Die Loop Box ist ein zusätzliches autarkes System, das den Aktiv-Transponder aktiviert, aber keine Daten des Transponders verarbeitet. Stattdessen werden die Daten entweder direkt an ein weiteres Aktiv-Gerät (Active Extension oder USB Timing Box) übermittelt oder auf dem Transponder gespeichert.
In den folgenden Artikeln werden die USB Timing Box und die Active Extension als Hauptzeitmessgerät vereinheitlicht.
Ein-/Ausschalten der Loop Box
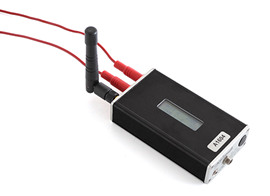
Um die Loop Box einzuschalten, drücken und halten Sie den schwarzen Funktionstaster, bis die rote LED im Display ausgeht und ein Startbildschirm mit Informationen zum Gerät angezeigt wird.
Die Loop Box schaltet sich auch automatisch ein, sobald Sie mit Strom versorgt wird. Die Box kann nicht ausgeschaltet werden, solange sie geladen wird.
Um die USB Timing Box auszuschalten, drücken Sie den Funktionstaster einmal, so dass die folgende Meldung erscheint:
| press again: OFF |
| hold for config |
Drücken Sie den Funktionstaster erneut, um die Box auszuschalten.
Hinweis: Wenn Sie keine Schleife angeschlossen und keine Detektion im Buffer haben, schaltet sich die Loop Box automatisch aus, wenn sie vom Strom genommen wird.
Stellen Sie sicher, dass die USB Timing Box vor dem Verstauen ausgeschaltet ist, um die Batterie nicht unnötig zu entladen.
Loop Box Einstellungen
Die Loop Box verfügt über die gleichen Einstellungen wie die Active Extension: Loop Power, Channel ID, Loop ID. Zusätzlich kann der Modus verändert werden.
Sie gelangen in das Menü, indem Sie den Taster für 2 Sekunden gedrückt halten. Die erste der vier Einstellungen beginnt zu blinken und kann nun durch ein kurzes Drücken des Tasters geändert werden. Drücken und halten Sie den Taster erneut für 2 Sekunden, um zur nächsten Einstellung zu gelangen. Um das Menü zu verlassen, halten Sie den Taster gedrückt, bis keine Einstellung mehr blinkt.
Im folgenden Beispiel wird die Loop ID geändert:
| Loop█ 1 020% < |
| CH# 8 Repeat |
Der blinkende schwarze Block zeigt Ihnen an, welche Einstellung Sie gerade ändern.
Loop Box Modes
Repeat Mode
In this mode, the Loop Box activates the transponder, receives its data and sends (repeats) it to a primary system.
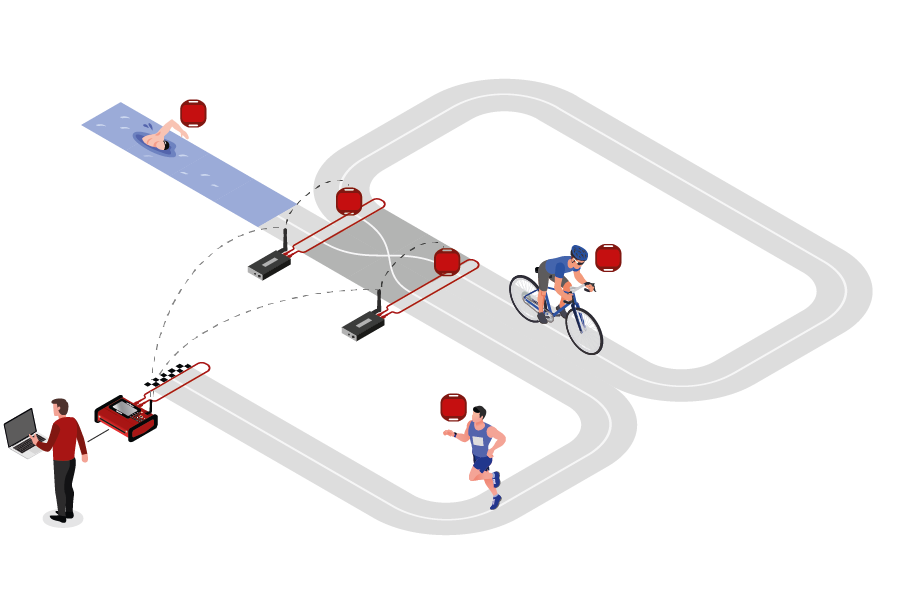
This is an easy way to connect several timing points within an area, e.g. a triathlon finish, transition in and transition out. The maximum distance between repeating / receiving devices can be up to 900m depending on conditions.
Note that the Loop Box has an internal buffer for 1000 detections. Even if the connection between Loop Box and the main loop is interrupted, the detections will not be lost: once the connection is recovered, the Loop Box will transmit the buffered detections. Thanks to the precise internal clock of the Loop Box, the detection time will still be correct and precise.
For the communication between devices when using Repeat Mode please note:
- Loop Box and the main loop need to run on the same channel (see Channel ID Setup). It is recommended that you select a fixed channel on the main decoder instead of using the auto mode.
- The main loop that will receive the detections from the Loop Box(es) must have Loop ID 1. This way the Loop Boxes know where to send the data even if several systems are present.
Impulse Mode
The Impulse Mode is the same as Repeat Mode, but the audio output will be used as impulse input that creates a fake detection.
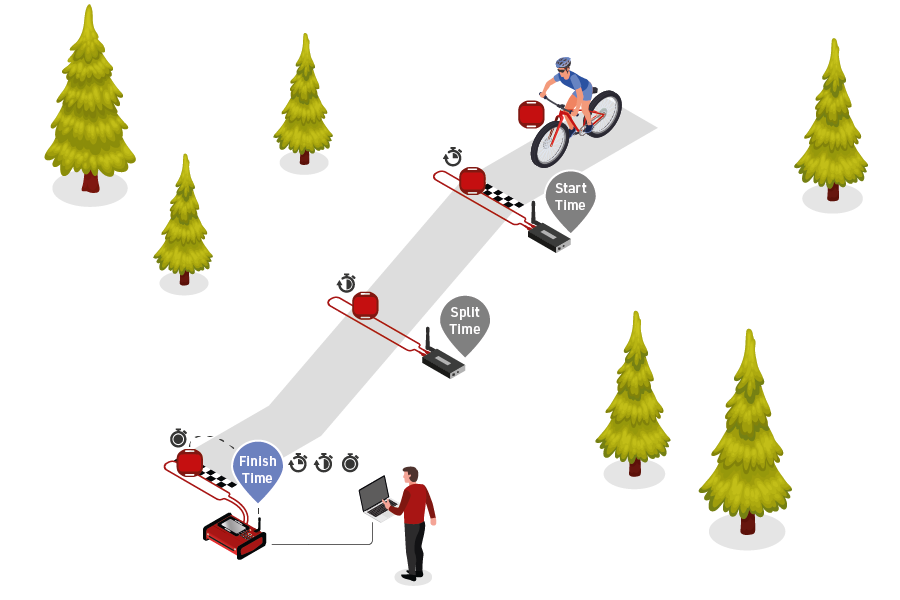
Store & Forward (FW2.6 and above)
This mode only works with the ActivePro and MotorKart transponders, V2 transponders may additionally return less accurate times.
In this mode, when the transponder is activated by the Loop Box, it will create a stored passing on the transponder and additionally send the passing to the device.
For each stored passing an internal timer on the transponder is started which can then later be converted in to a time, the stored passing maintains the loop information of the device which activated the transponder. The internal clock for each stored passing runs for a maximum of 24 hours (passings will be deleted afterwards) and a maximum of 64 passings can be saved.
When the transponder is activated by another active system which is not in Store & Forward or Store mode then the transponder will transmit not only the new passing but also all stored passings.
For the forwarded passing to be received you will need to follow the same guidelines for comunication as per Repeat mode.
For example for a MTB downhill race, a Loop Box at the start and split could create stored passings on the transponder, and at the finish three detections will be received (start, split and finish).
Should the start or split Loop Boxes be in range of the inish, then these will be received immediately. If, however, the connection drops out during the race, passings will still be stored on the transponder and will then be received at the finish.
When using Store & Forward mode, if you receive both the forwarded passing and the stored passing then the Active system may not store two records in the passings file. For every incoming passing the system checks within the most recent 1,000 passings if it received another passing with the same Wake Up Count. If so, then the later one will be ignored as it is considered a duplicate.
Additionally note that the forwarded passing may have lower accuracy than the stored passing or regular Repeat mode, as the internal calculation and communication prioritises the stored passing.
Store Mode (FW2.5 and below)
Similar to Store & Forward mode, transponders will create a stored passing which can be read out at a later time.
With Store mode on Firmware 2.5 or earlier the passing is not additionally forwarded to the device, only the stored passing is generated.
Loop Box Time
Note that the Loop Box and the ActivePro/MotorKart transponder do have an internal clock, but do not need to have the current time of day. They simply tell the main loop how much time has elapsed since the detection occurred. The main loop will then calculate the detection time by subtracting this offset from its current time.
Loop Box Detektionen mit RACE RESULT 12 verarbeiten
Wenn Sie eine oder mehrere Loop Boxen verwenden, werden deren Detektionen über die Basis (Loop ID 1) eines Ubidium, eines RACE RESULT Systems mit Active Extension oder einer USB Timing Box empfangen und im Timing Tab auch über diese eine Verbindung in RACE RESULT 12.
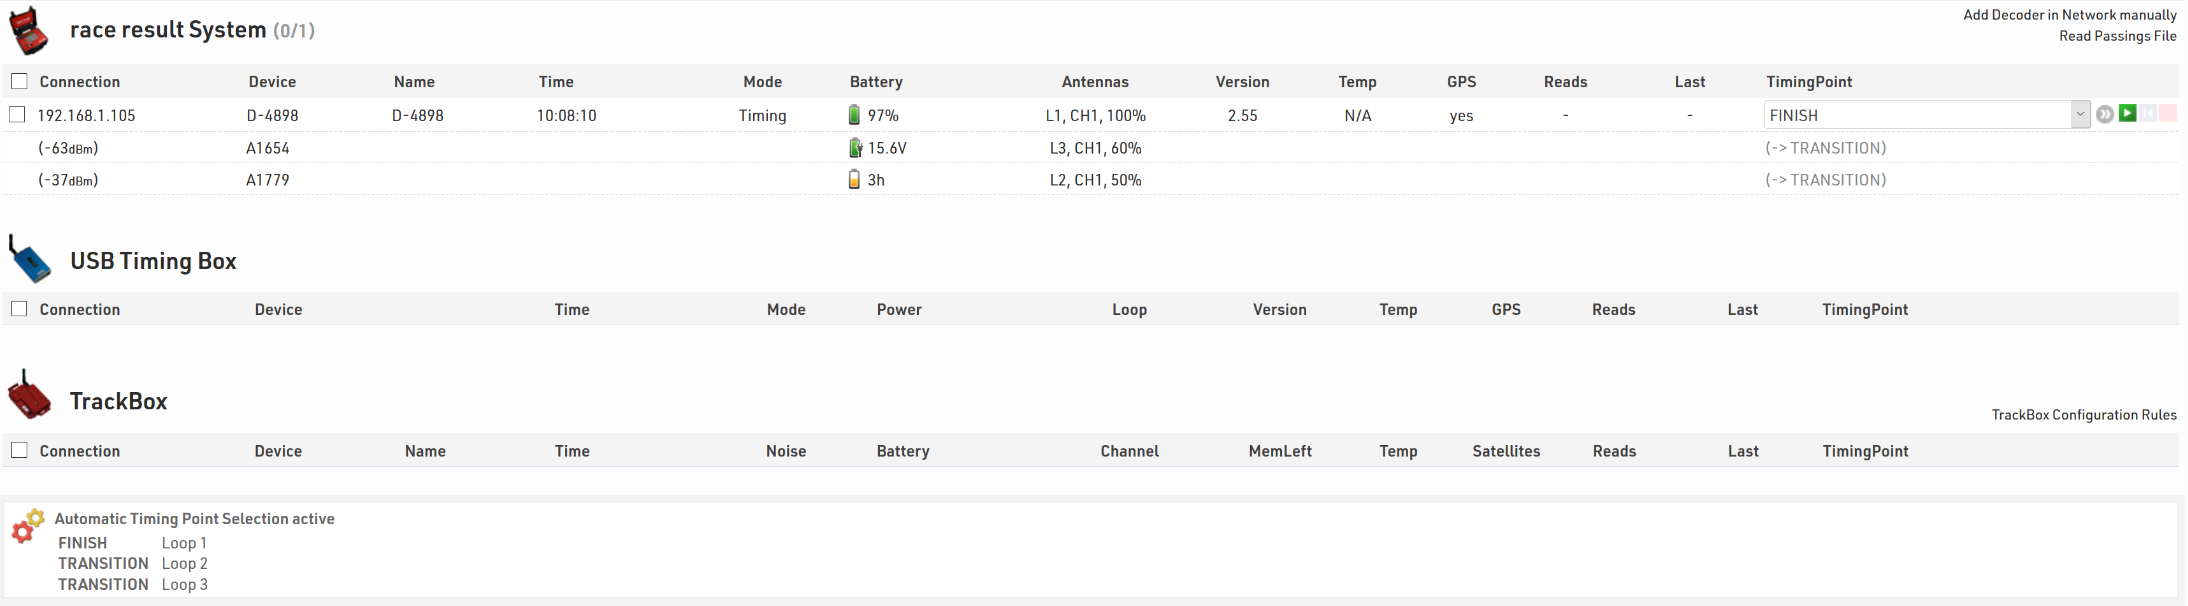
Um Detektionen mehrerer Schleifen einer bestimmten Messstelle zuzuordnen, gehen Sie in Ihrer Veranstaltungsdatei auf Timing->Messstellen und verwenden die Automatische Messstellen-Zuordnung. Die nachfolgenden Screenshots zeigen den typischen Aufbau eines Triathlons, bei dem das Hauptmesssystem mit Loop ID 1 (Base) am Ziel steht, und zwei Loop Boxen am Ein-/Ausgang der Wechselzone auf Loop IDs 2 & 3 verwendet werden.
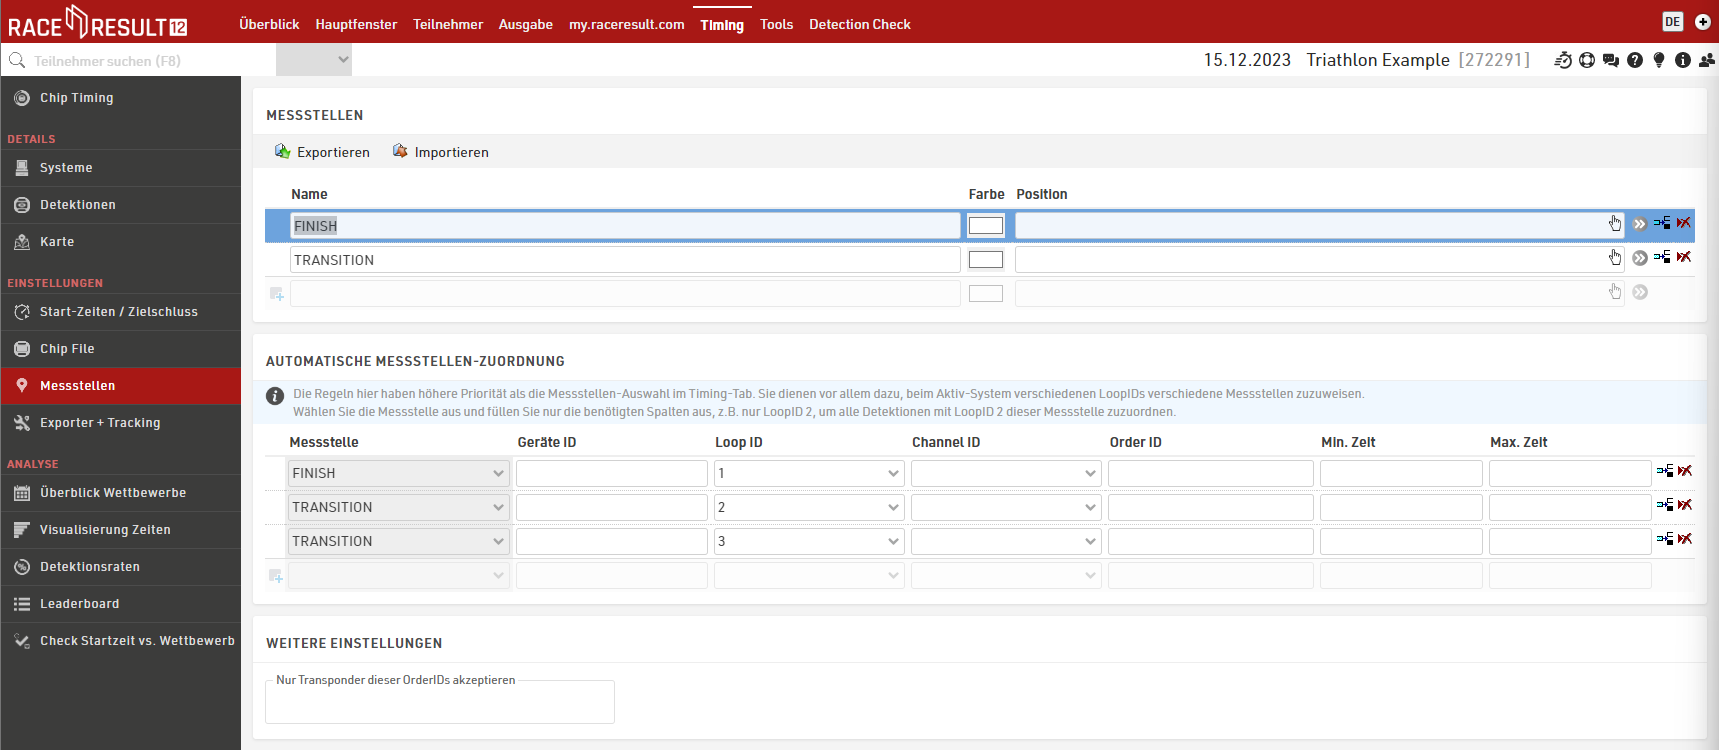
Unter Chip Timing und Systeme sehen Sie im Timing Tab, welche Loop Boxen im Repeat Mode mit einem Hauptmesssystem verbunden sind. Zudem wird die Signalstärke und der Batteriezustand angezeigt. Ganz rechts zeigt RACE RESULT 12 die Messstelle, in die über diese Loop Box generierte Daten geschrieben werden, sofern eine automatische Messstellen-Zuordnung für diese Channel/Loop ID hinterlegt ist. Beachten Sie, dass Sie für das Hauptmesssystem nichts zwangsläufig eine Messstelle hinterlegen müssen, da die Regeln aus der automatischen Messstellen-Zuordnung Priorität gegenüber der Messstelle aus dem Dropdown haben.
Hier ist eine Tabelle mit ungefähren Werten für die angezeigte Signalstärke:
| Signalstärke | Wert |
| Perfekt (kann kaum besser sein) | über -65 dBm |
| OK (Sie müssen sich keine Sorgen machen) | -75 dBm ... -65 dBm |
| Könnte besser sein (prüfen Sie, warum die Verbindung nicht optimal ist) | -85 dBm ... -75 dBm |
| Schlechte Verbindung (unbedingt prüfen und verbessern) | unter -85 dBm |