Local 10K - Splits
Event Splits Setup
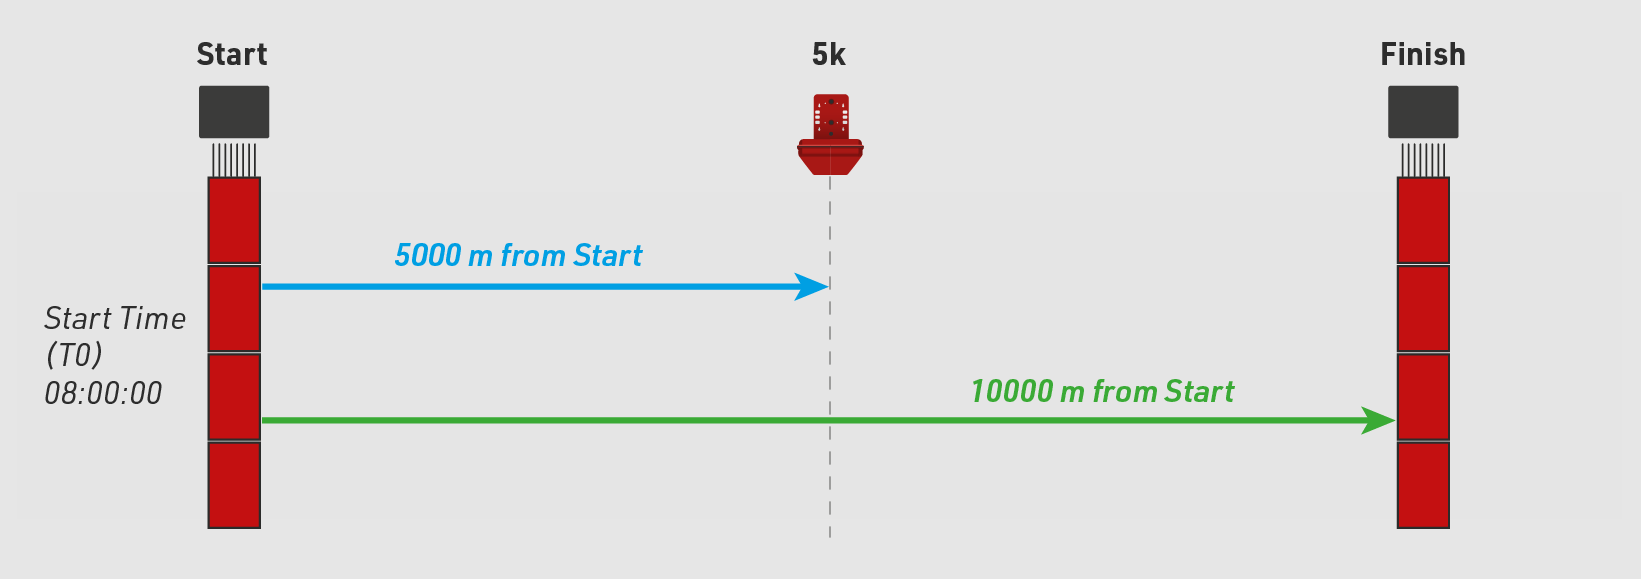
This event is a 10 km running event over a point-to-point course. We have a start line, 5K split point, and separate finish line.
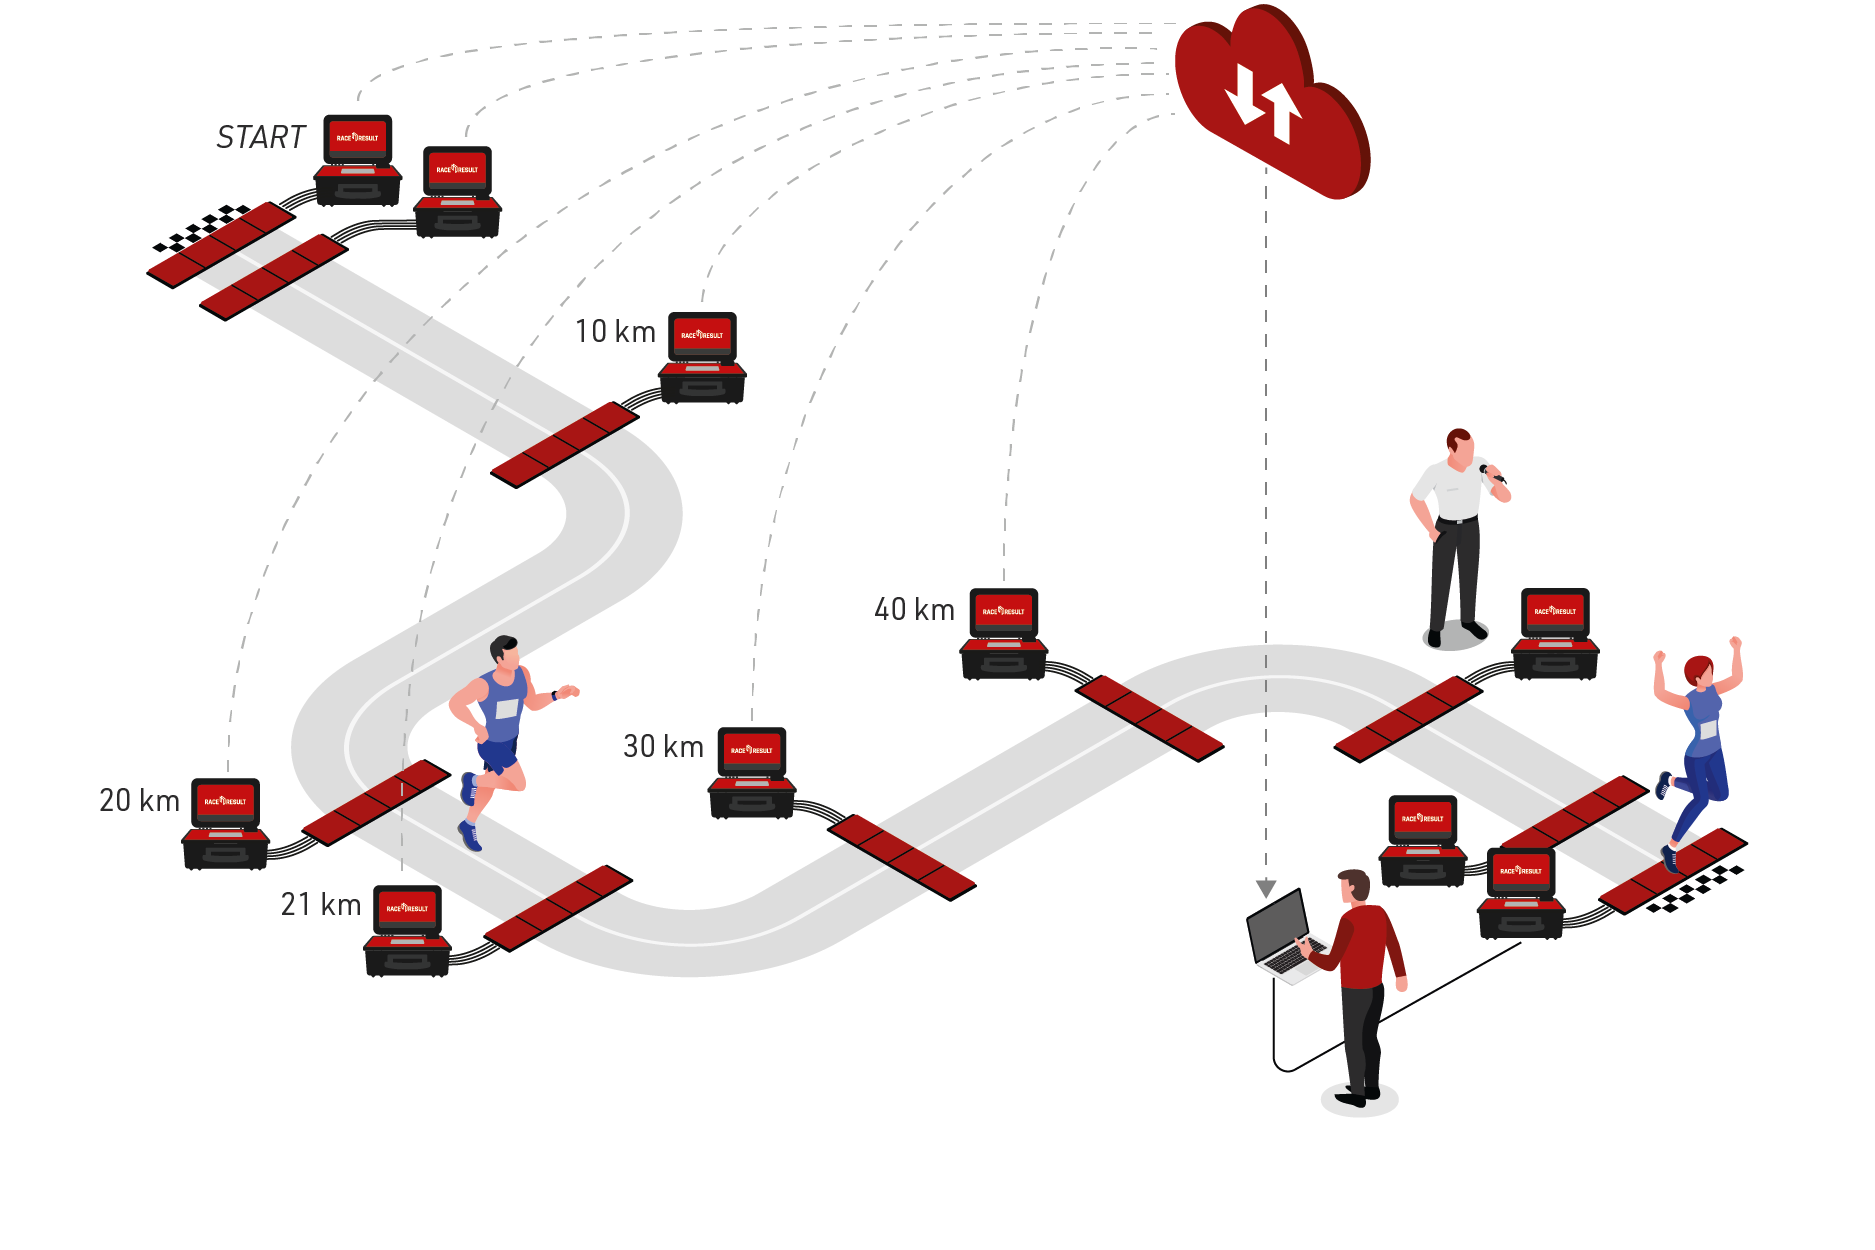
The diagram below represents the setup of the event and will be referenced throughout setting up the Splits within RACE RESULT 12.
Timing Points & Timing System Connections
Labeling Timing Points
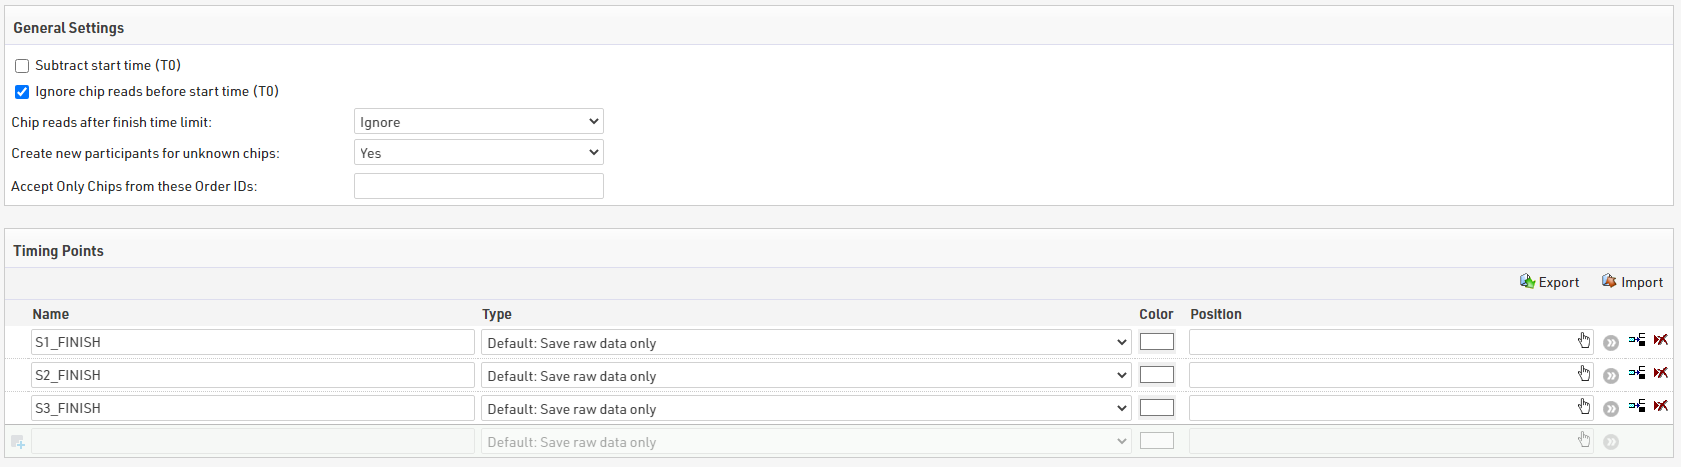
A Timing Point defines a physical location at which chip times are recorded.
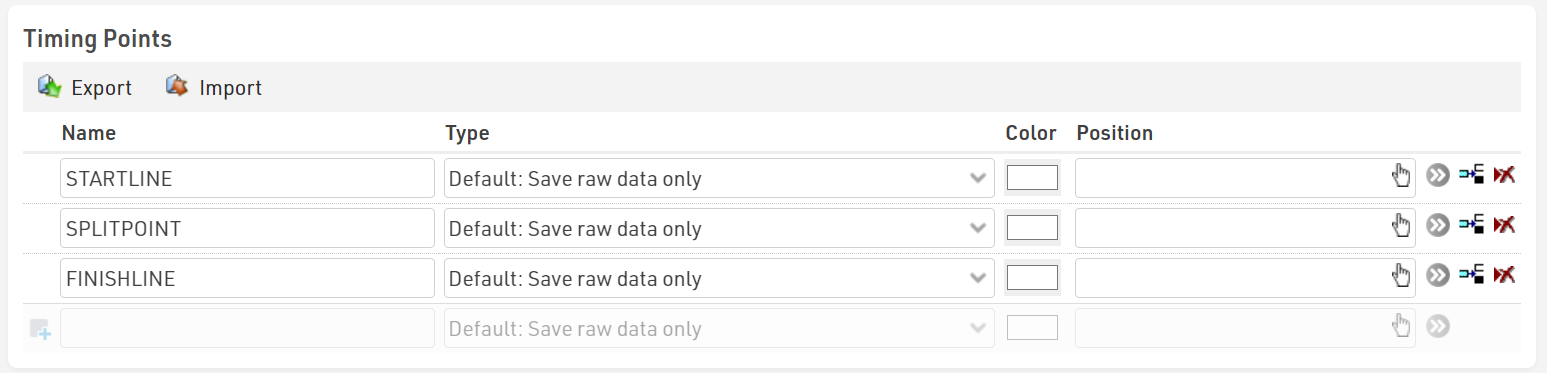
In this example, we are using three Timing Points, one for each timing location on the course, these are defined as STARTLINE, SPLITPOINT, and FINISHLINE.
All three Timing Points are configured in RACE RESULT 12, in particular note that all Timing Points are using the type of Default: Save raw data only. Splits will only work with Raw Data.
Connecting Timing Systems to Timing Points
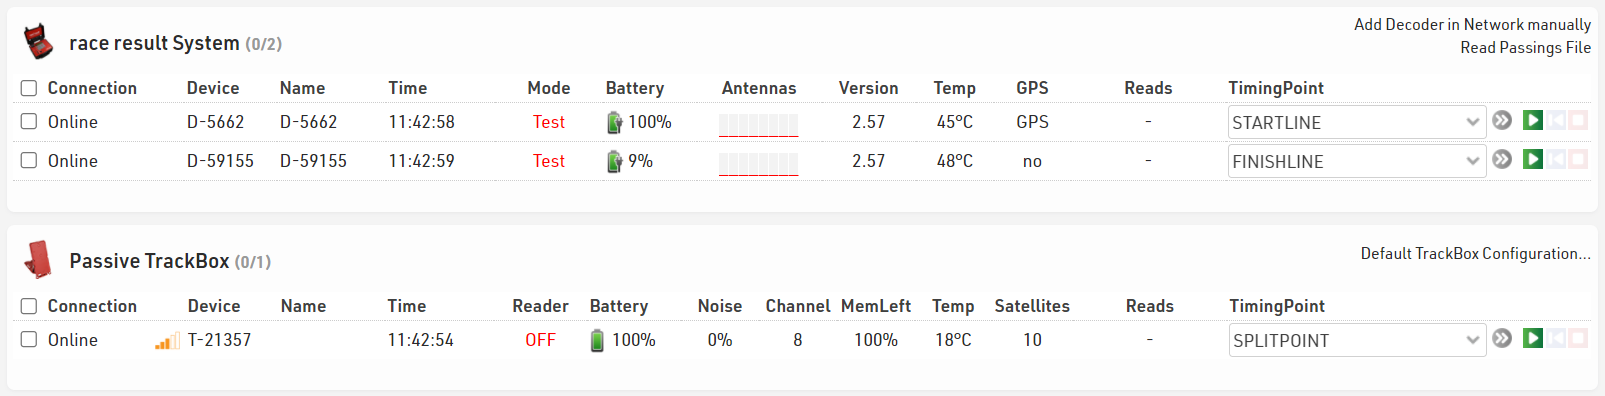
When connecting your timing systems to RACE RESULT 12 in the Timing Tab, it is important to assign each decoder to the correct Timing Point.
Later in our Splits setup, we will assign these timing points to various splits on the course. Below you can see we have three systems connected. There are two decoders, one for the Start line and one for the Finish line. We also have one Passive Track Box as our 5k split.
Splits Setup
What information is needed to calculate a Split?
Each Split point relies on three bits of information, Name, Timing Point, and a minimum valid time. The minimum valid time is calculated using either a minimum time or by using distance with a speed/pace. Together these bits of information help the software determine if a chip read is valid for each specified split on the course. You can also reference General Splits Setup for more information on Splits.
- The Name of a Split should be something that describes a location on the course without making the name too long or complicated.
- The Timing Point tells the software which raw data to use for the split.
- The Type of Sport is only necessary for defining the start of a race. When using This is the Start, the last chip read will be taken and defines the Split to be used to calculate Chip Time. When using one of the available sport types, the first read will be taken. Sport type will also provide a recommended speed or pace to use for easy setup.
- Distance is defined from a previous point on the course. For the start of a race, this will be a distance of 0. Further Splits can be defined either from the start or from any previous split.
- Pace/Speed/Time is where you define the minimum or maximum time a participant can complete the specified split.
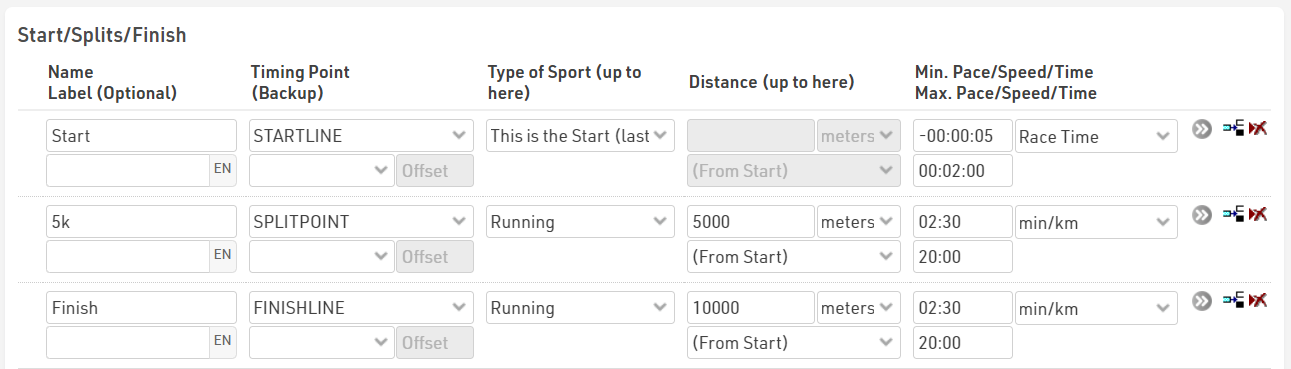
This file again has 3 Splits setup, one for each of the 3 Timing Point locations on the course.
Start Split
This first row defines the start of the race where we want to collect the last chip read for each participant as they leave the start line. This is also known as the Chip Start if you are scoring based on Chip Time. The reason we want the last chip read here is that participants who are standing on the start line will receive several chip reads before the race starts. Most of these will be ignored because they are before T0 but some participants will still get multiple reads after T0 because they are moving slowly at the start of the race. The last read is the most accurate read as a participant leaves the start line.
- We set the name to Start since this is the start of the race. This is shown on the course map as the first decoder labeled Start.
- We set the Timing Point to STARTLINE.
- Since this is the start, we set the type to This Is the Start (last read).
- Since this is the start of the race, there is no distance up to here. This option is greyed out.
- We are using Race Time which is the time from the Start Time (T0). We set a min time of negative 5 seconds and a maximum time of 2 minutes. This defines a start range of 2 minutes from T0. Any participant starting after 2 minutes will not get a start time. If it is going to take more than 2 minutes for everyone to cross the start line, this value should be increased.

Here we can see a breakdown of the above Start split. This shows us the time range in which a chip read is valid for this split point. For a detailed explanation of how this information reflects a participant's results, please see Participant Splits & Troubleshooting.
| Time of Day | Race Time | |
| Min | 07:59:55 | -00:00:05 |
| Max | 08:02:00 |
00:02:00 |
5k Split
The next row defines our 5k split point where we want to collect the first read as each participant passes this location on course.
- Split name is 5k.
- We set the Timing Point to SPLITPOINT.
- The type of sport should be set to the type of sport you are timing, this event is a running event.
- We set the distance to 5000 meters and then define this as the distance (From Start). We can see this represented on the course map by the blue line.
- By default when selecting running as the Type of Sport this is set to use pace (min/km or min/mile according to your event file's units or measurement), here we are using min/km with a minimum (fastest) pace of 2:30/km and maximum (slowest) pace of 20:00/km. When using a speed/pace with distance, the valid time window will be calculated relative to the previous split.

Here we can see a breakdown of the above 5k split. This shows us the time range in which a chip read is valid for this split point.
| Pace | Race Time From Previous Split | |
|---|---|---|
| Min | 2:30 min/km | 00:12:30 |
| Max | 20:00 min/km |
01:40:00 |
Finish Split
The last row defines our finish split where we want to take the first read as each participant crosses the finish line decoder.
- Split name is Finish.
- The Timing Point is set to FINISHLINE.
- We set the type of sport to Running.
- Distance is set to 10000 meters and defined as (From Start). We can see this represented on the course map by the green line.
- We are again using the default pace settings according to the type of sport.

Here we can see a breakdown of the above Finish split. This shows us the time range in which a chip read is valid for this split point.
| Pace | Race Time Relative To Previous Split | |
|---|---|---|
| Min | 2:30 min/km | 00:12:30 |
| Max | 20:00 min/km |
01:40:00 |
Final Splits Setup
Now that we have looked at each individual split this is what the entire Splits setup will look like.
Participant Splits Troubleshooting
Now that we have our Splits setup, we will look at a few participant examples. We will look at why some participants might have times, while others do not. For all examples, we will assume an 08:00:00 start time. The course map at the beginning of this section can be used for reference.
5k Split Analysis
First, let us take a detailed look at the below 5k split. At a minimum pace of 2 minutes and 30 seconds per kilometer, the fastest a runner can run and still get a valid 5k split is 12 minutes and 30 seconds. We know this because we can multiply a 2 minute and 30-second pace by the distance traveled which is 5 kilometers.
At a max pace of 20 minutes per kilometer, the slowest a runner can run and still get a valid 5k split is 1 hour and 40 minutes. We know this because we can multiply a 20 minute pace by the distance traveled which is 5 Kilometers.
Based on the Splits Setup we know a runner must pass this point on the course between 12 minutes 30 seconds and 1 hour, 40 minutes. We will need this information as we analyze each participant.
Finisher with full Splits
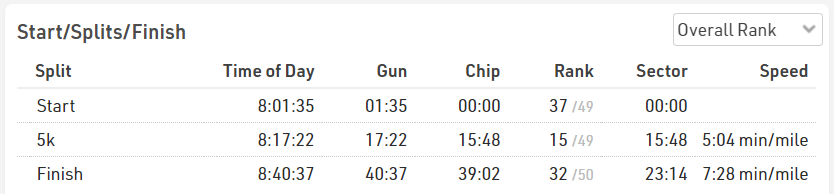
This shows what a normal participant who received all split times would look like. This information can be found by going to any participant's profile and navigating to their Results tab. Here we can see this participant has a time for each of our three split points. We can see both their chip time and gun time are within the range we calculated above. We can also see the pace is within the specified range.
Finisher with missing 5k split
This example shows a participant who is missing the 5k split time, but why?
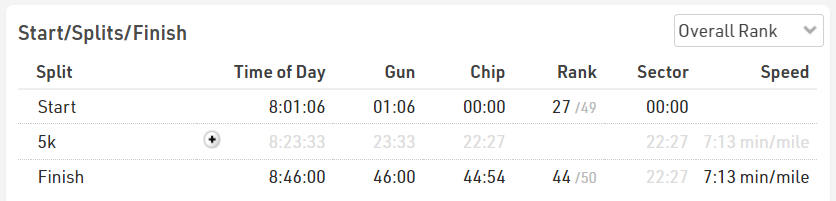
Looking at this participant's Timing Raw Data, we see there is a chip read at the SPLITPOINT Timing Point but there is no calculated Split value in the Split column.
Since we know the race started at 08:00:00 and we can see the chip read at the SPLITPOINT Timing Point is at 08:12:00 we can calculate this runner ran 5 kilometers in 12 minutes. This is equal to a 2 minute and 24 second pace. This is faster than what we allowed for in our Splits set up so this chip read is ignored and not used to calculate the 5K split.

Missing Start split
Our third example is of a participant who is missing their start time. If we take a look at this participant's Splits we see there is no Start split.
In the participant's Timing Raw Data we can see they do have a STARTLINE chip read but in the Split column, there is no Start split.

If we take a closer look at the STARTLINE timing point we can see the Time is 08:02:10.0. Our Start Split point has a maximum limit of 2 minutes race time. This time is not within this limit which was calculated as 08:02:00 so this participant's chip read does not count for the Start split.
International Marathon
Event File
Participant times are recorded at the start, 10km split, 20km split, 21.1km split, 30km split, 40km split and finish. We also included an ‘announcer’ system, so we know who is about to cross the finish line.
Preparing the Event File
- Download a copy of the marathon event file.
- Define the event settings (date, location, time zone)
- Import the participants
T0 Start Time
In this example we included an Additional Text Field ‘Wave’. It is used to show participants what wave they will start in depending on their time objective and set their T0 start time.
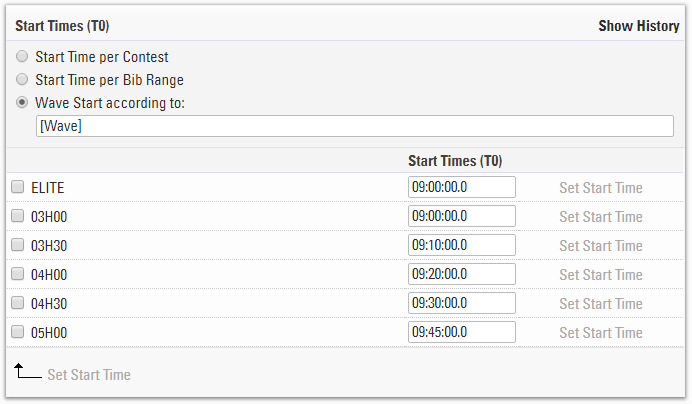
We set the Start Time (T0) by Wave Start according to the ATF [Wave]. This will enable us to enter in the start times for each wave.
Splits Setup
Time mode is set to score by Gun Time, which is according to their starting wave.
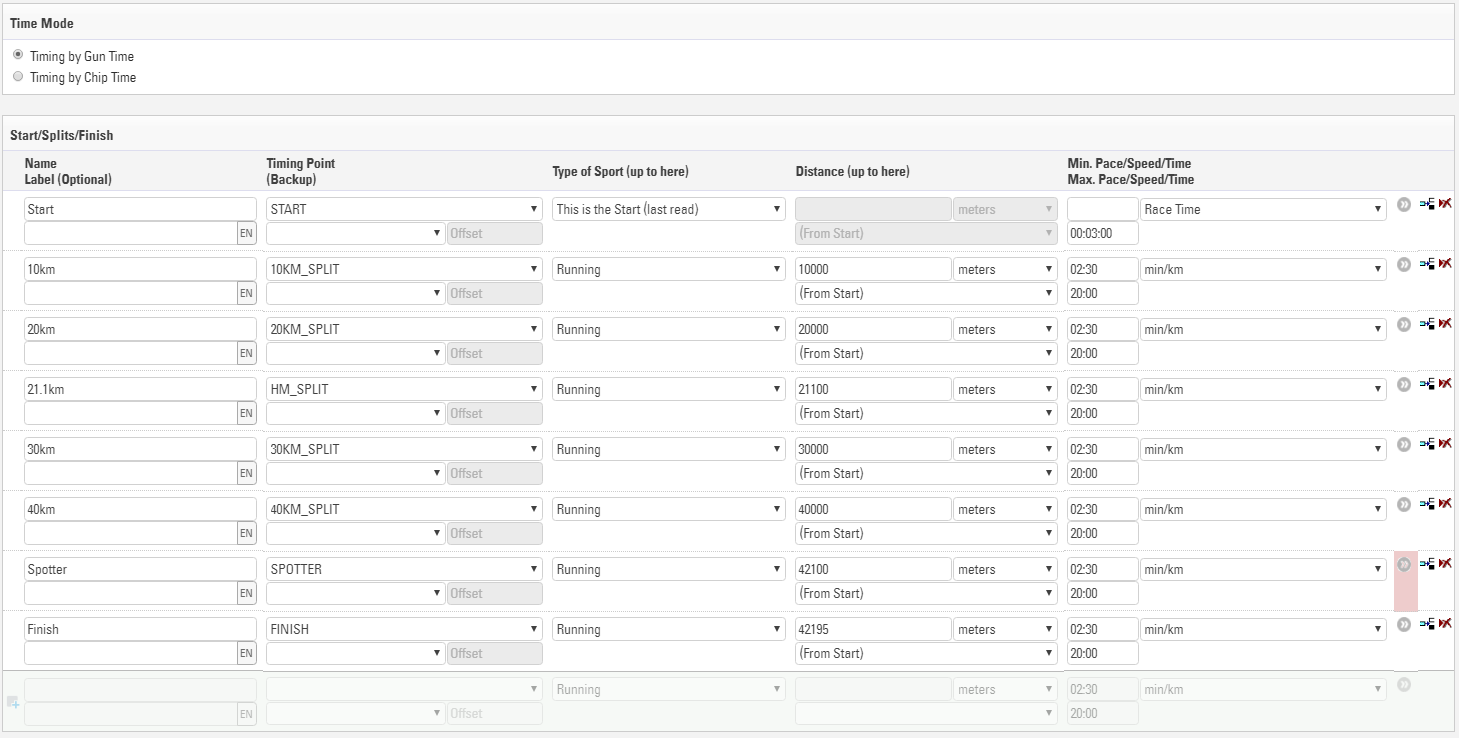
The spotter is set to an Internal so that this will not be published in the online leaderboards.
Legs are setup below, we have a leg defined for each half of the race.

Estimated Finish Time Calculation
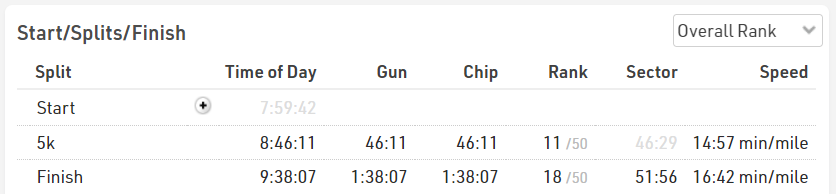
Belinda Ward just crossed the 30km mark and we want to know what time she is expected to finish
Splits automatically provide predicted times for any Splits which haven't recorded a time. This is based on the participants current average pace, the sector distance and the sector minimum pace / time or maximum speed.
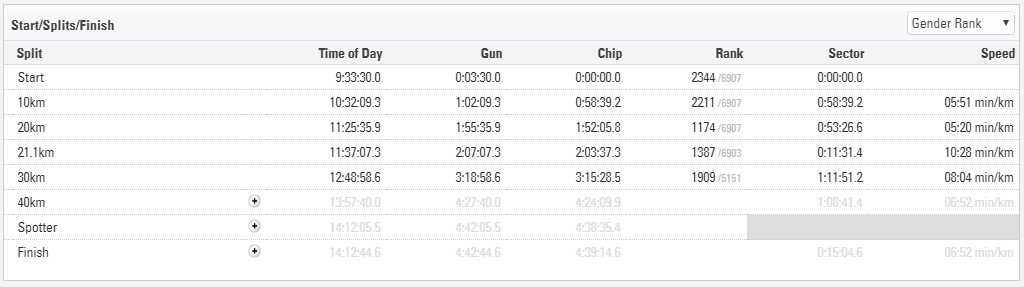
Predicted times are shown greyed out, but can be inserted as manual times by clicking the plus icon if needed. This can be accessed in an output list with [Finish.Predicted]
Speed and Pace Calculation
Each type of sport included with Splits has a default unit for speed or pace, this may also vary depending on region according to the normal unit for speed, this unit can also be edited for each split individually.
To call the speed or pace for a split simply use [SplitName.SpeedOrPace], in our Live list we use this with the selector to return their current pace, this also returns the unit as text.
{Selector}.SpeedOrPace
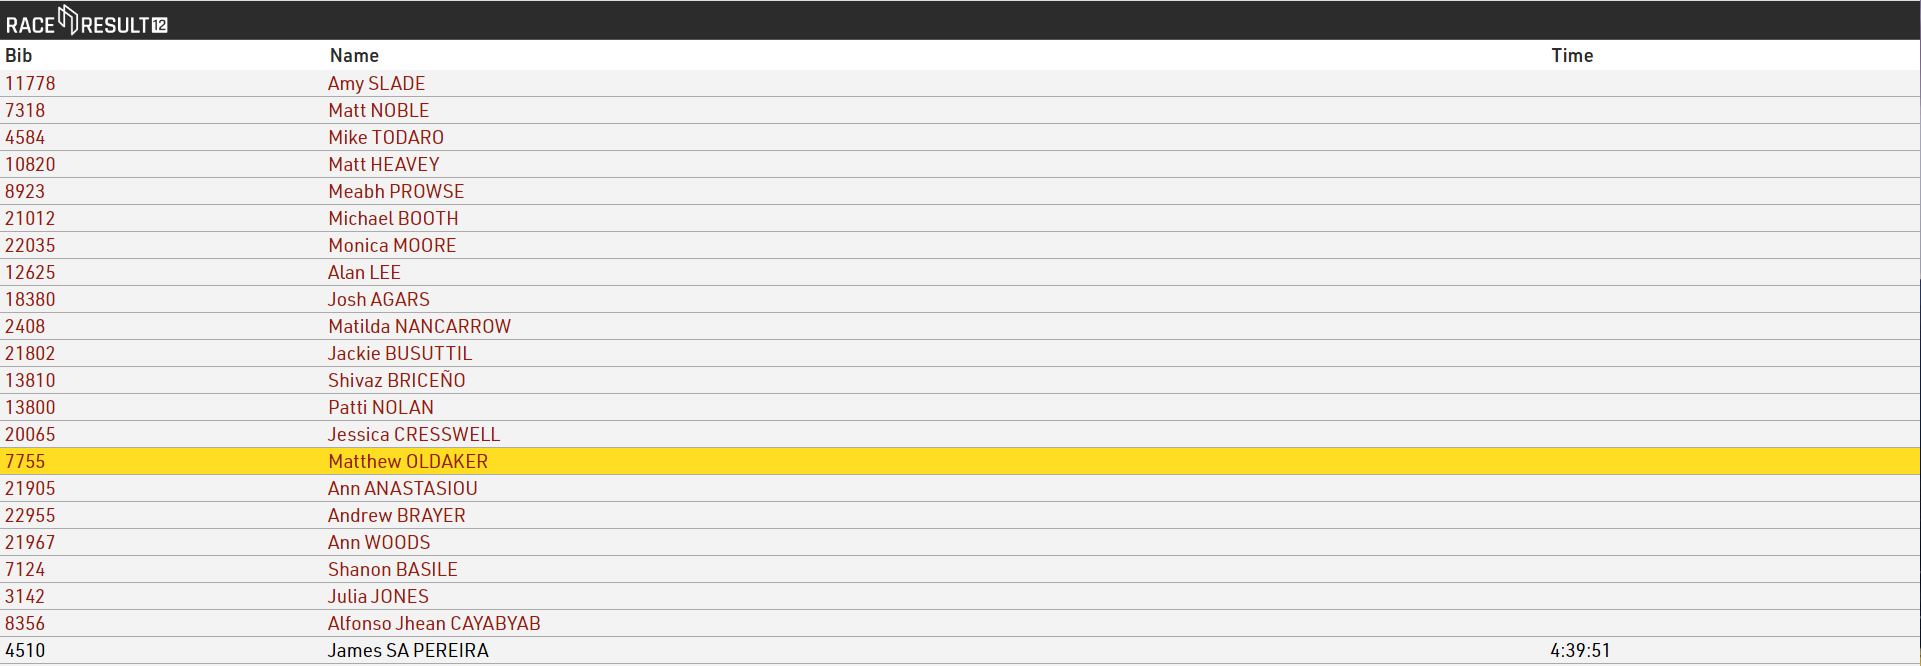
Announcer List
We want to enable the announcer to follow the race and to be able to know which participant is going to cross the line next.
The Live Finish Line list is sorted by [Spotter.TOD] the time of day that the participant crosses the spotter system and we sort it in reverse order to show the last at the top.
We can format the output list to show participants who have crossed the spotter but not yet crossed the finish line in a different colour using dynamic formatting. Participants will be shown in red when they are approaching the finish and turn black when finished.
The Present Results tool will display the results automatically in real time. Perfect for the announcer at the finish line.
Dyamic Formatting
If [Finished] is true then use color rgb color 0,0,0 (black), otherwise us rgb color 157,25,13 (red).
if([Finished];"C(0,0,0)";"C(157,25,13)")
Read more about the Dynamic Formatting options.

Online Result Output
- Live shows what location and time the participant was last seen, current net time, expected finish time of day and expected net time.
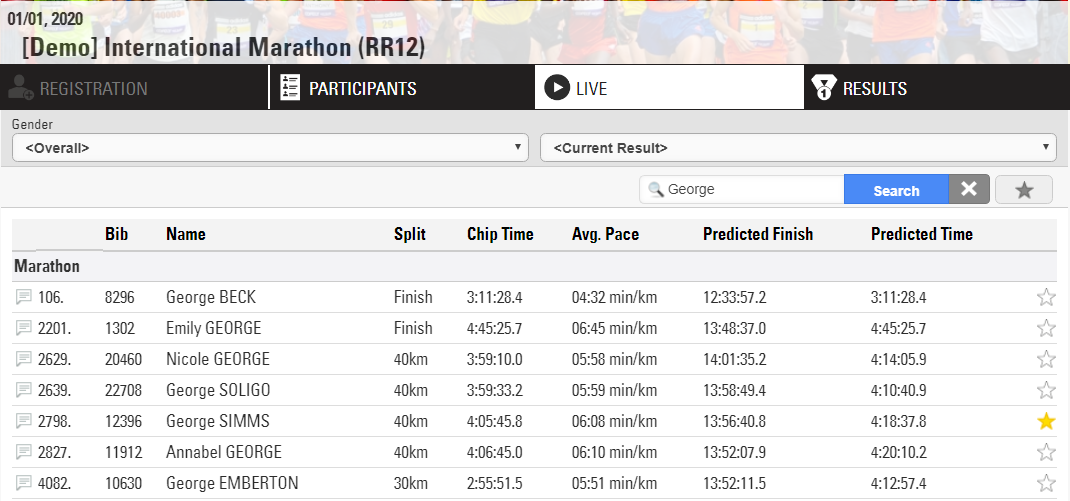
e.g. George Simms has passed the 40km in a current time of 4:05:45, at this pace he is expected to finish at 1:56pm with an expected net time of 4:18:37
Users can search for runners by name, bib, club, etc and can be marked as a favourite for one or multiple friends competing in the race
-
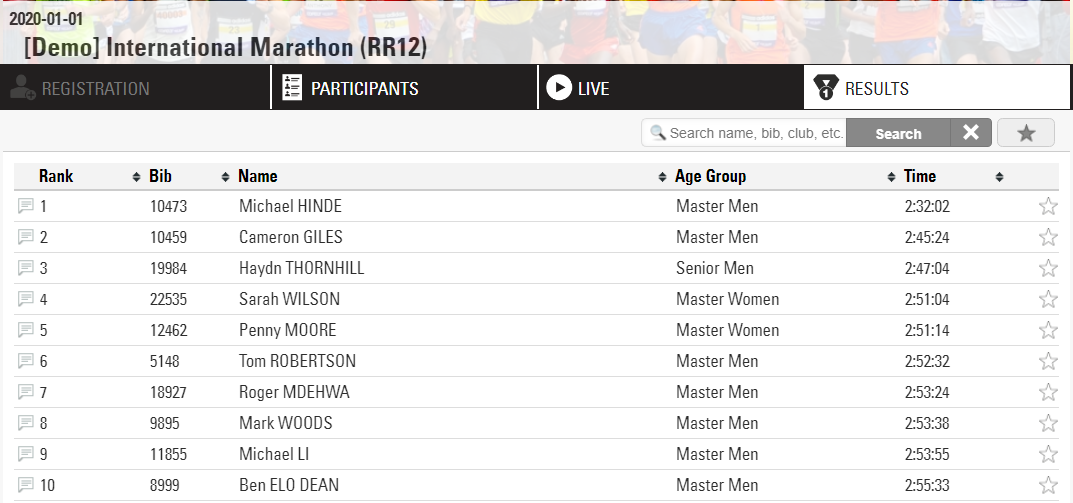
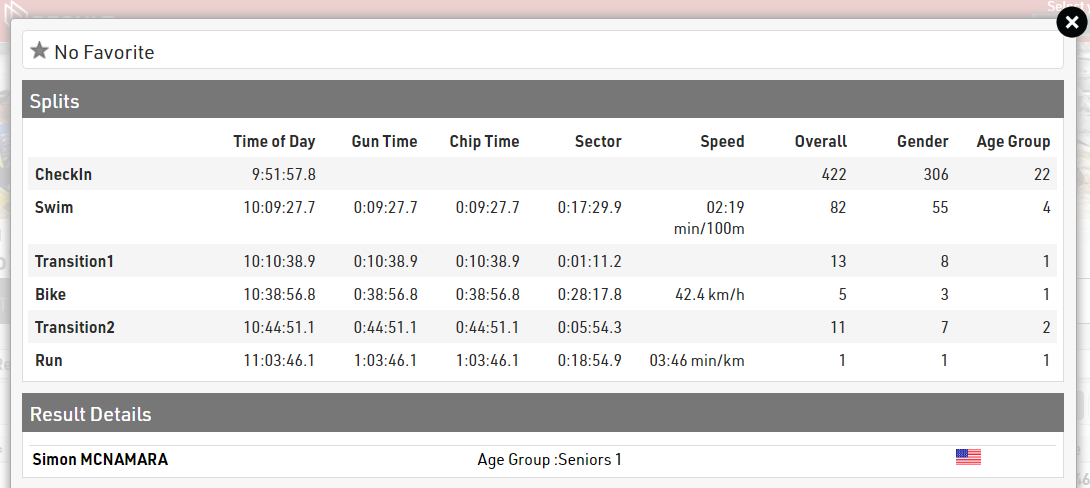
Results shows the rank, bib, name, age group and overall finish time.
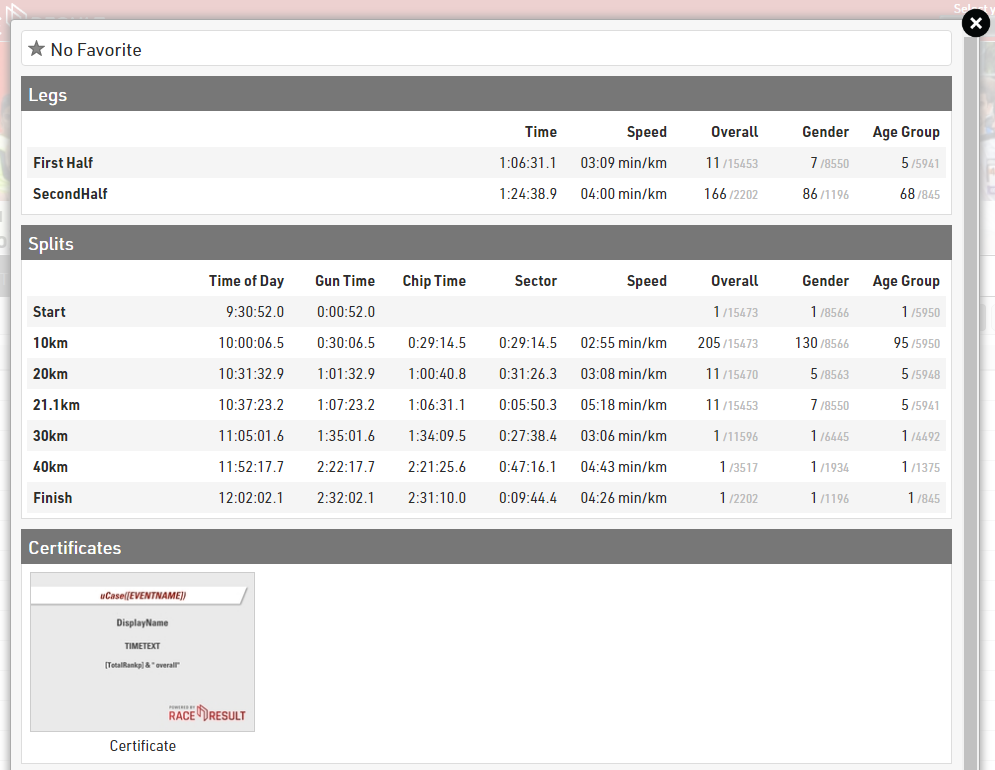
Selecting a specific runner displays an in-depth look at their run over the course with split times, age group rank, speed and pace.
Additional Tools
RACE RESULT 12 has a collection of tools to assist the in the presentation and analysis of results. Consider using Contest Overview, Present Results or Time Visulalisation at your next event.
Series Scoring
There are three ways how to score Series:
- All races of the series will be managed in one Event File. This is most feasible when the athletes keep their bib numbers for the entire series. The main advantage is that you can produce series results at any time, even while one race of the series is running.
The disadvantage is that you will have to set up separate Results, Rankings and Lists for each race of the series. This is similar to how a Stage Race would be setup.
- Alternatively, the event file can contain the result, relevant for the series scoring, from each race (like finish time or points) and is used for timing the current race at the same time. After each race, the finish times or points will be copied to a separate result, the file will be copied for the next race and the timing results will be deleted in the copy.
- The last alternative is to have one event file per race of the series and an additional event file for the series scoring into which the results of each race will be imported. Usually these races are completely independent. Athletes have different bib numbers per race. Often the races will even be organized by different race directors.
The sub-sections below give guides for options 2 and 3.
Series Scoring with One Event File per Race, Series Results in each File
In this case, the event file contains the points from each race of the series and does the timing for the current race. Set up the event file like this:
- The timing points do not require any special configuration. In this example there will be only one timing point for start+finish:

- Set up the results:
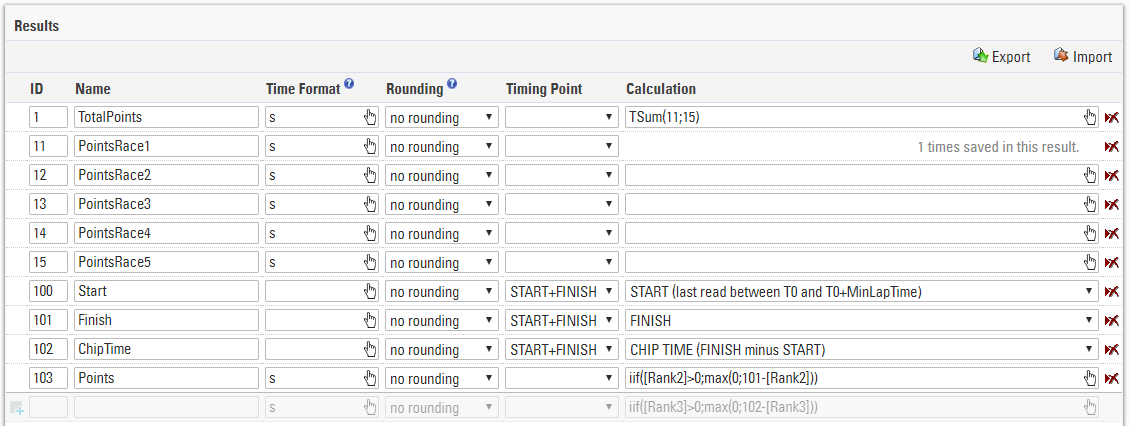
Results 100, 101, 102 are used to time the current race. Result 103 calculates points for the current race based on the rank for the race (rank2).
Results 11 to 15 save the points from each race and result 1 sums up the points. - The rankings could look like this:

Rank1 calculates the rank of the series, Rank2 calculates the rank for the current race.
After one race, proceed in the following steps:
- Write the points in one of the results 11 to 15 using a Data Manipulation, for example:
SET DecimalTime12 to [DecimalTime103] - Create a copy of the event file for the next race.
- Delete the Raw Data from the copy, but keep the points in results 11 to 15.
Series Scoring with One Event File per Race, Series Scoring in Separate File
In this example, there will be one event file used only for the scoring of the series.
The results in your series event file may look like the below example. The series score (Result ID 1) is the sum of points earned in each race. Results 11-15 are the individual point values for each race once imported.
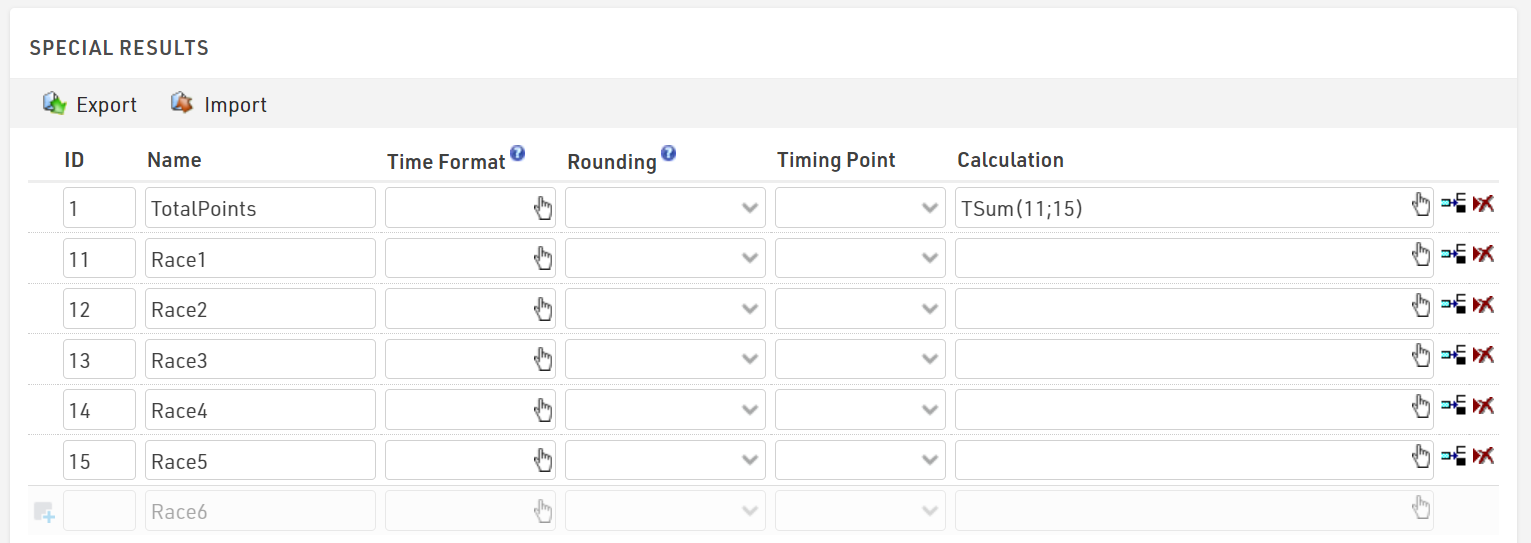
The results from each race can be imported via Participants⇒Import Participants⇒Import Event File (*.ses):
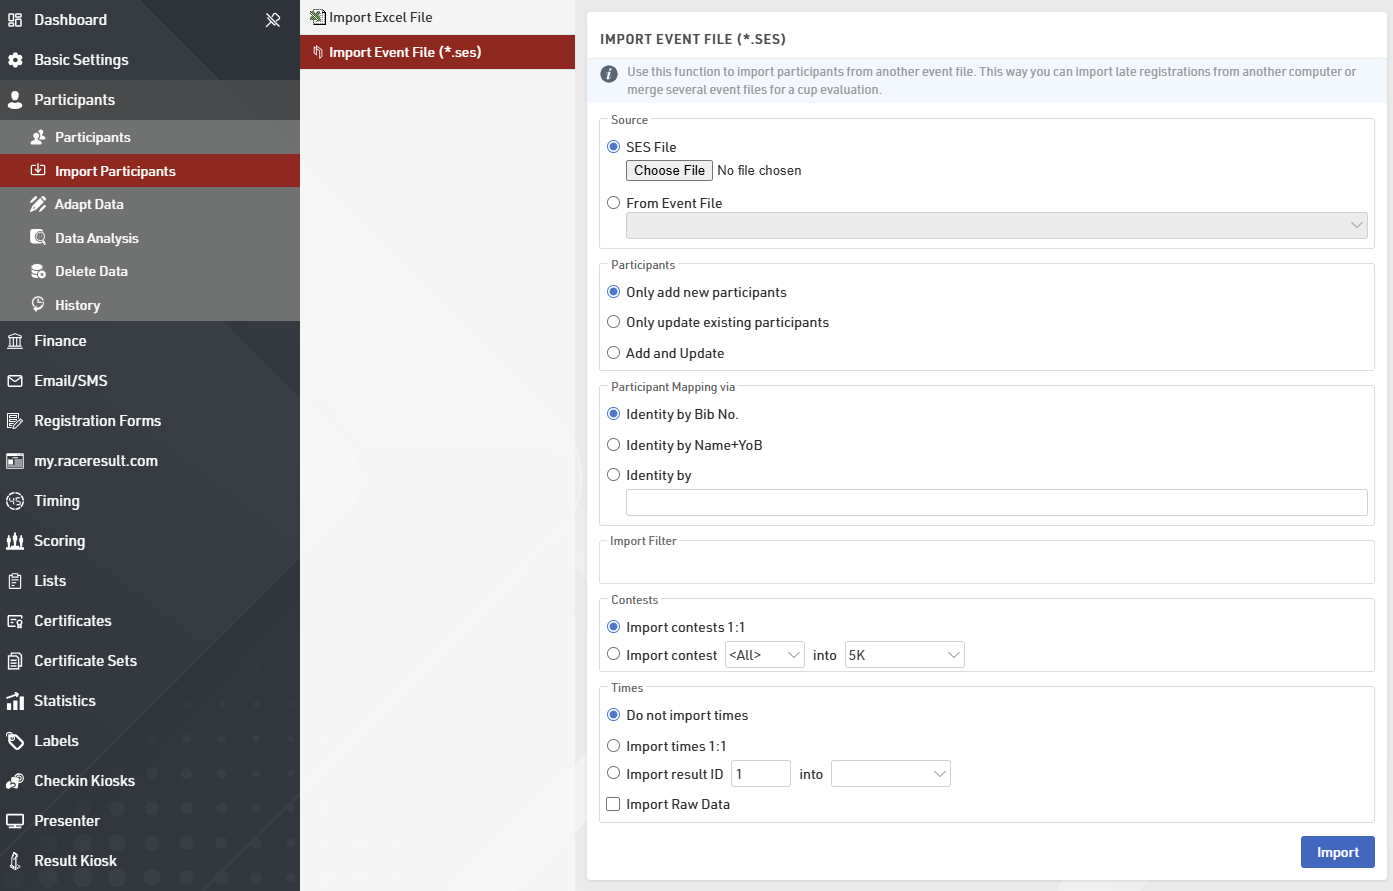
Select the file you wish to import and define the following settings:
- Define how it is decided if two participants are the same person. In most cases, it will be by name and year of birth. If, however, participants have the same bib throughout the series, choose Identity by Bib No.
- Optionally, enter a Filter to select the participants you would like to import.
- Decide how to handle contests. Either participant can be assigned to the same contest (ID) in the series file as in the source file, or if you decide to put the participants in a certain contest in the series file.
- Decide how to import times. In this example, you would calculate the points in each individual race file. When importing, you select the result that contains the points to be imported into one of the results 11 to 15 of the series file.
Make sure to run a Name Compare after the import to find participants with different spellings of their names. For a detailed explanation of the settings available when Importing Participants by Event File.
Event Series - Registration form, timing and results
This event is meant to be used for an Event Series, where registration, timing and result presentation are all in the same event. We will be focusing on the main features of the event file, which allows you to make the participant's experience unique.
In this example, we will build a Series with 4 events, which will take place the second Sunday of each month from April to July 2024.

Data Preparation
Event Attributes
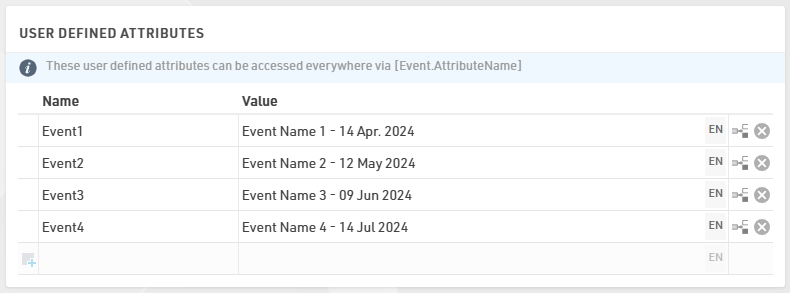
Having a Series, you are in the need of storing values for each event which have to be cross-linked to all participants no matter on which event they apply for.
Under Basic Settings > Event Settings > User Defined Attributes it is possible to store information which can be called in the Registration Forms, Output lists and Certificates later on.
Additional Fields
For the creation of the Registration Form and for assigning the right entry fee to each participant, we first need to create additional fields which will allow us to evaluate the participant's registration and calculate the proper entry fee.
Under Basic Settings > Participants Data > Additional Fields, we can create a group and store as many checkboxes as the number of events we have in our Event Series. The WholeSeries checkbox is to simplify the registration of a participant who wants to participate in all events, profiting of the special price for it.
The use of a checkbox is preferred due to the fact that only two choice are possible. A dropdown with a YES/NO menu could also do the job, but it would require more work on our side and more action from the participant when registering to the event.

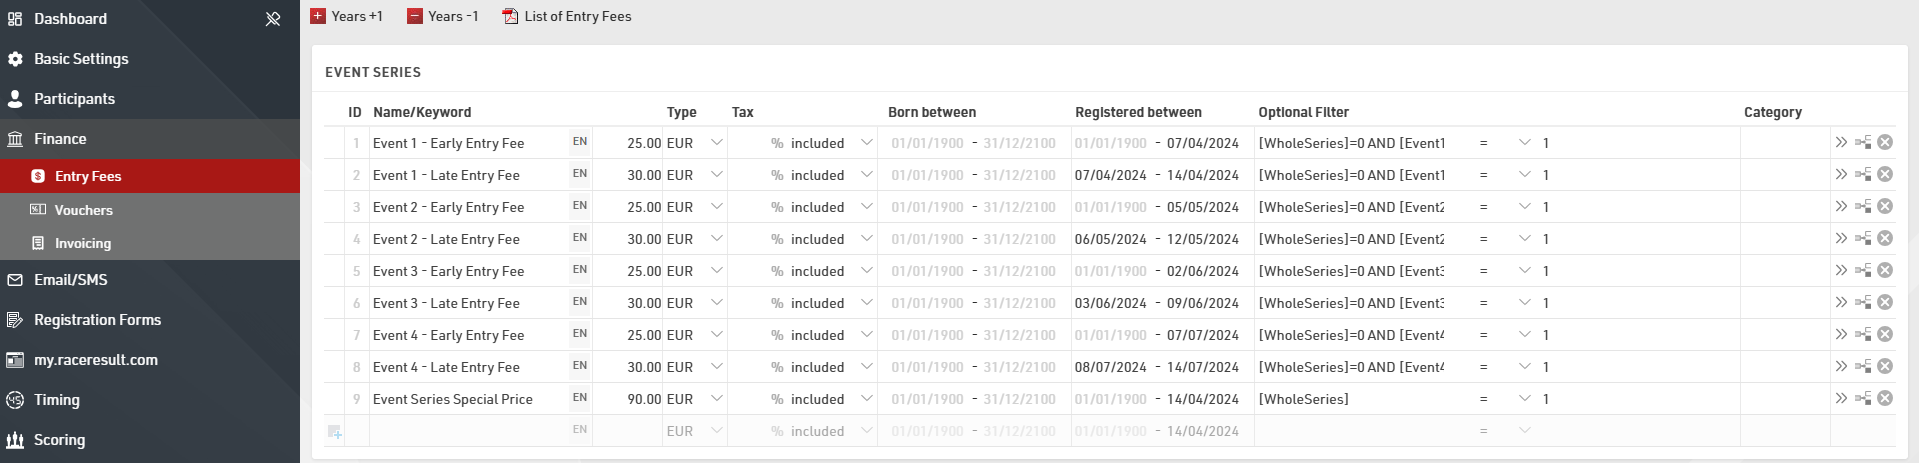
Entry Fees
In relation to the series, each event entails two fees - a discounted early fee applicable until one week before the race day and a late fee incurred for registrations made within seven days of the race.
To make this possible, we fill the "Registered between" date-span field accordingly to the fee and the event in account.
All fees will be applied based on a filter which looks if the [WholeSeries]/[EventX] checkboxes are ticked/unticked.
Registration
For this section, two steps are required:
- Create a Registration Form;
- Publish the form on my.raceresult platform, to let participants register to the Event Series.
Registration Form
In this example we decided to include, within the same step, the input fields for participants' data and address, an HTML table as a recap of all the entry fees available for the Series, and the Entry Fee Table summary which updates itself automatically based on the user's choices.
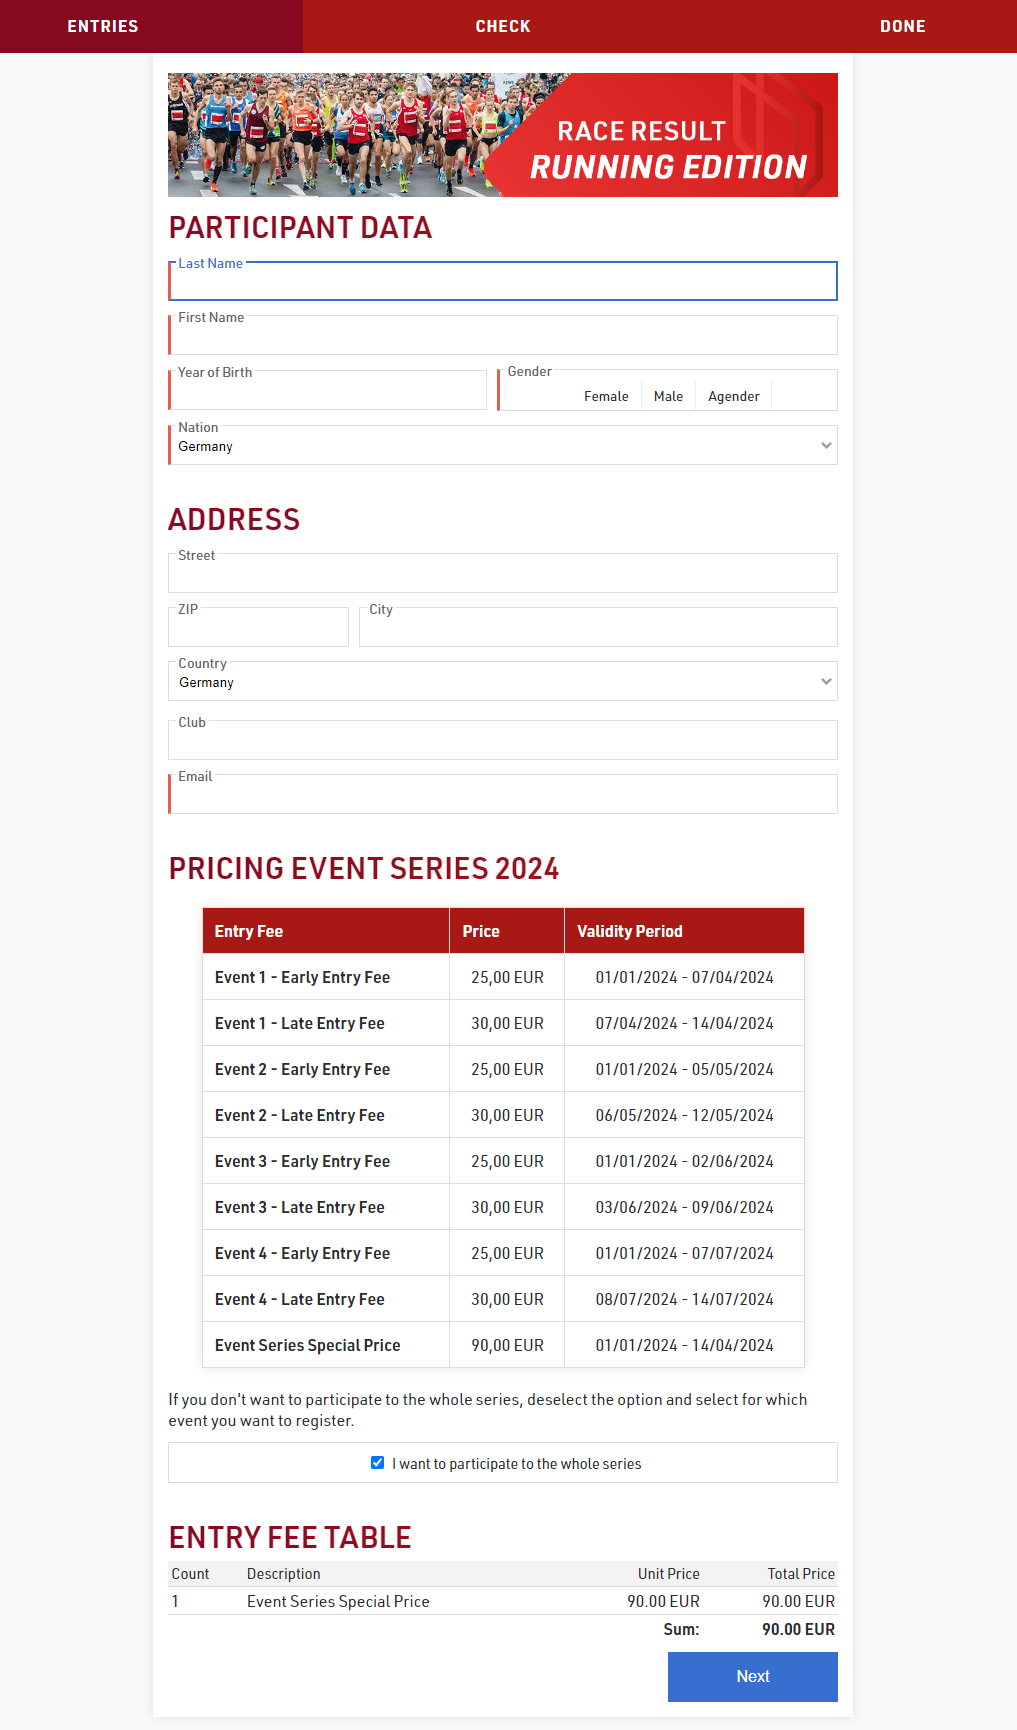
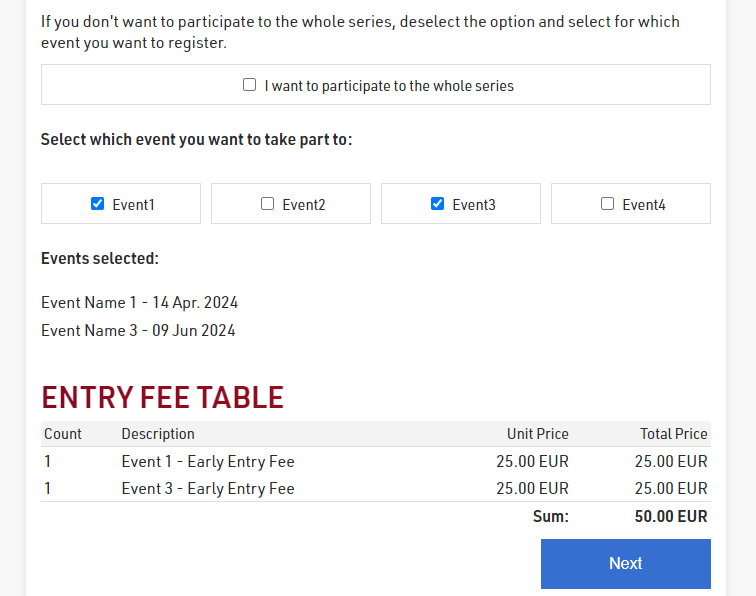
By default, the checkbox WholeSeries is ticked, but as soon as the participant unticks it, the 4 checkboxes created as Additional Fields will appear giving the participant the ability to select specific events one by one.
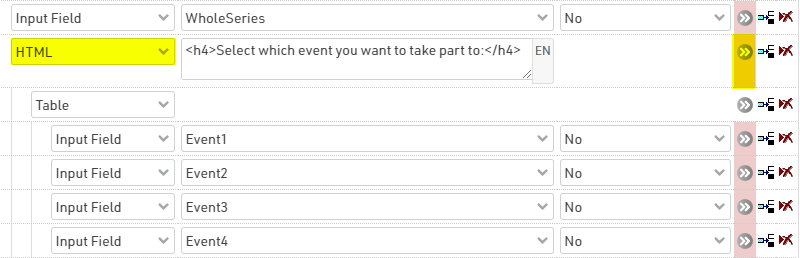
To display/hide fields based on other fields' value, you can use the advanced setting SHOW IF.
To avoid applying the show if to all elements, we have indented all the EventX fields under the parent element HTML highlighted, and applied to it the show if filter:

my.raceresult
For this step, we forward you to the relevant my.rr article, which describes all the steps for enabling the platform for the registration.
Timing and Scoring
For the timing of each event, we will use the same two devices, one for the start and one for the finish.
To define each time which device goes where, we create one single timing point for each event.
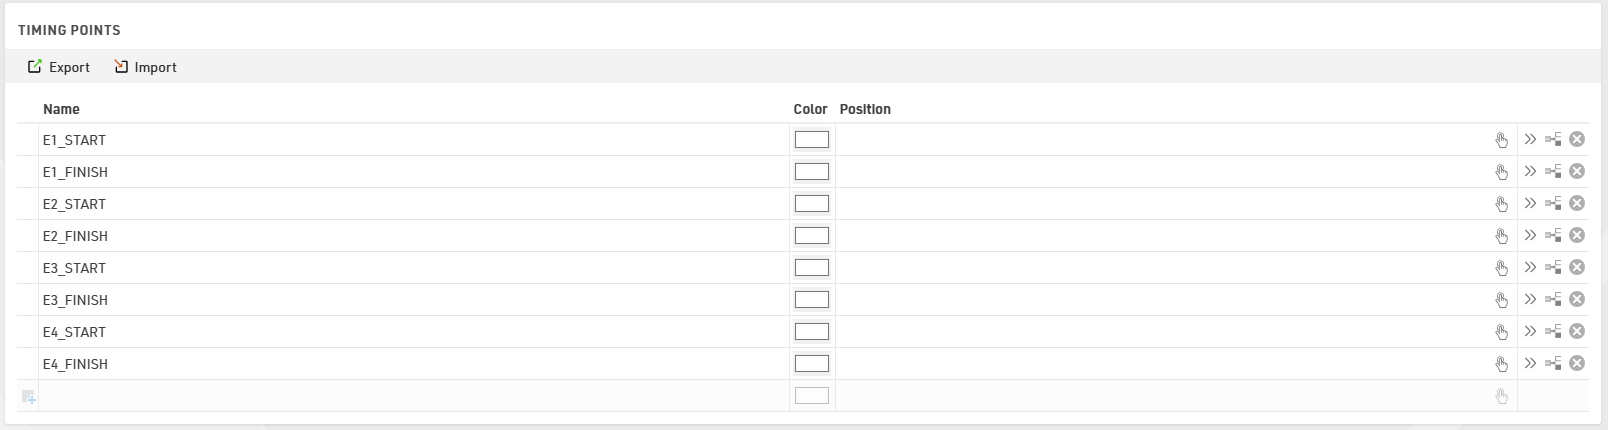
This will allow us to associate each detection of a specific timing point of a specific event into a "timing container" which will be then used in the Special Results to run calculations.
Special Results
To better work with special results, when having multiple events/races on the same file, it's highly suggested to structure the results with some sort of logic.
In this case, we decided to store each result of a specific event in a block of 100.
And all similar results have the same unit: for example, the EventX_Time has always result ID X01.
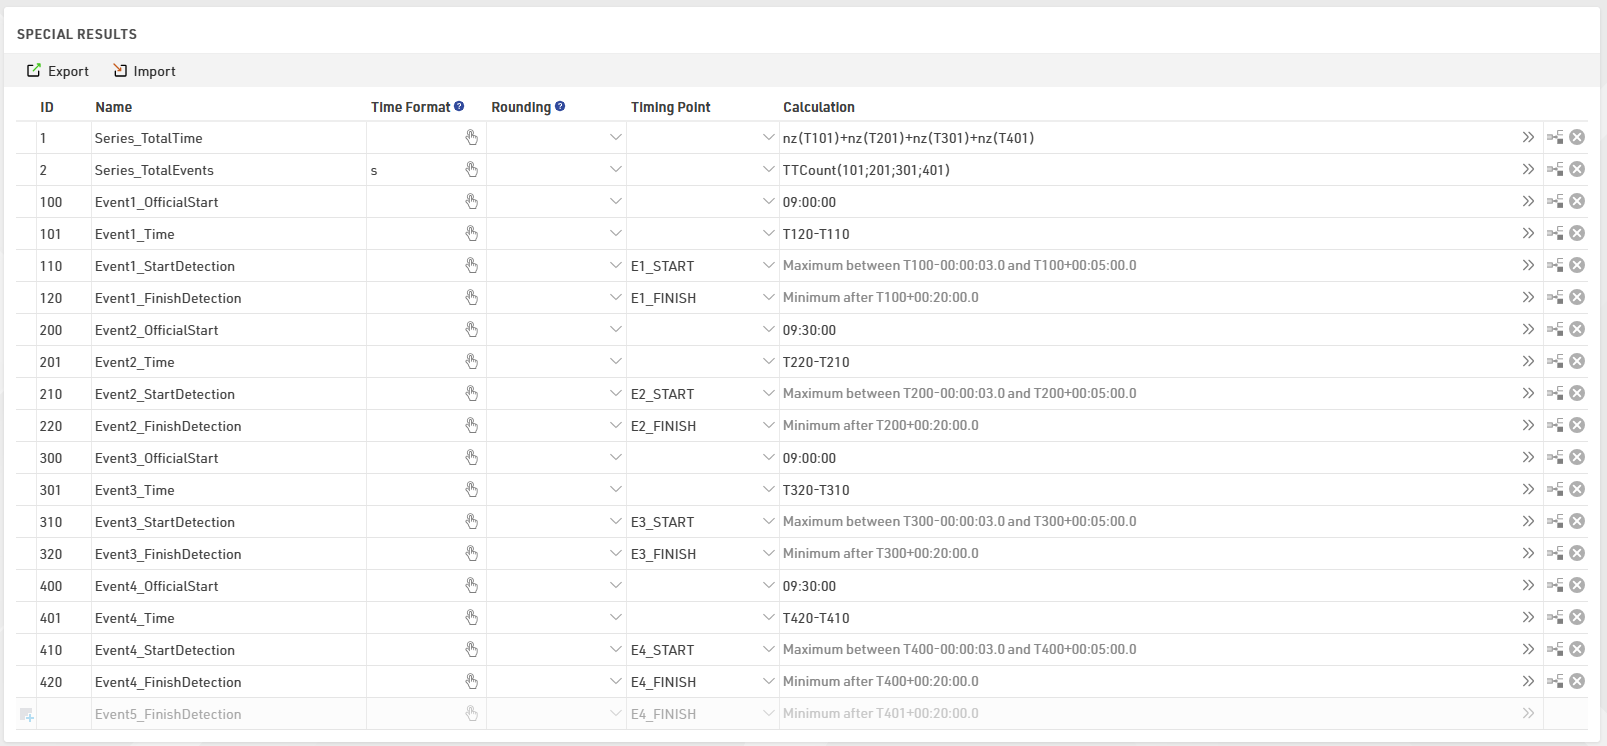
In results 100-200-300-400 you can enter the official start time of each event, and the EventX_Start/Finishdetection will look at them to take the right timing detection from each timing point.
In result 1 we store for each participant the sum of all the times of each event, and in result 2 we count how many events have been completed.
These two results will be then used for sorting and ranking participants in the result lists.
Scoring
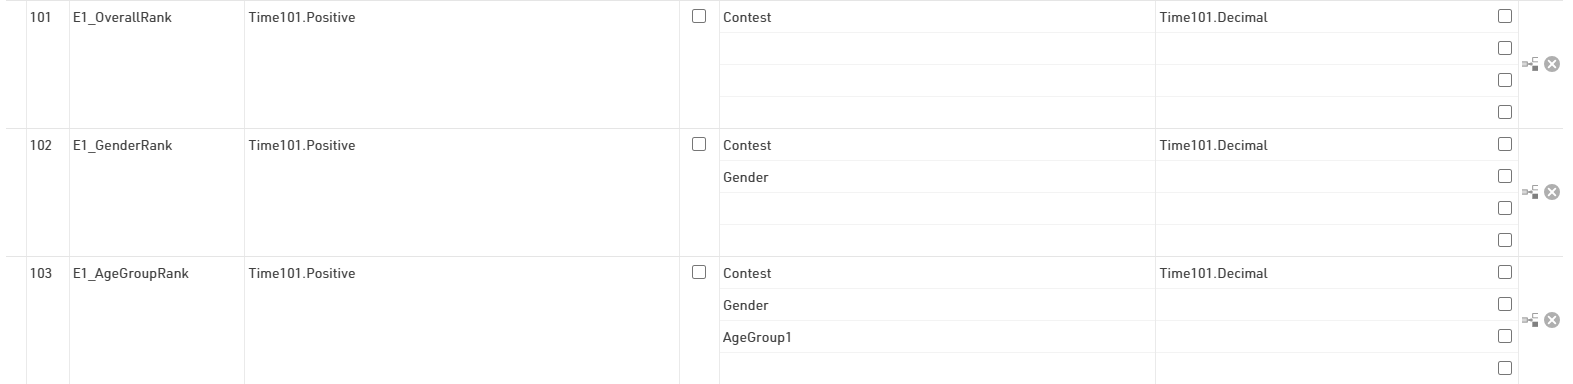
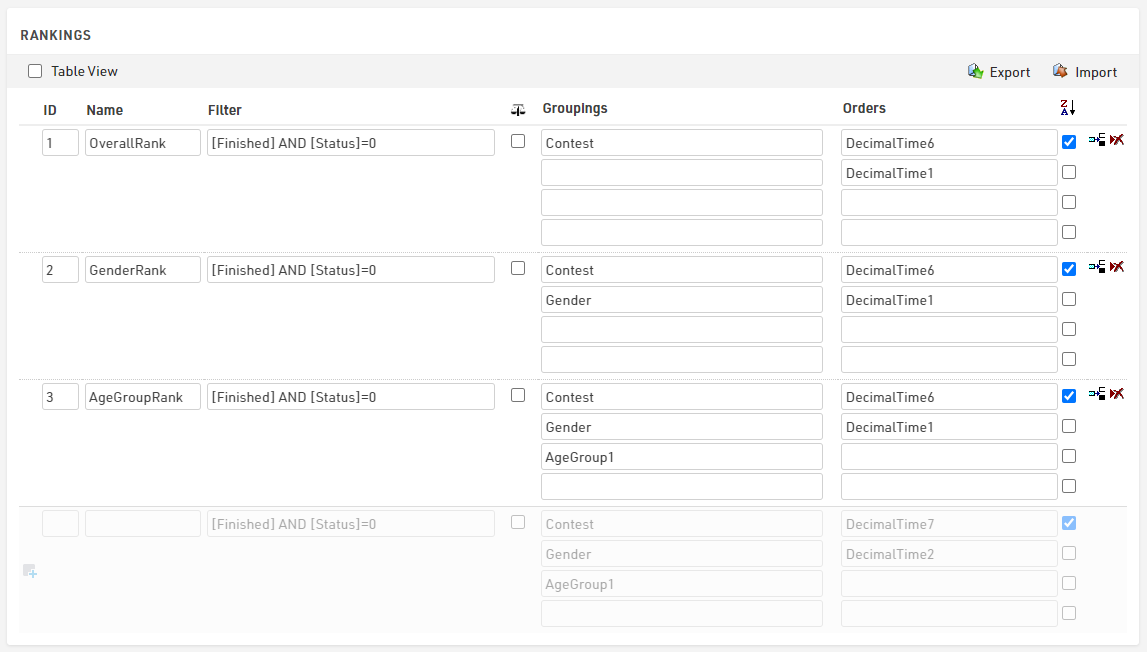
Under Scoring ⇒ Rankings is possible to create an indefinite number of ranks based on filter/grouping/sorting values applied.
For each event, we have followed the same block structure used in the special results with blocks of 100.
Each event has 3 specific rankings, which are the Overall/Gender/AgeGroup: they all have the same filter and order, but they differ by the grouping used.
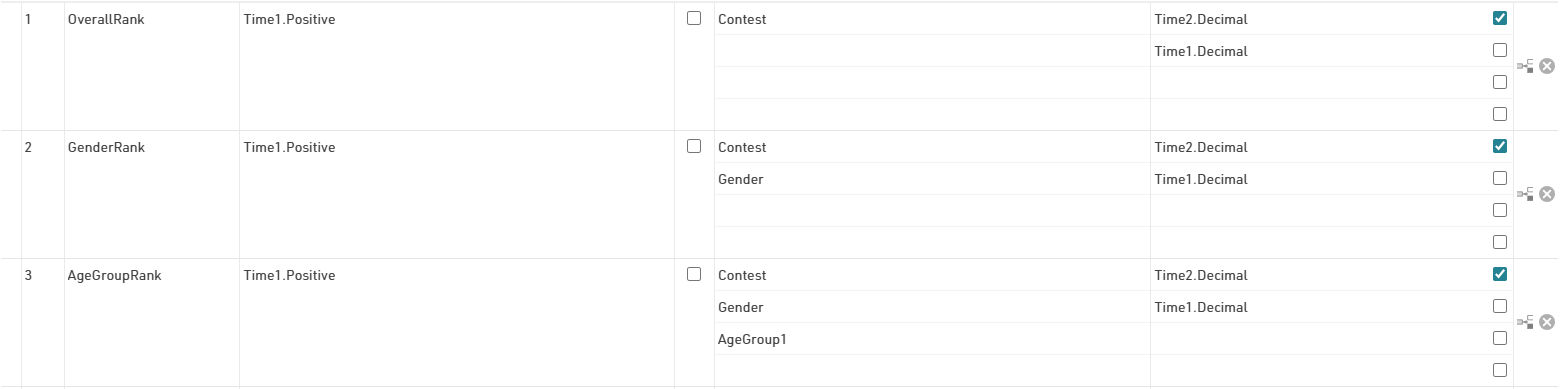
For the Event Series, we have ranks 1-3 which take in account the special results IDs 1 and 2.
The checkbox ticked on the first line of each ranking tells the software to order participants by highest number of events completed to lowest. Only when participants have participated in the same number of events, the software will then sort by fastest to slowest.
Lists
Under Lists it is possible to define an indefinite number of lists, useful to create participants lists, results lists and internal lists which will help you to proof check data.
In this template, you will find participant lists and result lists for each event.
The participant lists are each filtered by the additional field EventX, in order to display only the relevant participants;
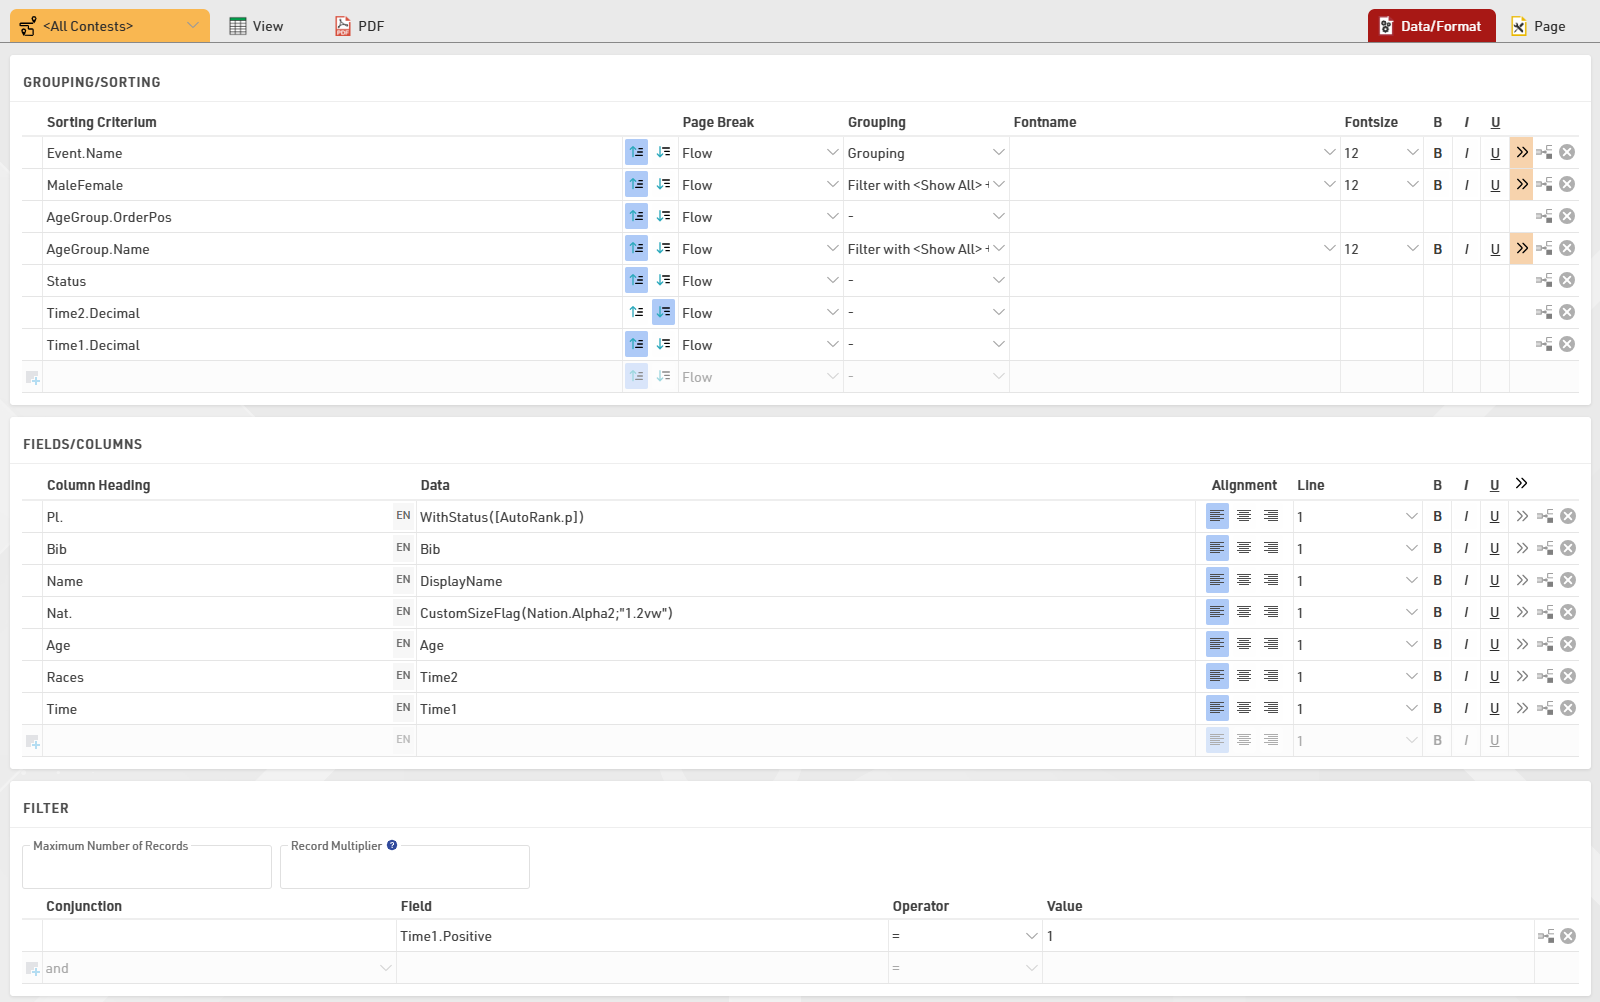
The result lists are instead filtered by the TimeX01.Positive field, which returns 1 when a participant has a valid finish time.
The Final list displays the ranking of the whole series, by filtering only those participants who have at least participated to one event (thus they have a [Time1.Positive]=1), and sorts them by number of events completed (Z>A) and then by fastest to slowest(A>Z).
my.rr
In this section of the software, you can define all the content you want to make visible online, to let participants be able to check the event info, register and later on check their results.
Basic Settings
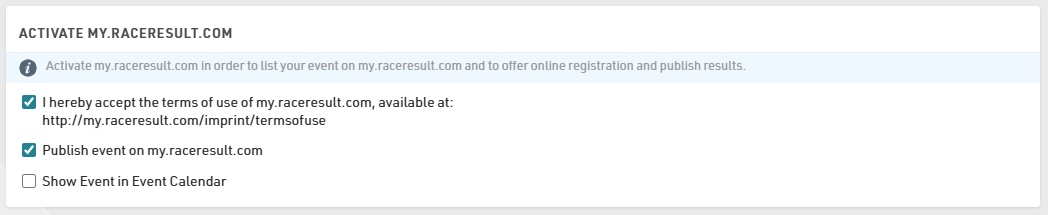
By flagging the first two checkboxes you accept the terms and publish the event online on my.raceresult.com/EVENTID.
Presenter
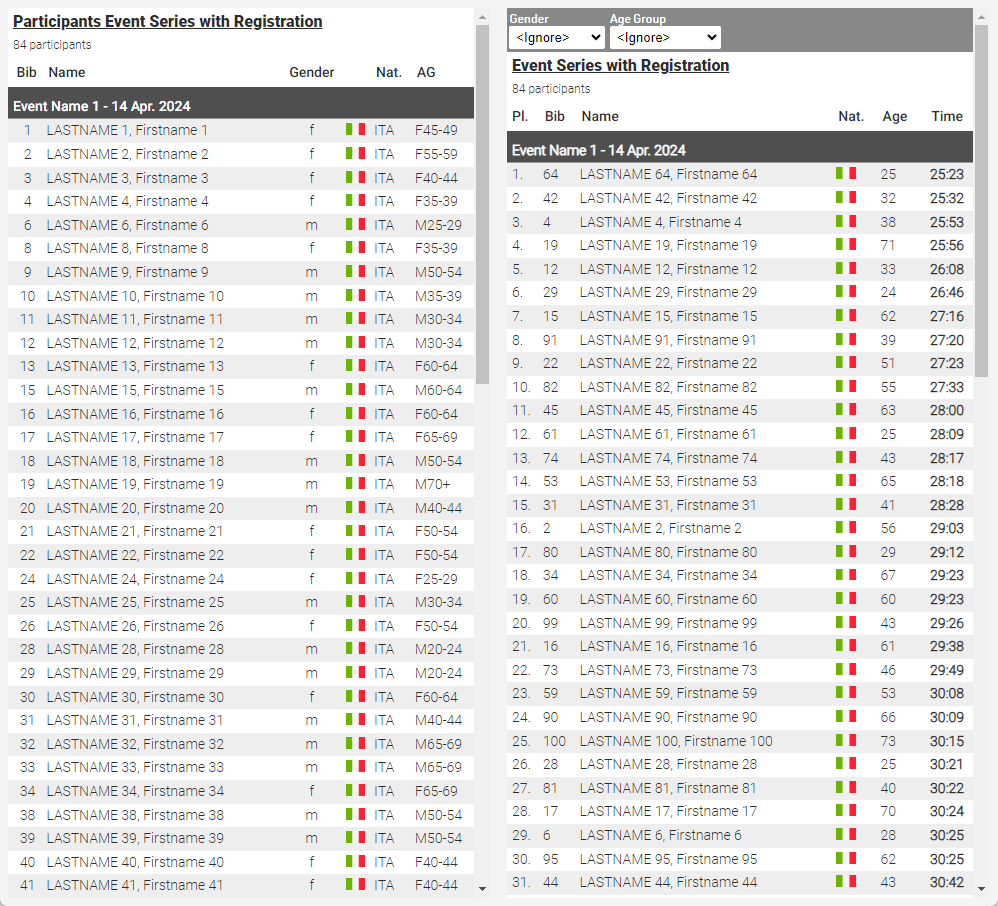
Under Presenter, you can create one or more presenters which are useful to display results on-site during the event.
Here in this KB article you can read how to setup the presenter.
In the event file attached, the presenter "Present Results" is set to display in screen 1 the Participant list on the left half and the Final Results on the right half, both referring to the Event 1.
Relay Races
There are three ways how to set up a Relay Race:
- A relay-team can be recorded as one data-set like a normal single participant. The handling does not differ from handling of single participants. The team has only one chip. Data like name, age or sex of relay-members can be set in Additional Fields.
- Team members are saved as individual participant records, but the team has only one chip, so all times will be saved in one of the participant records.
- Team members are saved as individual participant records and each team member has his own chip.
One Participant Record and One Chip per Team
This option is the easiest to implement a relay race. The software does not even "know" that there are relays. One participant record will be create per team and the names of second, third, .. team member will be stored in Additional Fields.
Go through the following steps to set up the event file:
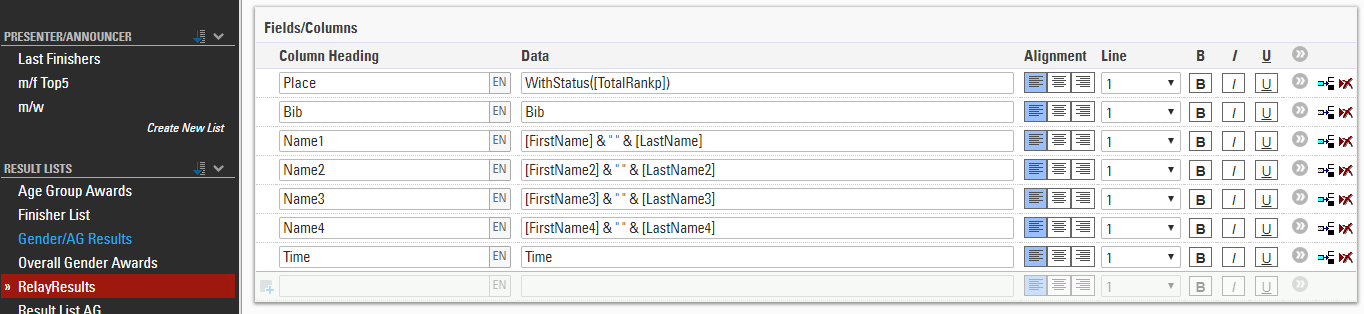
- Create additional text fields for the data of the second, third, ... team member:

- Create a copy of a result list for the relay race and add the names of the other team members as columns:
- In many cases, the relay race will be one of several contests. If you would like to offer an Online Registration for your event, you have several options:
- Use the Contest Dependent Registration. Add the ATFs for the names as form fields of the online registration and in the column Show In select the relay contest.
- Use a Special Registration (Single) for the relay contest and add the ATFs to the form fields as before.
- Use the normal online registration, add the ATFs to the form fields and in the Extended Settings define: Show if: Contest = Relay Contest
Several Participant Records, One Chip per Team
In this case, there will be a participant record for each team member, but there will be only one chip for the team that will be handed over. This chip will be assigned to the first team member, so this record will have the finish time of the team and also all split times, whereas the other team members will not have any times.
The main advantage of this option is that you can easily store all information of all team members (like name, date of birth, email, phone, etc.). There needs to be a field with a unique team name which defines who belongs to the same team. Let's assume the Club field will be used for that.
Go through the following steps to set up the event file:
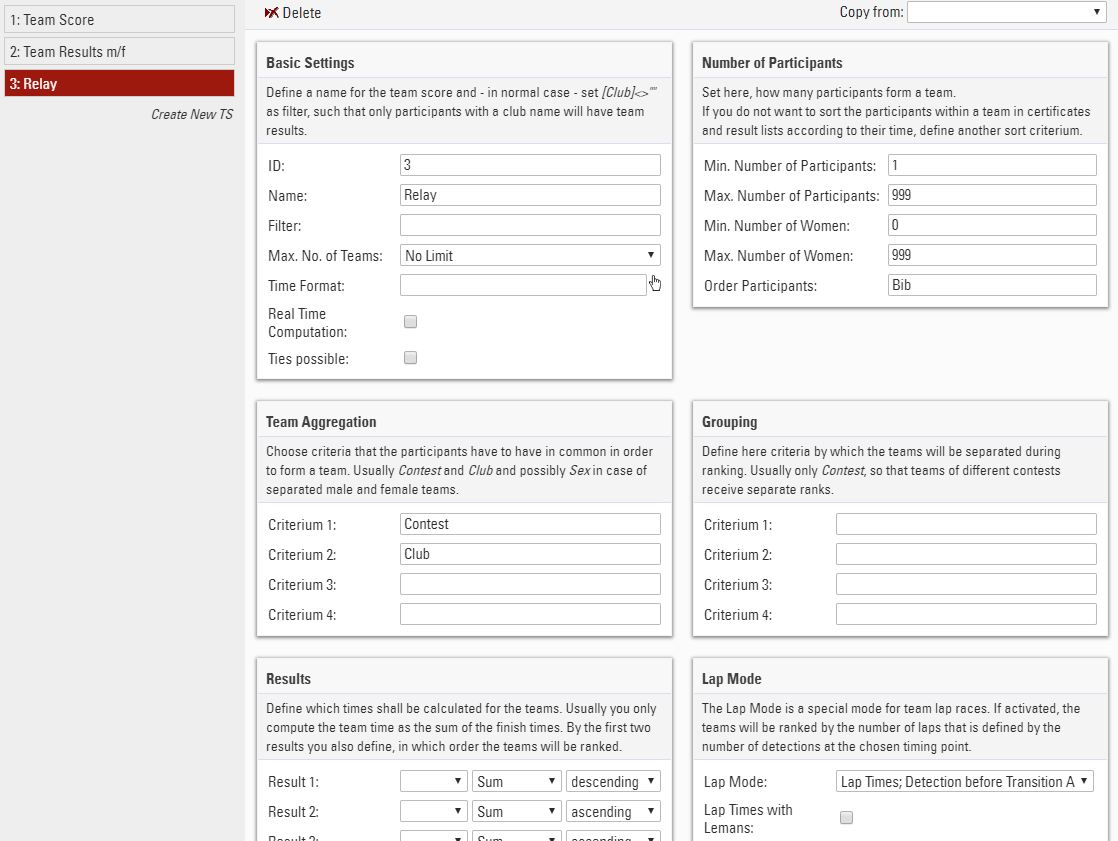
- Set up a team scores which links the members of a team:

Here, team score 3 (TS3) is used. The team is aggregated by contest and club, so the team members must be registered for the same contest and must have the same team name in the club field to be part of the same club.
Note that the maximum number of participants is set to 999, so all participants with that team name will be put in that team.
Also note that no results are selected at the bottom of the settings. This way, athletes will also be part of the team if they do not have any times. This is important since only the first member of the team will have times.
Finally, note that the participants are order by Bib: This assumes that the team members will race in the order of their bib numbers.
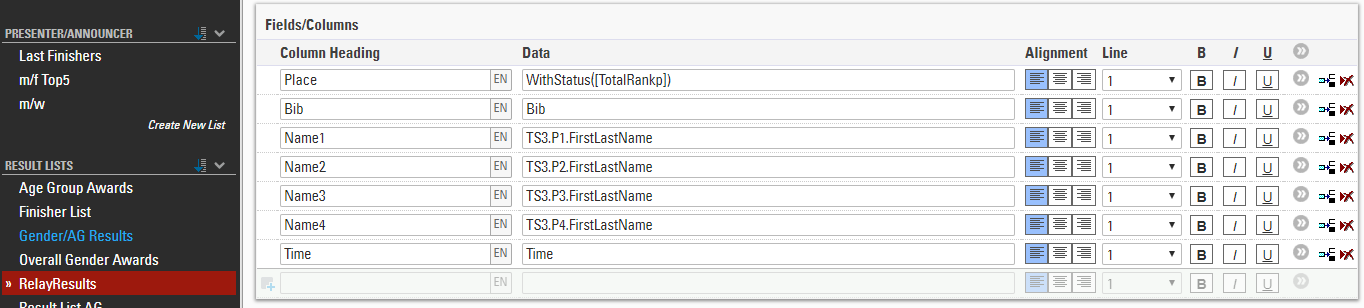
You can now access the xth participant of the team via TS3.Px, for example TS3.P2.LastName would return the lastname of the second athlete.
- Similar to the previous example, create a copy of a result list and adapt it to show the names of all members of the team:
- If you wish to offer an online registration for your event, you will need a Group Registration in this case. You can either use the Contest Dependent Registration or the Special Registration (Group) for the relay contest. Make sure to add the Club field as a common field and to mark it unique for the contest in the Extended Settings.
One Chip per Team Member
First of all, note that this option is not recommended! If each team member has his own chip, things can end up in a big chaos. The biggest problem are team members waiting for other teams or watching other team members, while being in the read field of the timing system. You will get a lot of unwanted reads and it can be close to impossible to find out which reads are actually those you need. This can become even more complicated if team members swap the parts they are supposed to run.
Note that if there is only one chip like in the previous two cases, all these problems cannot happen.
If you still wish to give one chip to each member of a team, set up your event file in the following steps:
- Make sure there is a unique field that defines who belongs to the same team. Let's assume the Club field is used for that.
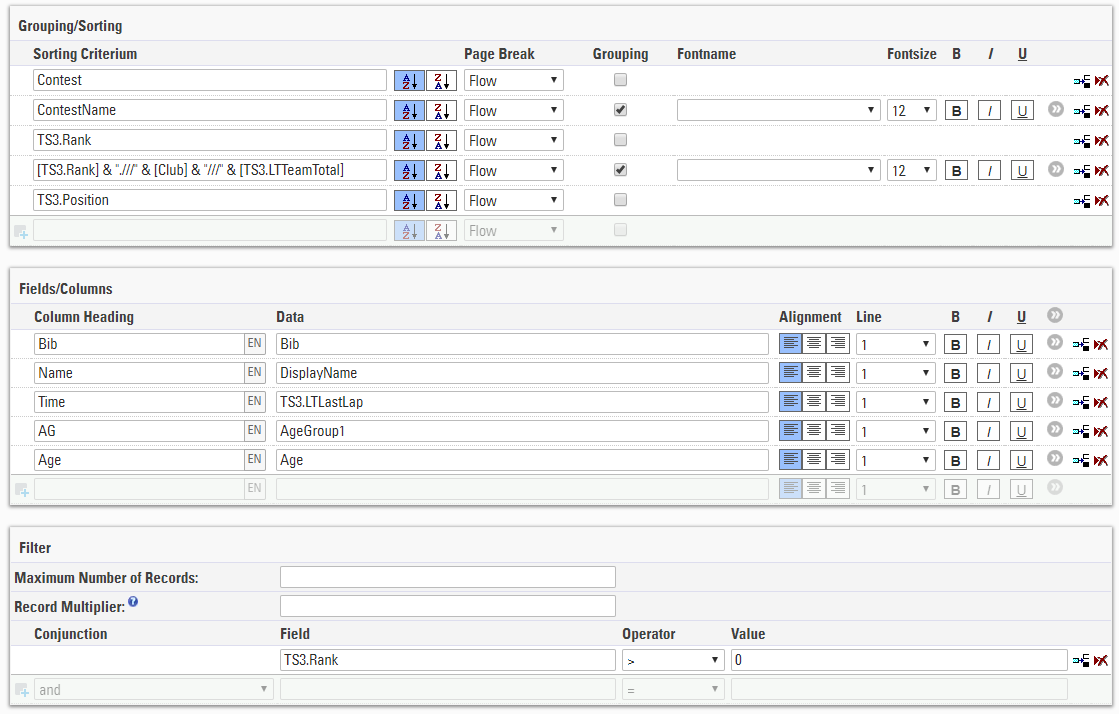
- Set up a team score and activate the Lap Mode. The Lap Mode is intended for team lap races like 24 hour races, but it can also be used for this type of relay where each team member completes only one lap/section.
- Create a copy of the Team Results list, adapt it from TS1 to TS3, replace Time by TS3.LTLastLap, and replace TS1.Time in the grouping by TS3.LTTeamTotal:
- If you wish to offer an online registration for your event, you will need a Group Registration like in the previous case. You can either use the Contest Dependent Registration or the Special Registration (Group) for the relay contest. Make sure to add the Club field as a common field and to mark it unique for the contest in the Extended Settings.
Backyard Ultra
The example file is at the bottom of this article!
A backyard ultra is an endurance running event that challenges participants to complete a set distance, usually a loop course, within a specific time frame, typically one hour. The unique aspect of this race is that it repeats indefinitely, with participants starting a new loop every hour. If a participant completes a loop within the hour, they rest until the next hour begins, and then they start the next loop. The race continues until only one participant remains able to complete the loop within the hour, and that participant is declared the winner.
For this kind of race, the special results are the tool to use to run the proper calculations for the whole event.
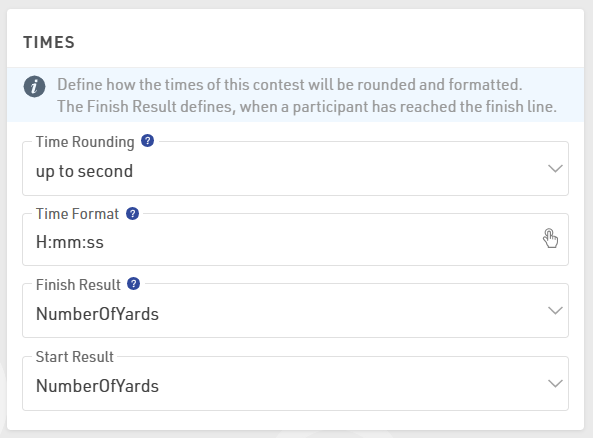
MULTI-DAY EVENTS Settings
The first setting to apply is on the event date: since participants may run for more than 24 hours, it is mandatory to select a Date Until (under Basic Settings > Event Settings)
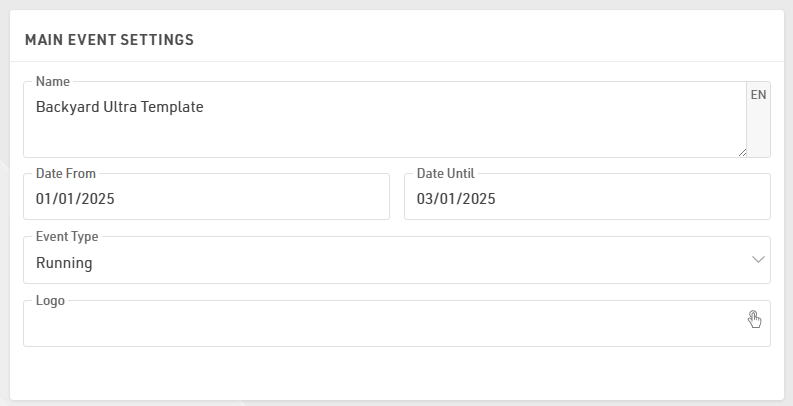
in order to unlock the section MULTI-DAY EVENTS under the Timing > Chip Timing.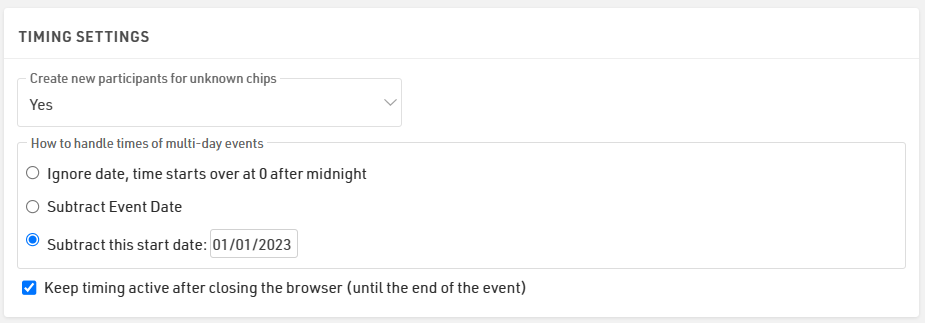
Define the timing points
In this example, we will use 3 different timing points: one decoder for the start/lap detection and 2 more decoders for 2 additional timing point on the course, which will be used as a check to check that all participants run the whole loop.

Build the Special Results
Since we are not going to use the official T0 the following settings are un-ticked to have a better control of all the special results.
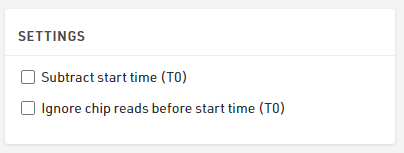
The T0 under Timing > Settings > Start Times / Finish Time Limit can be left to 00:00:00.
Dynamic Start Times
To define the start time of each lap, we need first to create a reference for the race start.
In T101 we store 10:00:00, which is the start time of the race.

In results T102-T106 we will store the start times of the next 6 yards (example has to be expanded accordingly!), which will be calculated dynamically for each participant, based on the calculation entered for those results: the time will be, indeed, calculated only if the participant finished the previous yard (T300X) in less than 1 h (3600 seconds).

To calculate the finish time of each yard, we need first to get all the right detections from our timing points.
Start, Checkpoint 1, Checkpoint 2 and Finish Detections
Since the current record for Backyard Ultra is 102 yards, our advanced results should be set by considering future developments: that's why we choose to store the Start/CP1/CP2/Finish detection at least 200 IDs apart from each other.
Start Detections T1001-T1006
For the Start, we always take the last detection between 10 s before and 30 s after the dynamic star time of each yard. This ensures to get a chip detection also for those who start slightly before or after the official start. For the calculation of the Yard Time, we will be taking the OfficialStart - the chip detection is used as a check.

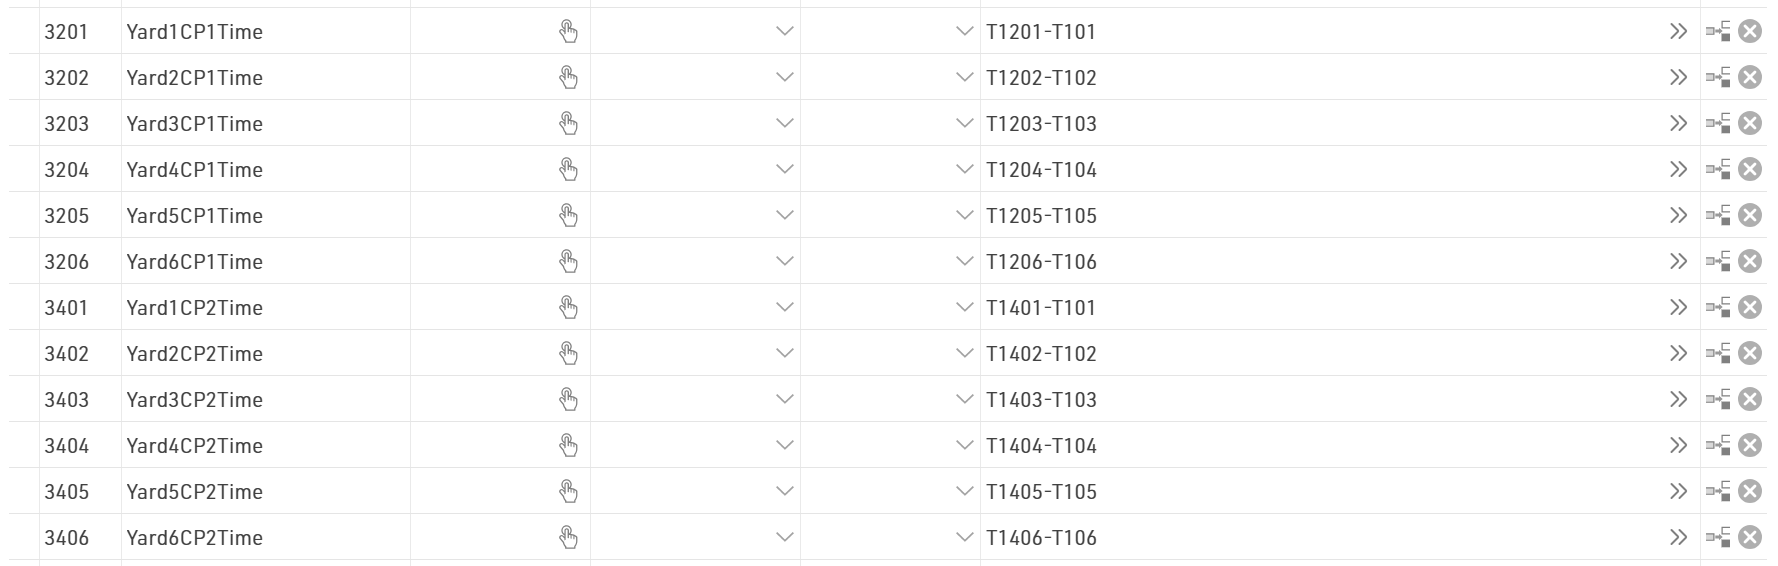
CP 1 Detections T1201-T1206
For the first checkpoint, we consider valid the first read after the start of the respective yard, thus we set the reference with the relative Start Detection.

CP 2 Detections T1401-T1406
For the second checkpoint, we consider valid the first read after the first checkpoint of the respective yard, thus we set the reference with the relative CP1 Detection: this ensures that participants are running with the right course-direction and not in reverse.

Finish Detections T2001-T2006
For the finish detections, we have chosen to keep a bigger gap with the result IDs in order to have enough room in case the organizer wants to have extra checkpoints on the course.
In this case, for the finish, we consider valid every detection which occurs after at least 20 min from the Start Detection and before the end of the hour. For an extra-control, it could also be possible to reference the finish detection directly with the CP2 detection. 
Time Calculations
Now that we have all the detections, we can run our calculations for the run time of each yard, the running time of each checkpoint and the rest time that each athlete has after the conclusion of each yard. Once again, we keep the same IDs gap between the different calculations, in order to have consistency with the other results and to have enough room for development.
Yard Time
For calculating the time of each yard, we need to take each finish detection and subtract the relative official start time. In case the finish detection is missing (participant didn't complete the run, or participant finished the run above the time-limit) the Yard Time won't be calculated at all.

CP1 and CP2 running Time
For these, we subtract the CP detections with the relative start detection of each yard.
Rest Time
For the rest time, we calculate it by subtracting the next yard start time with the current finish detection. In this way, we are able to know how much time each athlete can spend resting before the next yard start.

Summary of results
With these functions, we can store all the info we may need for our output lists. 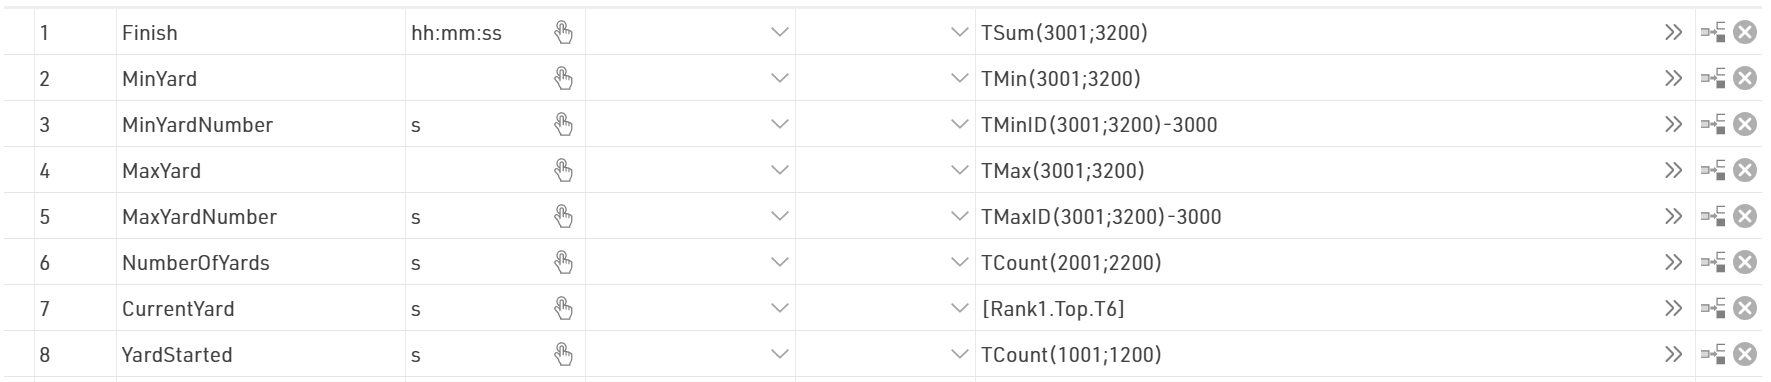
Note that the CurrentYard result (ID7) stores the number of yards ran by the leading participant: this will be extremely useful for calculating automatically the status of every participant during the event.
The YardStarted (ID8) stores the number of Yards started by each participant and NumberOfYards (ID6) the number of Yards completed.
Displaying Results
With all the results calculated, we can now focus on result presentation.
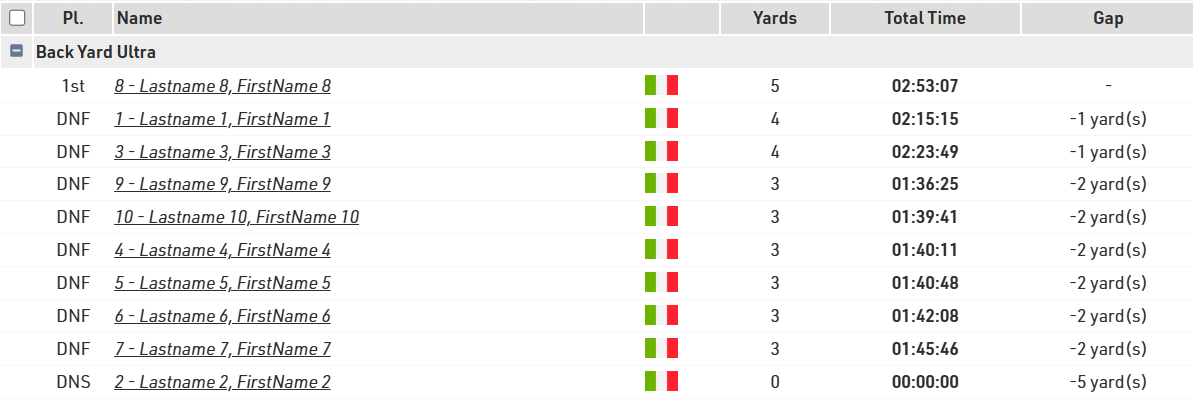
Final List
To automatically set the status DNF to all participants who didn't start the round on time, it is possible to create a User Defined Function with the following formula:
AutoStatus(x): switch([Status]>0;WithStatus();[Status]=0 AND T6<T7;"DNF";1;[x])
Trying to put the formula in words, if the status of a participant is already set different from regular, its status will be displayed straight forward. In case the status is regular ([Status]=0) and the NumberOfYards of that participant (T6) is smaller than the number of yards ran by the leading participant (T7), then we will automatically display "DNF"; for all other scenarios, we will display the field we want to show.
Final List
In this list, we want to display all participants who have started the race or if they have a status different from regular.
For that, we apply in the filter the following conditions:
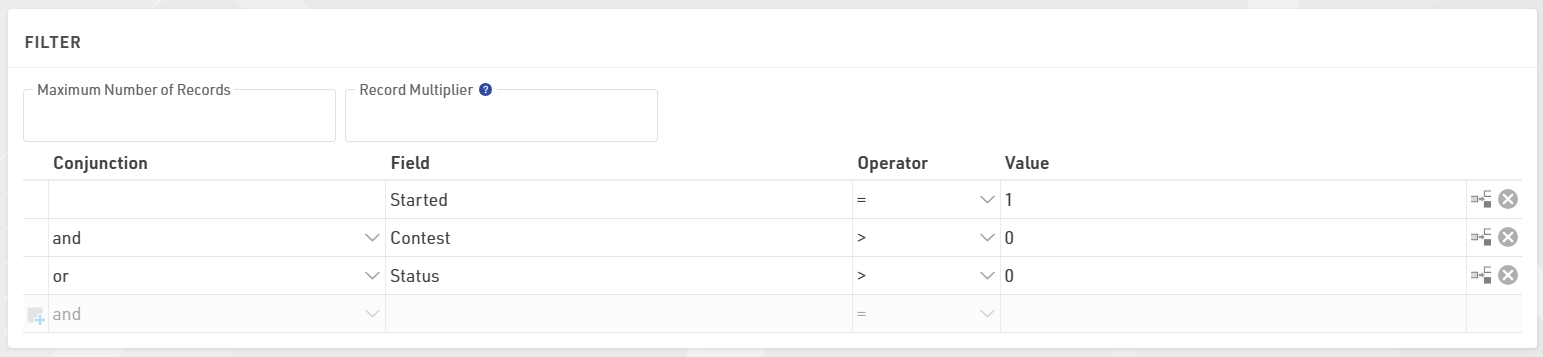
where [Started] refers to the result selected under Basic Settings > Contests
To order participants properly, we sort by OverallRank.
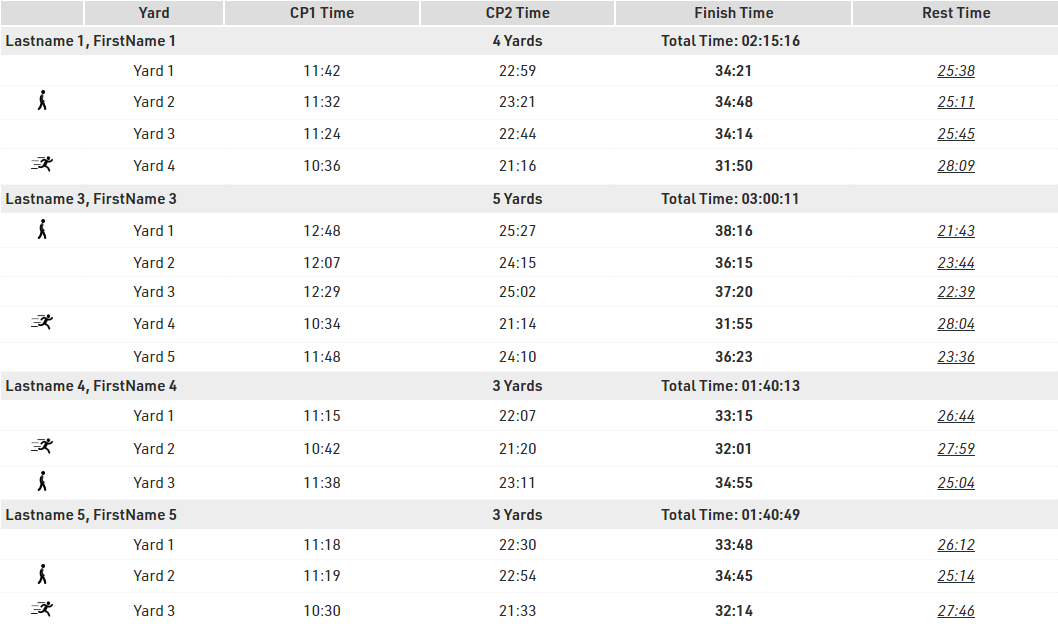
Detail List
For showing each yard for each participant, we can prepare a detail list by using the record multiplier [NumberOfYards] which will create one line for each yard completed by each participant.
By referring to the row number via {n}, we can call each calculated time and with the format() function, we can show the times in the preferred format.
Two images are also been added based on the fastest and slowest yard completed: these refer to the row number and the values stored in the advanced results T3 and T5.
Live List
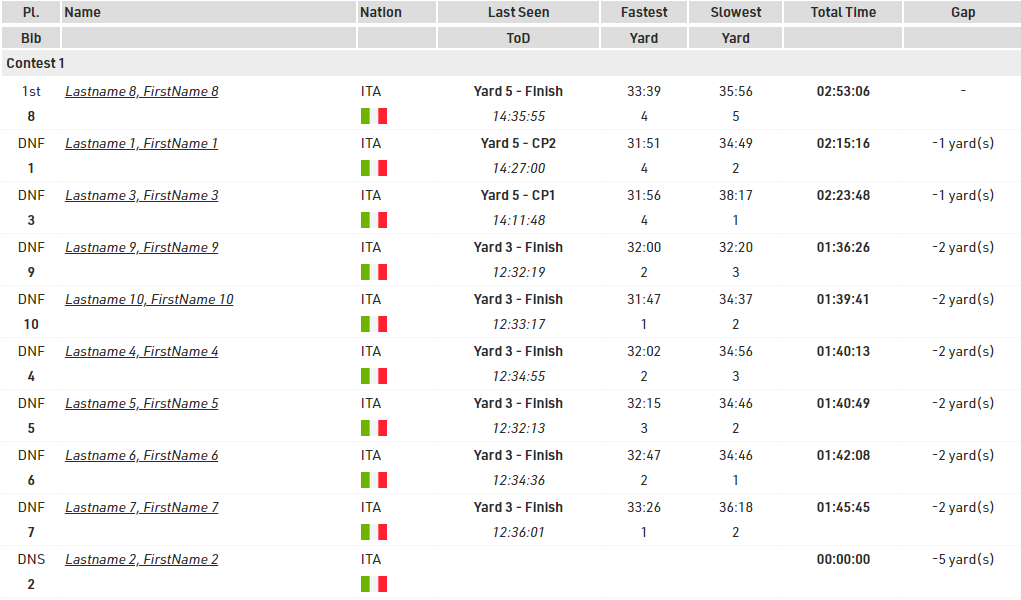
In the live list, we display the current position of each participant (Last Seen column), with the relative Time of Day (ToD) and Gap from the first participant.
Triathlon
Event File
Times are recorded at the entrance and exit of the transition area, and on the finish line.
An additional system is used as a swim check-in, to let the organizer know who actually started and make sure all participants come out of the water. The public can follow the race live on my.raceresult.com.
This example shows the ActivePro transponder in use with two Loop Boxes at the transition area wirelessly transmitting passings to a USB Timing Box at the finish line.
It is possible to use the passive system and HuTags, the setup of the event file remains the same.
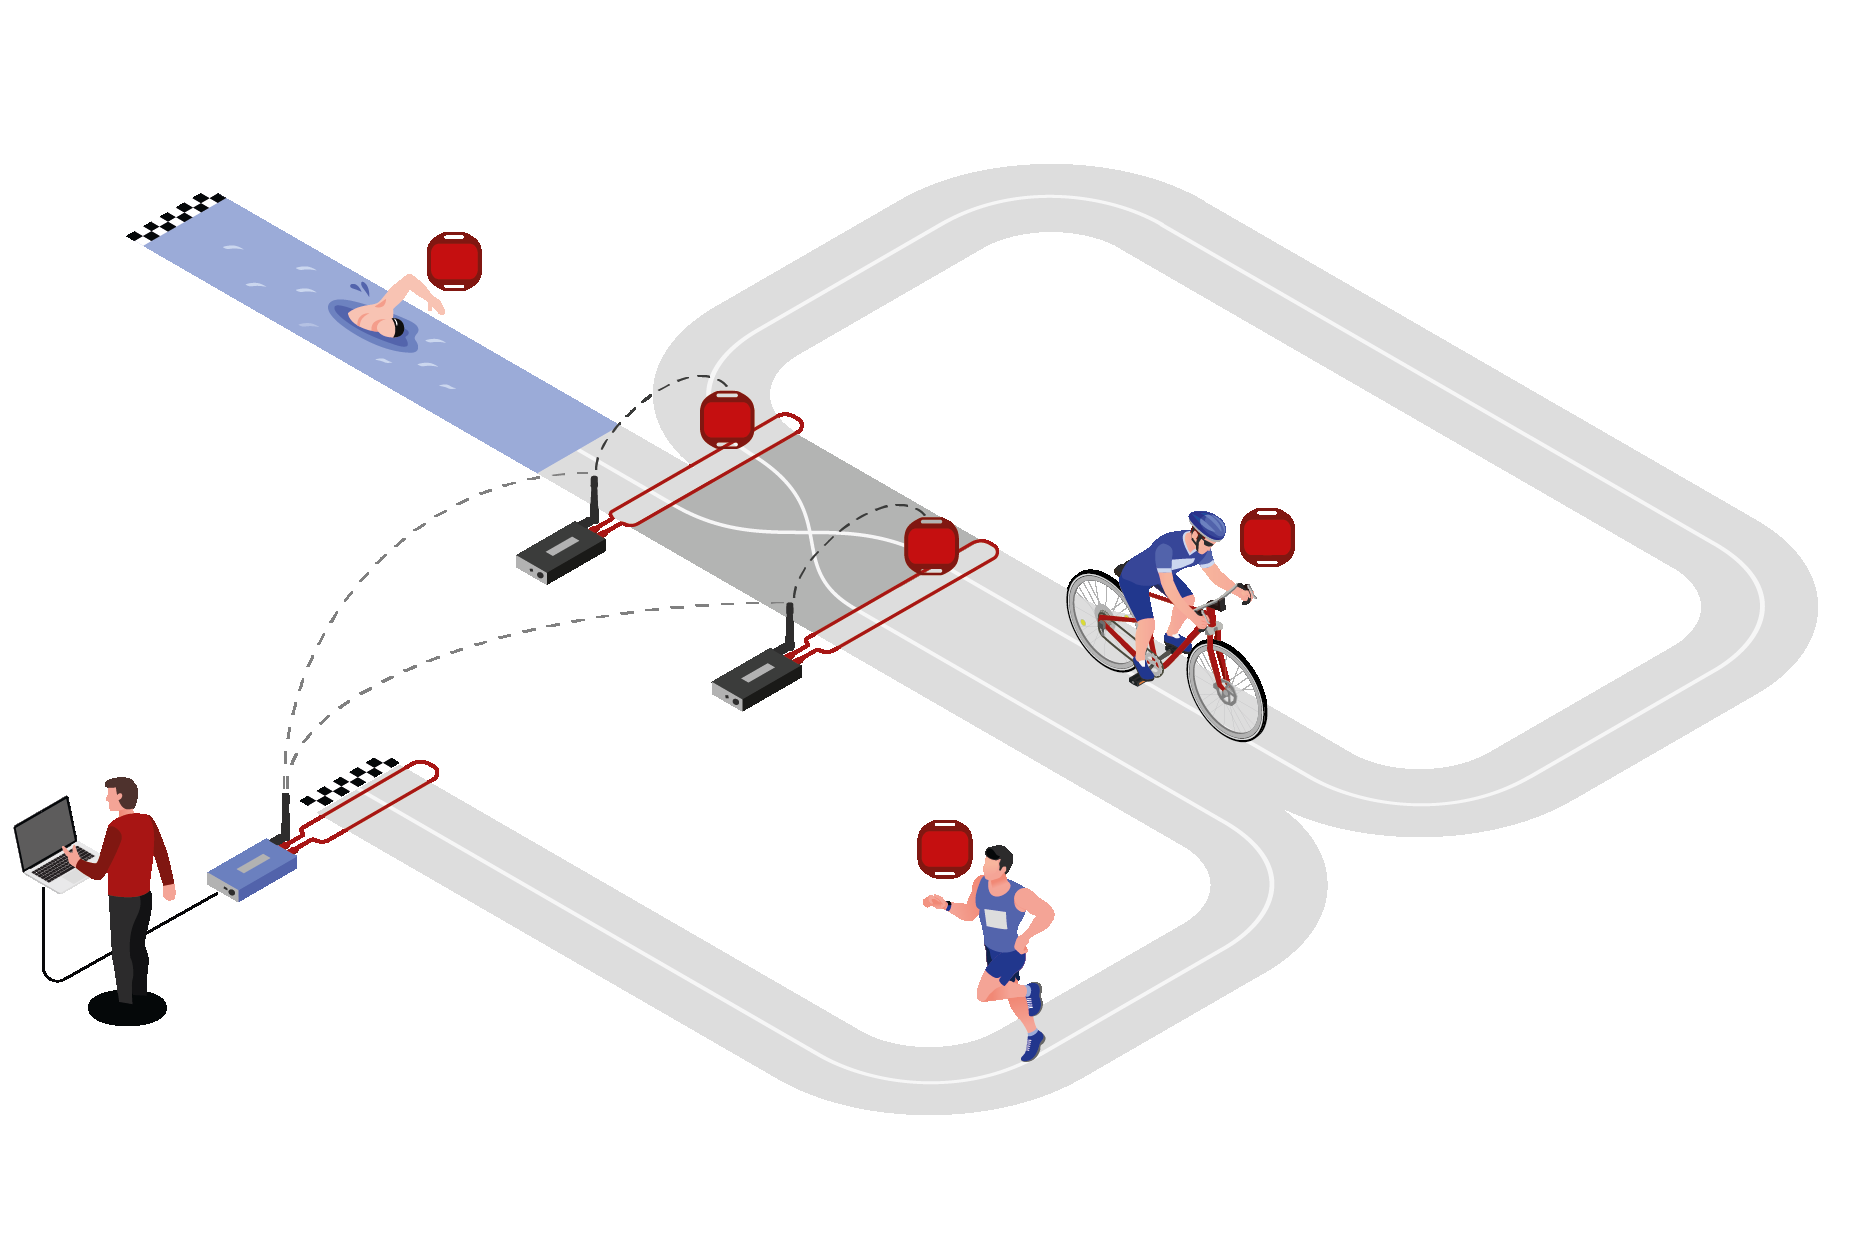
Timing Locations
Start Check-In, Transition In, Transition Out, Finish.
Preparing the Event File
- Download a copy of the triathlon event file.
- Define the event settings (date, location, time zone)
- Confirm the contest information
- Import the participants
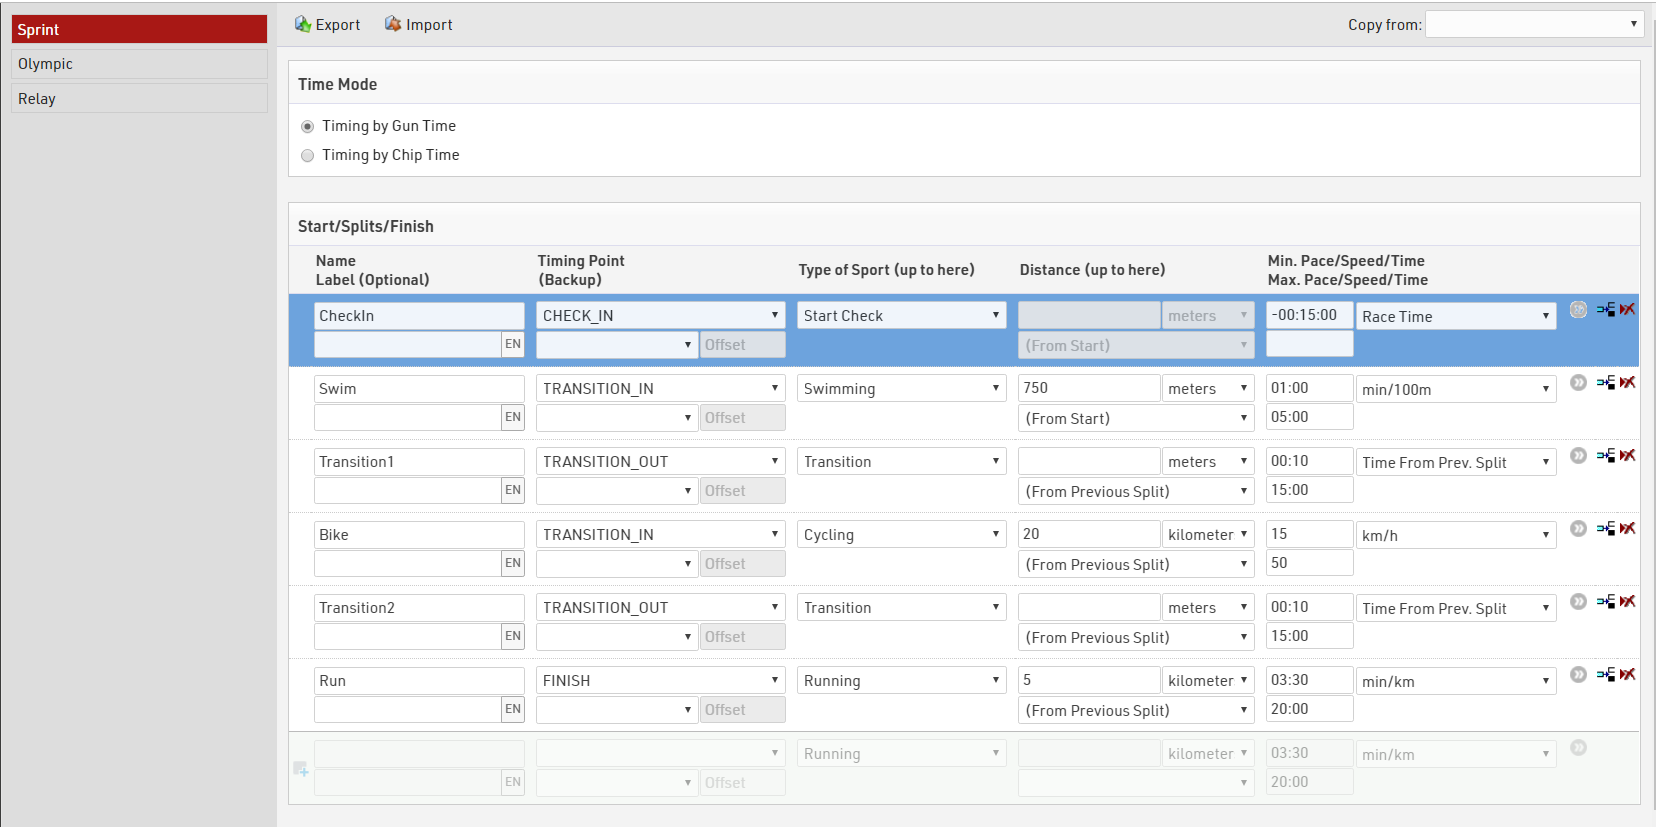
Splits Setup
Splits are setup for each Contest accordingly, Time Mode is set to Gun Time. Since we have no additional Splits we don't define additional Legs here as the Split Sector times will give us the leg times.
Team Members
In this example, a team member completes one leg of the course. One transponder is issued to the team and is transferred between team members after each leg.
Additional Text Fields are used to capture the firstname, lastname and gender of participant 2 and participant 3.
Displaying Team Members
To display all team members on multiple reports easily, we create a user-defined field to display the 2nd and 3rd participants. Another user-defined field DisplayName has already corrected firstname and lastname to the correct case for each team member.
DisplayNames:
[DisplayName] & if([DisplayName2]<>" ";" / " & [DisplayName2]) & if([DisplayName3]<>" ";" / " & [DisplayName3])
Output: Katherine WADDELL / Jo LAMBRICK / Marina TYSON
User Defined Functions - Determining Team Gender
We can determine the gender of the team automatically. To qualify as a single gender team, the genders of each participant must be the same. First we create a function to convert the gender to either 0, or 1 and add together the values for each team member, from the sum of these Gender values we can determine whether the team is all female, mixed or all male.
GenderToNumber(x): Translate([x];0;1)

GenderSum: Val(GenderToNumber([Gender])+GenderToNumber([Gender 2])+GenderToNumber([Gender 3]))

TeamGender: Choose([GenderSum]+1;"female";"mixed";"mixed";"male")
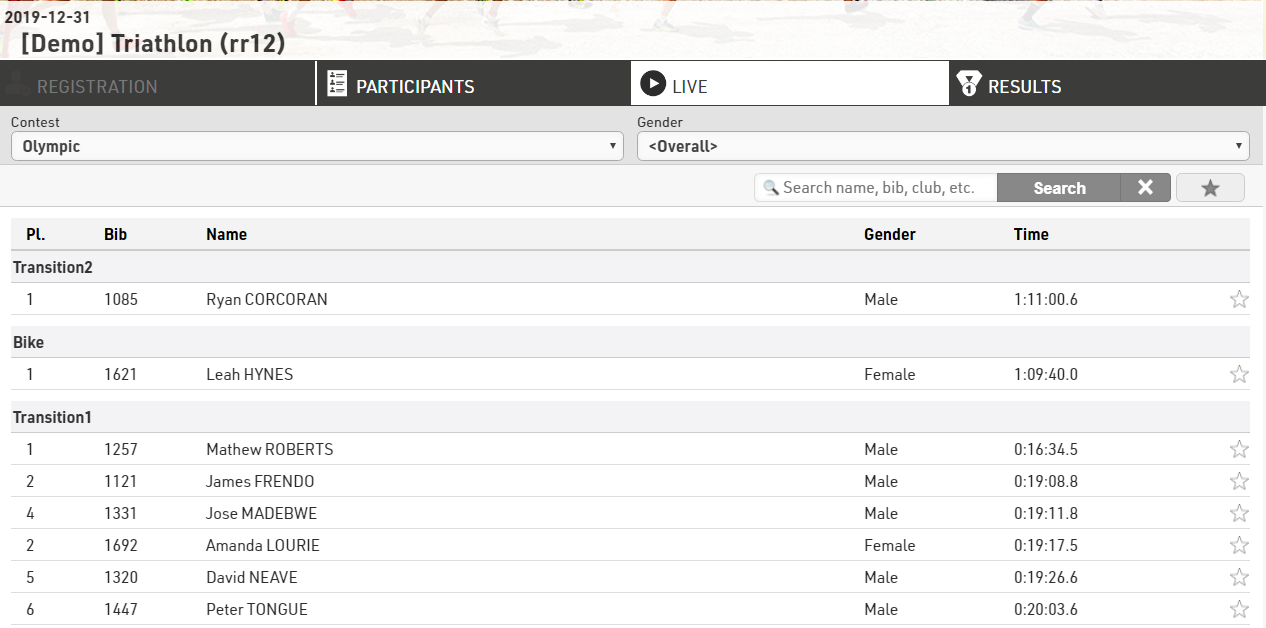
Statistic Report
At any time the organiser or officials may need to know how many participants are at what point on the course. We can determine an overview by using a statistic set. Our statistics set will look at a User-Defined FIeld called LastSeen, this is built using {LastSplit} a special function to enable the calling of fields from the last participant at which the participant recorded a time.
Switch([{LastSplit}.Name]="CheckIn";"0. Check-In";
[{LastSplit}.Name]="Swim";"1. Swim Finish";
[{LastSplit}.Name]="Transition1";"2.Bike Start";
[{LastSplit}.Name]="Bike";"3.Bike Finish";
[{LastSplit}.Name]="Transition2";"4. Run Start";
[{LastSplit}.Name]="Run";"5. Finish";
[Started]=0;"Not Started")
Using the Statistics Settings > Columns Format WithStatus([LastSeen])
The statistic set will produce the output below.

If a participants status is regular, the last split seen at will be used, otherwise their status is shown.
We can see in the Relay and Sprint Contests everybody is accounted for at the finish or recorded as DNF/DNS/DSQ. In the Olympic race 4 participants were last seen at the SwimFinish and so presumed to be still in Transition 1, 541 participants on the Bike course, 1 in Transition 2 and 1 on the Run course.
Result Outputs
- Live has a leaderboard which groups all participants by their last seen location, ranked by cumulative race time, we use the {LastSplit} special field to sort participants and show the relevant times. Using {LastSplit}.Gender we see their gender position at their last split, this will remain the same until they reach the next split.

We enabled the filter for Contest and Gender so spectators can choose which race to look at and can look at a specific gender category if they choose.
From this we can see that in the Olympic Contest Justin Appelman was the first Male to leave transition 1, however he has not been seen since and we have those who are further on the course ahead with their respective ranks at those splits.
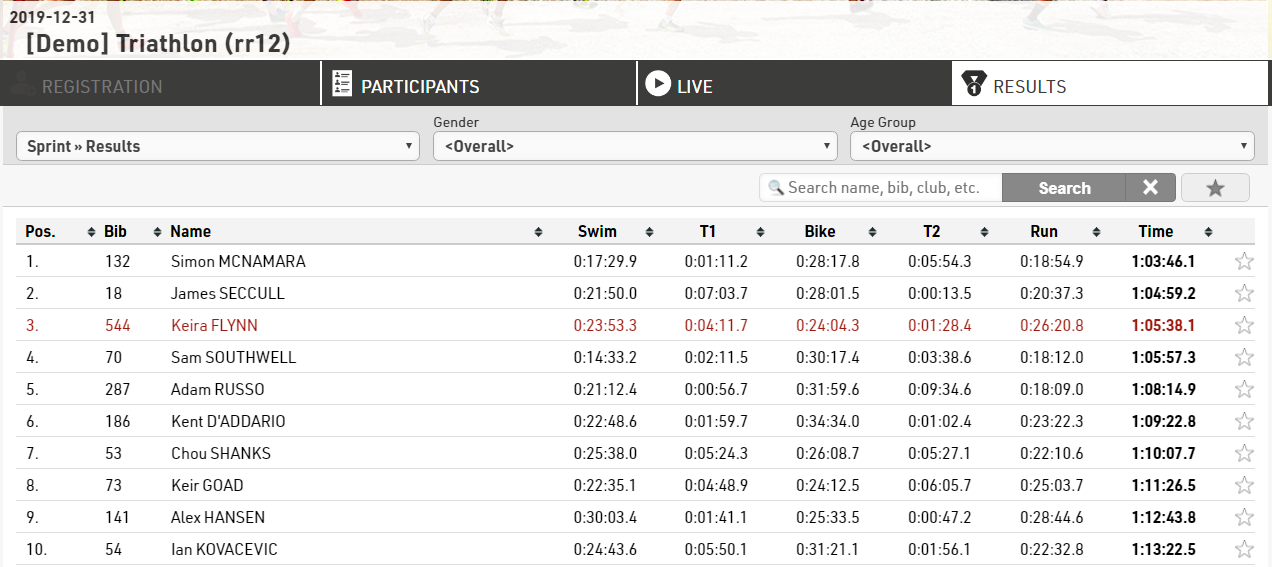
- Final Results shows the rank, bib, name and split times for each leg and overall finish time.
Details List
Selecting a specific participant displays an in-depth look at their Split times, and an additional details list with their personal info is shown below.
This is achieved by enabling Show Splits under Certificates / Details settings and also publishing the output Individual Details under the details list for the corresponding output.
Triathlon Elite Mixed Relay
Event File
The relay consists of 4 team members, 2 males and 2 females. The first team member completes their triathlon before the next team member starts. 3 team members will finish at an alternative finishing line relay finish with the final team member running through the finish.
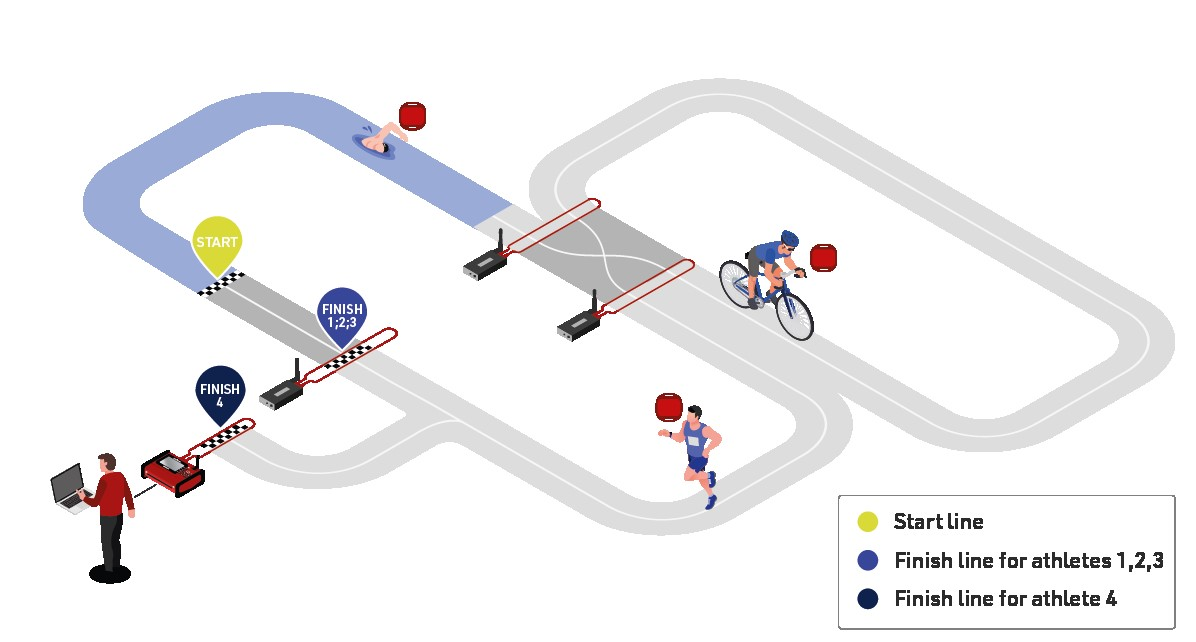
Timing Locations
Start, Swim Out, Transition Out, Transition In, Relay Finish, Finish
Result Calculations
Since each participant's start time depends on the previous team member's finish time, for this event type we will use the advanced results setup.
1 - 6: Times calculated for each split

10 - 20: Raw data from timing systems

30 - 36: Cumulative split times

101 – 102: Determine where the participant was last detected

Team Members
Participants are identified on course with their a combination of team number and letter to identify their position in their team. This can be calculated by combining two functions into one user defined field:
DisplayBib:
[TeamID] & choose(right([Bib];1);"/A";"/B";"/C";"/D")
DisplayBib: Take the team index, which is the first 1 or 2 bib numbers from the participant's bib, and the right most digit of the bib, if this is 1, display A, if 2 dispay B and so on. Bib 133 would be translated as 13/C (TeamID 13, team member C)
Ranks
The HelperRank orders team members by their RelayID. The RelayID is taken from the last digit of the bib number (1-4).
Start Time Calculation
The first team member's time is calculated from T0, the following participant's times are calculated from the previous team members finish time. Thanks to the dot logic we can identify the finish time of the previous team member as defined by the HelperRank (Rank100.Prev.T15).
switch([RelayID]=1;T0;[RelayID]>1 AND nz([Rank100.Prev.T15])>0;nz([Rank100.Prev.T15]))
Using RelayID the switch function identifes in which position the participant is starting, if RelayID is 1 use T0; if RelayID > 1 and the finish time of the previous team member is > 0 then use the finish time of the previous team member.
Finish Time Calculation
The first 3 team members use an alternate finish Relay Finish whilst the last team member uses the finish line. We can determine the finish location by using the choose function:
choose([RelayID];T15;T15;T15;T16)
If RelayID = 1,2 or 3 use time time from TimingRun (T15), if RelayID = 4 use the time from TimingFInishLine (T16).

e.g. The raw finish time for team member C (relay ID 3) is determined from the finish of TimingRun.
Team Score Calculation
Team members are determined by having the same contest and club name to a maxium of 4 participants. The overal finish result is the minimum time for the Result AfterFinishLine which only the 4th team member receives.
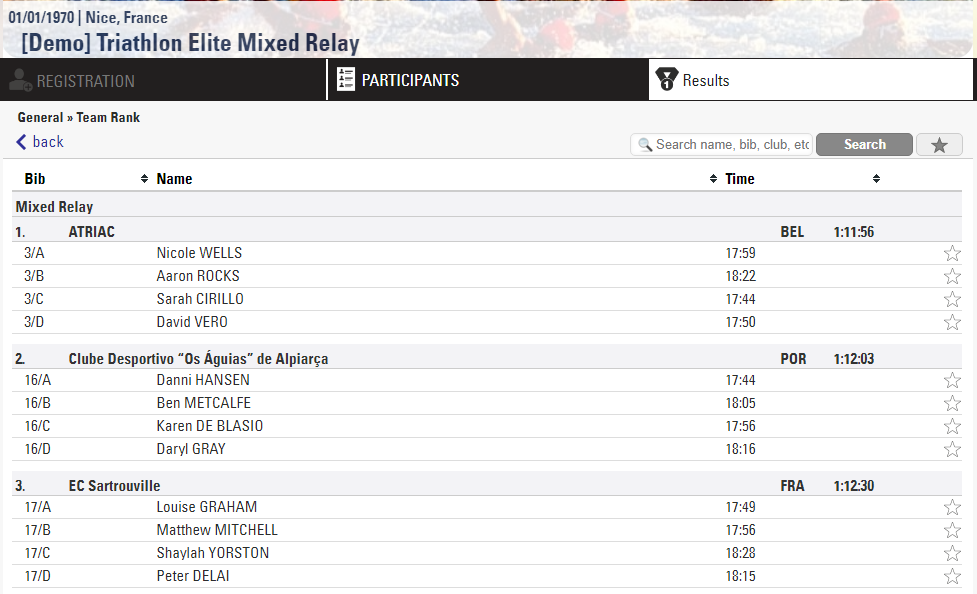
Live Output List
To enable the grouping by finishers and location we have several layers of grouping and sorting.
- Contest and ContestName
- RelayID and RelayName
- LastSplit and LastSplitName
- Time102 Time of the last split
A live rank has been used to determine the position on the couse at each of the timing locations. start, swim, transition1, bike, transition2, run and finish line.
The rank of the last split can be determined using Rank(x) with the LastSplitID Result:
Rank([LastSplitID])
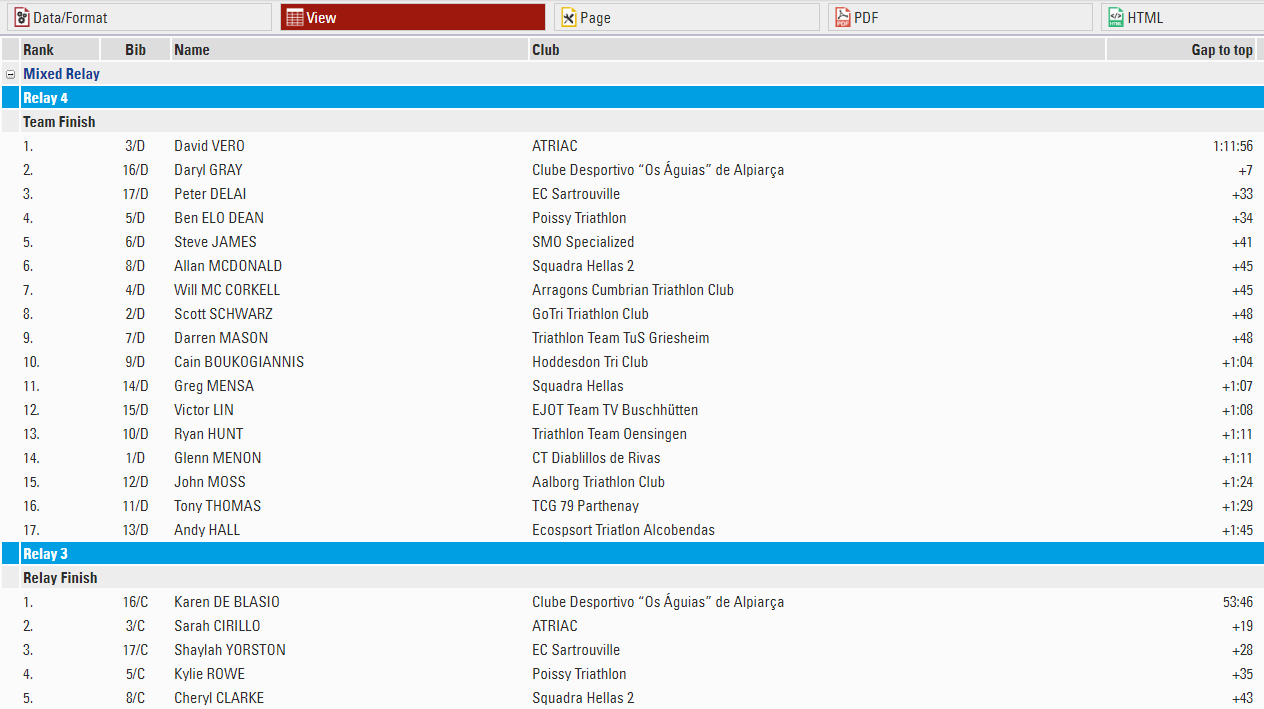
Final Result
Grouping Participants by Team
To group team members we use the user-defined function OrTeamStatus([TeamTime.Rank]) & ".///" & [Club] & "///" & [CountryIOC] & "///" & [TeamTime.Time1]
This will group all team members and sort by the overall rank of the team score, club name, country and team time. If the team has a status of non regular, the team status will be shown.
Using "///" will push the field into the next column along.
Qualifications / Heats / Finals
This example looks at how you can manage events with qualification rounds and progressive heats in RACE RESULT 14.
In this we show the core concepts of how to manage such events, but this example does not consider all possibilities, the basic methods shown here can be adapted to handle a range of requirements such as additional rounds, different genders, lap races and more.
Event Format
In this event we have all participants registered in a single Contest and only use a single Gender. The event is based on a simple short race (modelled on a 1km cycling time trial), with a fixed start time and single detection for each round. We keep this example short with just 16 participants starting.
The event starts with a Qualification round, where participants are assigned a unique individual start time.
From the Qualification round the best 8 will progress to the Semi-Finals, with 2 rounds of 4 participants.
The Finals will be formed of the best 2 participants from each Semi-Final round.
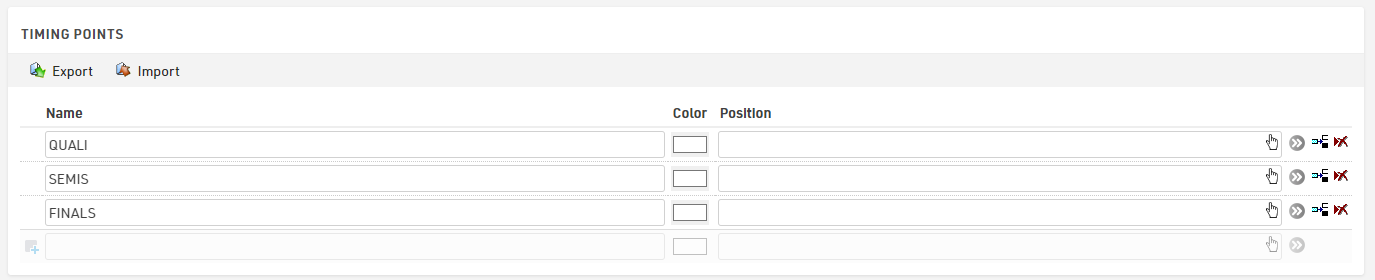
Timing Points
This setup uses a unique Timing Point for each, this isn't critical for this setup, but it makes it easier to understand the data later, especially if the event is spread out over multiple days
Results
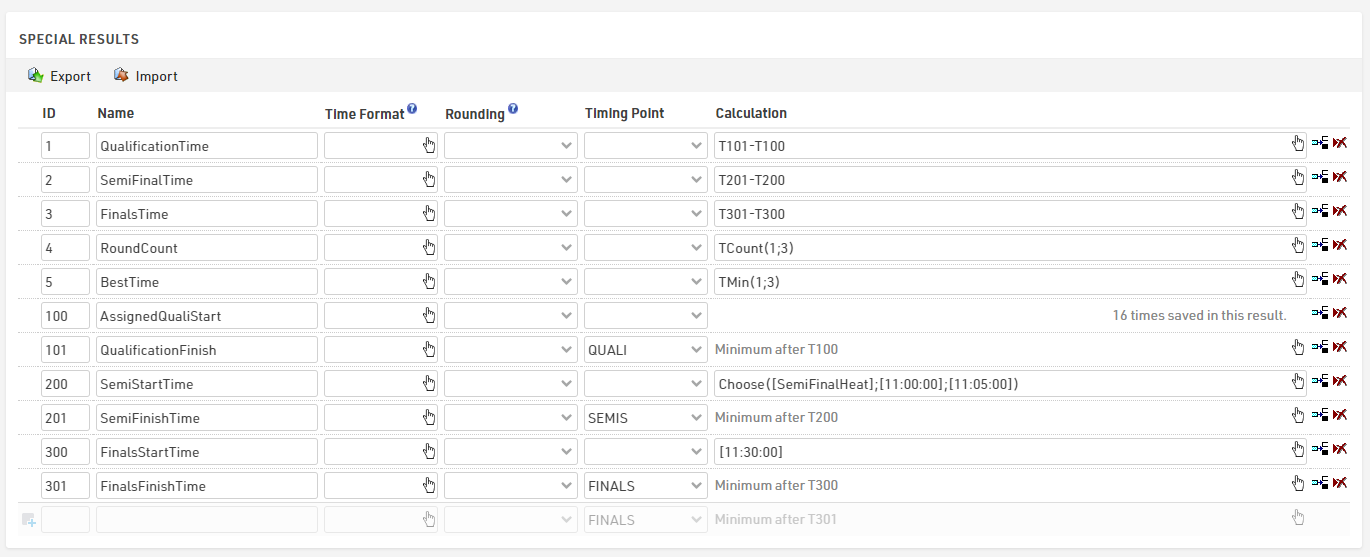
The results setup here is kept as simple as possible.
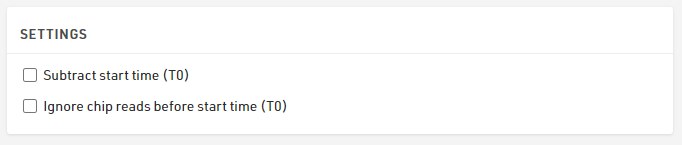
Given that T0 is irrelevant in this type of event where the same participant has multiple starts, we do not subtract this in our settings.
For each round we have a start time, which is a fixed time and a single finish detection at the relevant Timing Point, which is simply the first time after the start, and then for each round we calculate the individual participant's time.
We also calculate the number of rounds each participant has completed and their best time of the 3 rounds.
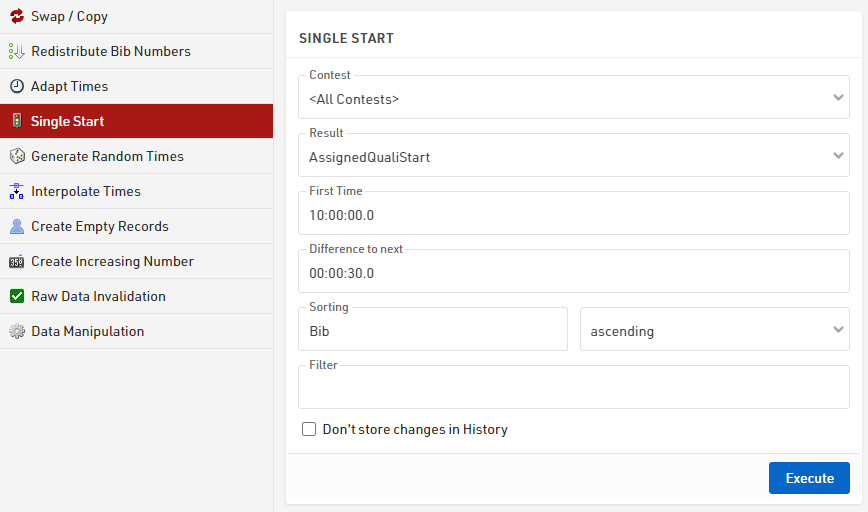
For the qualification we set the times using the Adapt Data - Single Start feature which sets a static time for each participant at set intervals according to the sorting criteria. This could alternatively be calculated directly in the result or imported with the participant data.
The Semi-Finals time uses a Choose() function based on the heat number (which we will calculate later) which then returns a time for each heat.

Since the Finals are a single round we have a fixed time in here.

Note that for both the Semi-Finals and Finals the times are in square brackets, this ensures that the software knows to convert this to a time that is internally stored as a decimal value in seconds.
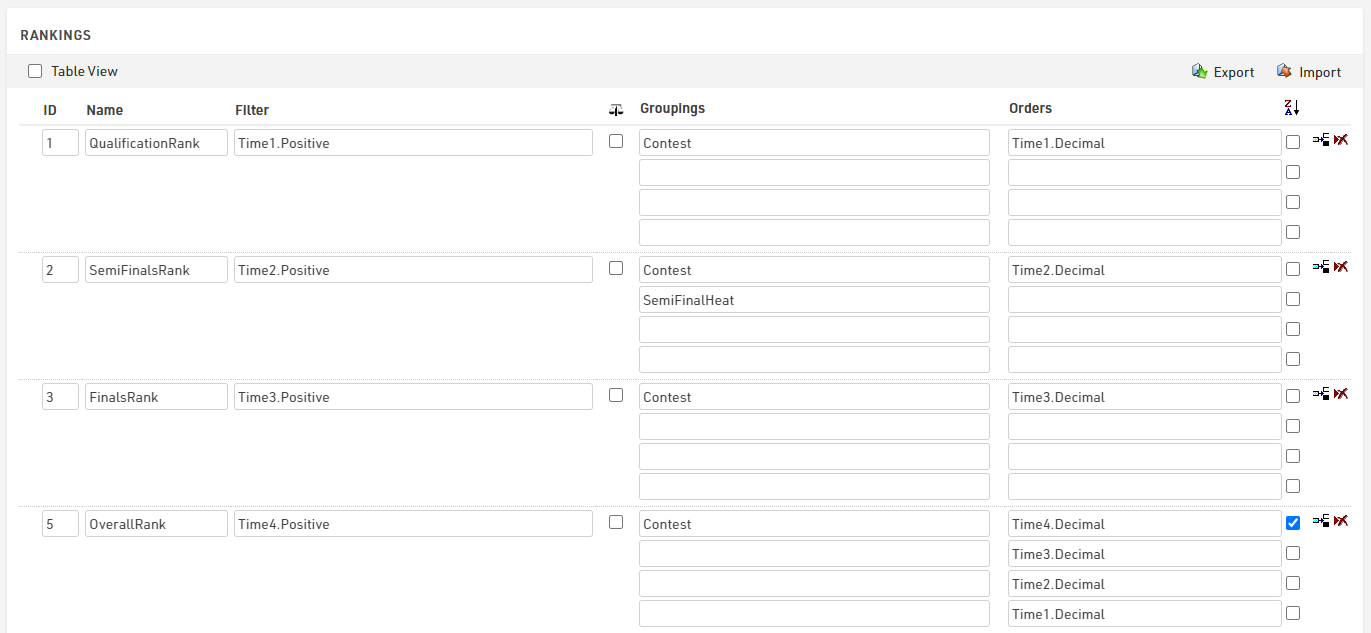
Rankings
For this we need 3 main ranks, one for each round, and also produce a final overall ranking which helps put everybody in one output list later on.
Each of the round ranks filters on TimeX.Positive, so only those with a time in the round are ranked, the Semi-Finals additionally groups by the HeatNumber so that we only compare those of the same heat for the progression to the finals.
Our final overall rank is based on the number of rounds completed from largest to smallest (so those who qualified for the Finals will have 3 rounds whereas those knocked out during Qualification will only have 1. We then sort based on their Finals time, Semi-Finals time and lastly the Qualification time.
Round Progression
The most important part of this setup is how participants progress from Qualification to Semi-Finals to Finals. This is calculated automatically and dynamically using 2 User-Defined Fields.
Each User-Defined Field looks at the relevant rank to return a heat number for the next round.
For the SemiFinalHeat we take their Qualification rank as an input and return the heat number based on this using a Choose() function.
Choose([QualificationRank];1;2;1;2;2;1;2;1)
To understand this, here is the mapping of the ranks to heats.
| Rank | Heat | Rank | Heat | |
| 1 | 1 | 5 | 2 | |
| 2 | 2 | 6 | 1 | |
| 3 | 1 | 7 | 2 | |
| 4 | 2 | 8 | 1 |
Those with a Qualification Rank of 9 or higher therefore do not receieve a SemiFinalHeat and do not progress.
For the Finals we can simplify this and us a simple If() statement to only take those in the top 2 of their Semi-Final heat, we need to also check that the rank is greater than 0, since those who are not ranked will return a rank of -1.
If([SemiFinalsRank]<=2 AND [SemiFinalsRank]>0;1)
Outputs
Start Lists
For each round we produce a Start List of participants, for the Semi-Finals and Finals this is filtered to only qualified riders, and within each heat participants are sorted by their time from the previous round.
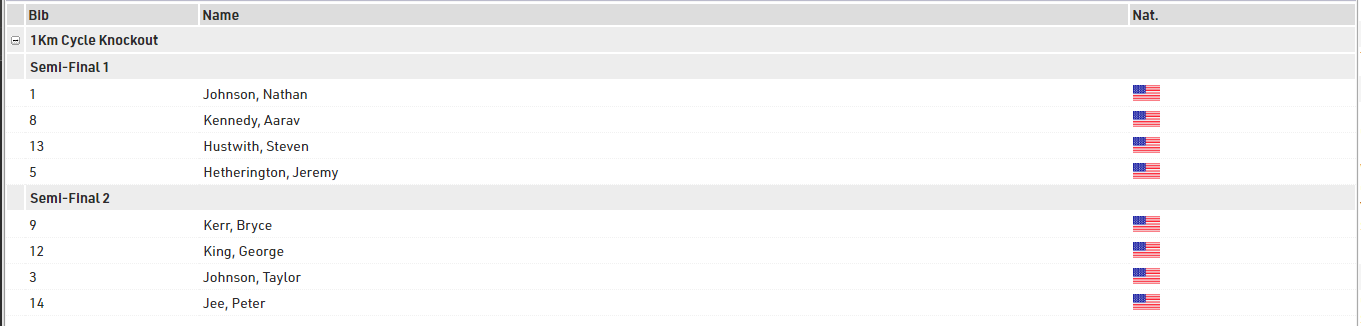
For the Semi Finals we group by Contest and then concatenate "Semi Final " and their heat number, then sort by decimal value of their qualification time.

The filter is used to only take those who have a SemiFinalHeat assigned.

The Finals Start list applied the same logic but simply groups by "Finals" and filters on the FinalsHeat.
Results Lists
For results we want to show for each round the participants' times and also who has qualified to move on to the next round.
Each rounds result list is filtered and sorted by the corresponding rank, so they are only shown if they have completed the round. We also apply the same grouping / filtering logic from the Start Lists to group by the round / heat number.
To show who has qualified we add a column which looks at the relevant rank and if this is less than or equal to the maximum rank to qualify shows a Q, for qualification this is the top 8.
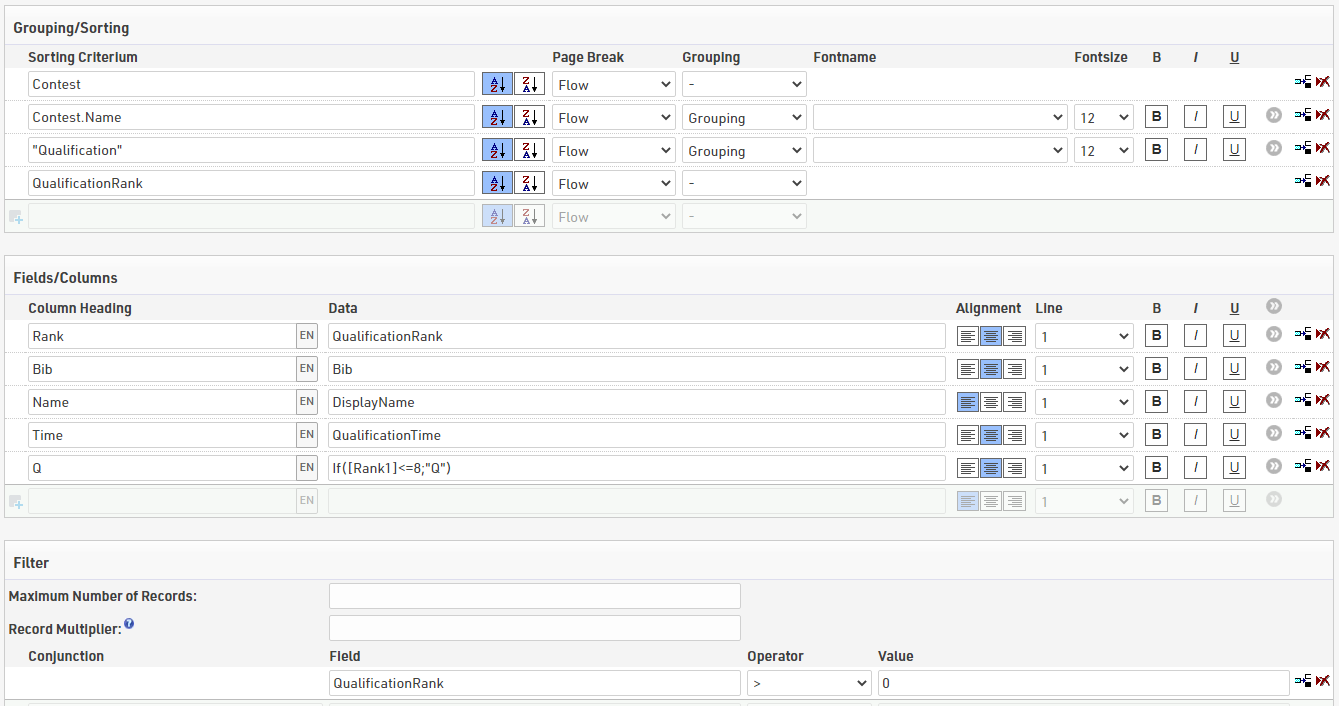
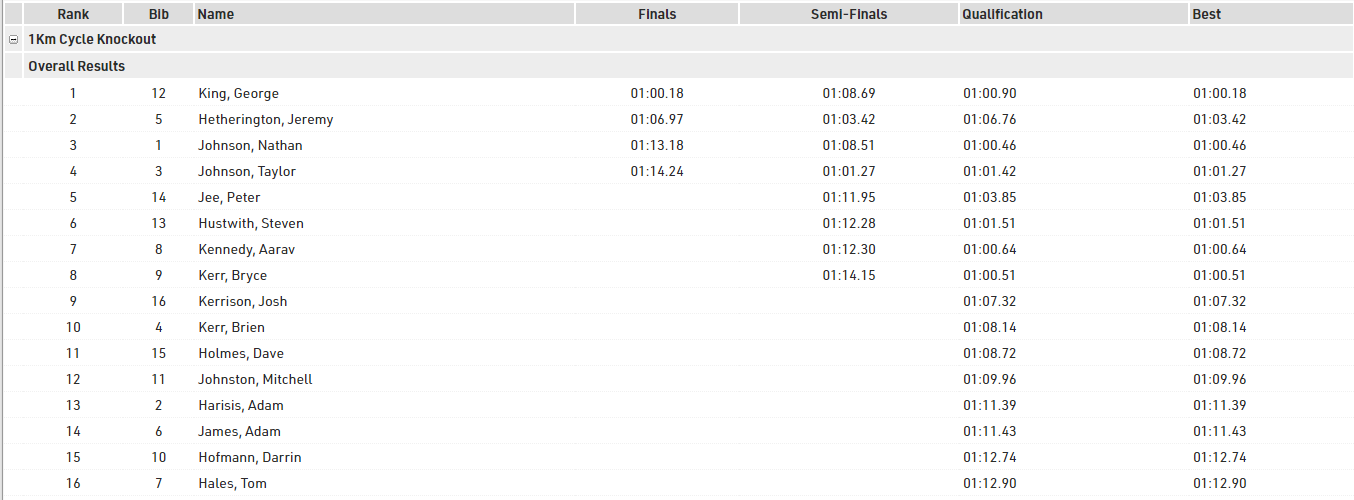
We also created an overall results list, which uses the overall rank setup earlier. With this as the main sorting criteria we can then also easily and clearly show who qualified for each round, and we also show their best time in an additional column.
Lap Race - Time Limit
This event is a general description of a lap race, where participants are allowed to race (in this example) for maximum 2 hours in a circuit of 2 km where the timing device is placed at the start/lap line. Scoring is anyway based on the most number of laps completed and then on the fastest total time.
Creation of a new event
When creating a new event, select the template Lap Race [variable number of laps], which is the perfect template for this kind of race. Once the template has been selected, define the Maximum #Laps expected to be completed from the winner. We highly suggest entering a number which is roughly the 5-10% higher of the expected laps, just for your safety. It would be inconvenient to adjust the event file during the race, if participants are running more laps than expected.
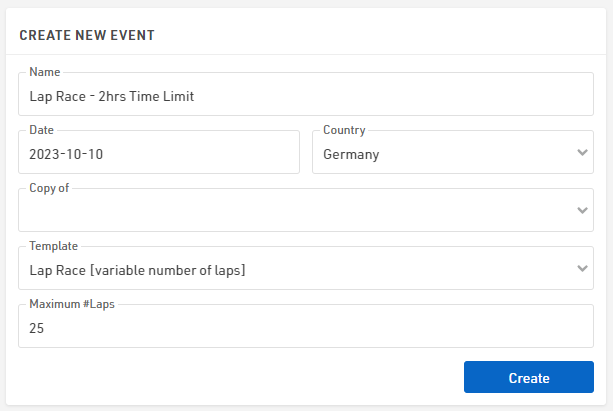
In this example, we expect participants to run with a pace above 3:00 min/km: even if a participant runs exactly at this pace, the laps completed in 2 hours will be 20, thus 25 Maximum Laps are more than enough for the following simulation.
Based on the laps entered, the template will generate Special Results accordingly: note that with more than 100 laps, the results for each lap will NOT be generated but everything is still calculated.
Definiton of the Raw Data Rules
Under Scoring ⇒ Special Results, the software has created already a set of special results reflecting the Maximum #Laps defined during the event's creation. These results are divided into 3 macro-sections, looking at the Results' IDs used.
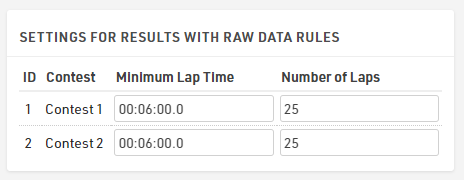
Before looking at them, it is important to focus the attention on the Settings for Results with Raw Data Rules.
By default, in the template, the Minimum Lap Time is set to two minutes. In our case, considering that a lap is 2 Km long, we set 6:00 minutes, considering the fastest pace to be 3:00 min/km.
Lap Times (IDs 1000 - 1025)
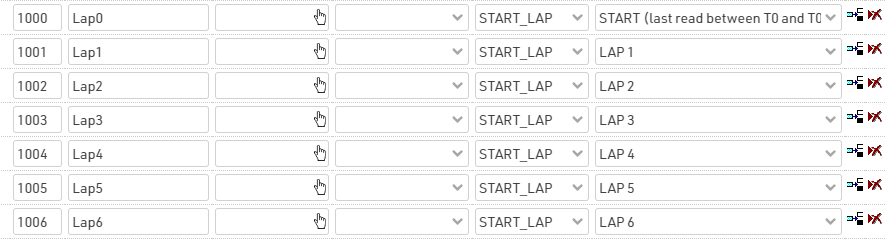
This set of results calculates the time of each completed lap. Result 1000 takes the last read from the timing device, which occurs between the official race start and the minimum lap time set for this event. For all the other results, the software will consider, as a lap detection, the first detection which has occurred after the minimum lap time.
Cumulative Lap Times (IDs 2000 - 2025)
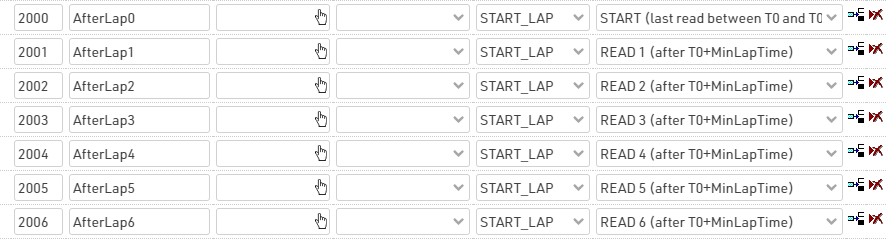
This set of results calculates the race time after Nth read.
Calculation Times (IDs 1 - 6)
This set of results is useful for creating rankings and output lists. For our final list, we want to order participants by number of laps completed (highest to lowest), and then for Finish Time (fastest to slowest). More info on Lap Race Rules.
Start Time and Finish Time Limit
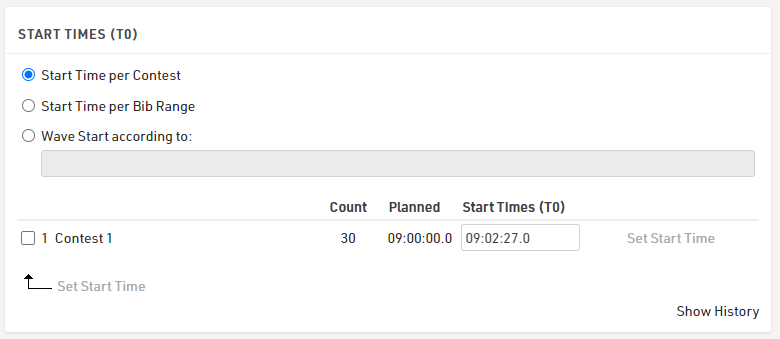
Under Timing ⇒ Settings ⇒ Start Times / Finish Time Limit, it is possible to set the official start time of the race (T0) and, consequently, the official Finish Time Limit considering that our race has a limit of 2 hrs. Note that both times have to be expressed in Time of Day.
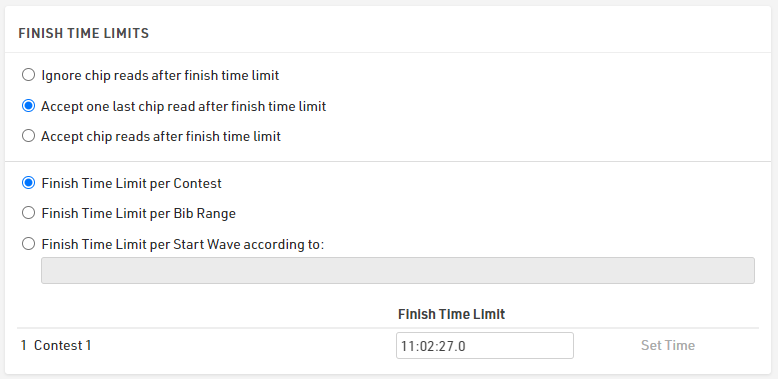
In the section Finish Time Limits, it is possible to define either to ignore any chip read after the 2 hours, or to allow one last chip read in order to allow participants who start their last lap before the finish time limit to complete this lap.
Rankings
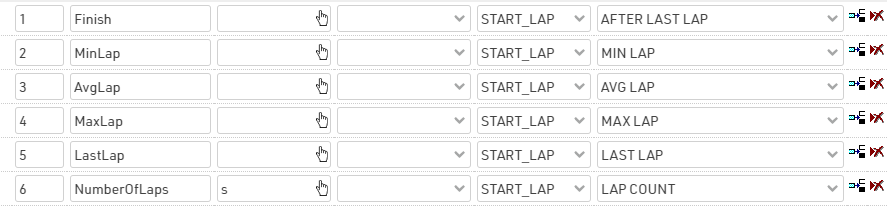
By default, 3 Rankings are defined under Scoring ⇒ Rankings.
These differ from the groupings' settings, but all sort participants by NumberOfLaps (Special Result ID6) completed (Z>A), and then by FinishTime (Special Result ID1).
Output Lists
The template includes most of the output lists requested from the organizers. The final list displays the total number of laps and finish time of each participant, together with the gap time or the difference in number of laps from the first.
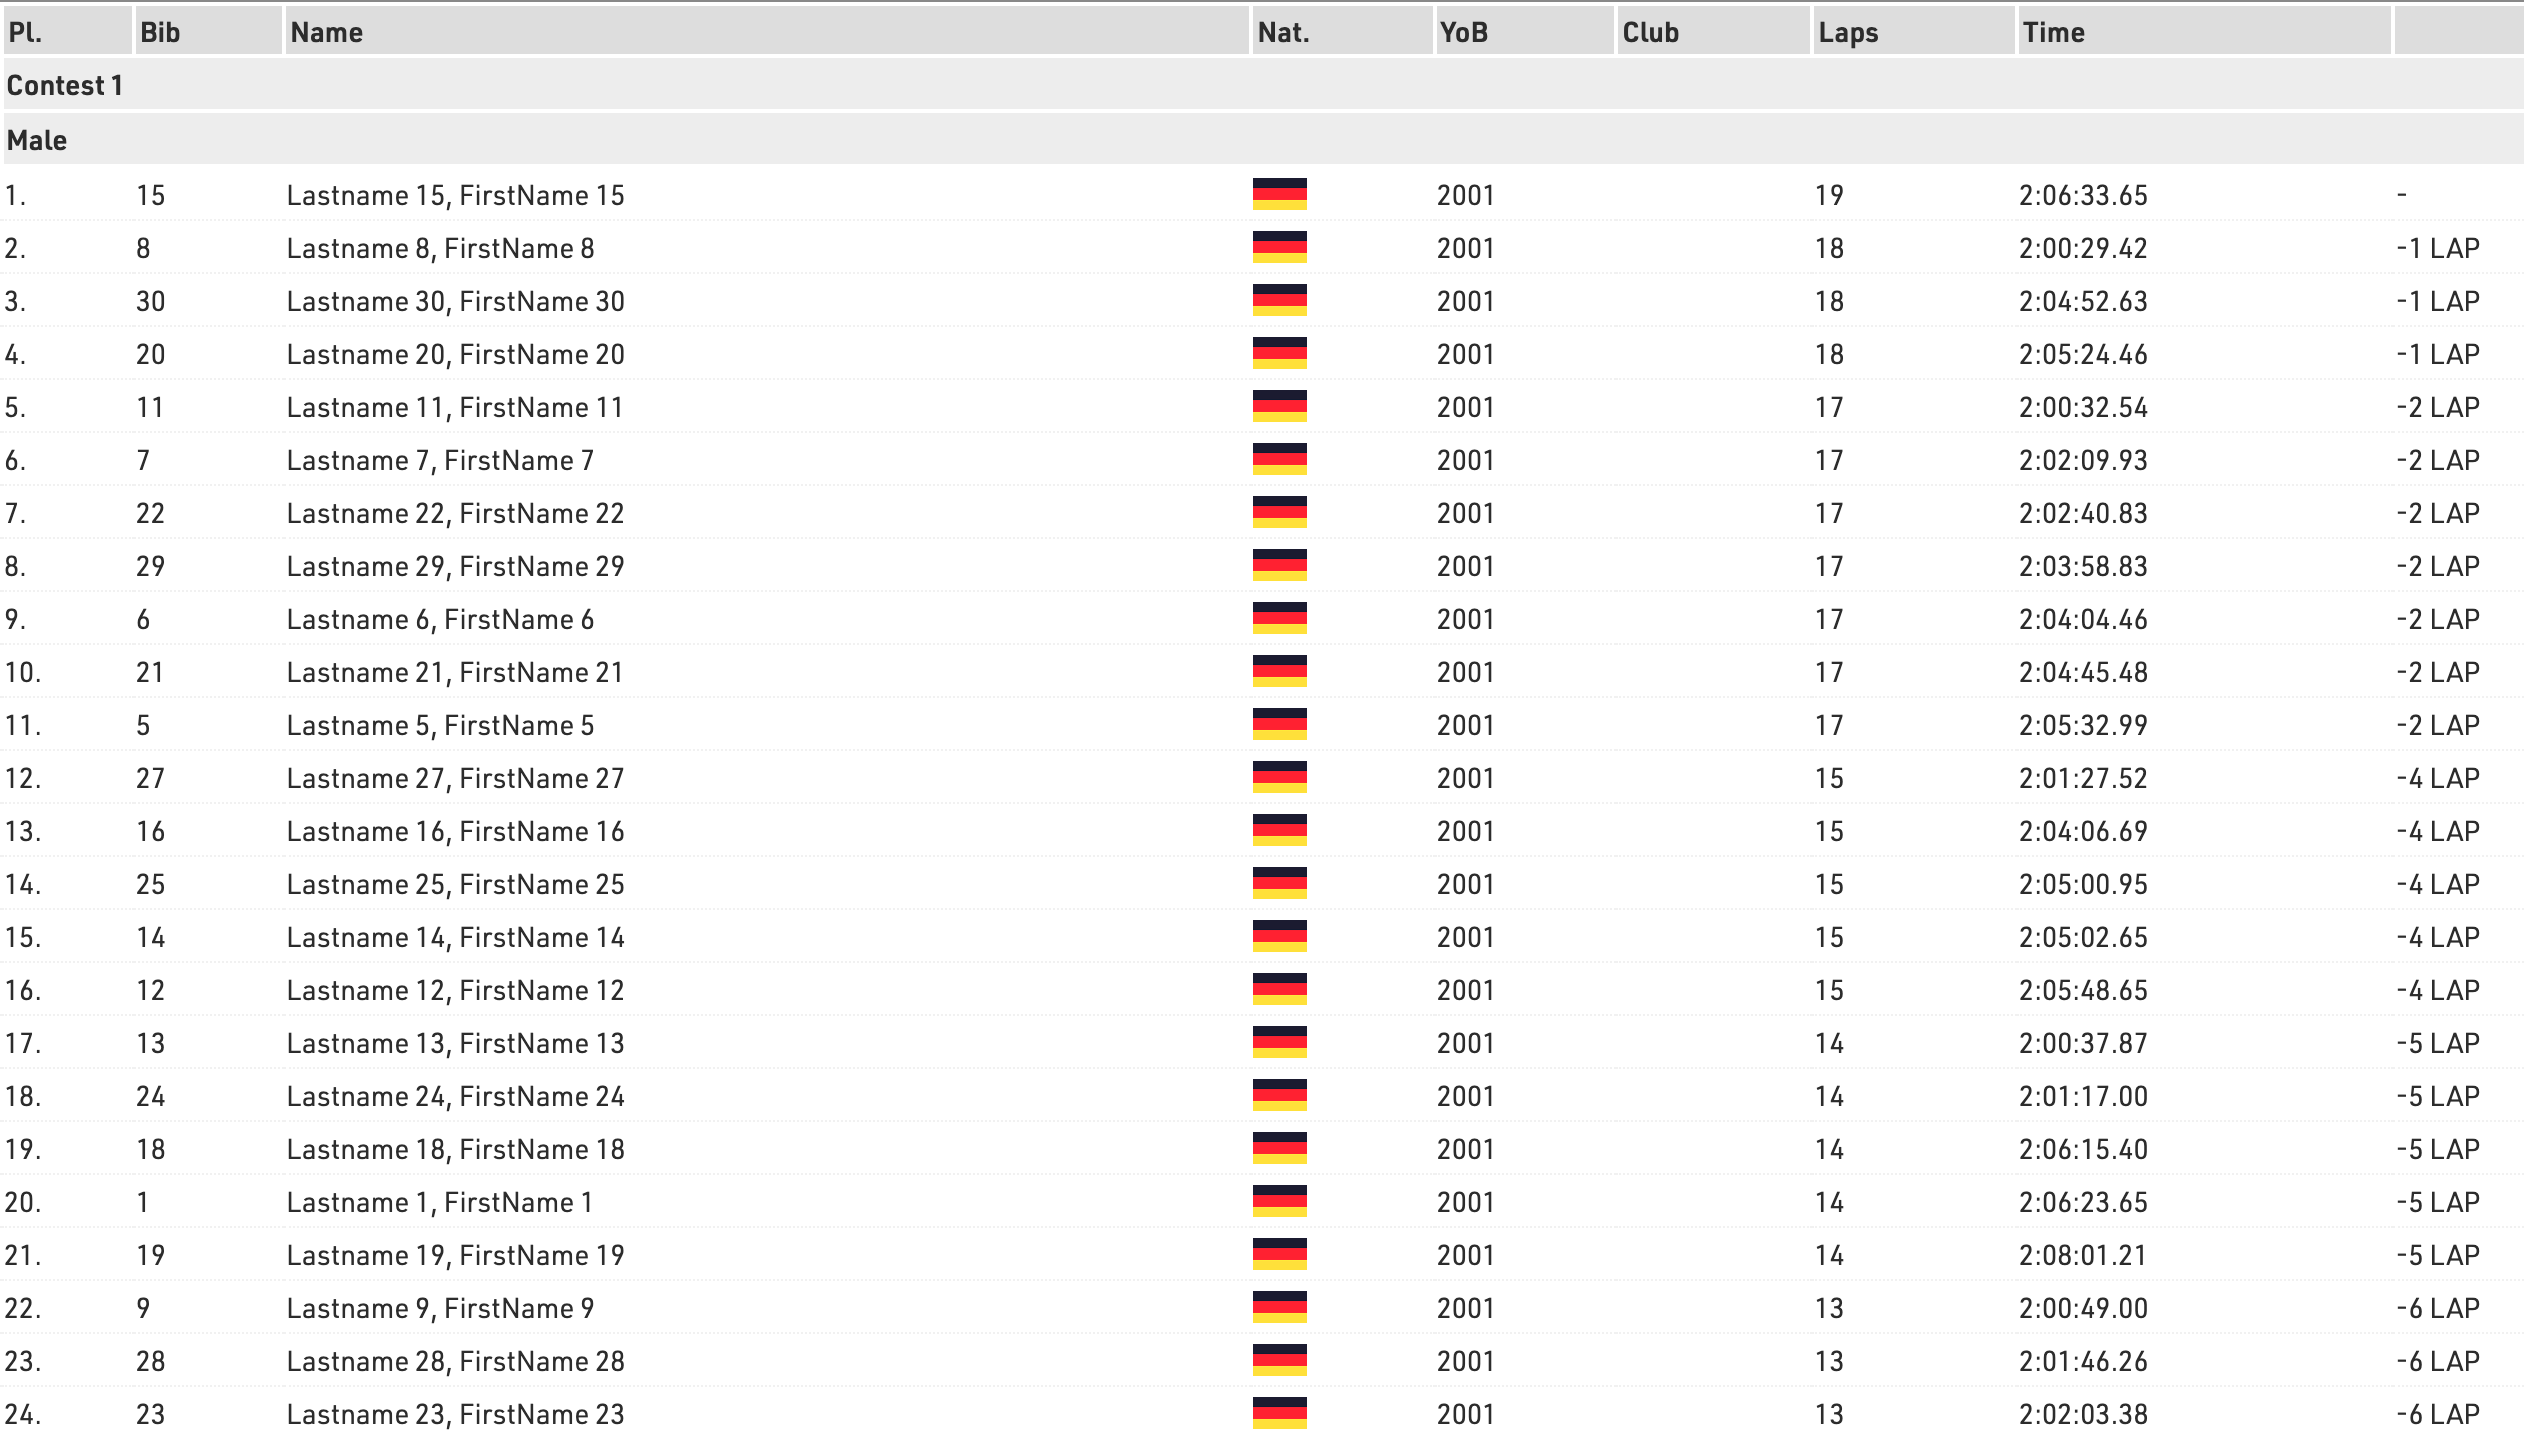
The Lap Details list displays the information of each lap of each participant, by using the advanced Record Multiplier. In the Record Multiplier field, the special result NumberOfLaps will define for each participant {n} lines matching the NumberOfLaps completed by each participant.
{n} will then trigger the calculation of the AfterLap and the Lap time for each lap.

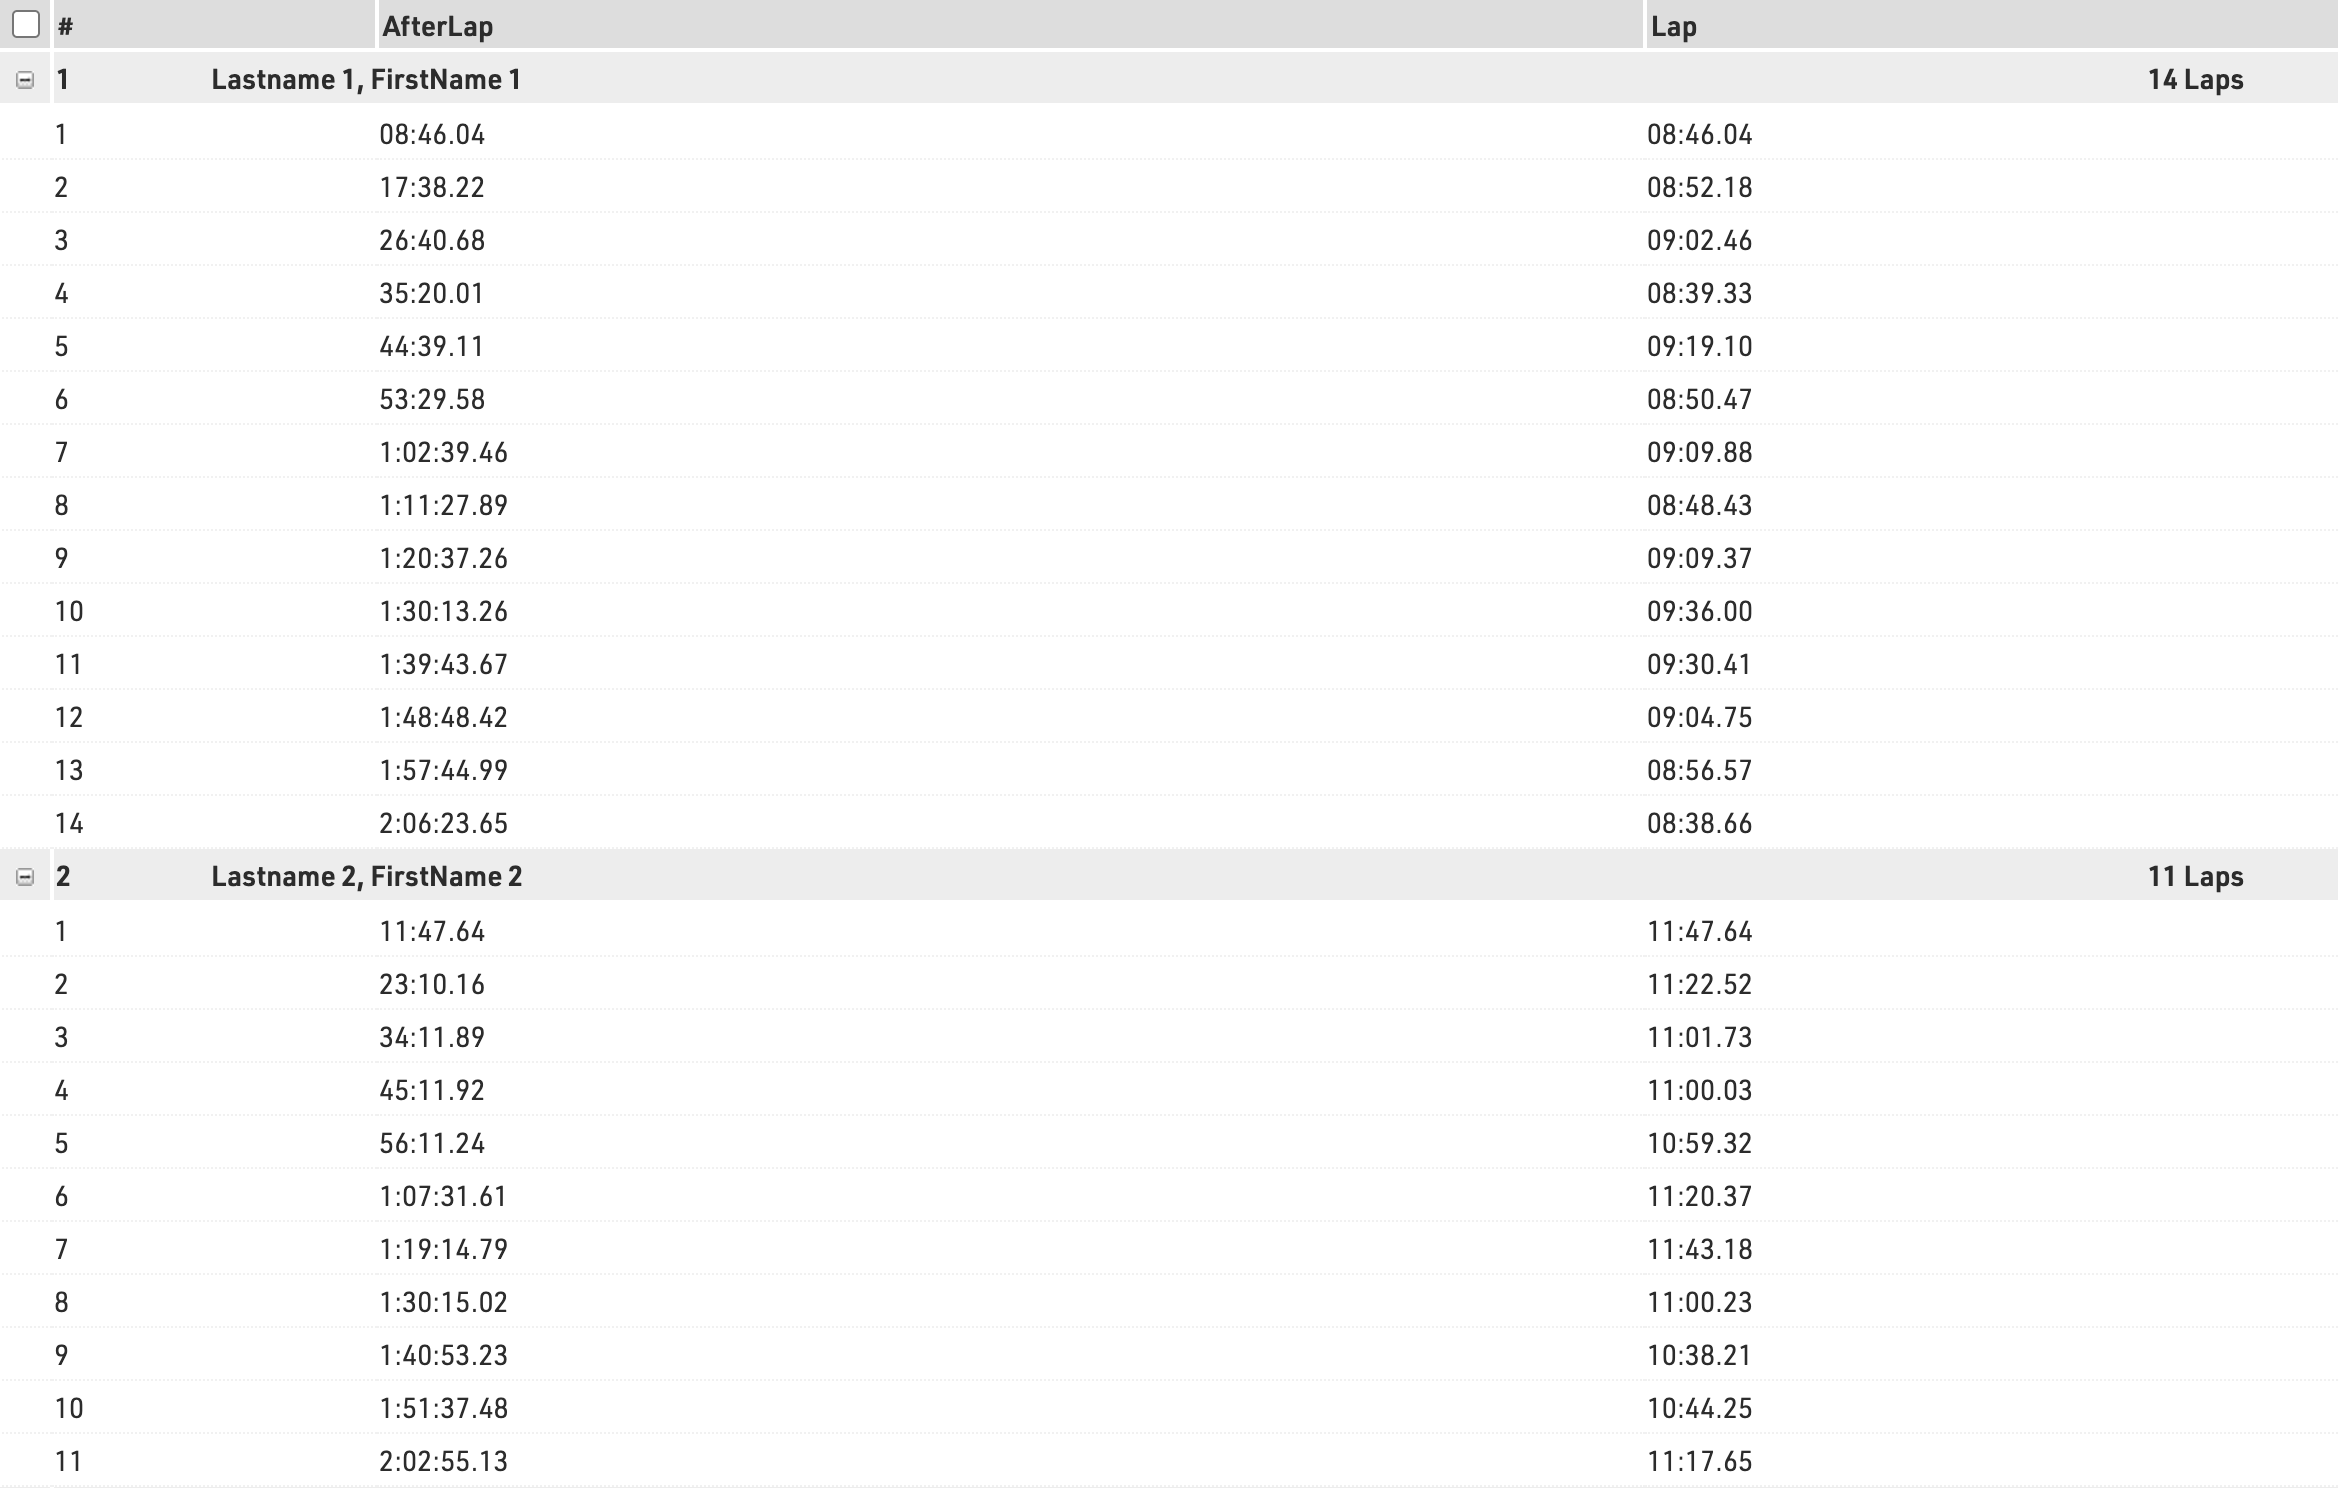
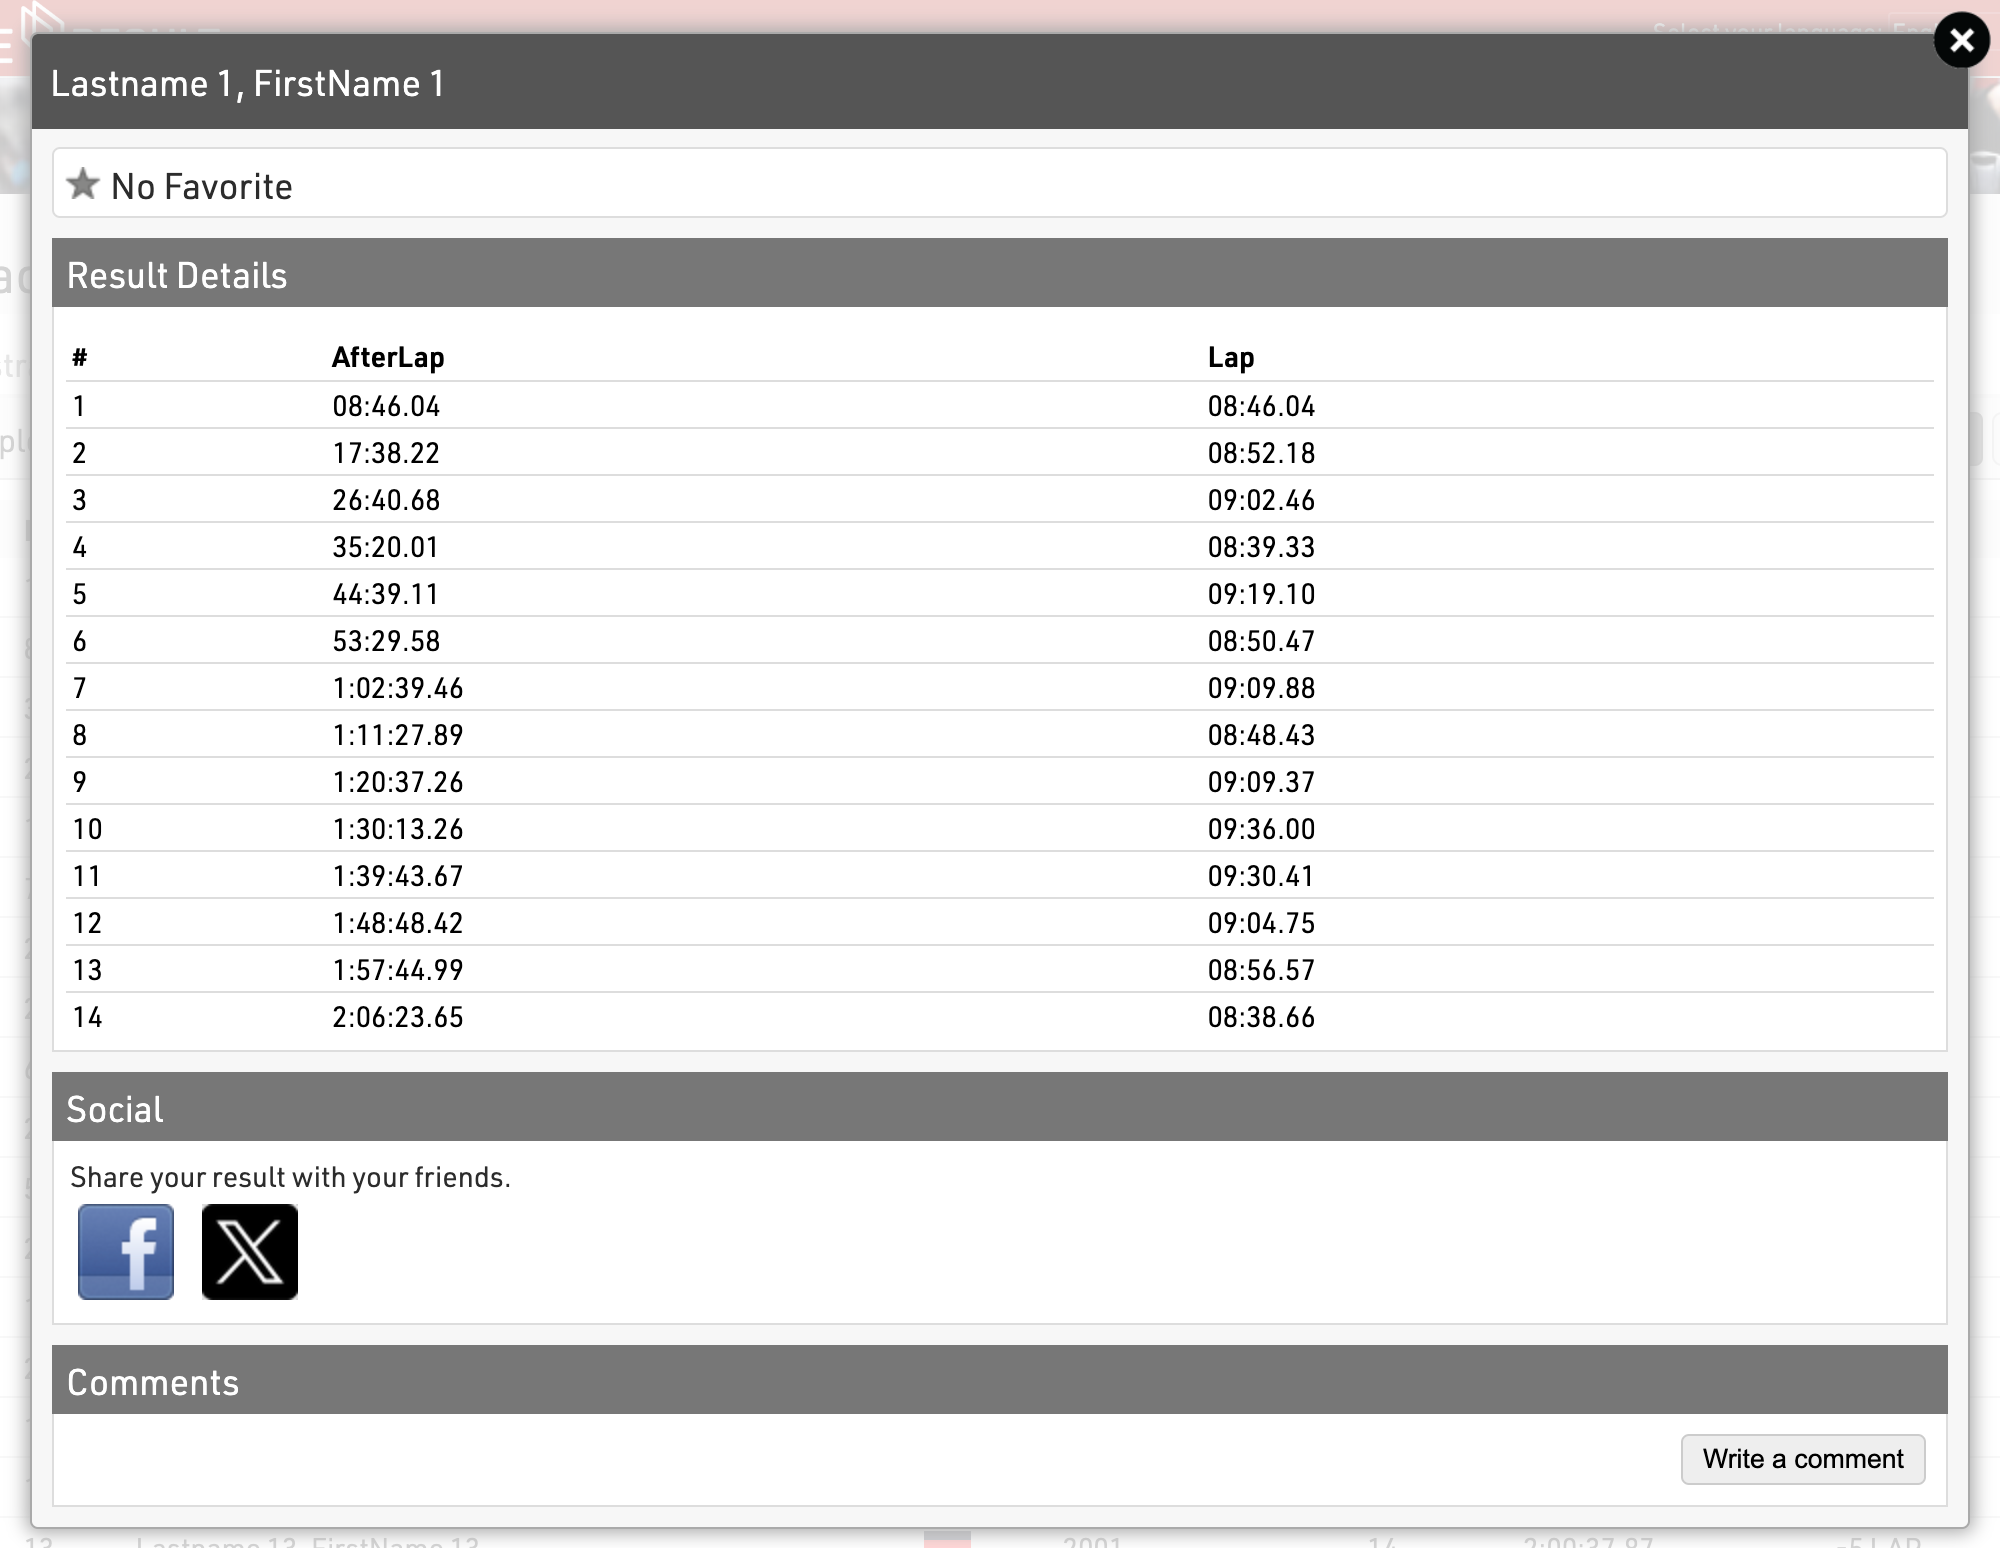
This list will be accessible on my.raceresult.com, as a detailed list of the Final output published under the Result Tab, for each participant when clicking on the participant's name.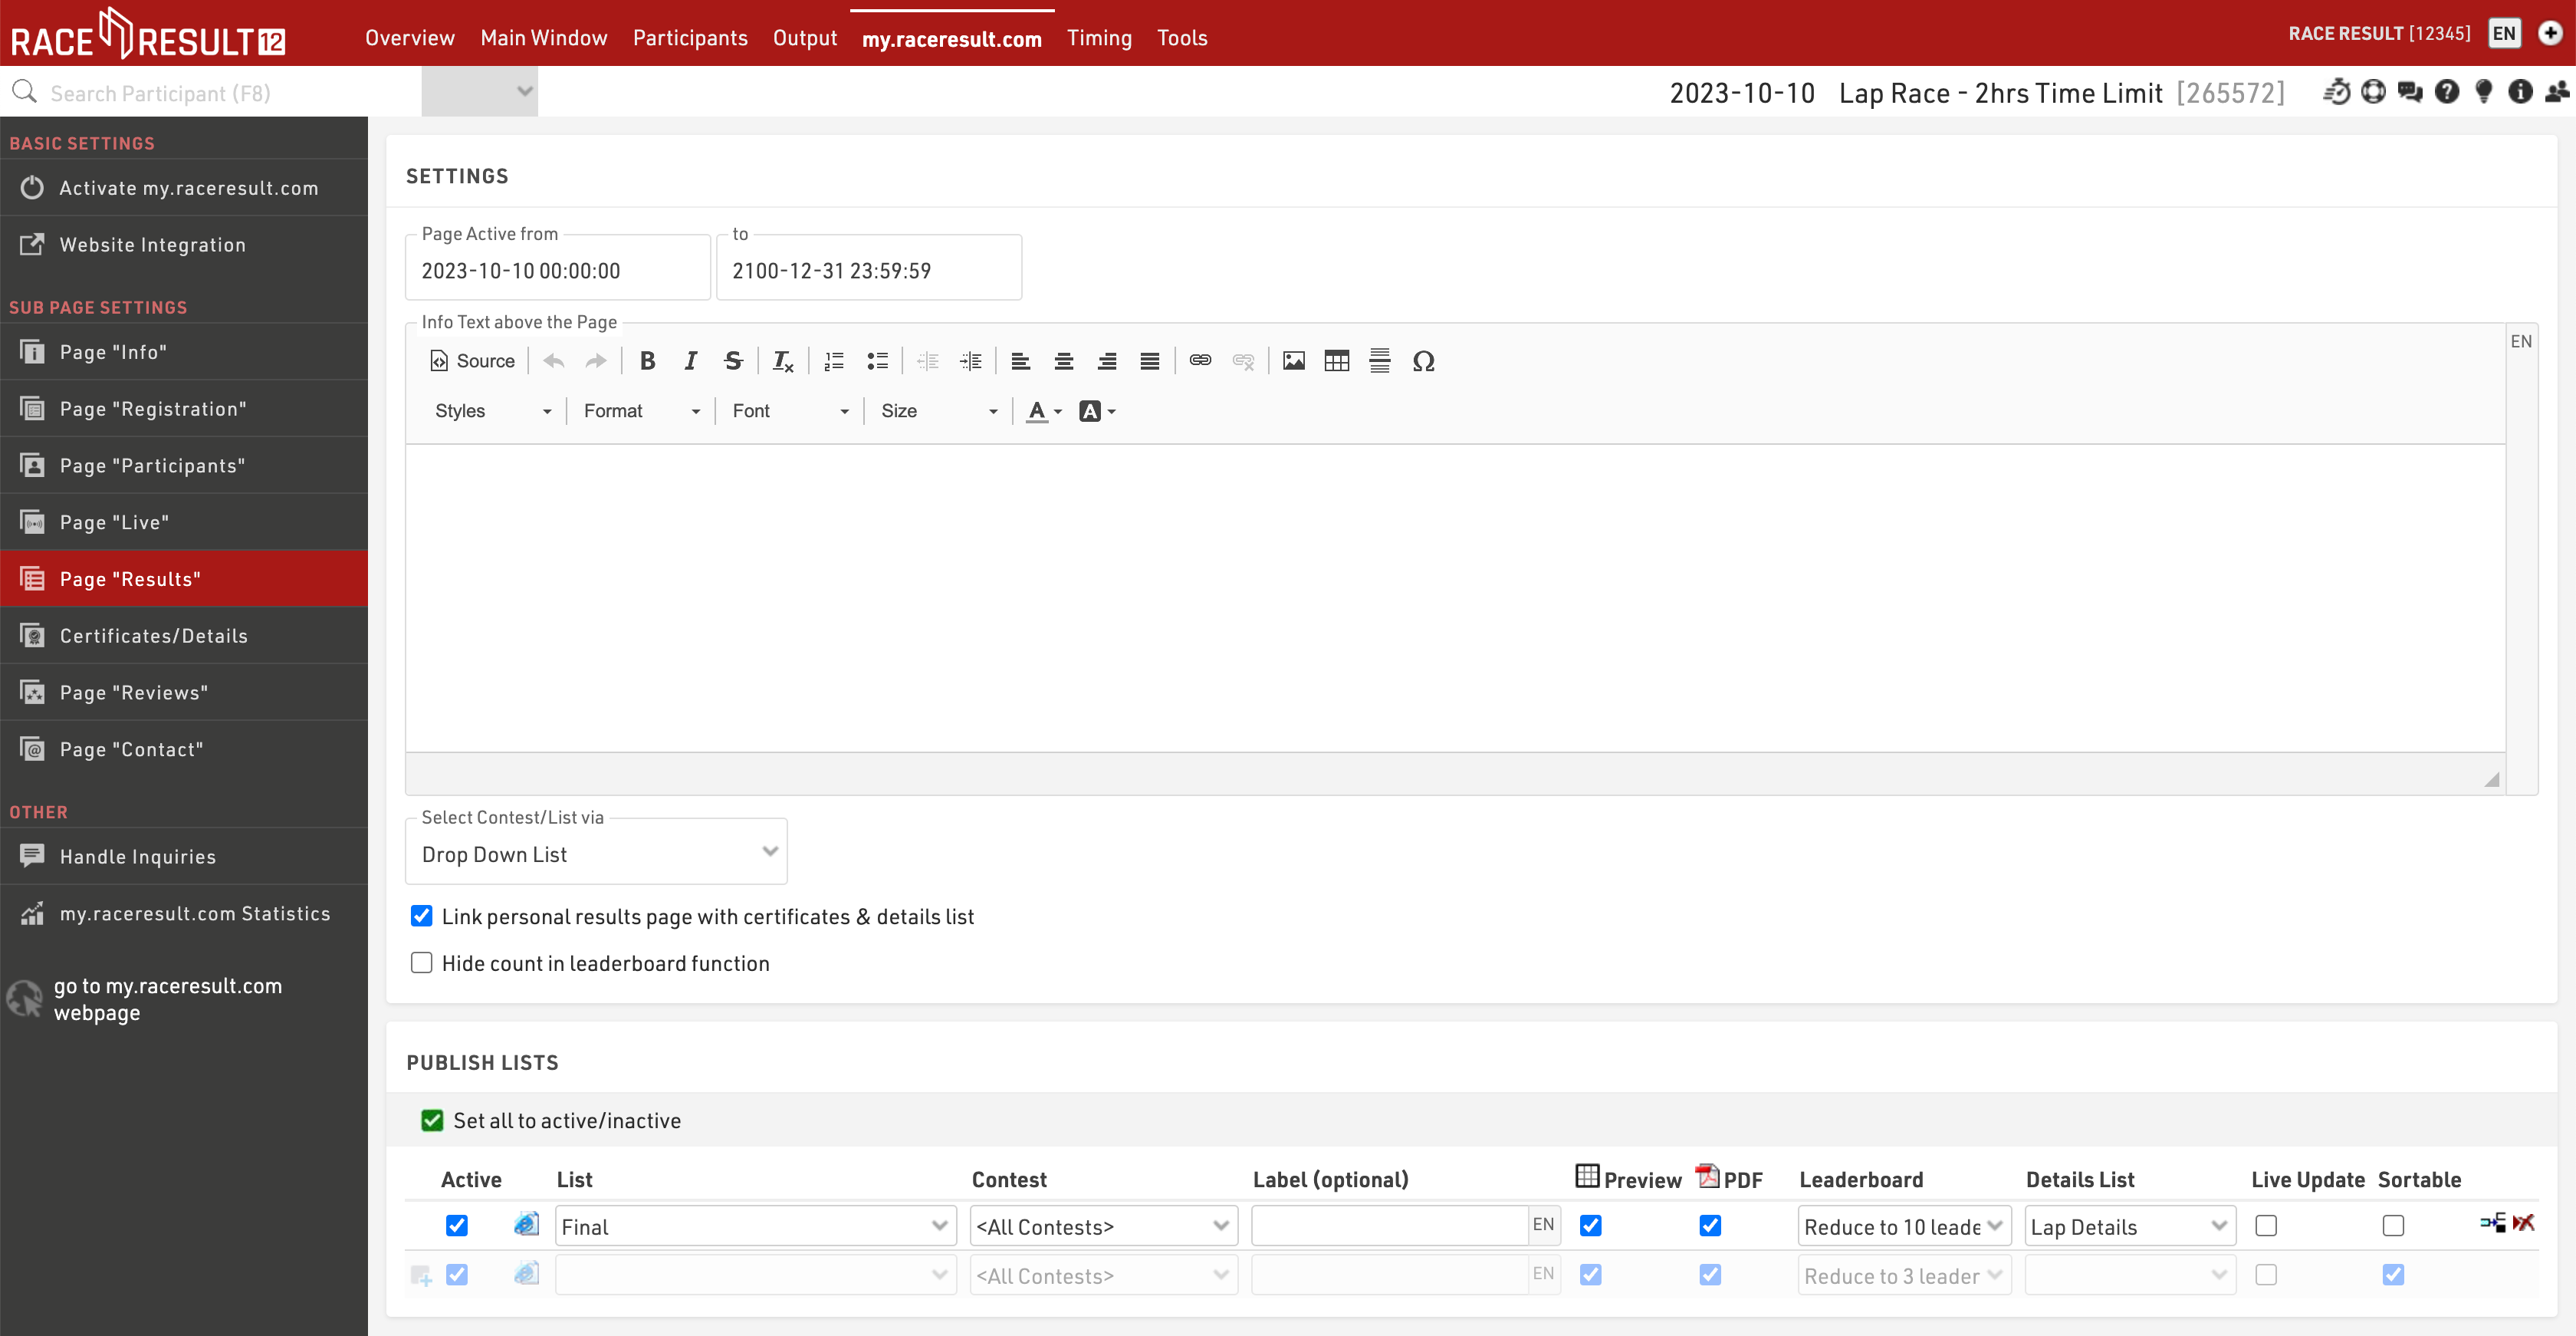
Stage Race - Simple
This is a simple setup to show the core concepts required in order to time a stage race or series race with all races setup in the same event file.
This event consists of 3 stages which all contribute to an overall tour rank based on the sum of times from each stage. There is also a team element, with teams scored on the best 2 times for each stage, to be considered for the team time for a stage a participant must have completed each previous stage as well.
Each stage is only scored on gun time.
All participants are entered in to a single Contest.
Timing Points
A unique timing point is created for each stage finish, since we are only scoring based on gun time for each stage.
Subtract start time (T0) is unticked, since we will not be referecing or using T0 at all in this setup.
Results
We'll first look at the individual results required for each stage and the overall tour.
Stage Results
To make results easier to understand we create distinct blocks of results for each stage, and use a specific Result ID range for each block.

We use results blocks of 100 for each stage (Stage 1 = 100-199, Stage 2 = 200-299, Stage 3 =300-399)
For each stage we create a result for:
- A start time as a time of day, ID X01
- A finish detection as a minimum after the start time of day, ID X02
- A calculated stage time as the finish detection minus the start time, ID X00
By following this pattern across all stages it makes later setup easier since IDs all follow the same pattern.
Tour Results
We need to know the total time at the end of each stage, for this we create a block of results with the total time at the end of each stage.

The time after stage 1 is simply the stage 1 time, subsequent stages are calculated as the time at the end of the previous stage plus the stage time. In this way a rider must complete each stage in order to have a total time. If we were to use a TTSum() to add stage times together then somebody who only completed 2 stages would still have a tour time and is likely to have a faster time than those who did complete all 3 stages.
Rankings
Individual rankings are setup for each stage, with both overall and gender ranks, then additional for the tour after each stage as both overall and gender ranks.
Team Scores
In this setup each team has 3 members, using the club field to denote who should be in the same team.
For each stage the best 2 times from the team are used to calculate the team's stage time, and then a team tour time / rank is also calculated for each stage. For the tour time / ranking a team member must have competed in each previous stage to be considered.
We created 2 team scores for each stage, the first calculates the teams' stage time, and the second is used to rank teams with their tour time.
Team Stage Time
For team scores we follow the same ID grouping to identify each stage.
The filter is set that they must have a club and must also have a total time after the corresponding stage, since we calculated this so they will only have a total time if they have completed each stage this filters as such too. For example bib 1 completed stages 1 and 3, but because they did not complete stage 2 they are not counted for the team's stage 3 time.
The Max number of teams is set to 1 and show part. w/o time this ensures that all team members with the same club are grouped together, and all receive the team time / rank.
For number of participants the min and max are both set to 2, since we are only considering the best 2 times from each team.
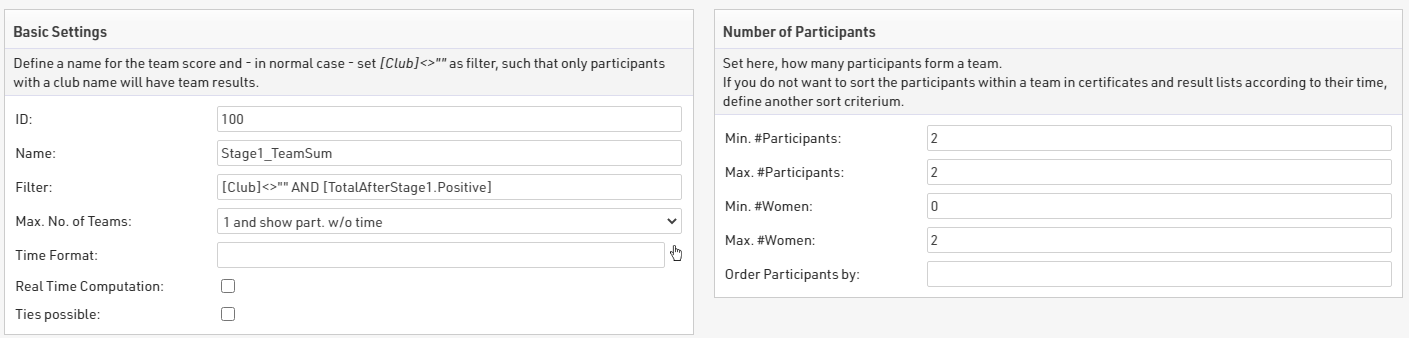
Teams are formed based on Contest and Club, and grouped according to Contest, since this setup only uses a single Contest and does not use any gender specific teams.
The results use the sum of each participant's Stage 1 time, and teams are sorted with times ascending.

Team Tour Time
To ensure we have the tour time for each team member we first call each stage time in to a result for eligble participants. To make this simpler we created a user-defined function called IfPositive(x)

This will check if X is greater than zero and if it is, will return X.
In the results for each stage we used this to call each team stage time.

The total time after each stage is then calculated in the same way as the individual totals, with a new block of results adding each team stage time individually.

To now rank teams according to their total time after each stage we create a second team score for each stage.This uses the same basic settings, aggregation and grouping, but the number of participants is set to a min / max of 1. Since all team members will have the team total time in their results we only need to look at one team member for each.
Since we are only looking at 1 participant to get the time we simply take the sum of the TeamAfterStage time, with times sorted ascending.

Output Lists
We needed to create output lists for both stage results and the overall tour results, and again for individuals and teams. Here we show 2 different approaches to producing lists, each with their own advantages / disadvantages. Some balance could be found between the 2 types, for example using a gender filter and autorank in the detailed results.
Quick Setup
The quick setup lists make use of the Results Selector which creates an additional drop down to select which result we want to look at. The selector allows for the quickest setup of a single output list to show different results in a single list, also making for a simpler online results setup. It is however limited without creating some advanced formulas, these are used briefly in the team quick results.
The selector calls the relevant stage time, or team stage time with the corresponding label and AutoRank is used to display the stage rank.

For individual results we also apply a filter to the Gender, allowing to quickly see gender specific results, or an overall result.

Team results have an additional filter to only show 1 record per team filtering by team score position is equal to 1. However as we need to look at a different team score depending on the selector we use a function here to take the ID of the selected result to calculate which team score to reference.
This is simplest in the Team Tour Results where the selector looks at results 21-23, so we use a choose() function with [SelectorID]-20, which will return 1,2 or 3, to return the corresponding stage team score.

Detailed Setup
The detailed results includes a more thorough breakdown, with this setup we had to create separate overall / gender outputs for individual results, for each stage.
The breakdown outputs use the ranks which were setup for each stage, so ensures that the rank displayed is correct. This becomes particularly import with more complex stage races which may have more advanced requirements for ranks.
By using a specific list for each display needed we can more easily include additional fields such as gaptime() which rely on a result ID and rank ID, which could otherwise only be shown with a more complex formula.
For team stage results we apply a grouping for each team to show each eligible team member who finished the stage, here we also highlight the team members who were used for scoring. To do this we use a simple IF statement looking at TSx.Scored which is true if their time was used for the team calculation.
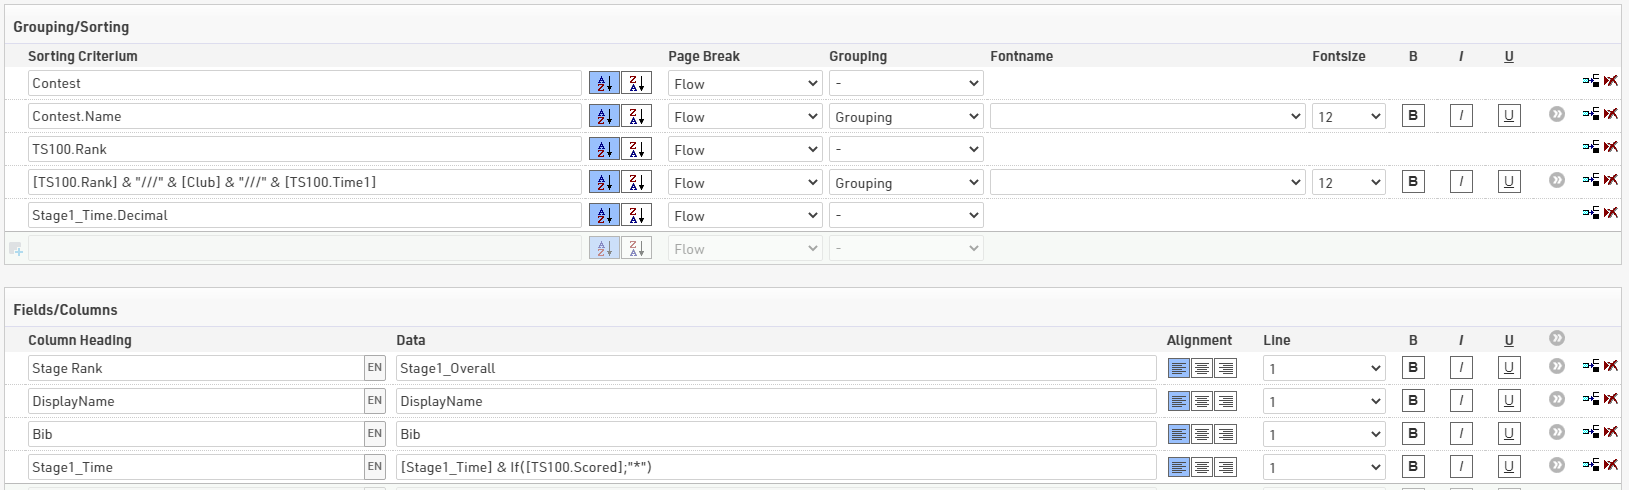
Within the tour results we're also able to show the time for each stage up to and including that point in time, making for a more detailed breakdown of each team's time.
Stage Race / Series Considerations
This setup is a simple example to show the principles of how to setup a stage race or series in a single event file. When dealing with such events there may be a number of other aspects to consider, these include;
- different start waves for each stage
- bunch time calculations (for cycling)
- age group calculations
- penalties / bonuses
- points per stage / total
- subtract start date (requires use of d:hh:mm:ss for stage start times)
The same concept can be applied to all of these but the complexity can increase exponentially with such races.
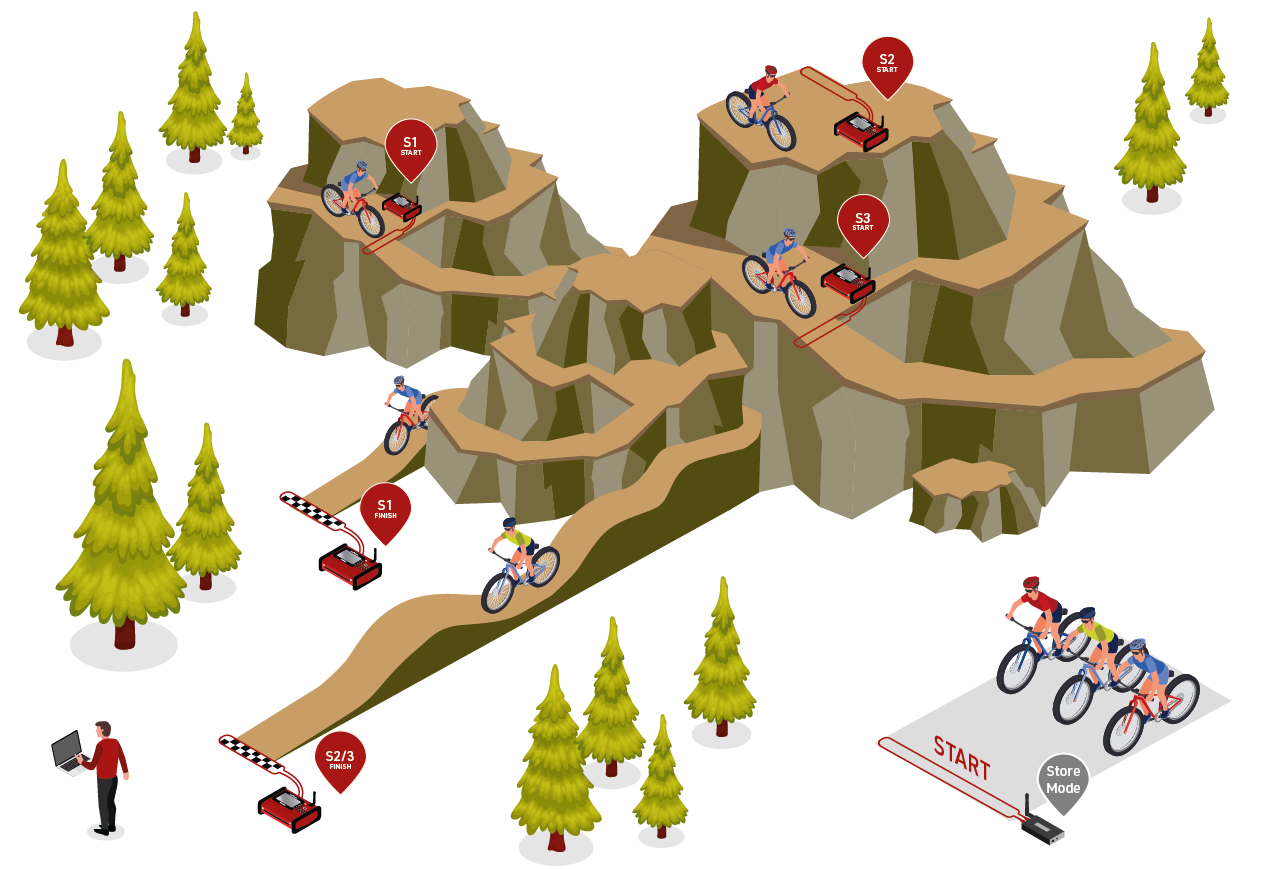
MTB Downhill Enduro - 7 Stages
Introduction
In this guide we explain how a MTB Downhill Enduro event could be managed using RACE RESULT 12, providing timing, scoring and live results presentation.
For this example, the event consists of 7 stages, spread over two consecutive days. For each day there is an initial start which is later used to calculate a total sector time for the first stage of each day.
In this example, an Ubidium System is used for each stage Start and Finish to provide live results. A similar setup could be achieved using Loop Boxes in Store Mode for the stage starts, this would not impact the results setup but would limit the live results.
Day 1 - Stages 1, 2 and 3
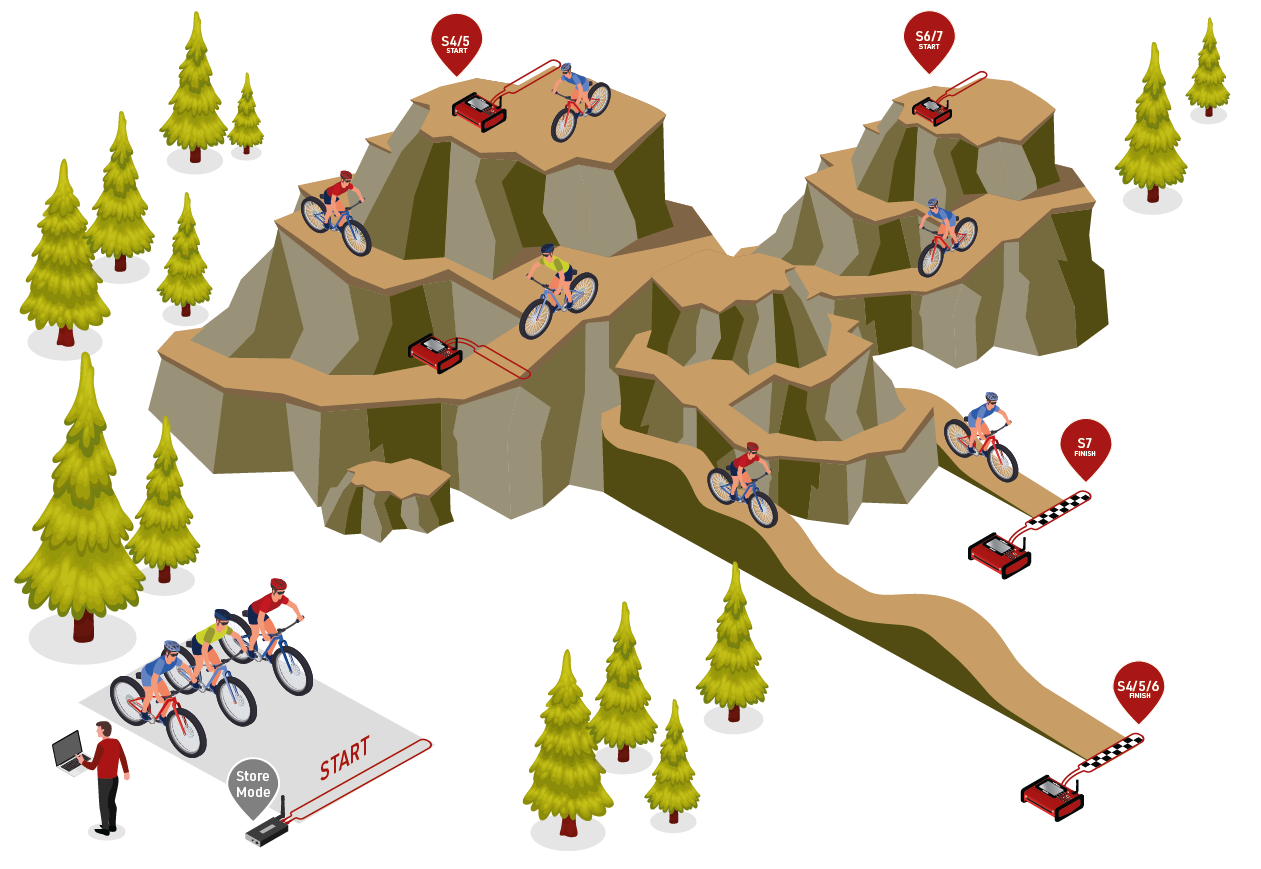
Day 2 - Stage 4, 5, 6 and 7
Event Settings
Additional Fields
Since the event consists of 7 stages, we may need to manage participants' status per each stage, however, RACE RESULT 12 offers only one single field for defining the Status of participants.
Using Additional Fields we can create 7 additional status fields, one for each stage, in order to change the participant's status of a specific stage.
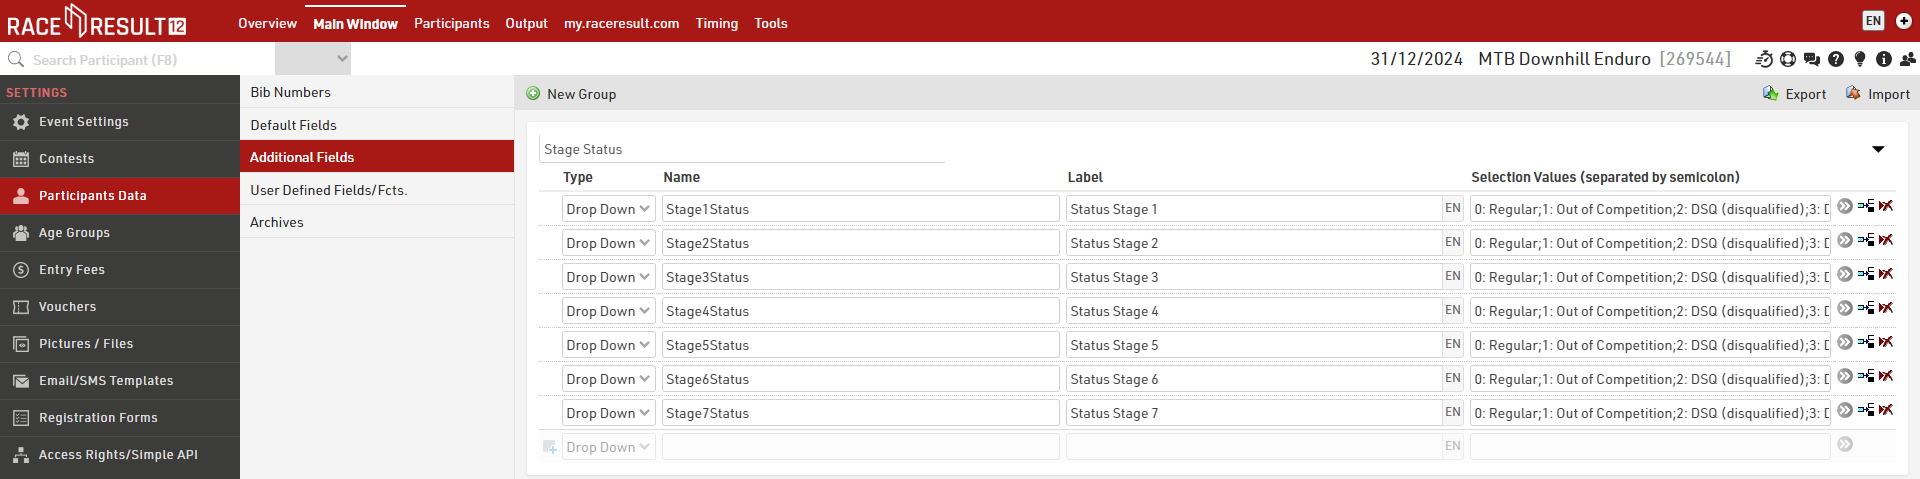
These are defined as a Drop Down and for the selection values we maintain the same logic as the default Status field, using a number and a description for each different status. This format later helps with the sorting of participants in output lists by using the numerical value for sorting.
0: Regular;1: Out of Competition;2: DSQ (disqualified);3: DNF (did not finish);4: DNS (did not start);5: did not show up
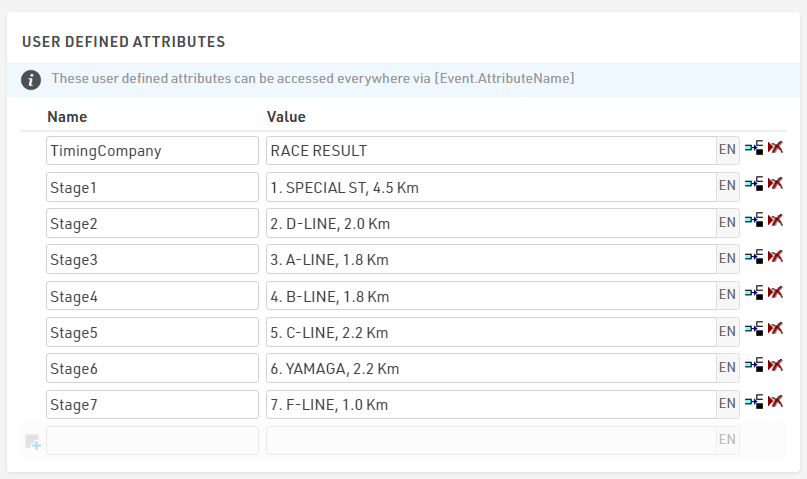
Event User Defined Attributes
To make it easier to later call the details of each stage in Output lists we use Event User Defined Attributes.
Here we created a User Defined Attribute for each stage giving the stage number, stage name and stage length.
These can be called using for example [Event.Stage1], which returns the same value for each participant. In the event that you have different stages for different participants in different Contests you could choose to store these in Contest User Defined Attributes.
User Defined Fields/Fcts.
User Defined Fields / Functions allow us to create our own functions which can be easily called to make it easier to return specific data without needing to copy long expressions each time.
Here we created two User-Defined Functions to easily call the stage name and participant stage status.
The first is a function called StageName which takes a single parameter which we call StageID, this is purely a placeholder to make it easier to understand what value the function expects to receive.
StageName(StageID) - choose([StageID];[Event.Stage1];[Event.Stage2];[Event.Stage3];[Event.Stage4];[Event.Stage5];[Event.Stage6];[Event.Stage7])
This function uses a choose() function which takes a number input to return a value. In this example, StageName(1) would return the value for [Event.Stage1].
The second function is used to return the numerical value for each stage status, we called this StageStatus which again additional takes the StageID as a parameter.
StageStatus(StageID) - left(choose([StageID];[Stage1Status];[Stage2Status];[Stage3Status];[Stage4Status];[Stage5Status];[Stage6Status];[Stage7Status]);1)
This function uses a combination of left() and choose() functions to return only the first character of the stage status fields which we defined earlier in the Additional Fields.
A third UDF, ShowStatus(x) is used for returning the stage status abbreviation whenever (x) is different from zero. This will be used in the announcer list to define the status of participants who did not cross the finish line of each stage. [x] will be filled with the StageStatus(StageID) explained above.
ShowStatus(x) - choose([x]+1;"OK";"a.k.";"DSQ";"DNF";"DNS";"n.a.")
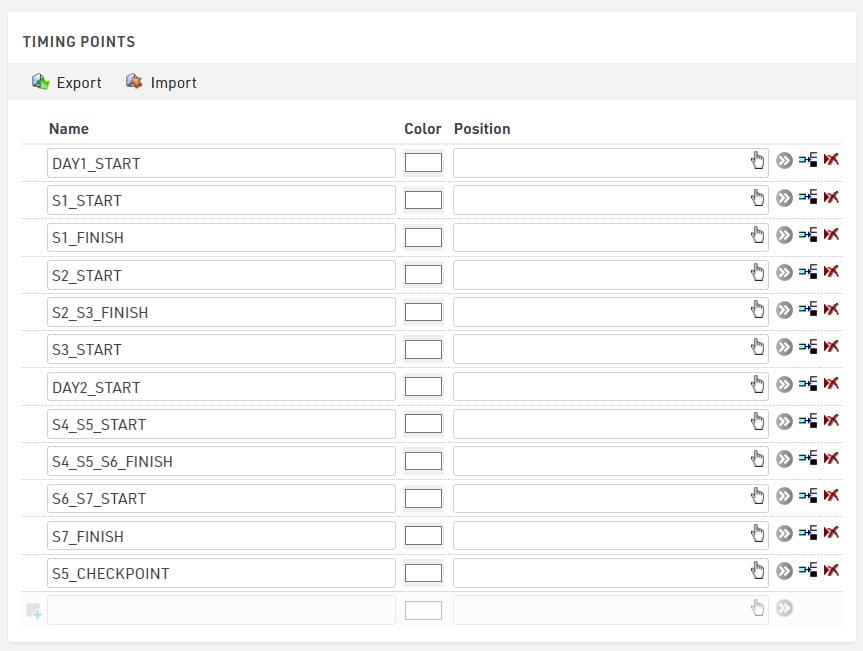
Timing Points
The same systems are used for both days of the event.
To make it easier to manage the assignment of times we create separate Timing Points for each stage, although note that some stages may share Timing Points (e.g. Stages 2 and 3 both finish at the same Timing Point).
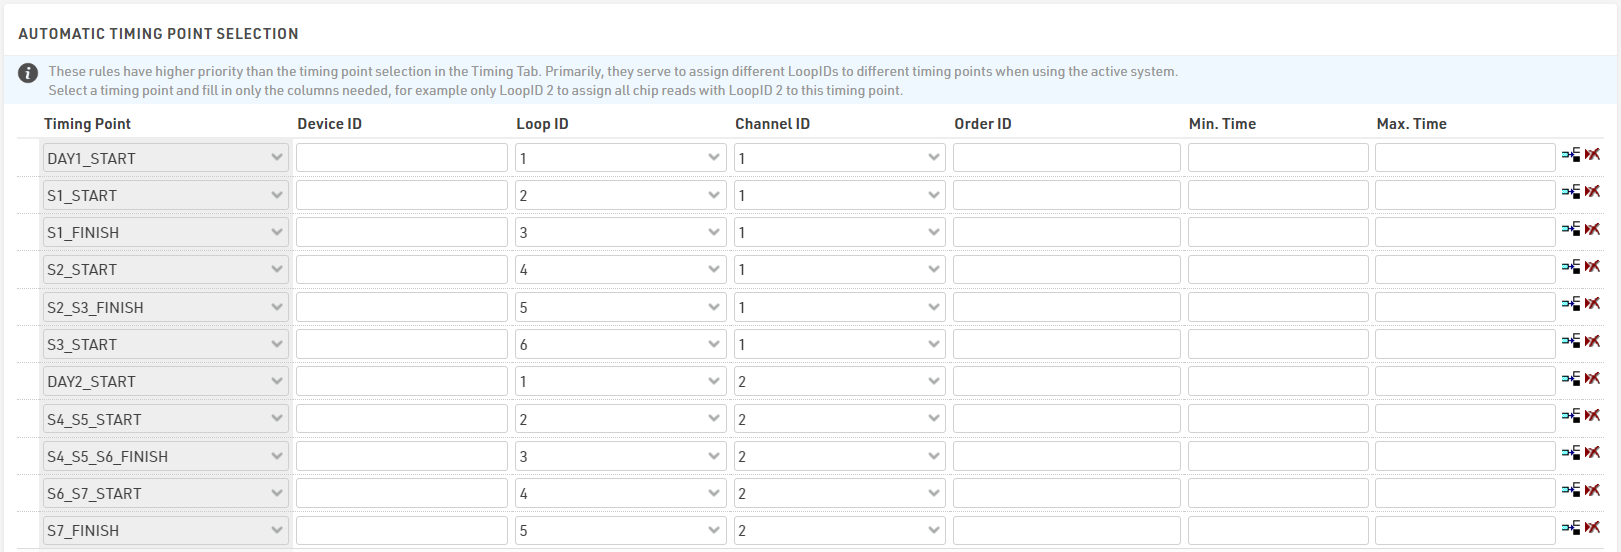
Automatic Timing Point Selection
When using multiple active systems it is recommended to use the Automatic Timing Point Selection to assign data from each system to the correct Timing Point. Each Timing Point should be setup with a unique combination of Channel ID and Loop ID.
To make things easy to check we used a unique Channel IDs for each day, and then used sequential Loop IDs for each Timing Point.
Special Results
When timing events with multiple stages you will need to use Special Results to calculate your results. It is important to keep a consistent structure here to make it simple to understand and easier to expand as needed.
The basic Stage Race example outlines the basic principles of how you will need to structure Special Results for a stage race.
Individual Stage Results
We first create results for the Start of each day in results 51 and 61. This takes the Maximum after T0, but it is important to note that T0 is set to 0 for this, since the stages on subsequent days may not start at exactly the same time.

For each stage, we create a set of results which will store the raw timing data and the necessary calculations for each stage.
Each stage follows the same logic, with each stage starting at a new hundreds unit, which matches the stage number.
The Finish result always refers the start detection of that stage, taking then the first read from its timing point which satisfies the rule set.

Each subsequent stage will reference the finish time of the previous stage in order to ensure the correct stage start time is used. For example the result for Stage2_Start is defined as the Maximum after T111, where T111 refers to the result Stage1_Finish.

Cumulative Stage results
For displaying the overall rank after each stage, with the relative time, we create a set of results where we sum up the stage times.
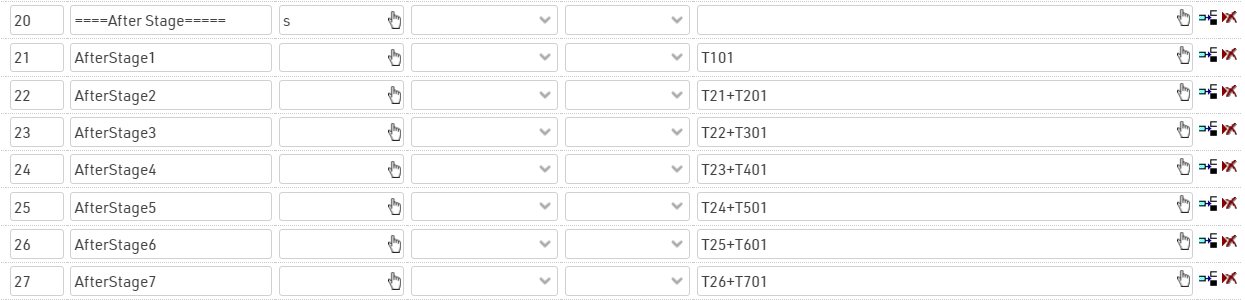
In this case, we don't use TSum() since if a rider does not have a result for a particular stage then the cumulative times for subsequent stages should not be calculated.
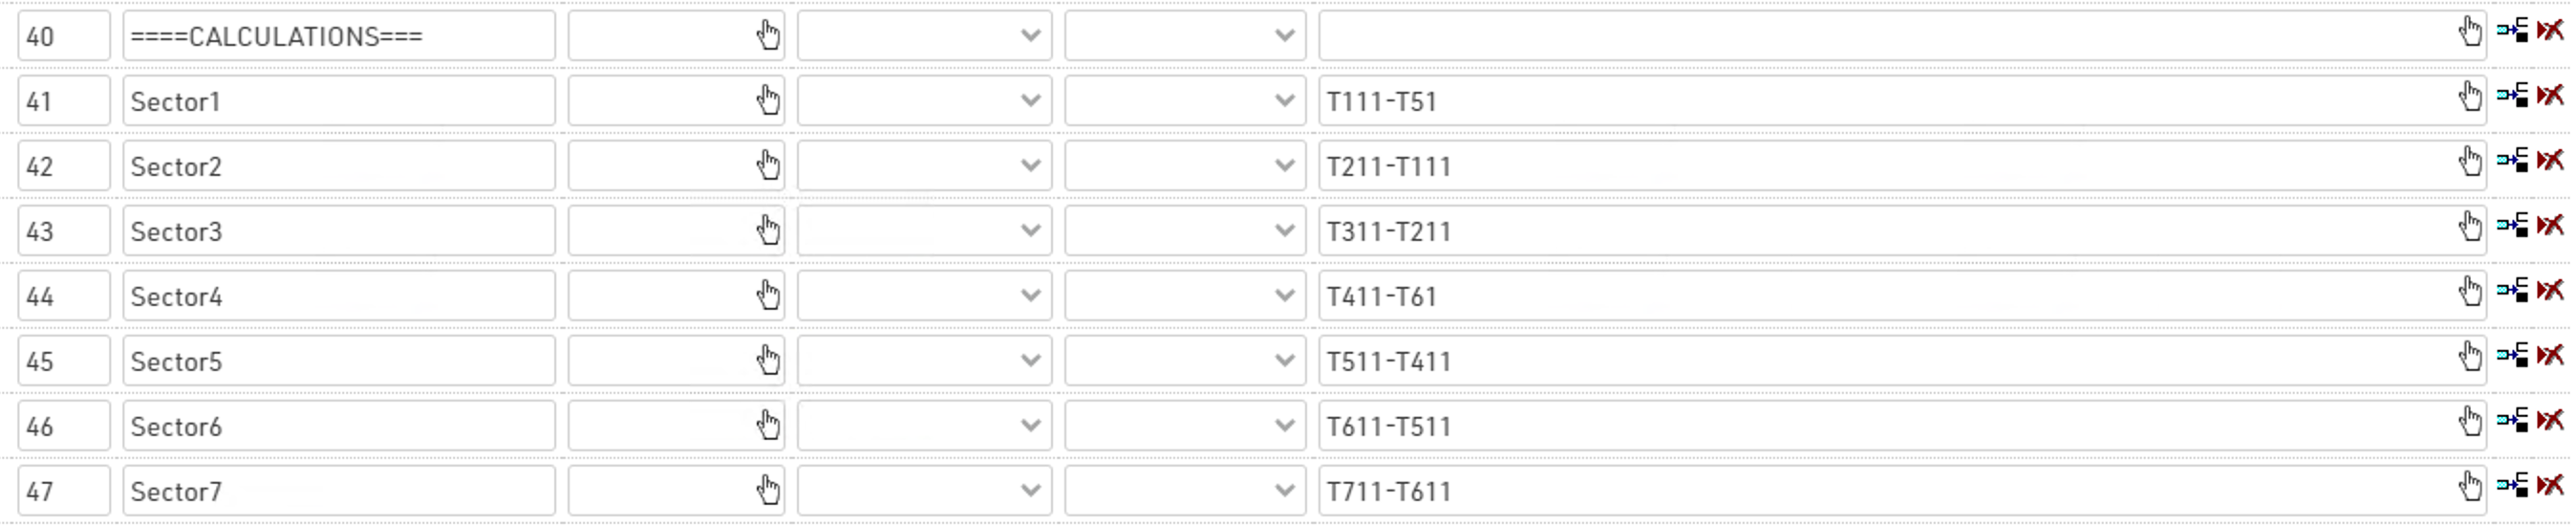
Calculation of Sector Times and Penalties
For this event, the regulations state that each rider must complete a full stage in less than 1h30min to avoid incurring in penalties.
A full stage is considered from the finish of the previous stage to the finish of the current stage, for stage 1 this is from the initial start until the finish of stage 1.
We calculate each sector time in a new set of results with IDs 40+, referencing the corresponding raw data results.
By referencing these results, with a Switch() it is possible to calculate if a penalty has to be applied to riders and how much time to add based on the time needed to cover the whole sector.
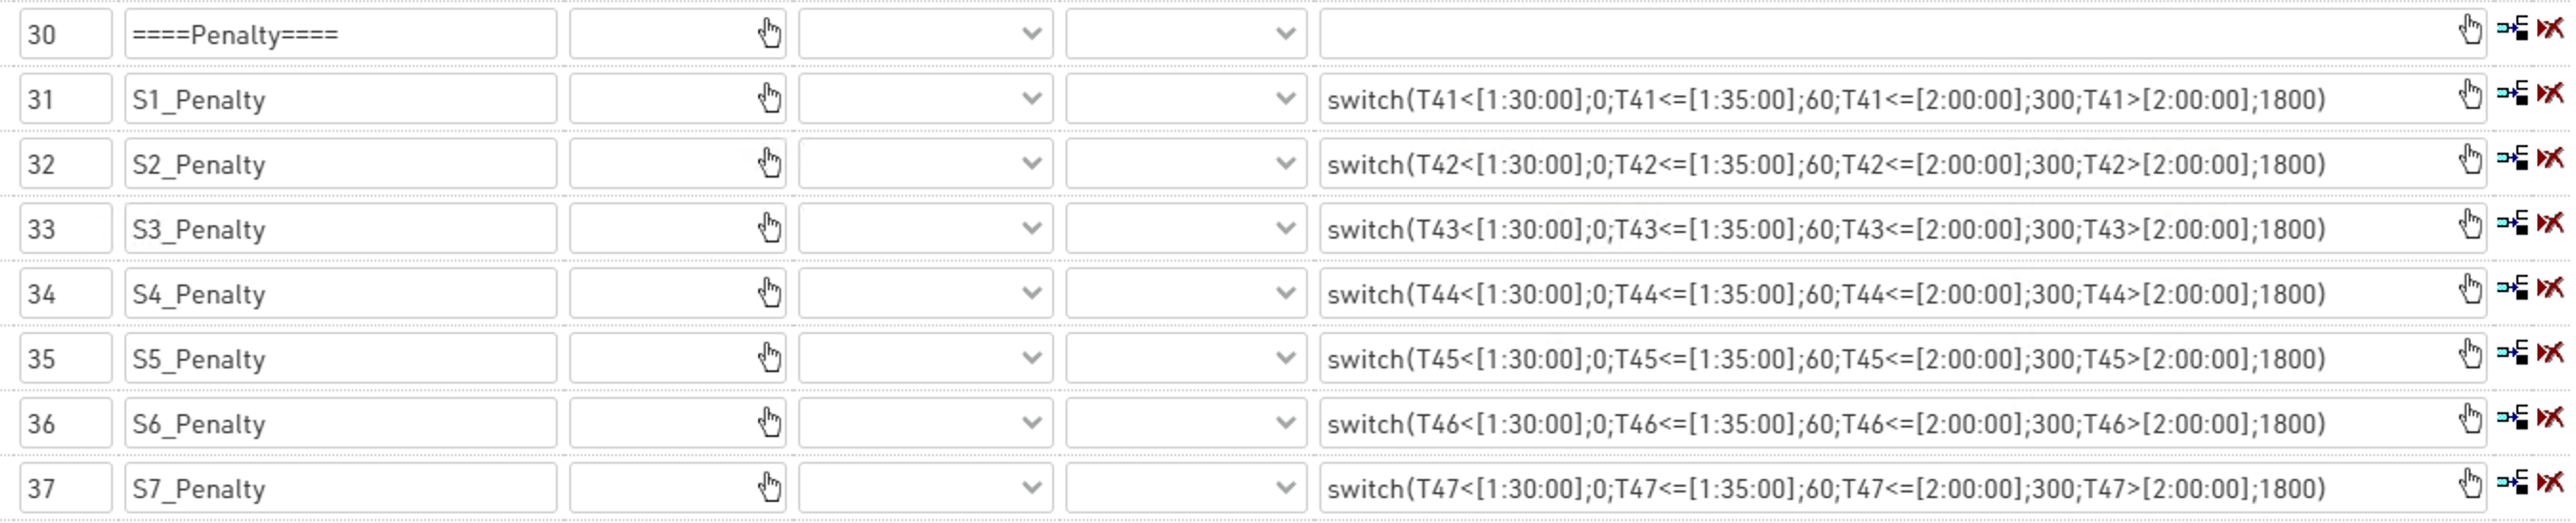
The penalty time to assign follows the table:
|
Sector Time |
Penalties |
| less than 1:30:00 | 0 s |
| between 1:30:00 and 1:35:00 | 60 s |
| between 1:35:00 and 2:00:00 | 300 s |
| more than 2:00:00 | 1800 s |
es. switch(T41<[1:30:00];0;T41<=[1:35:00];60;T41<=[2:00:00];300;T41>[2:00:00];1800)
E.g.: if Sector1Time is smaller than 1:30:00, no penalty is applied. If it is smaller or equal than 1:35:00, then 60 seconds are applied, and so on. Remember that the switch() formula stops at the first true condition!
Overall Results
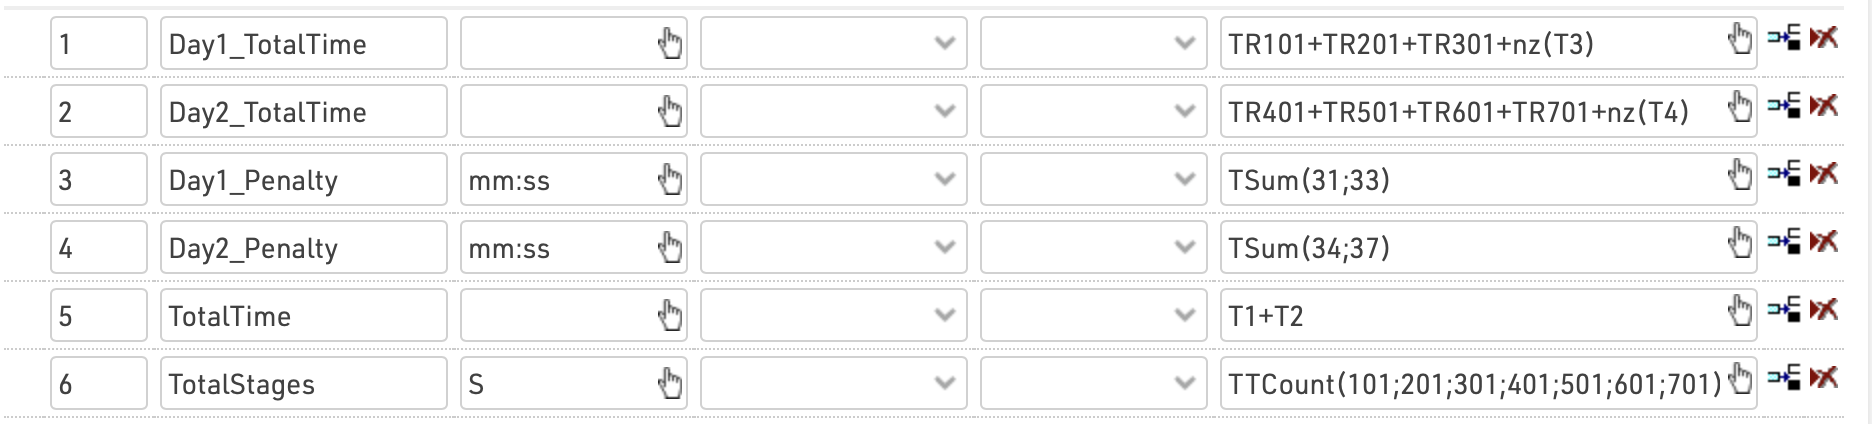
In Results 1-6 we calculate the overall results which are used to create our rankings for each day and the final results.
We first create a sum of times for each day, this used the rounded times for each stage and the sum of penalties for that day. By using TR we ensure that only participants who have completed all the stages on that day have their total time calculated.
We additional calculate the sum of penalties for each day using a TSum() function on the corresponding set of results.
We then calculate the total time as the sum of results 1 and 2, which are our individual day totals. Since these results only calculate if all stages have been completed, then the total time is also only calculate if all stages are complete over both days.
As an additional reference we count the number of stages which have been completed by using a TTCount function to count the number of stage results which have a time. Set the time format to s here, so the count is just displayed as a number 1-7.
Rankings
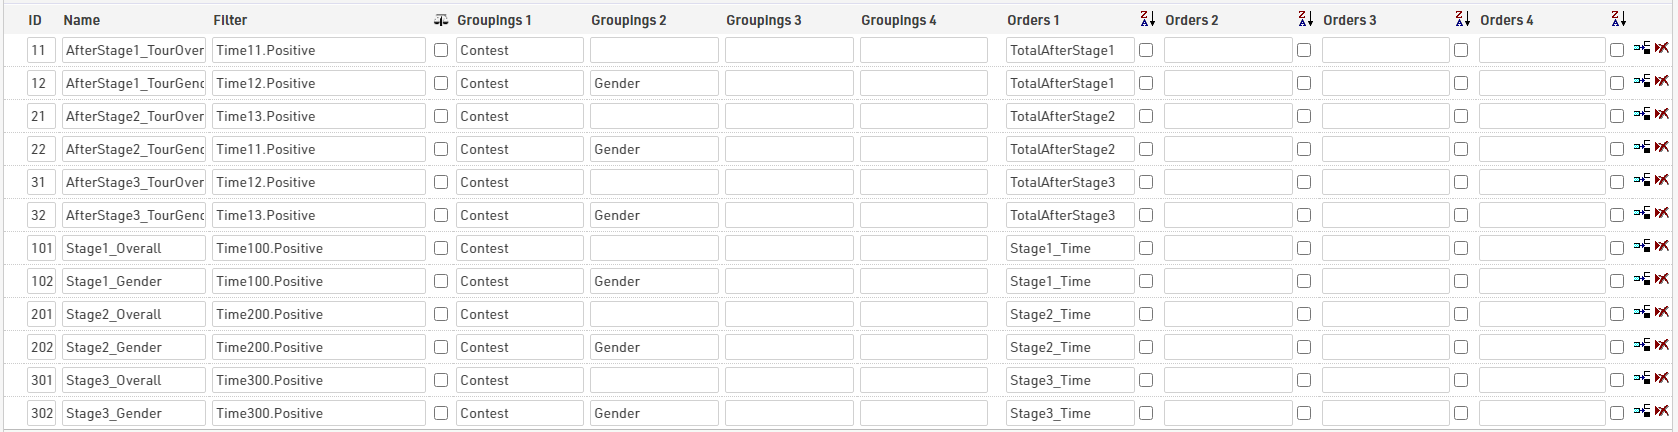
Following the same logic used in creating Special Results, Rankings have been generated for both individual stages and cumulative stage times.
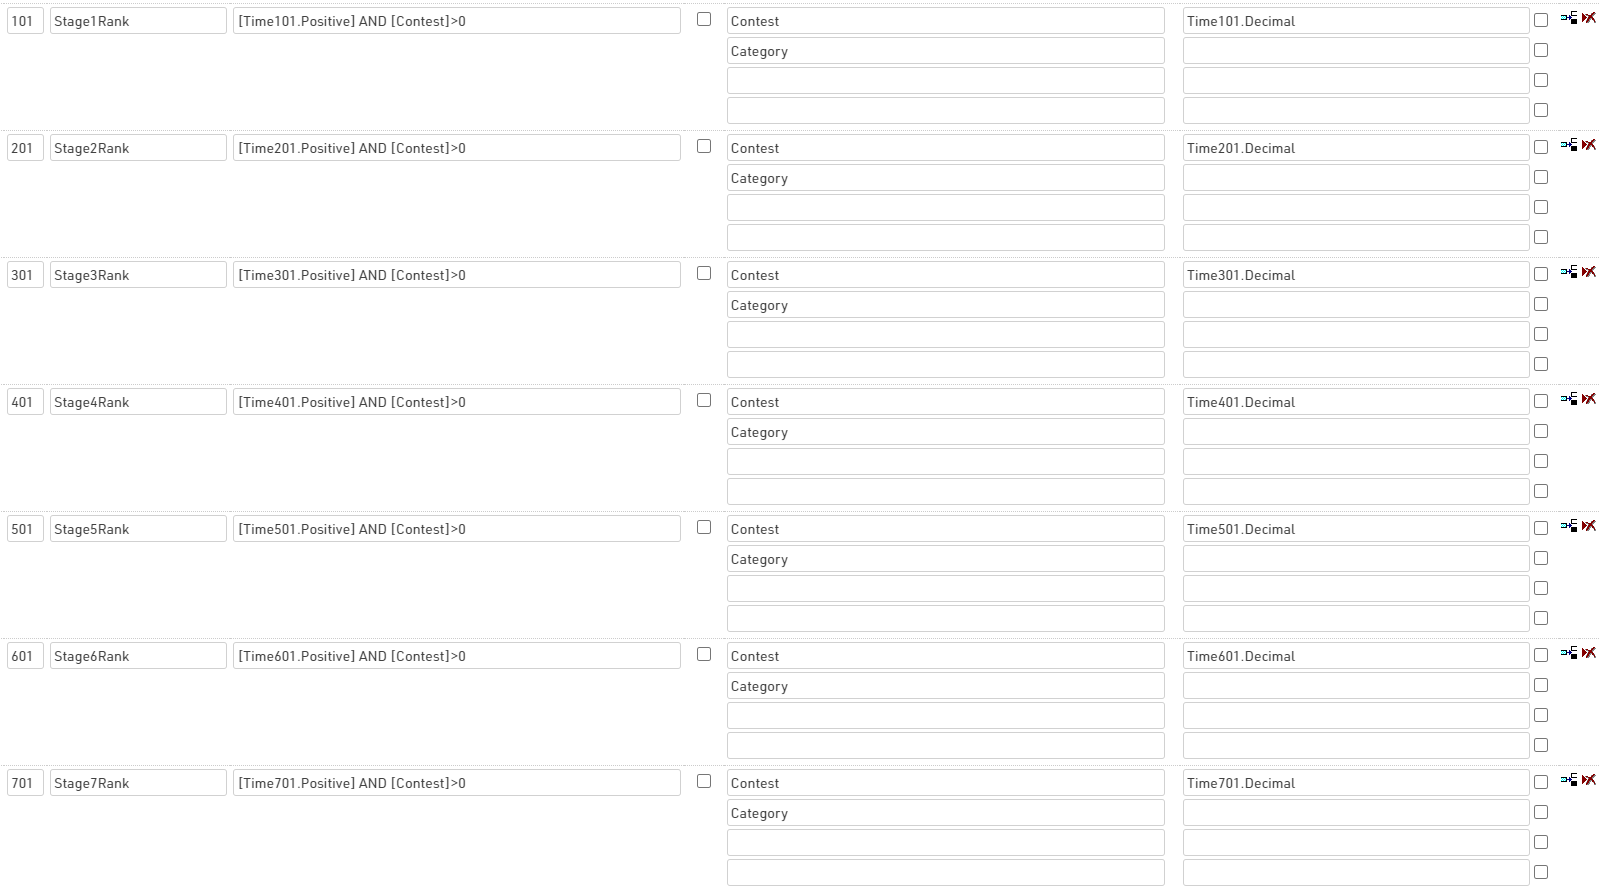
Individual Stage Ranks
Each individual stage rank corresponds to the same ID as the special result it refers to. The filter ensures that only participants with results for that specific stage are considered. The grouping is done by Contest and Category, and the participants are ordered from fastest to slowest in the stage.
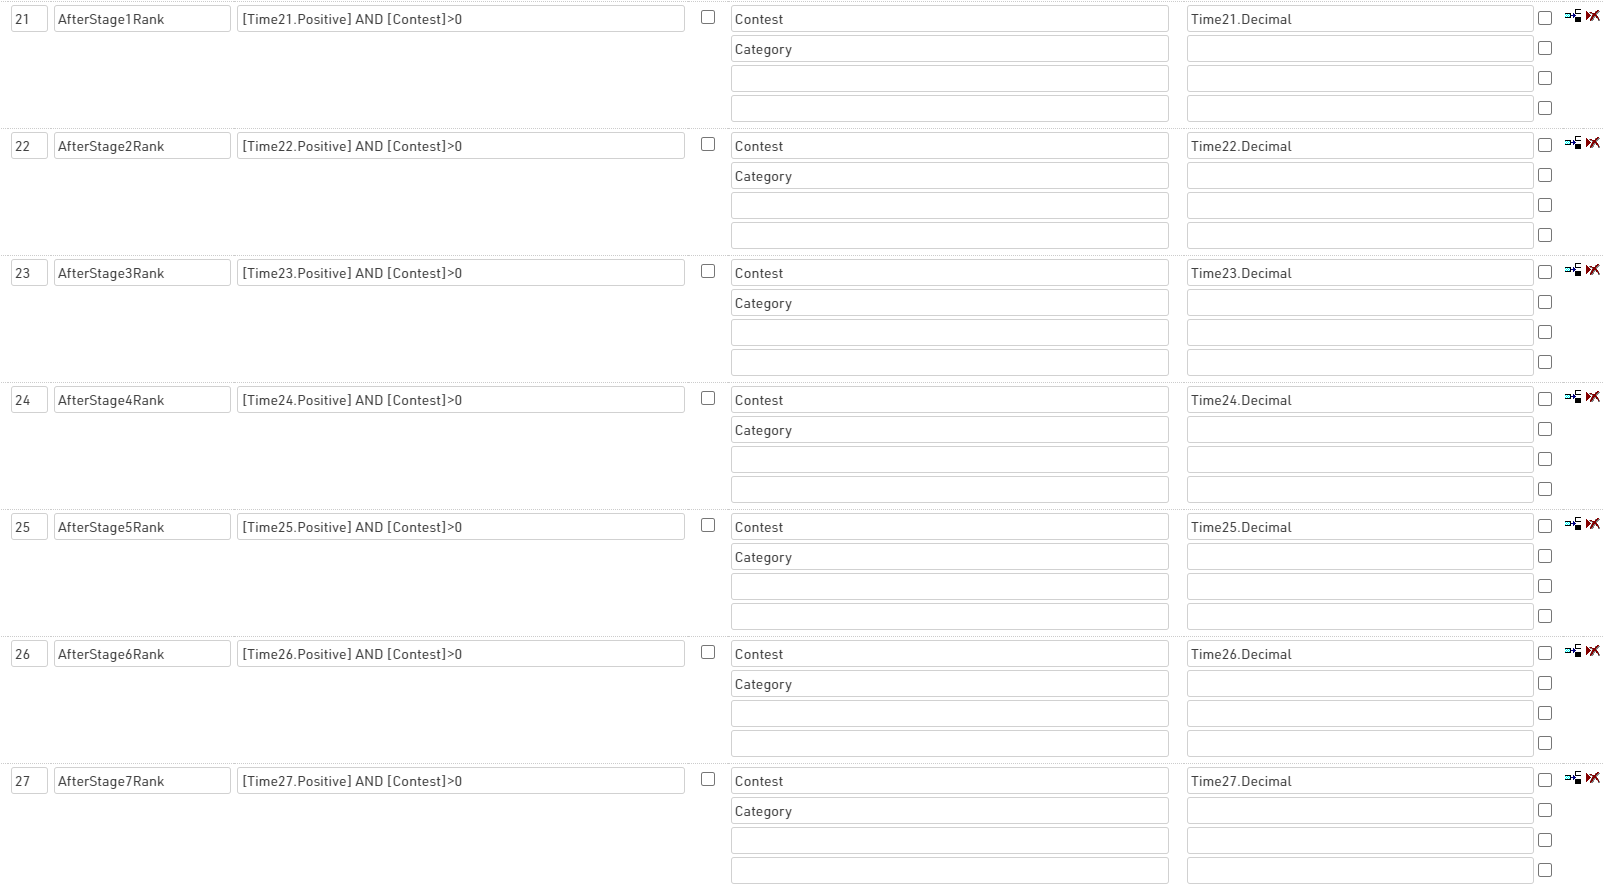
Cumulative Stage Ranks
Matching again the special results IDs, the AfterStage Ranks look at the cumulative stage time and ranks participants following the same logic of the individual stage ranks.
Overall Ranks
Looking at the results IDs 11, 12 and 15, which store the day1, day2 and Total Time with penalties included, the rankings 11, 12 and 15 assign a rank to all participants who have completed the full 7-stages event, declaring the winner of the whole competition.

Result Presentation
We provide two approaches to producing output lists for results presentation of differing complexities, for both versions we create lists for both an announcer feed and final results presentation.
The first is a simple approach which creates a separate output list for each stage.
The second is an advanced approach which uses the Results Selector to create dynamic lists which can easily switch between the different stages. This approach uses some of the same structure as the simple output.
Semi-Permanent Events
One timed race in the total event period
A semi-permanent event where participants only have one attempt during the total event period, doesn't differ much from a regular event.
In the attached learning example we look at an event with a 5km - one lap - and a 10km - two laps on the same course. There is one split timing point after 2.5km on the course. Participants can register online or through the Online Self-Service, during registration they can choose a starting slot of 1 hour during the 1 week event period. Using an event attribute, we limit the number of starting slots.
The below guide looks at the timing setup for such an event - the settings for the Online Registration and Self-Service will follow later.
Timing Points
For this it is more useful to have the Time of Day for each result, rather than subtracting T0, under Timing ⇒ Settings ⇒ Timing Points untick the first box to subtract T0.
Additionally with Create new participants for unknown chips set to No the software will only allow registered participants to take part in the event. Optionally, you can add the Order ID of your order to only allow tags from this special order to be detected.
We create two timing points. One for START/FINISH, and one as SPLIT. If you don't have a split timing point, you can simply delete this timing point.

Results (Advanced)
In the advanced results we define the calculation for each required result. Let's first have a look at results 10-15 which use raw data rules.

These results will be saved as the Time of Day of each detection.
T10 is the first detection and serves as a reference for all further detections.
T11 is the actual start detection. As participants often wait at the start line, whether to read instructions, wait for a friend or start their own wristwatch, we allow a maximum of 5 minutes after the first detection (T10) to receive our actual start detection. A negative offset is also applied so the first detection can be the actual start detection. Within these 5 minutes, we will use the latest possible detection, so if a participant waits to start, they will still get an accurate start detection as they leave the start.
For a concise setup, we use T15 as a finish result for both Contests. As the 10km race stretches over 2 laps, whereas the 5km only has 1, we will define separate raw data rules depending on the Contest.
In the 5km race, we only allow a finish detection which is at least 10 minutes after the actual start detection.
For the 10km race, we first setup a result for lap 1, this is T13 which uses the same rule as the 5km finish, accepting the first detection 10 minutes after the actual start. Then for the finish, we look for a finish detection at least 10 minutes after the first lap.
As the course is the same for both Contests, the first split (2.5km) is identical for both. We define it as the first detection a minimum of 5 minutes after the start detection. The second split is only relevant to the 10km race, therefore we adapt the raw data rule accordingly and use the second detection after the start detection. Alternatively, we could define the second split as the first detection after T13 + 05:00.
For further calculations and for more elegant output lists, we also define results 31 & 32 as the last detection and the result (ID) it belongs to.
For the last detection we use TLast(11;15)-T11, which returns the last available time from the results 11-15, and then deducts the individual start time.
For the last ID we will use TLastID(11;15)-10, which works in the same way but returns the ID of the result so we will receive 1 if someone has a start time, 2 if someone reached the first split, 3 after the first lap, etc.

To create more dynamic output lists for our live leaderboards, we also setup a predicted time based on the available results. The prediction uses the following expression.
In other words, for Contest 1 (5km) we return either nothing (we can't do an estimation based on the start time only), double the 2.5K Split time, or return the finish time once the participant has finished.
For the 10km we either return nothing, quadruple the 2.5K split, double the first lap time, multiply the 7.5K split by 1.33 - or return the finish time.
Finally, we conclude the most important results in 1-3.
T1 is always the finish time.
T2 is the time for lap 1 and is either the difference between finish- and start time (5km), or from AfterLap1 and the start time (10km).
T3 is lap 2 for the 10km calculated as the finish minus AfterLap1.

User defined fields / functions
We create a user-defined field called LastSplitName, which we will use to provide a name for the last available detection ID. This uses a choose() function looking at the LastDetectionID result to return a corresponding name for the result.

Contests
In the Contest settings, it is important to adapt the start and finish result for both Contests to use the results we have set up in order to use the default fields [Finished] and [Started].
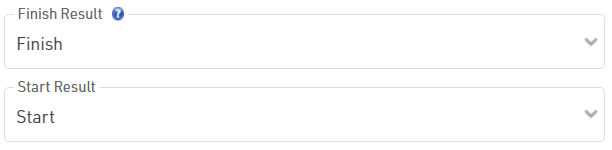
Rankings
There is no need to change the default rankings OverallRank, GenderRank and AgeGroupRank, as we updated the finish result in the Contests, we can still use these default rankings.
Additionally, we will add another ranking based on the estimated finish time, in this example - Rank11. The rank is filtered using [Time32.Decimal]>1, this limits the ranking to only consider participants with a valid first split detection. As the start time is 00:00 for everyone, it doesn't make sense to provide a ranking based on the start detection.
We are grouping only by Contest, if needed, you can also add additional groupings - or another ranking.
Sorting is based on DecimalTime21, which is our estimated finish time. The participant with the fastest estimated finish time shall be the leader of this ranking, as this returns the actual finish time for those already finished it will compare those on course to those already finished.
Output Lists
We adapted all lists slightly, but the default lists Final and Live are most important.
Final
For the Final output, used for final results, we removed some columns such as gun time, since there is no gun time in such an event.
Live
In the Live list, we use results 31 & 32 and the user-defined field for the sorting and grouping.
For the groupings, we use the "filter" functions to allow the user to apply custom filters. For the grouping MaleFemale we use "Filter with Ignore" to allow for a simultaneous grouping of Men and Women. This allows participants and spectators to view all participants, filter by the last available split or check who is currently on course.
In the data columns, we use the following expression to display either a ranking (AutoRank), if the participant has finished, or no ranking for anyone who is on course.
Lastly, we use the following expression to show the last available time and for participants still on course the expected finish time and ranking:
The Live list will look something like this:
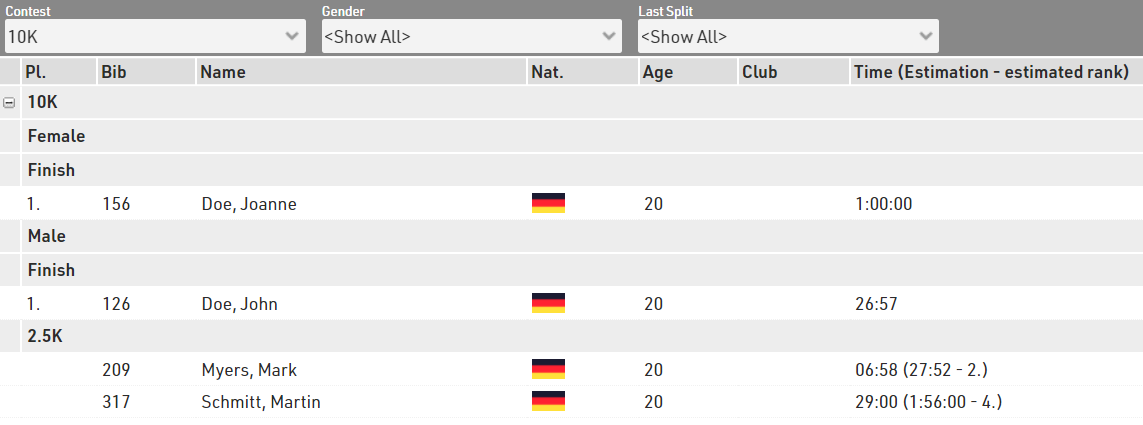
Online Registration with Starting Slot Selection
First, we create an event attribute under Basic Settings ⇒ Event Settings, named SlotsPerHour, as we will use this attribute to limit the availability of our start slots. In this example, we have 30 slots available per hour.
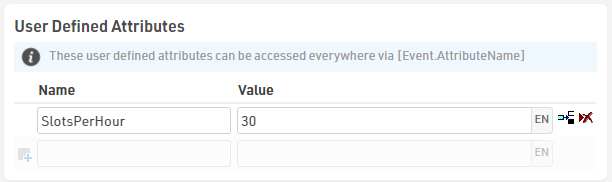
Next, we create two fields for the selection of the start slot. One field for the desired day, and another one for the time on that day.

We then add these two fields to the end of the form fields of the Online Registration (the same can be applied to Online Self Service for events which have switched from a regular event to a semi-permanent format).
In the advanced settings for either of the two, we add the following validation rule:
This makes sure that only as many participants can select the same combination of date & time as we have configured in the event attribute. The disadvantage of this layout is that full slots can't be hidden automatically.
You will find further information on the setup of Track Boxes and how to connect to them in RACE RESULT 12 in this video:
Points Calculations
There are various ways to calculate points in races which may be used as part of a series, team scores or other special requirements, below are a few of the most common ways to calculate points in RACE RESULT 12.
Note that these examples only show the calculations which can be used, it may be necessary to apply additional filters (using If() or Switch() statements) to only assign points to participants who are finished or have a Rank>0 since they may still return a positive value otherwise.
Points = Rank
The most simple method is when the points equal the rank.
For example 1st place gets 1 point, 100th place gets 100 points.
To assign points in this way simply call the corresponding Rank field directly in to a result, you may wish to create a special rank for this which filters only elligible athletes.

Points = Inverted Rank
Commonly points are also assigned according to the number of athletes who finished a race.
For example, 367 males Finished, the 1st male gets 367 points and the 367th male gets 1 point.
To assign points in this way we write a short calculation in a result using the MaxRank and Rank fields.
([MaxRankX]+1)-[RankX]
The +1 is necessary to balance the equation, since otherwise the points would always be 1 less, first place would get MaxRankX-1 and last place would get 0 points.

Points At Fixed Interval
Points may be assigned that first place receives a certain value and each rank thereafter reduces by a fixed value. This can be done with a simple calculation. In this example, first place according to the Gender rank gets 1000 points, and each rank thereafter receives 10 points less (2nd = 990, 3rd = 980, 4th = 970...).
1000-(([GenderRank]-1)*10)
The starting value is defined as 1000, and we must in this case subtract 1 from the Rank to ensure that the assignment correlates correctly with our deduction as 10.

Simple Points Table
In some races points may be assigned specially to the Top X finishers, with all other finishers receiving a nominal value of points. This is done with another calculation but this time also using our Choose() function which returns a value according to their rank.
In this example 1st place according to the Gender rank gets 15 points, 2nd = 13, 3rd = 11, 4th = 9, 5th = 7 and all other finishers get 5 points.
Switch([GenderRank]<=5;Choose([GenderRank];15;13;11;9;7);[GenderRank]>0;5)
Our switch first checks if they have a GenderRank less than or equal to 5, if true then assigns the corresponding points using the Choose() function, next we check if their GenderRank is greater than 0 and if true assign 5 points.

Complex Points Table
In the event that points cannot be calculated or assigned with a simple calculation then you can create a points table in the Results to assign points accordingly. To do this we need to select the hand icon to open the calculation window and select Table.
Each table can have up to 4 indexes, these are the values which the calculation looks up in the table to assign the points, for example Rank and Gender. Note that since Indexes must be numerical it is necessary to convert our Gender to a number here.
This example assigns a points according to the GenderRank (Index 1) and Gender (Index 2, male = 1 / female = 2) , the points assigned reduce randomly.

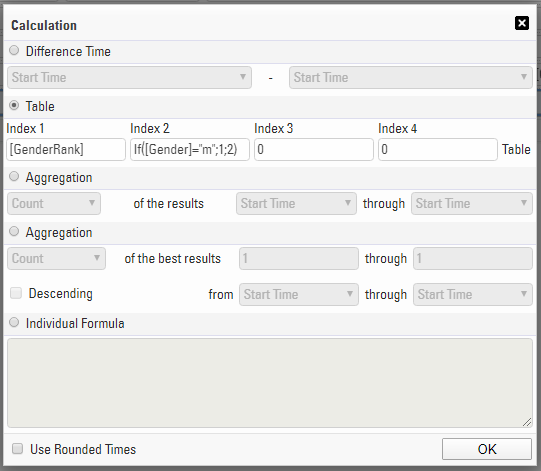
First assigned the Indexes which should be referenced, clicking Table bring up the index table where you can assign the index values and points value which should be returned. This can be imported from a standard excel file.
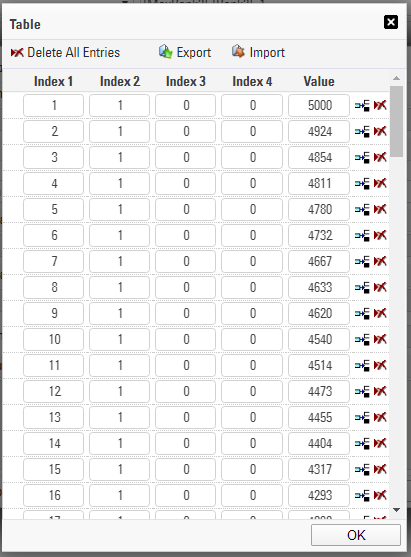
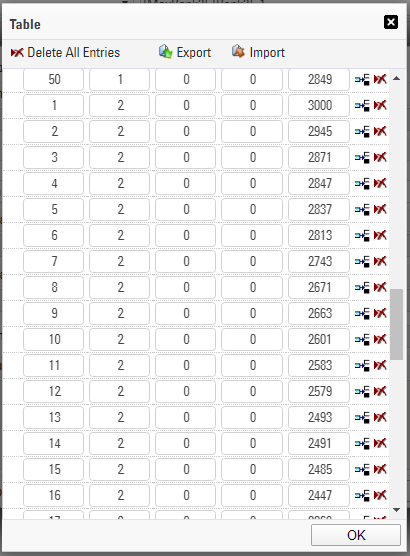
We can see that when Index 1 = 1 and Index 2 = 1 (GenderRank = 1 and Gender = Male) then 5000 points are assigned, down to Index 1 = 50 gets 2849 points. Moving to Index 2 = 2 then GenderRank = 1 gets 3000 points and so on.
Timing a Time Trial Race
Time Trials are a common race format in which participants start individually at different times, rather than all at once. These events require a different timing setup than mass start races, and RACE RESULT 14 offers two main approaches to handle them: using Splits or using Special Results.
While both methods ultimately give you each participant’s net time, the way they handle start times differs significantly. Choosing the right method depends mostly on how your event is structured — whether you have scheduled start times, use a light barrier, or simply let participants start freely, one by one.
To help you get started, a sample event file demonstrating both methods is available for download at the bottom of this article.
When to Use Splits vs. Special Results
The simplest and fastest method is to use Splits. This setup is ideal if participants start at their own discretion, and you're using chip detections to mark both the start and the finish. It’s quick to set up and works well in informal or smaller-scale time trials.
However, if your event requires precise control over start times — for example, if each participant has a scheduled start time, or you’re using a light barrier or a manual trigger at the start — then you’ll need to use Special Results. This method gives you much more flexibility and accuracy but involves a slightly more advanced setup.
Timing a Time Trial Using Splits
Using Splits is straightforward. In this approach, the system simply looks for a chip detection at the start line and one at the finish line. The participant's net time is calculated as the difference between the two.
To make this work, you'll need to create two Split Points in your RACE RESULT 14 event file: one for the start, and one for the finish. The start split should be configured with an open detection window, usually about an hour, to allow participants to start at any moment within that time frame. The finish split functions like any other chip-based finish detection.
Once those two split times are recorded, RACE RESULT can calculate the time each participant took to complete the course — no further configuration needed. This is the go-to solution when start times don’t have to be exact or scheduled.
Timing a Time Trial Using Special Results
In more formal or structured time trials, you might need to assign each participant a specific start time — either scheduled manually or triggered precisely at the start line. This is where Special Results come into play.
The setup involves a few more components, but allows for much finer control. Here’s how it works:
First, you define a scheduled start time for each participant. This is done using the Single Start tool in RACE RESULT 12, where you can assign start times based on bib numbers or other criteria. This scheduled time is then saved in a dedicated result field, in this case inside the PlannedStartTime special result.
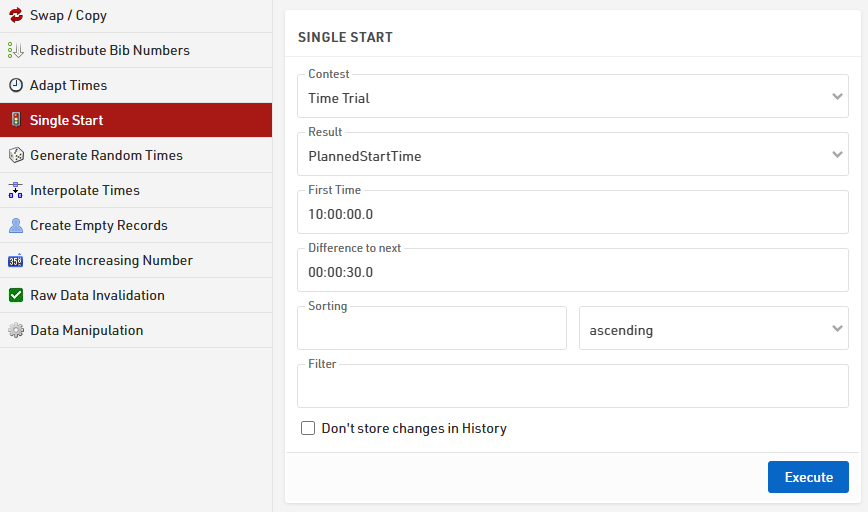
If start times are already assigned in an Excel list, they can be imported directly by naming the corresponding column as the Special Result field designated to store the start times.

Next, a start detection result is created to record when each participant actually starts. This result is typically linked to the scheduled start time, allowing comparison between planned and actual starts. For example, the StartDetection result can be configured to capture the last detection at the START Timing Point that occurs between 5 seconds before and 10 minutes after the participant’s PlannedStartTime.

If a lightbarrier is used to catch times of participants and it's connected to your device, you can store the detection in a Special Result by using the advanced setting "First Marker" linked to the StartDetection — in this way, for each transponder detection, the right marker will be taken and assigned to that specific participant.

To ensure a fallback in case of missed start detection or missing marker, a special result using the function TLast() can be created, which defaults to the PlannedStartTime when no actual start is recorded.

The finish detection is then set up similarly using a Special Result, linked to the recorded start time. It typically accepts the first detection at the FINISH Timing Point that occurs, in this example, at least 10 minutes after the StartTime.

Optionally, if a light barrier or manual trigger is used to start participants, it is important to ensure detections are correctly matched to each athlete. This may require adding a light-barrier-specific marker or hardware input configuration, depending on the timing system in use.
Finally, a FinishTime special result is created to calculate the net time by subtracting the StartTime from the FinishDetection time.

It is important to note that both options under the Settings are disabled, in order to ignore completely the T0 of the event.
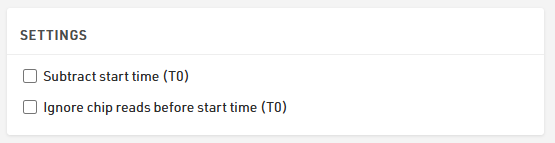
Link to Finisher Video
It is possible to link your results page or details list to a finisher video showing each participant crossing the line, this example links to YouTube however the same principals may be applied to other hosting sites or even static photo sites.
Videos can be shot on any standard video camera, GoPros are a popular choice due to their versatility. Once the race is finished, it's a good idea to crop the video down, you'll want a bit of time (around 15 seconds or more depending on your finish setup) before the first finisher crosses the line.
The link for each participant contains three parts; the base URL, the VideoCode (a unique identifier for each video) and the playback controls which determine at what point the video should start playing from, when it should end and whether it should automatically play once loaded.
e.g. https://www.youtube-nocookie.com/embed/hZCHKy0ESPU?start=0&end=14&autoplay=1
links to Video hZCHKy0ESPU, starts automatically playing at 0 seconds and will automatically stop at 14 seconds.
(Our knowledge base uses 'www.youtube-nocookie.com' by default, which you use is up to you as both work the same)
In order to form this URL we first need to calculate the time difference between each participant and the first person to cross the finish line (based purely on finish order / time of day).
To do this it is useful to first call the Finish Time of Day in to a unique result, either using [SplitName.TOD.Decimal] or you may need to use Tx+T0.

We also need to Rank all participants according to this Finish time of day, this is done with a specific rank which has no grouping and sorts according to our result or split.

With these we can now calculate the gap time for each participant, there are a number of ways this can be calculated but using the GapTimeTop() Function is most simple. In this case we use GapTimeTop(1;4;0;"s") since the first participant should have a gap of 0 and the gap should be in seconds.
We also want to know the time in the video at which the first finisher crosses the line, or when their video should end, this is simply entered as a value in seconds.
These values are used to calculate the end time for each participant, so the video stops once they have finished.

We can now form the URL, this is done using 2 User-Defined fields so that the template can be copied across and have just the VideoCode updated rather than the full URL.

VideoLink: "https://www.youtube-nocookie.com/embed/" & [VideoCode] & "?start=" & Val([VideoOffset]-14) & "&end=" & [VideoOffset] & "&autoplay=1"
Note that the start must never be negative otherwise the video will fail to play automatically.
Now our VideoLink is calculated we can link this in an output list, this example has the video linked as part of the details window but it can be linked to any output or even under the Links in my.raceresult.com Certificates/Details
It's nice to use an image as a link rather than show the full URL, so in your output first insert an image, we use a png of the YouTube logo which has a transparent background.

Bring up the additional field details by clicking the grey arrows to the right side and in the HTML Link as Expression field enter our User-Defined Field [VideoLink].

The image will now be a clickable link in the output list whichw will take you directly to the finisher video for the corresponding participant.
Fitness Race
The example file is at the bottom of this article!
Fitness races are becoming increasingly popular. They combine endurance and strength activities where participants alternate running legs with activity zones — for example, a format with eight running sections and eight workout activities.
This article explains a simple approach to setting up such an event using the Splits function in RACE RESULT 14.
Event Concept
In this example event file, four timing points are used:
- START
- IN_ZONE
- OUT_ZONE
- FINISH
Participants start the race, run 1 km, enter the IN_ZONE to perform the first activity, and exit via OUT_ZONE to begin the next running segment.
This pattern repeats until the final activity, after which competitors go directly to the FINISH, skipping the OUT_ZONE.
Splits Setup
The entire event is structured using the Splits table.
Each row defines either a running segment or an activity. Running legs are measured by distance (e.g., 1 km), while activities are time-based and use the “Other” sport type.
The Label field is used to name each split — for example, 1KM Running, 1000m SkiErg, or 50m Sled Push.
These labels can then be shown on the LIVE list, so spectators can follow which part of the race each participant is currently in.
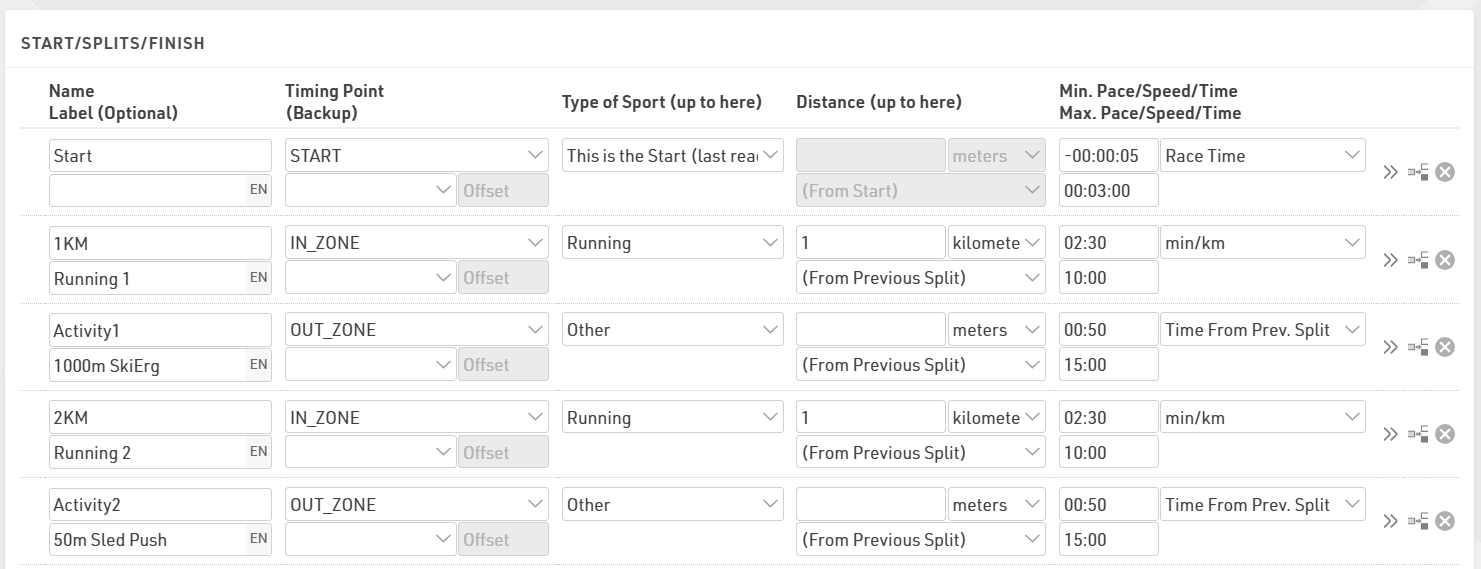
In this example, the event is set for a single contest (Race 1) with the Start split open for 3 minutes. All participants must cross the start line within this time window from the official race start (T0).
When working with multiple start groups, there are two different approaches depending on the structure of the event:
- Different race categories - Create separate Contests
For example, if your event has Elite Men, Elite Women, and Open divisions running independently, each category should have its own contest. This ensures separate rankings, timing logic, and results.
- Multiple start waves within the same category - Use Wave Starts
If participants in the same category simply start in several waves — for instance due to capacity limits or flow — you can use Wave Starts and assign participants based on their wave field. Waves allow staggered starts while still keeping the group ranked together in one contest.
Displaying Participant Progress
To make the LIVE view more interactive, a User Defined Function (UDF) is used to display a progress bar indicating how far a participant has advanced through the course.
The function, called ProgressBar(x), uses the number of completed splits {Selector}.SplitCount to determine progress:
choose(([x]-1)\2+1;
"□□□□□□□□"; "■□□□□□□□"; "■■□□□□□□"; "■■■□□□□□"; "■■■■□□□□"; "■■■■■□□□"; "■■■■■■□□"; "■■■■■■■□"; "■■■■■■■■")
Each full square (■) corresponds to the completion of an activity section. As participants complete runs and activities, the bar fills up, giving a clear visual overview of their progress.

Optional Improvements
This example keeps the setup simple, but it can easily be expanded.
For more detailed timing, you can add dedicated IN/OUT timing points for each activity to capture the exact time spent inside each station, rather than combining the short running transition.
Since these events typically attract large participation numbers, it’s strongly recommended to use a Check-In Kiosk. This helps efficiently manage and recycle transponders by reassigning them to new participants as soon as previous participants finish their race.
The event template attached already includes a Check-In Kiosk setup configured for this purpose. The kiosk uses Transponder Assign mode: Delete Existing Assignment, meaning that when a transponder is assigned to a new participant, any previous assignment is automatically removed.
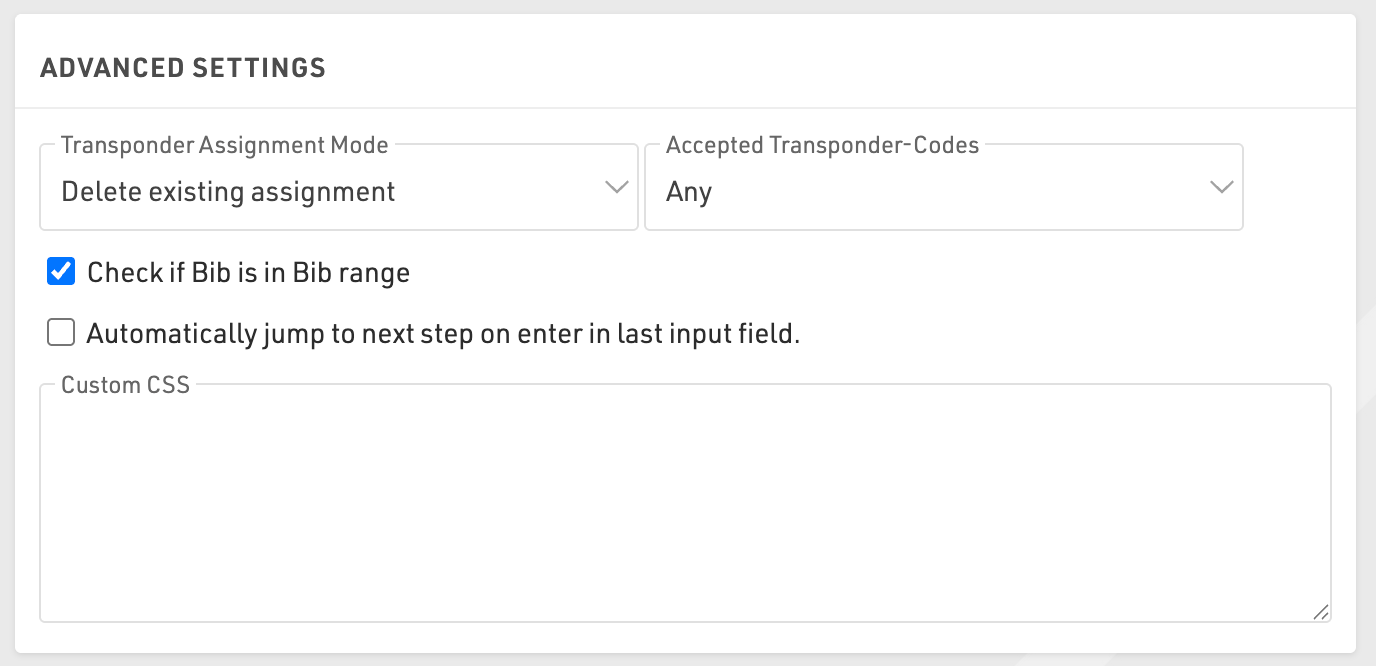
This ensures a smooth transponder-reuse workflow without manual intervention.