First steps
Before and after your event you should be working online via the Internet. This way, you can collaborate with all of your team members and make changes to the event file, all at the same time.
When your event is online, you can also use my.raceresult.com to let participants register online, and to publish startlists and results.
To access RACE RESULT 14 online, you need a customer account. If you already have one, you can skip this step and simply log in to your account in the top right hand corner:
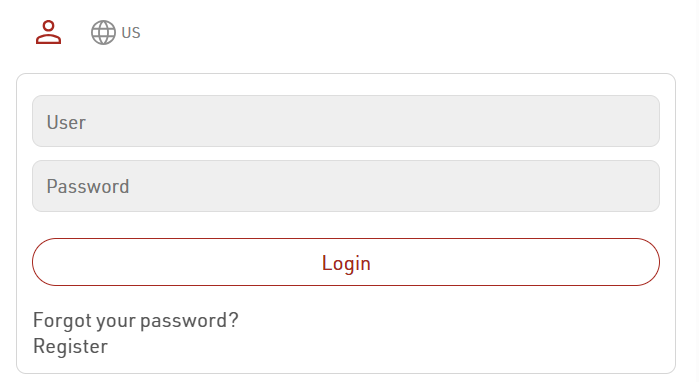
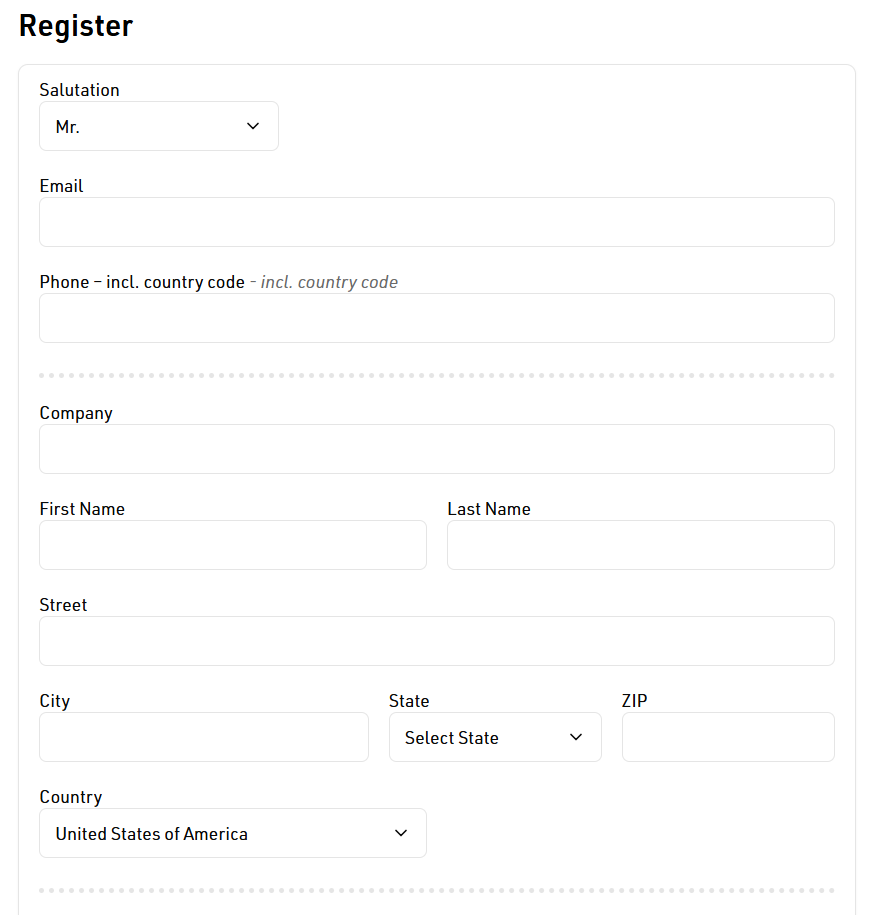
If you do not have a customer account yet, follow the link "Register" to create a new account:
RACE RESULT 14 Demo
How to Open an Event
In your customer area, click on the button start RACE RESULT 14 in order to access your events in the RACE RESULT software.

This START area of RACE RESULT 14 allows you to open existing events and to create new events. For illustration purposes, a demo event has been pre-installed.This can be accessed at any time by clicking the RACE RESULT 14 logo.

Choose the RACE RESULT 14 Demo event by simply clicking on it. You can now see the more detailed overview of that particular event:
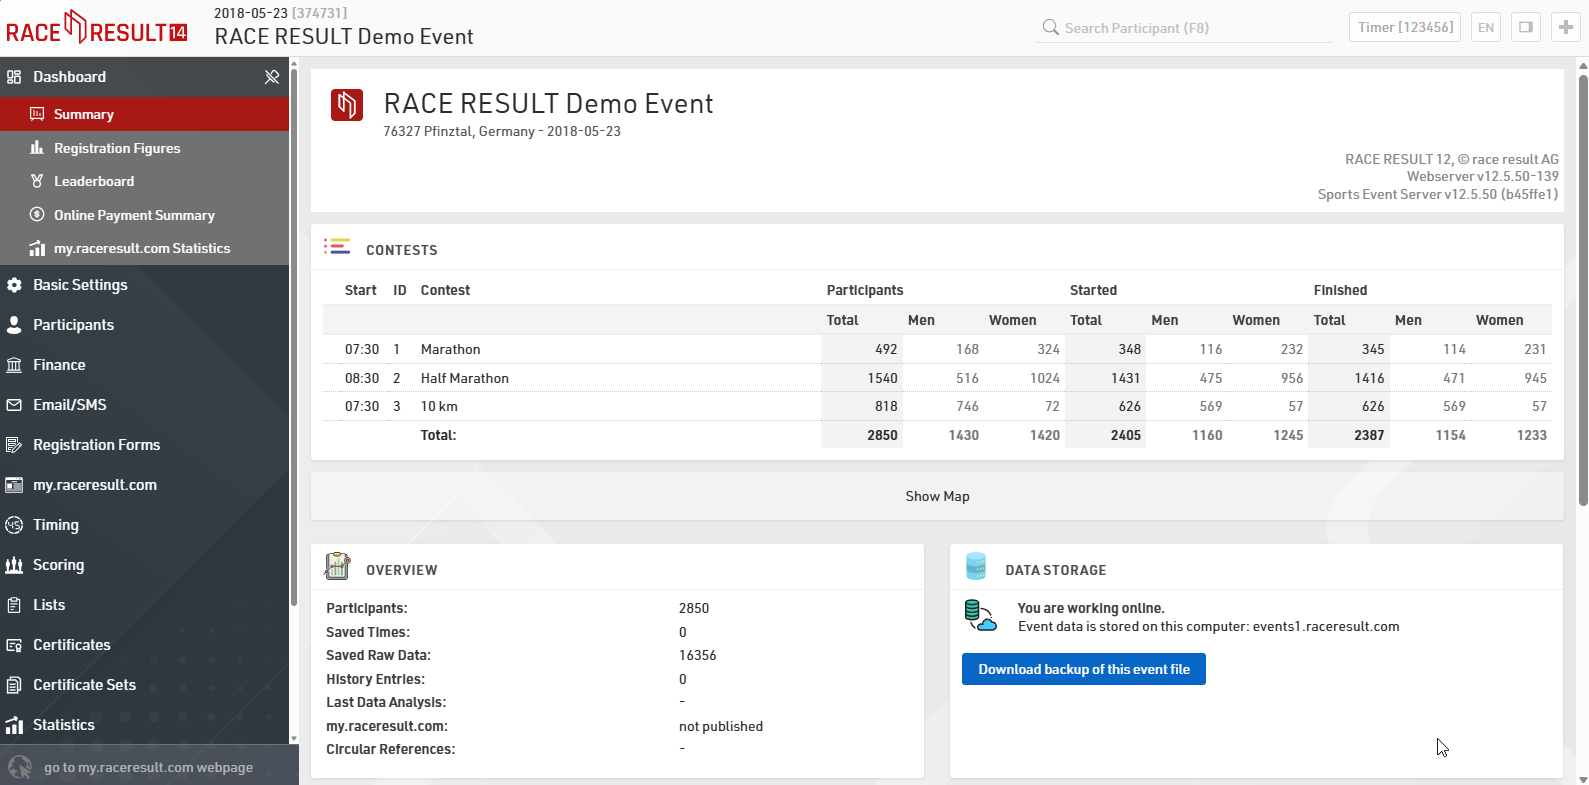
All the navigation can be found in the menu on the left side of the screen, if you prefer to open multiple tabs or windows, useful when using additional monitors, you can press the + icon in the top right to open another tab of the same event.
You can open the right hand side-bar by clicking the  logo or pressing F9. There are seven small icons on the right-hand side which give you additional orientation: Timing gives you an overview of your devices connected to your local network or which have TCP upload enabled; Knowledge Base provides quick reference to the full knowledge base whilst still in your event; via the Chat you can discuss anything you have on your mind with other RACE RESULT users or event specific chat with anybody else who is working on the same event file; the Q&A section serves to discuss specific questions you may have; What's New? provides you with the latest updates from the RACE RESULT team including any software feature updates; Info shows the most relevant data fields for your event for entering in results or output lists; and Calculators allow you to manually check time calculations.
How to Navigate in RACE RESULT 14
All navigation in RACE RESULT 14 is simplified in the left hand window. If you prefer to open multiple tabs or windows, useful when using additional monitors, you can press the + icon in the top right to open another tab of the same event.
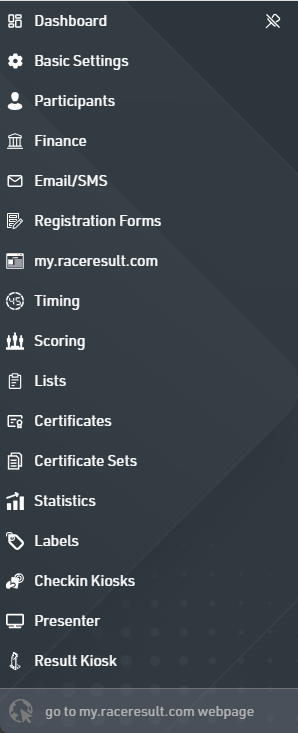
We will now focus on the Participants Window, and the two most common outputs, Lists and Certificates Windows first.
Participants Window
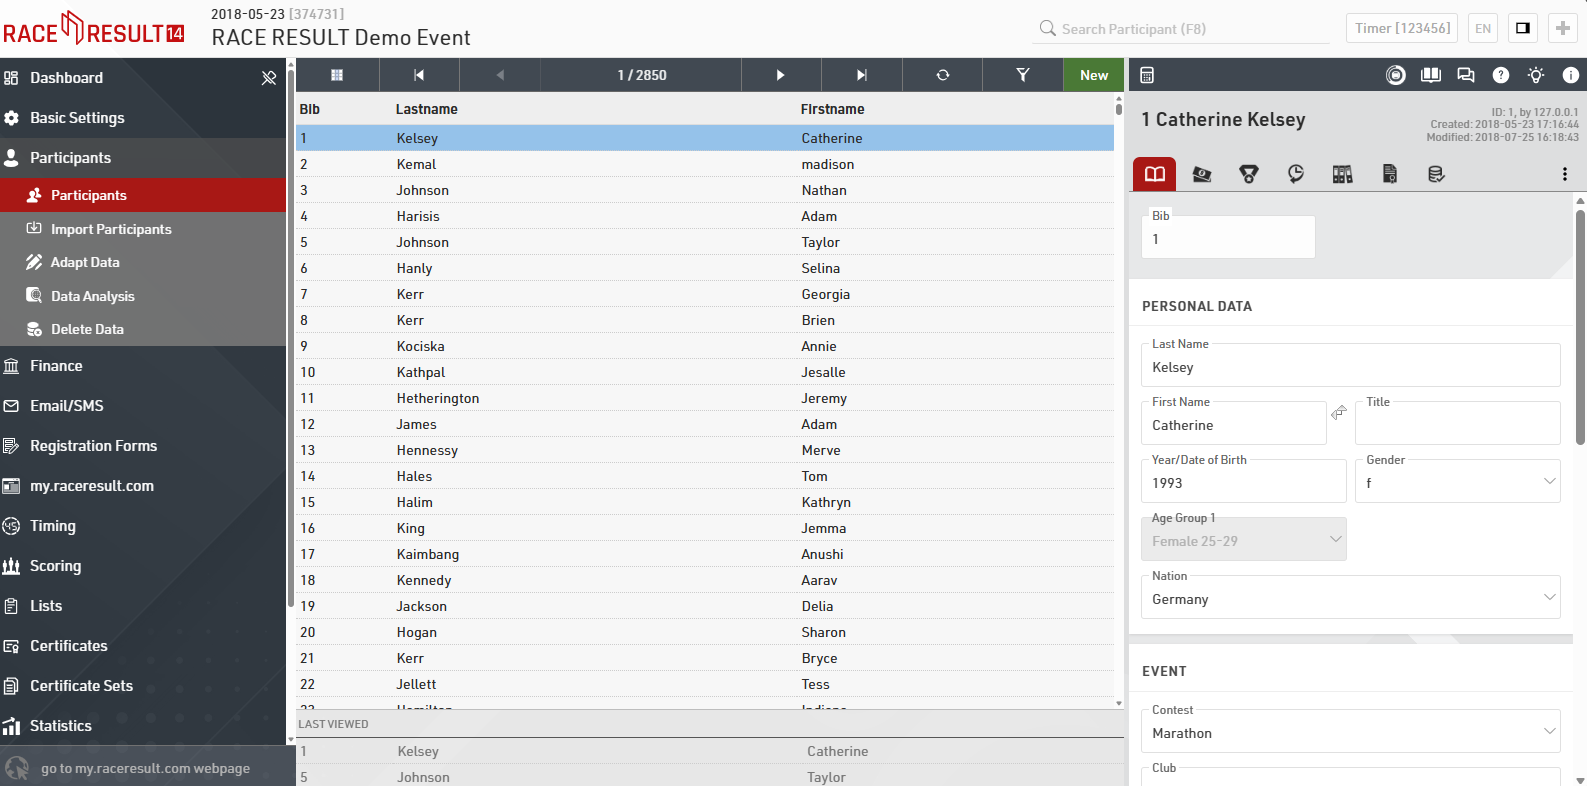
Each participant record contains a variety of information that is grouped in categories at the top of the screen: General, Entry Fee, Results, History, Archives, Certificates and Timing Raw Data.
- General specifies the most basic participant information (e.g. name, year of birth, gender, etc.).
- Entry Fee shows all the Entry fees applied to the participant based on the settings under Main Window > Entry Fees.
- Results shows all calculated results for a given participant. The participant's rankings (for example, Gender Rank, Age Group Rank, etc.) are also displayed in this tab.
- History records all changes that have been made to the participant's information. Being able to track the history is particularly helpful when there is confusion about race results or other data.
- Archives show all recent runs / registrations for each individual participant, provided you are using the participant archives.
- Certificates allows you to view and print a single race certificate for the participant
- Timing Raw Data shows all the raw data reads of the participant from any connected timing systems and allows manipulation of timing data.
Navigation
In the main window, a list view of all participants is shown. You can scroll the list and load a participant in the right panel by clicking on them, by clicking on the Go to First / Go to Previous / Go to Next / Go to Last arrows at the top of the main window you can quickly and easily move through consecutive participants. In addition to navigation, you can reload the list or filter based on your own requirements. You can also add / remove any additional columns to the list view and sort on these by clicking the field name once for sorting smallest to largest, clicking again will sort largest to smallest. The most recent viewed participants are shown at the bottom of the page.
Search
In order to search for a specific participant, you can use the search bar in the header at the top of the page or search a specific participant from the List View.
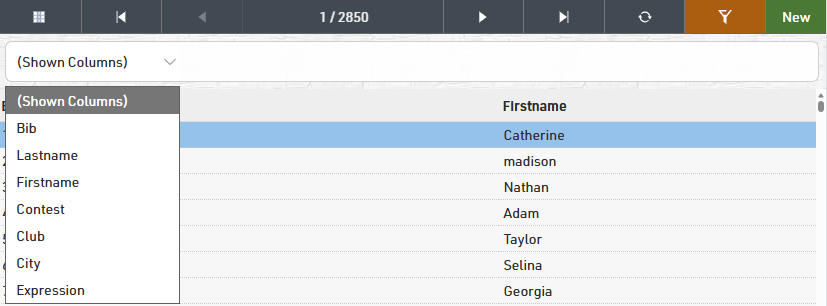
Using the search filter you can search specific fields either with no filter on fields, this will match anything from the bib, firstname or lastname fields. Alternatively you can use the drop-down to search a different field.
Alternatively you can also apply an expression for the search. For example [Contest]=1 AND [Bib]<100 will search for all participants registered in Contest the ID 1 and with a Bib lower than 100.
When searching you will automatically be taken to the Participants window and search results will be loaded in the list view on the left side window.
Changing participant information
If you need to change a participant's data, you can simply click on the appropriate (text) field and change the information. Once you start making changes, a little disk symbol will appear in the upper right hand corner.

If you want to save the changes without switching to a different data set, you can click on that disk symbol to save the newly entered info. The symbol in the upper left hand corner will then disappear.
Note: generally, RACE RESULT 14 saves all changes you have made when you navigate away to a different page (automatically), or if you click on the disk symbol (manually). If you do not want to save any changes you just did, than you have to close the whole tab you are working with.
How to add a participant
To add a participant to your event, simply click on New Participant in the upper left hand corner or press F10. An empty form will appear where you enter the participant's information. The document will again be saved automatically or manually.
List and Certificate Windows
Lists and Certicates are the most important methods for displaying and getting data out of RACE RESULT 14.
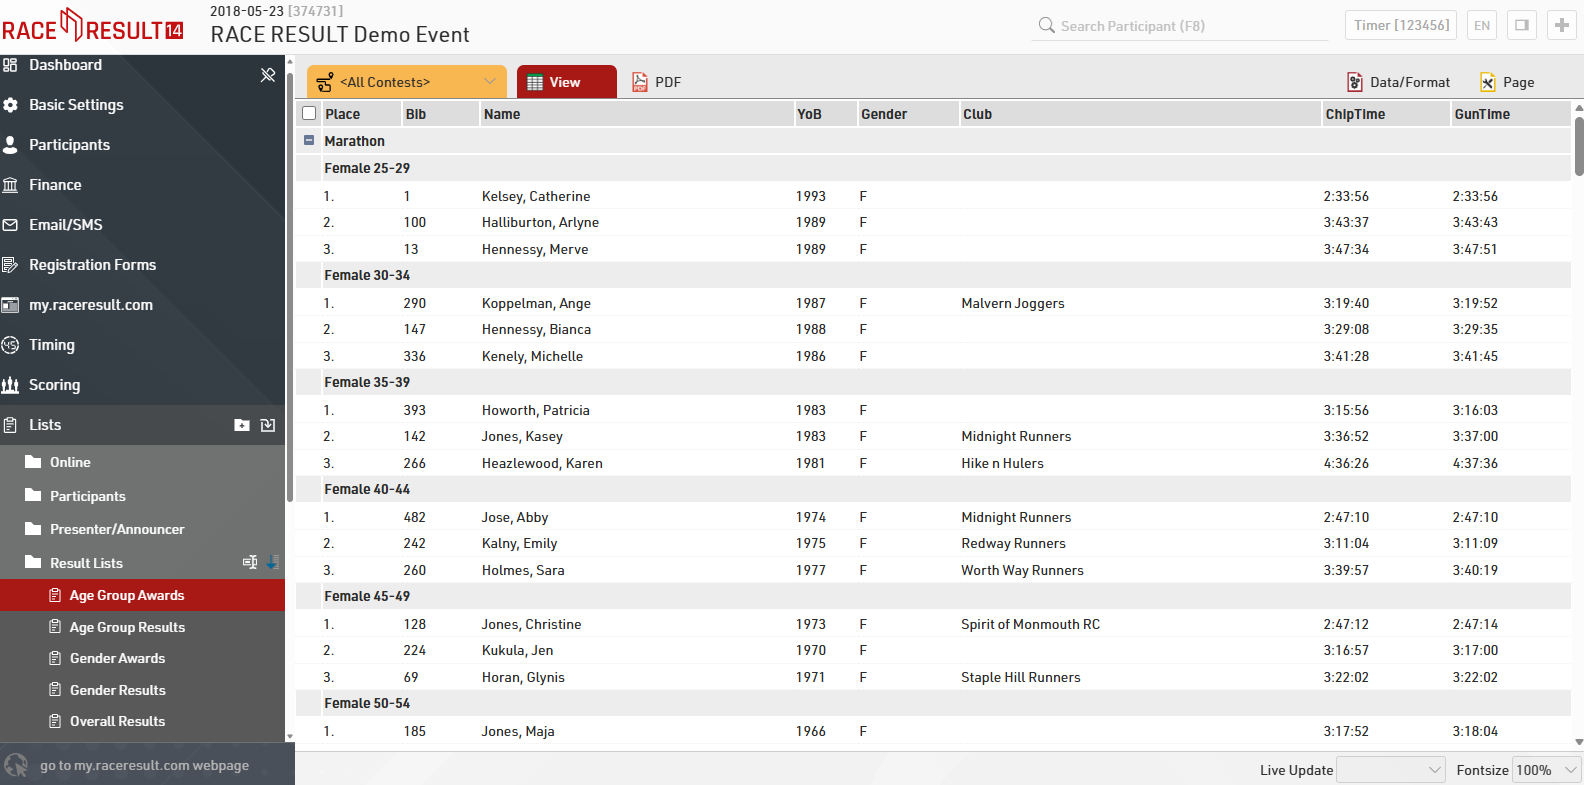
In the navigation bar on the left, you will find here the available lists, our demo event and all templates include the most commonly used output lists. This will save you time when configuring your event file and compiling result pages. After choosing a list, you can display the data in a variety of formats, e.g. PDF and HTML (and more). PDF is most suitable for printing. By choosing a contest in the top left hand corner (instead of <All Contests>) you can filter the list accordingly.
When clicking on Certificate Sets, you can choose from a number of different pre-defined Certificate Sets, e.g. certificates for all age group winners for your award ceremony.
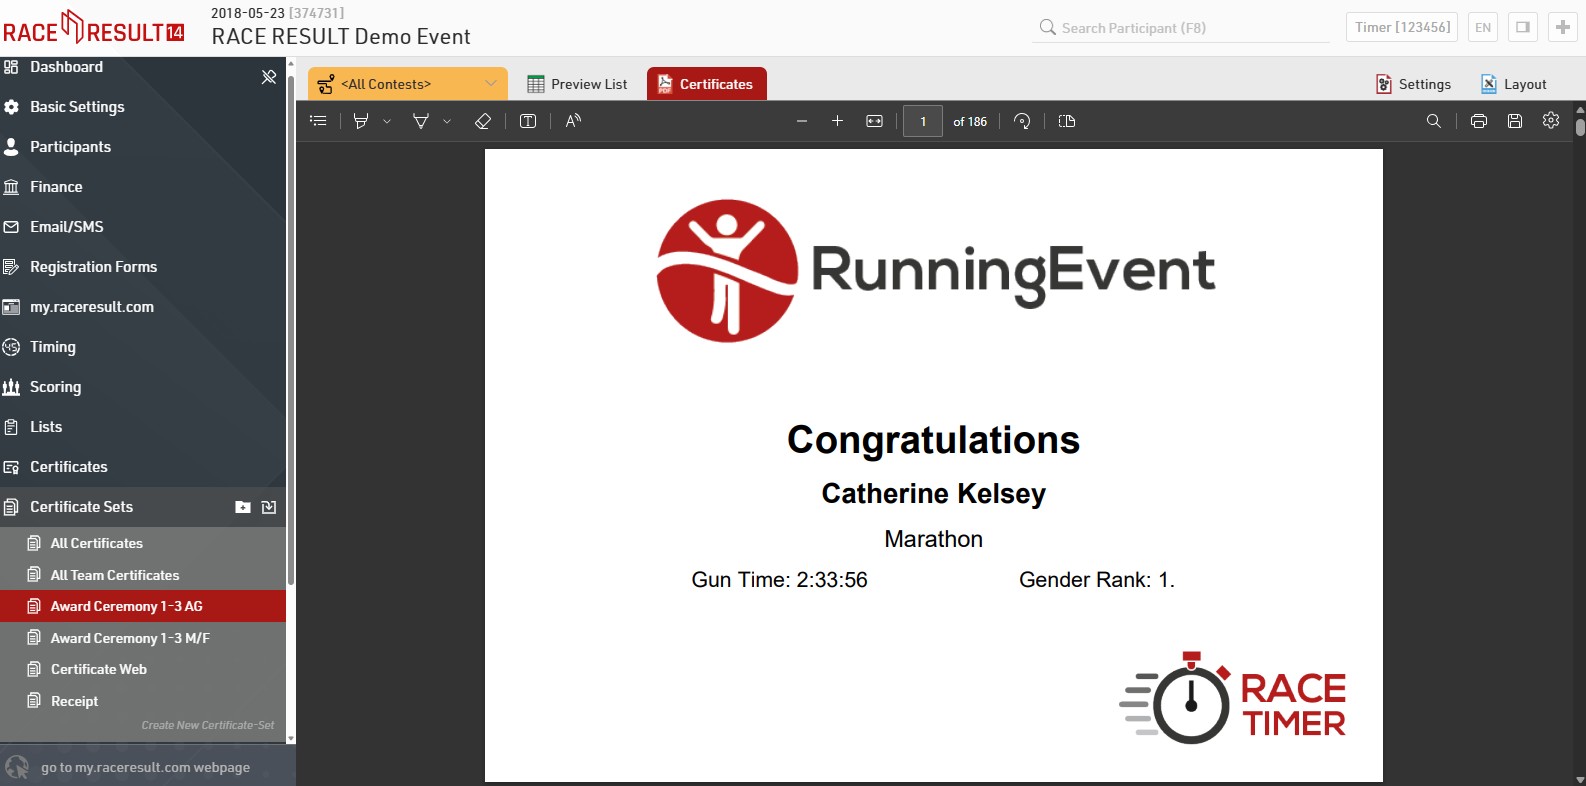
For more information and a detailed explanation on how to configure and customize lists as well as certificates, please refer to the respective links.
Making Changes
In order to see how concrete changes affect the results sections, let's make some modifications. Go to the List window, choose Age Group Awards, and filter the contest to show Half Marathon. Then, click on the output format View. We will now change the race time of participant Kirsty Casarotto who has a time of 1:53:09 (2nd in Half Marathon Age Group Female 15-19) so that she will move into third place. To make the necessary changes, go to the Participants window and search for Kirsty by searching for her bib number (= 5304), or double click on her name in the output view to open her participant record. Next, click on Timing Raw Data and at first invalidate her finish detections by unticking the Valid both next to the Start+Finish reads at ~10:24, now to record a new time, the bottom under Add missing raw data entry enter 10:24:19 in to the Add missing raw data entry, then click Add.
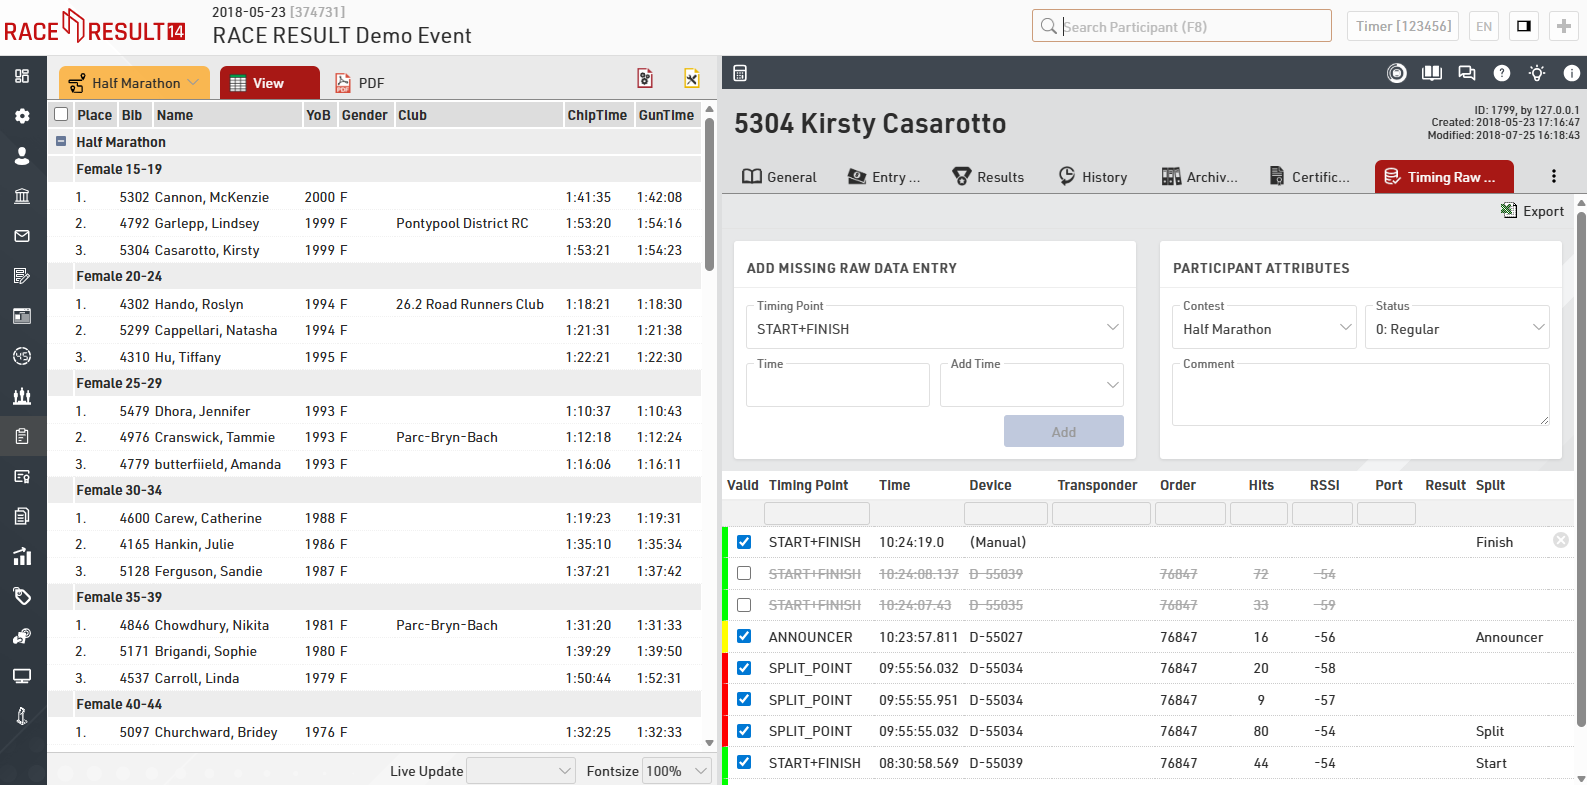
As soon as you click Add you will see this time is now listed in the Timing Raw Data as a Manual entry, manual data entries can also be deleted with the red X on the right hand side in case of any errors. Still in the Participants Window click Results and you will see that the Gun time for the Finish Split is now showing 01:54:23
Go back to the Output window and click again on View, you will now see the updated results list with Kirsty listed as 3rd in her Age Group.
Next, we will modify Kirsty Casarotto's year of birth which will shift her into a different age group. Access the Participants window and click on General. Change the Year of Birth from 1999 to 1991. The change will be reflected immediately by changing the age group from Female 15-19 to Female 25-29 automatically when you exit the Year of Birth entry field.
Before:
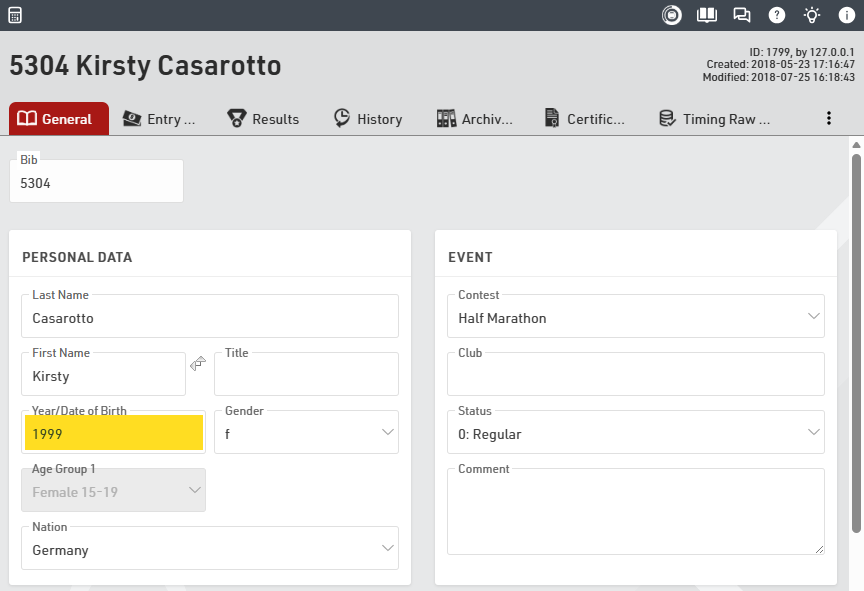
After:
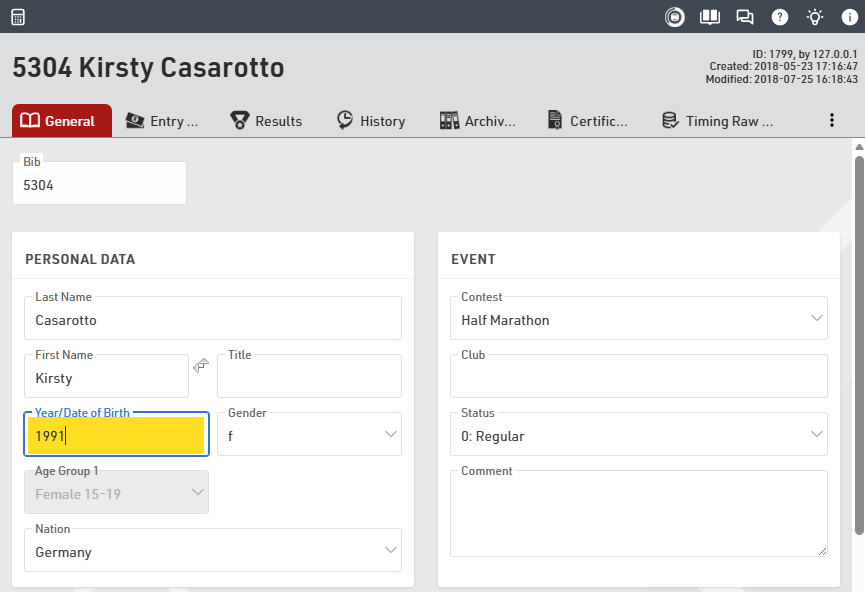
In the upper left hand corner, you will again see the disk symbol which means that the change has not been saved, yet. Now, click on History - navigating away now saves the change automatically. RACE RESULT 14 saves all modifications when navigating to a different tab, participant, or when you click on the disk symbol. Looking at the History of this participant, you now see all modifications that have been made to this particular participant so far:

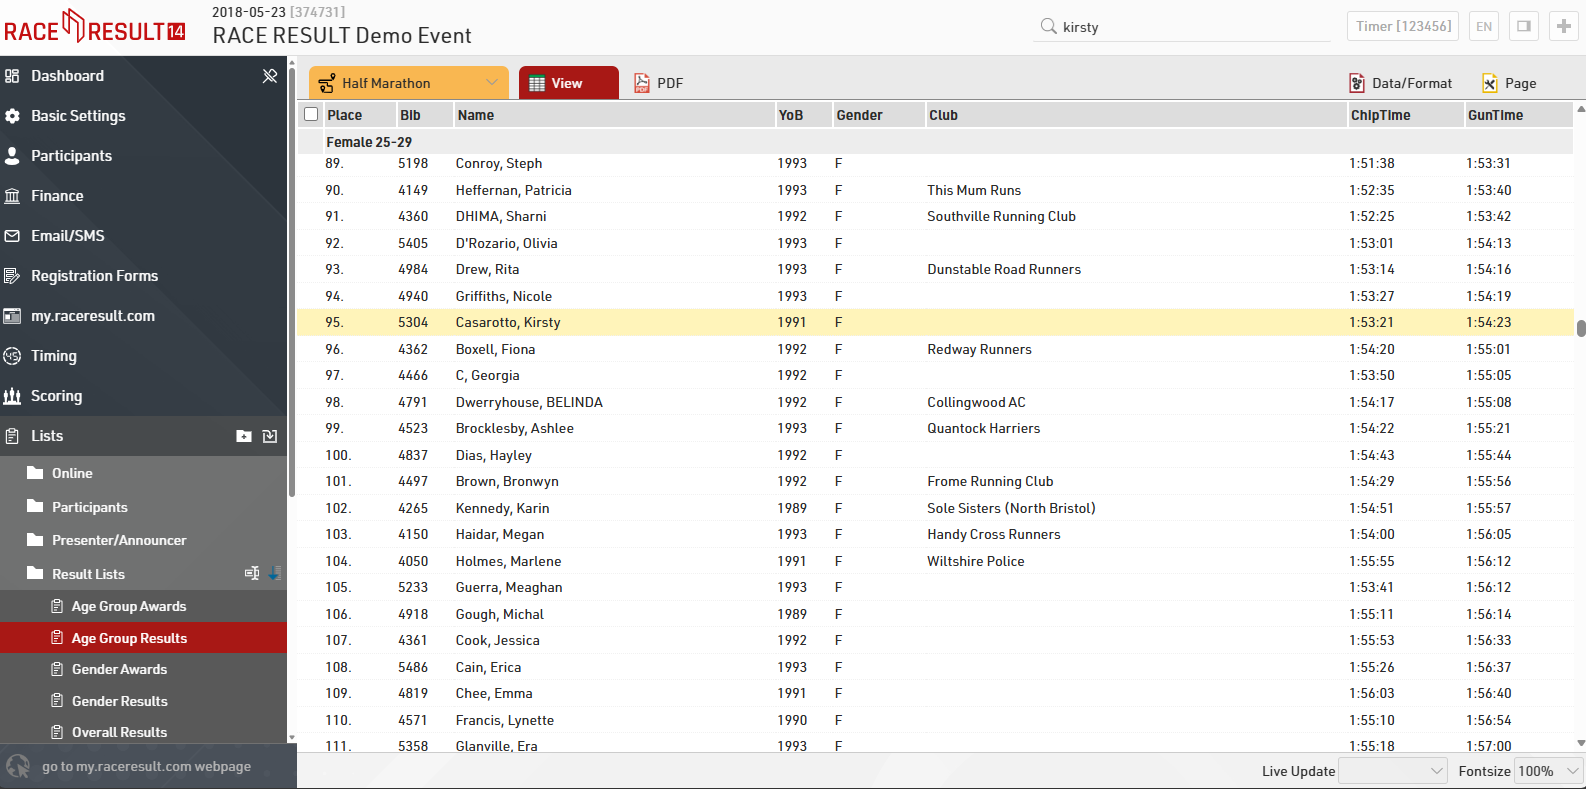
If you go back to the Output Lists and open Age Group Results, you see that Kirsty Casarotto is now included in age group Female 25-29 with a Gun Time of 1:54:23. She is ninety-fifth in that age group.
Next, we will add a new participant manually. Go to the Participants window, click on New Participant or press F12, and fill in the empty form. The bib number will be the next available value after the current highest bib number, in this event that is 10818 so you should also select the 10km contest which this bib number would be for. FIll in the participant details as below.
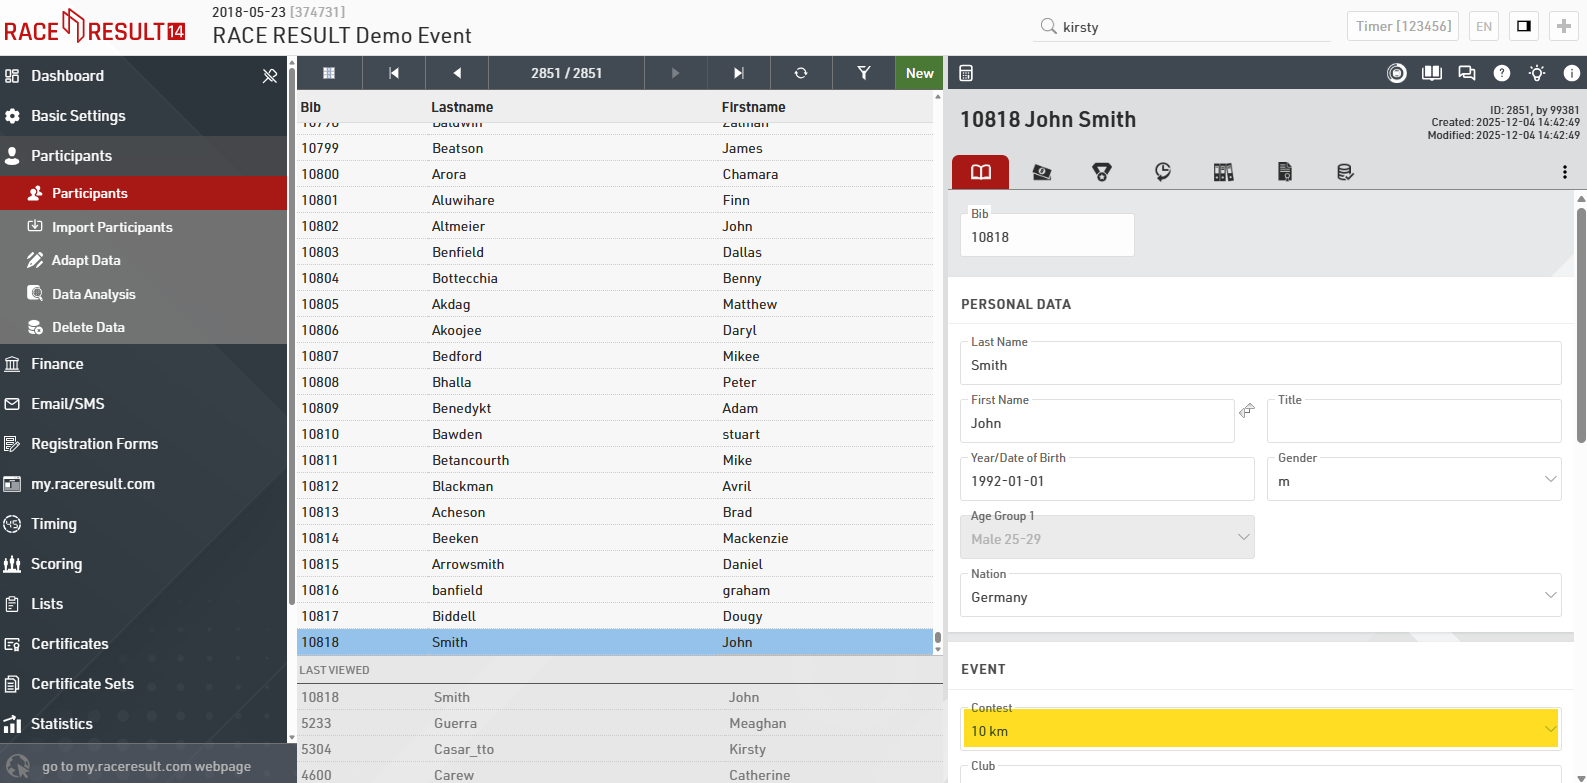
Go back to the Output window (again changes you have made will be saved automatically) and open the list Participants List123 for the 10 km Contest.
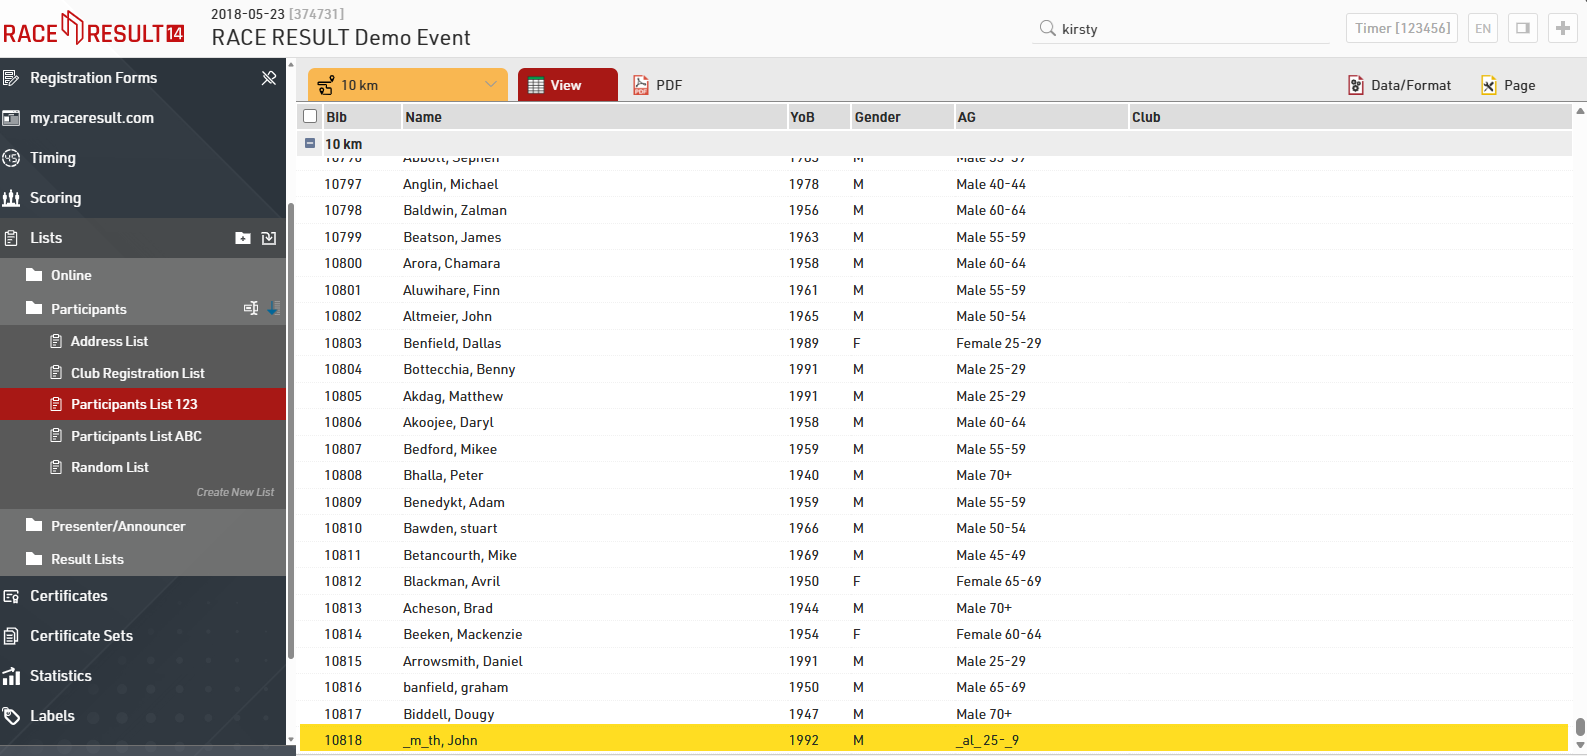
At the bottom of the participant list you can see that the newly added athlete John Smith is not being displayed correctly, but garbled by underscores. The following section explains why.
Participant Activation with Credits
RACE RESULT 14 uses a credit-based payment model: that means, you do not have to buy the software, but instead purchase RACE RESULT Credits. This fee per participant includes all our services: scoring, online registration, startlists and result lists as well as certificates on my.raceresult.com, support, server usage, etc. This model has proven to be fair and advantageous for all event organizers as even very small organizers can now manage, time and score their races using professional software at a low price.
Billing happens every night between 2 am and 6 am (Central European Time): one credit is taken from your account for every new participant. If you add participants for tests and delete these before the night, this will be free of charge.
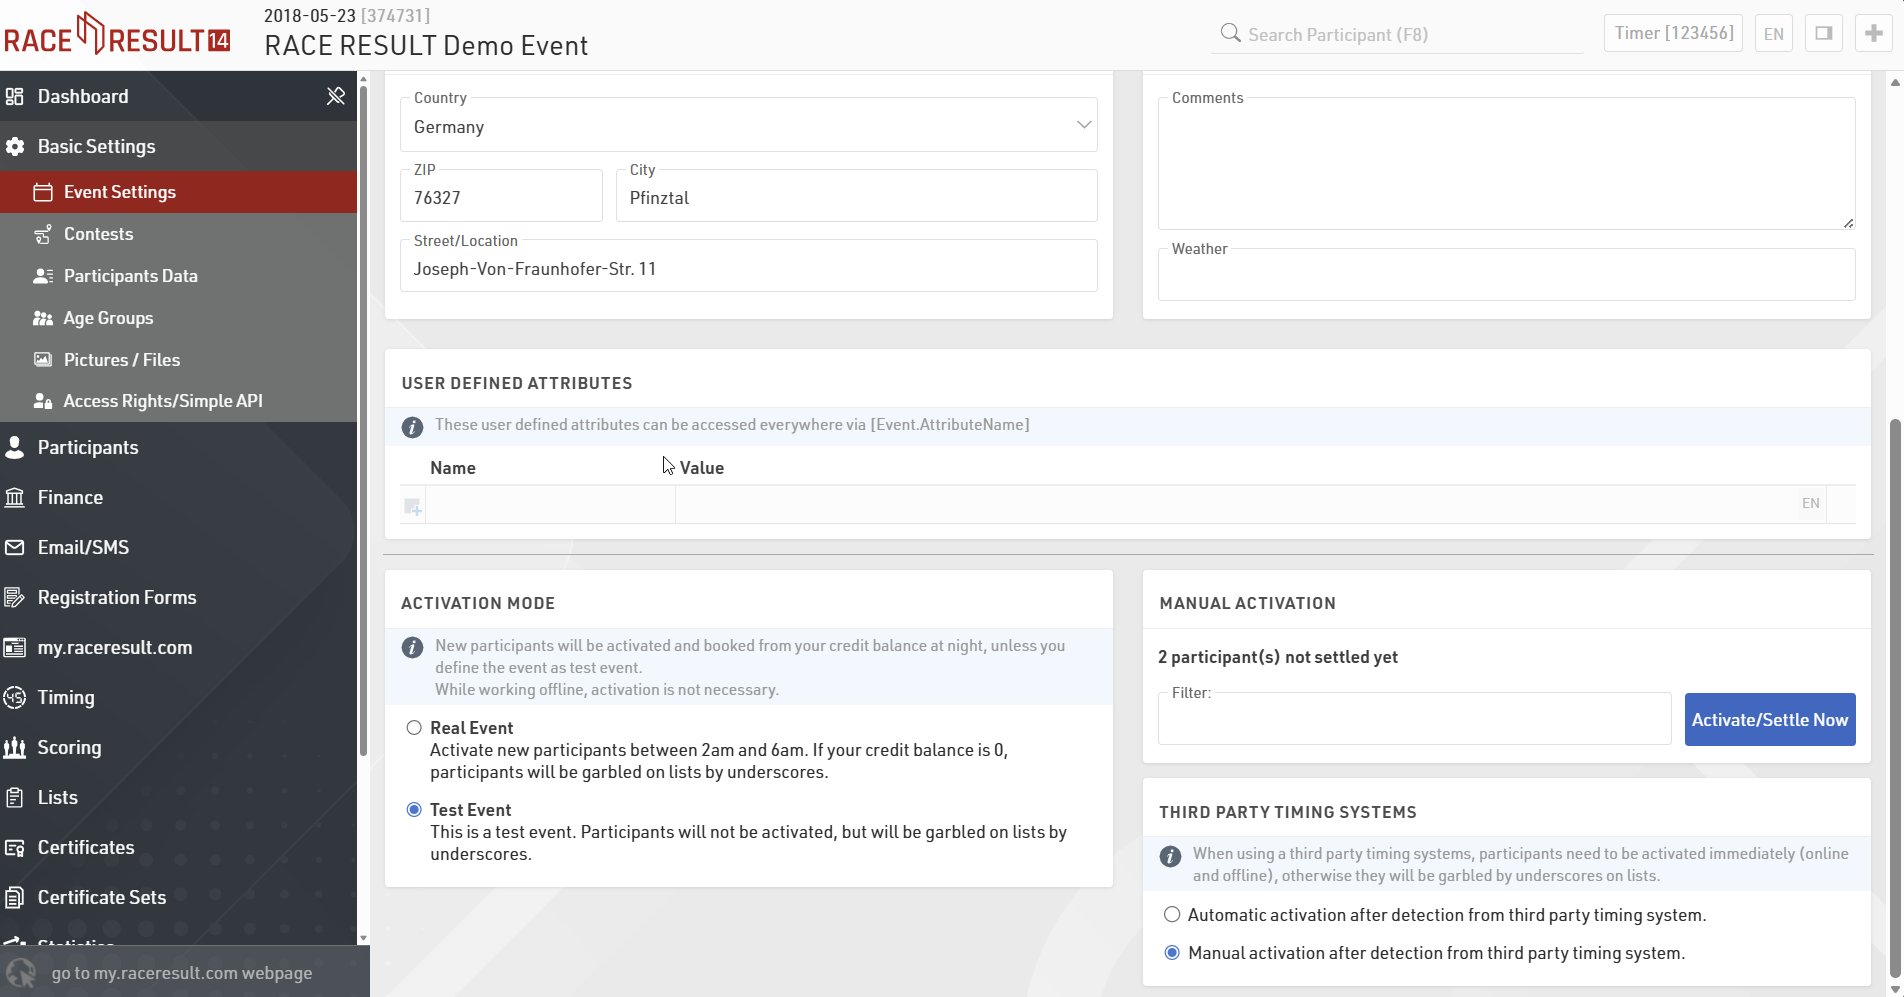
Also, you can define an event as "test event" in Basic Settings > Event Settings. In this case, you will not be charged for the participants, but instead the underscores will show up in your lists so that you cannot use them for a real event. The demo file is defined as test event which is why the underscores appeared for John Smith.
The underscores will also appear if the nightly activation fails, for example, when you do not have sufficient credits in your account.
How to Buy Credits
You can find prices for the credits on our website www.raceresult.com in the section SOFTWARE > RACE RESULT 14 > Pricing. Unused participant credits are not lost, but can be used for your next event. It is most cost-efficient to purchase participant credits in bulk as the per participant cost decreases as you buy a larger amount at once.
Once you have made the decision to use RACE RESULT 14 for your event, go to your Customer Area and click on Buy/Transfer Credits where you find the following form to buy RACE RESULT credits:

When clicking the Buy Now button, you will be forwarded to the shop for the checkout process, if you require credits immediately then you should pay via Credit / Debit card as other payment options have delayed authorisation which will delay the transfer of credits to your account.
Create a new event
Having gained first insights into RACE RESULT 14, we'll now show you how to create and configure your own event. First, go to the main menu in RACE RESULT 14 by clicking the logo in the top left corner.
How to create a new event
Click on Create New Event and enter your event name and the event date. Use the format “yyyy-mm-dd” (for example, use “2026-04-08” for an event on April 08, 2026). Optionally, you can also choose a pre-configured event type (e.g. a lap race) or create a copy of an existing event file:

How to configure events
Once again, you will be directed to the Dashboard Summary window. In the navigation bar on the left, you find the category Basic Settings, which specifies all options for your event.
Other (Advanced) Options / Settings
As you work through Navigating / Using RACE RESULT 14 you will find other relevant settings such as:
Timing Settings
If you have more than one timing point, you will have to set up and configure timing points.
Results and Ranks
If your event is more complex than just start and finish time, and overall/gender/age group rank, you need dive into the scoring settings. It is possible to save or calculate several times for each participant, e.g. a start time, interim result(s), and a finish time. RACE RESULT 14 also enables you to calculate any type of special ranking.
Team Scores
A Team Score is used to group several participants (e.g. from the same club or company) to build one team, and subsequently rank each team.
Archives
You can archive all data of your event. Using the archives, you can then add new participants very quickly by simply importing individual athletes from the archives.
Online Registration
Most likely, to save time and money you will want to offer online registration for your event. Included in our service, is free usage of our sports portal my.raceresult (http://my.raceresult.com) which lists your event so that race participants can find you quickly and easily.
Your event page on my.raceresult.com contains the pages Info (for general information), Registration (for online registration), Participants (in order to publish participant lists), Live (active during the race day for live results), Results (for the publication of result lists and certificates), Reviews (for comments), and Contact (to contact the event organizer or timekeeper).
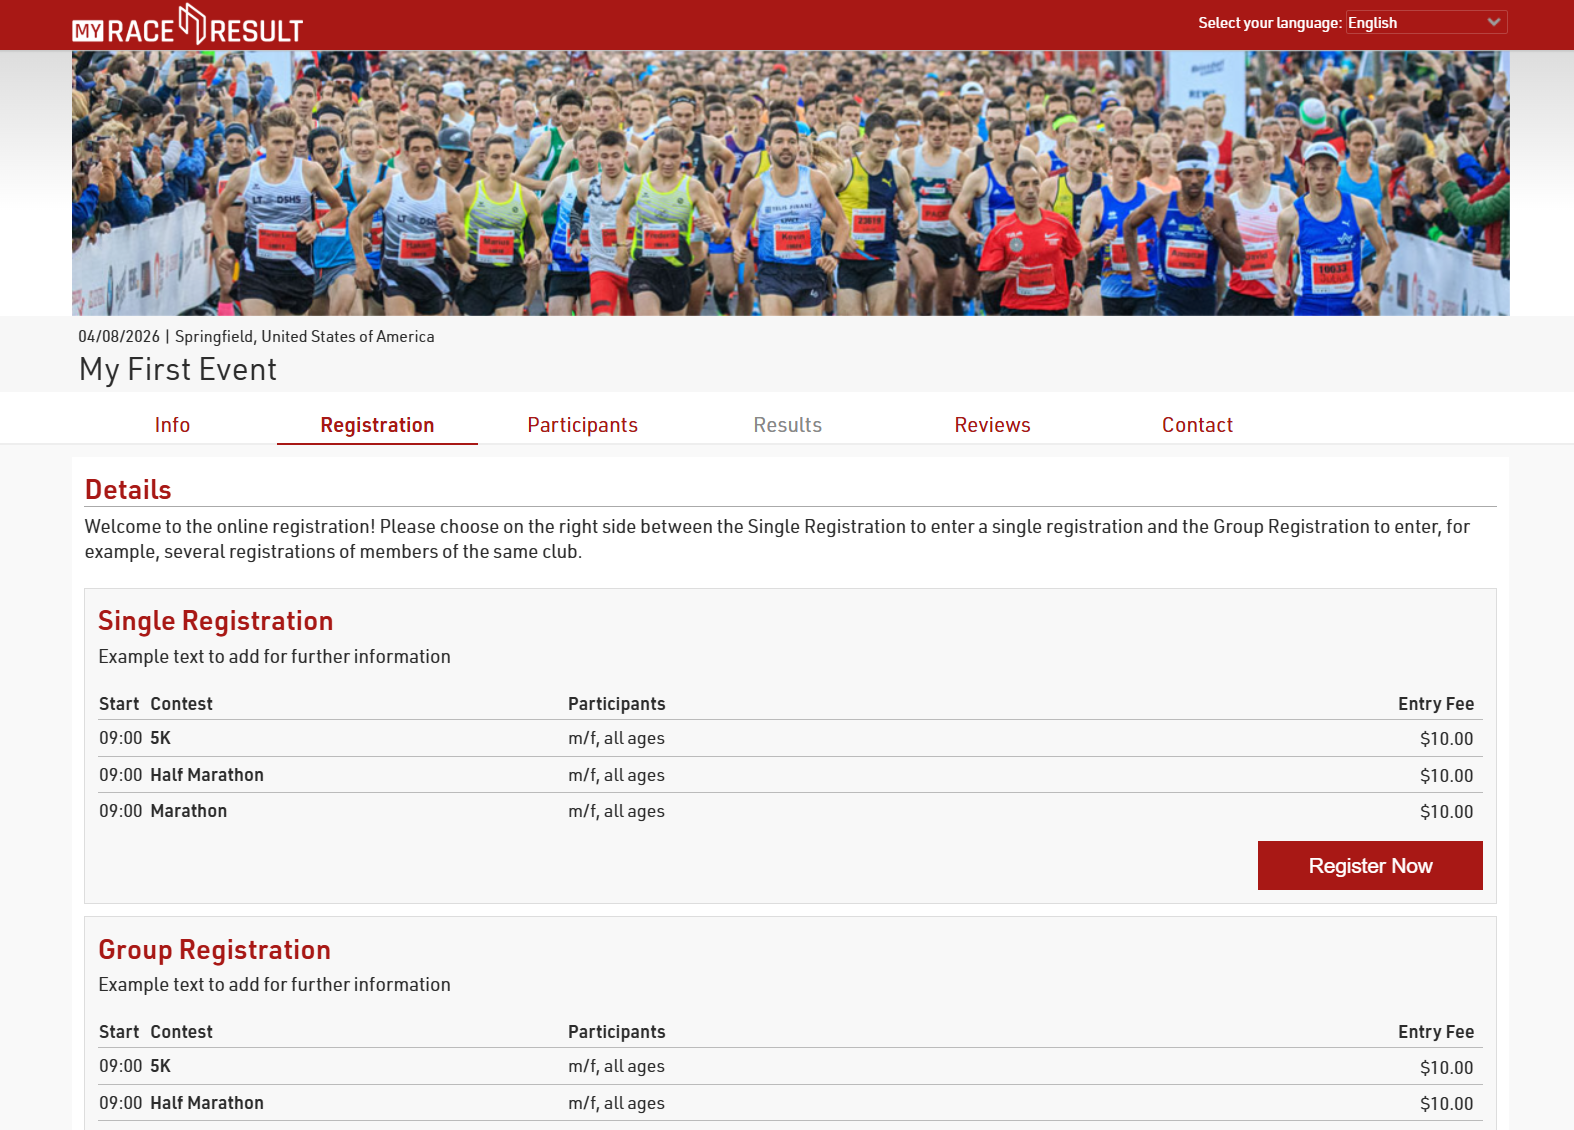
All pages can be customized through the my.raceresult.com Window in RACE RESULT 14. We will now address each setting in more detail.
Basic Settings
In order to publish your event on my.raceresult.com, click on the tab my.raceresult.com at the top of the general window. Then, accept the general terms of use and activate the checkbox Publish event on my.raceresult.com.
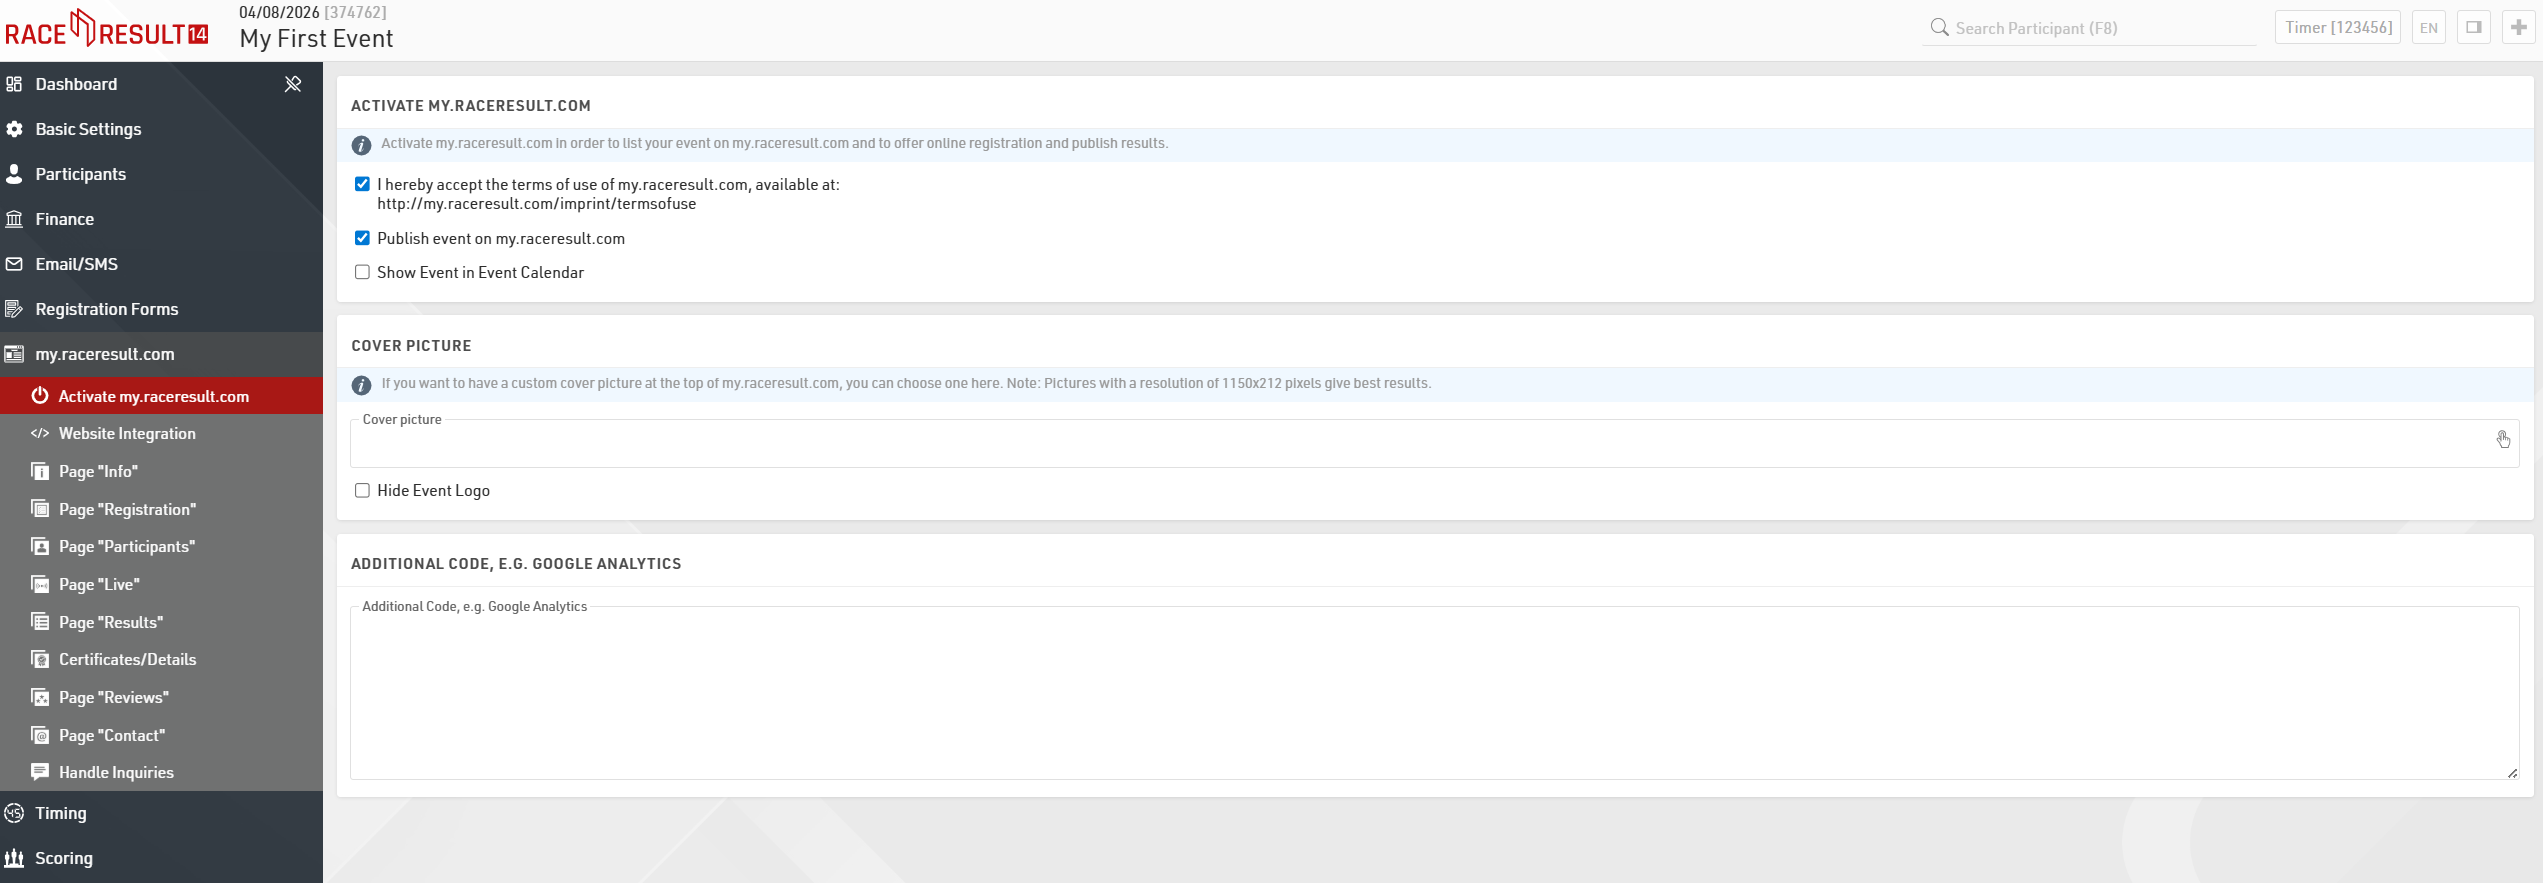
An individual cover picture is recommended and gives your event a special touch.
In the rest of the my.raceresult.com menu it's possible to make changes to all the relevant pages of the platform.
Online Registration
The options that refer to the online registration can be set in the page Registration. Activate the checkbox Activate Registration in the Basic Settings overview in order to enable online registration on my.raceresult.com and adjust the registration period.
Scrolling down in the Registration Forms section, you can define which Form to publish on the page, add additional Info Text and decide either to show the entry fees or not.
For testing purposes, at the bottom of the page you can find the TEST MODE where registration can be tested before the beginning of the registration period, without capturing payments. In this case we highly recommend setting the end date of test mode, for avoiding participants registering without paying fees.
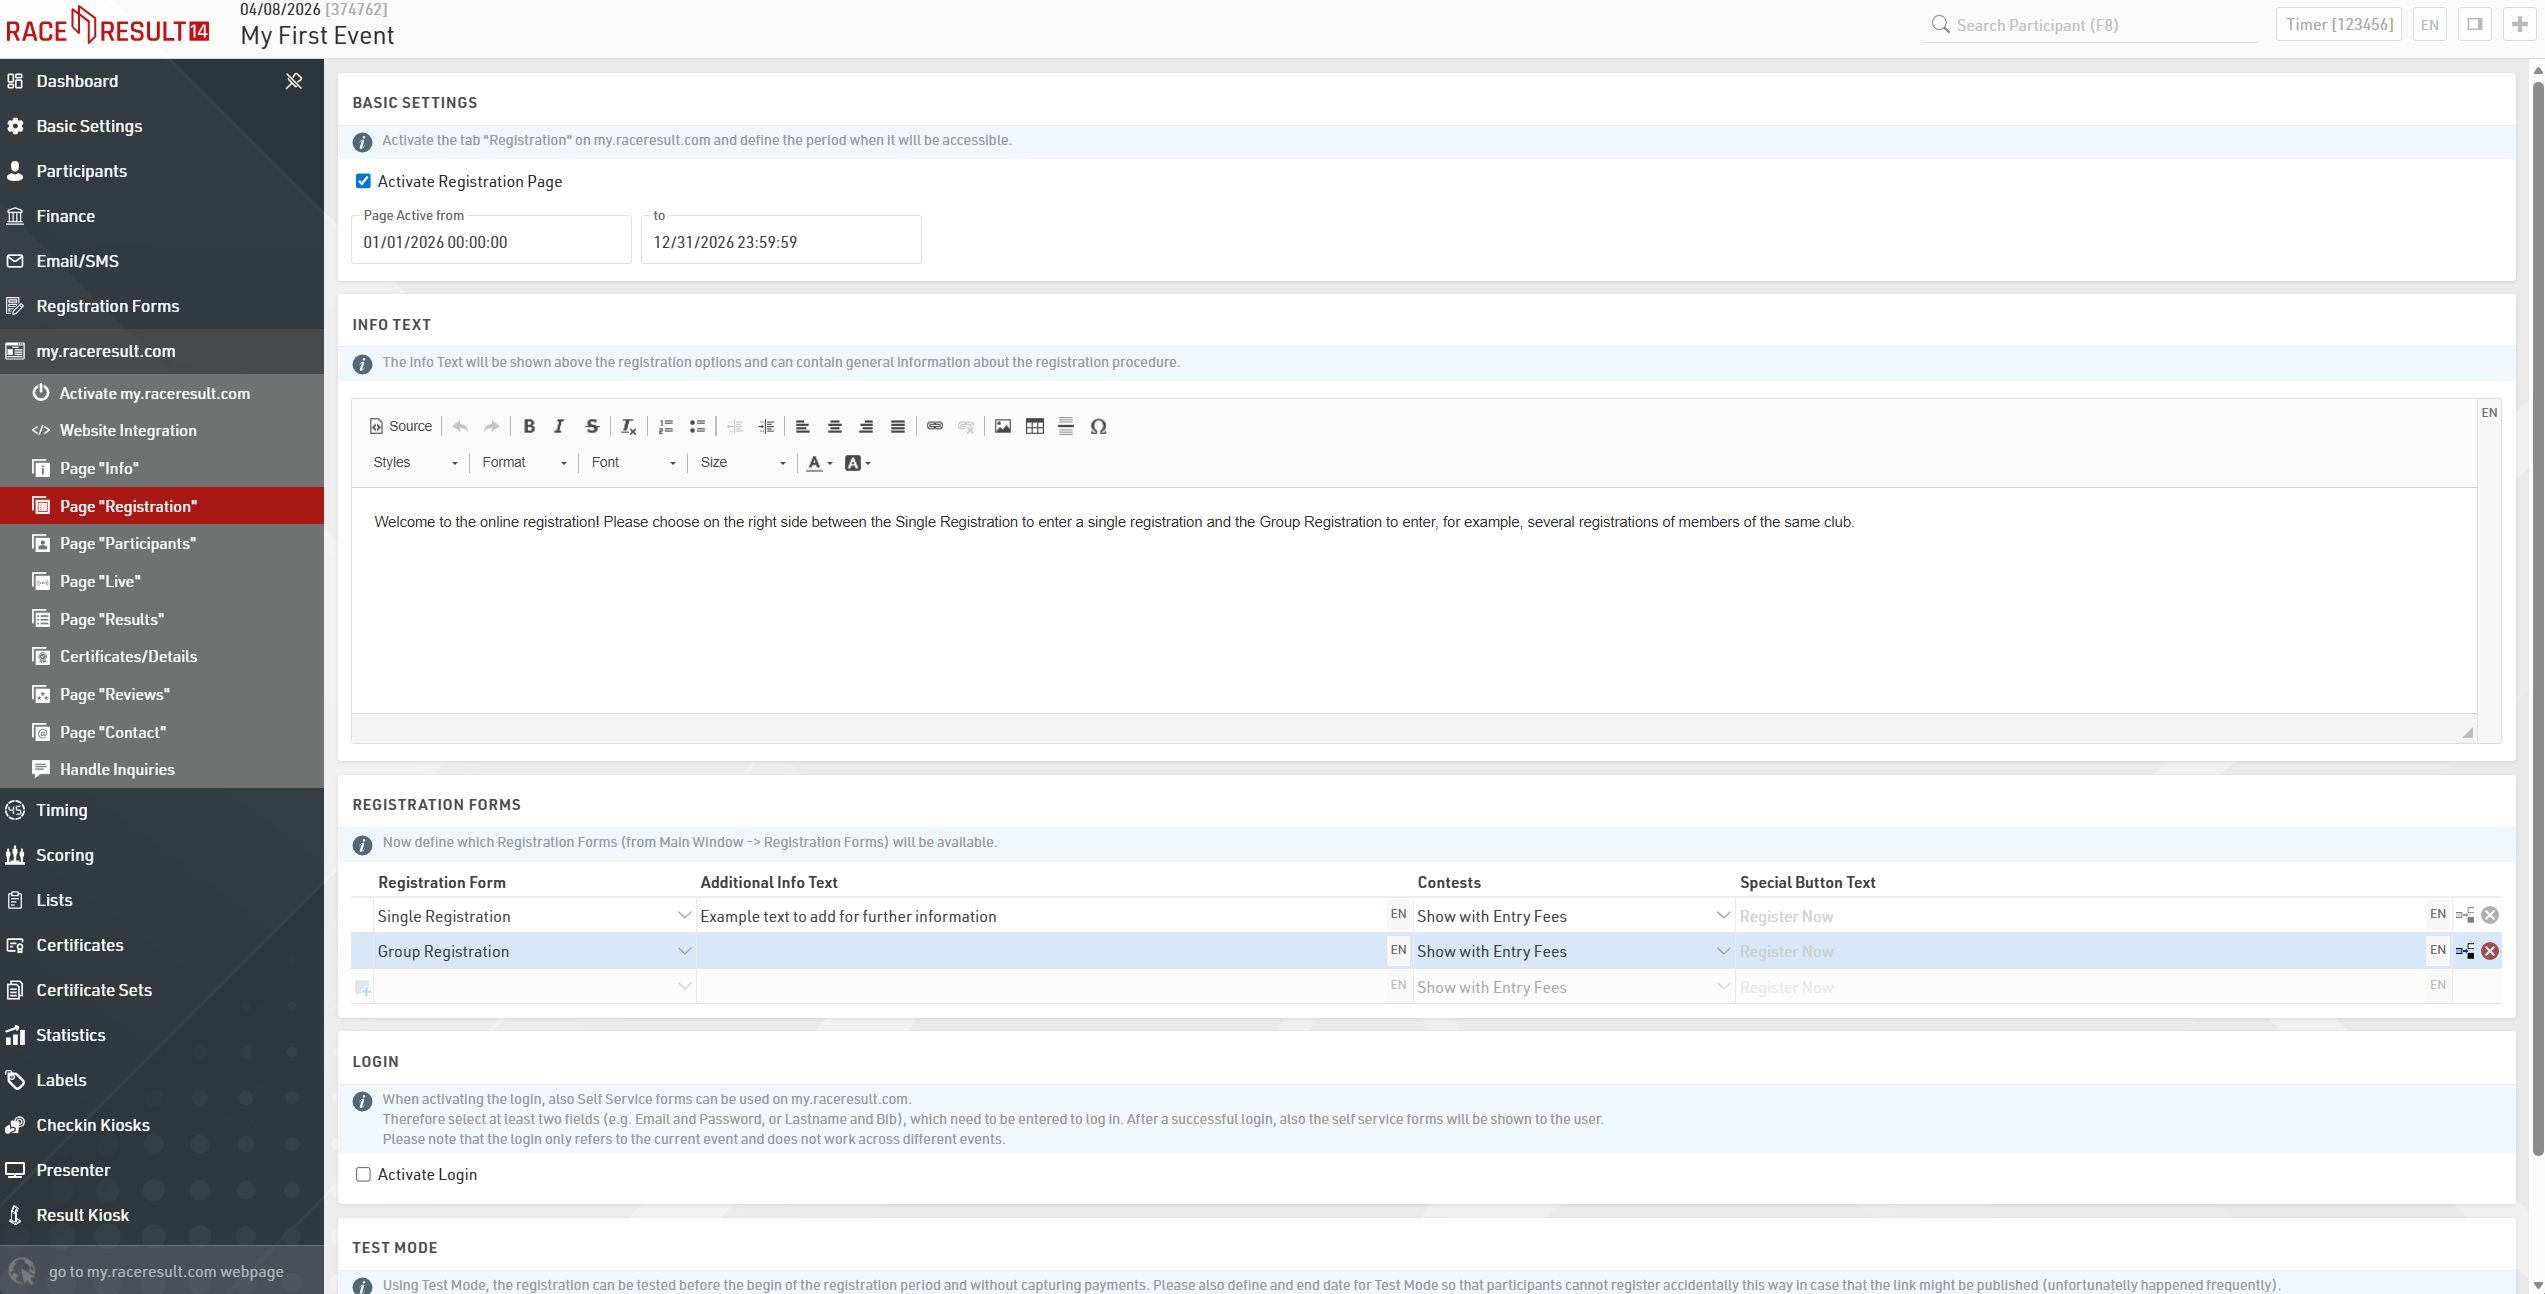
The creation of the Registration Forms can be done under Main Window > Registration Forms. Here you can define all the steps like the form fields, the payment method, the confirmation page and the confirmation email to be sent at the end of each registration. More detailed information can be found here.
Publishing List and Certificates
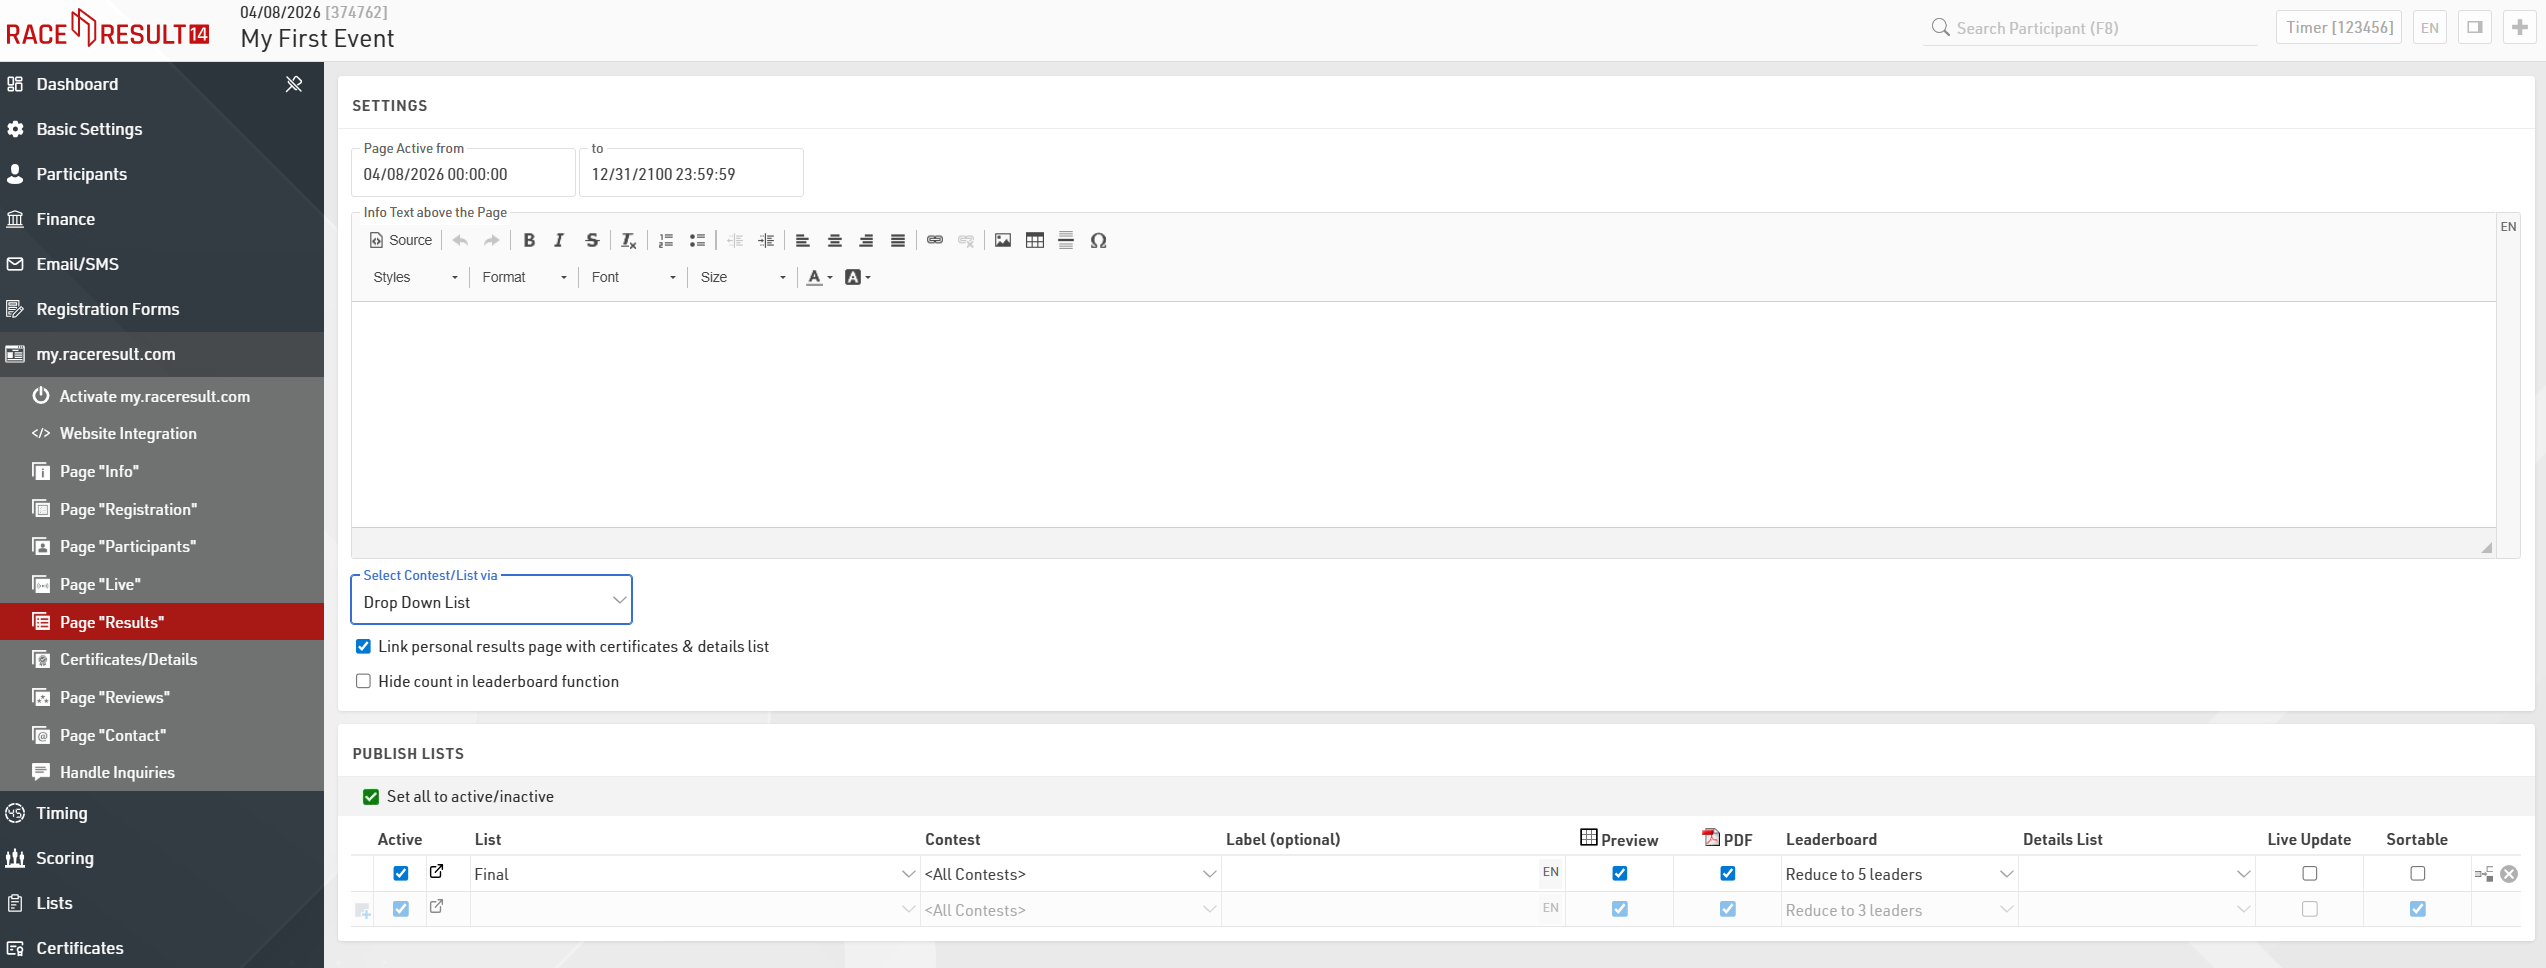
In the pages Participants, Live and Results you can define which lists from the Output Window, and which race certificates and links will be published on my.raceresult.com. The certificates and links can then be accessed by clicking on a participant's name in a result list. You can setup and configure pages for the Participants with an entry list e.g., a Live page with live results direcly from the track and a Result page for publishing the results after the race. For each page you have different settings, and you can vary the date when the certain page has to be active.
In order to publish a list or a certificate, simply select it in the drop-down box and define for which contest it shall be published.
How to Create Race Certificates
If you want to print race certificates for your event and/or offer certificates online for participants to download, you need to configure your certificates first. This is done in the Certificates window, first create a layout in the Certificate Tool and then configure the Certificate Sets
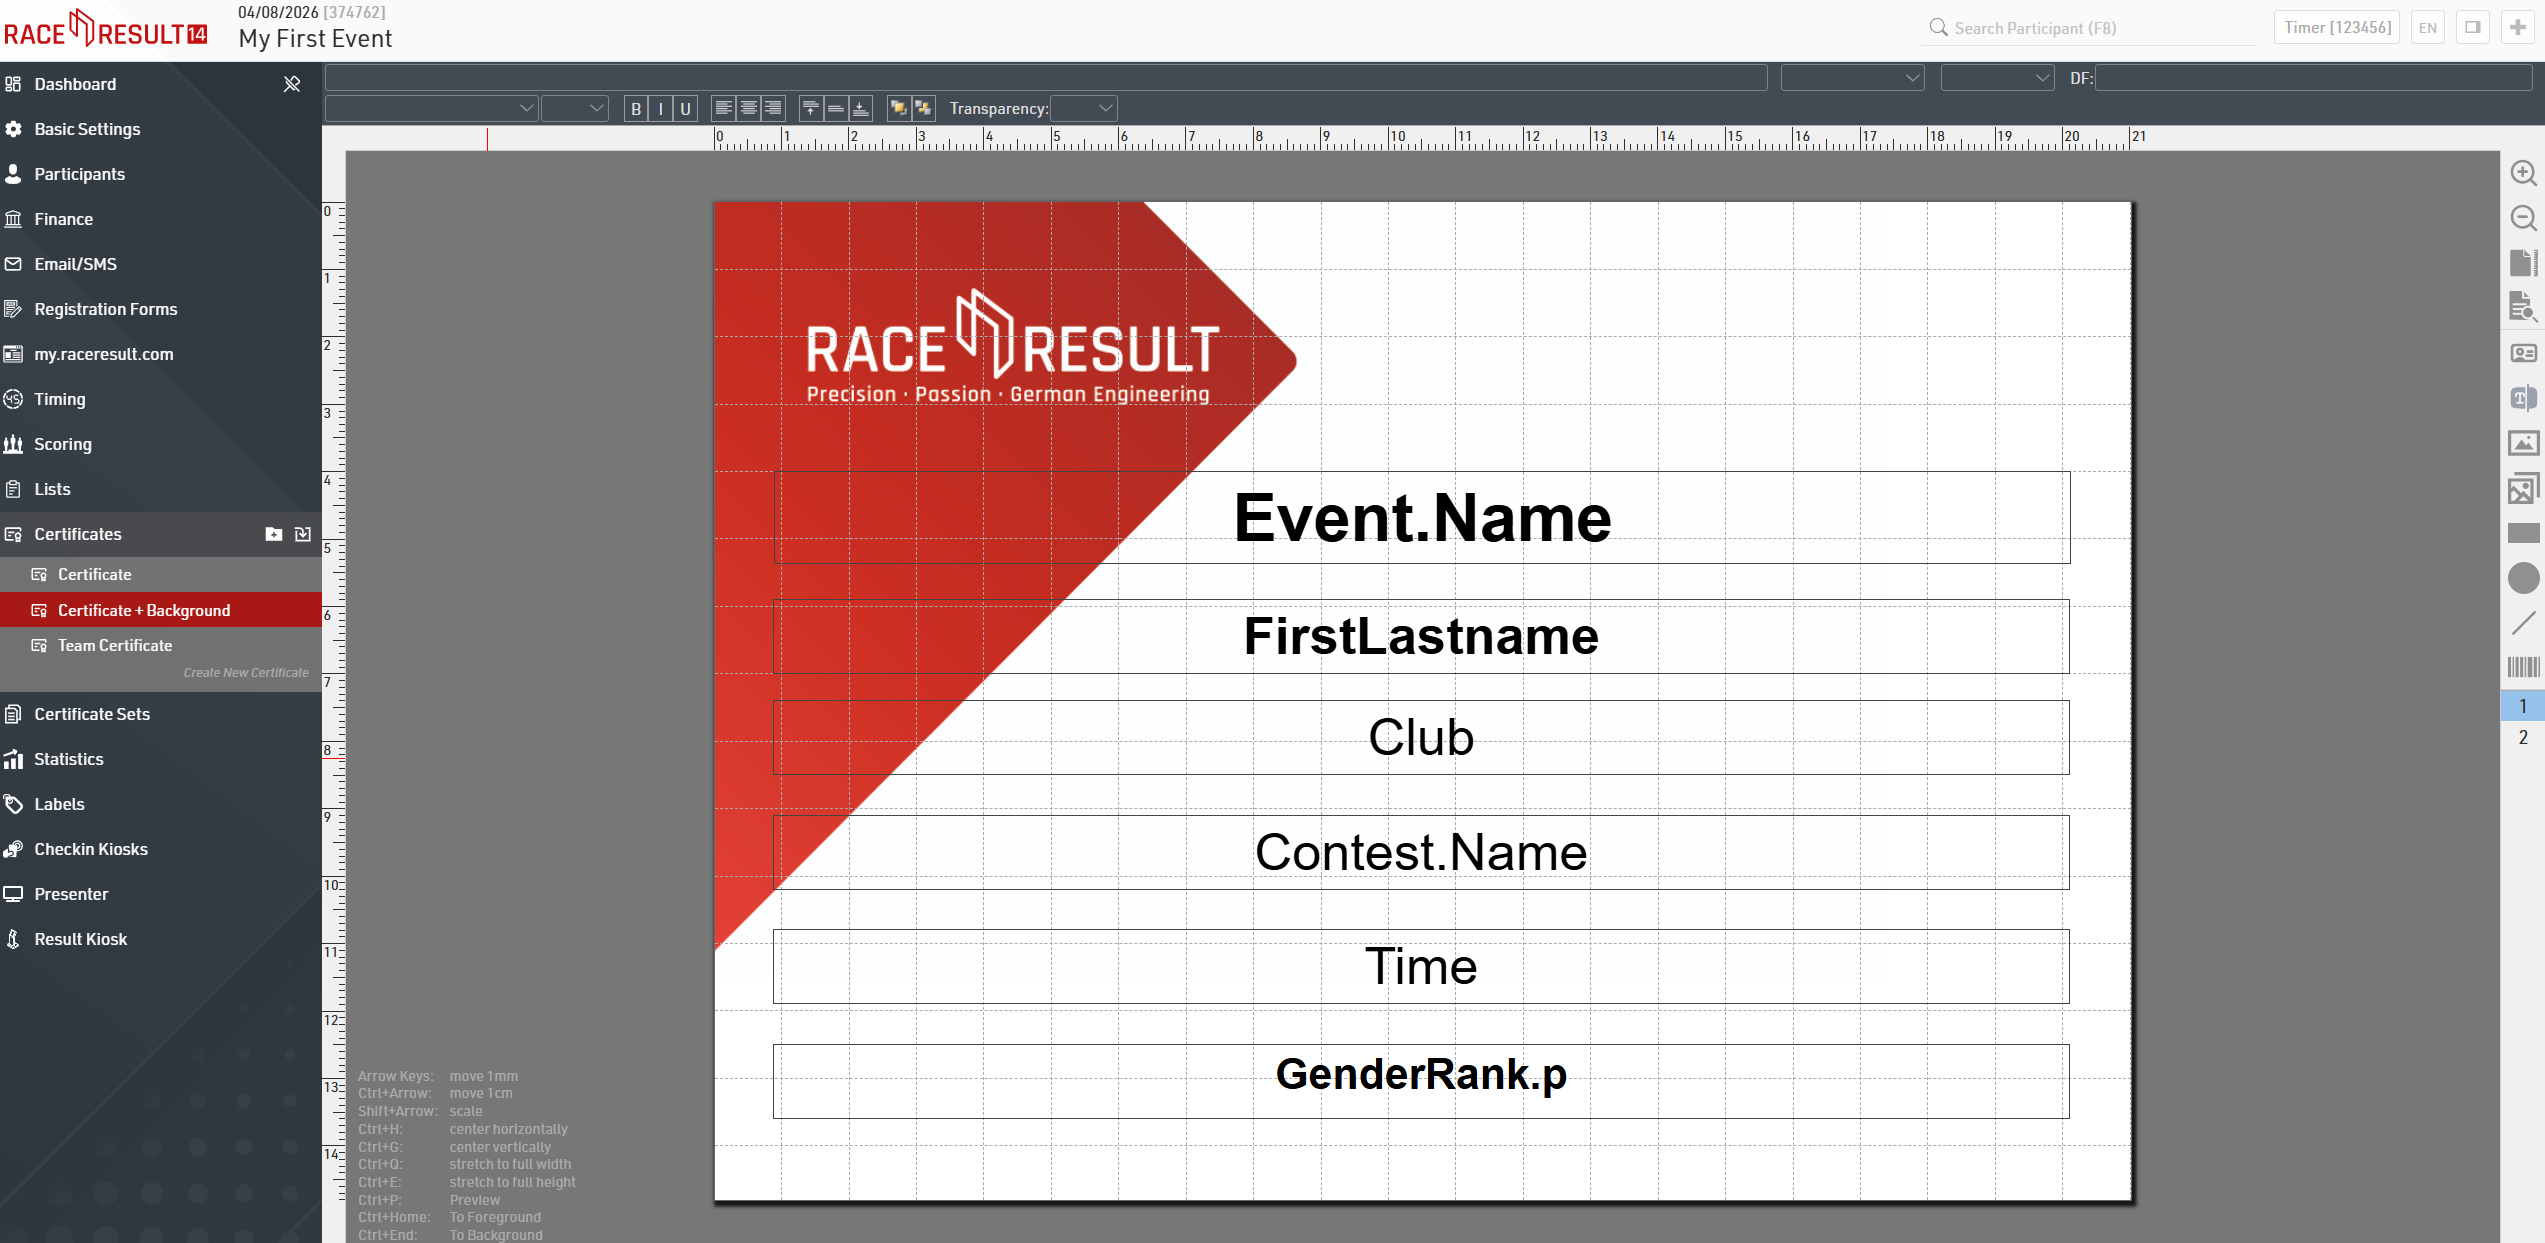
You can choose from three types of pre-defined certificates on the left: Team Certificate, Certificate + Background, and Certificate. The simple and standard Certificate is intended for prints on pre-printed paper. Certificate + Background is intended to contain a background picture and will be offered to participants online for download.
More detailed information about how to create and configure your own certificates can be found here.
Further Options
Your event has now been configured. Of course, you can add details and special options to your event by:
- Creating new and customized lists for your event
- Customizing the existing lists: e.g. by inserting pictures, formatting font style and size, changing page frames, etc.
- Creating certificate sets that you may want to print during your event
- etc.
If you would like to learn more, please read the RACE RESULT 14 Details.
Shortly Before Your Event
Most likely, you will not have reliable Internet access during the event. Even if you do have an Internet connection, we recommend that you work offline during the event: this will help reduce issues in case the connection is lost for any reason.
Two steps are necessary:
- install the latest version of RACE RESULT 14 on your computer
- download the event file and save it on your hard drive.
You will still be able to post live results while working offline, and if your internet connection is interrupted you can still time the race and provide results on the day.
Download and Install RACE RESULT 14
The latest version of RACE RESULT 14 can be downloaded on our website www.raceresult.com. Go to
SOFTWARE > DOWNLOAD. Download and start the installation file and then follow the instructions that guide you through the installation.
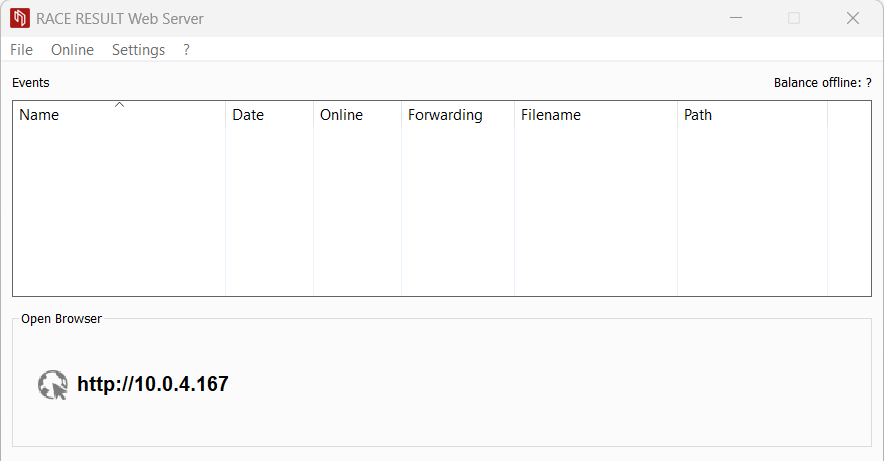
After the installation, launch the RACE RESULT Web Server in your Windows start menu or on your desktop. Check for new updates regularly to run the latest version of the software.
Checking Out the Event File
Currently, your event file is still saved online on the Internet. Shortly before your event starts, you will want to download your file and continue working on it in offline mode. Consequently, your master file will then be stored offline on your computer. This process is called Check-Out. In order to check out an event, go to the RACE RESULT Web Server and click on Online > Download an Event from Server (Check-Out) …. Once you have checked-out your event file, you will not be able to open it online anymore. This way, you ensure that changes can only be made to the master file and confusion is avoided.

Note that your online registration has to be closed in order to be able to check-out an event.
Once your event has been checked out and saved on your computer, you can always open it by clicking on File->Open Event. You then have access to your event simply by clicking Open Event in the RACE RESULT Web Server which opens your web browser and brings you the Overview page of your chosen event.
During the Event
Next, we will describe the most important steps for using RACE RESULT 12 on race day.
Connecting Additional Computers
Often you will want to work on the event using more than just a single laptop, for example the event organiser needs to enter participants after online registration is closed, i.e. you have to enter late entrants manually. If you have more than one laptop available, we recommend that you add all computers to a local network. This way, your staff can work on entering new participants simultaneously and thus save time and make the best use of your available resources. All connected laptops can then access the main computer and the master file through the browser.
The RACE RESULT Web Server displays the network address at the bottom left corner (see picture: http://192.168.1.179/). Simply enter this URL in the browser of any computer in your local network to access your event file.

Once you have entered the abovementioned address in the browser, you will be directed straight to the event list within RACE RESULT 12:

Now, you can access the event file simply by clicking on it in the list. All you need is a browser, you do not need to install RACE RESULT 12 on every single computer.
Timing
Now it is time for the most important part: timing your race. Using RACE RESULT 14 you can do both Manual Timing or Chip Timing. This Timing Guide help you in doing so.
Posting Live Results
When working offline you can use Online Forwarding to forward your changes made offline to the file online. This way, my.raceresult.com has access to the latest race data and can show live results. Since only the changes will be forwarded to the Internet, there is only little data to be transferred such that even a 2G connection is sufficient in most cases.
There is a guide on using Online Forwarding here
Right After Your Event
Check-In of Your Event
Right after the event, you want to upload your master event file to the Internet. This will have two effects: first, your results will be available on my.raceresult.com if you haven't used Online Forwarding, and secondly, you and your colleagues can then collaborate again online and work on the event file simultaneously.
This process is called Check-In. As soon as your event file is checked (back) in, the offline file will be closed and changes can only be made online after logging into your account on www.raceresult.com. Thus, be sure to only check-in your event, if you are certain that you do not want to make further modifications to the offline file. In order to check-in your event, click on Online > Move this Event to Server (Check-In).
Results on my.raceresult.com
If you have not done so already, select the result lists and certificate sets that you would like to publish on my.raceresult.com.
my.raceresult Inquiries
my.raceresult.com also offers you an extra form to collect feedback and inquiries from participants. This form can be found in the Contact section on my.raceresult.com. When participants fill in this form, the inquiry can be found in the my.raceresult.com Window of RACE RESULT 14 under the headings Inquiries > Handle Inquiries.
When processing inquiry, all result lists and certificates on my.raceresult.com are updated automatically. Of course, the same goes for changes that you make in the Participant Window or anywhere else in RACE RESULT 14.