For small and mid-sized events, Manual Timing is a cost-effective alternative to chip timing. You do not need a stop watch, RACE RESULT 12 brings all the tools necessary for manual timing.
Below two different methods for small and mid-sized events are explained in detail.
Small Events
If an event can be considered as small in the context of manual timing depends more on the number of participants finishing per minute than on the total number of participants. A 250 meter child’s run with 20 kids can be more challenging than a half marathon with 200 participants.
The method described in this section works well for events with a maximum of 10 finishers per minute. Times and bib numbers will be captured together at the finish line using one computer.
Capturing Times
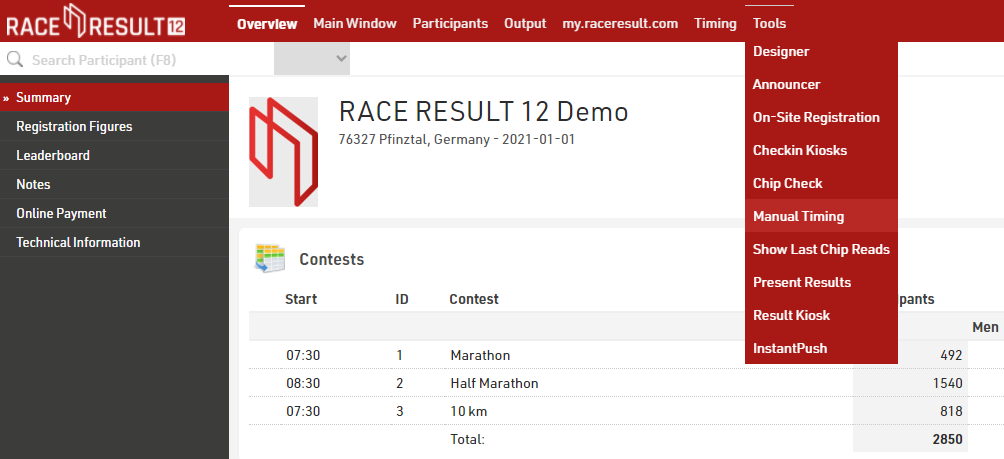
The Tool for Manual Timing can be found in RACE RESULT 12 in the Tools menu:
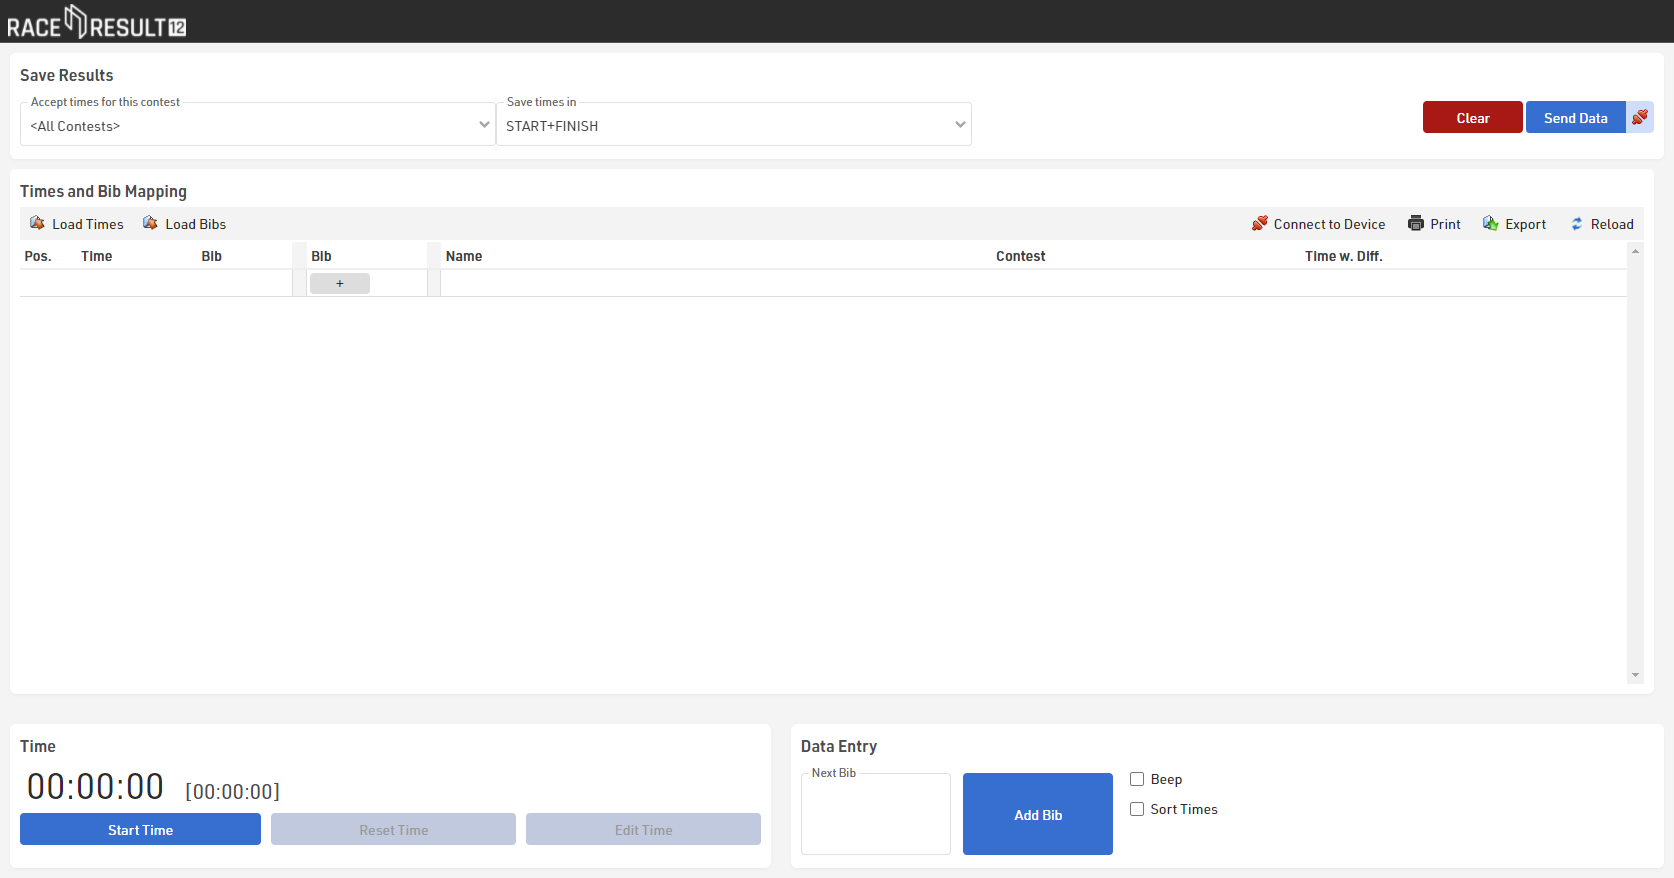
Start the time with the gun start by clicking the button in the bottom left corner. In case you missed the start, you can adapt the time afterward by clicking the button Edit Time.
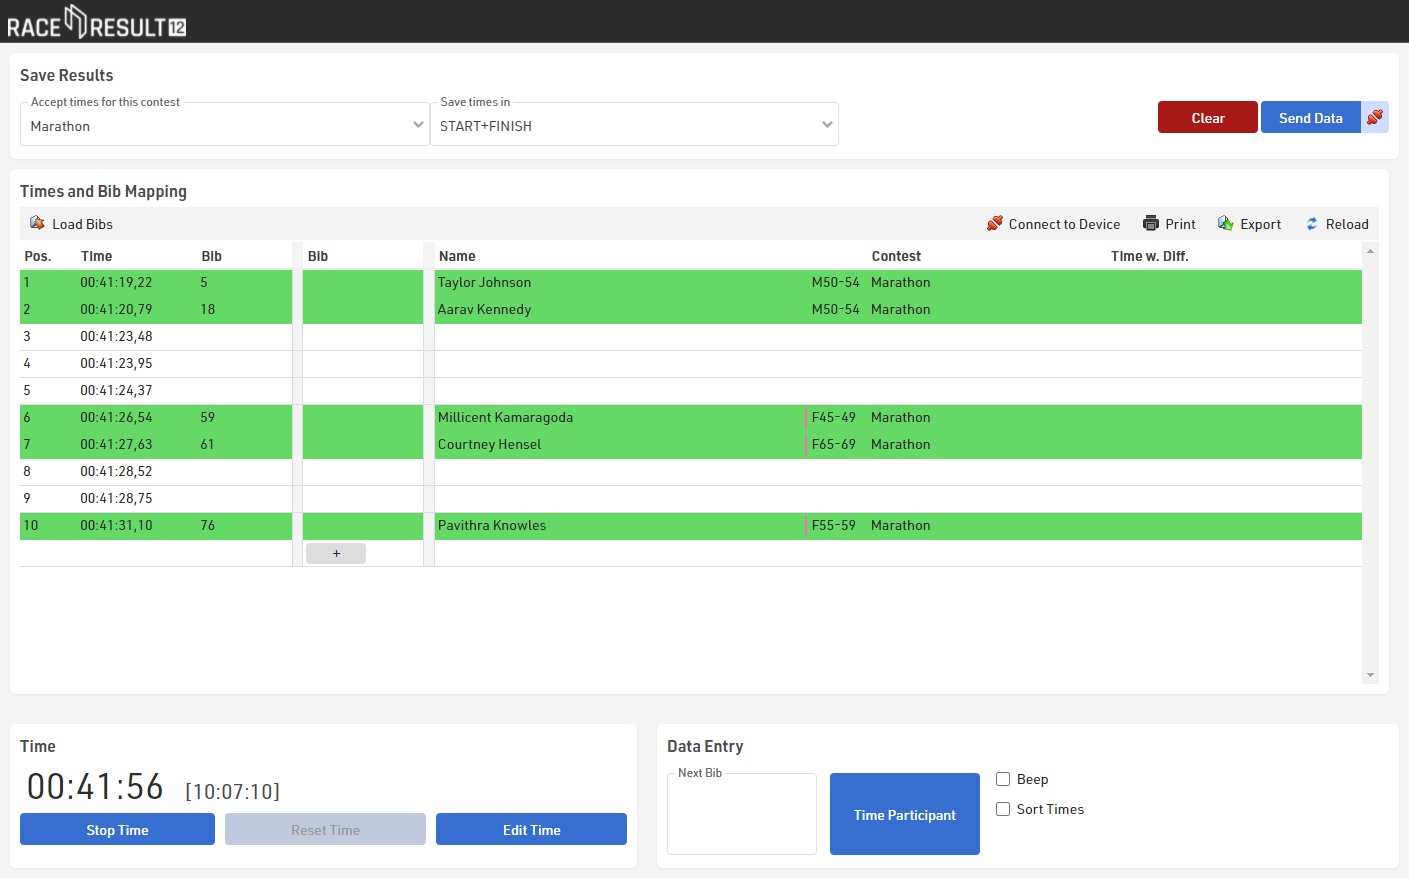
Next, set the cursor in the field Next Bib, enter the bib number of the first participant approaching the finish line and press enter when they cross the line. The participants will be listed immediately in the table above:

In case you cannot enter the bib number (too many participants finishing at the same time, bib number worn on the back, etc.), you can take the time without entering the bib by pressing Enter. You can enter the bib later in the table above:
Saving Results
Once the last participant reached the finish, the results can be saved in the event file. Therefore, select the right contest in the dropdown at the top of the screen and the timing point where you want to save these times:

If a participant in the table is registered for another contest, he will be marked yellow and you need to decide if you have mistyped the bib, if he is registered in the wrong contest or if he should have not been captured (maybe he was just warming up).

You can either delete the time, change the bib or change the contest to the one selected at the top of the screen.
When the results are complete and correct, click the button Send Data to write the data into the event file and press Clear to clear the table and to begin timing the next contest. From then on, the results are available in RACE RESULT 12, for example in the Output Window.
Mid-Sized Events
Also mid-sized events can be timed manually. There should not be more than 30 finishers per minute in peak times and not more than 15 per minute on average.
When many participants reach the finish at the same time, it is not feasible to type in every bib number so quickly. That is why capturing times and bibs will be split into two tasks. At the finish line, times are taken and then participants line up in a funnel in the same order as they finished. At the end of the funnel, the bibs will be either written down by hand or recorded with your laptop by typing in the numbers or by scanning a barcode on the bib.
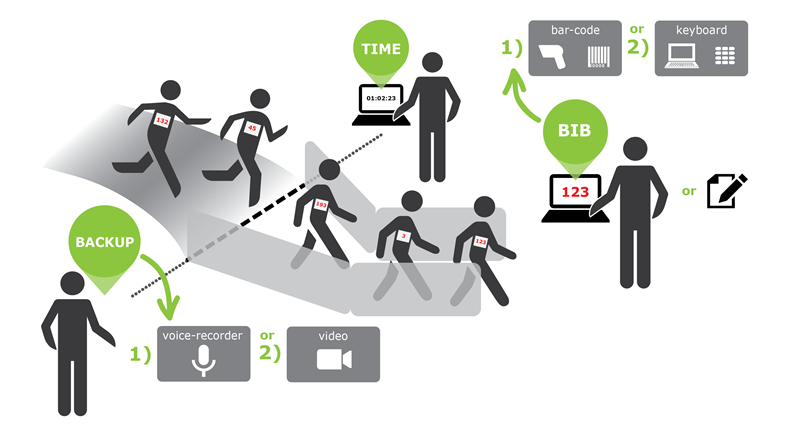
In case there are any doubts about the results, it is helpful to have a backup. You can use a camera to record the finish line or a voice recorder to record your voice while saying the bib numbers.
Capturing Times
For capturing the times, the tool Manual Timing will be used as well. If your race office (where you score the race) is at another spot (i.e. not at the finish line) you have the following options:
- You can work offline and your event file is stored on your main computer in the race office. This computer and the computer at the finish line can be connected through a local network, so that you can access the event file in the race office simply through your browser by entered the IP address (for example http://192.168.1.54).
- You can also create a copy of the event file for the computer at the finish. When the race is over, export the results in the Manual Timing tool (button “Export”) and import them at the computer in the race office (button “Load Times”).
- You can also work online, i.e. the event file is stored on the RACE RESULT servers. At the finish and in the race office you need Internet access in order to access the file online.
Taking times works almost the same as described above for the small event. Set up your laptop behind the finish line, ideally together with a table and a chair and power supply. Set up the table in a way that you can see the athletes as early as possible. Ideally, you work in a team of two.
Then start the time by pressing the button Start Time. If you missed the start you can change the time by clicking the button Edit Time.
By pressing Enter, you can take the times. When you do not have several people finishing at the same time, try to type in the bib number for as many participants as possible. Later this will facilitate mapping the list of times and the list of bibs because you have reference points which time belongs to which bib. You can do so by either entering the bib in the box Next Bib (before the athlete finishes) or by entering it in the table in the third column (after taking the time).
Recording Bibs
When athletes reach the finish, make sure that they enter the funnel in the correct order and that they do not leave the funnel before you record the bib. You can do this either handwritten on paper or also using the tool Manual Timing.
When using the Manual Timing tool, simply put the cursor in the field Next Bib (without starting the time), type in the number and press Enter, or use a barcode scanner to enter the numbers.
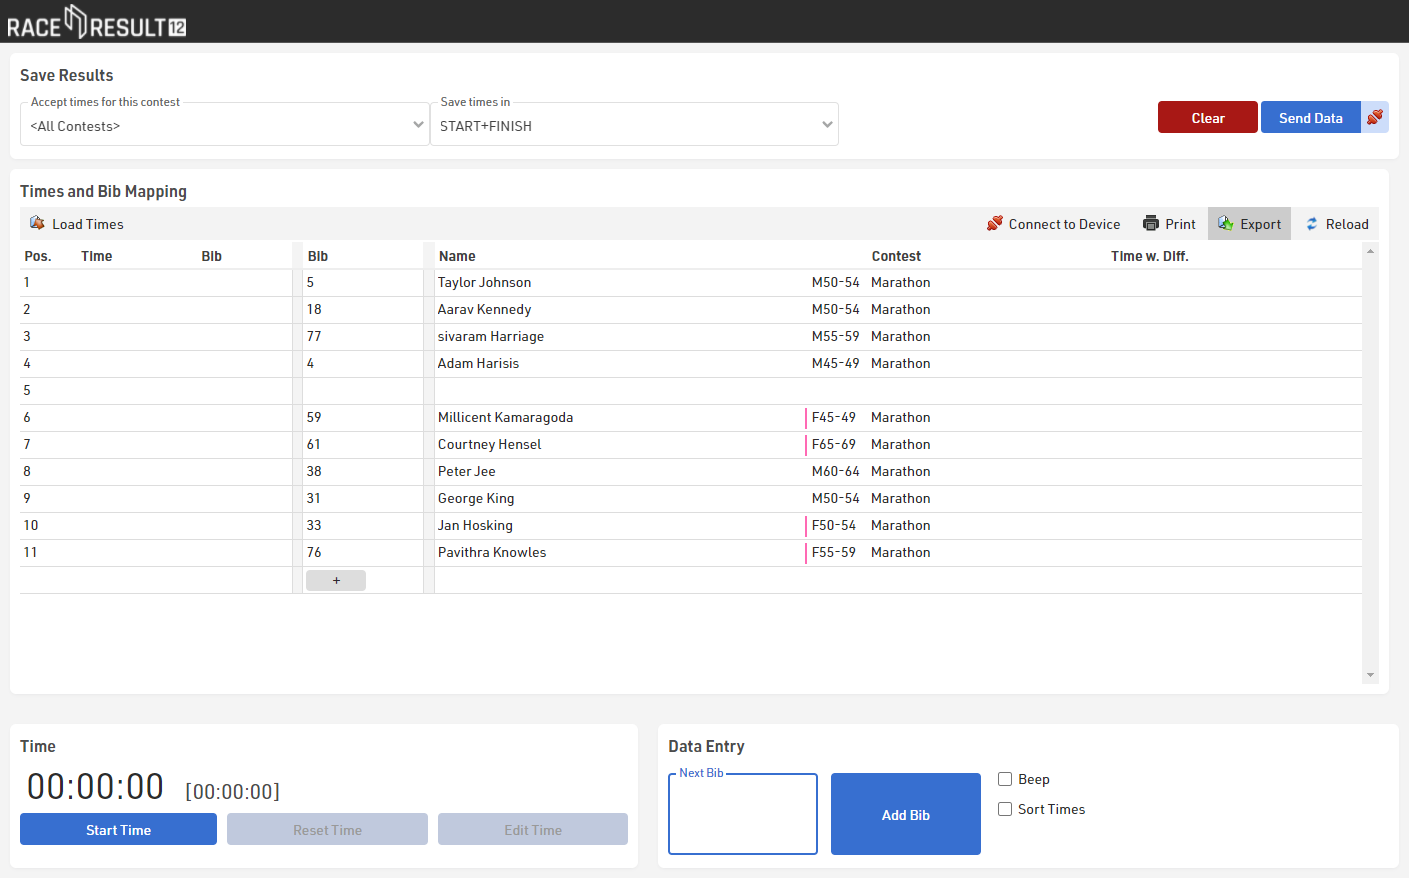
When the last participant has reached the finish, export the bibs by pressing the button Export.
Mapping Times and Bibs
After the end of the race the list of times and the list of bibs will be mapped, and the results be written in the event file.
In case you worked with a copy of the event file at the finish line, you first need to export the times (button “Export”), save them on a thumb drive and import them in the race office (button “Load Times”).
Next, the bibs will be added. If you wrote them down by hand, enter them in the third column (“Bib”) now. If there are discrepancies (for example too many or too few times taken), you need to decide how to solve the problem (for example insert or delete a time).
If you used the Manual Timing tool to record the bibs, you can now load the file by clicking the button “Load Bibs”.
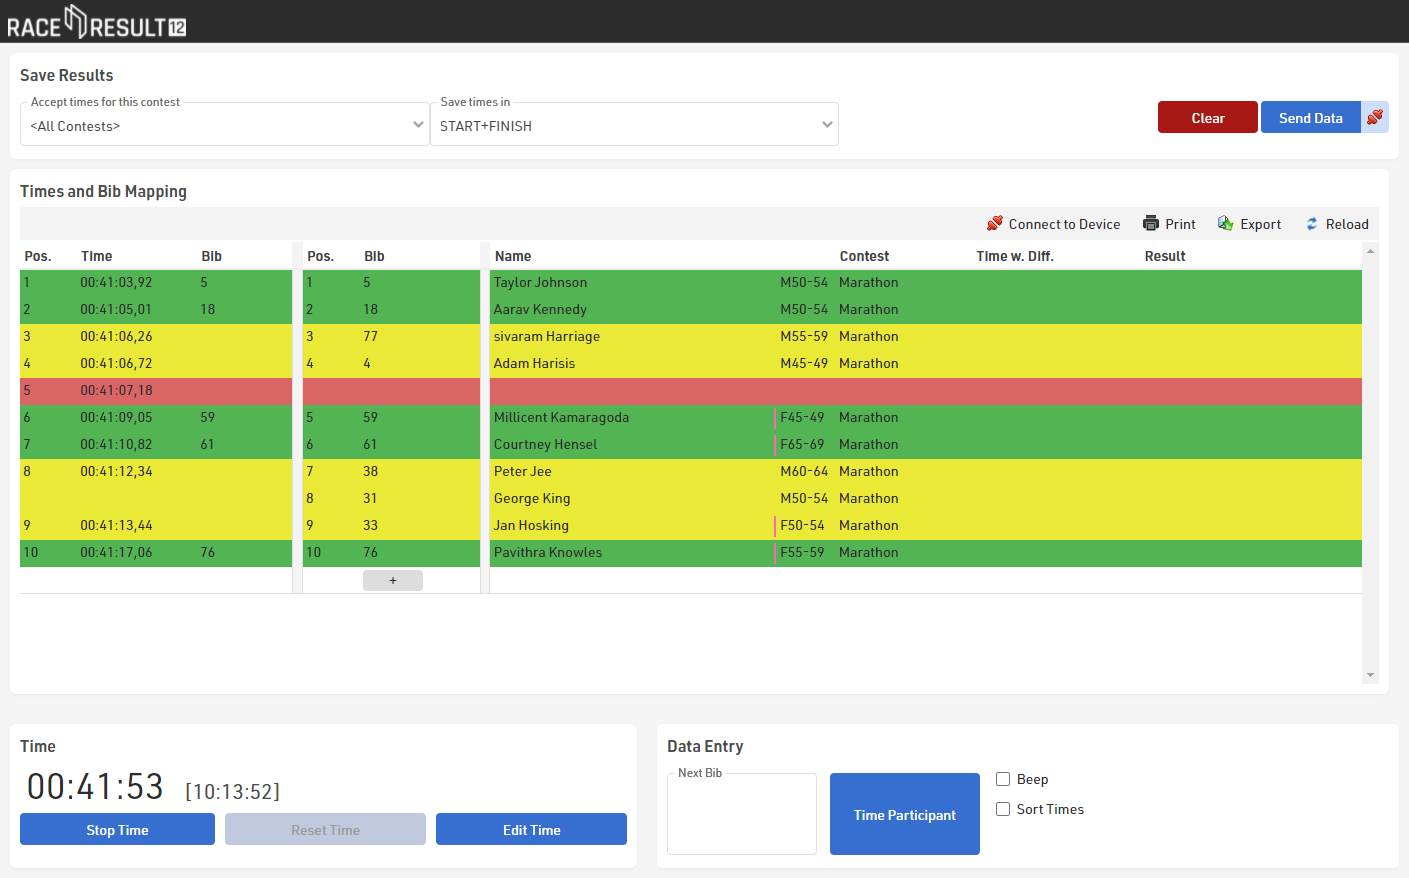
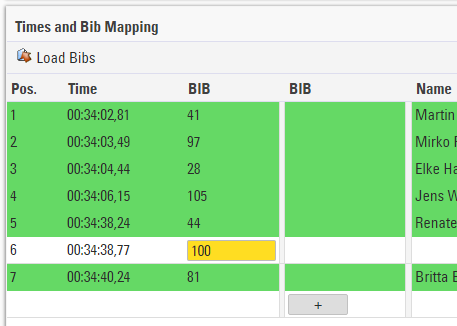
The tool tries to map the times and bibs automatically, but if the number of times and bibs in a block does not match, you need to investigate the situation and solve the problem manually. You can identify these blocks through the yellow and red background colors.
In the example above, a bib may be missing in the lines 3 to 5. This bib can be entered in line 5 or inserted in line 3 or 4 (when you hover the bib column, an Insert symbol will appear).
In line 8/9 a time may be missing or a bib was recorded accidentally. Either insert a time or delete a bib
In the end, all lines should be green and you can save the results in the event file by clicking the button Send Data:

Timing overlapping contests with different start times
"Overlapping contests" means that one contest starts before all athletes of another contest have finished. In this case you should work with the time of day, i.e. you record the time of day when an athlete finished and subtract the start time of the corresponding contest later on. Therefore proceed as follows.
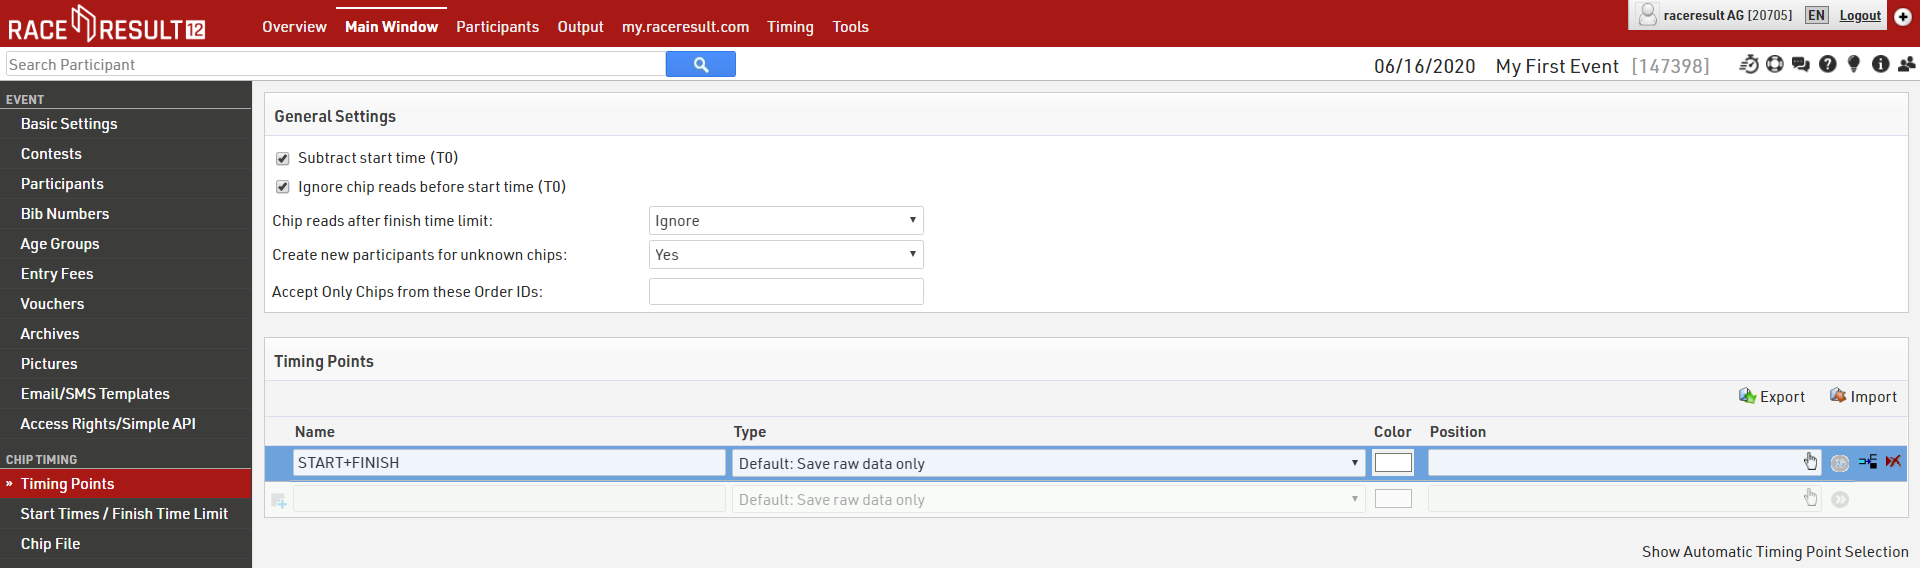
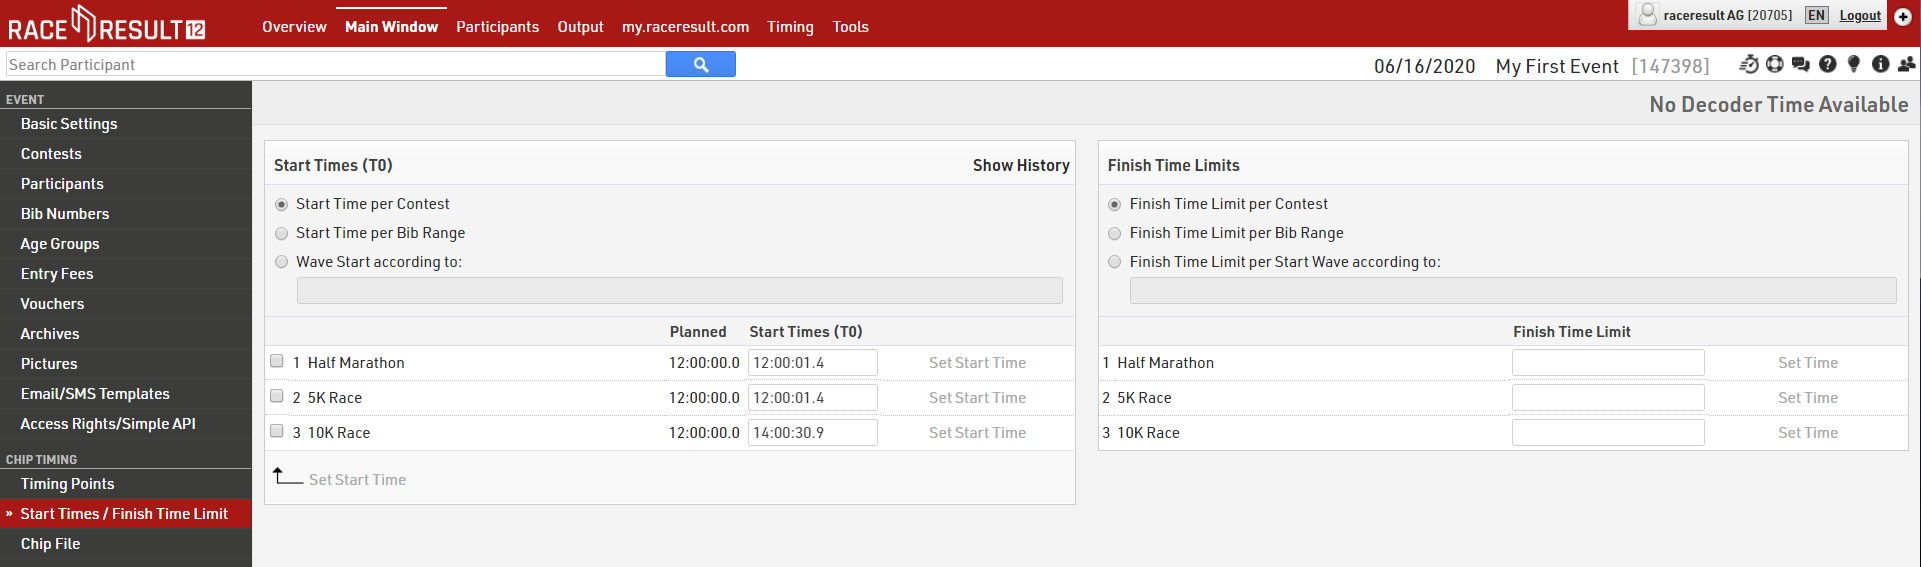
First, in the page "Timing Points", make sure that the option Subtract start time (T0) is activated, and that your timing point is set to "Save raw data only".
Then, when each contest starts, write down the exact start time and enter it in Main Window->Start Times/Finish Time Limit. Note that you can enter and correct these at any time.
At the finish line, start the time by clicking the button Start Time and then click Edit Time to set the time to time of day. You can either enter the time of day manually in the field Set time to or you can simply set the time to your computer time. Then close the Edit Time window.

When the participants cross the line, record their times and bib numbers as usual. The time recorded is the time of day at which the participant crossed the line.
Also make sure to select <All Contests> in the Manual Timing tool at the top of the screen (“Accept times for this contest”), so that times for all contests will be accepted.

When you take or import times, you can see the race time (day time minus gun start time) in the column “Time w. Diff”. The time of day will be stored in the Timing Raw Data tab of each participant, the software then deducts the start time and displays the race time in the Results tab.
In case you took times before setting the start time, you need to click the button Reload in the Manual Timing tool, to see the times based on the new start time.
Managing intermediate timing points
If desired, you can also take split times using Manual Timing. The number of participants per minute should be low so that you can record time and bib together.
For this, set up a laptop at the split timing point and start the Manual Timing tool. When you have set up several results/timing points in Main Window, a dropdown will appear at the top where you can choose in which result the times will be written:
