Los datos de cronometraje ("detecciones" o "pases") se pueden recuperar de cuatro maneras diferentes:
- via la interfaz Ethernet
- via el puerto USB
- Al cargar los datos a través del módulo interno 2G/3G/4G, los datos pueden descargarse de Internet
- Accediendo al decodificador a través de su navegador
Conexión de Red/Ethernet
Ethernet/Conección de Red
La conexión Ethernet es el tipo de conexión recomendado para leer en vivo los datos del sistema durante la carrera. El sistema se puede conectar directamente a una computadora mediante un cable de conexión estándar o cruzado, o puede integrarse en una red local mediante un conmutador o enrutador.
El Sistema RACE RESULT ofrece dos puertos Ethernet y ambos puertos pueden usarse para conectarse a una computadora/conmutador. El puerto adicional se puede utilizar, por ejemplo, para conectarse a otro sistema RACE RESULT (paso). Tanto los puertos Ethernet como el propio sistema RACE RESULT están conectados a través de un conmutador interno.
Los parámetros de la conexión Ethernet se pueden definir en el menú Red.
De forma predeterminada, está configurado en DHCP para que el sistema recupere una dirección IP dinámica de un enrutador/servidor DHCP en su red. Para el cronometraje de carreras, puede ser mejor asignar direcciones IP fijas a cada sistema. Para eso, simplemente desactive DHCP e ingrese la dirección IP manualmente (también puede configurar la máscara de subred, la puerta de enlace estándar y el servidor DNS que serán necesarios cuando el decodificador necesite acceder a Internet, por ejemplo, para una actualización de firmware).
Para más información sobre la configuración de red vea Networking Guide
Puerto USB
El puerto USB sirve para guardar los archivos de detección en una memoria USB. Esto se puede hacer después de la carrera o en vivo durante la carrera. Al conectar una memoria USB, el decodificador mostrará un mensaje que indica que se detectó una memoria y copiará todos los archivos de transferencia existentes a la memoria. Se creará una carpeta separada con el nombre del ID del decodificador.
Si se enchufa una memoria USB durante la carrera, el sistema guardará las nuevas detecciones cada pocos segundos en la memoria. Esto puede servir como una copia de seguridad adicional: en teoría, incluso si el decodificador se descompusiese, los datos que pasan se almacenan en la memoria USB, que puede ser extraída.
 No retire la memoria mientras el sistema está en modo de cronometraje. Esto puede destruir el sistema de archivos en ella.
Para el formato de datos de los archivos pasando, consulte Formato de Archivo de Datos.
Mobile Upload
The integrated 4G module (previously 2G or 3G) can be used to upload the detection data to a RACE RESULT database in the Internet. The data can then be downloaded from any place with an Internet connection. In other words, this is an easy way to connect remote timing points.
Upload
To upload the detections using the 4G/LTE module proceed as follows:
- Insert your SIM card in the SIM card slot.
- Go to the menu Upload.
- Enter your RACE RESULT customer number and the PIN of your SIM card
- Leave the mobile APN config setting on "auto". Your provider settings will probably be automatically recognized by the decoder. If not, select "manual" and read the sub-section of this article below to find out how to set up your APN.
- Set the option Enabled to yes.
The modem will go through successive connection stages detailed below as well. Once upload is successfully activated, the upload count on the display should match the current detection count.
You can also upload the data via an Ethernet connection with Internet connectivity. If the the decoder has access to the Internet via one of its Ethernet ports, the IP information on the display is marked with an asterisk. The upload feature automatically uses Ethernet when available, and falls back to 4G if the connection via Ethernet is lost.
Mobile Usage
In the second page of the Upload settings you can set the preference for usage of mobile upload.
There are 3 options for mobile upload.
- Fallback - The mobile GSM will only connect if upload is enabled and no internet connection is available via either the ethernet or via USB Wi-Fi adapter. If the connection drops from a preferred source then the module will attempt connection.
- Hot-Standby - The mobile GSM will connect always even if an alternative internet connection is available. If the connection drops from a preferred source the system will immediately switch to this.
- Preferred - The mobile GSM upload will be used at all times regardless of internet connection via either ethernet or USB Wi-Fi adapter.
Upload Target
In the second page of the Upload settings you can also set the upload target for the data.
As of firmware version 2.58, there are 2 options for upload when working with RACE RESULT 12.
- race result - This uploads via TCP protocols for communication with the Timing Module. This also includes an HTTP fallback in the event that the TCP connection is unstable which will also provide data to the Timing Module.
- race result (obselete) - This uploads data to our HTTP server, this will be fully deprecated at the end of 2021 and should not be used.
Download
When using RACE RESULT 12, you can download the passing data in the Timing Module.
To download the data using your own software, please consult Online Storage Communication Protocol.
GSM connection process stages
If a mobile connection is required, the GSM connection process runs through several stages as briefly described below. If it fails in one of the stages it will restart the process from one of the earlier stages.
Note that the decoder will try to connect to a max. of 20 APNs. If manual APN settings are configured, the manual APN will be tried first. If AUTO APN settings are selected and a connection was already successfully established, the last known successful APN settings (for that SIM/SIM network) will be tried first.
| State as displayed | Meaning | Possible cause of failure |
|---|---|---|
| START | Connection process is starting. | |
| IGNITE | Modem is started. | |
| PORT-SETUP1 | Decoder-modem-communication setup. | |
| MODEM-WAIT | Wait until modem is ready. | |
| PORT-SETUP2 | Decoder-modem-communication setup. | |
| MODEM-TYPE | Detect modem type. | |
| SIM-CHECK | Check for SIM. | No SIM inserted/SIM not readable |
| SIM-INFO1 | Get SIM ID. | |
| PIN-CHECK | Check if a PIN is required. | |
| ENTER-PIN | Enter PIN if required. | Less than 2 PIN tries left. |
| SIM-INFO2 | Get provider information from SIM. | |
| WAIT-READY | Wait until modem is ready. | |
| GET-RSSI | Get signal quality. | |
| SEARCH-NET | Searching for networks. | No network available. |
| APN-LIST | Build list of APNs to use/try. | |
| REGISTER | Register for data communication. | No network available. |
| SET-APN | Set one of the APN settings. | |
| DIAL-UP | Establish data connection. | Invalid APN settings tried/SIM not activated/No low level data transmission possible due to bad reception/Provider issues |
| VERIFY | Verify that data can be transmitted and received. | Invalid APN settings tried/SIM not activated/No data transmission possible due to bad reception/Provider issues |
| CONNECTED | Connection is established. |
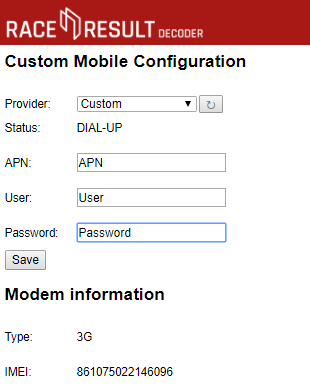
Custom APN Configuration
If your SIM card will not connect using auto-apn then it may require custom APN settings in order to connect.
To enter custom APN settings you should connect to the decoder via the Browser Interface, and open the Configuration tab.
Once inside you will see the option to configure settings for 2G/3G.
The list of providers has a list of already supported APNs or the option for a Custom APN, these APN settings should be provided by your GSM provider, they normally consist of an APN name / URL, a username and password, some APN settings only require the APN name and the username / password can be left blank.
Note that GSM providers may have multiple APN settings depending on which service you have subscribed to.
To store these press save and ensure to switch your decoder to use the Custom 2G/3G APN configuration.
Browser Access
You can easily access the decoder by entering the IP address in your browser, e.g. http://192.168.1.43
In the browser you can:
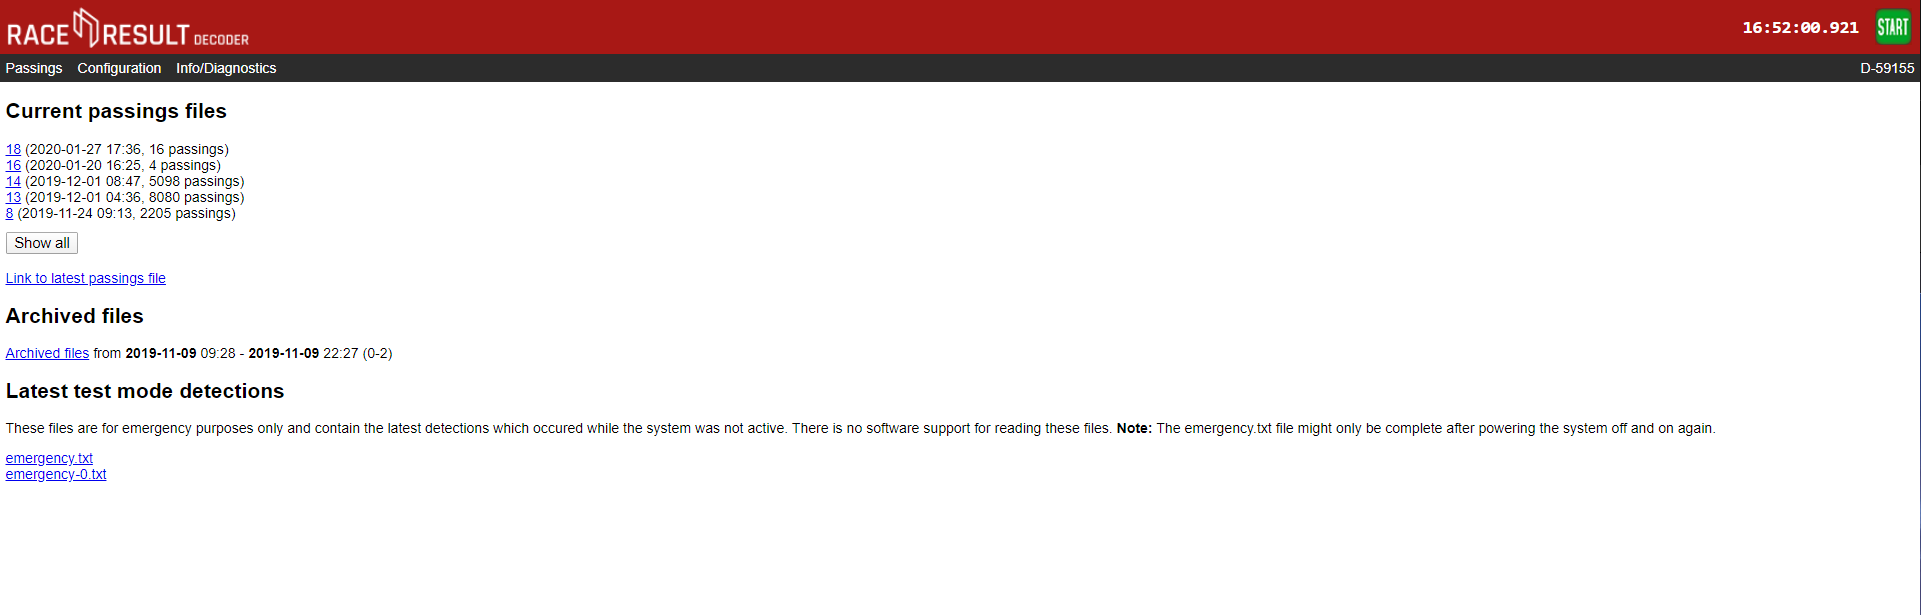
- Access all (old) passing files. Note that you cannot delete passing files. When the internal memory of 85 MB is full (it can save over 1 million detections), the oldest files will be deleted automatically.
- Access emergency data files. These are created during test mode and are stored automatically when timing is stopped.
- Set the time zone
- Configure upload settings including Custom APN Configuration, upload target and client mode.
- Upload Diagnostics Data
- Check the status of connected Loop Boxes
- Start / Stop Timing mode
Show Active Systems
When connected to an active extension there is an option to view active systems, this allows you to see the status of the active extension and any connected loop boxes. This will open in a new mini window.

Passings
All passings files on the decoder can be accessed through the browser interface, any non-archived files will be shown immediately, when files are archived they are grouped together by the date range and can be downloaded.
There are 2 emergency files which are also available, these store the last detections from when the decoder was in test mode. emergency.txt is the most recent and emergency-0.txt is older passings.
There is no support to read this directly in to RACE RESULT 12 and so these files should not be relied on for timing.
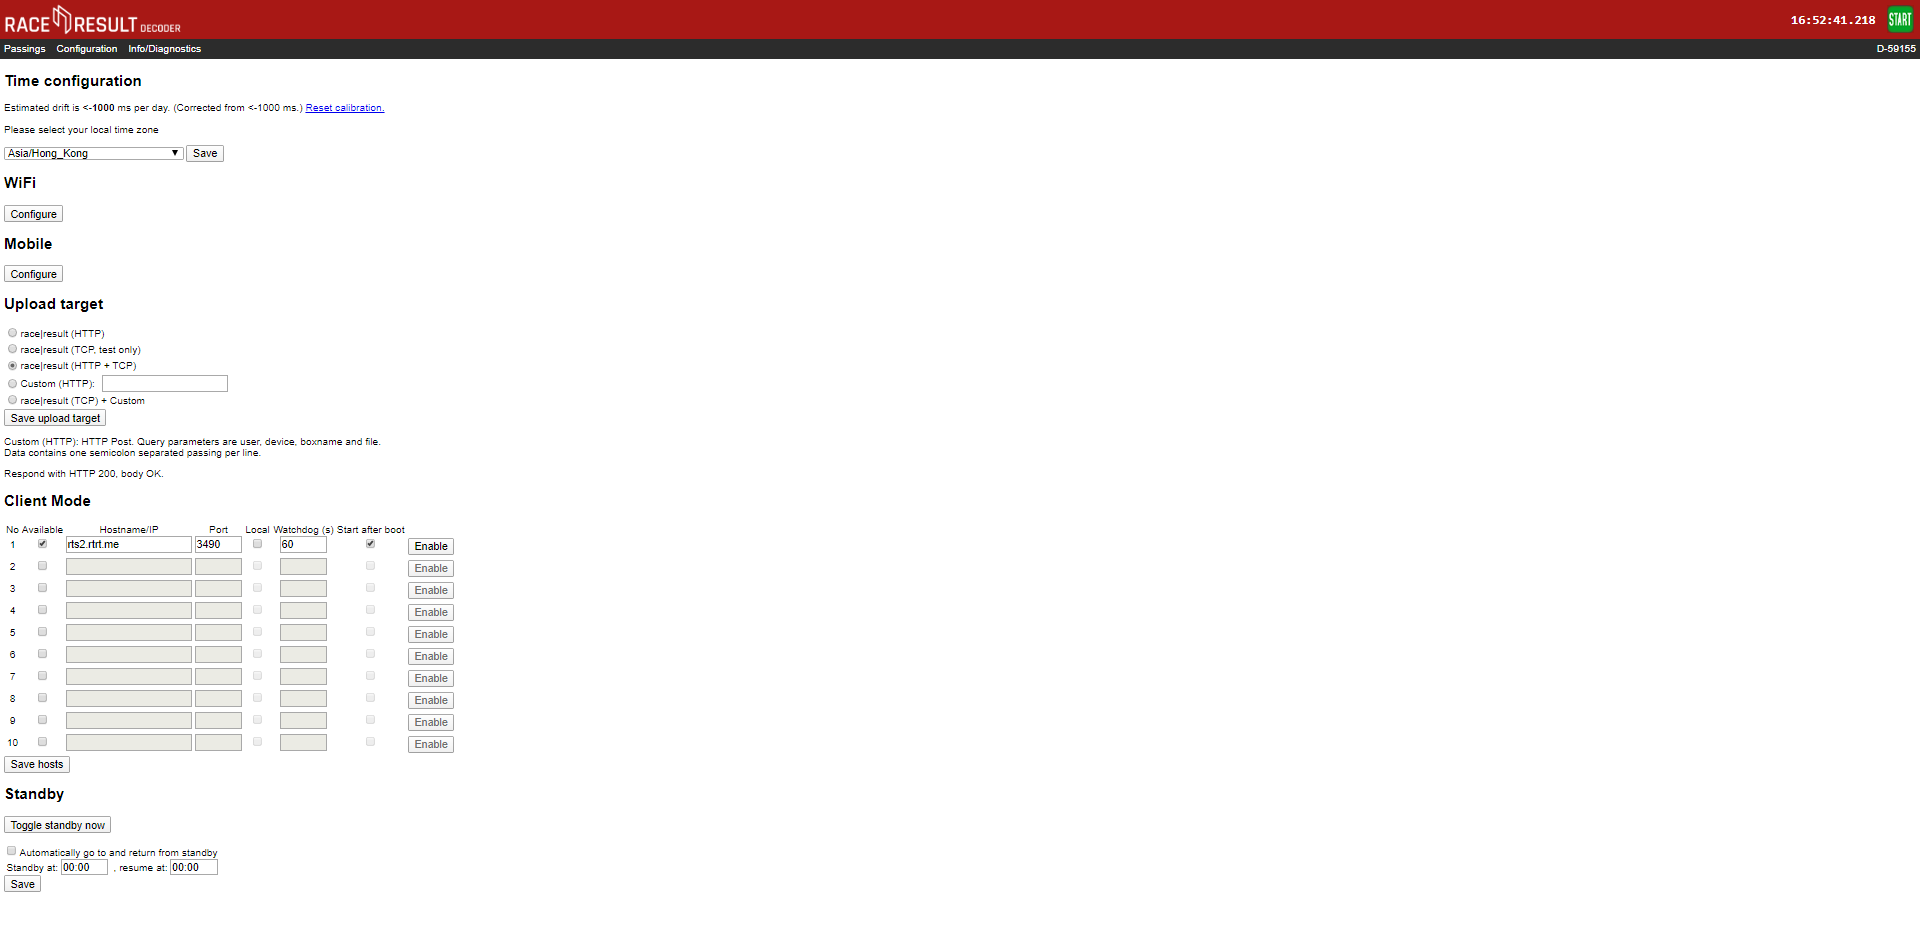
Configuration
The configuration tab allows for some additional configuration of settings which cannot be achieved through the decoder menu.
Time Drift
Here you can view the estimated time drift, this is the variation in time that may occur on the decoder, leaving the decoder turned on connected to the internet via ethernet can help to reduce this time drift, resetting the calibration will force the decoder to recalculate the time drift.
Time Zone
The time zone of the decoder can also be changed here using the drop down.
2G/3G
If you need to use custom APN settings for your Sim cards then these will need to be configured through the browser interface. You can also find your Decoders IMEI number from the Mobile Configuration page.
Upload Target
Decoders support upload to both HTTP and TCP, you can choose which method to use or define a custom HTTP target. HTTP upload is used for the Transponder module and Connector software, TCP upload is used for the new Timing Module. We advise using both HTTP and TCP for backup whilst the Timing Module is still undergoing development work.
Client Mode
You can use the decoder as a TCP server to pull data to a client, this is used by some third-party tracking platforms and timing software. There are a maximum of 10 TCP clients which can be configured with the IP address, port number, watchdog and auto-enable.
Find out more in our Developers Section
Standby
Standby is used in some permanent installations where the decoder can be powered down over night to preserve battery, it is not advised to set this for normal events as it could cause premature shut down.
Info / Diagnostics
The info tab shows the UHF reader serial number and firmware version, and also allows you to upload the decoders diagnostics file directly to race result or download it to send to us. This may be required if you experience abnormal behaviour with your decoder during it's use.

Formato de Archivo de Datos
Los pases en los archivos de pases están almacenados en el siguiente formato:
<PassingNo>;<Bib/TranspCode>;<Date>;<Time>;[<EventID>];<Hits>;<MaxRSSI>;
<InternalData>;<IsActive>;[<Channel>];[<LoopID>];[<LoopOnly>];[<WakeupCounter>];
[<Battery>];[<Temperature>];[<InternalActiveData>];BoxName<CrLf>
|
<PassingNo> |
Número de registro de pases, comenzando en 1 para el primer pase. | ||||||||||||||||
|
<Bib/TranspCode> |
Número de dorsal del transpondedor (o código del transpondedoren caso de tags multi usos o transpondedores activos) |
||||||||||||||||
|
<Date> |
Formato: aaa-MM-dd Si se usa GPS, fecha de la detección, de otra manera 0000-00-00 o 000-00-01 después de 24 horas y así en adelante. |
||||||||||||||||
|
<Time> |
Tiempo de la detección, formato: hh:mm:ss.kkk |
||||||||||||||||
|
<EventID> |
ID del conjunto de dorsales. La combinación de <Bib> y <EventID> es única para todos los transpondedores de dorsales producidos de RACE RESULT. En caso de tags multi uso <EventID> es 0 o vacío. |
||||||||||||||||
|
<Hits> |
Número de veces que el tag fue detectado. |
||||||||||||||||
|
<MaxRSSI> |
Máximo valor RSSI encontrado mientras se determina <Time>. |
||||||||||||||||
|
[<InternalData>] |
Este campo solo es usado para propósitos internos y es opcional. |
||||||||||||||||
|
<IsActive> |
1, si este pase es de transpondedor activos. |
||||||||||||||||
|
[<Channel>] |
Canal ID (1 -> 8) |
||||||||||||||||
|
[<LoopID>] |
Loop ID (1 -> 8) |
||||||||||||||||
|
[<LoopOnly>] |
1, si esta detección fue generada en modo de almacenamiento. |
||||||||||||||||
|
[<WakeupCounter>] |
Contador general de reactivación del transpondedor (transpondedores nuevos empiezan en 10000). |
||||||||||||||||
|
[<Battery>] |
Nivel de batería en voltios. |
||||||||||||||||
|
[<Temperature>] |
Temperatura en grados Celsius. |
||||||||||||||||
|
[<InternalActiveData>] |
Detalles de transmisión de datos. Un byte. Los tres bits más bajos: contador de canal ocupado (número de veces, que el pase no se pudo transmitir porque el transpondedor no pudo acceder al canal). Siguientes tres bits: Sin contador ACK (número de veces que el pase se transmitió, pero no se reconoció). Séptimo bit: 1, si este pase no se pudo transmitir en un intento anterior (="pase almacenado", pase antiguo), de lo contrario 0. Bit más alto: 1, si el transpondedor despertó de sueño profundo debido al pase, de lo contrario 0. Consejo: Puede checar si el pase es un pase almacenado usando Hint: You can check if a passing is a stored passing using [InternalData] & 0x40 == 0x40
|
||||||||||||||||
|
[<BoxName>] |
Nombre del decodificador. Por defecto el ID del dispositivo. |
||||||||||||||||
Modo Cliente
El Modo Cliente se utiliza para las conexiones salientes a software / plataformas de terceros, se configura a través del decodificador Acceso al navegador, el modo cliente se puede utilizar para conectarse a servidores TCP/IP locales o a servidores en línea. Los usos más comunes incluyen plataformas de seguimiento de terceros y la integración de software de fotofinish.
Cuando el Modo Cliente está habilitado el decodificador intentará hacer una conexión con el servidor especificado, una vez conectado permite que el servidor envíe comandos al decodificador para extraer datos y también cambiar la configuración.
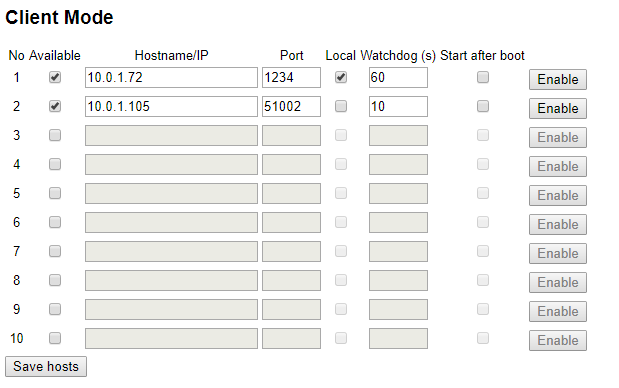
Para configurar el Modo Cliente, necesitará el nombre del servidor, la dirección URL o la dirección de puerto; si el servidor está en la red local, marque la opción local. El watchdog es la frecuencia con la que el decodificador espera comandos del servidor, de lo contrario intentará reconectarse.
Cuando el Modo Cliente está habilitado, los contadores de carga en la pantalla se alternarán entre los recuentos de carga normales (Carga / HTTP Up) y TCP Out. TCP Out mostrará el número de conexiones que están activas a través del Modo Cliente, si muestra 1 o más entonces está conectado al servidor(es).