Start
Evénements
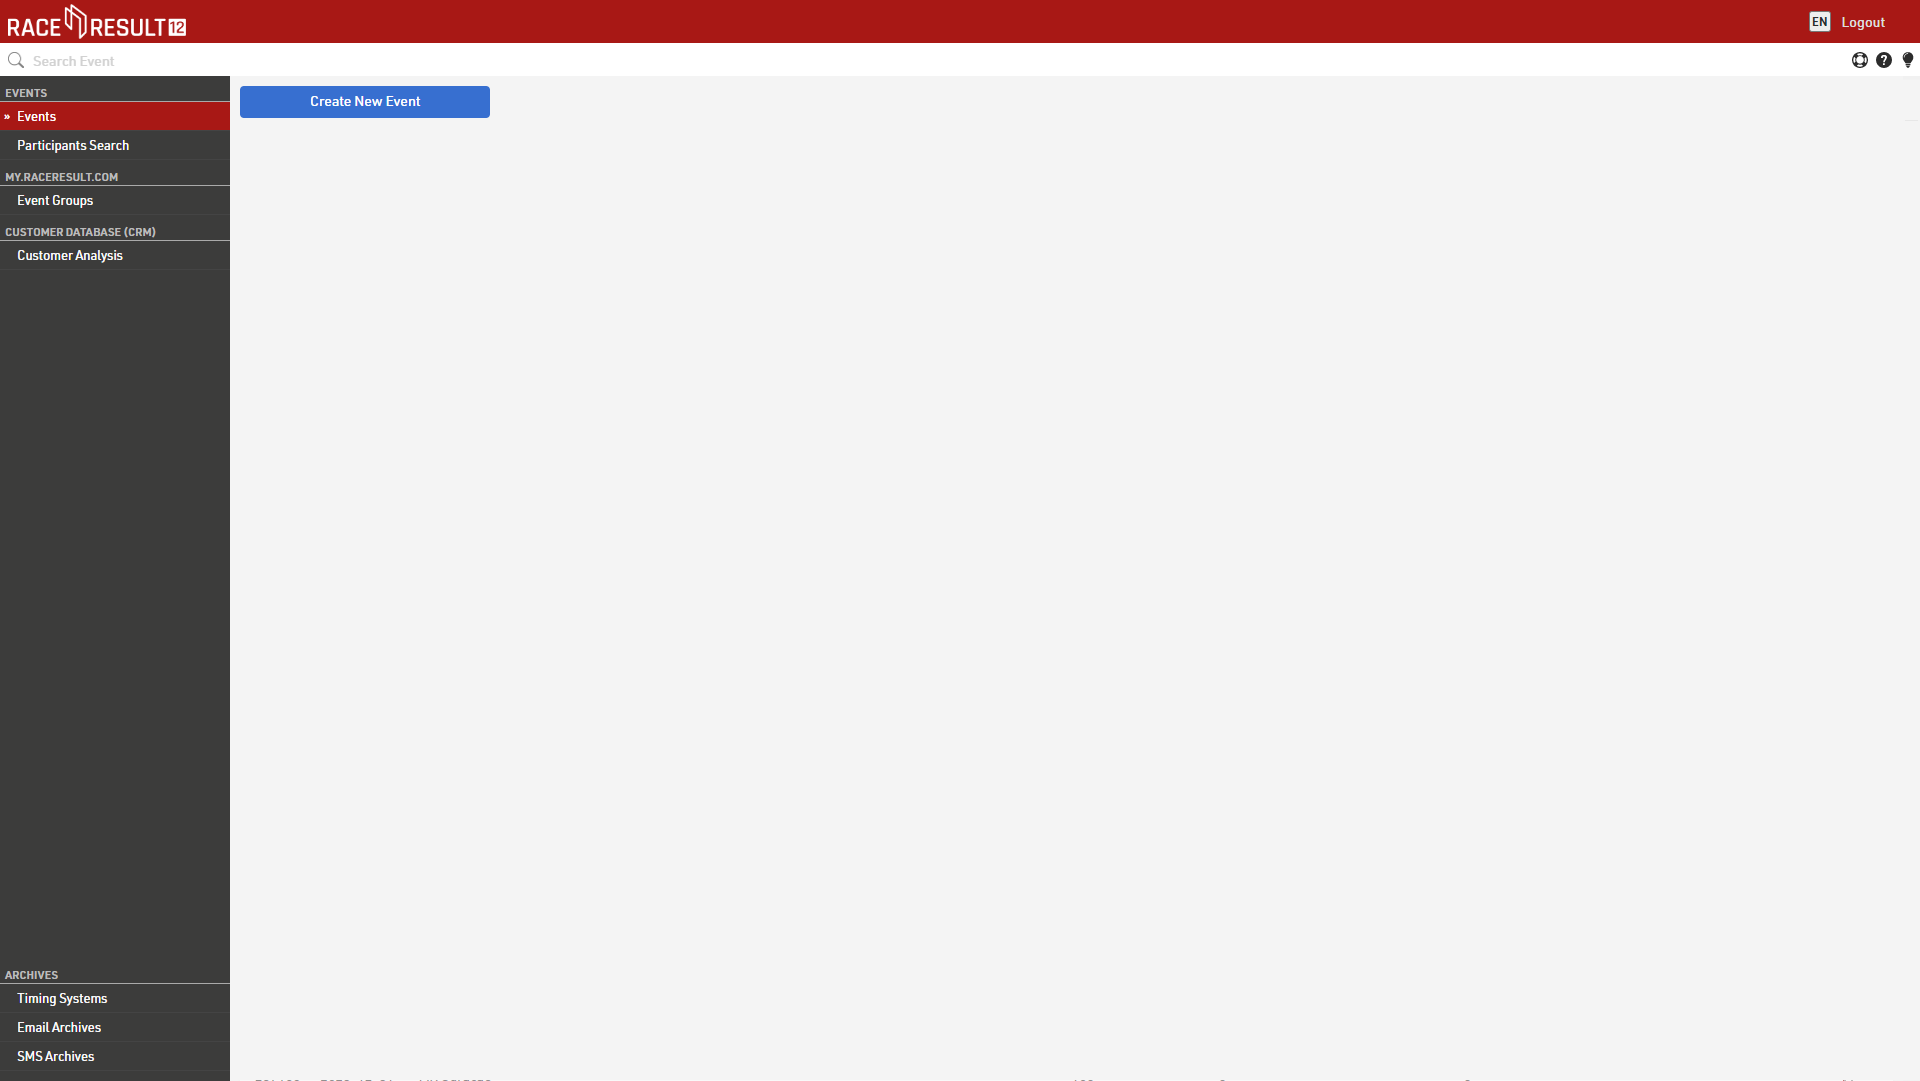
Le menu Evénements de RACE RESULT 12 est principalement utilisé pour créer de nouveaux fichiers d'événements et pour ouvrir ou effacer des fichiers existants, lorsque vous travaillez hors ligne, toutes les options du menu ne seront pas accessibles.

Pour créer un nouvel événement, il suffit de cliquer sur le bouton Créer un nouvel événement, de saisir le nom et la date de l'événement, de sélectionner un modèle et de cliquer sur Créer (Cette fonction n'est disponible que lorsque vous travaillez en ligne. Hors ligne, de nouveaux fichiers d'événements peuvent être créés dans le serveur web RACE RESULT).
Cliquez sur un événement existant pour l'ouvrir ou entrez le nom de l'événement dans la boîte de recherche en haut de l'écran et appuyez sur Entrée.
Pour supprimer un événement, cliquez sur l'icône de suppression à droite (disponible uniquement lorsque vous travaillez en ligne). Lors de la suppression d'un événement, il vous sera demandé votre mot de passe de connexion (qui appartient à votre numéro de client).
Recherche de participants
La fonction de recherche de participants vous permet de rechercher des participants dans tous vos fichiers d'événements.
Groupes d'événements
Les groupes d'événements sont utilisés pour trier vos événements sur my.raceresult.com dans les différentes catégories affichées. Vous pouvez trouver plus d'informations dans l'article Groupes.
Analyse des clients
La base de données clients (CRM) vous donne des informations précieuses sur l'identité de vos participants (clients), sur le lieu et la fréquence de leurs courses et sur leur provenance.
Groupes
La section Groupes d'événements est située sur la page principale de RACE RESULT 12 online où vous pouvez créer de nouveaux groupes et gérer vos groupes existants.
Ces groupes sont utilisés pour trier vos événements sur my.raceresult.com dans les différentes catégories affichées.
Organisateurs de courses - Clubs - Séries - Chronométreurs - Sujets
Veuillez noter qu'un événement peut être ajouté à plusieurs groupes et que vous pouvez également créer des groupes internes qui ne sont pas visibles sur my.raceresult.com.
Création de nouveaux groupes
Si vous créez un nouveau groupe, donnez-lui un nom significatif et facile à comprendre.
Groupes publics
Vous pouvez ajouter vos événements à des groupes publics et rendre votre groupe accessible aux autres utilisateurs de RR12. Veuillez utiliser cette fonction de manière responsable. Plus les événements sont bien classés, plus il est facile pour les utilisateurs de trouver vos événements sur la plateforme :
- N'ajoutez des événements à un groupe que si cela permet d'améliorer l'expérience de l'utilisateur final (participant / spectateur).
- Avant de créer un groupe public, vérifiez si un tel groupe existe déjà.
- Si vous pensez avoir besoin d'accéder à un groupe existant (club, série d'événements, thème), essayez de contacter le responsable de ce groupe.
Publier le groupe sur my.raceresult.com
Si vous souhaitez que le groupe soit listé publiquement, cochez la case publier sur my.raceresult.com et assurez-vous de l'assigner à la catégorie appropriée. De cette façon, le groupe est affiché dans l'onglet approprié sur my.raceresult.com et peut être facilement trouvé par les utilisateurs.
Catégorie de groupe
Pour la catégorie de groupe, vous avez les options suivantes :
- Série d'événements : Si vous avez plusieurs événements qui, par exemple, ont un score global, font partie d'une ligue, d'une coupe, etc.
- Clubs : Ajoutez tous les événements organisés par le même club. Un tel groupe peut être facilement intégré au site web d'un club.
- Autres sujets : Il s'agit d'une catégorie qui pourrait être utile à d'autres chronométreurs/organisateurs qui ne correspondent à aucune des autres catégories, comme les événements d'une région spécifique.
- Chronométreur : Cette catégorie vous permet, en tant que chronométreur, de lister tous vos événements publiés en une seule fois, afin de montrer à vos clients potentiels l'étendue de vos événements.
N'oubliez pas que tous les événements publiés sont répertoriés sous "Tous les événements" sur my.raceresult.com, où les participants peuvent filtrer par sport, date, pays, etc. L'inscription d'un événement dans l'une des catégories ci-dessus est une fonction supplémentaire facultative.
En particulier pour les groupes de chronométreurs, il peut être utile de cocher la case pour inclure tous vos fichiers d'événements dans ce groupe, chaque fois que vous créez un nouvel événement, il sera ajouté automatiquement.
Photo de couverture
Le téléchargement d'une image d'en-tête rendra la page du groupe beaucoup plus attrayante. La taille optimale de ces images est de 1150 x 212 px. Les autres formats seront automatiquement redimensionnés. Si vous ne téléchargez pas d'image, un modèle par défaut sera utilisé.
Logo
Téléchargez un logo pour augmenter votre valeur de reconnaissance ! Nous suggérons de télécharger un fichier d'une résolution de 300 x 300 px. Les autres formats seront automatiquement redimensionnés.
Informations de contact
Fournissez des informations de contact pertinentes pour le groupe. Ces champs sont facultatifs mais utiles à remplir. En particulier, l'indication d'une adresse électronique permet aux participants et aux prospects d'être facilement contactés.
Algorithme de tri
En arrière-plan, my.raceresult classe tous les événements en fonction de l'activité récente des utilisateurs (nombre de clics, d'inscriptions, de consultations de listes, etc.) Plus un événement est populaire, plus il sera affiché en haut de la liste des événements récents et à venir.
Pour les groupes, l'algorithme additionne tous les scores des événements au sein de chaque groupe. Plus l'activité des utilisateurs au sein d'un groupe est importante, plus le groupe sera mis en évidence. Cela signifie également que le classement peut être mis à jour tout au long de la journée si plusieurs événements populaires sont organisés.
Pour affiner encore l'expérience des participants, le système vérifie également les paramètres locaux du navigateur et affiche d'abord les résultats provenant de ce pays. Le champ de recherche détecte les lieux connus et trie les résultats en fonction de la géolocalisation de l'adresse de l'événement/du chronométreur. Si vous tapez Berlin, les résultats de la recherche seront triés en fonction de leur distance par rapport à Berlin.
Modifier/masquer des informations sur my.raceresult.com
Les groupes peuvent être facilement édités / mis à jour, et il est conseillé de garder les bannières et les logos à jour si ceux-ci changent au fil du temps. Un groupe peut être caché de my.raceresult.com à tout moment en désactivant l'option de publication de l'événement.
Pour le lancement de la plateforme, nous avons pris la liberté de télécharger quelques logos de chronométreurs et de trier tous les groupes existants dans les nouvelles catégories. Si vous pensez qu'il y a des problèmes plus importants, veuillez contacter support@raceresult.com.
Archives
Les archives sont liées à votre compte client RACE RESULT et donnent accès à des informations historiques. Certaines de ces informations sont également disponibles directement auprès de RACE RESULT 12.
Systèmes de chronométrage
Les archives des systèmes de chronométrage répertorient tous les systèmes qui ont été connectés aux serveurs de RACE RESULT en utilisant votre numéro de client. Quelques informations de base sur le système sont également affichées.
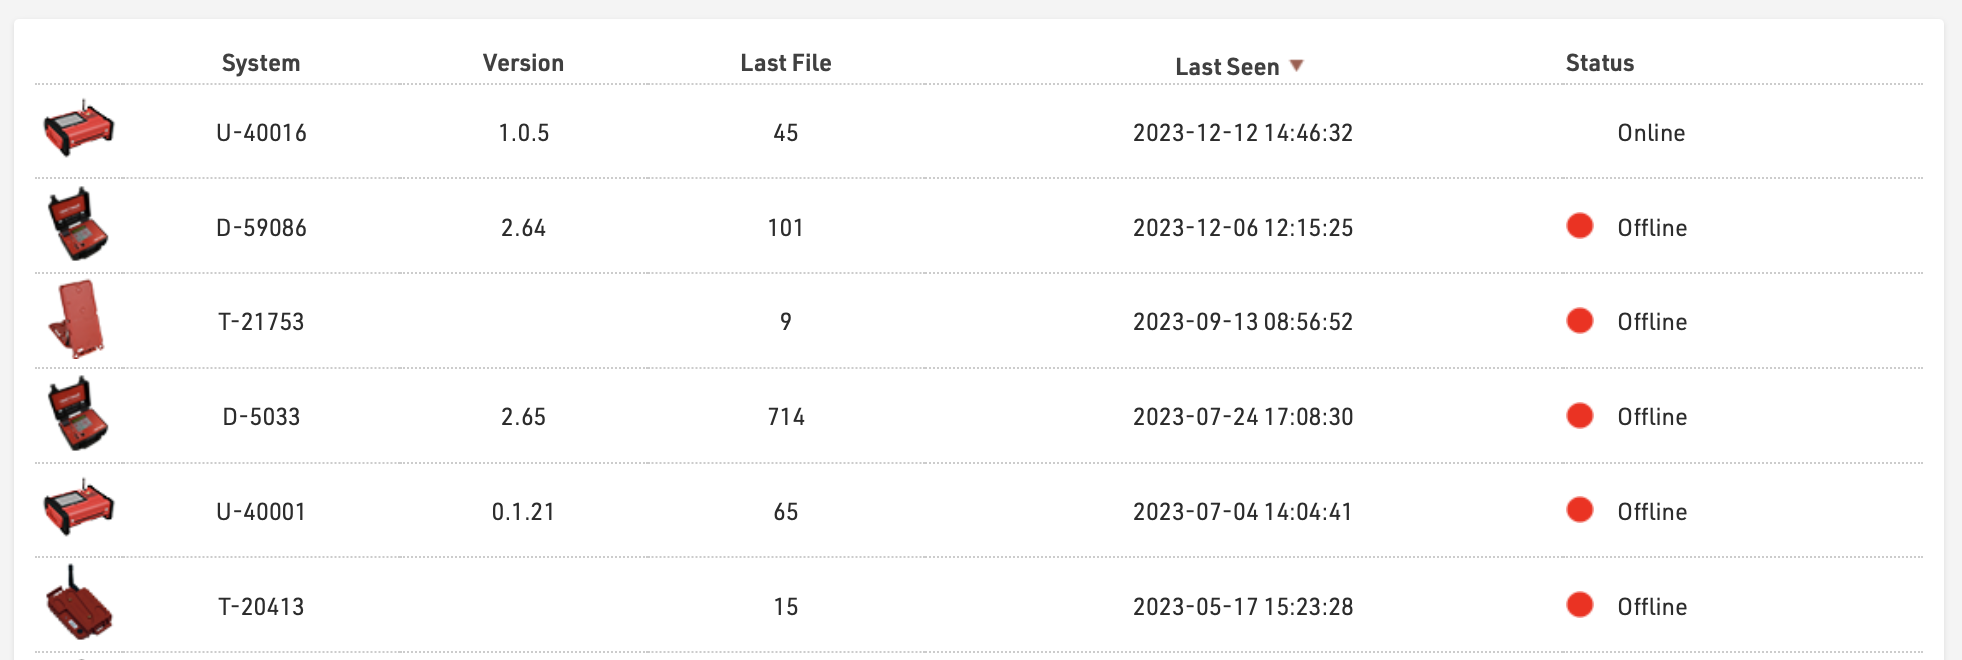
En cliquant sur un système, une fenêtre s'ouvre et répertorie tous les fichiers de passage qui ont été téléchargés pour ce système. La carte sur le côté gauche montre la position GPS du système au moment où le fichier a été créé.

En cliquant sur un fichier, vous téléchargez un fichier txt de ce fichier de passages qui peut ensuite être importé manuellement via l'onglet Chronométrage de RACE RESULT 12, si nécessaire. Cliquer sur Dernière position permet de zoomer sur la dernière position connue de l'appareil (selon les appels d'état de l'appareil).
Archives des courriels
Lors de l'envoi d'emails par le biais de RACE RESULT 12 en ligne, que ce soit par le module Email / SMS, les formulaires d'inscription ou les exportateurs de données brutes, une copie de base de l'email sera conservée dans les archives, ainsi que le statut de l'email s'il a été renvoyé par le serveur de messagerie. En cliquant sur un élément, un aperçu du contenu complet de l'e-mail s'ouvrira.

Archives des SMS
Lors de l'envoi de SMS par le biais de RACE RESULT 12 en ligne, que ce soit par le biais du module Email / SMS, des formulaires d'inscription ou des exportateurs de données brutes, une copie de base du SMS sera conservée dans les archives, avec le statut du SMS.

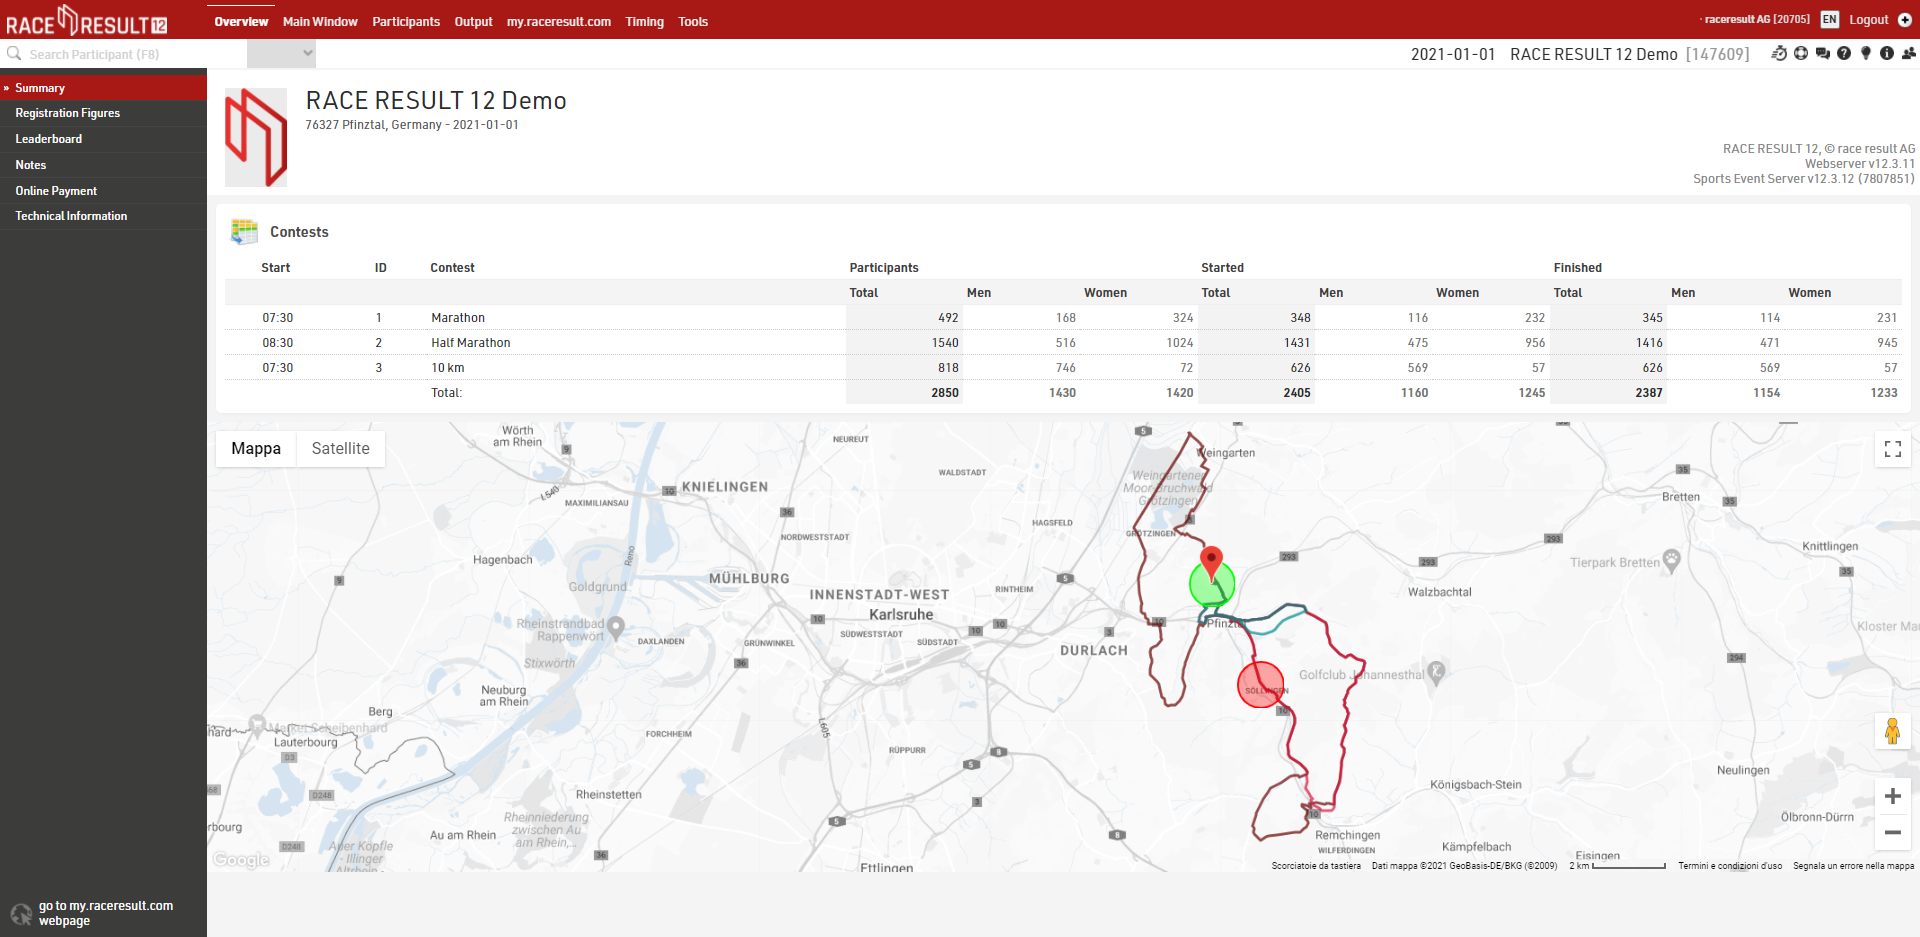
Vue d'ensemble
La fenêtre d'aperçu fournit une vue d'ensemble rapide de votre événement, en particulier des informations sur les chiffres d'inscription et les paiements.
Figures d'inscription
Les figures d'inscription de la fenêtre d'aperçu fournissent des informations sur la répartition des inscriptions des participants avant la date de l'événement.

La fenêtre se compose de deux sections : le tableau des inscriptions, qui présente un graphique avec des vues cumulées, par jour, par semaine et par mois, et les chiffres des inscriptions, qui indiquent le nombre de participants inscrits à chaque concours et le jour en question, exprimés sous la forme J-X, où J est la date de l'événement et x le nombre de jours précédant cette date.
Il est également possible de comparer les chiffres d'inscription avec ceux d'un autre événement appartenant au même compte, ce qui est utile pour comparer les inscriptions d'une année sur l'autre pour le même événement, par exemple.
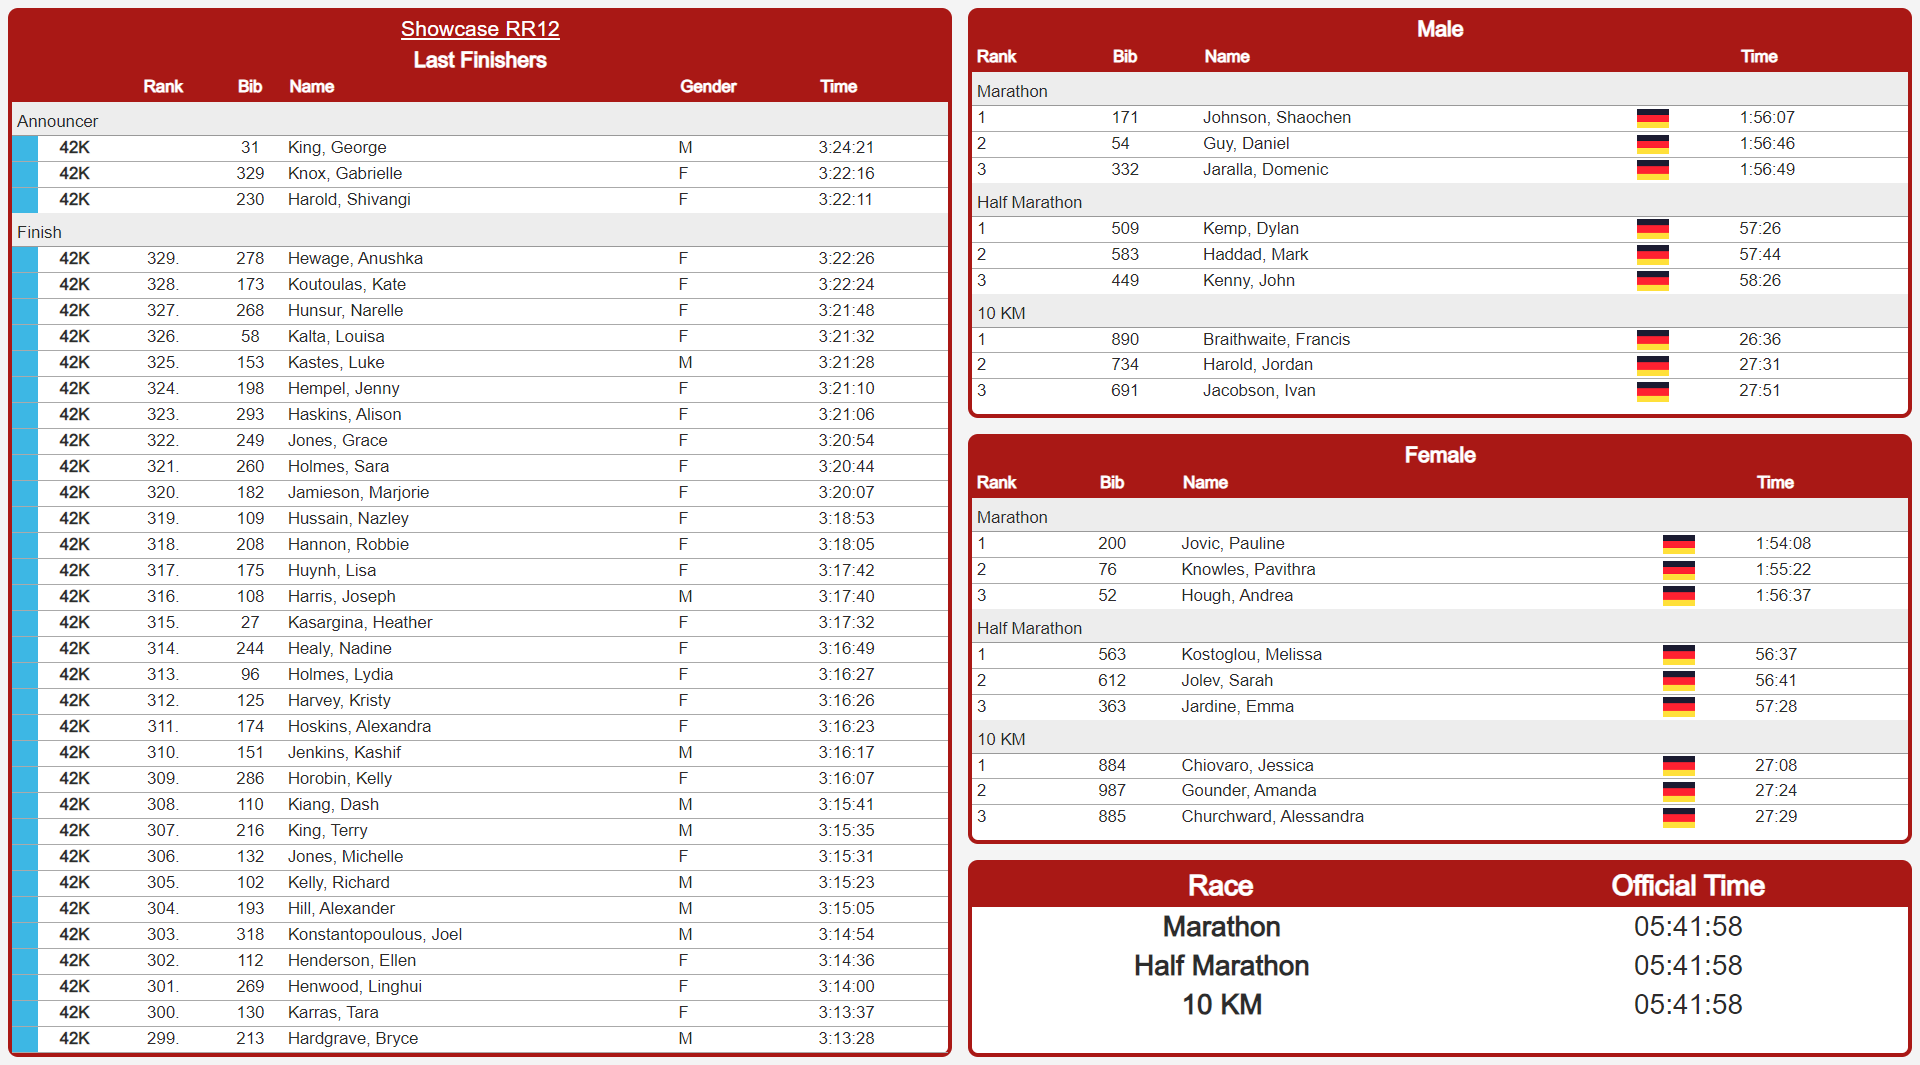
tableau des leaders
Le tableau des leaders dans la fenêtre de vue d'ensemble montre les gagnants ou les leaders actuels de l'événement. Dans les paramètres au bas de l'écran, vous pouvez sélectionner un classement et un nombre x afin que les x premiers participants de chaque groupe du classement soient affichés.
Si vous souhaitez afficher différentes colonnes (ou utiliser un format différent), vous pouvez également sélectionner une liste à partir de laquelle les paramètres des colonnes seront pris en compte.
Activez la case à cocher Mise à jour automatique pour rafraîchir automatiquement la page toutes les 30 secondes.
Notes
La section Notes de la fenêtre de vue d'ensemble peut être utilisée pour écrire des notes et suivre les tâches en cours.
section Paiement en ligne
La section Paiement en ligne de la fenêtre d'aperçu présente toutes les transactions du paiement en ligne et un résumé des paiements mensuels. Dans la vue d'ensemble des paiements en ligne, vous pouvez également annuler des paiements si nécessaire. Pour les prélèvements SEPA différés, cela peut s'avérer nécessaire en cas d'annulation de l'événement.
Informations techniques
La section Informations techniques de la fenêtre d'aperçu présente des informations importantes sur votre fichier d'événement, telles que le nombre de participants, les temps ou les entrées de données brutes.
En outre, elle montre les dépendances de notation entre les résultats, les classements et les scores d'équipe et signale si le fichier contient des références circulaires. Vous pouvez également télécharger une copie de votre fichier d'événement à partir d'ici.
fenêtre principale
La fenêtre principale sert principalement à définir les paramètres de votre fichier d'événement, ainsi qu'à importer, vérifier, modifier et supprimer les données des participants.
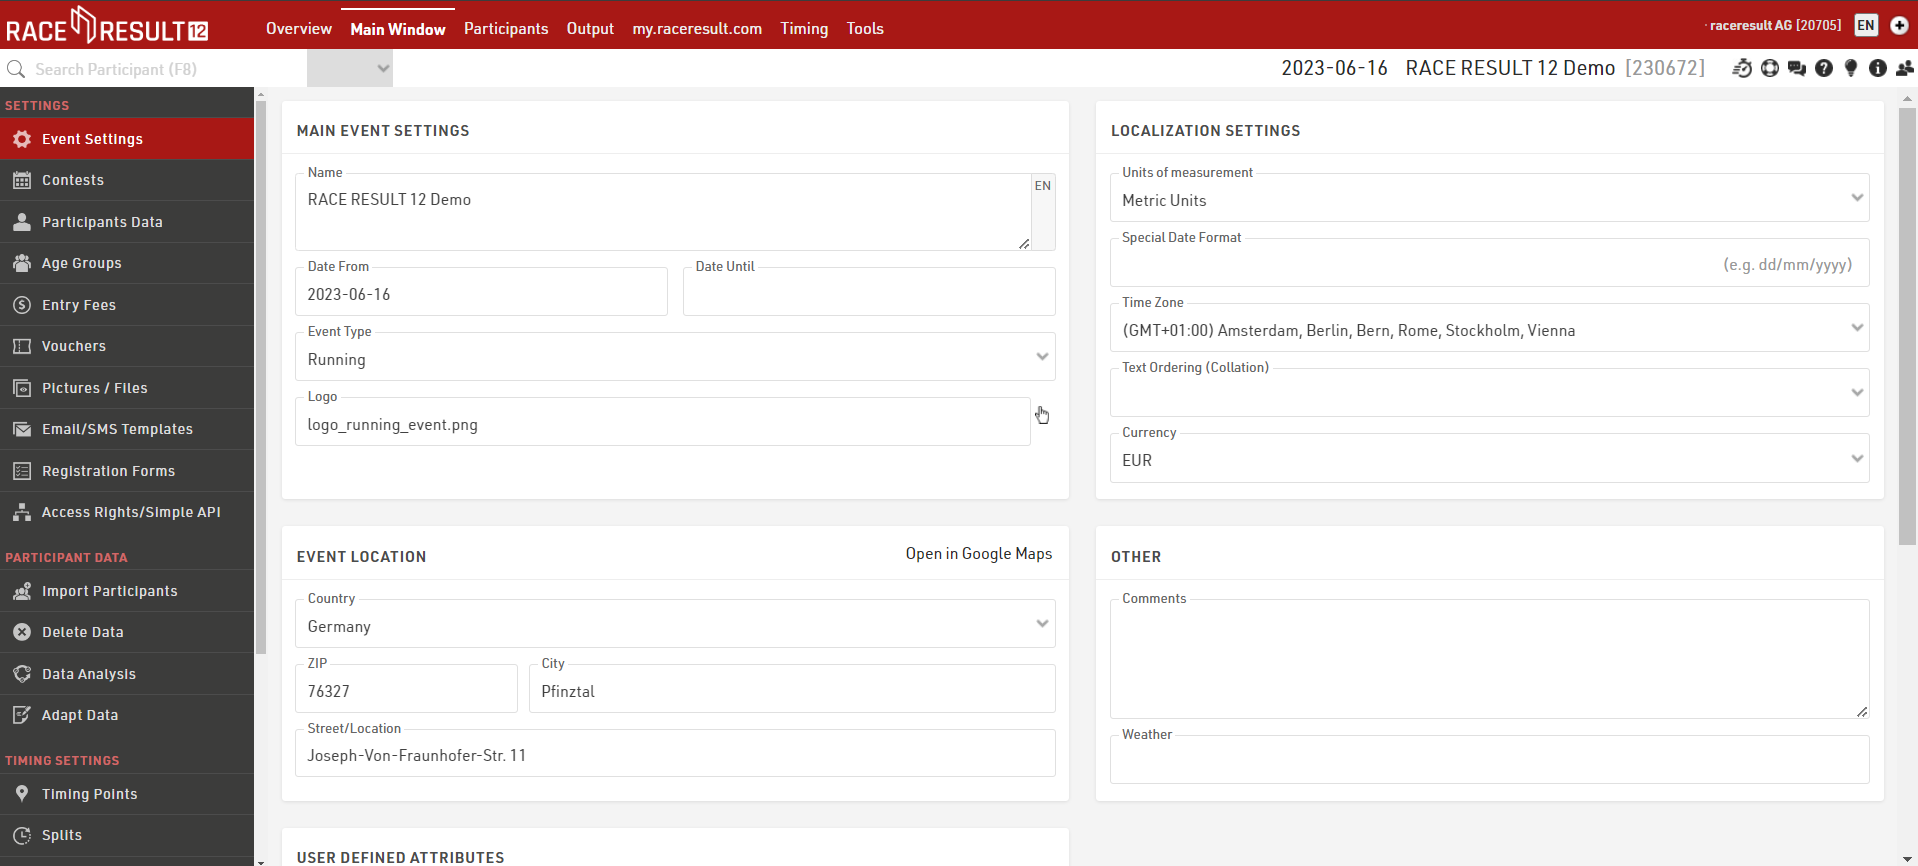
Paramètres
Il s'agit des paramètres fondamentaux de tout événement qui déterminent principalement la structure des données de l'événement et un certain nombre de fonctions de base utilisées dans l'ensemble du logiciel..
Participant Data
Timing Settings
Timing Setup defines which times you expect to record for a participant and how these times should be used. There are three key points to the timing setup:
Timing Points - The points at which you will record Raw Timing Data ("Chip Reads"). For example the START, FINISH or your Split Timing Points on course.
Start Times / Finish Time Limits - The official start time (T0) to be used for timing the race, this is used by your Splits or Special Results setup to calculate race times. Optionally in some cases a maximum time.
Splits: The setup of Timing Points in the order they will be crossed in the race and when, allowing calculation of times and ranks.
For more complex setups where Splits cannot be used it may be necessary to use Special Results under Advanced Scoring Settings.
Advanced Scoring Settings
For more complex races or for custom scoring methods you may need to define Advanced Scoring Settings, there are 3 types of advanced scoring settings.
Special Results - Results are fields associated with a time, which can be pulled/calculated from Raw Data or calculated from Splits / other data. Results may be required for certain event types such as variable lap races.
Rankings - Checking the configuration of rankings, for example overall/gender/age group rank.
Team Scores - Optionally, defining team scores. A team score will, for example, sum up the times of best three athletes of each club and create a ranking over the team time.
Note: By default, an event file already has overall/gender/age group rankings. You need to work on the rankings only if you want them to be calculated in a different way or if you want to calculate additional rankings.
Participants
The Participants Window serves to add new participants and to edit existing participants. Times and ranks can also be controlled and edited if need be.
The Participants Window was already introduced in the RACE RESULT 12 Introduction which covers adding / changing data and looking up participants.
Read more about how to configure Participant data to choose which data fields are shown in the General Tab.
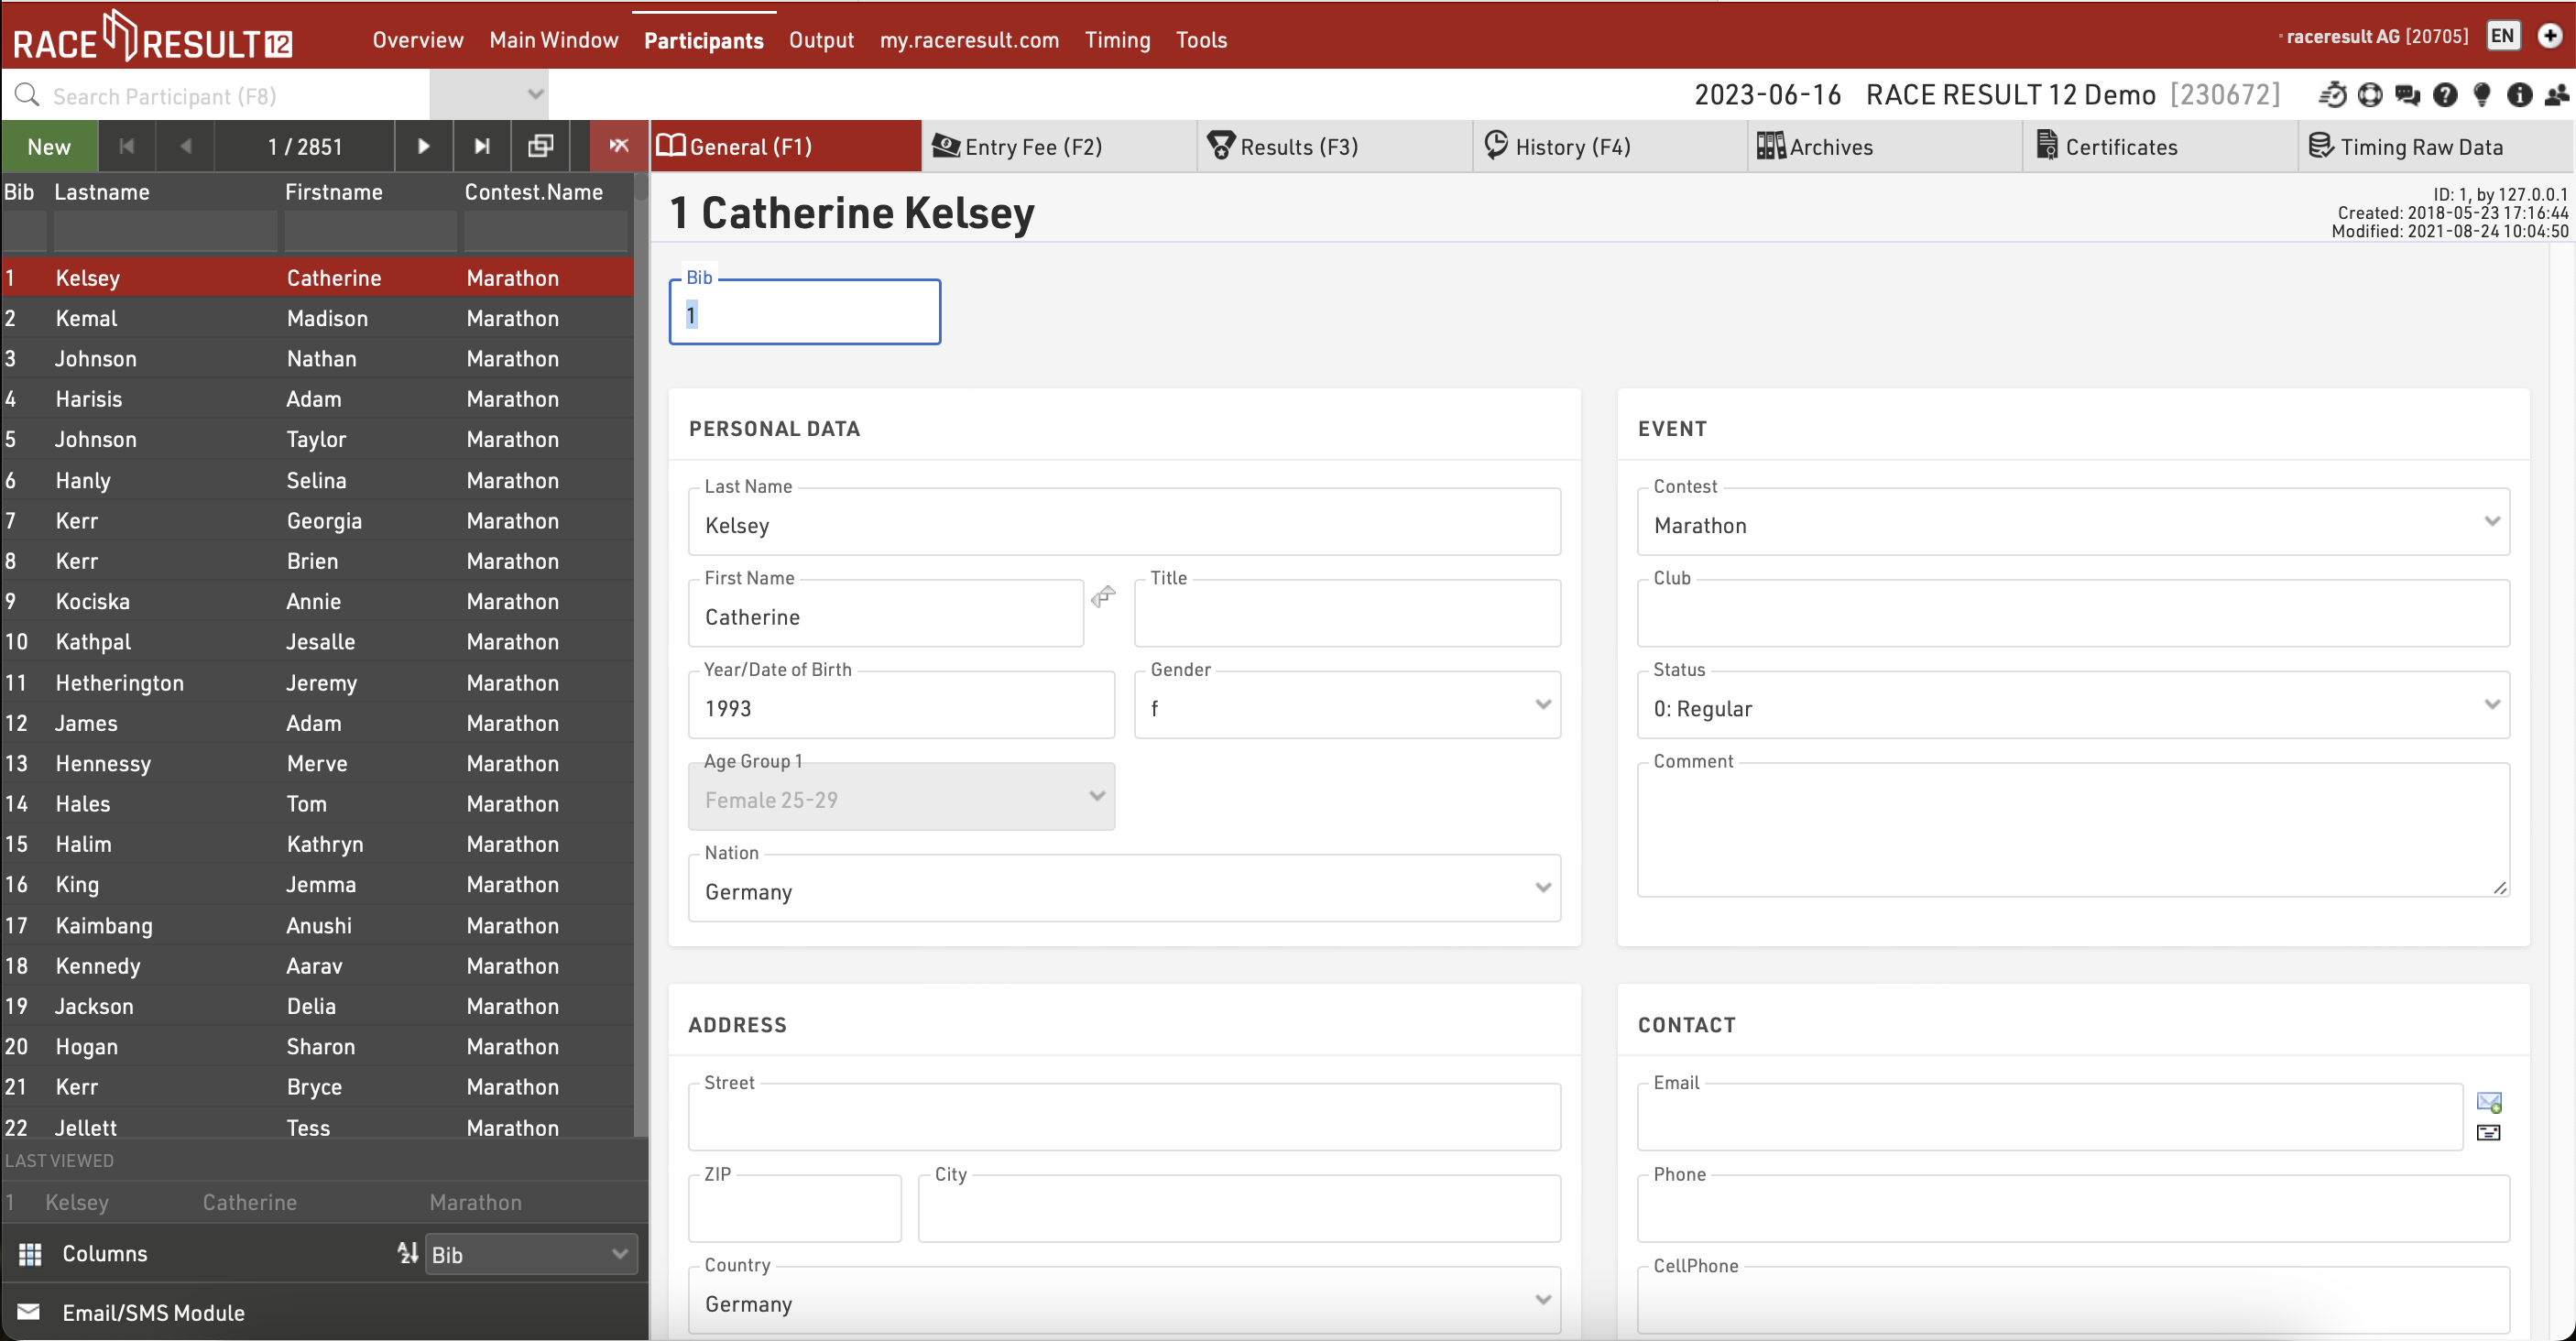
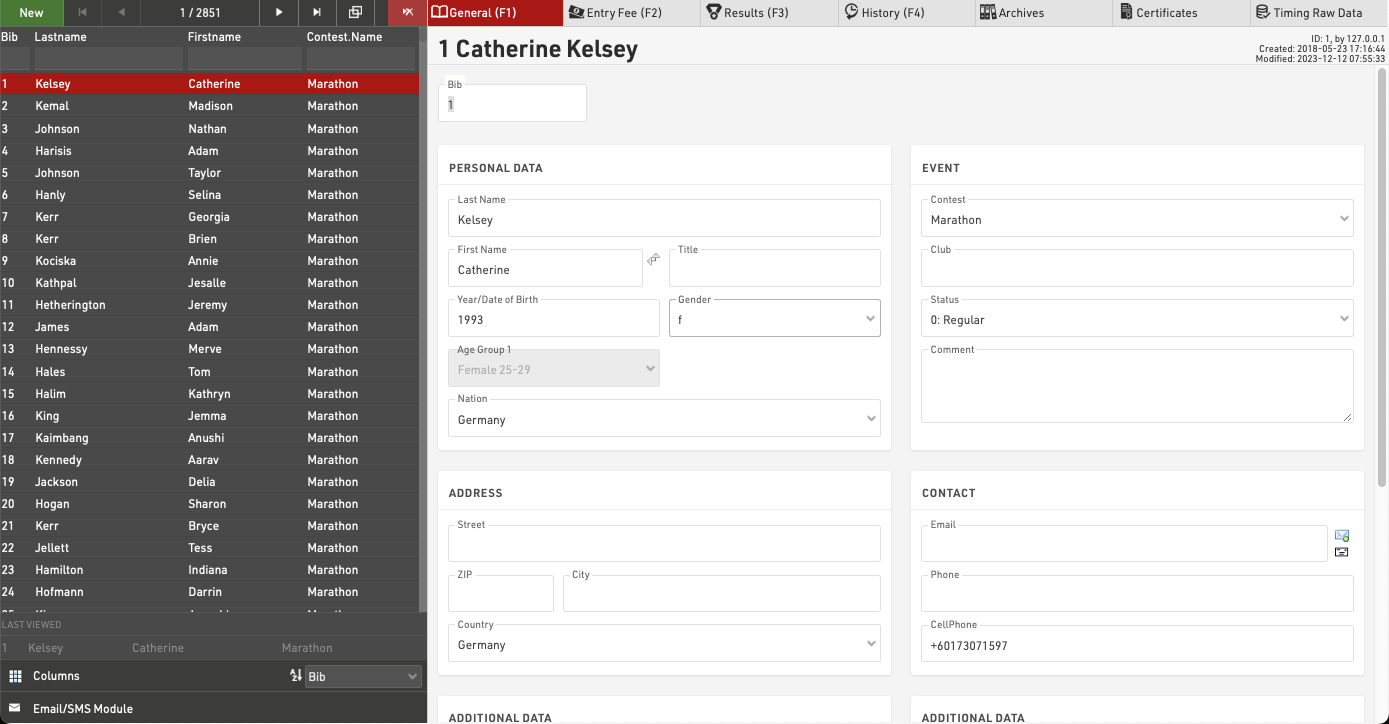
List View
The left side of the Participants Window presents participants in a list view and gives an overview of all participant records in your event file. A list of your recently viewed participants will be shown at the bottom to quickly get back to a particular participant.
Navigating & Editing Participants
The navigation bar allows you to create new participant records, delete participant records or scroll through the list of participants. When using the navigation buttons for first/previous/next/last these will consider the sorting in the list view for the sorting of participants.
Clicking a participnt in the list view will open that participants full details in the right side of the window allowing all their data to be viewed / edited.
Note that the list of participants will be cached by the browser so when importing new participants or editing large batches of data you may need to reload the data using the reload button  in the navigation bar.
Sorting / Searching & Filtering
By clicking on the head of a column you can sort the table by this column. Press the same column head a second time to sort in descending order.
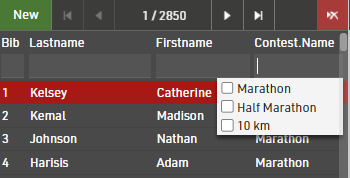
The textboxes underneath the column headers can be used for filtering the list. Simply enter a value to search, or some fields will provide a drop down with multiple selection values.
Additionally at the bottom of the list view there is a drop-down with some quick options for sorting from A-Z.

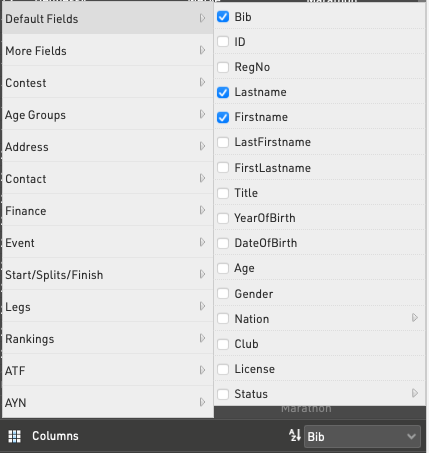
Configuration of Columns
Besides the standard columns you can add other columns to the List View or hide columns not needed. To change the visible columns hover over the columns icon at the bottom of the list view, an overview with all available fields will pop up, allowing you to check and uncheck the fields.
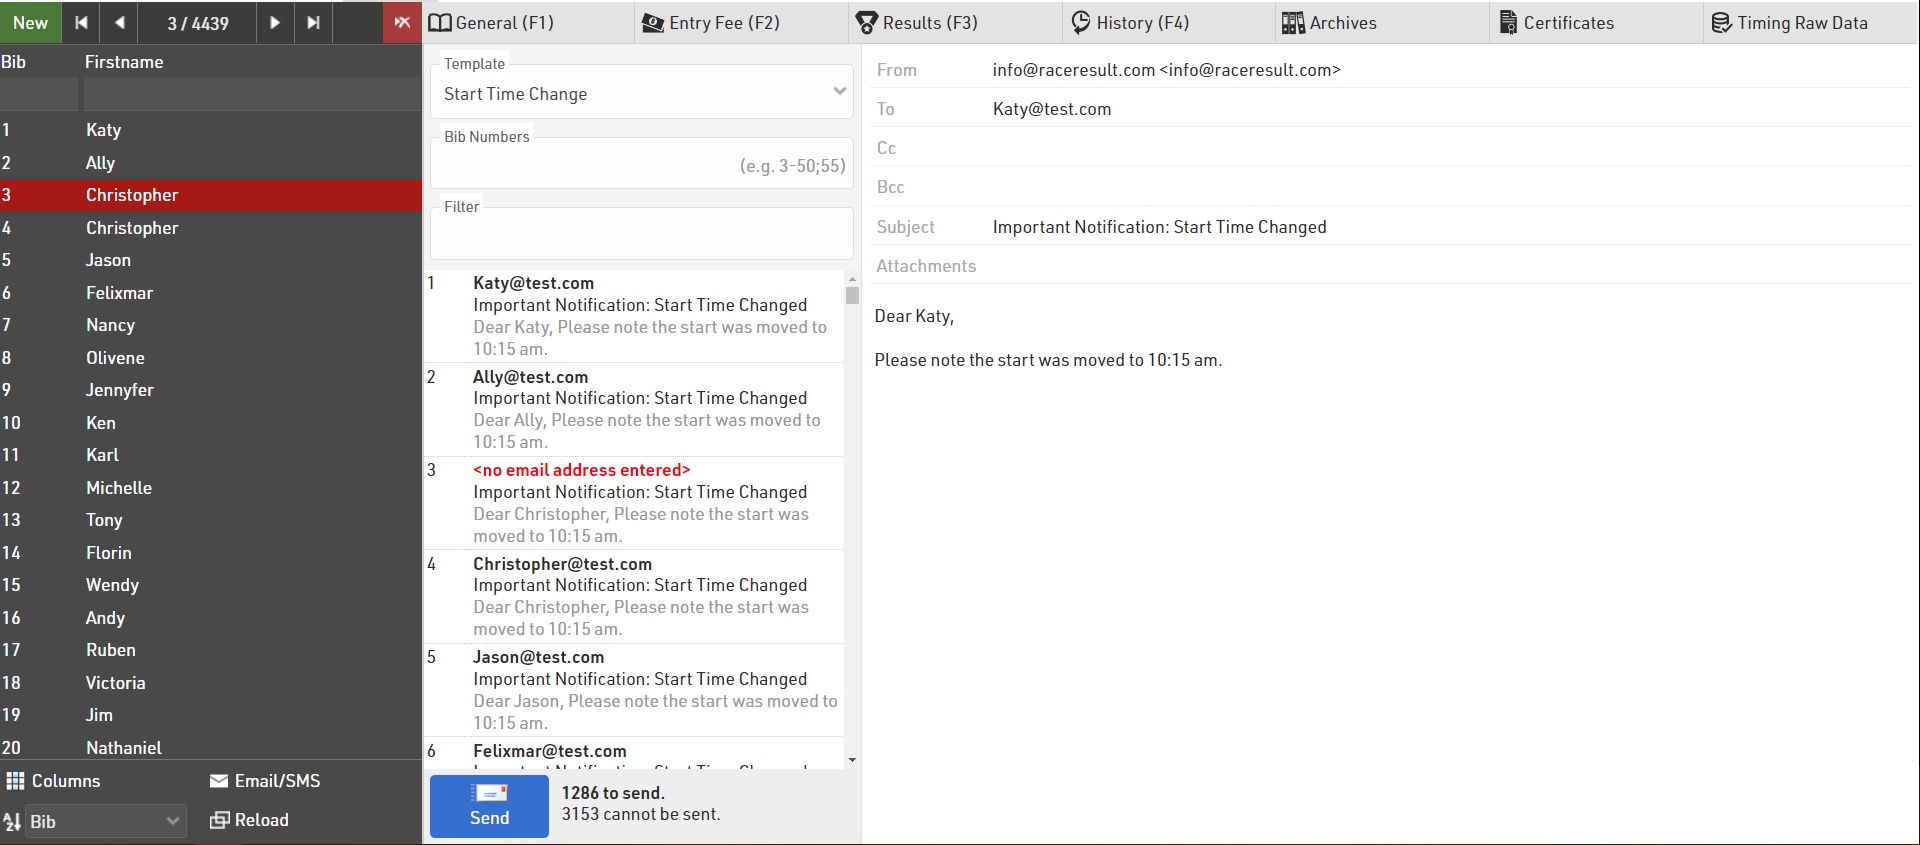
Email / SMS Module
The Email / SMS Module allows for bulk sending of Email/SMS Templates to participants.
Select a template from the dropdown and a list of all messages to send will be populated below. You can additionally check if the filter is correct and adapt this if necessary.
Clicking on an item from the list will show a full preview of the message on the right side, note that individual e-mails cannot be edited.
If a participant does not have a valid email address, it will be marked red with <no email address entered>.
At the bottom of the list you can see the number of messages which will be sent, and how many cannot. Clicking the Send button will start sending the messages, note that these are sent individually and so you need to keep the window open until sending is complete.
Entry Fee
If using online registration and payment through my.raceresult.com you can review each participants payment details.
Type displays the following;
- Entry Fee - A break down of each fee due according to the entry fee table.
- User Fees - Transaction fees based on the selected payment option.
- Payment - Any payment which has been received for the entry.
The Payment details also provide a unique payment reference and ID, the payment method, date and time and also the amount billed / received.
Below this are 2 sets of information;
- "OPEntryFee - EntryFee" - The entry fee which has been billed subtract the total amount due for the entry.
- "OPBalance" - The actual amount received minus what is owed, if negative then not paid completely, if positive then too much has been paid.
OPBalance may be non-zero if the participant changes contest / details which affect the entry fee they should have paid.
Results
The Results tab shows the relevant information according to your timing and scoring setup for that participant.
The Results Tab will show different tables for Splits, Legs and Results, Ranks, Team Scores and Participant Attributes, each showing the corresponding information.
For each Split the table shows Time of Day, time from Gun, time from Chip, Rank (from Gun or Chip according to the Contest Time Mode), Sector time (from previous Split) and Speed.
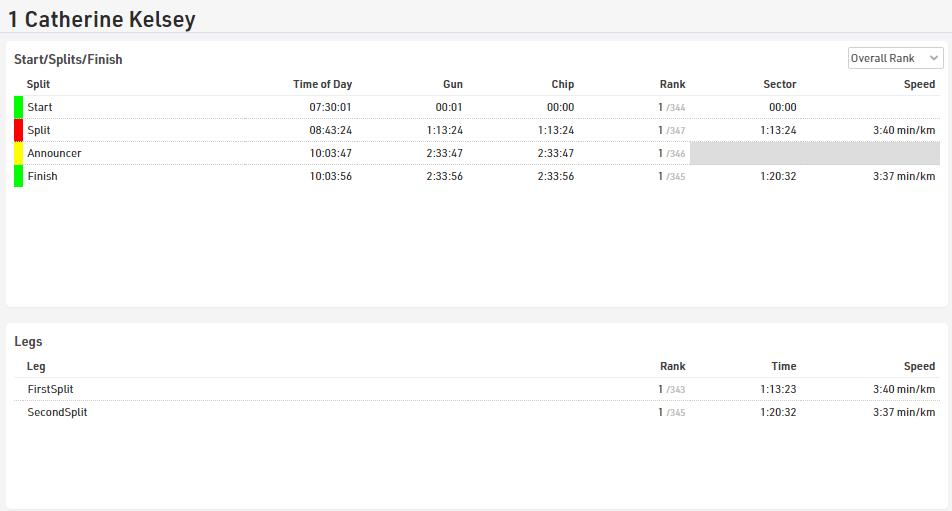
For splits which have not yet been reached or are missed then the Predicted Times are shown, a predicted time can be turned in to a manual Raw Data Record by clicking the + symbol. The Time of Day can then be edited and saved by pressing the enter key.
The Rank includes a drop-down to switch between Overall, Gender, Age Group or None, speed shows the SpeedOrPace field for the sector according to the default format of the split.
For each Leg the Rank, Leg Time and Leg SpeedOrPace is shown, the Rank is controlled by the same dropdown as per the Splits table.
Results are listed in order of the Result ID with T0 always listed first, Ranks and Team Results are shown in order of their ID so you can quickly look up an individual's rank.
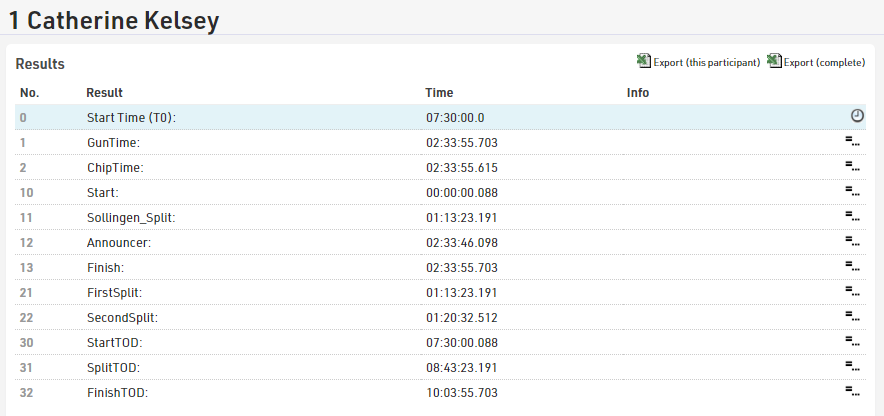
Using Raw Mode a Result can be manually overwritten by hovering over the result and selecting the edit icon. The result field will become editable. Once entered the adjusted result will turn red indicating the time has been overwritten. Should the raw data be recalculated, the overwritten value will remain.
To delete the overwritten result, select the red cross next to the result to return the raw data calculation. If you need to delete all overwritten results refer to Delete Overwrite Values.
History
The History records all changes made on a participant's record. This concerns all data fields such as name, contest, additional fields or status of the participant.
You can review all these changes in the Participants Window in the History tab, here you can see all of the changes which have been made to which field, and by which user or software tool. Additionally you can revert changes either individually or in bulk, by using the checkboxes.

In case there are a lot of changes in your Event File, the history might inflate the file. You can delete all History entries via the Delete Data function.
The history can also be downloaded as an excel for an individual participant or for all participants if you need to review bulk changes or as a backup before deletion.
Archives
In the Archives tab, there are three sections:
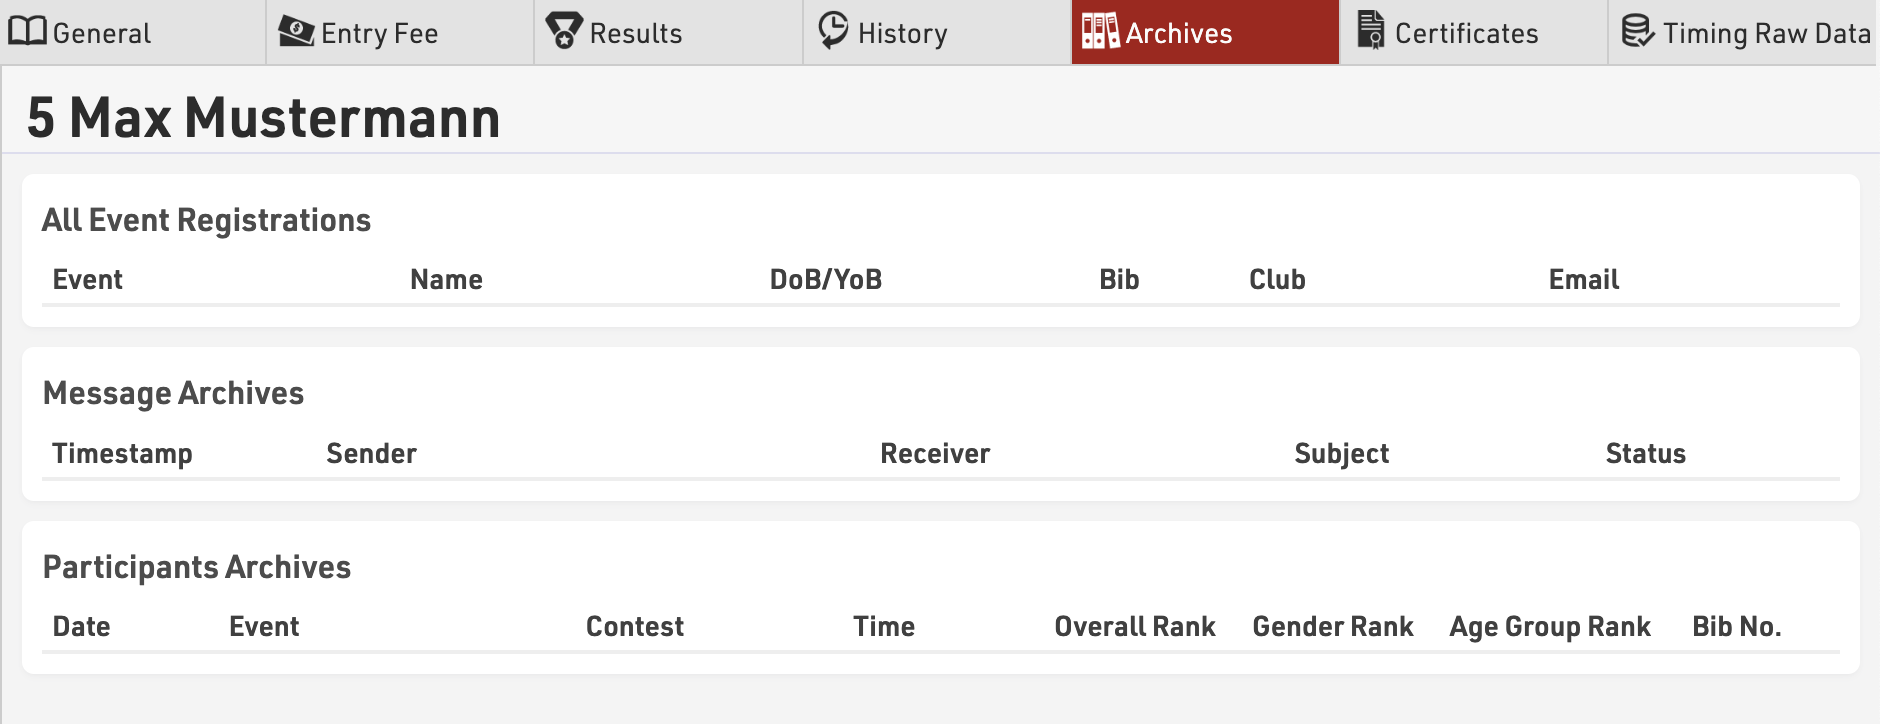
- under All Event Registrations, you will be able to see in which other event of yours the participant is registered. This will allow you to cross-check some information like the Club and the Email address. This section is part of the Customer Database (CRM) which you can find in the RACE RESULT 12 start page.
- Message Archives gives you an overview of all the emails/sms sent to the participant. In this way, you can check the status of emails to be sure that messages have been delivered. This section is part of the Email Archives which you can find in the RACE RESULT 12 start page.
- Participants Archives shows the participant's past results if you have imported past event Archives in your event file.
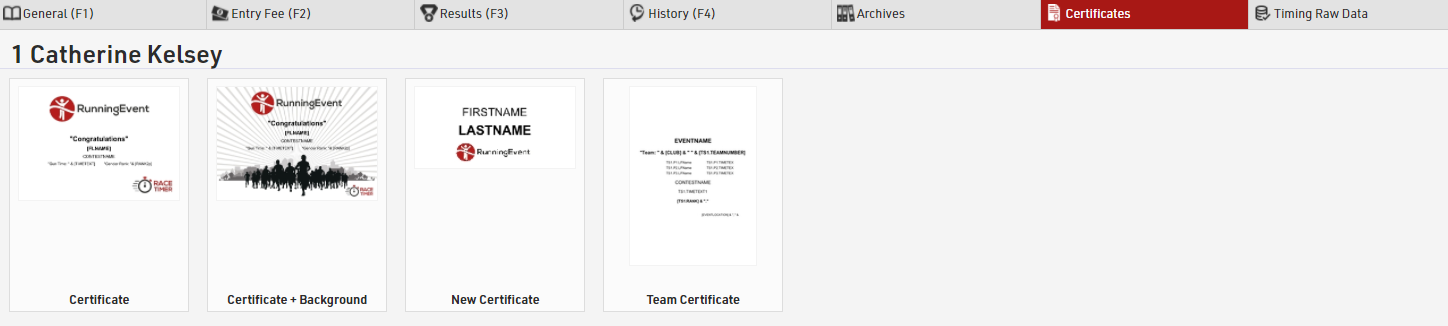
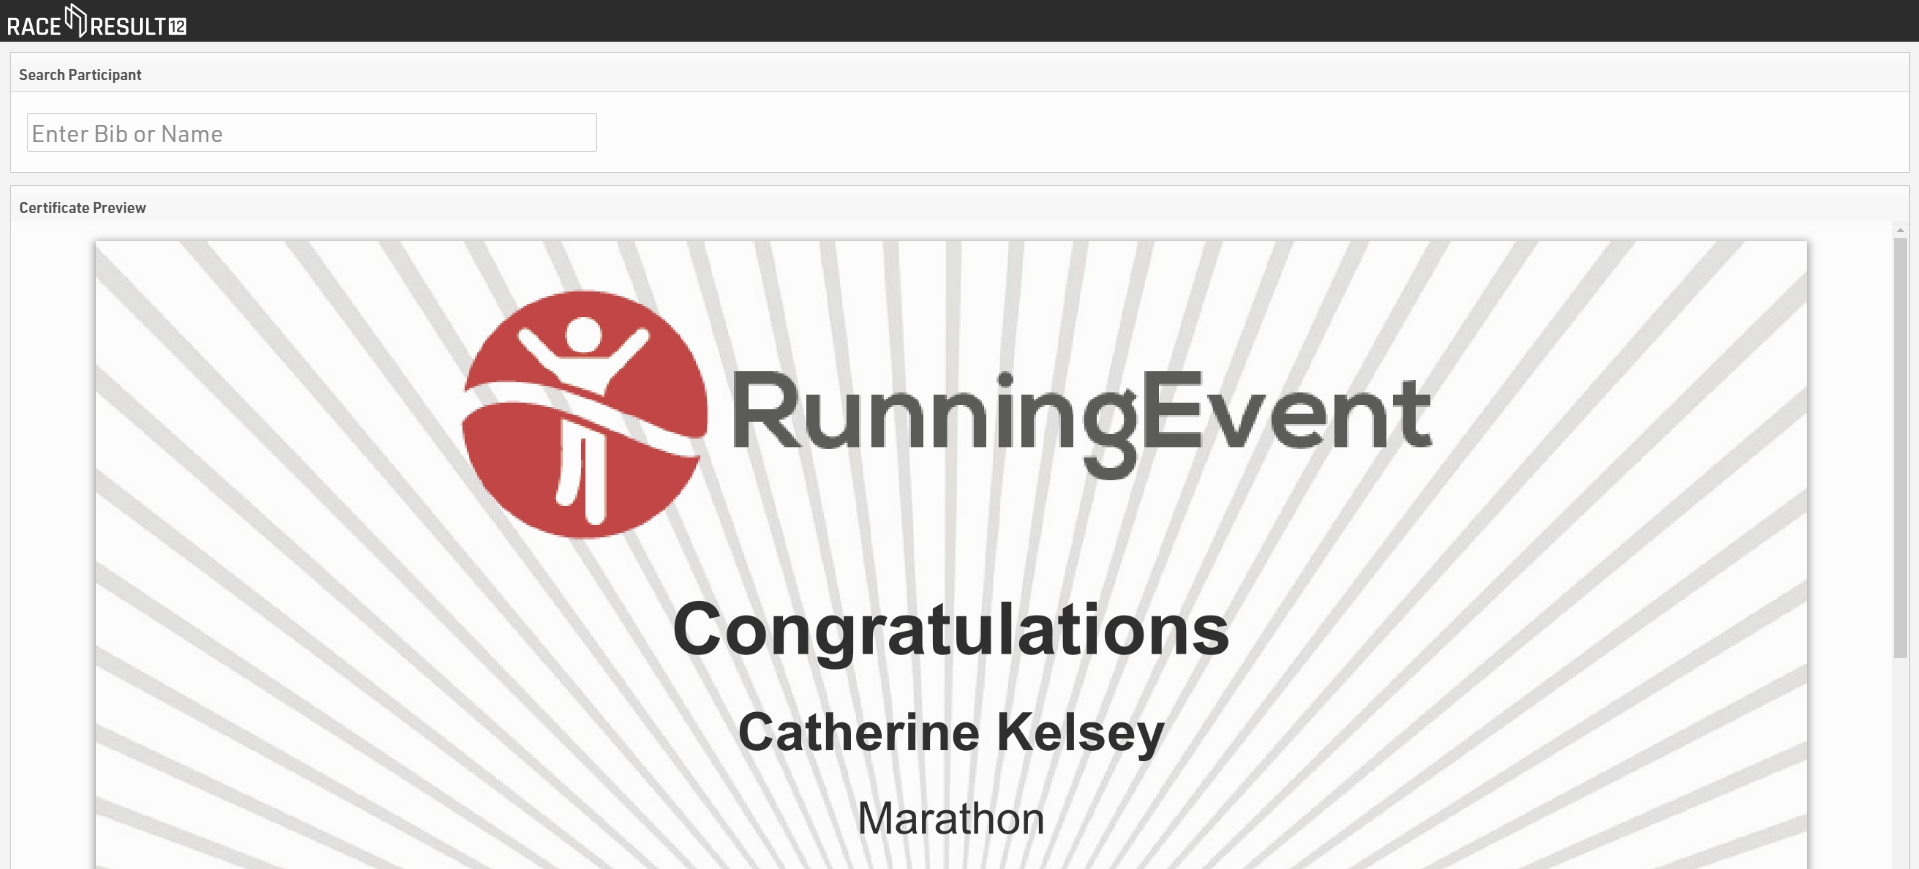
Certificates
The certificates tab provides a quick way to preview and print / download a participants certificates. A Certificate will be generated for each layout regardless of Certificate Sets.
Simply click the certificate you wish to view and a preview will be generated which you can download / print straight from the preview window.
Timing Raw Data
When working in Raw Data Mode all of the passings for a participant are saved to the event, you can view all of a participants data in the Participants Window - Timing Raw Data tab.
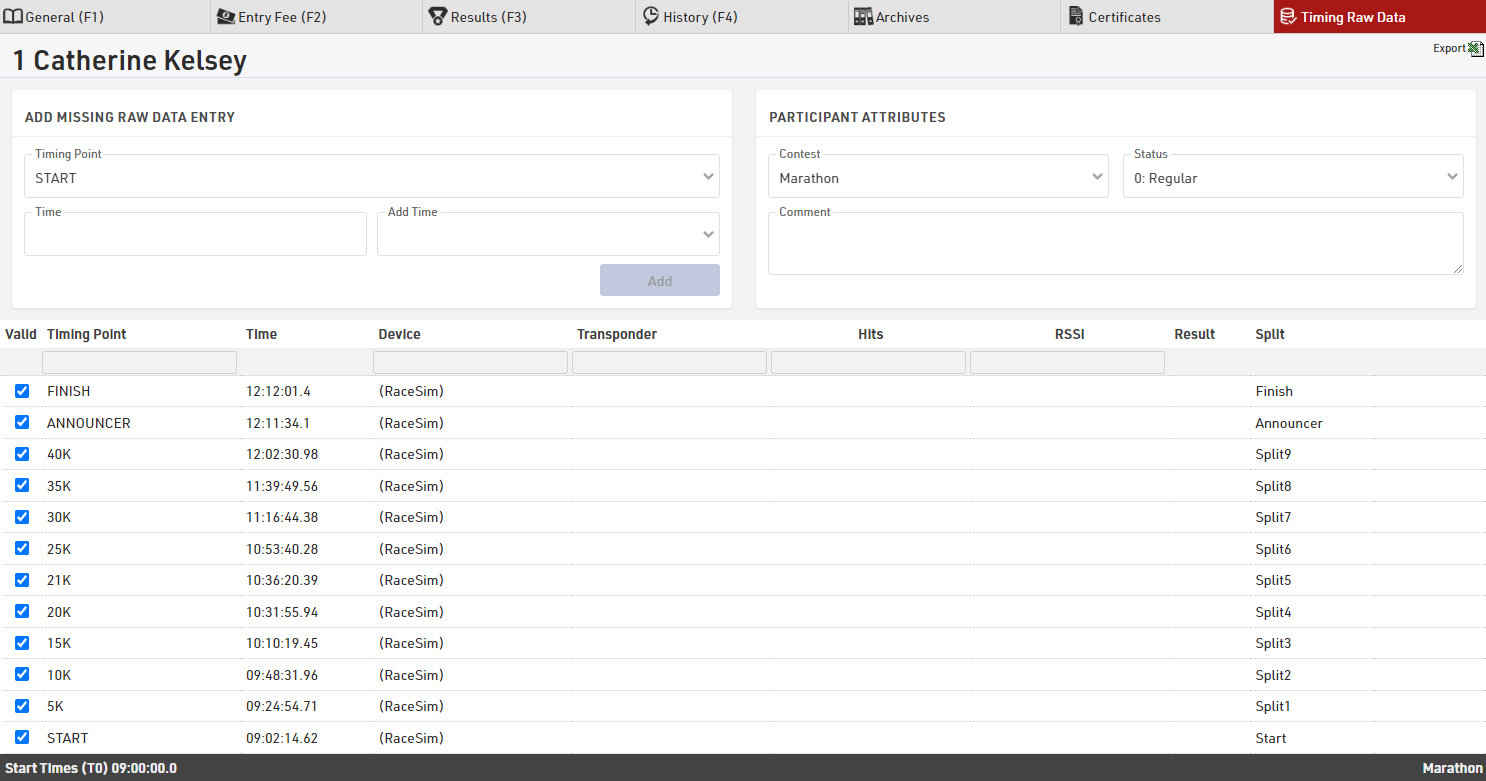
Here you have every recorded passing for the participant, technical information about the passing, and which result the passing has been used for, if any. See Passing Information for more details about understanding the technical information.
If a time should be ignored then untick the box in the first column and the time will be greyed out and ignored for raw data calculations, re-tick the box to use it again. Results will be re-calculated automatically.
If you have missing passings or need to enter additional raw data then you can do this below the table, just select the timing point and enter the time. You can enter the time as time of day, or as a race time / split time and then have the option to add T0 or any other result to this time, useful if you have a net time for a participant or need to add a missing split without calculating the time of day.
If you want to save a copy of all the raw data for review then the export function allows you to export all raw data for just the current participant or all participants.
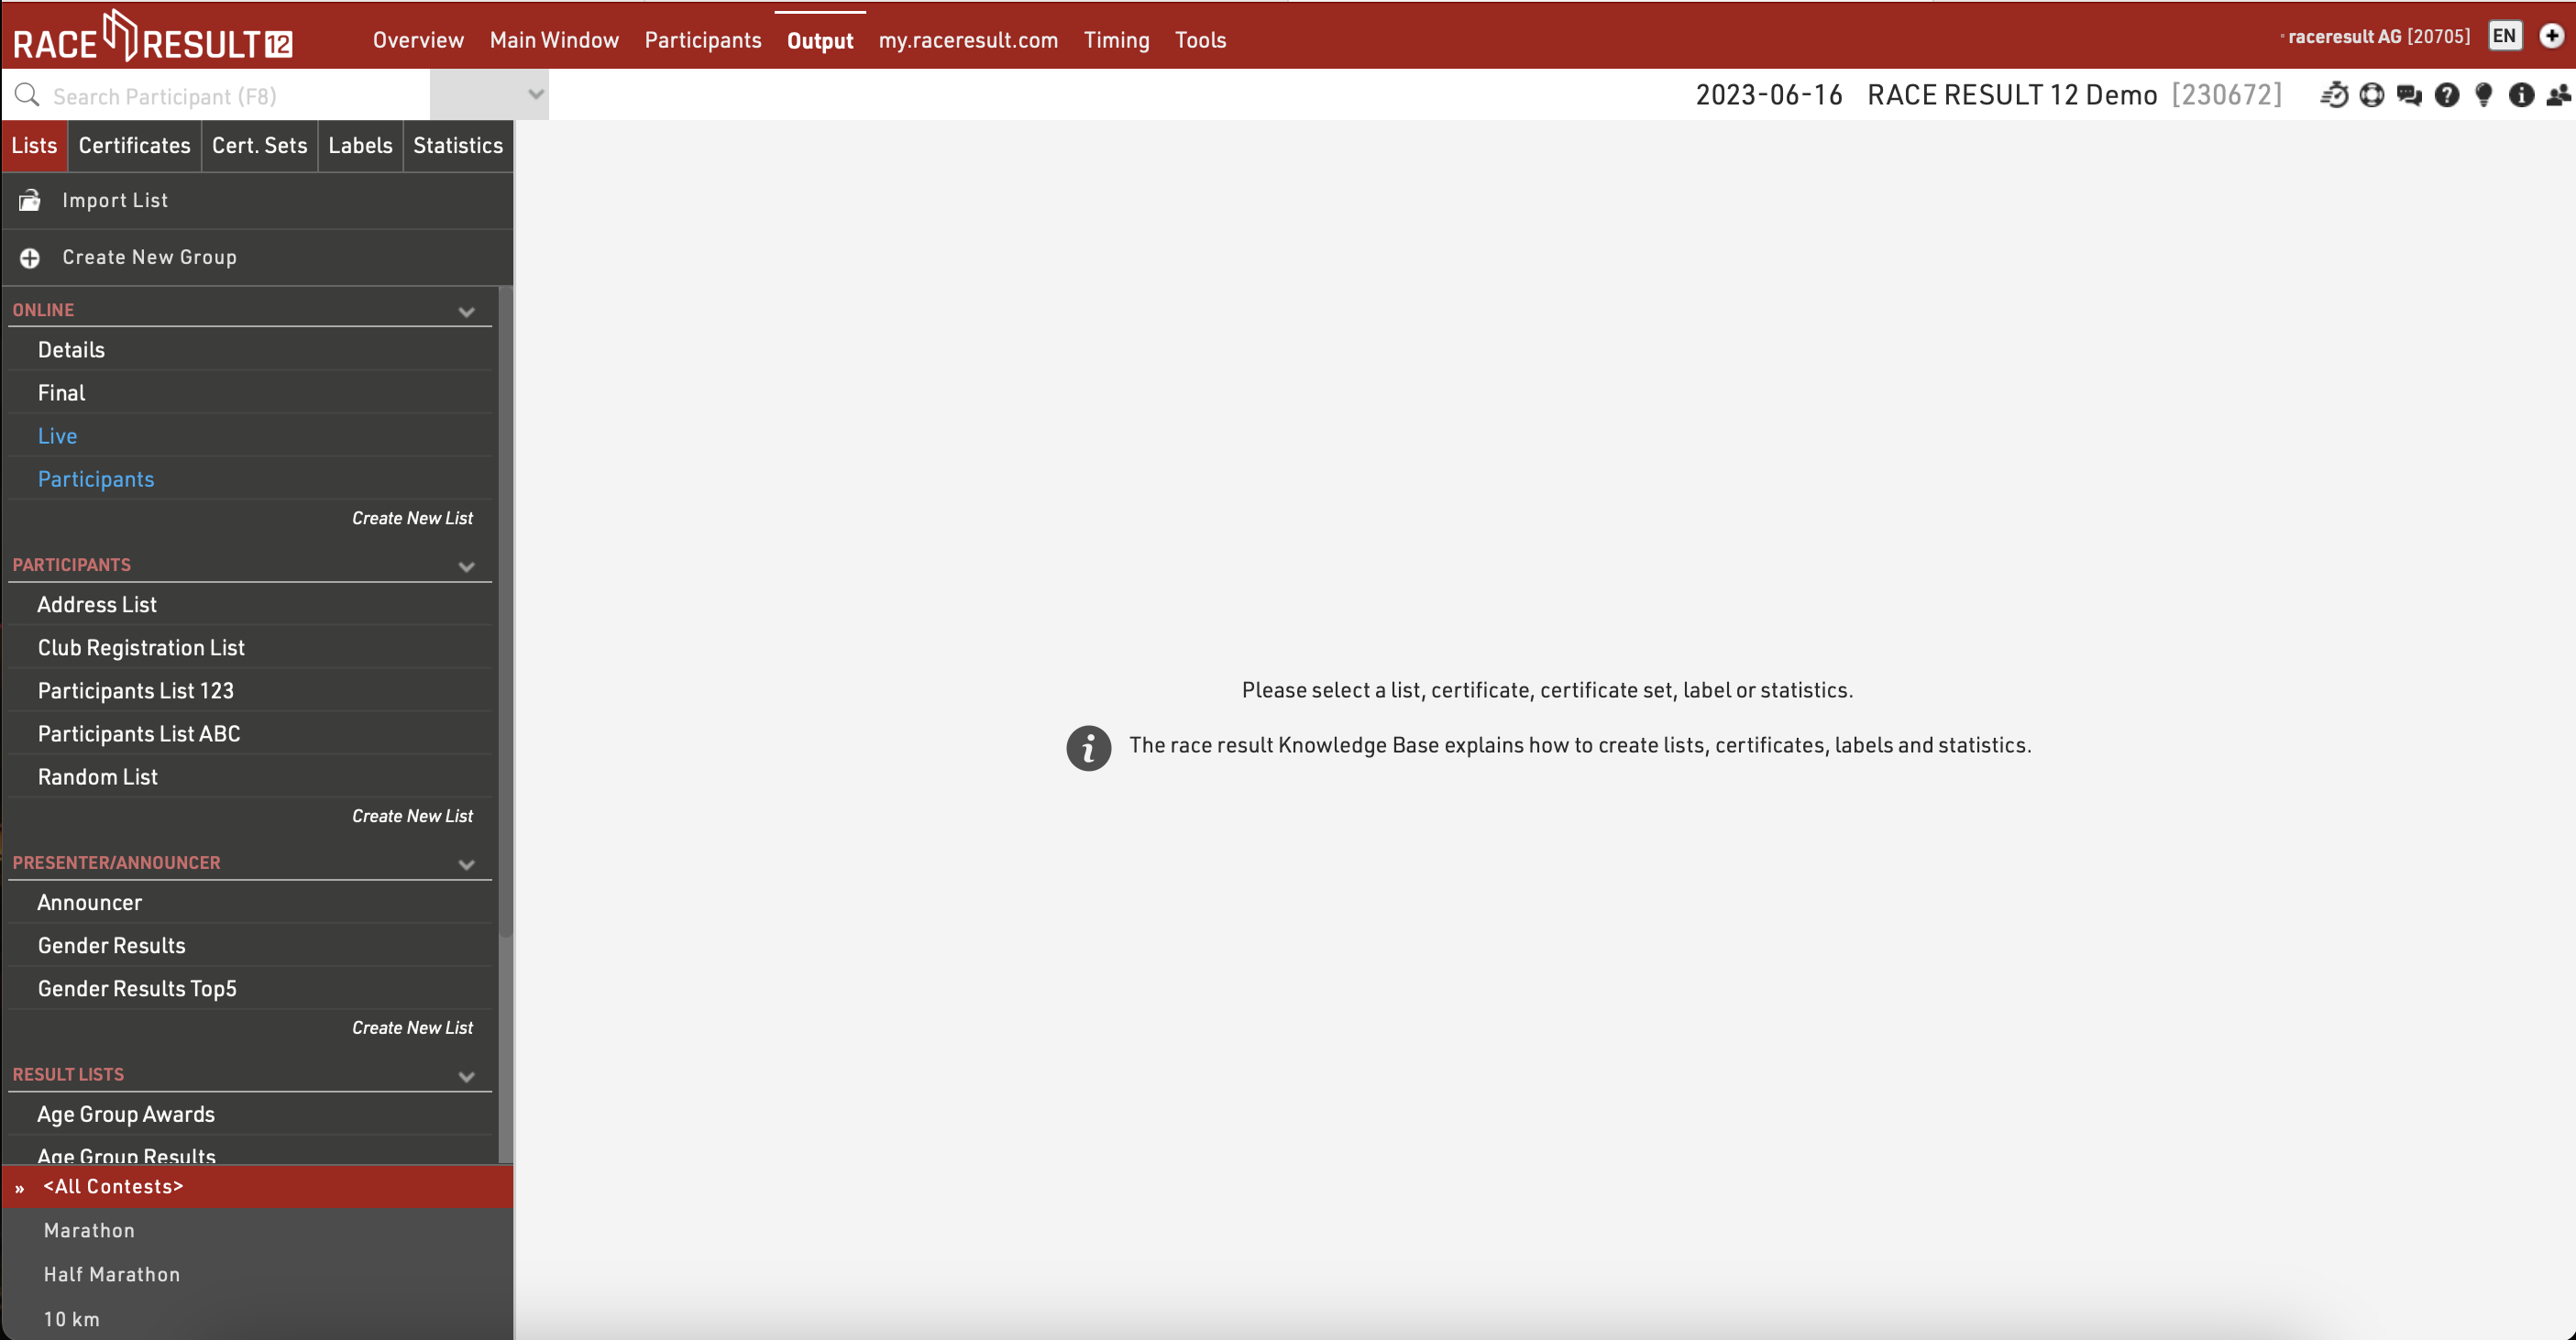
Output
The Output Window is used for the presentation / displaying of data, broken down to 5 categories (accessible from the buttons in the top-left corner).
Lists
The most important method for getting data out of RACE RESULT 12. Create any list of data - whether for printed results, publishing online results, results screens, tools for the announcer, your own checklists for verifying results or any custom report you need.
Certificates
A design tool for creating layouts with text and images on a page. They are mainly used for race certificates, but also for individual result print outs or to create receipts/invoices.
Certificate Sets
Determine which participants should receive a particular certificate, these sets can then be printed or published online or accessed through tools such as the Results Kiosk.
Labels
Create label sheets with rows and columns for printing personalised labels
Statistics
Create standard or custom statistics from the participants data.
The bottom left contains a filter for Contests, by default Outputs will automatically be loaded for All Contests, but you can quickly filter an output to specific Contests by selecting them from this list, or select multiple Contests using the checkboxes when hovering an item.
Lists
Lists show a defined set of fields for a specific set of records. The settings of a list determine:
- which participants are shown
- which data fields (columns) are shown
- how the records are sorted
- how the records are formatted
- how the page is formatted (page format, margin etc)
Lists are additionally sorted into categories. By clicking the category head, the category can be collapsed and uncollapsed. To create a new category, click the New List Category link at the top. You can also rename List categories.
Lists can be sorted manually via drag&drop. Therefore move the cursor to the free space left of the list name. You can also drag&drop the list into another category. To sort the lists in a category alphabetically, click the  icon. Empty categories will be deleted automatically when you reload the window.
Clicking the name of an output list opens an overview page for that list.
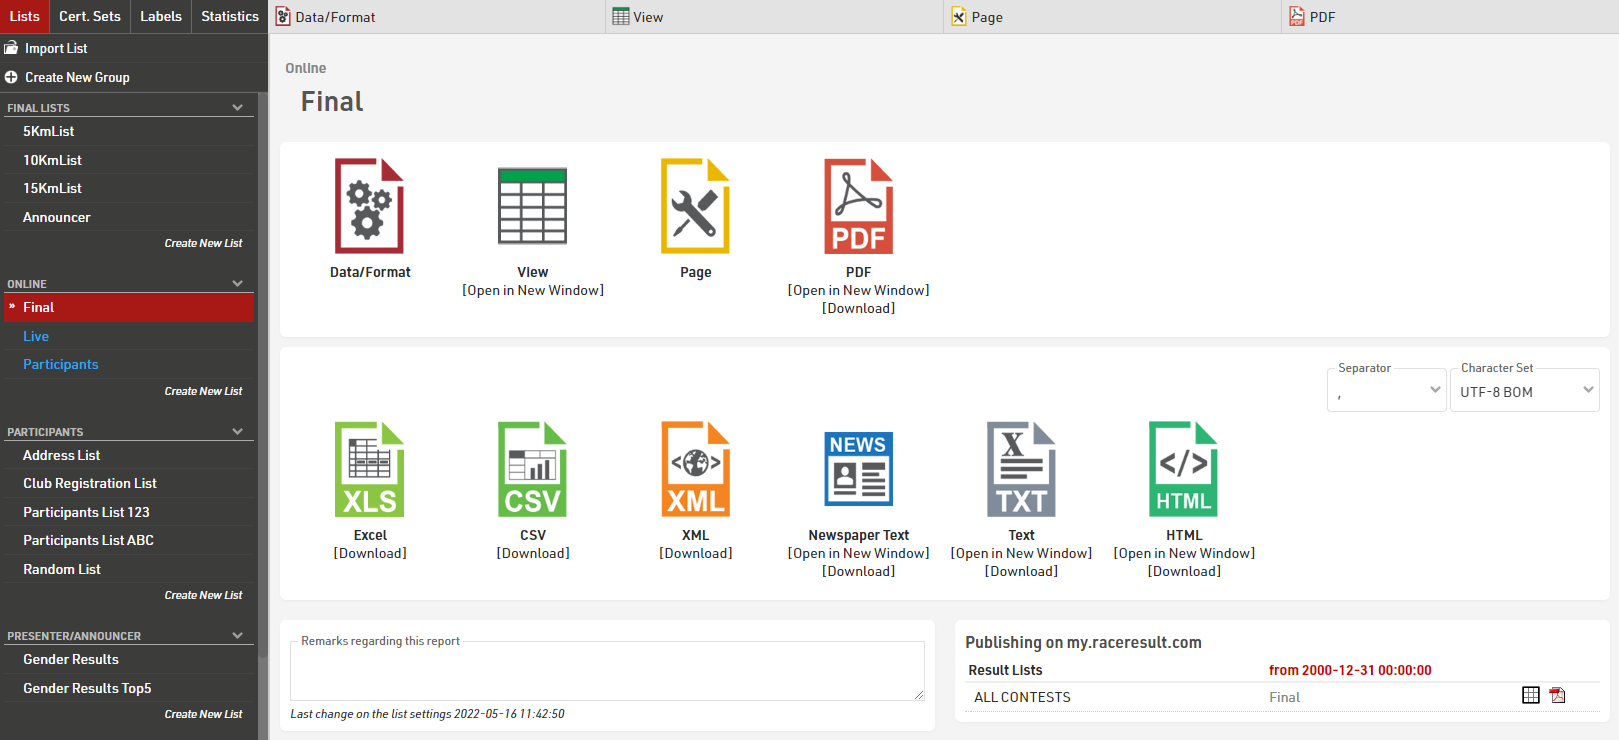
The settings of a list are split into the tabs Data/Format and Page. Data/Format contains all settings regarding the data shown on the list and how it is formatted, whereas the Page settings concern the general page layout and are only relevant for the PDF and HTML output form.
To view a list click the View button or tab, this can also be opened in a new window, lists can also be opened directly to the View tab by double clicking the list name from the menu. A PDF view of the list can also be previewed or downloaded.
Lists can also be exported in different formats as EXCEL, CSV, XML, TXT and HTML.
Certificates / Certificate Sets
Contrary to a List, a Certificate creates a page for each participant. Texts and pictures can be placed freely on the page. A certificate primarily serves to:
- Print name, time, etc. on a pre-printed certificate during the event.
- Displaying/Printing of certificates on my.raceresult.com (complete with background image).
In addition, certificates can be used for:
- other print-outs, such as confirmation of registration, invoices, receipts, lap reports at a 24h-race, etc.
- Background image for a List
- Cover sheet and closing page for a List
- Content of Labels
Certificate layouts should first be created in the Certificates tab which opens the design tool to create different layouts for different purposes.
Once you have a certificate setup, Certificate Sets define for which participants a certain certificate will be created. You can edit the settings of a Certificate Set by clicking on Settings after selecting the certificate set in the Output Window.
Certificate Sets serve to print sets of certificates. To print out single certificates, go to the Certificates tab in the Participants Window.
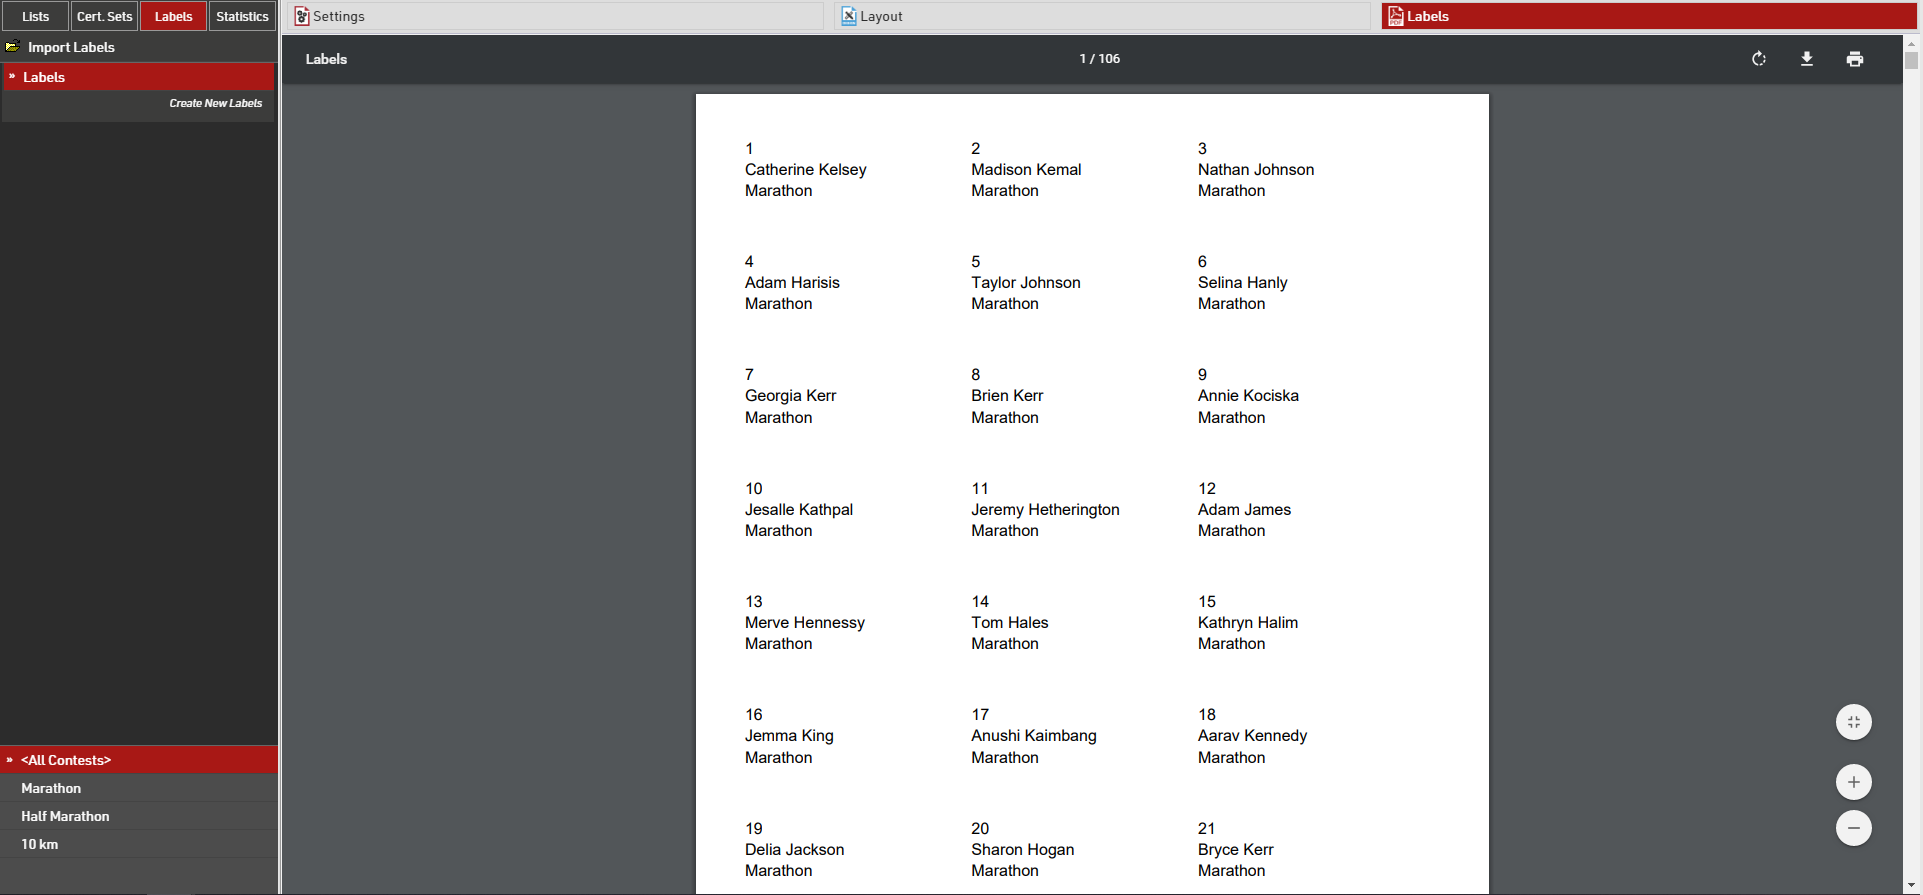
Labels
Labels are normally printed on pre-cut label sheets and allow you to place either text or a certificate design on each label.
The Label Settings determine the basic layout and template for the labels.
Participants
A Filter that defines for which participants a label will be created.
Sorting Fields that define how the labels will be sorted.
Content
Enter an Expression that defines the content for each label.
Other
The Directional layout (row / column direction) of the labels.
Optionally a design to be printed instead of the Expression, see Labels with Design, if a design is selected then it can be edited directly through the Layout tab.
Optionally replace the content of the label with an automatically generated Barcode for each label, the barcode will include the bib number.
Font
Define the font, font size, formatting and alignment for text.
Page
Page settings for each sheet, these are normally provided by the manufacturer of the label sheets.
Label
The individual label sizing / spacing, these are normally provided by the manufacturer of the label sheets.
Once the settings are defined you can preview, download and print the labels through the Labels tab, an example might look like this.
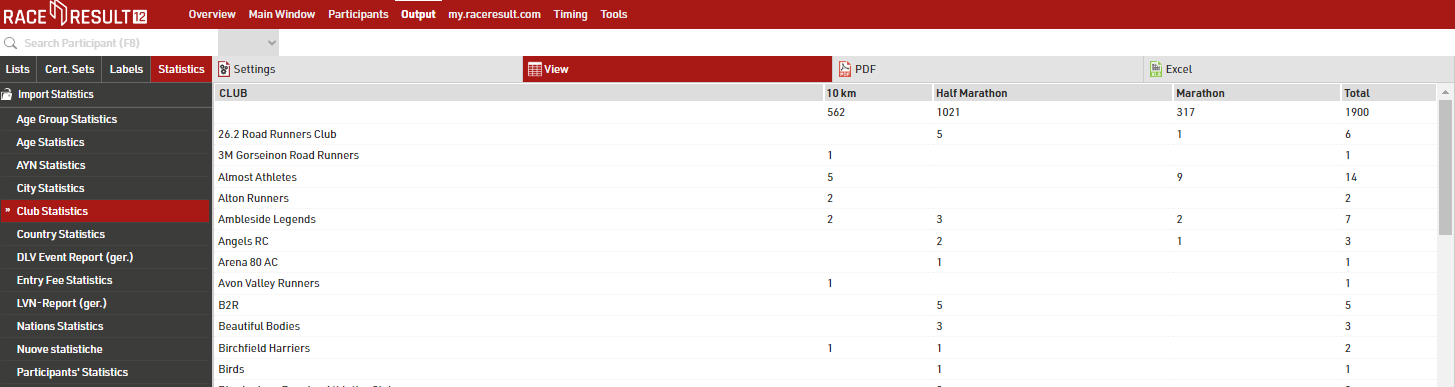
Statistics
Every new event file has numerous default Statistics, for example Club Statistics that shows the number of participants per contest and Club:
Dynamic Formatting
Dynamic Formatting allows to format the individual records of Lists and Certificates differently, for example men could be printed in blue and women in pink.
An Expression is used which generates a text with formatting instructions. This expression is entered for lists in the Extended Column Settings and for Certificates.
The formatting text can contain several instructions which are separated by semicolons:
Element1;Element2;...
These elements can be:
|
B |
Bold |
| I | Italic |
| U | Underlined |
| S | Strike-Through |
| AL | Align Left |
| AC | Align Center |
| AR | Align Right |
| C(X) | Font Color X |
| BG(X) | Background Color X |
| T(X) | Transparency level (0-100%) |
|
BTC(X) / BRC(X) BBC(X) / BLC(X) |
Border Top / Right / Bottom / Left Color X |
| BTW(X) / BRW(X) BBW(X) / BLW(X) |
Border Top / Right / Bottom / Left Width X |
| FS(X)* | Font Size X in pt |
| OC(X)** | Outline Text Color X |
| OW(X)** | Outline Width X Value 0-5 in 0.5 increments |
* only applicable to outputs in PDF and certificates in Designer. For PDF outputs X must be smaller than the default font size.
**only applicable to certificates in the Designer
Possible color values are:
See more information on colours HERE
Examples
A field will be printed italic for women:
if([Sex]="f"; "I"; "")
A field is formatted with a red background and white text for participants with Age less than 18.
if([Age]<18; "BG(#FF0000);C(#FFFFFF)"; "")
A field is marked red for participants from USA:
if([Nation.IOC]="USA"; "C(255,0,0)"; "")
Colors
The Colors of the text elements on Lists and Certificates can be adjusted. By default all texts are shown in RGB-black.
RACE RESULT 12 supports RGB colors as well as CMYK colors.
The colors of the columns in a list can be edited in the Extended Column Settings. You can use the following formats:
- a hex value, like in HTML (RGB), e.g. #FF3300
- RGB as a decimal value, e.g. 255,51,10
- CMYK as a decimal value, e.g. 30,30,30,100
In Certificates, both RGB and CYMK colors can be set via the tool bar at the top of the screen.
With the help of Dynamic Formatting, fields can be formatted differently for each data record.
The following website is useful for picking colours and can convert between HTML, RGB and CMYK: https://html-color-codes.info/
my.raceresult.com
The my.raceresult.com tab serves to configure the registration and results platform my.raceresult.com and to handle inquires from my.raceresult.com
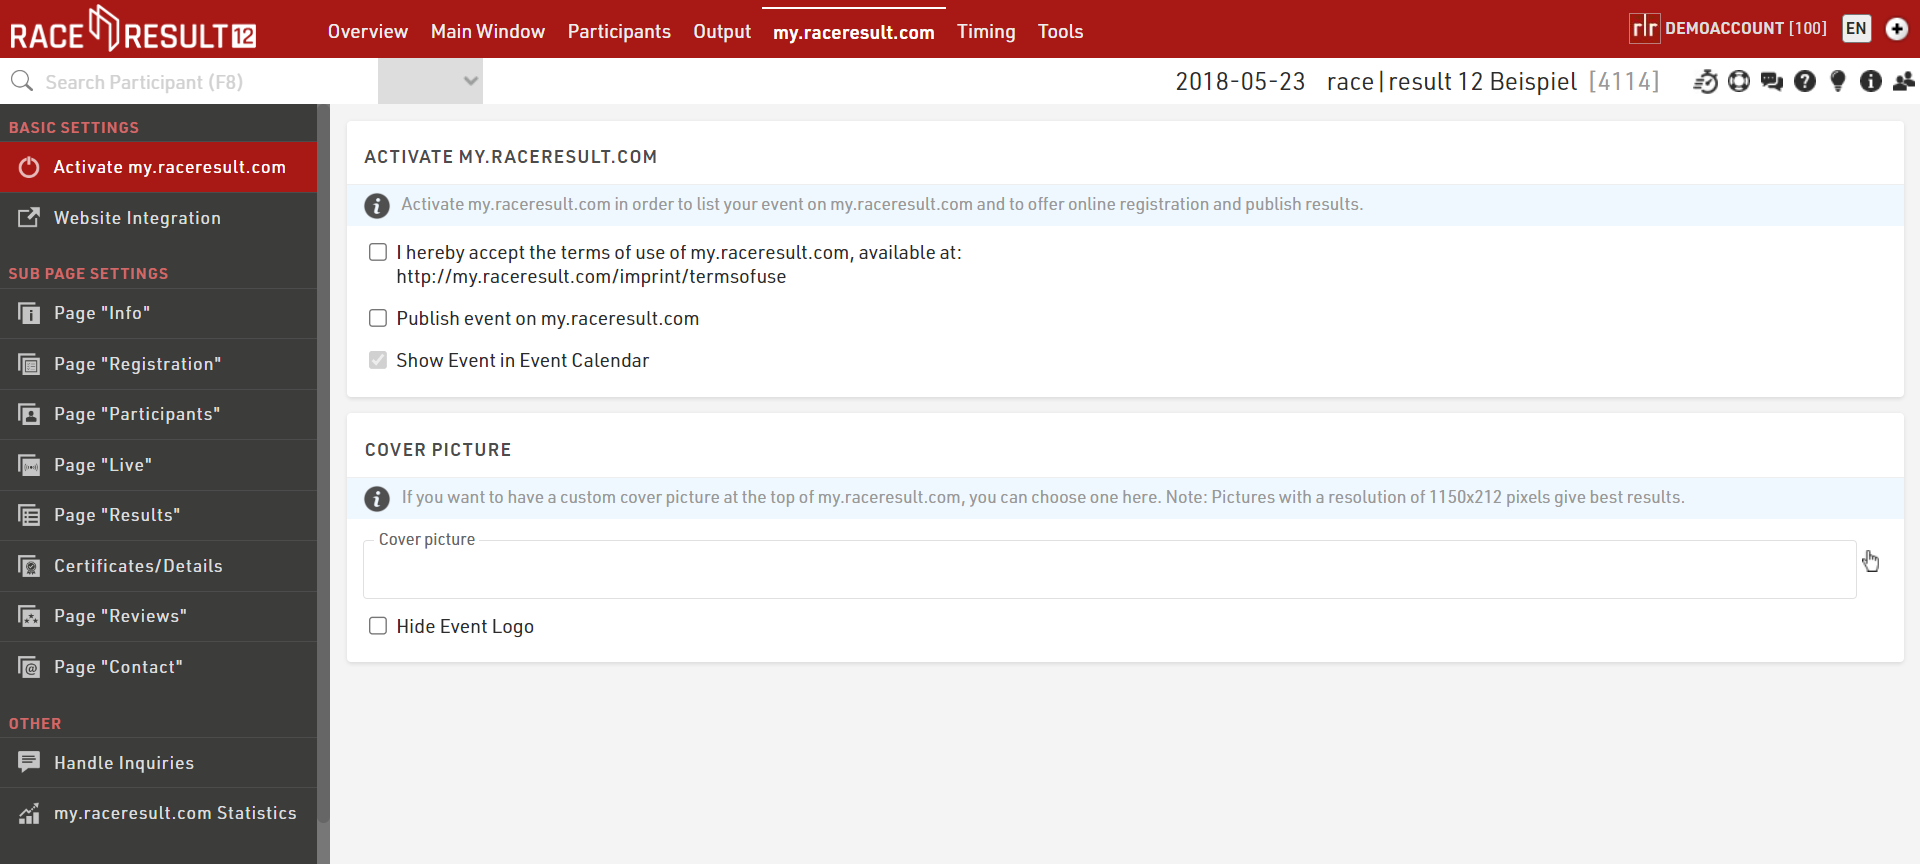
Basic Settings
Sub Page Settings
my.raceresult.com contains multiple sub pages for each event which can be used for different purposes, and can be hidden / displayed separately.
Other
Timing
The Timing Tab is used to connect to your RACE RESULT timing systems and includes the Data Exporters for forwarding of data to third party software/systems, it also contains a group of other tools designed to make Timing a race as simple and easy as possible. It should be your go-to window when timing an event.
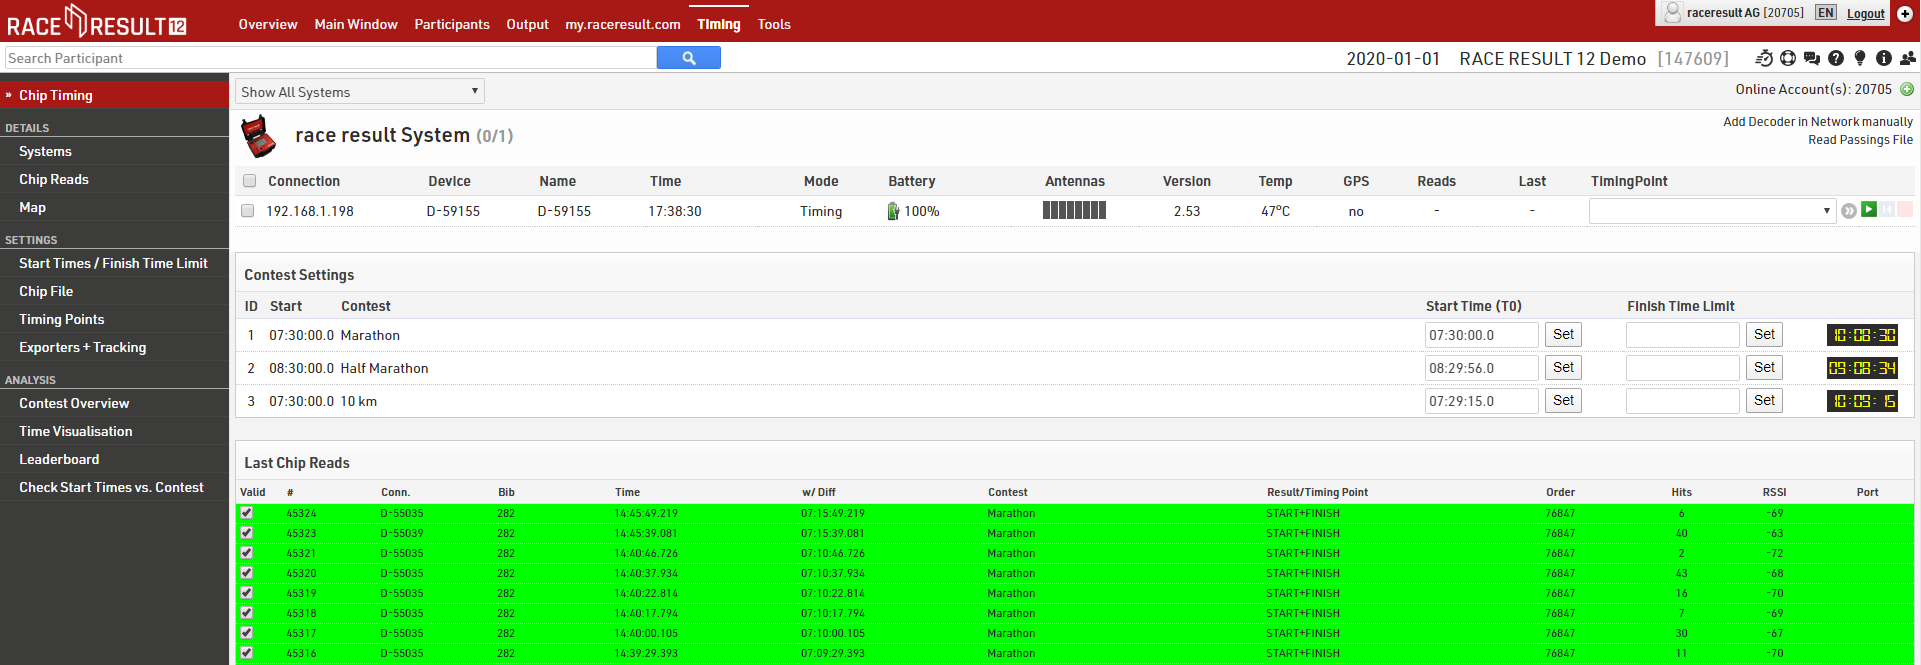
Chip Timing
When opening the Timing Module you will first be presented with the Chip Timing window, which gives you a brief overview of your timing systems and the first steps to timing a race.
This window can be used for most types of races if you have everything setup already, the functionality of parts of the Chip Timing window is explained in the additional sections below.
Alternatively there are advanced options on the other windows for more complex requirements such as when you have multiple Timing Systems to monitor and some additional tools which are useful during the event. Connecting to systems and the additional tools and functions are described in the sections below.
Details
Settings
In order to make the Timing more streamlined we moved a number of key settings to the new Timing Module so that they are just a click away.
From here you can edit: Start Times (T0) / Finish Time Limits , Chip File and Automatic Timing Point Selection
This section also includes the setup for Raw Data Exporters + Tracking Forwarding.
Analysis
Under Analysis you will find some tools which are useful for analysing your event whilst it is ongoing, these are designed you aid you with Timing the event by identifying any erroneous data, most often caused by participant error.
Contest Overview
This gives you an overview of each contest, showing the number of participants signed up, started / on-course and finished in each contest. Hovering over any of the segments gives a breakdown by gender also. You will also see a running clock next to each Contest which shows the elapsed time since T0.

Time Visualisation
Time Visualisation is a very helpful tool to check if participants miss reads and if times are realistic, or in other words to identify cheaters.
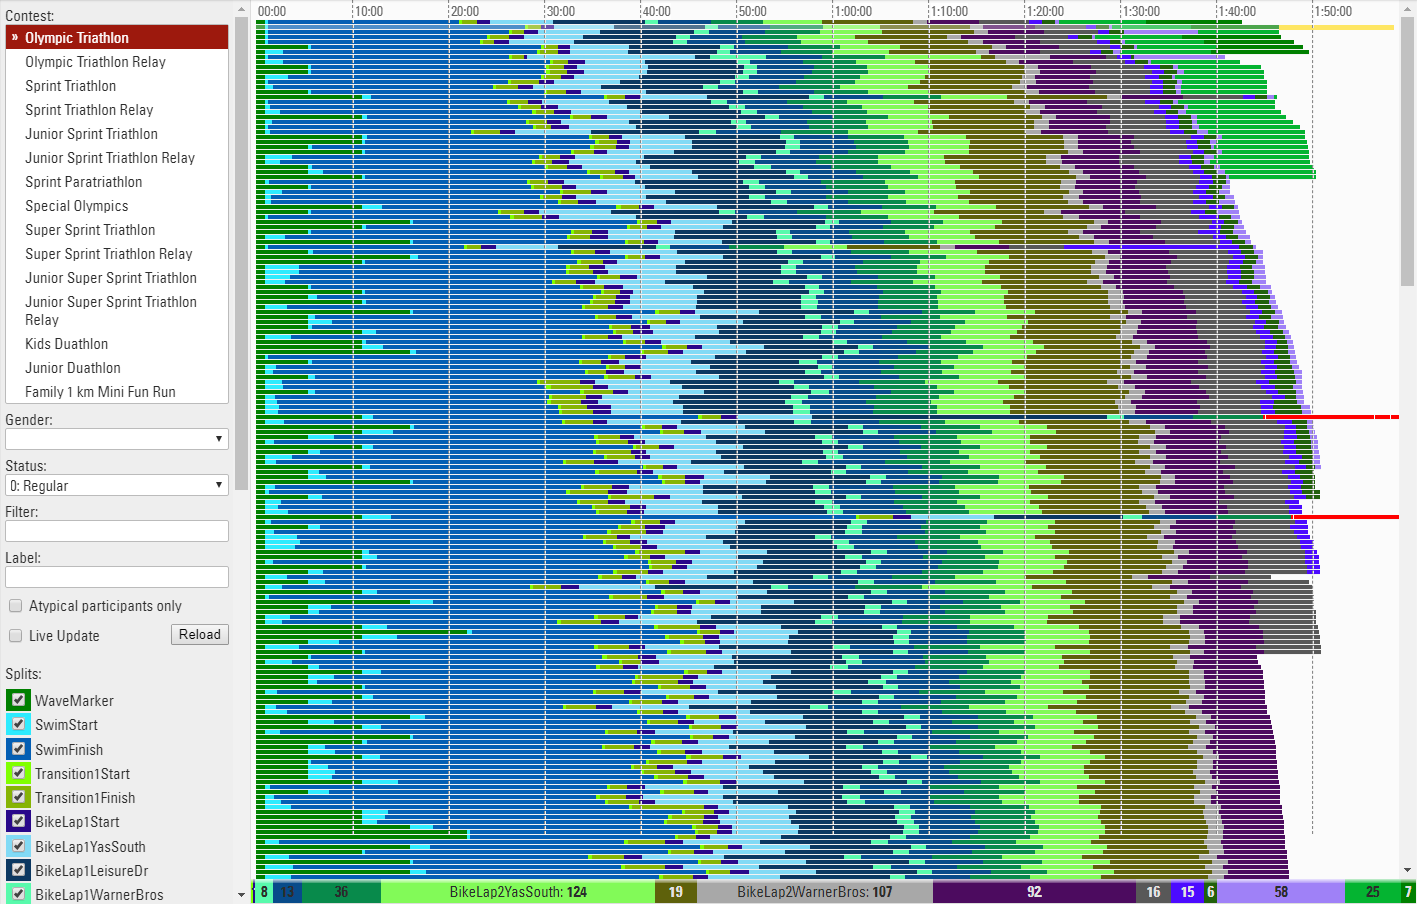
The tool shows one line for each participant. The different colors represent the section times between two split timing points. The length of the bar represents the time and the fastest athletes are at the top.
If you click a line you will see the details and can immediately disqualify the participant.
Use the settings bar on the left to select the contest(s), gender, status or apply any other filter, you should also select the splits or results that will be part of the visualisation. Sometimes you may want to exclude certain times. Usually you will want to see just the key timing data for each Timing Point, not the intermediate split times. A label can be applied to each line, this could be particularly useful when comparing multiple contests together.
If you only want to see participants who are missing data then click "Atypical Participants Only", the view also has a live update checkbox which will refresh the visualisation as new Results are calculated, this is useful for monitoring a race whilst it is in progress.
Best Practice Tip: If you have a large number of splits and the data does not make sense, try deselecting Timing Points to just keep the important Results which show where somebody is on the course as opposed to split times between 2 Results. Sometimes participants standing at the side lines can cause some erratic data as the Visualisation cannot determine the correct order of the Timing Points, it is often best to ignore this data in the participant record.
Read Rates
Read rates offers additional analysis of Splits to compare detection rates across the Primary & Backup timing points and also considering any manual raw data entries.
For each Split the expected number of participants is calculated, either based on the number of finishers (if Finishers only is ticked) or by the number of participants seen at this Split or a later one. This is then used to calculate the percentage of participants detected at the main timing point, backup timing point, a combined rate across both, the number of manual reads and the total participants detected at this point across all.
A table is generated for each Contest independently and the total read rates across all Splits is also shown at the bottom of the table.
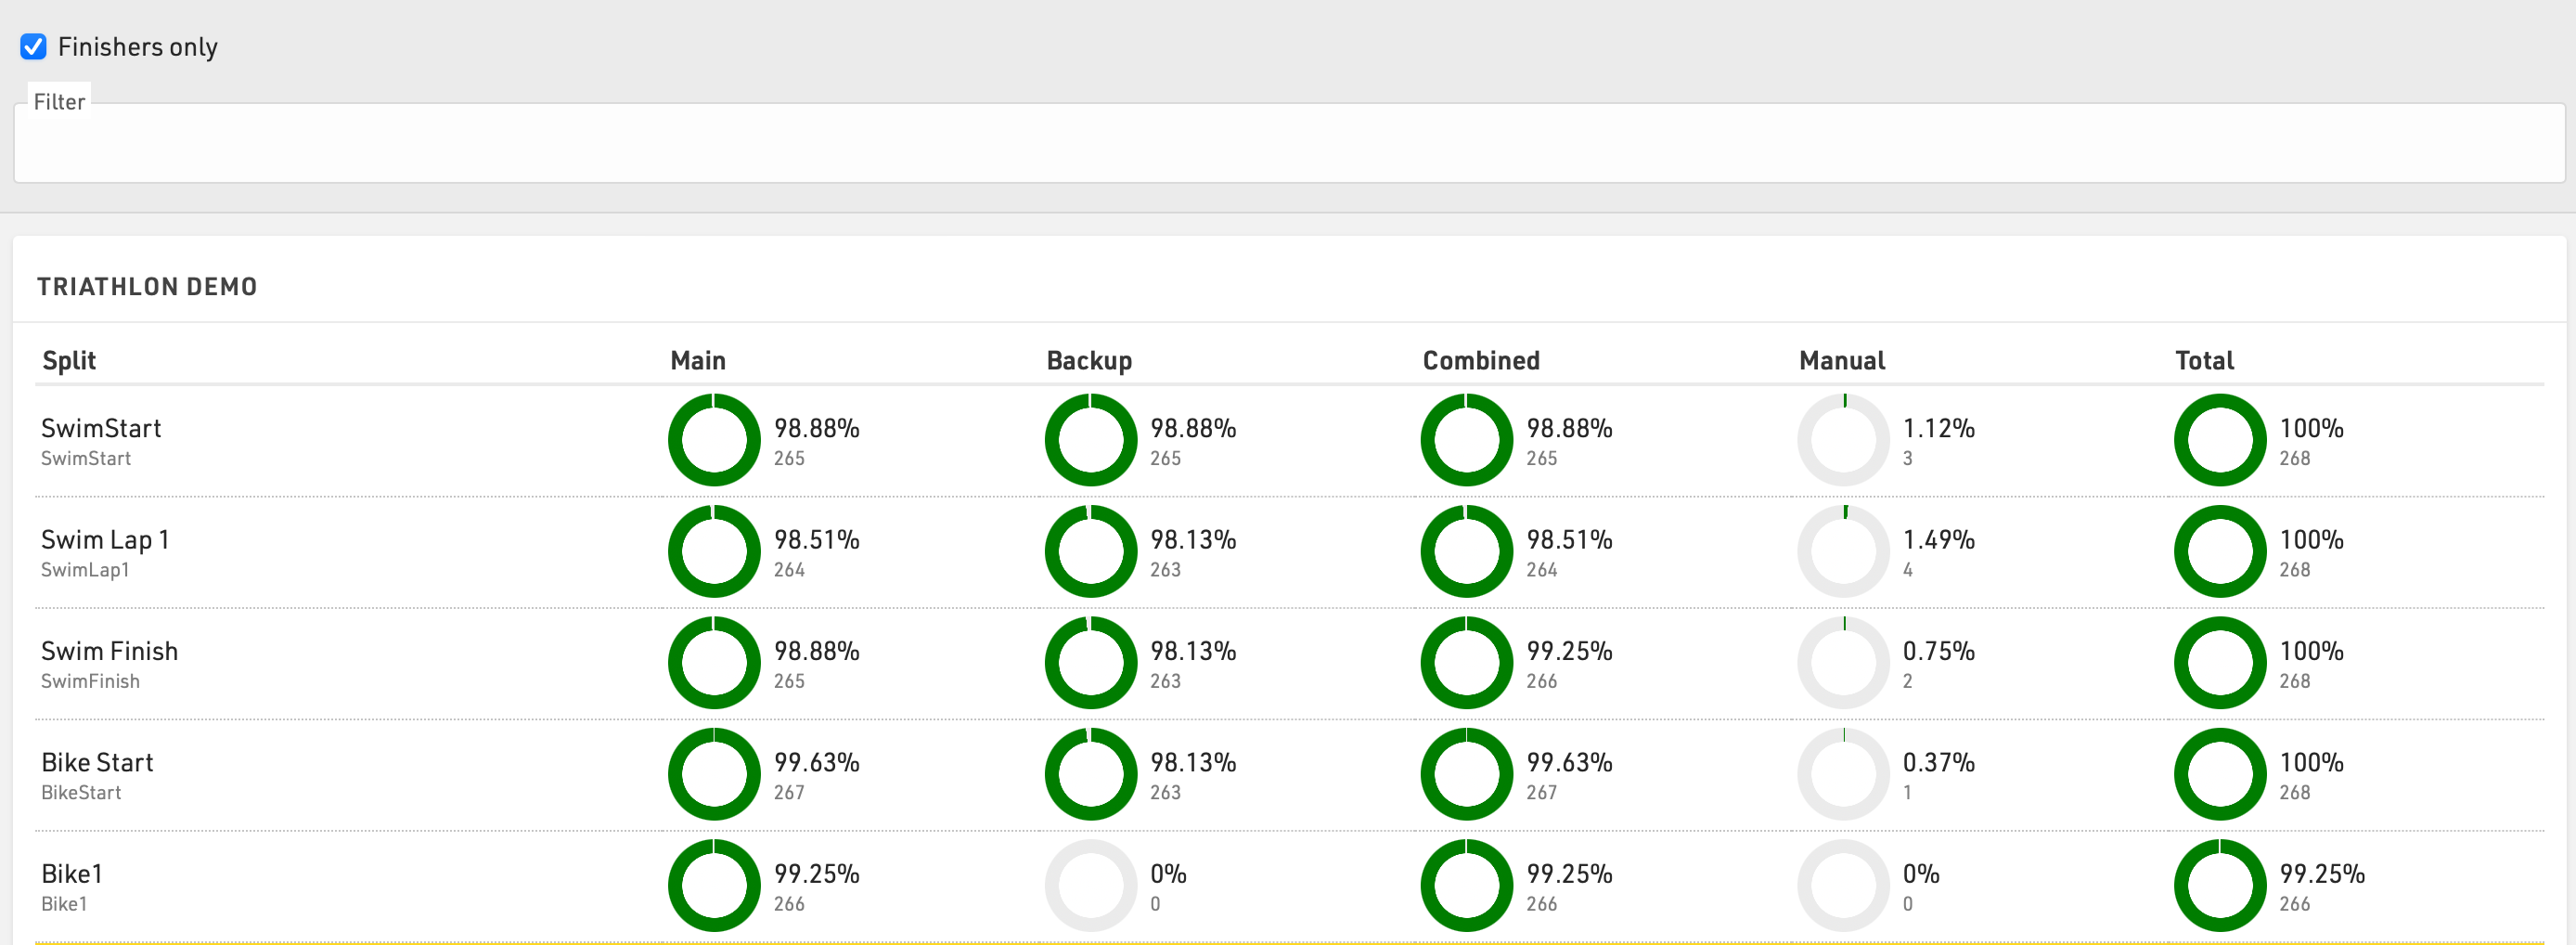
An additional optional filter can be applied.
Leaderboard
The Leaderboard in the Overview Window shows the winners or current leaders of the event. Through the settings at the bottom of the screen, you can select a Ranking and a number x so that the first x participants in each group of the ranking will be shown.
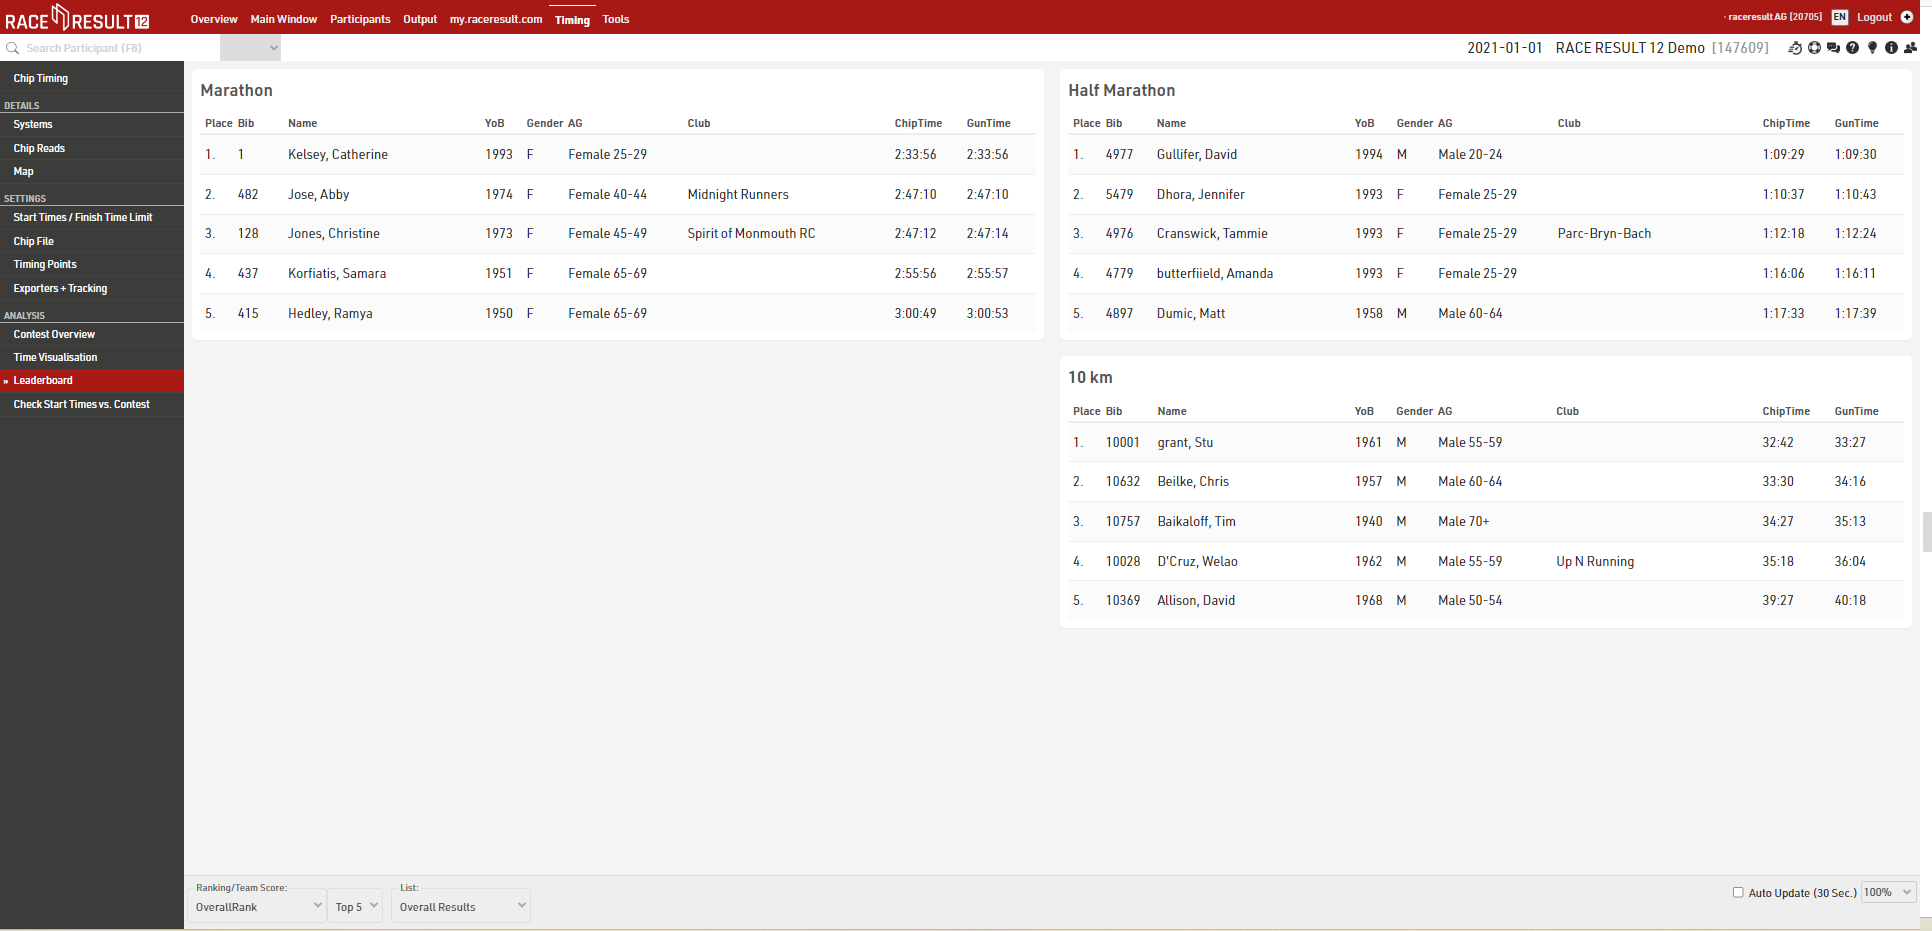
If you would like to show different columns (or use a different format), you can also select a List from which the column settings will be taken.
Enable the Auto Update checkbox to auto refresh the page every 30 seconds.
Check Start Times vs. Contest
Check Start Times vs. Contest is a helpful tool to find particiants who started in a contest other than the one they registered for. In particular when using Raw Data Mode, these may have no times in their results at all because all raw data detections are filtered due to the wrong contest. In consequence it would be difficult without this tool to find these participants.
Preconditions
Please consider the following preconditions for the tool to work:
- Only works with advanced Results at this time
- The timing system is running on time of day
- Start times will be kept
- The result that holds the start time is selected as Start Result in the Contest Settings.

What you see
- Underneath the headline with the name of the contest, those participants are listed that are registered for that contest, but started probably in another contest.
- The area with gray background color shows the time span the majority of participants needed to complete the proposed contest.
- The red bar, on the contrary, shows the time span of the contest the participant is actually registered for.
- The vertical lines show the participants' chip reads. The legend at the bottom of the screen shows which color belongs to which timing point.
- If there are many reads of the same chip with only small gaps in between, the reads may appear like a bar.
Making changes
You can either change the contest of the participant or change the status (for example to DSQ). When clicking on the bib number, the Participants Window shows on the right side of the screen and you can check the Raw Data in detail before making any changes.
Exporters / Forwarding
The exporter feature built in to the Timing tab of RACE RESULT 12 can be used to trigger the sending of data to external sources, this can be used to either send E-mail / SMS templates or export timing data to other systems such as third party timing software, tracking partners, LED clocks and more.
Exporters include some built-in functionality for specific partners but it is designed to be fully flexible to support a wide range of uses.
The exporter runs on both online and offline versions of RACE RESULT 12.
Tools and Programs
Presenter
Presenter is used to create displays for primarily on-site results presentation, announcers or for other staff / volunteers to easily access data.
Within an event file multiple templates for presenter displays can be created, each of which can be accessed by a unique URL, this allows different templates to be defined for different purposes. The URLs can be accessed without logging in to RACE RESULT 12 meaning they can easily be shared without giving full access to the event file. By default, you will find three presenters in your event file: Chip Check, Present Results, and Show Last Chip Reads.
Displays may contain multiple screens which can be switched manually, using a touch screen or using the FN-Keys 1-4.
Checkin Kiosks
The Kiosks provide a flexible tool for looking up and editing participant data during an event for example at registration, or giving access to individuals to easily lookup and edit fields without providing full access to RACE RESULT 12.
Within an event file multiple templates for kiosks can be created, each of which can be accessed by a unique URL, this allows different templates to be defined for different purposes.
The given name to each kiosk will be shown in participants' history, when changes are made: in this way, you can always retrieve from which kiosk (and user) a change has been made.
Manual Timing
The Manual Timing tool can be used to record times manually for each participant, whether as a primary split or finish time or as a manual backup. It can also be used to connect to serial devices which transmit data.
Result Kiosk
Athletes can use the Result Kiosk tool to check and/or print their result/race certificate on race day, most commonly it is used with a thermal receipt printer so participants can get a quick print out of their Results / Ranks to take home. It can be found in the Tools menu.
Settings
Make sure to define the following important settings:
- Decide if the user can view and/or print his race certificate. If you would like to support printing, RACE RESULT Web Server needs to be running.
- Select one or more Certificate Sets that can be shown/printed for each contest.
- Opitionally, you can add customs texts, automatically set an Additional Field and forbid multiple print outs for the same participant.
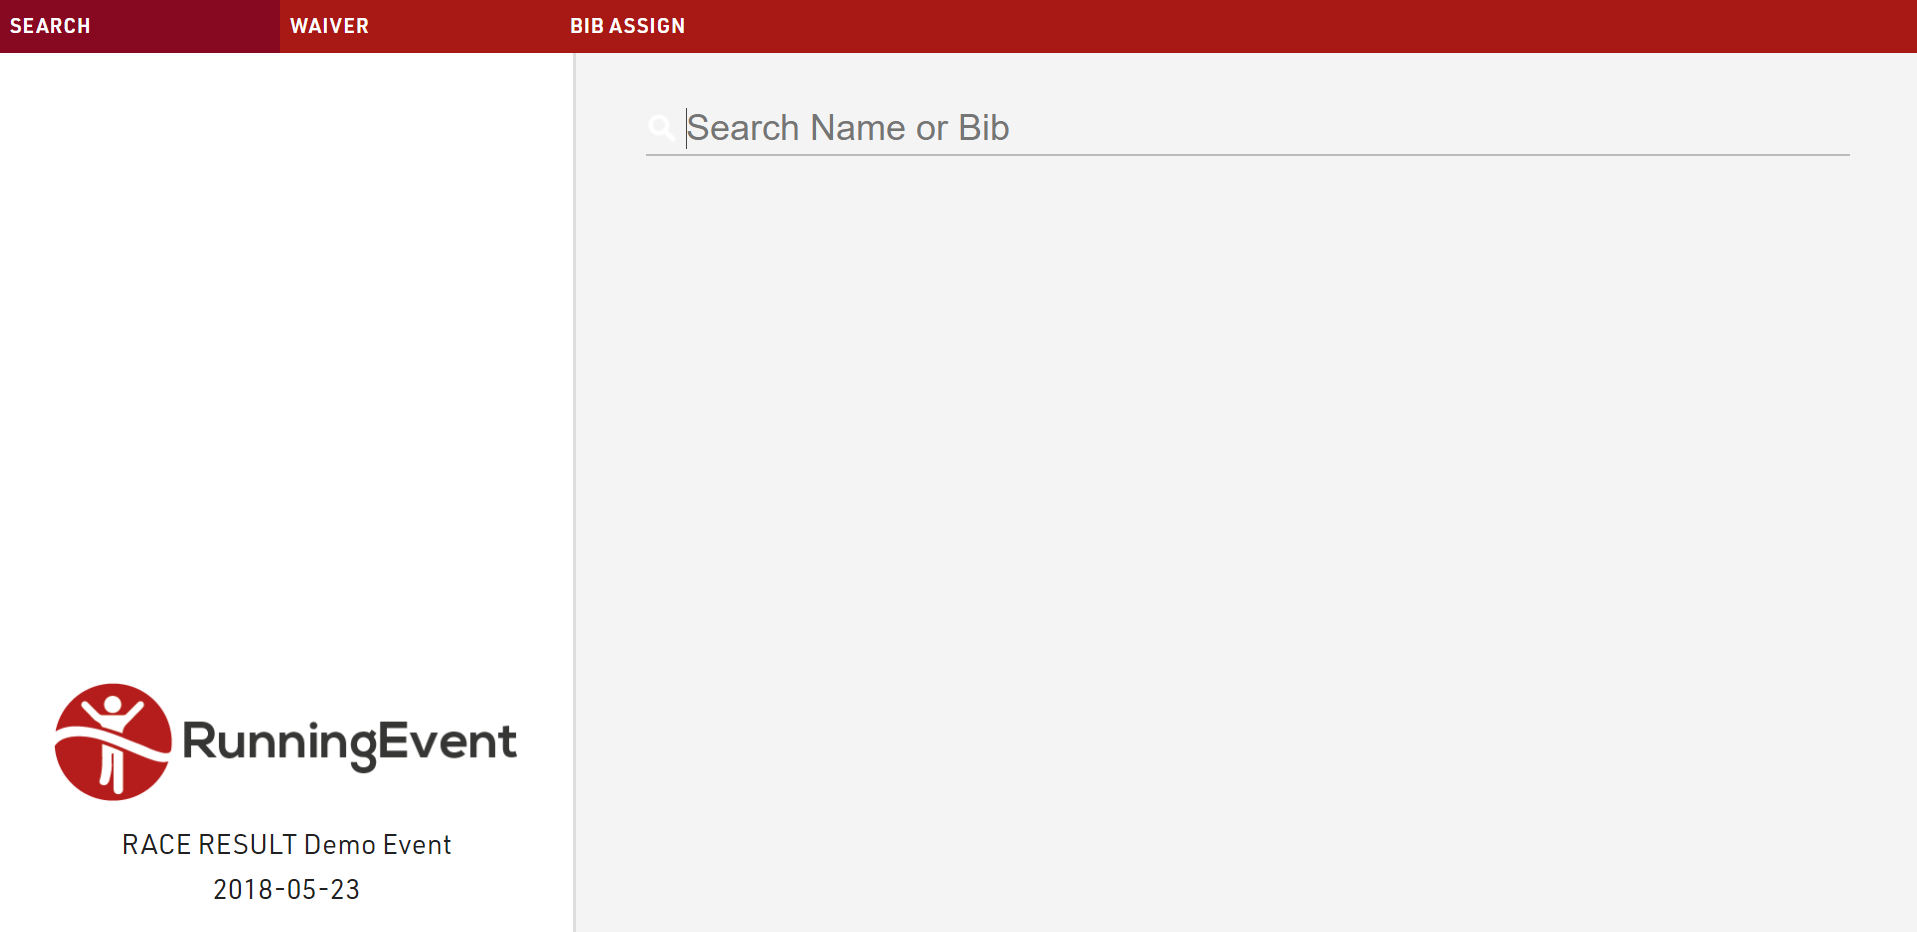
Input
The input field can search from either Bib or Name fields or lookup by Transponder Code when using alpha-numeric chip codes (note that standard passive transponders mapped in a chip file cannot be used at this time).
You can use the RACE RESULT Decoder. Tag Reader or USB Timing Box to scan transponders directly in to the search bar. To connect to a device click the connection icon in the top right of the search input, this will list available devices below and allow you to connect directly to the device for input of Transponder code. The RACE RESULT Web Server must be running for this.

Windows-Based Tools
Note that all of the functionality from the windows-based tools has been replaced by an alternative in the browser, and so there should only be rare cases where these are required.
Most of RACE RESULT 12 is run directly from the browser page, however the standard installation also includes some tools as separate windows-based programs which run independently from the main web server.
Each of these can connect to either a local file, a web server on the local network or the online web server.
To connect to the event file you are working on open the relevant program, and open the File menu, select either 'Open Event' to open an SES file or Connect to Sports Events Server.
To connect to a web server on the local network enter the IP address of the web server or enter events.raceresult.com to connect to an online file and click connect, you will then need to enter your customer ID and password if connecting to the online server.
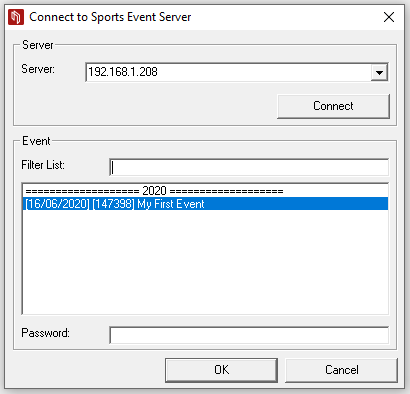
The open files in the web server or your available online files will be listed below and can then be opened by the program.