Manuálne meranie časov
Pri malých a stredných podujatiach je manuálne meranie časov cenovo výhodnou alternatívou oproti meraniu časov čipmi. Nepotrebujete stopky, race|result 11 prináša všetky nástroje potrebné na toto manuálne meranie.
Nižšie sú vysvetlené dve menšie metódy pre malé a stredné podujatie.
Malé podujatie
Ak sa podujatie môže považovať za malé v súvislosti s manuálnym meraním časov, záleží viac na počte účastníkov, ktorí skončia za minútu, než na ich celkovom počte. Detský beh na 250 metrov s 20 deťmi môže byť náročnejší než polmaratón s 200 účastníkmi.
Metóda popísaná v tejto časti funguje dobre pri podujatiach s maximálnym počtom 10 finišerov za minútu. Časy a čísla bibov budú zachytené spolu na cieľovej čiare pomocou jedného počítača.

Stredne veľké podujatie
Aj podujatia strednej veľkosti môžu byť merané ručne. V priemere nesmie byť viac ako 30 finišerov za minútu a najviac 15 za minútu.
Keď sa veľa účastníkov dostane do cieľa súčasne, nie je možné zachytiť každé bib číslo tak rýchlo. To je dôvod, prečo sa čas a číslo bib zachytávajú na dve úlohy. Na cieľovej čiare sa zberajú časy a účastníci sa zoradia do zúženia v rovnakom poradí v ako skončili. Na konci zúženia budú štartové čísla spísané buď rukou, alebo zaznamenané pomocou prenosného počítača zadaním čísel alebo skenovaním čiarového kódu na bočnom paneli.
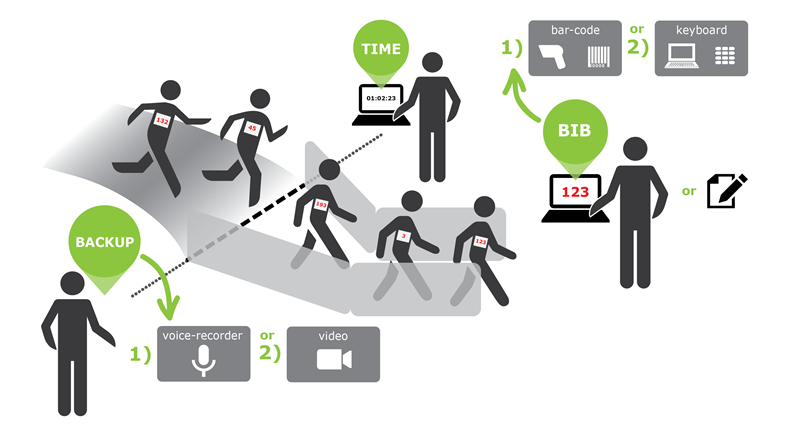
V prípade akýchkoľvek pochybností o výsledkoch je užitočné mať zálohu. Ak chcete nahrávať cieľovú čiaru alebo mať hlasový záznam, môžete nahrávať hlas pri nahlasovaní čísiel bib.
Časovo prekrývajúce sa súťaže s rôznymi časmi začiatku
"Prekrývajúce sa preteky" znamená, že jedny preteky sa začínajú predtým, ako skončia všetci športovci iných pretekov. V takom prípade by ste mali pracovať s časom dňa, tzn. zaznamenávať čas, keď športovec skončí a neskôr odčíta čas začiatku príslušnej súťaže. Preto postupujte nasledovne.
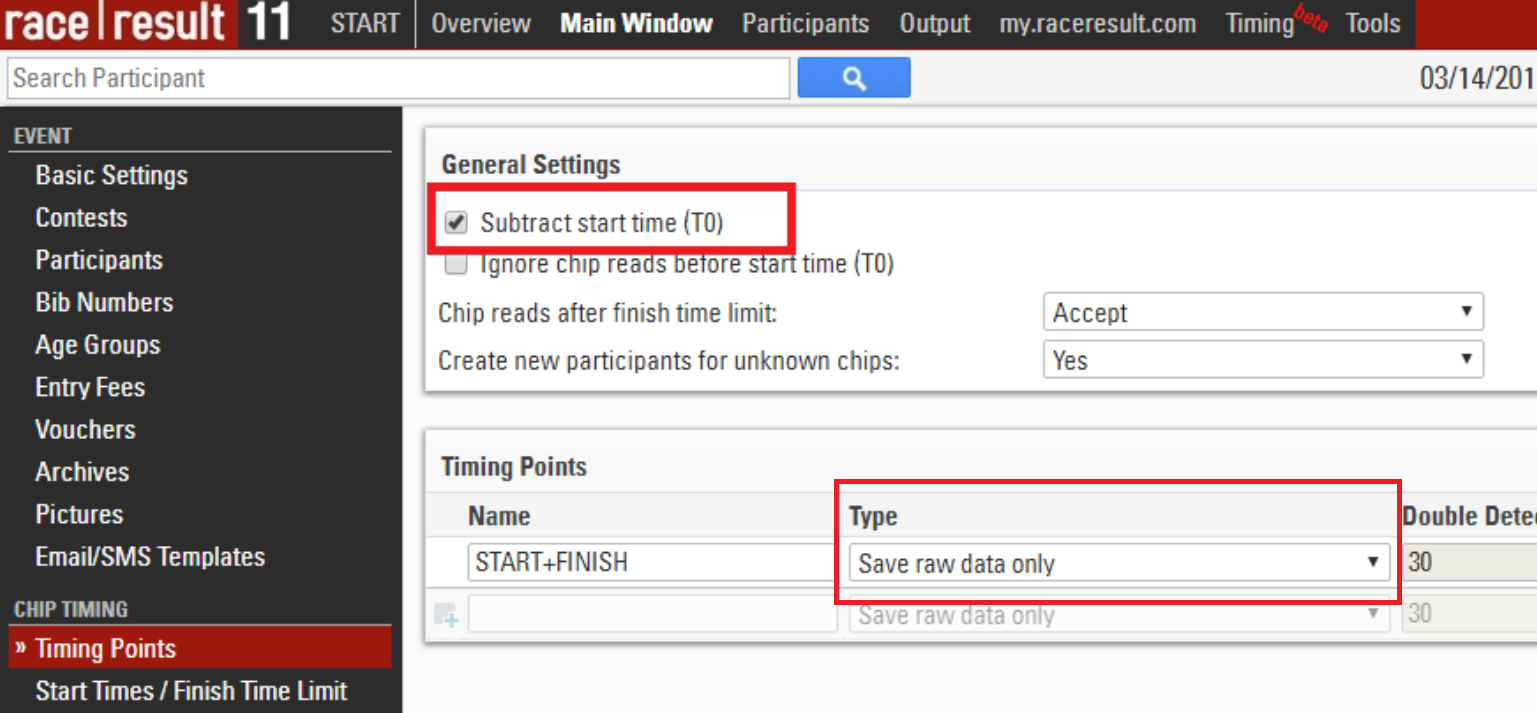
Najskôr sa na stránke „Časové body“ uistite, že je aktivovaná možnosť Odpočítať čas spustenia (T0) a že časový bod je nastavený na „Uložiť len nespracované údaje“.
Potom, keď začne každý pretek, napíšte presný čas začatia a zadajte ho do hlavného okna -> štartovacia doba / časový limit dokončenia. Upozorňujeme, že ich môžete kedykoľvek zadať a opraviť.

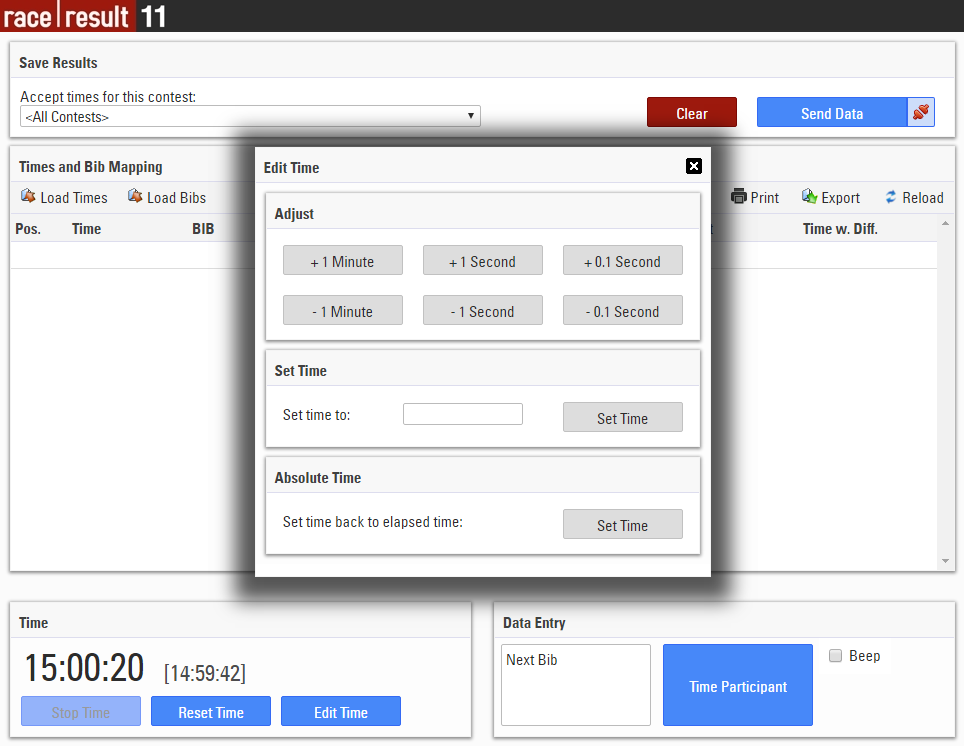
Na cieľovej čiare spustite čas kliknutím na tlačidlo Štart merania a potom kliknutím na tlačidlo Upraviť čas nastavíte čas na čas dňa. Môžete buď zadať denný čas manuálne do poľa Nastaviť čas, alebo môžete jednoducho nastaviť čas na čas počítača. Potom zatvorte okno Upraviť čas.
Keď účastníci prekročia cieľovú líniu, zaznamenávajú svoje časy a čísla bibov ako obvykle. Zaznamenaný čas je čas, v ktorom účastník prekročil líniu.
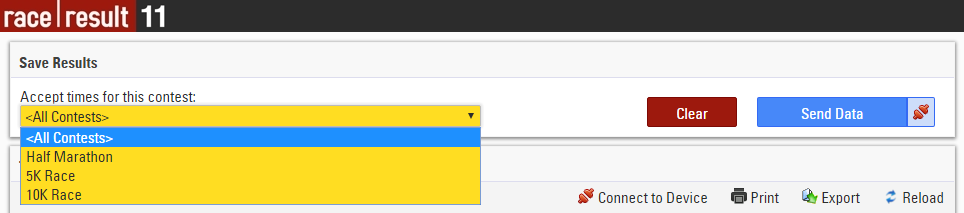
Nezabudnite tiež vybrať položku <Všetky preteky> v nástroji Manuálne meranie časov v hornej časti obrazovky ("Prijať časy pre tento pretek"), aby sa prijali časy pre všetky preteky.
Keď použijete alebo importujete časy, môžete vidieť čas preteku v stĺpci "Čas s rozdielom". Denný čas bude uložený na karte Meranie neupravených dát každého účastníka, softvér potom odpočíta čas začiatku a zobrazí čas preteku na karte Výsledky.
Ak ste si pred nastavením času spustenia vybrali čas, musíte kliknúť na tlačidlo Znovu načítať v nástroji Manuálne meranie a zobraziť časy na základe nového času začiatku.
Správa medzičasových časových bodov
Pokiaľ je to žiaduce, môžete tiež použiť rozdelenie času pomocou manuálneho merania času. Počet účastníkov za minútu by mal byť nízky, aby ste mohli nahrávať čas a čísla bib spolu.
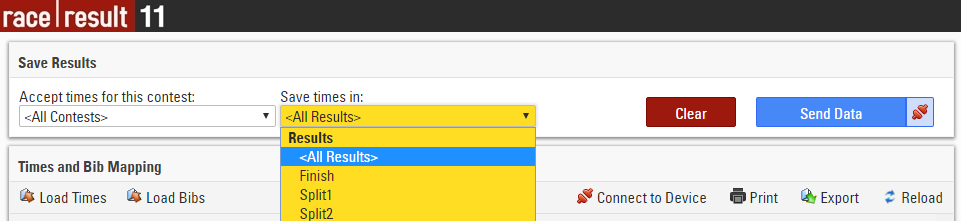
Za týmto účelom nastavte počítač na rozdelenom časovom bode a spustite nástroj manuálneho merania času. Ak ste v hlavnom okne nastavili niekoľko výsledkov / časových bodov, v hornej časti sa zobrazí rozbaľovací zoznam, v ktorom môžete vybrať, v ktorom výsledku sa zapíšu časy:
race|result Systém
Táto príručka slúži ako krátky úvod k používaniu systému race|result. Je určený pre používateľov, ktorí majú skúsenosti s prácou so systémami transpondérov a jednotlivcami, ktorí predtým nikdy nepoužívali elektronické uchovávanie údajov.

Úvod
Ďakujeme, že používate race|result systém na meranie vašich pretekov.Predpokladáme, že už nejaký čas s týmto systémom merania pretekov pracujete a že už máte vaše podujatie nastavené. Je pár dní pred pretekom a vy ste si prenajali tento systém, aby ste si to vyskúšali a oboznámili sa s ním.
Nasledujúce kapitoly opíšu ako nastaviť systém a ako sa k nemu pripojiť. Predpokladá sa, že váš pretek je štandardný so štartom a koncom a možno aj s viacerými kolami. Ak je však vaše podujatie veľmi špeciálne, musíte sa ním zaoberať hlbšie a to tu... závod | výsledok 11 podrobností.
Pre úspešné podujatie je veľmi dôležité, aby ste si túto príručku poriadne preštudovali a dodržali všetky pokyny. Softvér je dostatočne flexibilný nato, aby mohol merať akékoľvek podujatie na svete (aj tie, ktoré ešte neboli vynájdené), ale to znamená, že existuje veľa nastavení.
Dôležité: Nedotýkajte sa ničoho, čomu nerozumiete. Nemyslite si, že vaše podujatie je mimoriadne zložité. 95% všetkých podujatí môže byť merané štandardnou konfiguráciou alebo iba s niekoľkými vylepšeniami.
Splits - The Newest Way to Time
Splits are the newest way to time races in RACE RESULT 12, they simplify the setup of the timing and scoring requirements making it easier than ever to time a race. All splits in RACE RESULT 12 are calculated dynamically, so if any data changes such as your Start Time or Contest the participant is taking part in then the times and ranks are all automatically recalculated.
RACE RESULT 12 has some simple templates built in, from which you can time a simple race or use as a base to build your setup. When timing with Splits there are 3 parts to the setup which should be considered.
Timing Points
If you have a single shared Start / Finish line then this can be setup as a single timing point. The Timing Point Type must be set to Save Raw Data Only.
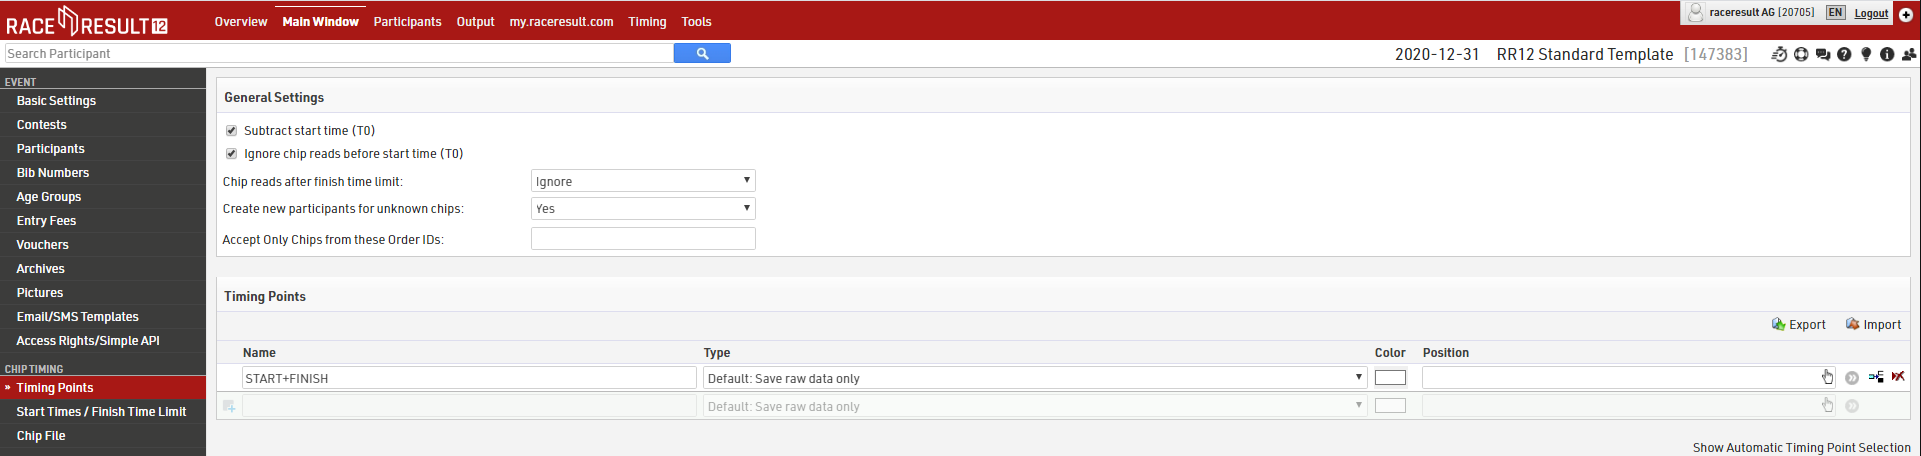
The settings above are only applicable if using Special Results setup.
Splits
Splits setup only requires one Split for each time the participant will be recorded (Start and Finish). Time Mode should be set according to whether the race is ranked based on Gun Time or Chip Time
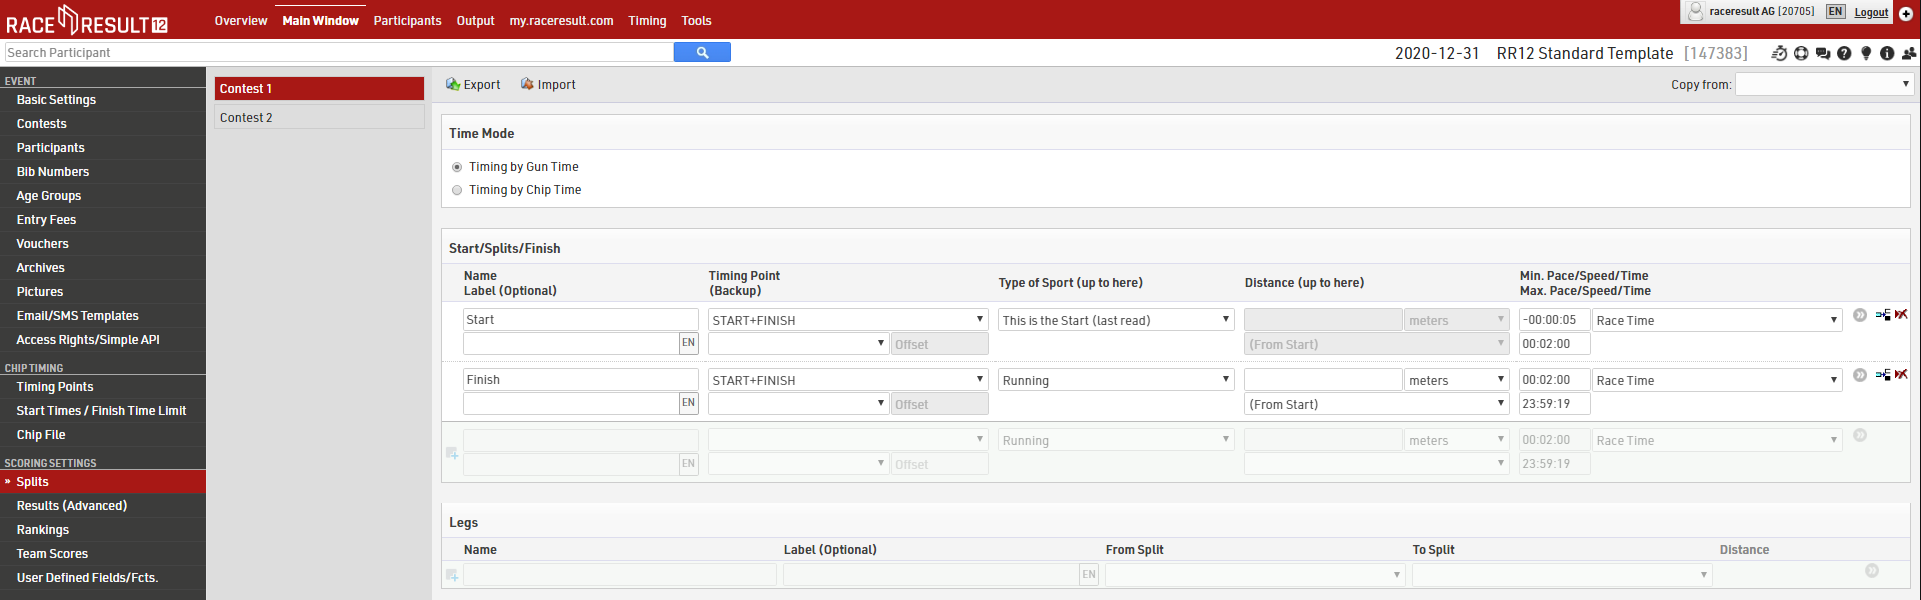
Make sure to set the Max. Time for Start and Min. Time for Finish, this will depend on how many athletes you have and the length of your race.
If your setup is more complex then you may wish to look at a more advanced template or read more about how to Splits or Results in Raw Data Mode.
Contest Settings
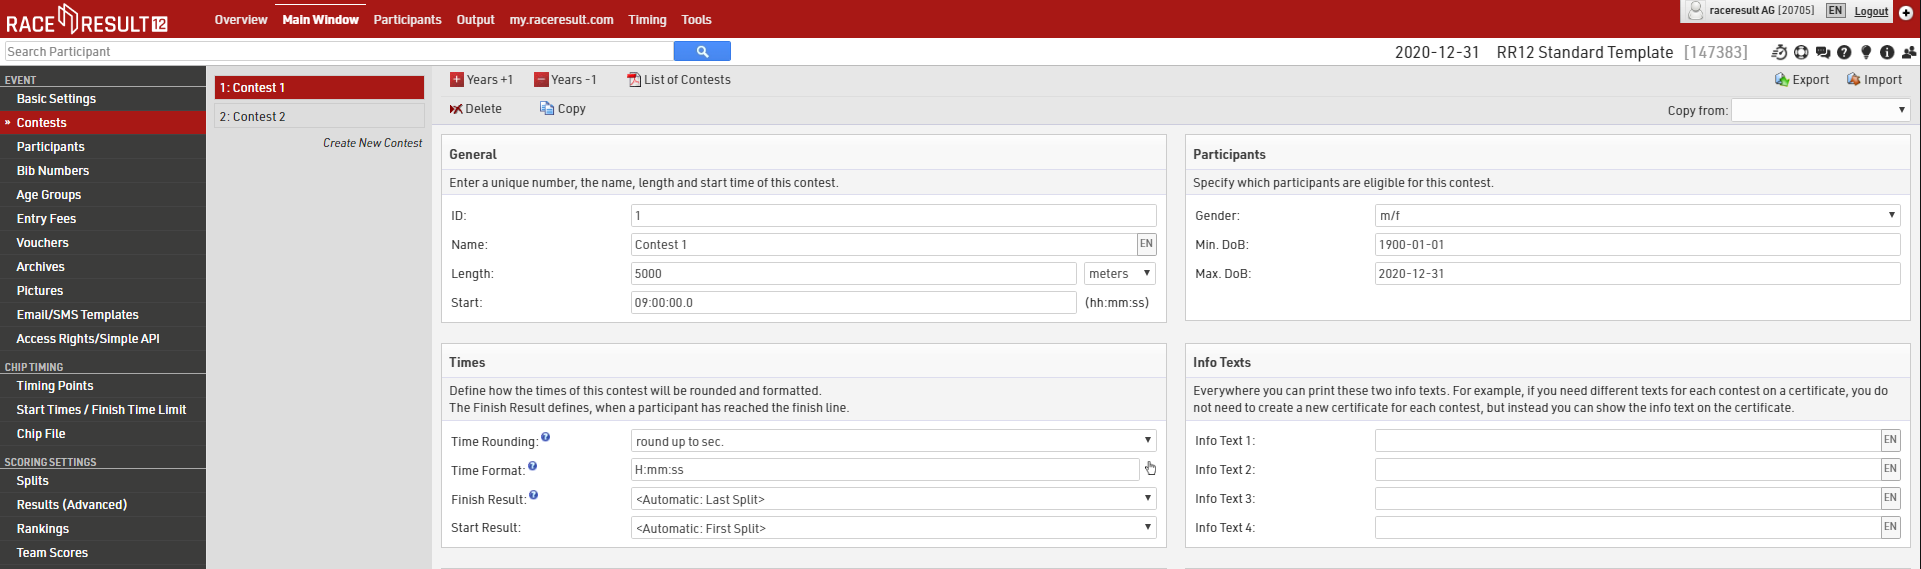
Each Contest should be setup accordingly. The Finish Result defines what time should be used for the 'official' time which is then used in results lists etc. This should be set to automatically use the Last Split.
Setting up the Antenna
The Decoder can be used either with a Passive Antenna or an Active Extension. Please find some setup notes below.
Connecting the Decoder
Place the decoder next to the antenna/Active Extension and connect all 8 coaxial cables to the 8 connecting ports on the back of the decoder/connect the Active Extension to the Feature Port of the decoder. With the passive system, every cable can be connected to any plug; you do not have to follow a certain order. Avoid putting other cables (e.g. electricity) over or under the coaxial cables.
Besides the connections for the antenna, the decoder has the following ports:
|
Power: |
The rechargeable internal battery of the decoder lasts for max. 6-8 hours and serves primarily as a backup function in case of power outages. The decoder should always be connected over a cable supporting 110-240V / 50/60Hz. As an alternative, you can also use the included cable to connect the decoder to an external battery or a cigarette lighter of a car. |
|
Data: |
The detections can be read through an Ethernet connection. |
|
Audio: |
The decoder contains an internal beeper, which will give an acoustic signal for every detection. Alternatively, you can connect an external speaker or headphones. The internal beeper will then be deactivated. |
|
|
When operating the system during hot temperatures (>25°C / 80°F) and located in direct sun light, the lid should be opened. Otherwise, the system may perform a temperature triggered emergency shutdown. |
|
|
During rain, the lid of the decoder has to be closed and locked. Therefore, all cables have to be led through the gap between box and lid on the side. |

Starting the System
After connecting the antennas, the decoder can be powered on by briefly pressing the ON-button. The booting process will begin. In order to turn off the decoder, push and hold the OFF-button for approximately 8 seconds.
After booting, the decoder will be in Test Mode. As long as transponders are within range of the antenna, you should hear a constant beeping. This allows you to check if the antenna is connected properly and if it detects everywhere. The detections in Test Mode will not be saved and cannot be read out.
Next, you should set your decoder's internal clock to the current time of day. This can be done by opening the "Menu > Time" Settings. By selecting Start GPS Time your decoder will now search for available Satellites and set an accurate time of day. If this fails (normally only if you are indoors) the decoder may offer an estimated time, which you can accept by pressing OK, or you can also set a time of day manually by choosing Set Running Time. You should also check the GPS time zone of your decoder which is found through the same menu.
Once you have tested your system and you are confident that it is reading transponders well across the whole antenna field then you should press START to set the decoder to Timing Mode, which will start recording passing data. We recommend switching to Timing Mode as soon as your system is setup, then you are done with the hardware side of things and can focus on the timing and scoring.
Passive System only: You will notice that the transponders can be detected at a large distance from the antenna. Similarly, the decoder may beep during the race before the athlete has passed the antenna. However, this does not imply imprecise time keeping: after the first detection of the chip (beep) it will be read many times and in the end the time with the highest signal strength (right above the antenna) will be saved.
Connecting to the System
Starting and Stopping the Race
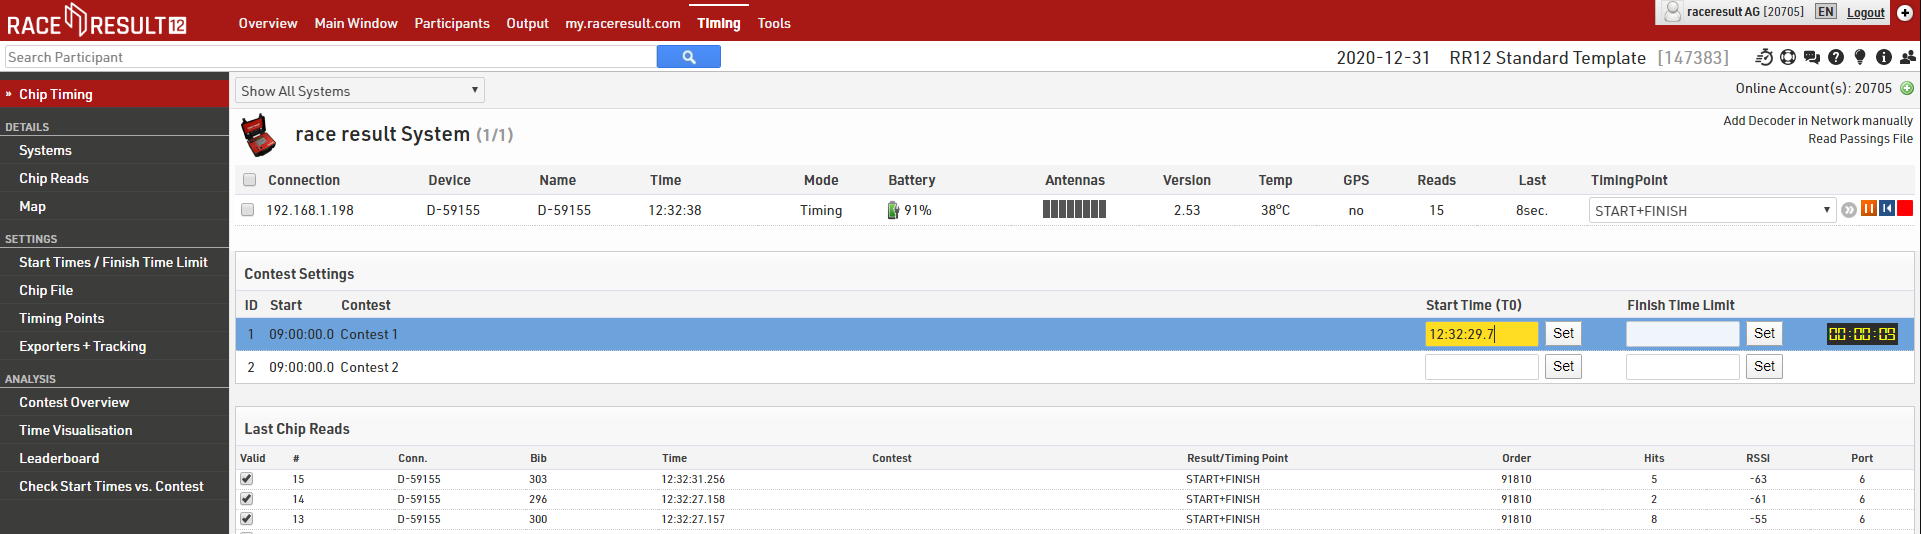
The Chip Timing view can be used for most types of races. You can also access an expanded version of each component of the Chip Timing tab in the details, which may be more practical if you have several systems connected, or a lot of contests for example.
Using Chip Timing you simply need to click Set, next to the Start Time of the contest which is to be started, when the race is started. This will have the following effects:
- The Start Time (T0) for that contest will be set based on the decoder's internal time which is set to Time Of Day.
- Results will start calculating for athletes in the started contest according to your Results setup.
- A running clock will show next to the Finish Time Limit which is the elapsed time since T0.
- Any times for athletes in other contests will still be recorded but because these are before the start time no results are affected.
If multiple contests start together you can press start for one of them and then type in the same time to the Start Time of the other(s). Because data is all handled dynamically these will re-calculate whenever the Start Time is updated.
Once you are not expecting any more participants for a contest, you can set the finish time limit. The raw data for anyone finishing after that will still be saved, but detections will not count as finish times. You can correct that finish time limit at any time if you do want to accept more finishers after all.
If it takes longer for everybody to start than you anticipated you can also update the Minimum Lap Time in here. Remember that if you're working with the same Start/Finish line this should always be before the fastest finish time. Otherwise the system will think this could still be a Start time.
Frequently Asked Questions
I forgot to set the Start Time and don't know what it was.
Check the list of chip reads (Timing Module -> Chip Reads) and look for the time when suddenly many detections come in. Set the start time to the nearest second before. When using Raw Data Mode, results will be recalculated automatically.
The decoder did not have a power supply and turned off after a while during the race.
Connect the decoder to a power supply, start the decoder, and set the time using the same method. Then, start the Timing Mode on the decoder by pressing the START button.
The start time has been saved as a finish time / The finish time has been saved as the start time.
This usually happens when your Minimum Lap Time is either too long or too short. Check your Minimum Lap Time settings.
I would like to start the next contest although the last athlete of the previous contest has not finished yet.
By using Raw Data Mode this is no longer an issue as your Start / Finish is the same timing point.
Unwanted Detections
By working with Raw Data you do not need to worry about too many detections. Provided that your setup follows the guidelines given, unnecessary times will be automatically ignored by the system.
If you really need to ignore a detection manually, untick the checkbox "Valid" in either Timing Module -> Chip Reads or Participants Window -> Timing Raw Data.
Lost connection
Maybe the connection between the laptop and the decoder is lost once in a while. The reasons are numerous, e.g. when cables have accidentally been pulled out or due to power shortages. In those cases, you will need to re-connect once the problem has been solved. All detections that have been recorded will then be read from the decoder, or you can press the blue replay button in the timing tab to replay all data from the decoder.
Complete crashes and “total chaos“
No matter what happens, you can always login to the decoder directly by entering the IP address in your web browser, e.g. http://192.168.1.210. Thus, you are still able to download the files with all detections, edit if necessary, and read all detections into the Timing Module by clicking "Read Passings File".
You can also plug in a USB stick. The decoder will then copy all detection files to the stick.
Meranie časov USB zariadením
race|result meracie zariadenie USB je aktívny systém na meranie malých podujatí. Táto príručka vysvetľuje, ako začať používať meracie zariadenie USB a nástroje poskytnuté systémom race|result 11.
Nasledujúce kapitoly vám pomôžu pri nastavovaní vášho meracieho systému, jeho pripojení k softvéru race|result 11 a spustení merania.
Ak chcete vykonať všetky potrebné kroky v tejto príručke, uistite sa, že spĺňate nasledujúce požiadavky:
- Musíte mať základné znalosti a nainštalovanú verziu softvéru race|result 11.
- Musíte mať v softvéri nastavené podujatie
- Musíte mať USB meracie zariadenie a slučkový kábel.
V prípade, že ste nikdy nepracovali s race|result vybavením hardvéru alebo softvéru, najprv skontrolujte [[326 | race|result 11 Úvod]].
Nastavenie slučkového kábla
Ak chcete začať s nastavovaním meracieho systému, musíte rozložiť kábel slučky.
- Vytvorte slučkový kábel na zemi a vytvorte obdĺžnik so šírkou 30 - 60 cm. Aby ste zaistili presnosť, uistite sa, že hrany, ktoré sú kolmé na smer časovania, by mali byť čo najviac rovnobežné.
Ako hrubý sprievodca: ak potrebujete veľmi vysokú presnosť (napr. Pri cyklistickom podujatí), musíte vytvoriť užší kábel slučky. Ak potrebujete menšiu presnosť, ale vysokú čitateľnú výšku, musíte rozložiť kábel slučky širší. - Upevnite kábel slučky na zem, a to buď pomocou lepiacej pásky alebo rohože..

|
|
Neprevádzajte iné elektrické zdroje cez slučkové káble. |
 |
Meranie časov s týmto USB zariadením môže byť veľmi presné. Aby ste dosiahli čo najlepšie výsledky, musíte tiež pracovať presne a starostlivo dodržiavať všetky pokyny. Napríklad, fixovanie slučkového kábla o niekoľko centimetrov nakrivo bude mať negatívny vplyv na presnosť. |
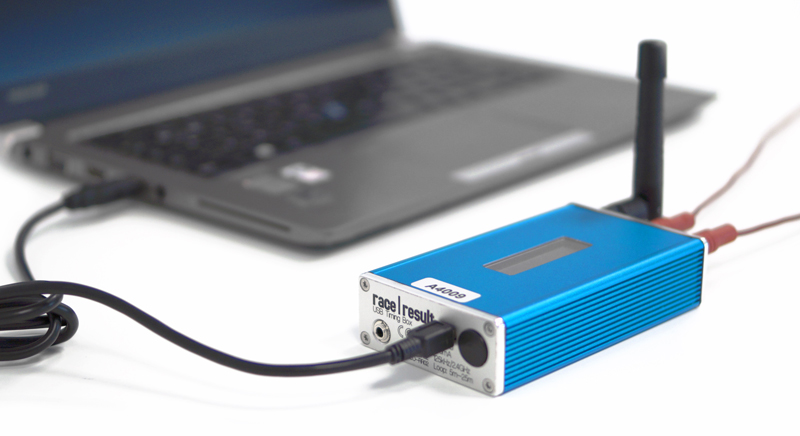
Pripojenie slučky a 2,4GHz antény
Ak chcete dokončiť nastavenie hardvéru, vykonajte prosím nasledujúce kroky:
- Umiestnite USB meracie zariadenie vedľa konektorov slučkového kábla.
- Zapojte kábel slučky do červených kruhových portov na USB meracom zariadení. Každý koniec kábla môže byť umiestnený do jedného portu. Sieťový kábel slúži na aktiváciu transpondéra.
- Zaskrutkujte čiernu anténu do USB meracieho poľa. Anténa sa používa na príjem signálu z transpondéra.
- Pripojte priložený kábel USB do USB zariadenia a pripojte ho k počítaču.
Časovacie pole USB sa automaticky zapne.
Používanie iných káblov USB so zväčšenou dĺžkou alebo nižšou kvalitou môže spôsobiť chyby.
Vysielače potrebujú priamu líniu do 2,4 GHz antény na vysielanie detekcií. Presvedčte sa, či medzi cieľovou čiarou a USB meračom nie je žiadna prekážka, alebo použite rozšírenie rozsahu.
Pripojenie k vášmu notebooku
Konfigurácia USB časovacieho zariadenia
Splits - The Newest Way to Time
Splits are the newest way to time races in RACE RESULT 12, they simplify the setup of the timing and scoring requirements making it easier than ever to time a race. All splits in RACE RESULT 12 are calculated dynamically, so if any data changes such as your Start Time or Contest the participant is taking part in then the times and ranks are all automatically recalculated.
RACE RESULT 12 has some simple templates built in, from which you can time a simple race or use as a base to build your setup. When timing with Splits there are 3 parts to the setup which should be considered.
Timing Points
If you have a single shared Start / Finish line then this can be setup as a single timing point. The Timing Point Type must be set to Save Raw Data Only.
The settings above are only applicable if using the advanced Results setup.
Splits
Splits setup only requires one Split for each time the participant will be recorded (Start and Finish). Time Mode should be set according to whether the race is ranked based on Gun Time or Chip Time
Make sure to set the Max. Time for Start and Min. Time for Finish, this will depend on how many athletes you have and the length of your race.
If your setup is more complex then you may wish to look at a more advanced template or read more about how to setup Splits or Results in Raw Data Mode.
Contest Settings
Each Contest should be setup accordingly. The Finish Result defines what time should be used for the 'official' time which is then used in results lists etc. This should be set to automatically use the Last Split.
Meranie časov s race|result 11
Často kladené otázky
USB Timing Box bol počas pretekov odpojený. Statil som všetky svoje údaje a detekcie?
Nie. Pripoje USB Timing Box znova k počítaču karta sa automaticky znovu pripojí a načíta všetky údaje zaznamenané pri odpojení časomerného zariadenia USB.
Účastníci prebiehajú cez detekčnú líniu a mne chýbajú údaje.
Pri aktívnom systéme by ste mali mať vždy 100% detekciu. Ak Vám chýbajú určité dtekcie, niečo je určite zlé.
Najskôr skontrolujte výkon slučky a podľa potreby ju zvýšte. Ak bol výkon slučky príliš nízky a čipy neboli aktivované, nanešťastie nebudete môcť získať detekcie.
Potom skontrolujte, či je čierna anténa bezpečne pripevnená k USB Timing Boxu a či je situovaná priamo na transpondéry. Ak nie, priskrutkujte ju a odstráňte všetky prekážky. Ak boli transpondéry aktivované, ale nemohli vysielať údaje z dôvodu nesprávneho umiestnenia antény, pravdepodobne sa detekcie uložili. Na okruhu jednoducho čakajte na ďalšie kolo a mali by ste dostať všetky chýbajúce údaje späť. V opačnom prípade znova spustite čipy cez štartovaciu líniu.
USB Timing Box zobrazuje LOOP ERROR na časomernej karte alebo na displeji.
Skontrolujte, či je slučka správne pripojená k USB Timing Boxu a či nebola poškodená. Ak detekcie napriek tomu prichádzajú, môžete varovania ignorovať. Správa sa môže zobrazovať ak používate slučky kratšie ako je odporúčané minimum - 2m.
Prichádzajúce čipy sú čítané ako NEZNÁME alebo vytvárajú účastníkov s náhodným číslom napríklad 50001.
To znamená, že detekované čipy nie sú priradené k žiadnemu z existujúcich účastníkov.Ak Vám takto ukazuje všetky čipy, pravdepodobne ste zabudli načítať čipový súbor. Vložte ho časomernú kartu a ďalši čítania by mali prísť so správnym údajmi. Ak máte tento problém ina pri niektorých čipoch, pravdepodobne ste urobili chybu v čipovom súbore, ktorý môžete opraviť manuálne.
Po odstránení chyby v čipovom súbore kliknite na tlačidlo Stop na Vašom pripojení a vymažte neznámych účastníkov. Potom znova stlačte tlačídlo "play". To by malo prepísať všetky predchádzajúce detekcie a tentoraz ich priradiť správnemu účastníkovi.
Zabudol som nastaviť čas začkatu a už neviem koľko to bolo.
Keď prvá osoba prekročí cieľovú čiaru alebo ak viete, kto to bol, prejdite na záznam tohto športovca v okne účastníkov, potom vyhľadajte nespracované údaje, pozrite sa, kedy ste ich naposledy videli v približnom čase začiatku a potom nastavte čas začatia na najbližiu sekundu skôr. Vo väčšine pretekov bude víťaz v prvom rade na začiatku.
Časy sa neuložili v správnom kole
Zvyčajne sa to stane, keď je Váš minimálny čas na jedno kolo príliš dlhý alebo príliš krátky. Skontrolujte nastavenie minimálneho času na kolo.
Nežiadúce detekcie
Pri práci s nespracovanými údajmi sa nemusíte obávať príliš veľkého množstva detekcií, ak ste pri Vašich nastavenia dodržiavali dané pokyny, systém automaticky ingnoruje nepotrebné časy.
Ak potrebujete zneplatniť čipy, môžete to urobiť v sekcii Timing tab, alebo na karteTiming Raw Data - nespracovaných údajov účastníka v okne Účastníci.
Načo sa používa režim kiosku?
Tento režim sa používa iba na riadenie transpondérov pred alebo po pretekoch a nie na meranie časov.
V okne čipového merania časov sa nemôžem pripojiť k USB Timing Boxu. Aký je problém?
Uistite sa, že ste zavreli "TagReaderKeyboard" a "TagTool". Meranie časov sa nemôže pripojiť k USB Timing Boxu súčasne s ďalším softvérom.
Aká veľkosť slučky a výkon slučky je najlepšou voľbou pre cyklistické podujatie?
Odporúčame širku 30-40cm (1.0 - 1.3 ft.) a výkon slučky 30%. Ale neberte to ako nominálnu hodnotu a skontrolujte svoju čítanú výšku!
Aká veľkosť slučky a výkon slučky je najlepšou voľbou jazdecké preteky? (kone)
Odporúčame používať maximálnu veľkosť 60cm (2 ft.) a maximálny výkon 100%.