Ein Netzwerk ist eine Verbindung von mehreren Geräten, die miteinander verbunden sind und miteinander kommunizieren können. In der Regel besteht die Verbindung über eine Ethernet- oder WLAN-Verbindung. Beide Verbindungsmöglichkeiten sind entweder als Teil eines Local Area Network (LAN) über einen Switch oder Router möglich, oder über eine direkte Verbindung zwischen zwei Geräten.
Netzwerk-Grundlagen
Die Netzwerk-Verbindung ist der empfohlene Verbindungstyp, um Daten während des Rennens live vom System auszulesen. Das System kann direkt mit dem Rechner über ein Standard Patch- oder Cross-Over-Kabel verbunden werden, oder in ein lokales Netzwerk mittels Switch oder Router integriert werden.
Das race|result System verfügt über zwei LAN-Ports, die beide für die Verbindung mit dem Rechner/Switch verwendet werden können. Der freie Port kann z.B. für die Verbindung zu einem weiteren race|result System verwendet werden. Beide LAN-Ports und das race|result System selbst sind über einen eingebauten Switch miteinander verbunden.
Wenn Sie ein Netzwerk aufsetzen, beachten Sie folgende Grundlagen:
- Jedes Gerät in einem lokalen Netzwerk hat eine eigene Adresse, die sog. "IP-Adresse".
- Jedes Gerät braucht eine eigene, eindeutige Adresse. Verwenden Sie IP-Adressen nicht mehrfach.
- Eine IP-Adresse besteht aus 4 Nummerblöcken (jeweils mit Werten zwischen 0 und 255), die durch einen Punkt getrennt werden, z.B. 192.168.1.100
- In lokalen Netzwerken beginnen IP-Adressen üblicherweise mit 192.168.x.x (dieser Adress-Bereich wird nicht im Internet verwendet).
- Möchten zwei Geräte aus dem gleichen Netzwerk miteinander kommunizieren (z.B. Timing System und Rechner), müssen sie im gleichen Subnet sein, d.h. die ersten 3 Nummernblöcke müssen identisch sein (aber der vierte muss unterschiedlich sein!), z.B.
Timing System: 192.168.1.201
Computer 1: 192.168.1.101
Computer 2: 192.168.1.102
Automatische (DHCP) vs. Feste (statische) IP
IP-Adressen können entweder automatisch vergeben werden oder auf einen festen Wert gesetzt werden. Welche Methode Sie wählen, hängt in erster Linie vom Netzwerkaufbau ab, in das Sie das Gerät einbinden möchten.
Wenn Sie ein Gerät in Ihr lokales Netzwerk zu Hause einbinden, vergibt der Internet-Router normalerweise automatisch IP-Adressen mit Hilfe von DHCP. Sind Sie kein Netzwerktechniker, empfehlen wir diese Methode, da der DHCP-Server sicherstellt, dass IP-Adressen nicht mehrfach vergeben werden. Bei den meisten Netzwerkfähigen Geräten ist die automatische IP-Vergabe per DHCP standardmäßig eingestellt, so auch bei sämtlicher RACE RESULT Hardware.
Wenn Sie das System ohne einen Router (d.h. direkte Verbindung zwischen Rechner und System, oder lokales Netzwerk mit einem Switch) verwenden, müssen Sie sowohl dem Timing System als auch dem Computer statische IP-Adressen vergeben. Bei allen netzwerkfähigen RACE RESULT Systemen finden Sie die Einstellungen hierfür in den Netzwerk-Einstellungen (Network settings).
How to set static IP address in Windows
In order to connect to a network device such as the RACE RESULT Decoder, your computer needs an IP address in order to communicate over the network. If you are using a router, an IP address will automatically be assigned. If you are directly connecting to a decoder, your computer needs a static IP address set. In most cases, the RACE RESULT Web Server will automatically assign a static IP address. In the case that it does not, you can follow these general steps to set one. For more details on networking see Ethernet/Network Connection.
Your steps might vary depending on your operating system but the concept is the same. Below are examples of Windows 10, Windows 11, and an alternate option that should work on all windows versions.
Windows 10
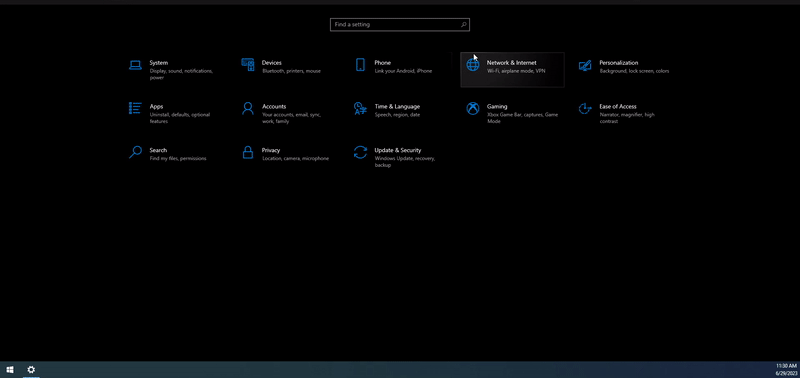
- Navigate to the settings on your computer. This can be found under the Windows start menu by clicking the gear icon labeled settings.
- Select Network & Intenet from the list.
- Select Properties for your Ethernet adapter. If you have multiple Ethernet adapters, make sure you are selecting the correct one! Do NOT select the WiFi adapter.
- Navigate to the section labeled IP settings. You should see IP assignment is set to Automatic(DHCP)
- Select Edit
- Change the drop-down from Automatic to Manual and toggle on IPv4
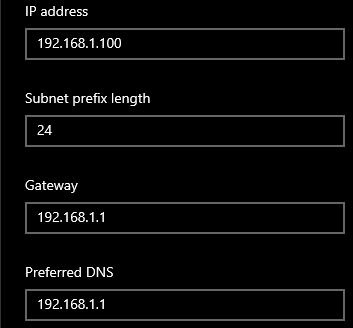
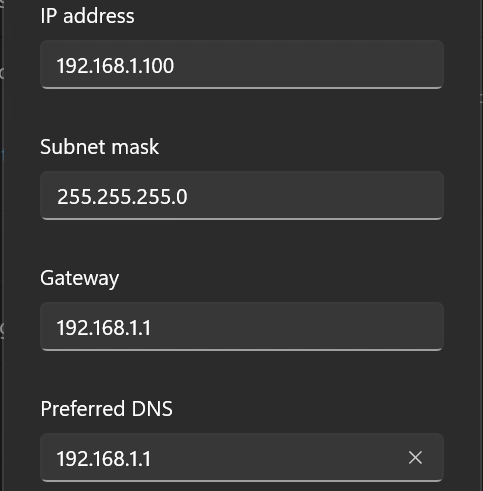
- Enter the below IP address settings
Windows 11
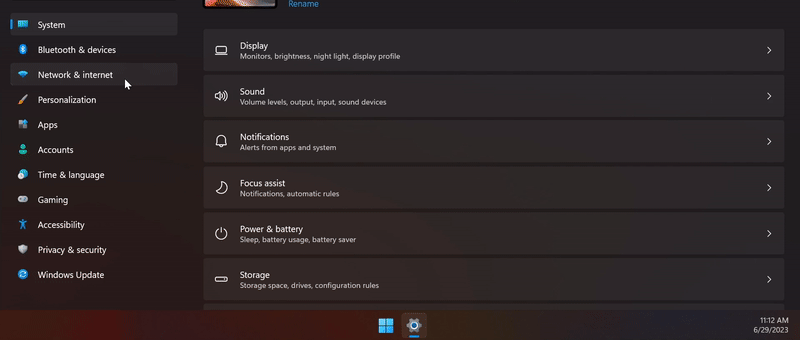
- Navigate to the settings on your computer. This can be found under the Windows start menu by clicking the gear icon labeled settings.
- Select Network & Intenet from the list on the left
- Select Ethernet.
- Next to the section labeled IP assignment, select the EDIT button. If you have multiple Ethernet adapters, make sure you are selecting the correct one!
- Change the drop-down from Automatic(DHCP) to Manual and toggle on IPv4
- Enter the below IP address settings
Alternate Option
If either of the above two options gives you an error you can try setting these settings through the control panel instead of the Windows 10/11 settings menu.
- Open Control Panel
- Select Network and Internet then select Network and Sharing Center
- On the left, select Change Adapter Settings
- Right-click your Ethernet Adapter and select Properties. If using a USB to Ethernet adapter, make sure it is plugged into your computer otherwise you won't see it yet.
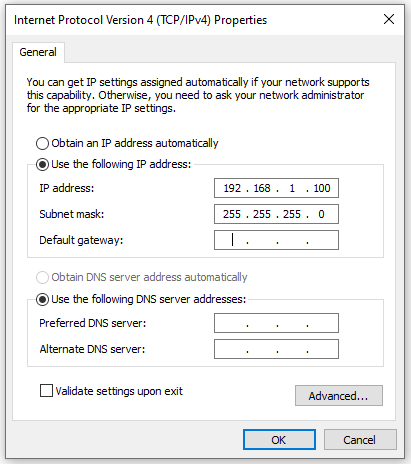
- Select Internet Protocol Version 4 (TCP/IPv4), then select properties
- Apply the settings listed below
Verify IP Settings
To verify that the IP address is set, you can open the RACE RESULT Web Server and look in the bottom left-hand corner to see if the IP address set appears. It should show 192.168.1.100. Note, if you are also connected to WiFi, you will see a second IP address.
Troubleshooting
Sometimes, your other networks (most likely your WiFi network) will use the same network scheme as the decoder. If this is the case, make sure that the Default Gateway does not match the WiFi network, or better yet, don't set one at all. It is not necessary for this type of connection.
How to check what IP addresses your computer has
You can use the Command Prompt application on your computer to check your network settings.
- Search "CMD" from the Windows start menu.
- Select Command Prompt from the list of searched programs.
- Type in the command ipconfig and press enter
- You will receive a list of network adapters and the various settings for each.
Note, it is possible for a computer to have more than one network adapter. Often, laptops will have a WiFi adapter as well as an Ethernet adapter. Make sure that you are looking at the correct network adapter (for a direct decoder connection you should be using the Ethernet adapter).