Zoznamy zobrazujú definovanú množinu polí pre konkrétnu množinu záznamov. Nastavenia zoznamu určujú:
- ktorí účastníci sa zobrazujú
- ktoré dátové polia (stĺpce) sú zobrazené
- ako sú záznamy triedené
- ako sú záznamy formátované
- ako je stránka naformátovaná (formát strany, okraj atď.)
Zoznamy sú navyše zoradené do kategórií. Kliknutím na hlavičku kategórie možno kategóriu zbaliť a rozbaliť. Ak chcete vytvoriť novú kategóriu, kliknite na odkaz Nová kategória zoznamu v hornej časti.Kategórie zoznamu môžete tiež premenovať.
Zoznamy je možné triediť manuálne pomocou drag&drop. Preto presuňte kurzor na voľné miesto vľavo od názvu zoznamu. Zoznam môžete tiež presunúť myšou do inej kategórie. Ak chcete zoznamy zoradiť v kategórii podľa abecedy, kliknite na ikonu .Prázdne kategórie sa pri opätovnom načítaní okna automaticky odstránia.
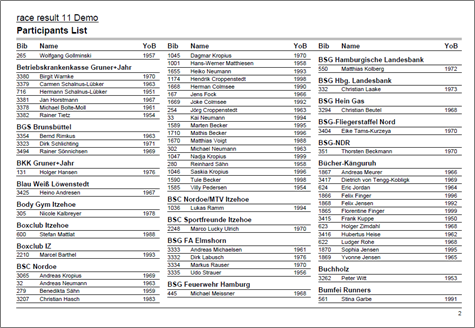
Kliknutím na názov zoznamu výstupov sa otvorí stránka s prehľadom tohto zoznamu.
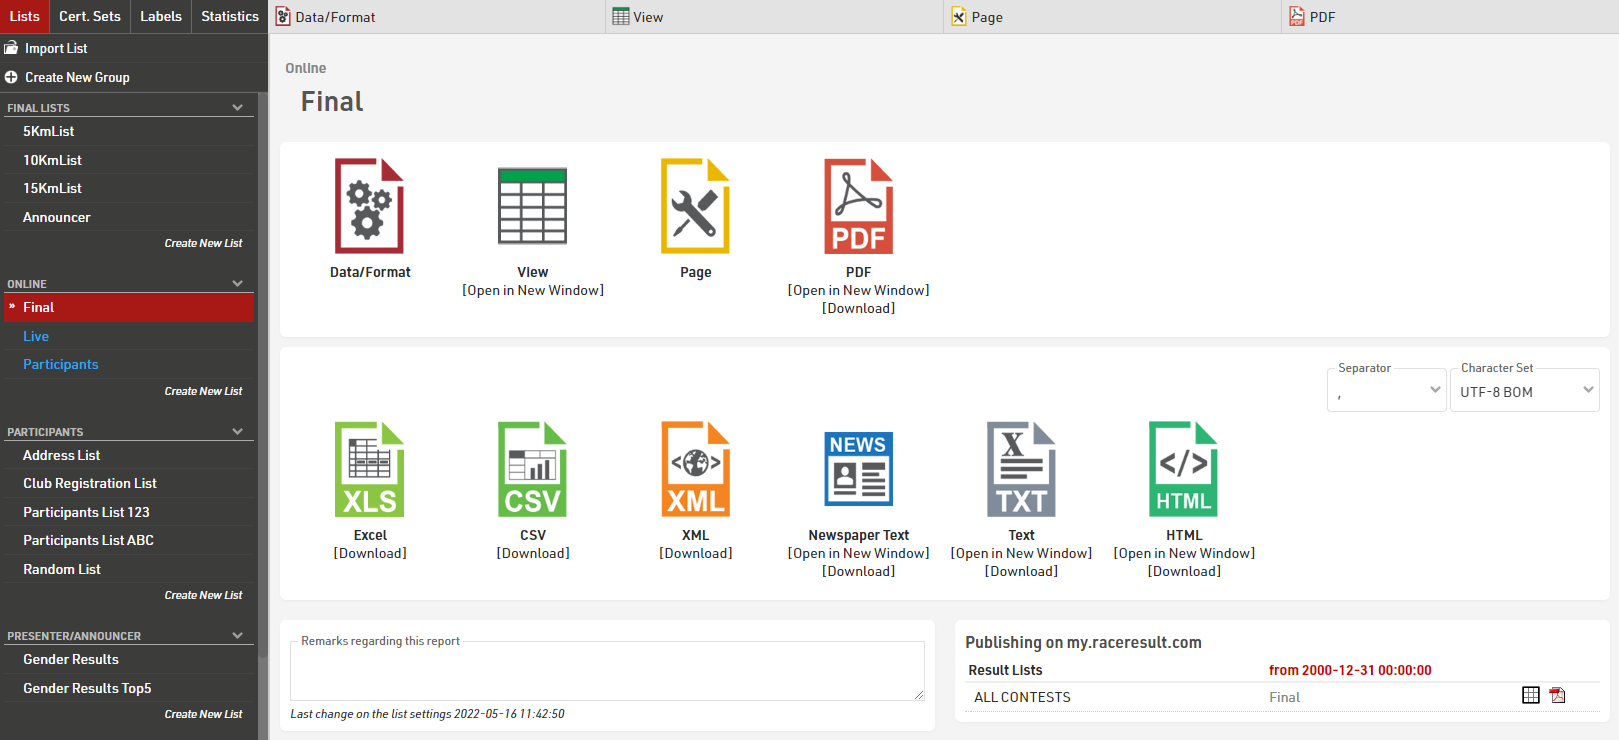
Nastavenia zoznamu sú rozdelené na karty Údaje/Formát a Strana. Údaje/Formát obsahuje všetky nastavenia týkajúce sa údajov zobrazených v zozname a spôsobu ich formátovania, zatiaľ čo nastavenia stránky sa týkajú všeobecného rozloženia stránky a sú relevantné len pre výstupný formulár PDF a HTML.
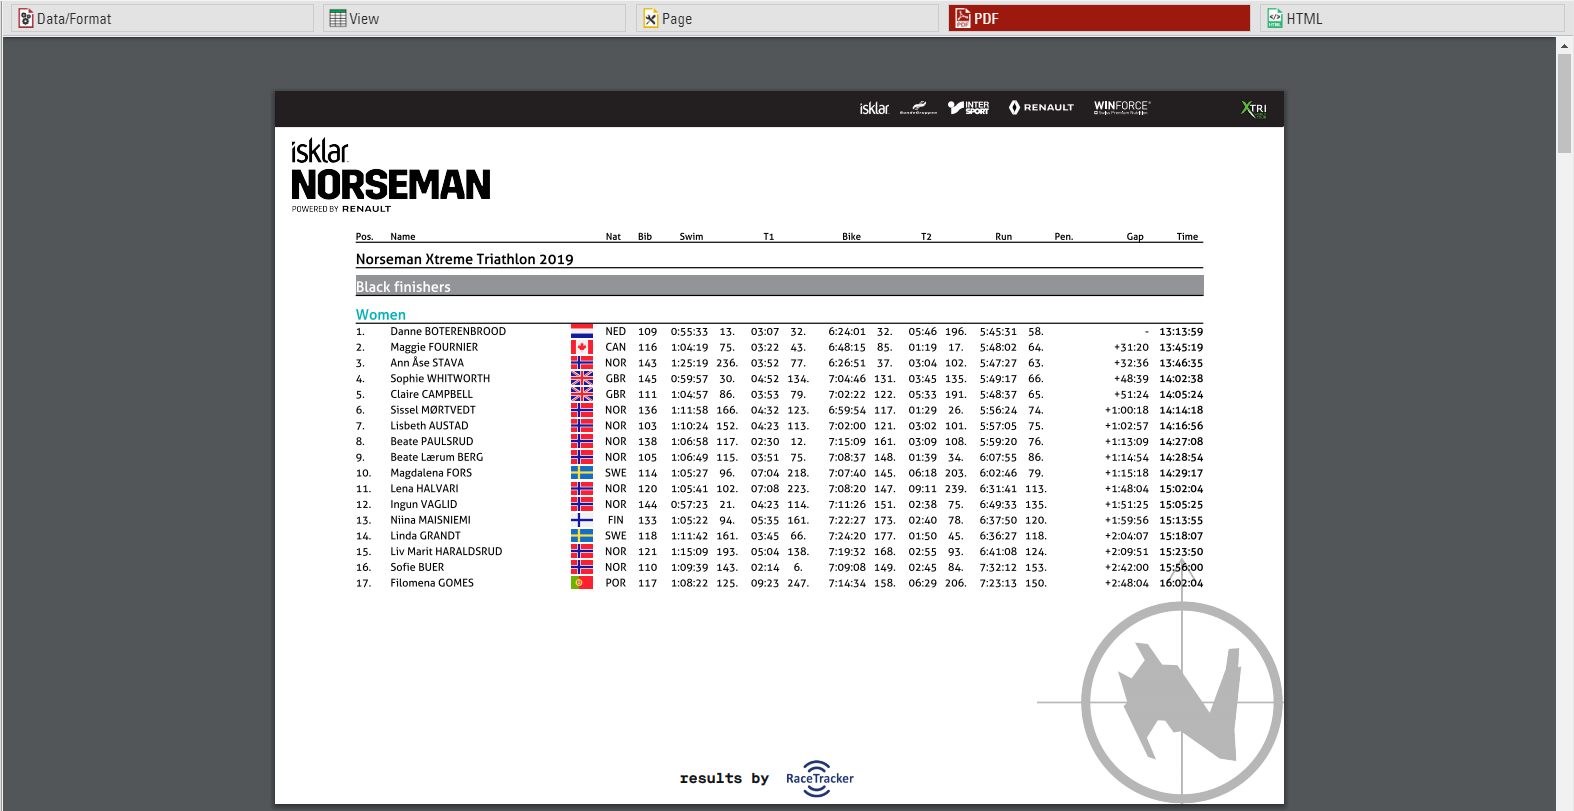
Ak chcete zobraziť zoznam, kliknite na tlačidlo alebo záložku Zobraziť, toto je možné otvoriť aj v novom okne, zoznamy je možné otvoriť aj priamo na karte Zobraziť dvojitým kliknutím na názov zoznamu v ponuke. Zobrazenie zoznamu vo formáte PDF je tiež možné zobraziť alebo stiahnuť.
Zoznamy je tiež možné exportovať v rôznych formátoch ako EXCEL, CSV, XML, TXT a HTML.
Nastavenia údajov/formátu
Karta Nastavenia údajov/formátu je rozdelená na tri časti: Zoskupovanie/Zoraďovanie, Polia/Stĺpce a Filter. Každá z týchto častí bude vysvetlená ďalej. Podľa nastavení a výberov vykonaných v týchto sekciách sa údaje účastníkov zobrazia vo výstupnom zozname.
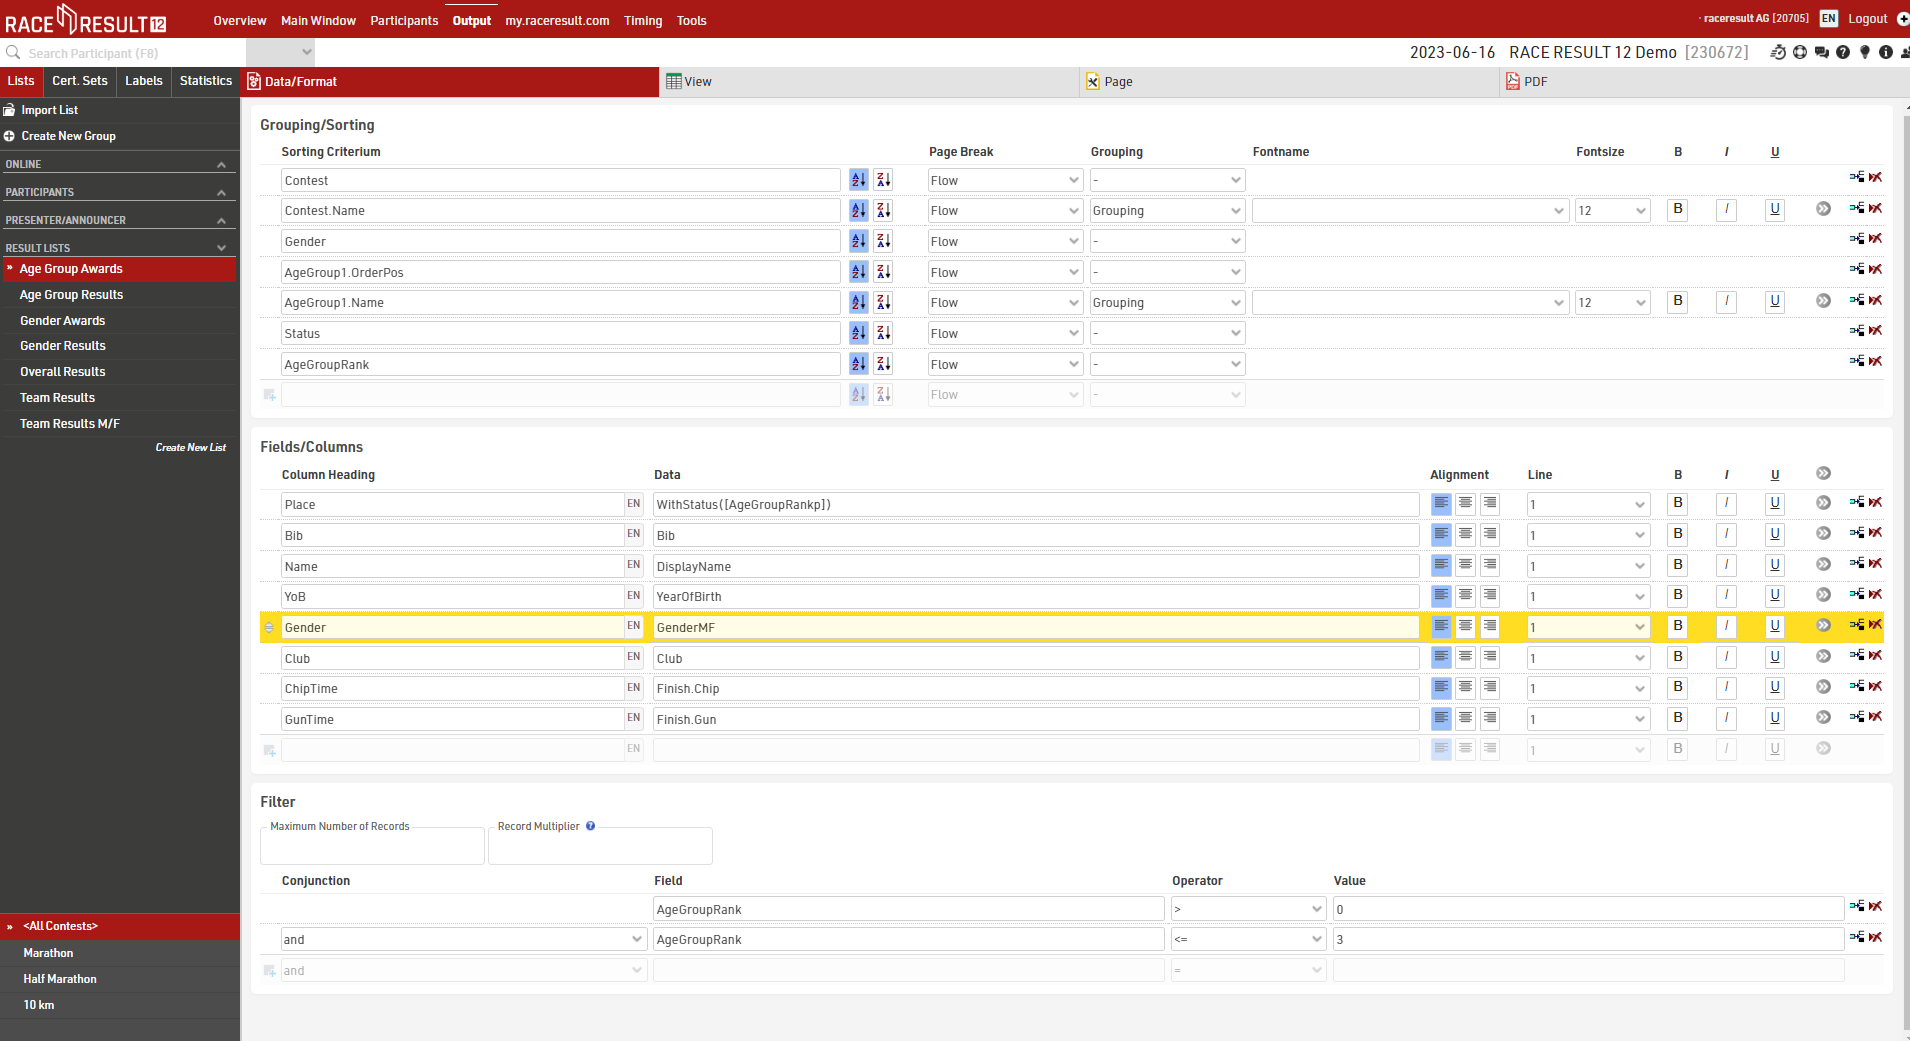
Zoskupovanie/triedenie
Táto časť definuje, ako budú zoradené záznamy v zozname. Jednoducho vyberte jedno alebo viac polí z Field Wizard, ktorý sa objaví pod zadávacím poľom. Zoznam bude zoradený podľa prvého poľa a ak toto pole nie je rozhodujúce, podľa druhého atď.
Po druhé, vyberte, či majú byť záznamy zoradené vzostupne alebo zostupne.
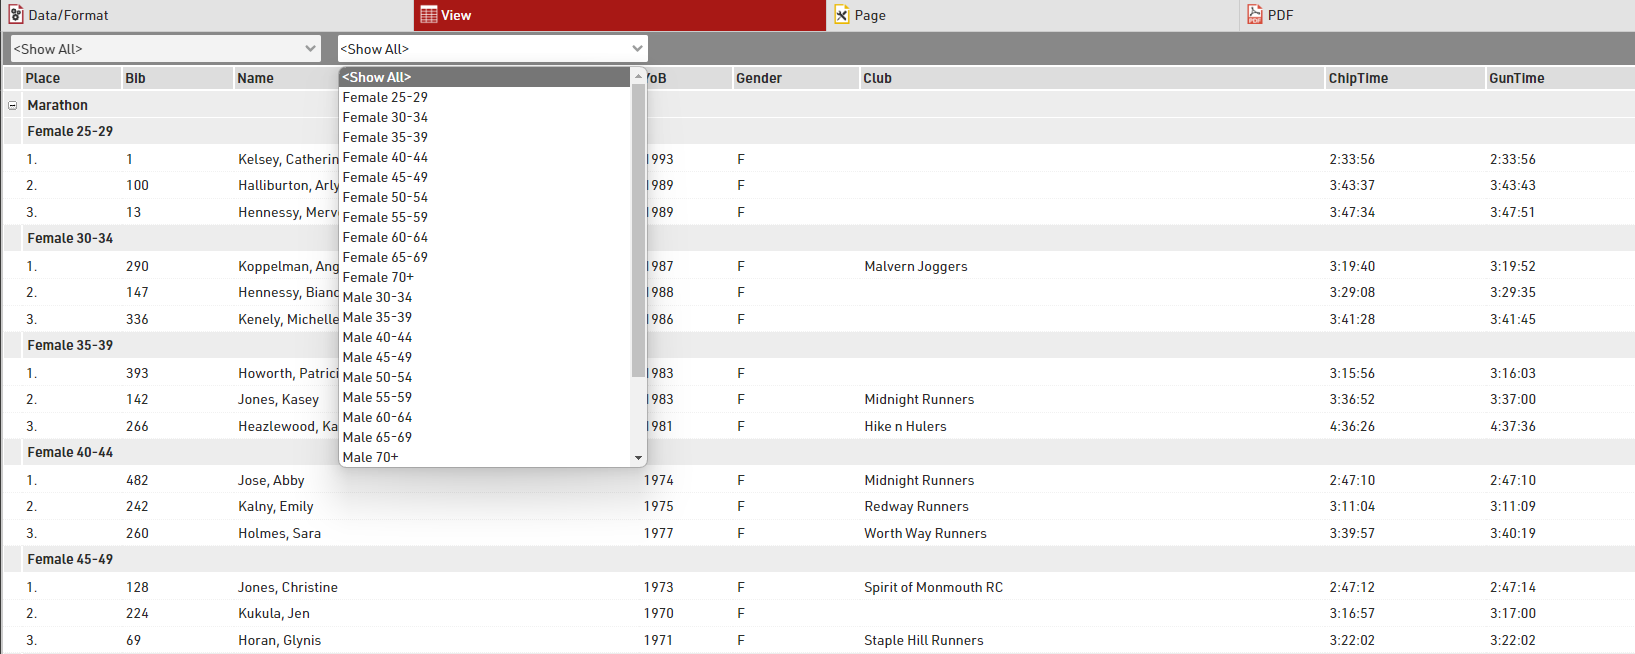
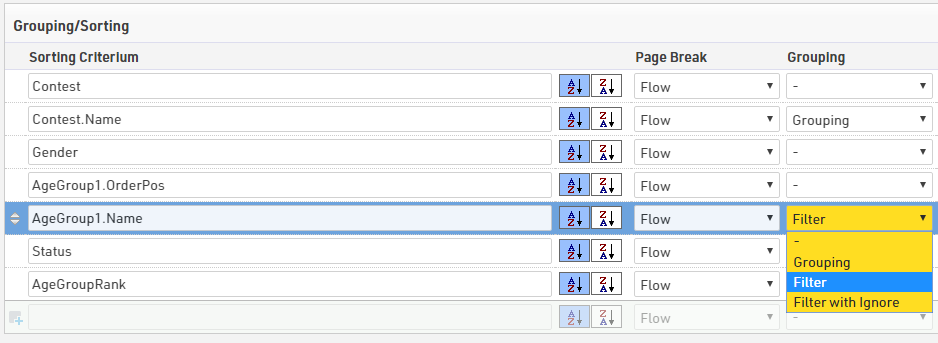
Polia možno použiť aj ako zoskupenie alebo filter, pri použití ako zoskupenie sa potom pre každú hodnotu skupiny na všetkých typoch výstupov vloží riadok hlavičky skupiny. Alternatívne je možné zoznam filtrovať podľa skupiny, pri tomto nastavení sa v náhľade a tiež na stránke my.raceresult.com pre každý filter zobrazí ďalšia rozbaľovacia ponuka, ktorá potom môže zobraziť všetky skupiny, filtrovať na konkrétnu skupinu alebo ignorovať túto úroveň zoskupenie všetkých (ak je vybratý filter s ignorovaním). Filter je obzvlášť užitočný pre online výsledky, aby sa v nich ľahšie navigovalo / filtrovali údaje, ktoré si niekto skutočne chce pozrieť.
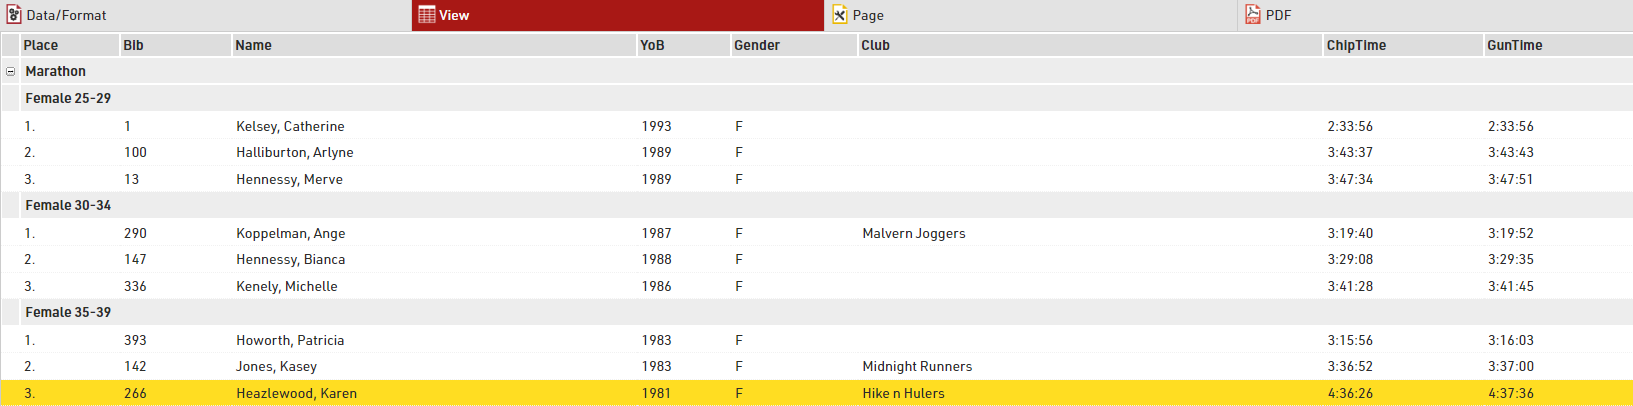
Tento zoznam je zoskupený podľa súťaží a vekových skupín:
a pod tým istým zoznamom pomocou filtra namiesto jednoduchého zoskupovania
Ďalšie podrobnosti a možnosti nájdete v časti Podrobnosti zoskupovania/triedenia
Polia/Stĺpce
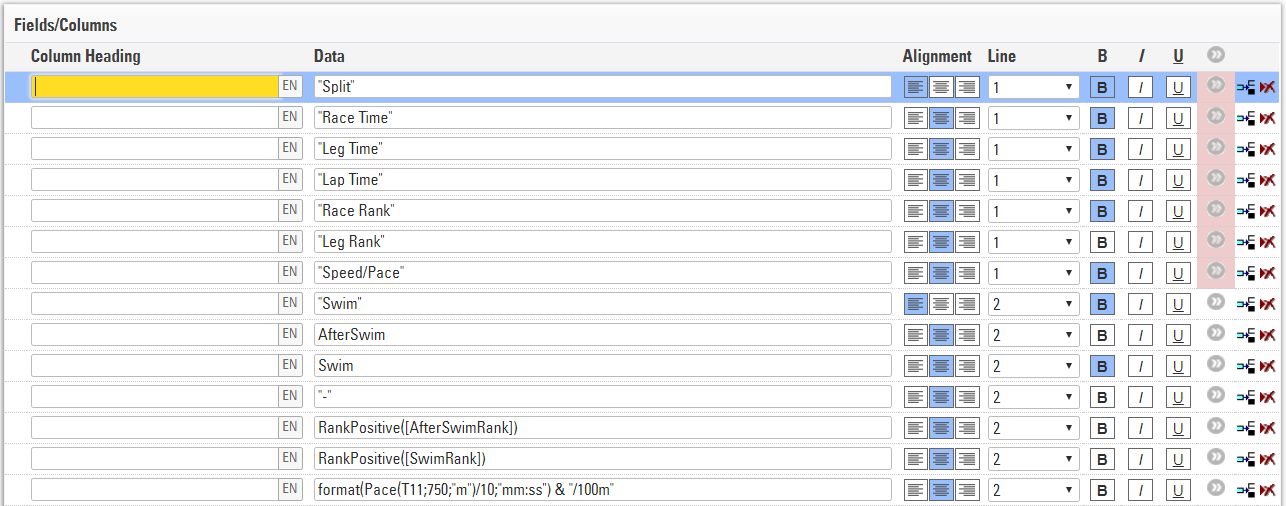
V sekcii Polia/Stĺpce vyberte polia, ktoré budú tvoriť stĺpce vášho prehľadu. Do poľa Záhlavie stĺpca zadajte popis poľa a do poľa Údaje vyberte pole z Sprievodcu poľom alebo zadajte výraz. Napríklad pomocou výrazu môžete skombinovať polia Priezvisko, Meno a Rok narodenia do: "Laň, Ján (70)"
Zodpovedajúci výraz by bol:
[DisplayName] & "(" & [YearOfBirth] & ")"
Vyberte číslo riadku väčšie ako 1 na vytvorenie Multi-Line Lists.
Kliknutím na tlačidlo s ďalšími podrobnosťami pre toto pole prejdete do Nastavenia stĺpca rozšíreného zoznamu.
Filter
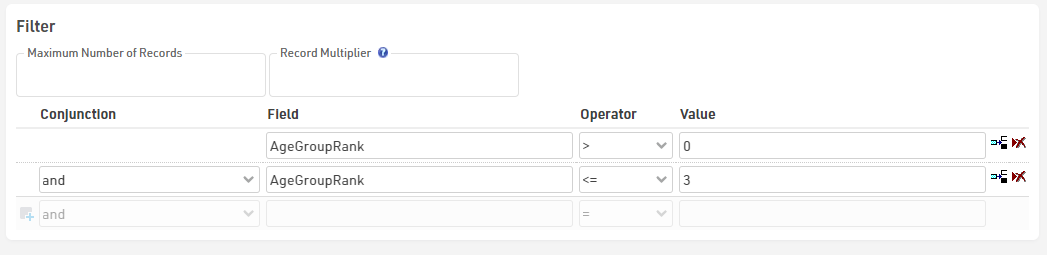
Nastavením filtra môžete z prehľadu vylúčiť určité záznamy. Ak nedefinujete filter, v prehľade sa zobrazia všetky záznamy.
Filtre sú dôležité najmä pre zoznamy výsledkov: chceli by ste zobraziť iba tých účastníkov, ktorí už skončili. Zvyčajne bude filter taký, že rank musí byť väčšie ako 0.
Namiesto nastavenia filtra môžete tiež obmedziť počet záznamov zobrazených v zozname nastavením maximálneho počtu záznamov.
Okrem toho Násobiteľ záznamov umožňuje zobraziť záznamy viac ako raz s rôznymi informáciami (napr. časy kôl) v zozname.
Podrobnosti o zoskupení/triedení
Zalomenie strany
Pomocou nastavenia Zalomenie strany môžete do výstupného formátu PDF vložiť zlomy strán, keď sa zmení hodnota poľa triedenia. K dispozícii sú nasledujúce možnosti.
- Prietok: Predvolená hodnota. Ak sa ďalšie záznamy nezmestia na predchádzajúcu, spustí sa nová stránka.
- Nová strana: ak sa zmení hodnota zoradenia/zoskupenia, začne nová strana. Napríklad zoznam môže mať novú stránku pre každú súťaž.
- Nový stĺpec: to isté ako Nová stránka, avšak v prípade viacstĺpcových zoznamov začína nový stĺpec, nie nevyhnutne nová stránka.
- Keep Together: pokúsi sa zobraziť všetky záznamy skupiny na tej istej stránke. Ak sa všetky záznamy nezmestia na jednu stranu, začne sa nová strana. Napríklad v prípade výsledkov tímu je možné spustiť novú stránku, ak sa na stránku nezmestí celý tím.
- Opakovať: to isté ako Flow, ale hlavička zoskupenia sa na novej stránke opakuje.
Farby
Kliknutím na tlačidlo (Viac podrobností pre toto pole) definujte písmo a pozadie farby:

Rôzne polia na triedenie a zoskupovanie
Zoznam sa často zoskupuje podľa poľa, ale nie podľa tohto poľa, napríklad podľa ID súťaže, ale zobrazuje názov súťaže. V takom prípade jednoducho zadajte pole triedenia pred pole zoskupenia. V nižšie uvedenom príklade je zoznam zoradený podľa ID súťaže, ale v hlavičke skupiny sa zobrazí názov súťaže. Podobne v rámci súťaží je zoznam zoradený podľa pozície vekovej skupiny, ale v hlavičke skupiny je uvedený názov vekovej skupiny:
Je možné použiť aj filtre, ktoré umožňujú manuálne filtrovanie zoznamov pomocou ďalších rozbaľovacích selektorov podľa dostupných hodnôt. Tieto filtre sa zobrazia aj na stránke my.raceresult.com pri používaní výstupných zoznamov online. Filter s ignorovaním vám umožňuje tiež ignorovať akékoľvek zoskupenie, napríklad pri filtrovaní podľa pohlavia môže byť užitočné toto ignorovať a zobraziť všetko spolu. Všimnite si, že keď sa použije ignorovanie, budú sa ignorovať aj všetky filtre/zoskupenia nižšie.
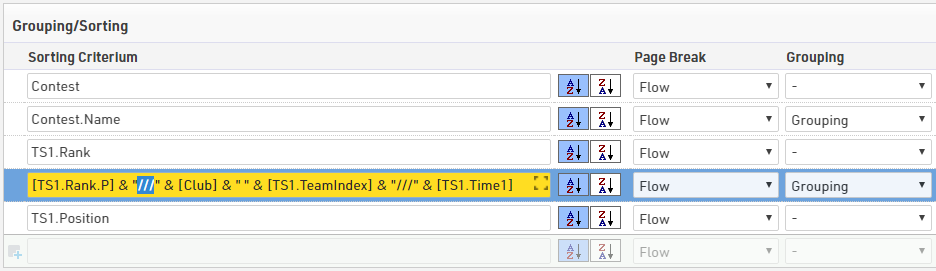
Stĺpce hlavičky skupiny
V niektorých prípadoch je užitočné vytvoriť stĺpce v hlavičke skupiny, napríklad vo výsledkoch tímu. V tomto prípade chceme zobraziť hlavičku skupiny pre každý tím, ktorá má svoju tímovú hodnosť, názov tímu a čas tímu v samostatných stĺpcoch, potom nižšie zobrazíme každého člena tímu a jeho individuálne podrobnosti.

Stĺpce sa vytvoria, keď hodnota poľa zoskupenia obsahuje tri lomky (///). Inými slovami, tri lomky sú oddeľovač stĺpcov:
Nastavenia stĺpca rozšíreného zoznamu
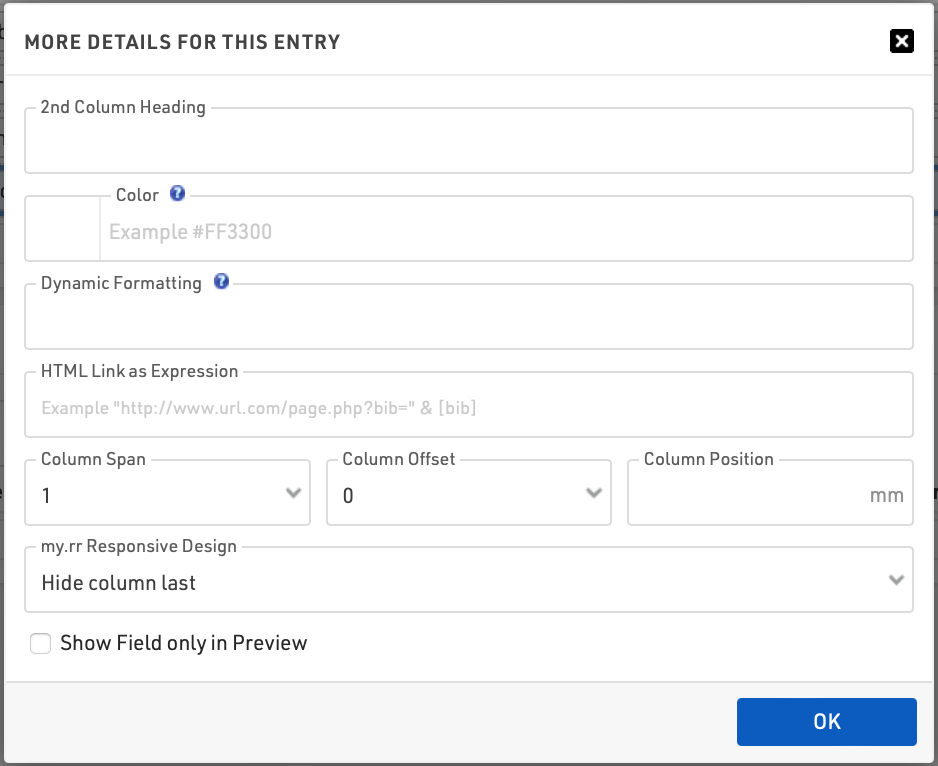
Záhlavie 2. stĺpca
Hlavička stĺpca môže mať dva riadky. V druhom riadku sa zobrazí, či niektoré pole obsahuje záznam pre toto nastavenie. Táto funkcia sa niekedy používa pre tlačené výsledky, ktoré majú mať nadpisy stĺpcov v dvoch jazykoch.
Farba
Vyberte farbu pre tento stĺpec.
Dynamické formátovanie
Rôzne záznamy môžu byť naformátované odlišne, pozrite si Dynamické formátovanie.
HTML odkaz ako výraz
Po kliknutí na riadok v tomto stĺpci sa použije odkaz. Väčšinou sa to používa pri výsledkoch publikovaných na my.raceresult.com, napríklad na vytvorenie individuálneho odkazu na webovú stránku s fotografiami.
Rozpätie stĺpca
Ak by pole malo zahŕňať viac ako jeden stĺpec, definujte podľa toho rozsah stĺpca, napríklad vo viacriadkových zoznamoch, kde polia v rôznych riadkoch môžu mať rôznu dĺžku, a preto ich nezarovnávajte do jedného stĺpca.
Odsadenie stĺpca
Nastavenie Offset stĺpca slúži pre viacriadkové zoznamy, pozri nasledujúcu časť.
Poloha stĺpca
Normálne RACE RESULT 12 automaticky vypočíta šírku stĺpcov v závislosti od obsahu. V niektorých zriedkavých prípadoch možno budete chcieť nastaviť polohu stĺpca manuálne (platí len pre PDF). Preto zadajte polohu v milimetroch zľava.
Responzívny dizajn my.rr
Pomocou tohto nastavenia určíte, v akom poradí majú byť polia skryté pri prezeraní na mobilných zariadeniach alebo na užších obrazovkách prostredníctvom stránky my.raceresult.com alebo vášho vlastného vloženia. Pomáha to optimalizovať zážitok diváka/účastníka, pretože väčšina zobrazení výsledkov je na mobilných zariadeniach a chcete zabezpečiť, aby sa tie najdôležitejšie polia zobrazovali jednoducho. Prečítajte si viac o Logike zobrazenia na mobilných zariadeniach, aby ste pochopili, ako nastavenia fungujú.
Zobraziť pole iba v ukážke
Pole sa zobrazí iba v náhľade, ale nie v PDF. Toto možno použiť pre odkazy na fotografie, ako je popísané vyššie.
Multi-Line Lists
Multi-Line Lists are an easy way to put more information on a list, most commonly used for Details Lists for online results or Results with multiple splits which should be displayed. Each participant record can have up to 50 lines on the list, to create additional rows simply select a line number greater than 1.
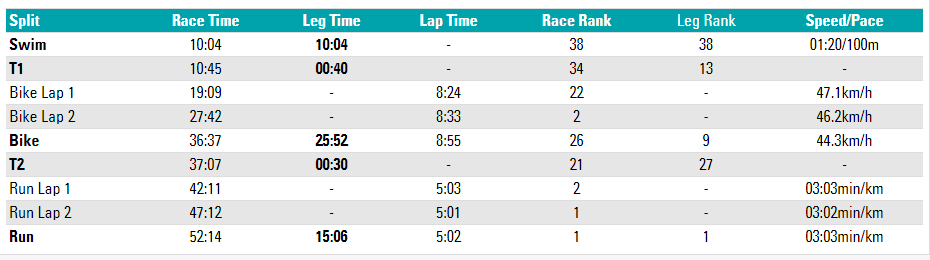
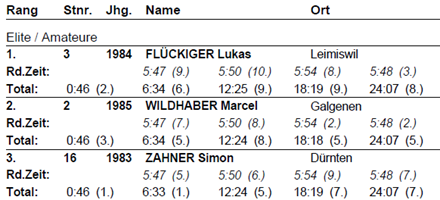
In this example each split for the race is shown on a new line, for each line the data fields are still shown in the order listed. The Row Headers are Line 1, using simple text with custom formatting. It may be necessary to add in blank fields using "" if you need columns to line up correctly.
Maybe you would like to have different column widths for the fields in the different lines like in the screenshot below: the lap times in the second and third line have different column positions than the basic information above. This is only possible in PDF output lists.
To do so, you have two options:
- Enter the exact column position in the extended field settings. This will disregard the column widths from other rows.
- Set a column offset. All lines will have the same columns, but for example in the second line the field will be moved one or several columns to the right, i.e. the previous column has a greater column span.
Record Multiplier
Using the Record Multiplier, records can be shown several times on a list, optionally with different data, for instance lap times.
The Record Multiplier setting in the Data/Format settings of the list can hold either a fixed value (e.g. 3) or a variable (e.g. DecimalTime6). If the result 6 saves the number of laps, the list will show one line for each lap time.
In order to show the lap times in the lines, the parameter {n} can be used, which will be iterated from 1 to n (=value of the record multiplier). If for example the lap times are saved in results with the names "Lap1", "Lap2", and so on, this field can be used:
[Lap{n}]Entering Complex Filters
The filter settings for a list offer an easy definition of your filter, for example:
If you need to enter a complex nested filter, the GUI may be tedious. In that case simply enter your filter in the first line like this:
iif(([Contest]=2 AND T2>5) OR ([Contest]=3 AND T2=5); 1; 0) = 1
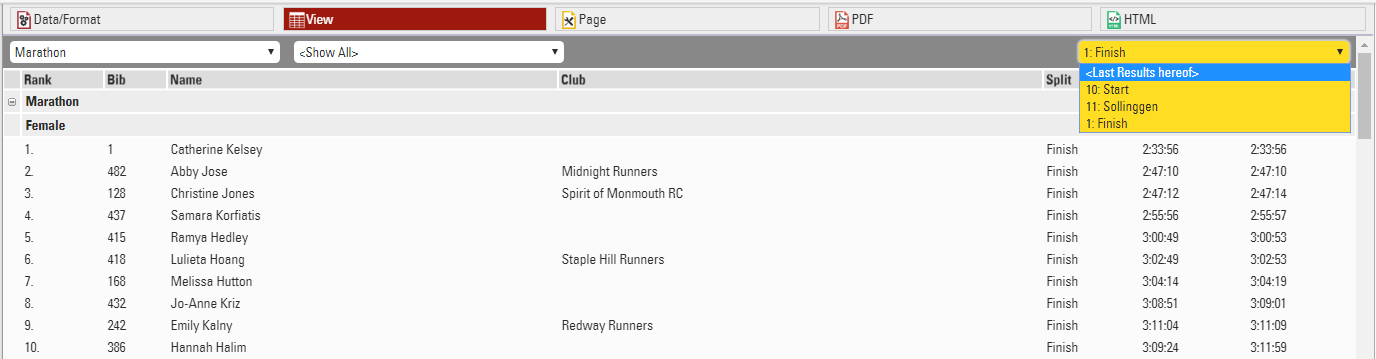
View
When viewing lists there are some additional functions and shortcuts to make working with the list and participant data easier.
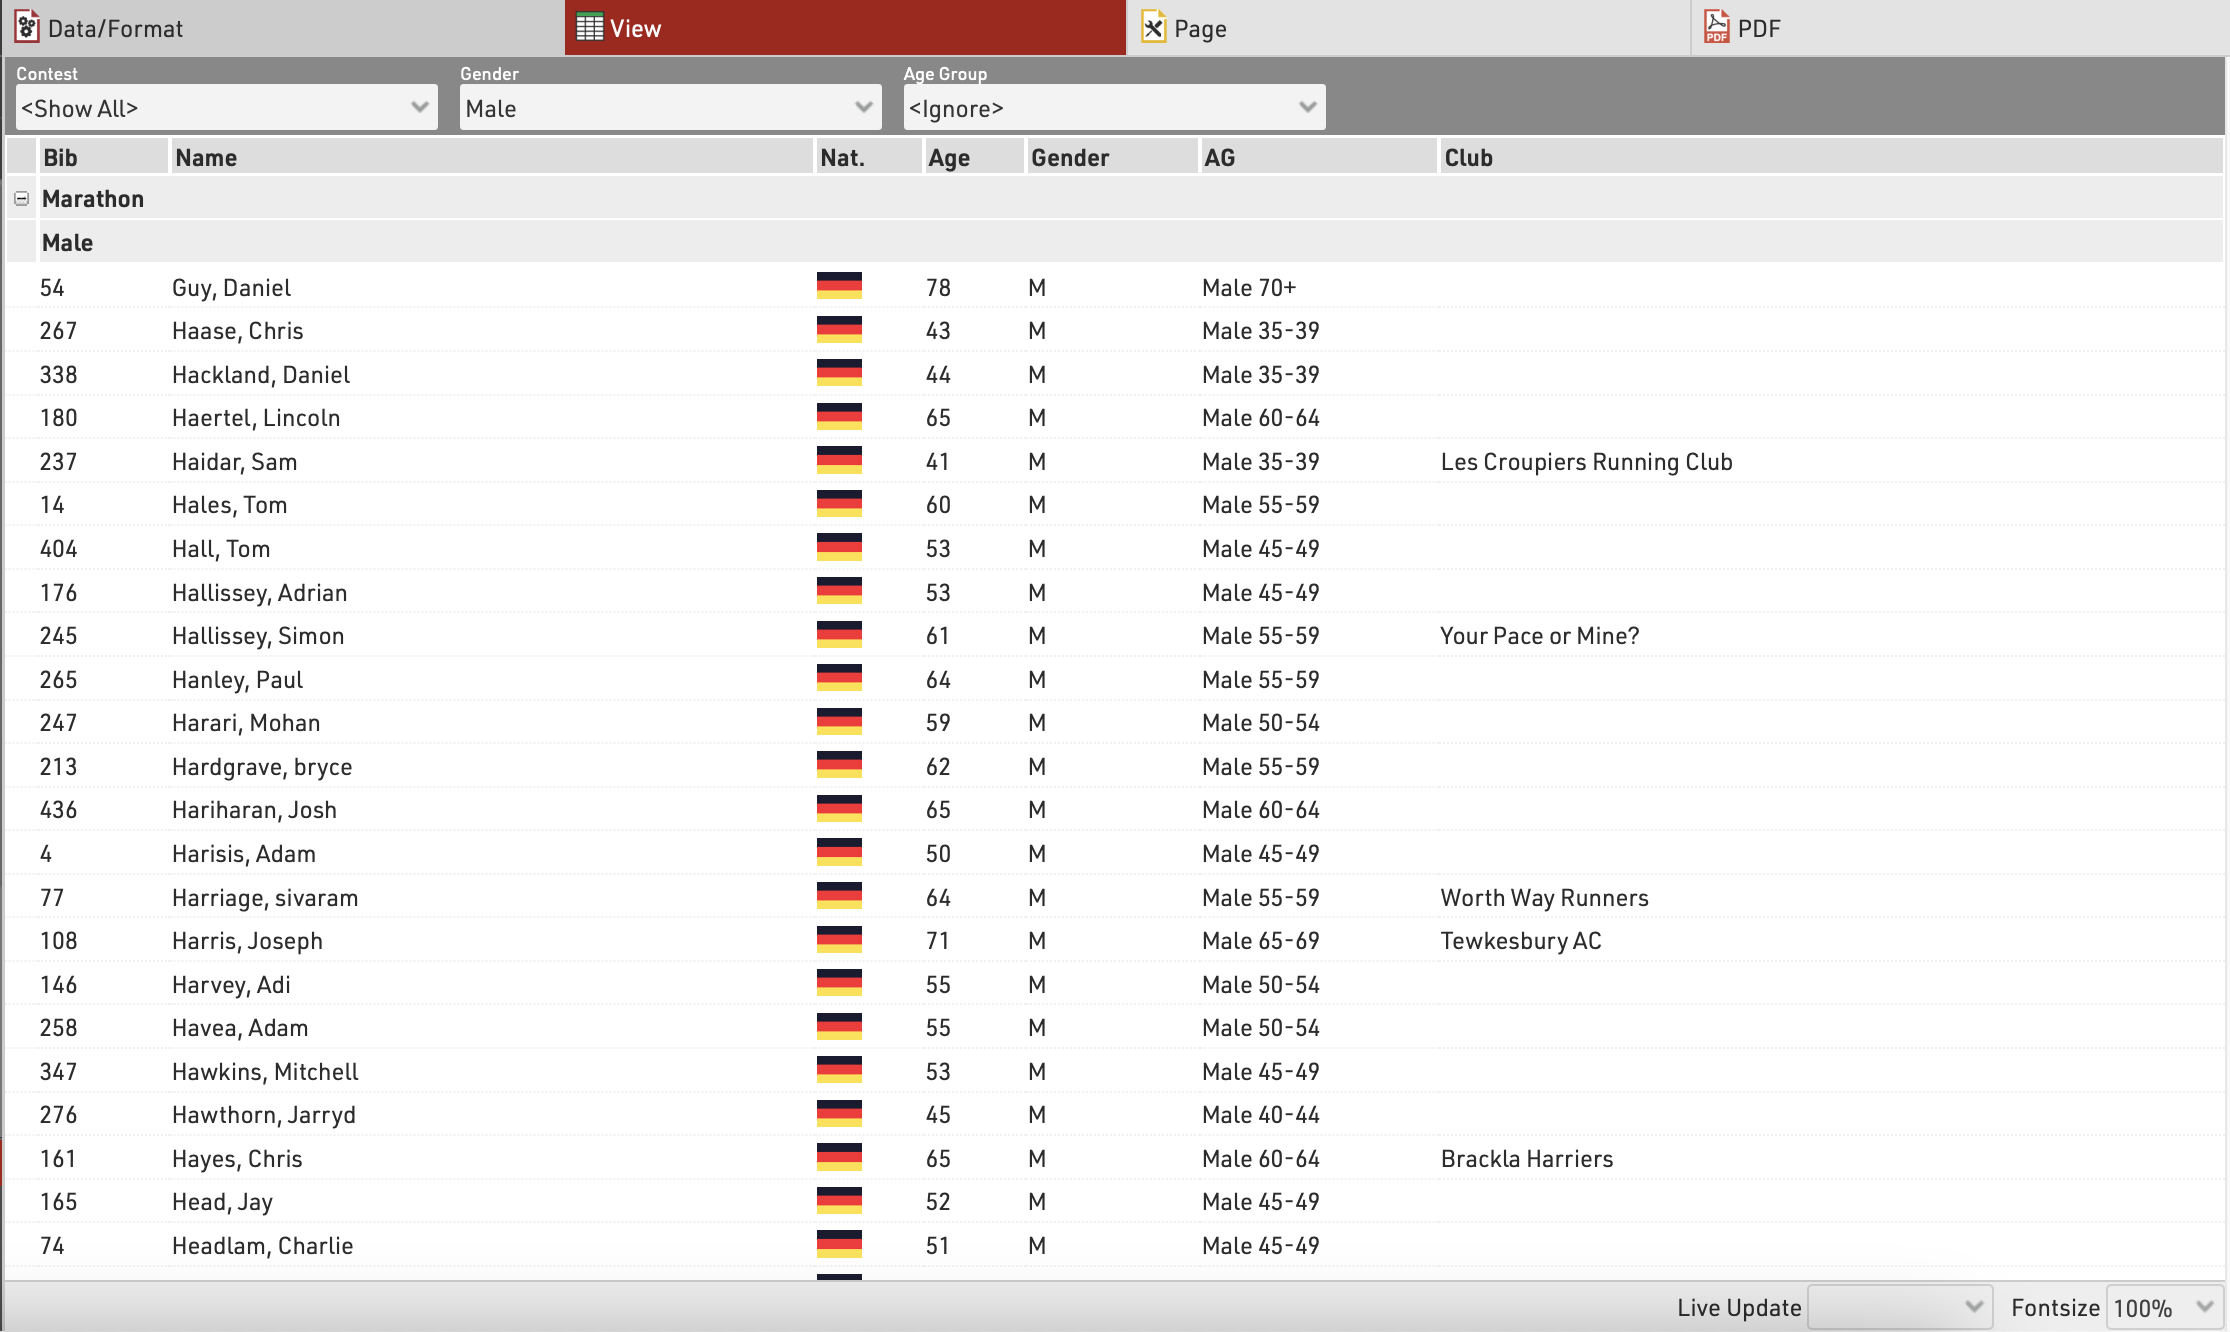
Any Filters you have applied to the list will be shown at the top of the list, allowing you to quickly filter to specific data sets. If using Groupings then the groups can be expanded or collapsed using the +/- icon at the start of the row.
Hovering over a row will highlight that entire row yellow.
Clicking on a row will open the Participants Tab directly to that participant record, if the right-side dock is open to the Participants Tab then it instead the participant record will be opened here.
Live Update allows you to set the list to automatically refresh at a pre-defined interval (from 1s to 60s), useful for monitoring specific lists during a race in an additional window.
Font size can also be adapted between 40% and 200%.
Page Settings
The settings in the Page tab are mostly relevant for the PDF output format as well as partially for the Presenter (marked with a *) and define how the records will be formatted and which additional information will be shown in the page header and footer.
Page Settings
Select here the page format, choose between portrait and landscape orientation and define the page margin in millimeters.
Multi Column
In some cases it can be helpful to split the page into several columns:
Simply define the number of columns and the column spacing in the Page settings of your list.
Background
The settings under Page Header allow you to put a picture in the top right corner of the report. However, if you require more flexibility regarding the design of the list, you can select a certificate at Design that will be shown in the background. This option gives you unlimited flexibility in designing your reports.
Cover sheet
Similar to the background, you can insert a certificate as additional Cover Sheet at the beginning of your report and an additional Back Sheet at the end of the report.
Page Header
Via these settings you can add and format the following elements of the page header: two header text lines*, the column headers*, a picture (which will be shown in the top right corner) and a gray line below the two header lines.
Records *
Define here the font type and size of the data records. Additionally, define if there shall be a thin line between the records and if every other line shall have a gray background. Via the Line Spacing setting you can define the height of the records.
Hint: Probably you would like to have the same font type throughout the entire report. Therefore, simply select the font type here and leave all other font type boxes empty. The font type for the records will then also be used for the header and footer texts.
Page Footer
You can add several texts and an image to the page footer. For example enter [Page] to show the page number in the footer of your report.
List Header and Footer
Enter an additional text that will be shown at the beginning/at the end of the list.
Output Selector
The output selector is designed to allow for easier creation of results lists which may otherwise require multiple output lists and ranks to be setup. It also includes an option to always show the last result which makes live results lists even easier to setup.
When the output selector is enabled an additional filter is shown which allows the user to select which result they want to look at, there are then a few different fields which can be used to show information according to which result is selected.
Splits Selector
To enable the drop-down selector for Splits there are 3 options for field names, of which one must be called in the Output.
- {Selector} - Will show all Splits and Legs in the drop-down
- {Selector.Splits} - Will show all Splits only in the drop-down
- {Selector.Legs} - Will show all Legs only in the drop-down
With these prefixes the standard Split/Leg field names can then be appended in the same way where {Selector} would be replaced by the selected Split or Leg name.
For example {Selector.Legs}.Distance would return the distance for the Leg selected from the drop-down.
Splits which are set to Internal Only will not be shown in the Selector or called in the <Last Results Hereof> option.
Results Selector
To enable the result selector you must include either SelectorDecimalTime or SelectorTime in the Data Fields of the output list, their functions are explained below. When included a new table will appear below the filter for Selector Results, in here you can select which results can be selected using the drop-down, if you are setting up a live results list then you can include <Last Results Hereof> which will when selected take the last result of those selected below which has a time and sort them from last result to first.
For each selected results you can choose to show up to 2 separate results, this could be for example a Gun Time and Net Time

Selector Fields
With the selector enabled there are now some additional fields which can be called which are relevant to the selected result.
SelectorDecimalTime / Selector2DecimalTime - This will return the decimal time in selector results 1 and 2 for the participant according to the selected result.
SelectorTime / Selector2Time - This will return the formatted time in selector results 1 and 2 for the participant according to the selected result.
SelectorTimePositive / Selector2TimePositive - Will return a 1 if there is a time in selector results 1 or 2 for the participant according to the selected result otherwise returns 0. Similar to TimePositive.
SelectorName - Returns the name of the currently selected result (Useful when using the Last Results Hereof when participants may be showing different results.
SelectorID - Returns the ID of the currently selected result if there is a time in that result.
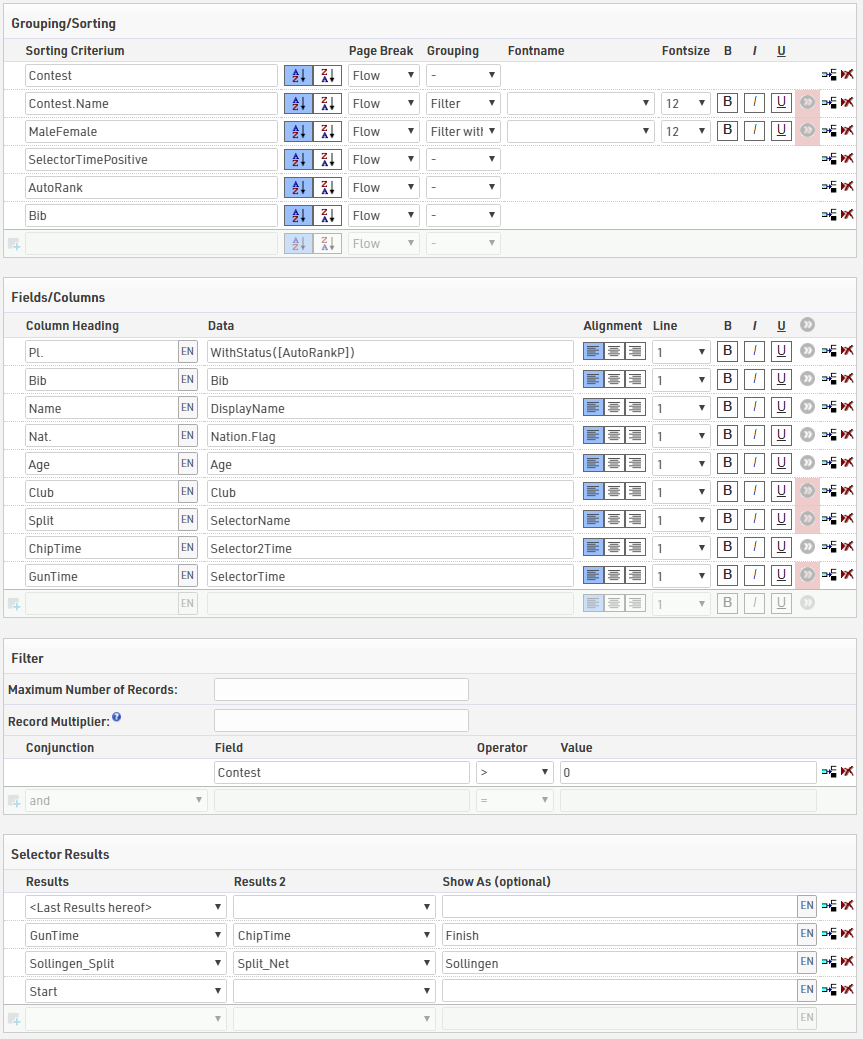
When using the Results Selector you can enable automatic ranking of participants by using the AutoRank field, to still show those who do not have a time at the bottom of the list you can first sort by SelectorTimePositive from largest to smallest so that those with a time are shown first.
Below is a typical setup that might be used for a live results list using the Results Selector
Inserting Images
Images can be inserted in to Output lists, these can be useful for functions such as linking to participant photos, videos or team logos.
Images can be inserted either from the event file pictures, a user-defined function or from an external URL link.
To insert an image use the code:
"[img:ImageName.png|height:30px]"
Ensuring that "ImageName.png" is the correct name and file ending of your image.
"ImageName.png" can be replaced with either your user-defined function or the URL of the image. When replacing the image name with a UDF or other data field you need to concatenate the data field name with the rest of the string.
"[img:"&[ImageUDF]&"|height:30px]"
If no height is defined then the image will be shown in full size.