Website Integration
You can embed the pages from my.raceresult.com on your own site using some simple Javascript. To find the source code for this you open any of your event files and navigate to my.raceresult.com > Website integration section.
You can use either the HTML code which uses javascript, or the Wordpress plugin, although this is much more limited.
Dynamic Lists
Since each embedded page uses two key variables (Event ID and page), it is possible to create a single page to handle multiple events or event different pages. You can do this by passing a variable through the web page URL into the embedded Javascript.
Here you can see the eventid variable is passed from the URL into the function to load the event id specified in the URL.
<div id="divRRPublish" class="RRPublish"></div>
    <script type="text/javascript" src="https://my.raceresult.com/RRPublish/load.js.php?lang=en"></script>
    <script type="text/javascript">
        <!--
            var rrp=new RRPublish(document.getElementById("divRRPublish"), eventid, "results");
        rrp.ShowTimerLogo=true;
        rrp.ShowInfoText=false;
        -->
    </script>
    <style>
        /* Add custom CSS here or elsewhere to change the design */
    </style>
Embedding Different Languages
By default the embed code includes the language parameter for the current working language, it is possible to change the language for lists and registration according to your needs.
Default Browser Language
Removing the lang parameter from the URL will allow the script to then query the language of the browser and will automatically use this language, this is the same behaviour as used on my.raceresult.com
Fixed Language
You can build out a web page for each language. Here you can see the language is defined as English by setting the lang variable to en.
<div id="divRRPublish" class="RRPublish"></div>
<script type="text/javascript" src="https://my.raceresult.com/RRPublish/load.js.php?lang=en"></script>
<script type="text/javascript">
<!--
    var rrp=new RRPublish(document.getElementById("divRRPublish"), 123456, "results");
    rrp.ShowTimerLogo=true;
    rrp.ShowInfoText=false;
-->
</script>
<style>
  /* Add custom CSS here or elsewhere to change the design */
</style>
Alternatively this parameter could be passed dynamically from a query parameter, however this would require additional work to implement correctly.
For more information on how multiple languages work within RACE RESULT 12 and a list of all supported language codes, you can check out Multi-Lingual Online-Registration.
Embed Multiple Lists on the Same Page
When embedding multiple lists on a single page you need to define unique div ids for each. By default, the source code for embedding participants, results, and live pages uses the same div id.
This portion of the code shows the div that will contain the loaded page. The id divRRPublish will be the same for all three lists.
<div id="divRRPublish" class="RRPublish"></div>
With the HTML language ids have to be unique. If you want to embed multiple lists on a single page this id needs to be changed. For example, you could add an extension to the name like this
<div id="divRRPublish_results" class="RRPublish"></div>
<script type="text/javascript" src="https://my.raceresult.com/RRPublish/load.js.php?lang=en"></script>
<script type="text/javascript">
<!--
	var rrp=new RRPublish(document.getElementById("divRRPublish_results"), 123456, "results");
	rrp.ShowTimerLogo=true;
	rrp.ShowInfoText=false;
-->
</script>
<style>
  /* Add custom CSS here or elsewhere to change the design */
</style>
In this example, divRRPublish is changed to divRRPublish_results. This creates a unique id that the other lists do not use. Note the variable is changed in two places as shown in bold in the example.
Embed a list of events
If you want to embed a list of all of the events in your RACE RESULT account you can do so by embedding the List of Events source code on your site.
<link rel="stylesheet" type="text/css" href="https://my.raceresult.com/RREvents/style.css">
<div class="EventTable" id="tEventTable">
<div><div> </div><div> </div><div>City</div><div>Event</div><div>Date</div></div>
</div>
<script type="text/javascript" src="https://my.raceresult.com/RREvents/RREvents.js"></script>
<script type="text/javascript">
<!--
var options= { dateFormat : 'mm/dd/yyyy' };
var rre=new RREvents(document.getElementById("tEventTable"), null, 'en', options);
rre.server="https://my.raceresult.com";
rre.user=11111;
//rre.year=2017;
//rre.group=1234;
//rre.eventlink="http://your.webseite.com/events/show?eventid=[eventid]";
//rre.openInNewWindow=false;
rre.loadEvents(function(resultSize) { return true; });
-->
</script>
This source code has several variables that allow you to customize what events are shown.
- rre.user - This defines the RACE RESULT user account to pull events from
- rre.year - This will filter events so that only events from the specified year will show
- rre.group - This will filter the list to only show events in the specified group
- rre.eventlink - If you have results embedded on your own site you can use this variable to link directly to that page. Note the eventid URL parameter at the end of the URL. You can use this with a dynamic results page list to lookup results from any event id.
- rre.openInNewWindow - If set to true, when an event is selected it will open in a new window.
Any variables that have the // before them are commented out. This means they will not be loaded.
Customize with CSS
You can customize your embedded results using CSS. This allows you to change anything from font size to button colors. There are a lot of options here. This section will give an example of a basic change and explain the process of locating an element to make a small change. Keep in mind that any CSS code that is added in the Online Registration > Basic Settings section will also be applied here.
Basic CSS Editing
A basic example of changing CSS could be to change the font color of the entire page. We can do this by adding a style to the <html> tag.
<div id="divRRPublish_results2" class="RRPublish"></div>
<script type="text/javascript" src="https://my.raceresult.com/RRPublish/load.js.php?lang=en"></script>
<script type="text/javascript">
    <!--
        var rrp=new RRPublish(document.getElementById("divRRPublish_results2"), 123456, "results");
    rrp.ShowTimerLogo=true;
    rrp.ShowInfoText=false;
    -->
</script>
<style>
    html {
        color: red;
    }
</style>
Here we use the CSS field color to assign a color of red. This will change the color of all text on the page to red, However, if there is text on the page that has its own style then that text will not be overwritten. You will see this with the text link to show all participants.
CheckIn Kiosks
The following articles show different ways how to use a Checkin Kiosk for different purposes.
Search for Participants Using a Unique QR Code
The main idea here is, that the participant will receive a QR code which is sent with an e-mail template after completing the registration form.This QR code contains a personal and random value which identifies the participant uniquely.
During race pack collection the participant can show this QR code, which is then scanned in the search step of a Check-In Kiosk when working with the Event Tools App.
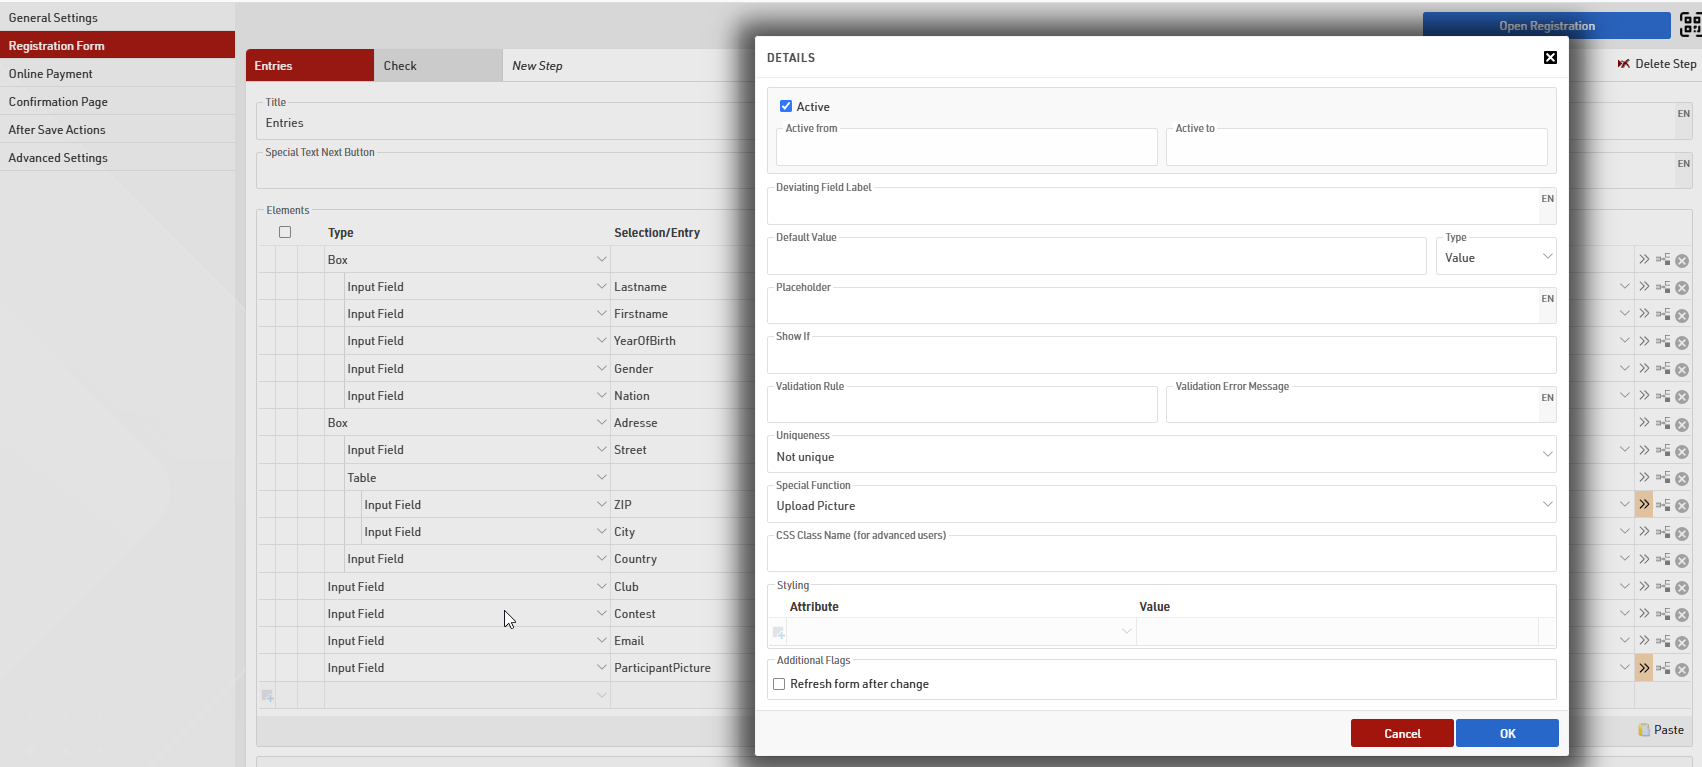
User Defined Fields and Advanced Settings in Registration
The first step is to add an additional field where we can save the string to uniquely identify the participant later.

In the registration form's After Save Actions we add the additional field [IdentificationNo] to store an additional value with a specific expression:
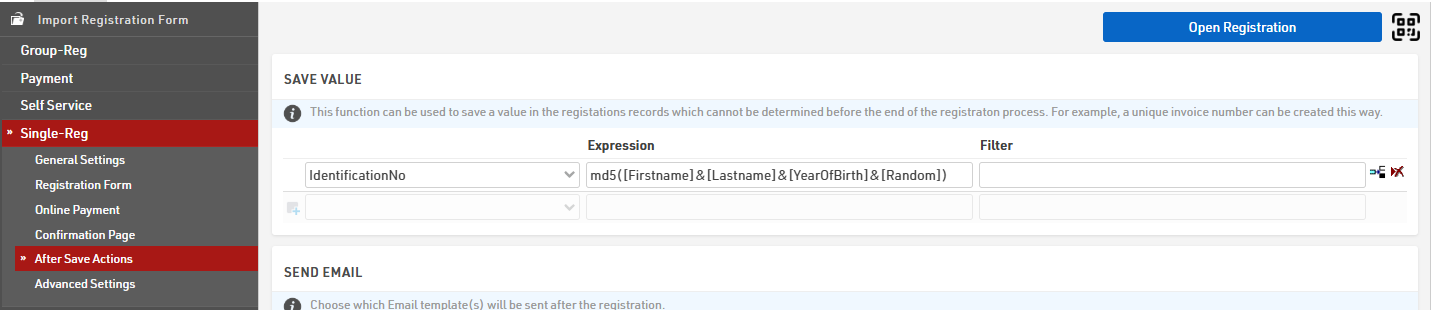
With this expression ("md5([Firstname]&[Lastname]&[YearOfBirth]&[Random]") a combination of the participant's entries ([Firstname], [Lastname], [YearOfBirth]) and a random value are saved in the additional field. The field [Random] is a Derived Field which returns a random number between 0 and 1. Additionally we use the md5() function in order to get a more secure string, which is quite impossible to copy.
QR Code Generation
The QR code will be generated in a certificate which can then be sent to participants with the confirmation e-mail. You can generate the QR code under Output >> Certificates via the small barcode icon on the right side in the tools section:
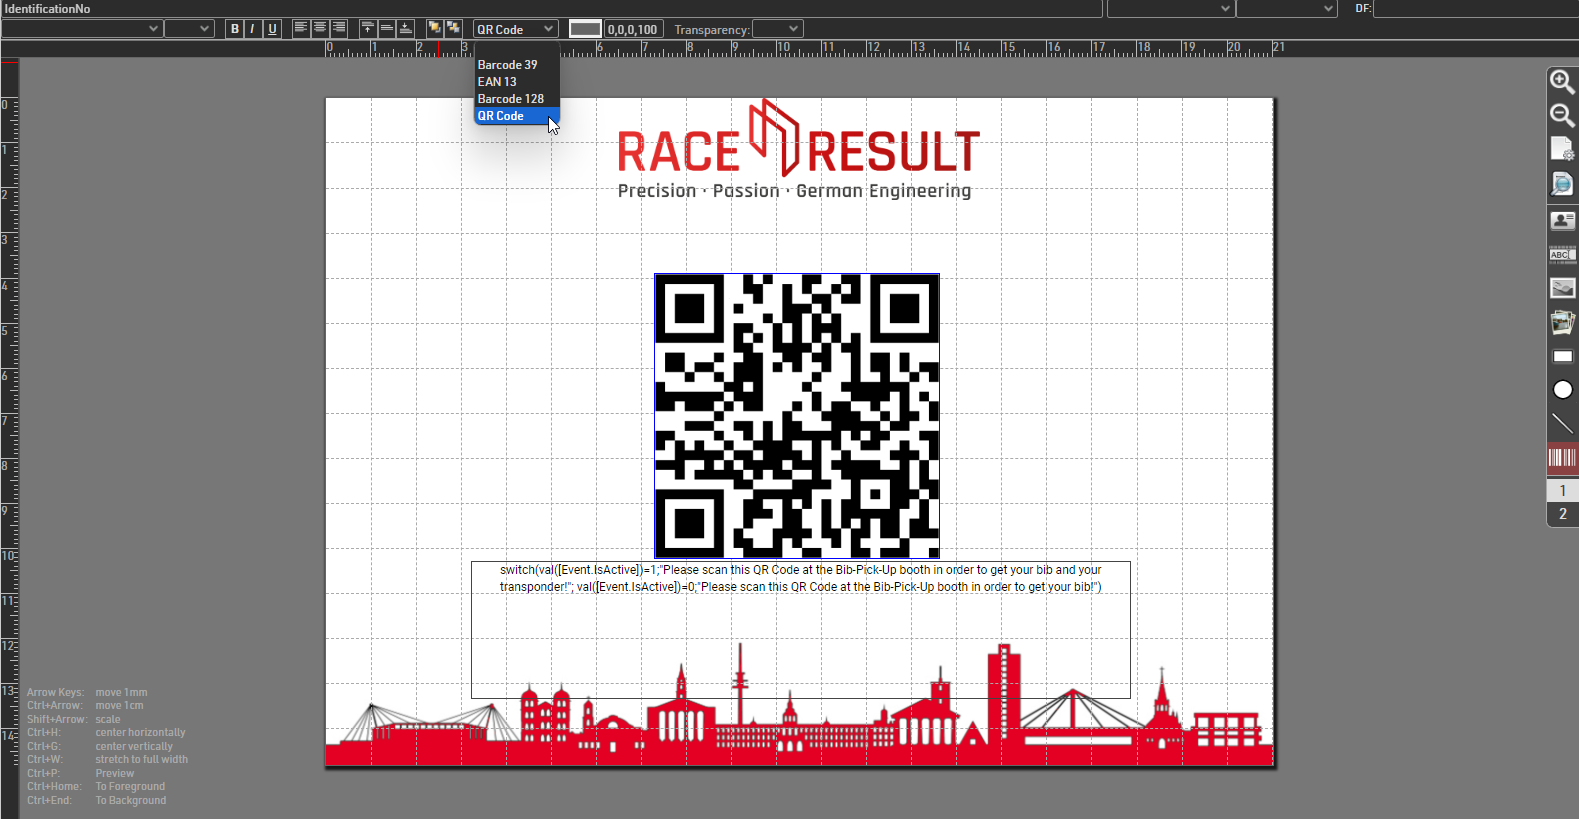
This will first create a barcode, but it can be changed to a QR code with the dropdown you find in the upper section.
After changing to the QR code we need to select the correct field which we want to save in the "QR code data". To do so, select the QR code and start typing the name of the field where you save the unique participant data during the online registration. Select the desired field from the dropdown of suggested datafields.
Email Setup
The confirmation email is set up in the Email/SMS Templates. As the participant should receive his QR code with the confirmation email after the online registration, the pre-setup certificate needs to be added as an Attachment to the email:

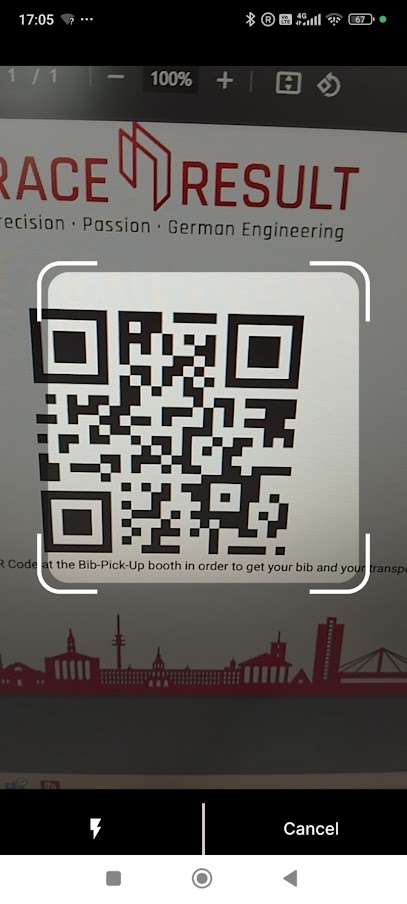
Event Tools App usage
After logging in into the Event Tools App select your Event and open the Checkin Kiosk for the Bib-Pickup.
By selecting the small, blue QR Code symbol on the bottom of the smartphone the app enables a camera mode which allows it to scan QR codes for the search entry field. In this mode the QR code for the bib pickup can be scanned and the participant's information and edit fields are going to be displayed in the next step:
After searching the participant in this way, it is possible then to adapt the editable data in the next step. This could also be a Dynamic Bib Assignment.
Dynamically Transponder Assignment
Instead of preparing a chip file and sorting chips correctly to the participant's bibs or racepacks before the event, it is possible to assign transponders easily on-site dynamically by using the Checkin Kiosk.
The transponders can be either assigned manually, by typing in the transponder code, or automatically by using a Decoder, Management or USB-Timing Box. It is also possible to use the QR-Code scanning option of the Event Tools App.
It is recommended to first import all transponder codes to the Chip File with bib number "0", this allows you to also verify the correct transponders are being assigned if using manual entry. This can be done easily scanning the transponders with a Management Box or a USB-Timing Box connected directly or through TagTool.

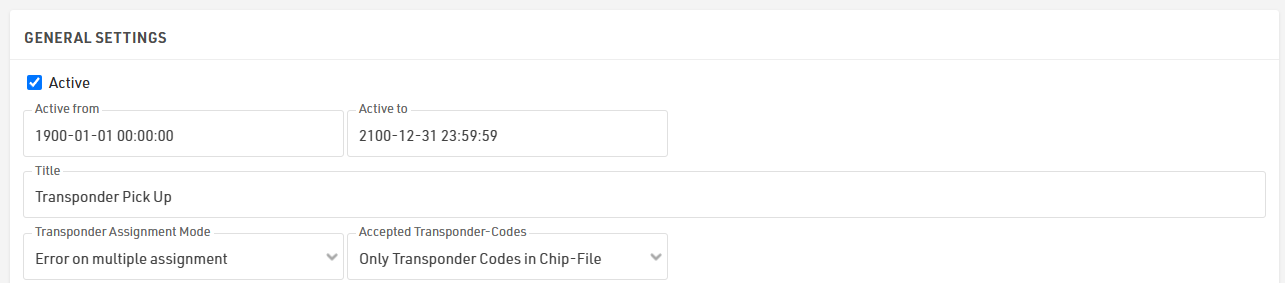
Checkin Kiosk setup
The basic setup for the Checkin Kiosk is the same for all three options. The small differences are explained in each option's description below.
In the general settings it is recommended to set the transponder Assignment Mode to Error on multiple assignment. In this case we get a notification if a transponder is getting assigned a second time (for what reason ever). Additionally, set the accepted transponder codes accordingly to use those in the chip file if applicable.
In the search step of the Checkin Kiosk we determine the fields that can be used for identifying a participant. This could be for example the first- and lastname, or a specific identification number which is encoded in a QR code. This QR code could be scanned by using the EventTools App in order to search for the participant in the database. How to set up this feature is described in the following article: Searching for Participants using a QR code.
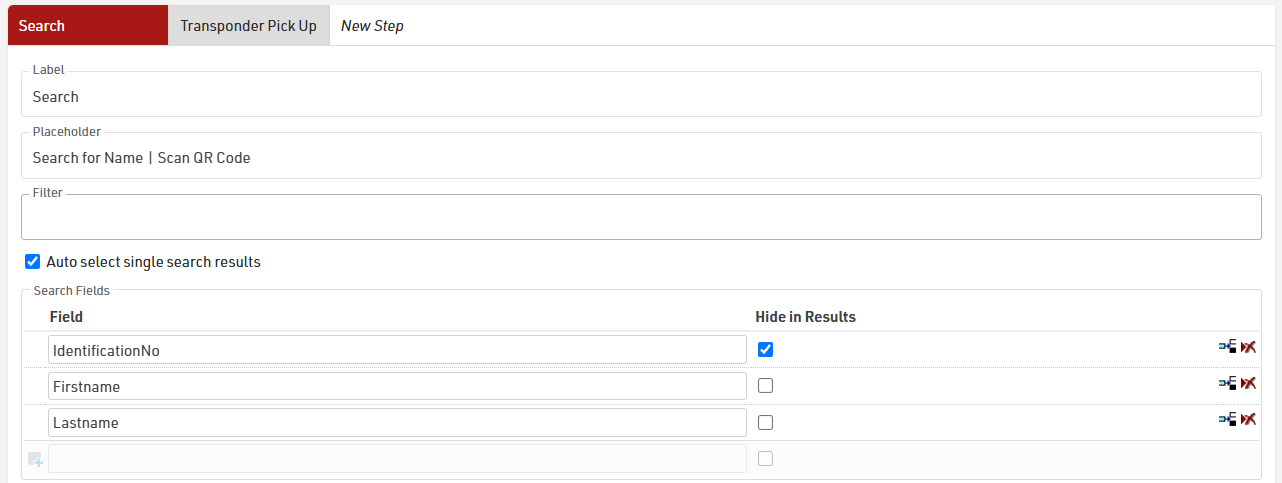
In the step for assigning the transponder code to the participant, the only editable field should be the Transponder1 field (and Transponder2 field, if two transponders per participant are handed over). If more data should be editable, the corresponding fields need to be added either in this step, or in additional steps. It is for example also possible to combine the transponder assignment with a [[@41740|dynamic bib assignment].

Manual transponder assignment
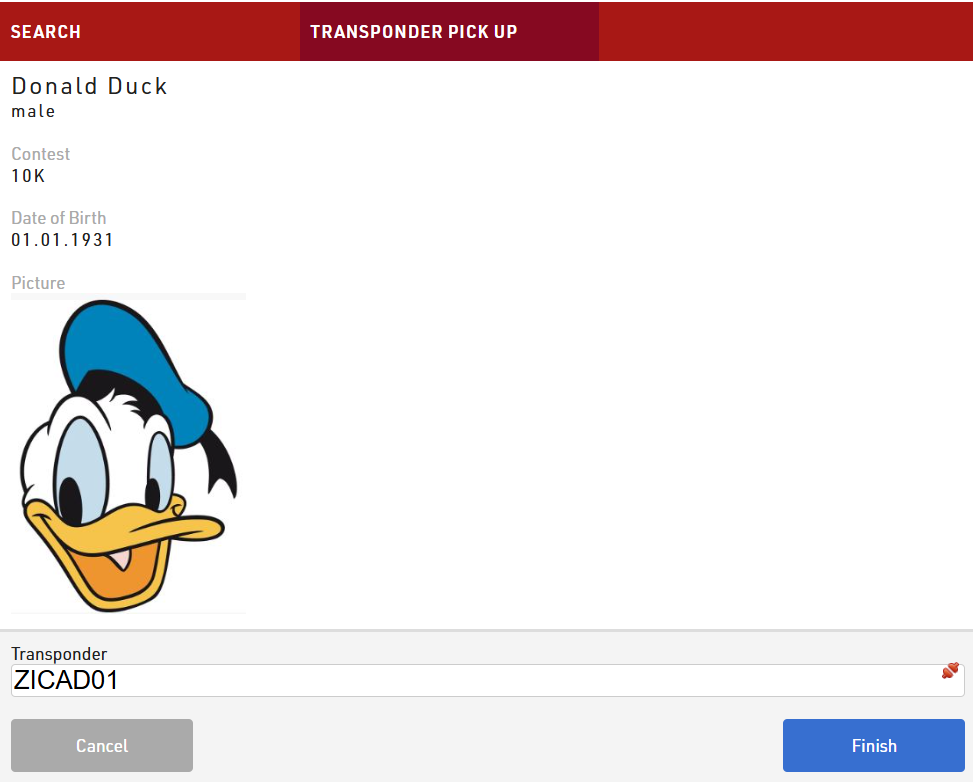
The easiest way without any additional equipment is assigning the transponder by typing in the transponder code manually on the laptop or by using the EventTools App.
If a wrong transponder code is entered, we get a notification, that this transponder is not in the chipfile that has been edited before:

If somehow an already assigned transpondercode is entered because of a typo, we get again a notification:

After clicking on the "Finish" button the entry of the correct transponder code is saved to the participants data and the transponder has been assigned correctly.
Transponder assignment with Management, USB-Timing Box or Main Timing System
Instead of reading the small printed transponder code, transponders can also be scanned directly with one of the following devices, you will need to have the RACE RESULT Web Server running on the computer running the kiosk.
- Management Box in Check mode
- USB-Timing Box in Check mode
- Ubidium
- Decoder with Active Extension connected
When connected, click the red connection icon to search for available devices and select the relevant device, the connection icon will turn green when it is connected.
Now it is possible to simply scan the transponder on the device and the transponder code is copied in the entry field automatically.

Transponder assignment with EventTools App
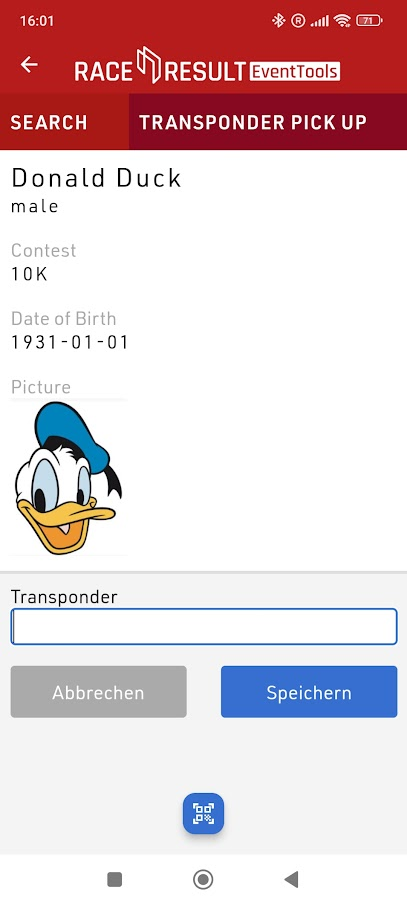
Using a Checkin Kiosk on the EventTools App gives us the opportunity to use the QR-Code scanning option which is implemented in the App.
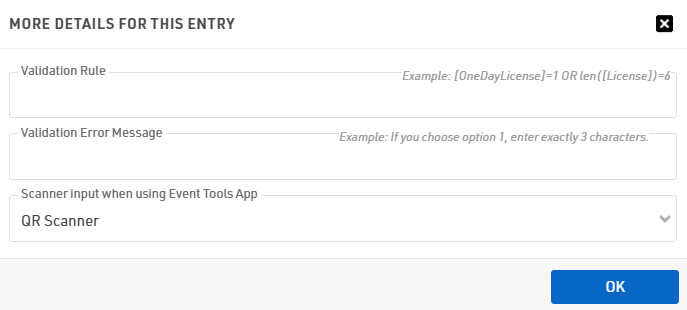
As a preparation for the transponders, all need to have a sticker on them with a QR-code which contains the Transponder code. In the Checkin Kiosk advanced settings for the editable Transponder1 field we need to select QR Scanner input when using the EventTools App:
By doing so, the small blue QR-Code symbol on the bottom of the screen will be shown in the App for scanning the transponder's QR code and to encode the transponder code:
Dynamic Bib Assignment
Using dynamic bib assignment allows for a faster bib collection for participants and can also reduce errors, participants are assigned the next available bib number rather than having to search for and select the correct bib.
Bib Numbers
The first step is to set up bib number ranges that are outside of the actual bib number ranges which are going to be used for the event. The bib ranges are set up in the Participants Data -> Bib Numbers menu:
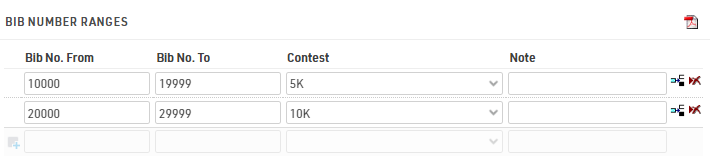
After the online-registration the participants are going to be saved in the event file with a bib number in these ranges. During the bib pick up, the bib number will be changed in the participant's data to the bib the participant receives at the bib pick up booth.
If the assigned number ranges overlap with your actual bib number ranges it may be necessary to use the reassign bib numbers in the Adapt Data menu.
Checkin Kiosk
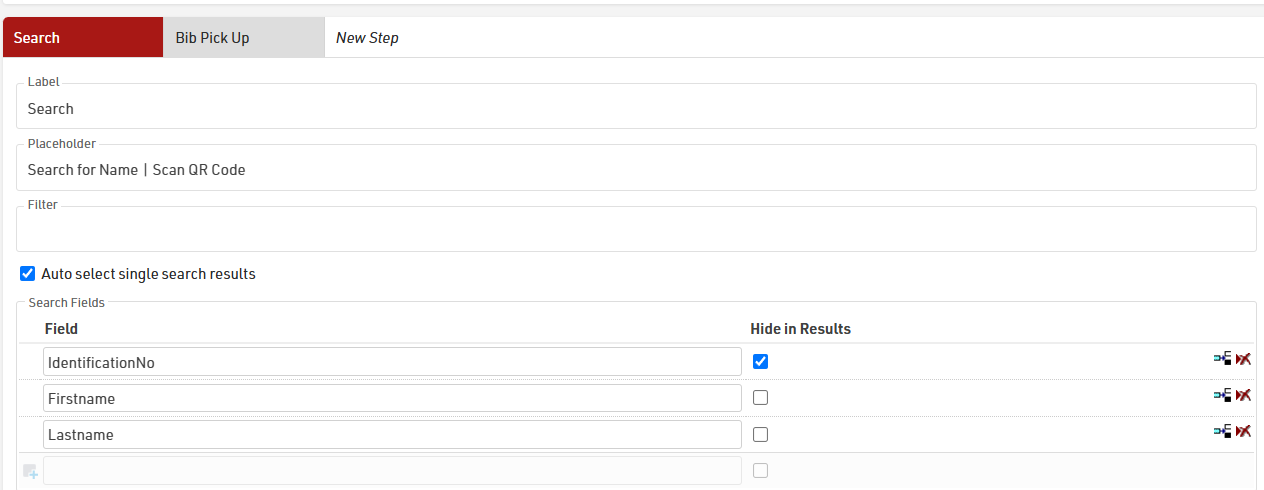
Bib numbers can be dynamically assigned using a Checkin Kiosk. Volunteers need to simply search for participants and then assign the bib number.
In the search step we determine the different fields that can be used for searching, e.g. firstname, lastname or a personal identification number that is evaluated during the registration process. By using the Event Tools App it would be even possible to scan a QR code which is for example encoded after the registration for each participant in order to identify the participant uniquely. How to use the App and the QR scan to do so, can be read in this article: Search for Participants Using a Unique QR Code.
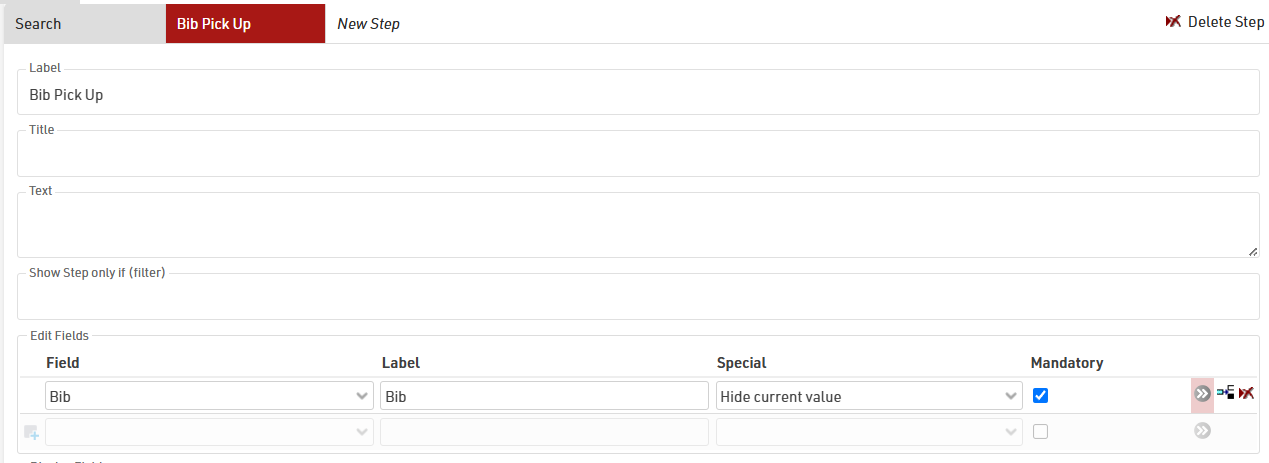
In the second step, the only editable field is the Bib field. By using the Special function "Hide current value", the current bib number (which is an invalid number) will not be shown:
After the search step and selecting the correct participant, it is possible to enter the new bib number manually:
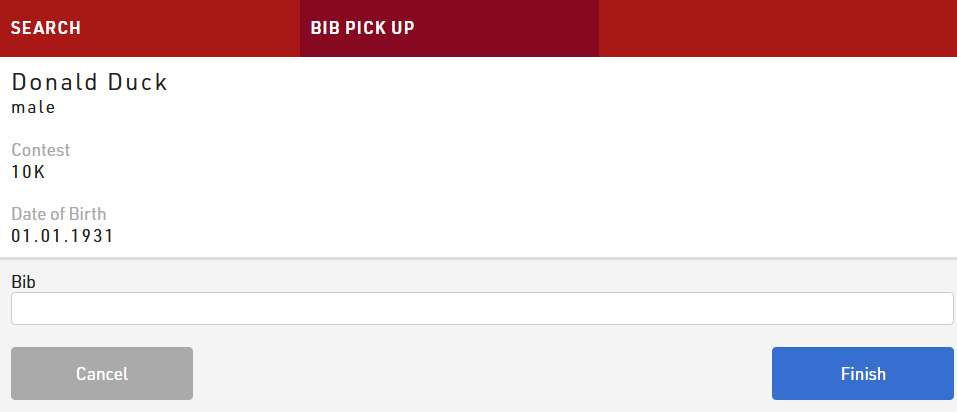
After clicking Finish the new bib number is assigned to the participant.
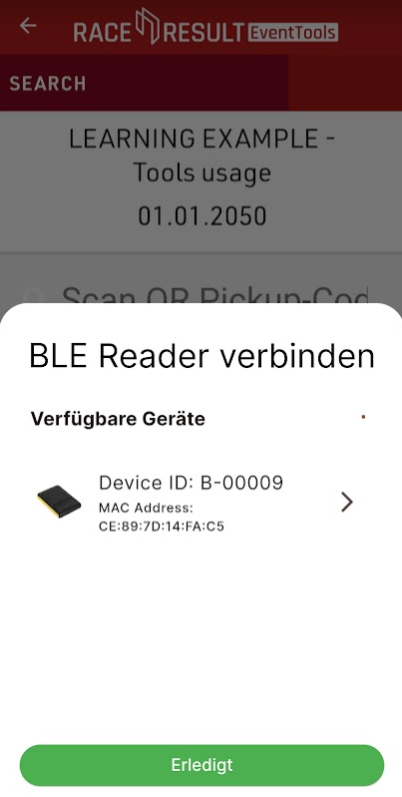
Again, when using the Event Tools App to assign the bibs dynamically, it is also possible to use the app in combination with the BLE Reader. In the details for the the Bib entry-field we can determine the BLE Reader as an input device, when using the Event Tools App:
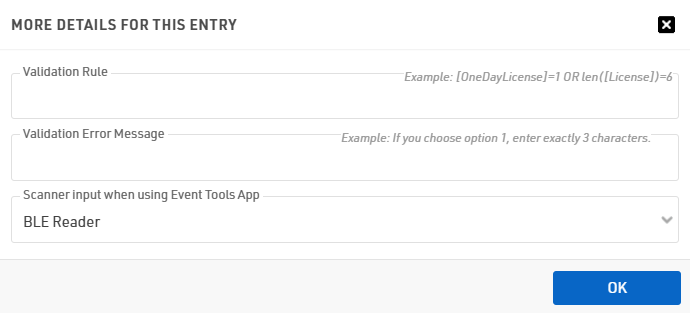
By doing so, the volunteer can just take the bib out of the box, scan the transponder once and the Reader will instantly read the bib number and will automatically fill the corresponding field. This way is a bit less error-prone, as the volunteer has no need to type in any numbers, however it does require that you are using bibs with matching transponder codes. Alternatively you could combine the bib assignment with Dynamically Transponder Assignment.
Registration
The following articles show different ways to manage and customize the registration process.
Managing Online Payments
Set Entry Fee Based on Group Size
Events may offer discounted entry fees for group registrations, typically calculated in one of the following three ways:
-
Discount Starting from the n-th Participant: The discount is applied only to the n-th participant and any additional participants thereafter.
-
Discount for the Entire Group: The discounted entry fee applies to all participants in the group, provided the group meets a minimum size requirement.
-
Fixed Price for Group Registration: A set price is applied for the group registration, regardless of the number of participants in the group.
Setting up a Registration form of type Self Service
It is often useful that participants are able to change their own data online. For this you can provide participants a unique individual link to a Self Service form (What is a Self Service form?) where they can adapt their data.
Registration Form Setup
The form is setup as a Registration Form, create a new form and select the type Single Self Service.

The form type Self Service allows a special element type in the formfields:

This field type is used to show pre-existing data which should not be editable. For example in this case the participant would only be allowed to change his contest or the club name, as these fields are still set as Input Fields.
The URL to the participant's personal Self Service form is generated using the Changelink() function, this can be sent in an e-mail template, to see how check our Knowledge Base guide on Adding a URL-Link for a Self Service form in an Email template.
When the participant opens the Self Service form via the link he received through the Email, he will see his pre-entered data and be able to adapt the data that is editable for him.
Sending a Payment Link with a Self Service Form
In some cases participants may have to pay additional fees after their initial registration either for additional services or because the fees were not captured originally. These fees can be captured using the same Online Payment methods as used in the Registration Forms, and can be sent to participants by creating a Self-Service form with the online payment enabled.
Registration Form Setup
The payment form is setup as a Registration Form, create a new form and select the type Single Self Service.
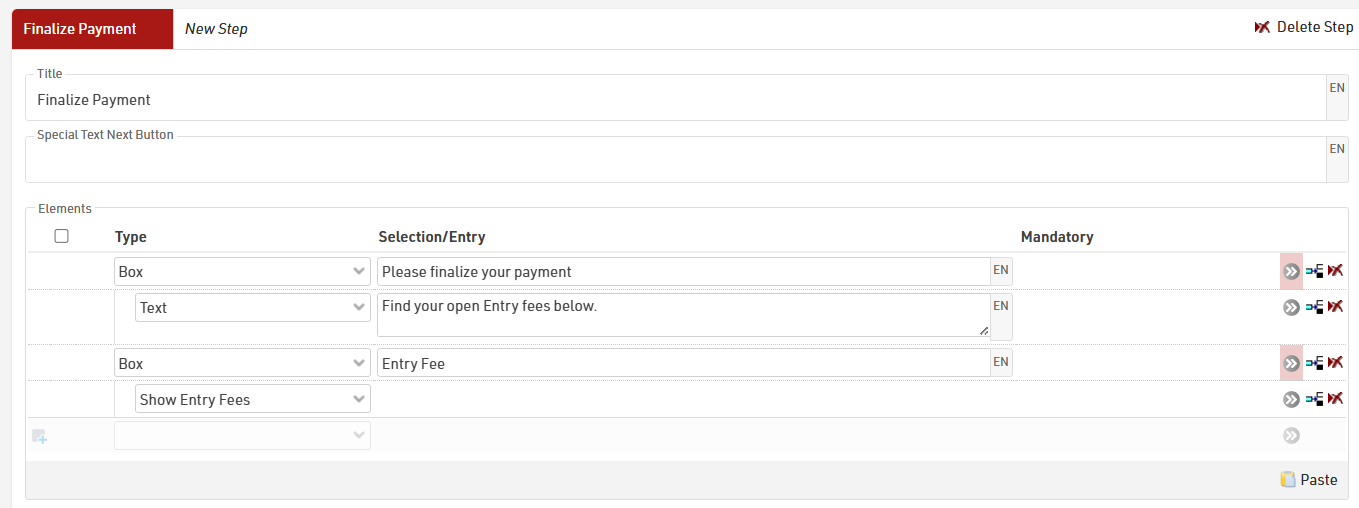
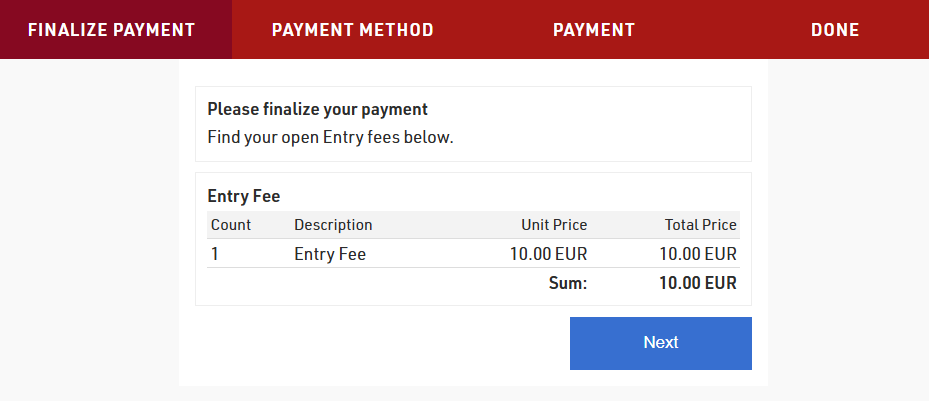
In this case it is not necessary to have a step in the registration form where the participant is able to adapt any data, therefore, we add only a very basic "Finalize Payment" step in the self service form, where only the Entry Fees are shown:
To then enable the payment in the form, activate the Online Payment in the form settings. See here for detailed information: Online Payment.
When the participant opens their Self Service form, they will see the summary of entry fees that are due, and the second step will then allow them to complete the online payment.
The URL to the participant's personal Self Service form is generated using the Changelink() function, this can be sent in an e-mail template, to see how check our Knowledge Base guide on Adding a URL-Link for a Self Service form in an Email template.
Adding a URL-Link for a Self Service form in an Email template
When using self-service form it is most common to send these in an e-mail either through to the E-mail / SMS Module or as an e-mail confirmation during registration.
To do so the e-mail format must be set to HTML, then It is possible to insert a URL link by clicking the link icon (  ) and using the Changelink() function.
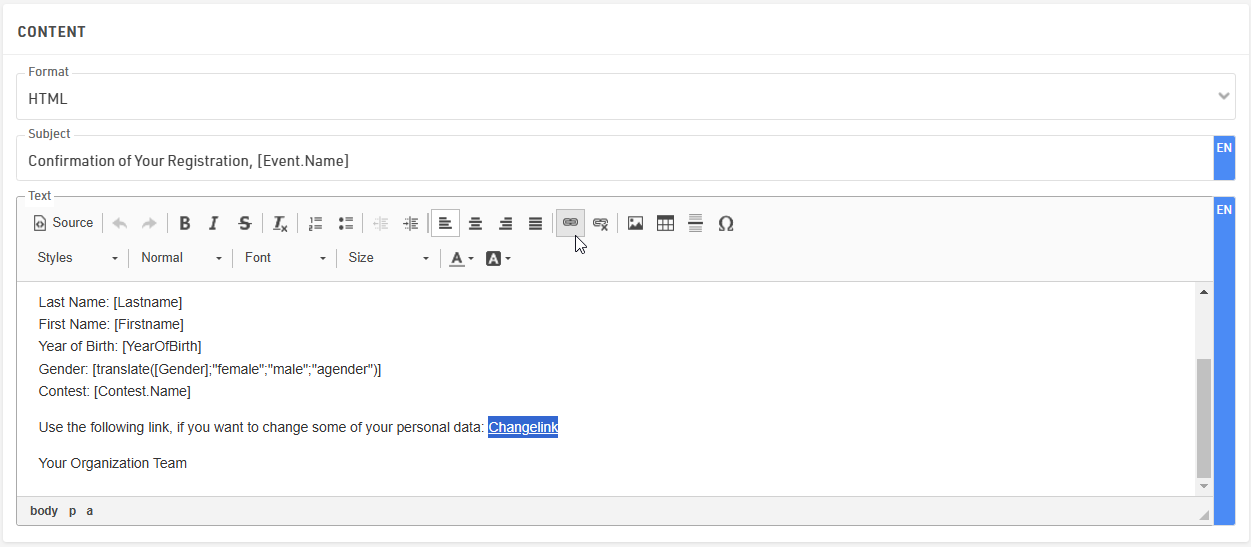
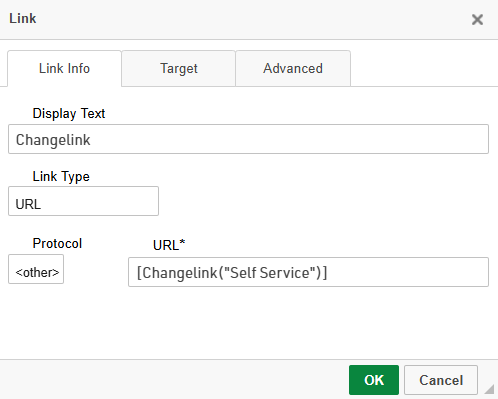
When clicking the link icon, a small window pops up where the Display Text can be adapted, this is the text that will be shown in the email instead of the whole URL link. In the URL section we call the Changelink() function in square brackets. Inside the ChangeLink() function you need to then type the name of the registration form in quotation marks.
It is very important to select the Protocol type <other> as the ChangeLink() function will already create the https:// prefix.
In order to send out the confirmation Email automatically, the template needs to be added in the After Save Actions of the regular registration form.
Send an Email Notification After X New Registrations
To enable automatic notifications after every X new registrations through the Registration Forms, it is necessary to include an additional field (e.g., [RegCount]) where the total number of registered participants is stored.
Additionally, an email template must be created with the appropriate recipient's email address.
Creating an Additional Field to store Registered Participants
Under Main Window > Participants Data > Additional Fields, create a Field type Number (Integer) called, for example, RegCount.

Configuring RegCount in the Registration Form
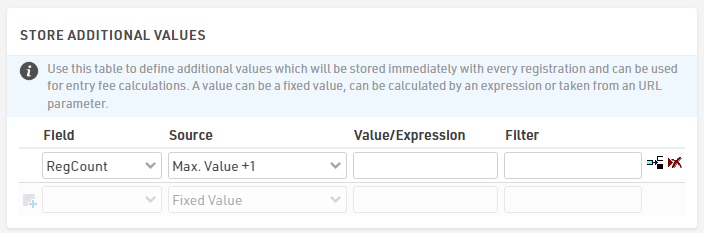
To track the number of registered participants, select the "Max. Value +1" option in the Store Additional Values section, available under the Advanced Settings of the registration form.
This configuration will automatically populate the [RegCount] field with the current total of registered participants for each new registration.
Creating an Email Template for Notification
The email template is designed to notify the recipient when X new participants have registered, including the total number of registrants. The function DMax() can be used to calculate the total number of participants.
Since the email will always be sent to the same address, the recipient’s email can be entered directly as an expression in the Receiver Field.
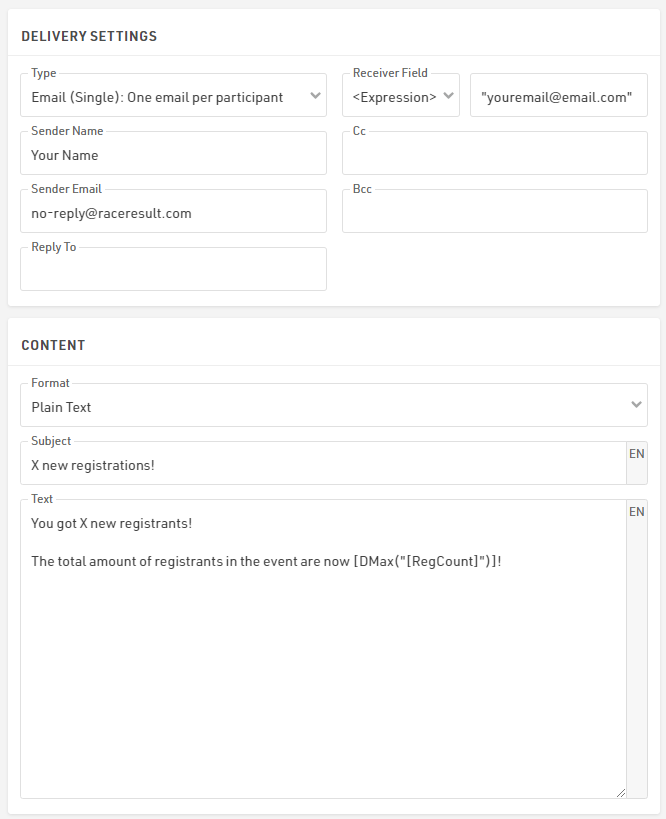
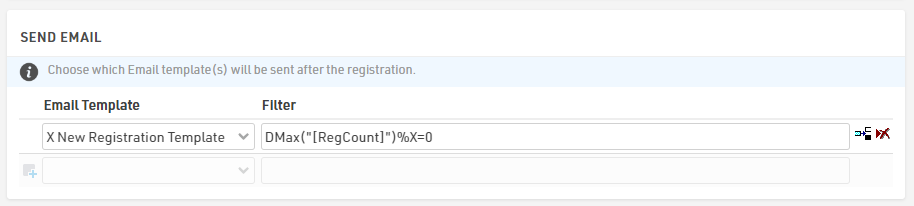
Triggering the Notification After Every X Registrations
To trigger the email notification after every X new registrants, apply the following filter in the Send Email module under the After Save Actions of the Registration Form:
DMax("[RegCount]")%X=0
This formula checks if [RegCount] is a multiple of X. When the remainder of the division is zero, the system sends the email notification.
Assign Entry Fees Based on the Number of Registered Participants
Some events offer tiered pricing for registrations: the earlier you register, the cheaper the entry fee. Although RACE RESULT 12 does not provide this as a built-in feature, such a pricing structure can be implemented by combining Additional Fields, conditional Entry Fee filters, and expressions in the Online Registration Form.
Example Scenario
Consider a tiered pricing model where the first 100 participants pay 10 EUR, participants 101 to 200 pay 15 EUR, and all subsequent participants pay 20 EUR. Implementing this model requires assigning a dynamic registration number at the time of form submission and using this value to determine the appropriate entry fee.
Create an Additional Field to Store Registration Order
To track the order of registration, an additional field must be added to the participant dataset.
In Basic Settings ⇒ Participants Data ⇒ Additional Fields, create a new field of type Number (integer), for example named RegCount. This field will store each participant's position in the registration order.

Define Entry Fees Using Conditional Filters
Once the RegCount field is in place, define the entry fees based on this value.
Under Finance ⇒ Entry Fees, create three separate fee entries and assign filters as follows:
- A 10 EUR fee applies when [RegCount] IN "1-100"
- A 15 EUR fee applies when [RegCount] IN "101-200"
- A 20 EUR fee applies when [RegCount] > 200
These filters ensure that the correct fee is applied automatically based on the stored registration count. The participant will see and pay the appropriate price during registration, based on the data at the time of submission.

Calculate and Store the Registration Count
The next step is to calculate and store the correct value in the RegCount field during the registration process.
Open the Registration Form, go to Advanced Settings > Store Additional Values, and add the RegCount field. Set the Source to Expression, and use the following formula:
DCount("[Contest]=" & [Contest]) + 1
This expression counts the number of participants already registered for the same contest and adds one, assigning the next available number to the incoming registration.

Handling Group Registrations
When using Group Registration instead of single registration, the calculation must account for the position of each participant within the group. In this case, the following expression should be used instead:
DCount("[Contest]=" & [Contest]) + [GroupRegPos]
This ensures that each member of the group receives a unique and incremented value for RegCount. The field [GroupRegPos] indicates the sequence of the participant within the group registration. It starts at 1 for the first person and increases for each additional group member. In single registrations, this value is 0, which is why the +1 expression is required instead.
Limitations and Considerations
The [RegCount] value is only saved after a registration is submitted. This means that if multiple users register simultaneously - especially near a pricing tier threshold - they may receive the same RegCount and be charged the same fee, even if one should fall into the next tier.
This can happen during periods of high demand or when tier ranges are very narrow compared to the registration volume. While such overlaps are rare and self-correcting, they should be considered when configuring the pricing model.
Transferring Registrations Using Vouchers
At times, participants may need to transfer their registration to another person while maintaining data privacy and avoiding the exchange of personal information.
A convenient and secure solution is to let a registered participant generate a Voucher (via SimpleAPI). This Voucher can then be used by a new participant as a discount code when registering for the event.
Prerequisites
Before setting up the process, make sure you are familiar with how to use:
- Web Service Calls in RACE RESULT 14
- Self-Service Registration Forms
- User Defined Fields (UDFs)
Voucher Structure
When parsing Voucher data via the API, the JSON structure is as follows. Not all fields are required:
{
  "Code": "EnterVoucherCode",
  "Type": EnterType,
  "Amount": EnterAmount,
  "Tax": EnterTaxValue,
  "Contest": EnterContestID,
  "Category": "",
  "ValidUntil": "",
  "ValidFrom": "",
  "Reusable": 1,
  "UseCounter": 0,
  "Remark": ""
}
* Type Values:
- 0 - Fixed Amount
- 1 - Percentage (1-100)
API Endpoint
To save a Voucher in RACE RESULT 14, use the following API endpoint:
vouchers/save
Set up a Web Service Call with the parameters below.

Post Content
Make sure there is a space after the first quotation mark:
Post Content: " [{" & [VoucherAPI] & "}]"
Create the UDF [VoucherAPI]
First, create a set of Additional Fields:
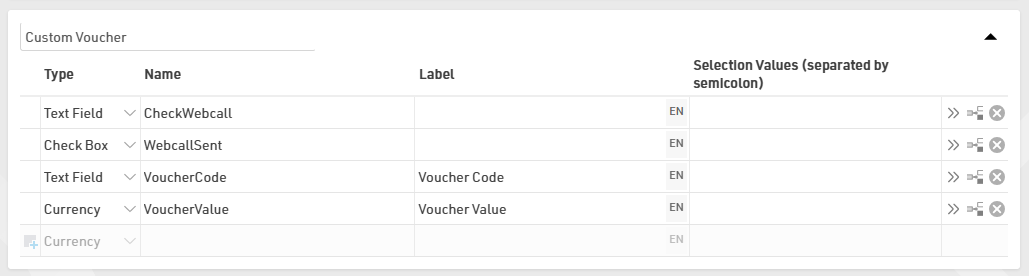
Then proceed with the creation of the User Defined Field VoucherAPI
VoucherAPI: #"Code": "[VoucherCode]", "Remark": "", "Type": 0, "Amount": [VoucherValue], "UseCounter": 0, "Reusable": 1, "Category": "", "ValidUntil": "", "Contest": 0, "OrderPos": 0, "ValidFrom": "", "Tax": 0
Generate the Voucher Code via the Self-Service

To generate the VoucherCode, use Store Additional Values under the Advanced Settings of your Self-Service Registration Form.

Expression - This expression ensures each Voucher can be traced back to the participant ID who created it:
[ID] & "V" & UCase(left(md5([Random]);6))
Automate the API Call
In your After Save Action, select the Voucher Web Call to make the POST request. To prevent multiple API calls for the same participant, add the filter [WebcallSent]=0
Send the Voucher via Email
You can allow participants to enter a receiver email address during the process. This way, the Voucher Code and its value are automatically sent to the recipient via email.
Restrict Additional Voucher Creation
To prevent misuse, use Show if (Old Values) conditions in your Self-Service Form to ensure that once a Voucher is created, the original participant:
- Cannot create additional Voucher Codes.
- Can still view the created Voucher Code and its value

This setup allows a participant to safely transfer their registration by generating a Voucher that another participant can redeem.
It ensures:
- Data privacy (no sharing of personal details)
- Controlled and traceable transfers
- Automation through the RACE RESULT API and Self-Service features
Automatically Creating & Sending Invoices
Especially for events including corporate registrations, you may be asked to issue invoices, regardless of the used payment method.
Example Scenario
In the registration form, we ask whether an invoice is required and if so, in the next step ask for the invoice details. After completing the registration, the invoice will be filled with payment terms from the online payment and is automatically sent to a dedicated invoice receiver address.
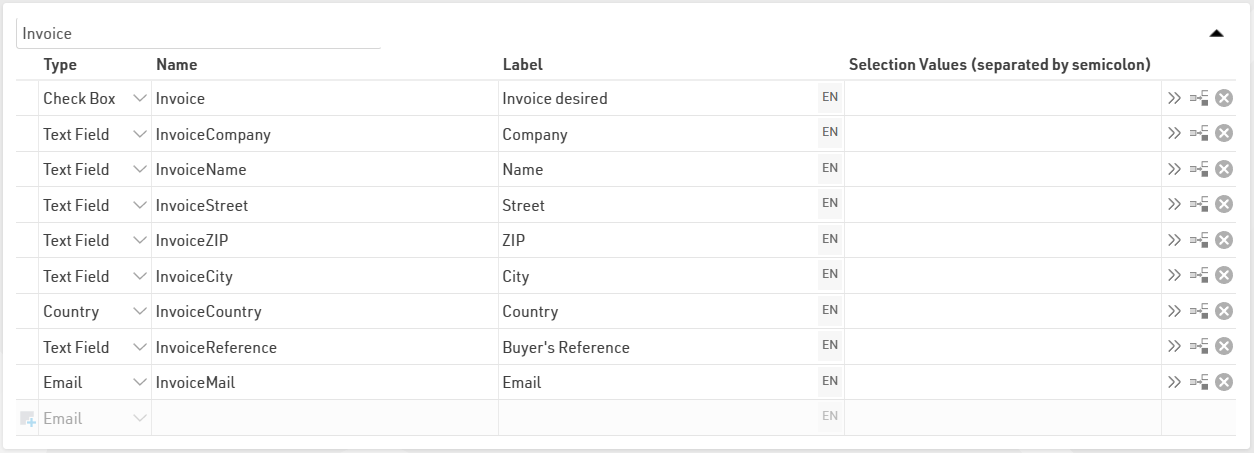
Create Additional Fields to Store Invoice Receiver Data
To fill the invoice with the correct receiver information, additional fields must be added to the participant dataset.
In Basic Settings > Participants Data > Additional Fields, create a new group with the required invoice fields. In addition to the invoice address, in the checkbox field [Invoice] we define whether an invoice shall be created and sent.
Define the Invoice Settings and Prepare the Invoice Layout
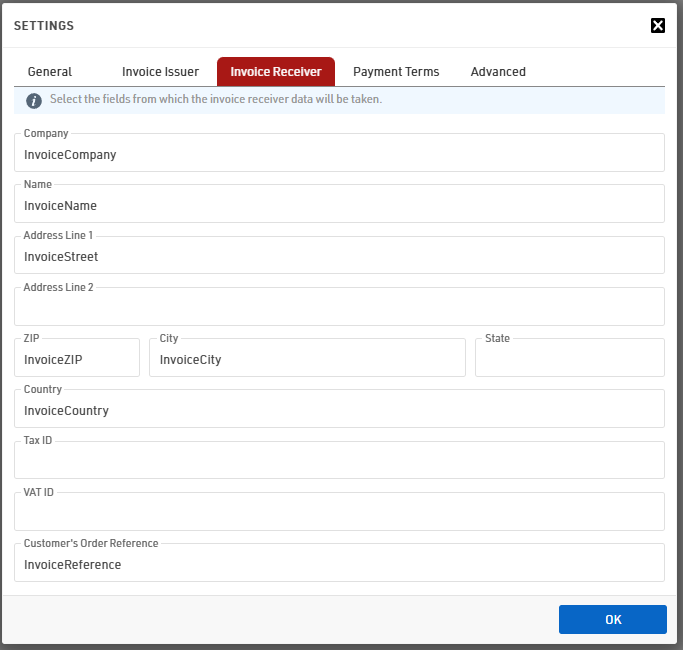
Under Finance > Invoicing open the Settings and define the details for the invoice creation, such as the invoice numbering, your company details as invoice issuer, . Lastly, navigate to Invoice Receiver. In here, assign the Additional Fields created for the Invoice Details to the respective Invoice Receiver Fields.
Prepare the invoice layout as outlined in this article.
Prepare dedicated Invoice Email
Under Email/SMS, create a new Email template. For the Receiver Field, select [InvoiceMail] to ensure the invoice email is sent to the dedicated invoice email address.

If required, you can add your companies' accounting email address as a BCC receiver to stream invoices immediately in your accounting tool.
At the very bottom of the template add an attachment of type Unsent Invoice. If the attachment name is left empty, it will automatically use [Invoice.Number].pdf as the file name.
Add Invoice Query to Registration Form and Define Auto-Send of Invoice
In the last regular registration step we add an Input Field for the field [Invoice]. In the extended settings we define the Deviating Field Label as "Yes, please issue an invoice".
Next, we add another step after the query to issue an invoice. For better formatting we put the Invoice Fields in a Box. Additionally, we define a "Show If" for the whole box to show only if [Invoice]=1. By doing so, the whole step will be skipped if no invoice shall be issued.
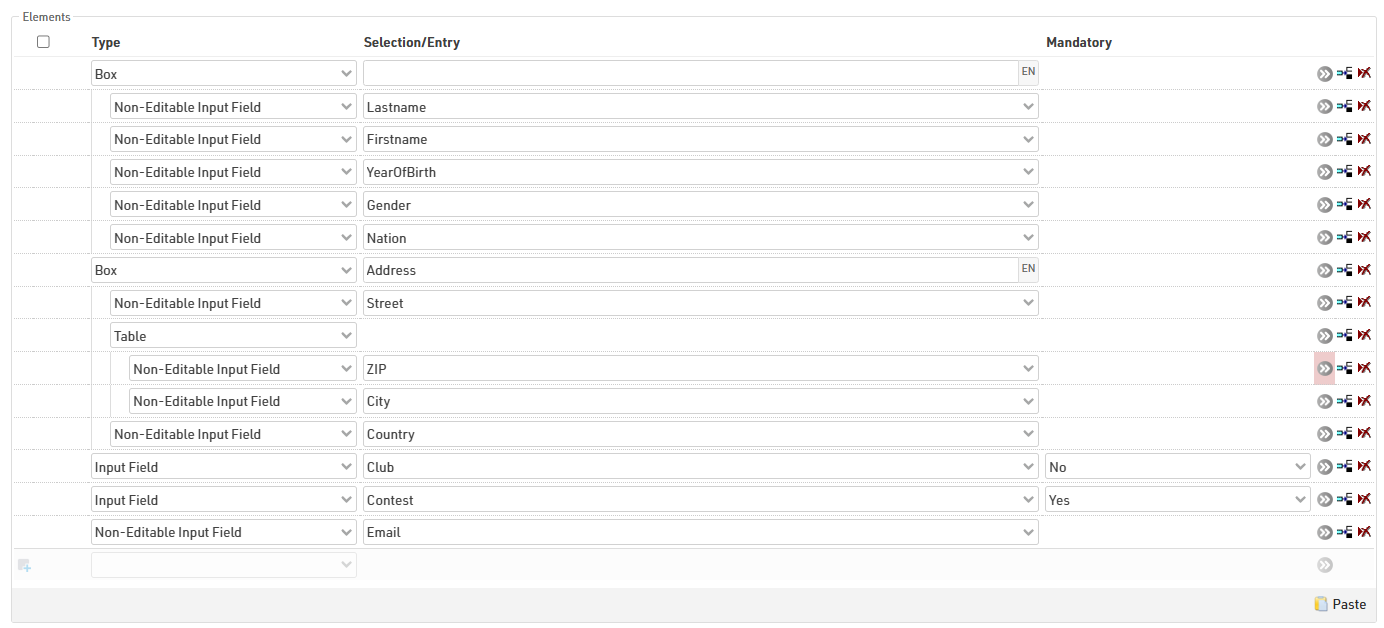
The table for ZIP and City can easily be copied from the "Entries" step and the fields be adapted. This ensures a proper width of the fields side-by-side.
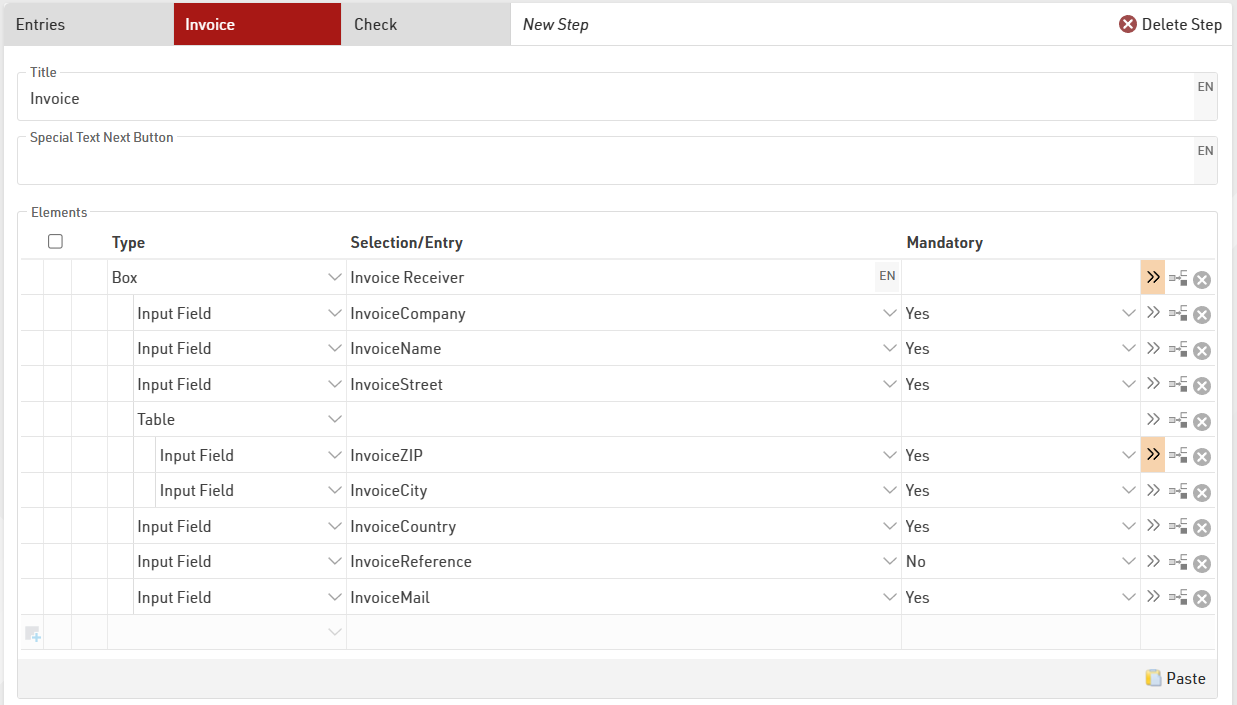
For Group Registrations, make sure ALL invoice related fields are defined as common fields.
Automatic Sending of Invoice
Under After Save Actions tick the box to automatically create invoice after registration with the following filter:
Under SEND EMAIL add the previously configured Invoice template and provide the exact same filter as above.
Slot Transfer Platform
Disclaimer: This solution is an advanced setup. Only trained customers who understand the different functionalities in use should use this solution.
This article will briefly explain how it is possible to set up a Slot Transfer Platform with different tools that are available in RACE RESULT 14.
Reason behind such a platform is offering the participants a possibility to transfer their slots to other participants.
Knowledge of all the functions mentioned is required. Of course, this is not a final and the only possible solution. Feel free to adapt different settings to your needs and see also the "Further Ideas" section at the end of the article.
General situation
- Contest / Event fully booked, but still interested Participants.
- Registered participants that cannot attend.
Idea
- Registered Participants can offer their slot for sale.
- Interested Participants can buy these starting slots on a “official page”.
Requirements
- Easy workflow for Buyer & Seller.
- (Automatic) Refund-System.
- No contact between Buyer & Seller.
- minimize fraud
- Data privacy
Attached to this article you will find an .ses file where everything is pre set. Note, that there is no further explanation and support offered for any CSS stylings that can be found in the eventfile.
In the Registaion Forms section you'll find two foldes named "Changeforms" and "Registrations". Depending on the type of form it is talked about, you'll find the form in the dedicated folder.
For a general overview see the flow-diagramm (picture) attached to this article.
General Procedure (see flow-diagramm)
- Participant A ("Seller") registers to the event and receives the usual E-Mail-Confirmation
- E-Mail contains two Changelinks
- Usual Changeform to allow changes / buy merchandise etc.
- Link to a "Selling-Form" which allows to put the Slot on the official Slot Transfer Platform
- E-Mail contains two Changelinks
- Participant B ("Buyer") cannot register anymore to the usual registration as e.g. the event is fully booked, but there are slots available on the Slot Transfer Platform.
- "Buyer" selects a Slot and does a "normal" registration and receives an E-Mail-Confirmation only with the usual link to his changeform
- In this example case the buyer is not allowed to sell his slot again.
- After the "Buyer's" registration the "Seller" is moved to different contest. This way contest-capacities are always leveled and contest do not get overbooked. The "Seller" receives an E-Mail with the confirmation that the slot has been bought and he now can ask for a refund of the Entry-Fee.
- E-Mail contains a link to a changeform called "Refund-Form" to trigger the (automatic) refund.
Additional Fields
Within the eventfile a bunch of Additional Fields is used, which are some key-elements in the whole process of selling and buying a slot on the platform. The fields are either used to save personal data automatically during different steps in registrations / change-forms, or for actions that participants need to make in registrations / change-forms.

Registration-Form ("Registration")
- In the eventfile is a dedicated registration-form which is used for the initial registrations to the event.
- In the After Save Actions the E-Mail-Confirmation "Single Registration" is send out
- The E-Mail contains two changelinks:
- Link to usual Changeform ("C-Changeform")
- Link to a Changeform where the participant can put his slot on the Platform ("A_Selling-Form")
Selling-Form
- Use: Participant can actively offer starting slot for sale.
- General settings >> Filter: Only participants that haven't put their slot on the platform yet and did not buy a slot from the platform can open the form.

- In this form the participants needs to tick a Checkbox (Additional-Field [SlotSold]) in order to confirm he wants to transfer the starting slot

- After Save Actions:
- Save a unique String in the field [URLID].
- Save the ToD when the form was done.
- Save the Changelink to the Refund-Form ("B_Refund-Form") in an additional field
- Send E-Mail -Confirmation

Slot Transfer Platform
The Platform is in the end a list in RACE RESULT 14. The list can be found in the folder "A_Slot Transfer Platform" and is called "B_Slots for Sale". You can find also other lists in the folder. Familiarize yourself how they are set up.

The list "B_Slots for Sale" has a specific filter in order to only show participants that have ticked the Checkbox in the Selling-Form and who's [URLID] is only once avaiable in the event:
[SlotSold]=1 AND DCount("[URLID]=""" & [URLID] & """")=1
The list itself shows not much data:
- Bib of selling participant
- "> Buy" Link
- ToD when the Slot was offered

Behind the "> Buy" link is a HTML-Expression which is
- The URL of a Registration Form called "Buying-Form"
- with an added URL-Parameter called "URLID" followed by a string which is the pre-calculated [URLID] of the selling participant, which was calculated in the "Selling-Form".
As an example, such a link could look like the following (in bold a calculated [URLID] of the selling participant):
https://events.raceresult.com/registrations/?event=378986&n=Registrations%7CBuying-Form&k=GG5bV1V3YZkX&lang=en&URLID=E9A9A99989657DC8B8F8FE690B60EC34- Make sure to change the URL, if you upload the file to your account. Remember, the event will receive a different Event-ID!

Buying-Form
The Buying-Form is a Registration Form, you can find it in the corresponding folder. It's almost a copy of the usual registration in the front-end but has some hidden functionalities.

URLID
Cruicial - the URLID is the field and String which is used to map the two participants.
- At the bottom of the first step you can find the Input Field [URLID] with additional Details:
- The Default Value of the field is from Type URL Parameter and the value itself is "URLID". In this way, it is possible to call the URLID-string which is in the URL of the opened form into the [URLID] Input field of the current "buying" registration.
- A certain CSS-Class "URLID" which is used to hide the field in the front-end of the registration via CSS. The CSS code can be found in the Advanced Settings of the "Buying-Form":
.URLID{
display: none;
}
If this CSS codelines are removed you would see the following in the frontend of the form:

The Registration is calling automatically the string from the URL into the addtional field [URLID] of the "Buyer". "Seller" and "Buyer" will have the same URLID-string in the additional field [URLID] which allows to map those two participants.

- This way it is now possible to store values/data from the "Seller" in corresponding "Buyer's" additional fields with the functionalities in the Advanced Settings >> Store Additional Values like:
- We are using here the DFirst() Function. The Bib, Firstname, Email etc. of the FIRST participant within the Eventfile, that has the same URLID-string in the field [URLID] as the "Buyer" has, will be stored in the selected field.

- We are using here the DFirst() Function. The Bib, Firstname, Email etc. of the FIRST participant within the Eventfile, that has the same URLID-string in the field [URLID] as the "Buyer" has, will be stored in the selected field.
- Important is to store the Changelink for the Refund-Form for the selling customer and his firstname in an corresponding additional field.
- In the After Save Actions three Email templates are sent:
- "Singel Registration" >> E-Mail-Confirmation for the Buyer
- "B2_Webservicecall" >> Web Service Call in order to move the Seller in another Contest
- POST Method calling an API-URL

- API comes from the Simple API section in Access Rights/Simple API.

- POST Method calling an API-URL
- "C_Request for finalisation of sale" >> E-Mail-Confirmation for the Seller that the slot has been bought and he can now ask for a refund via the Refund-Form.
- Important in this Email-Template:
- Receiver Field: [MailSeller] --> calculated in Store Additional Values.
- Salutation with [NameSeller] --> calculated in Store Additional Values.
- Changelink for Refund-Form from additional Field [RefundLink_Buyer] --> calculated in Store Additional Value.
- Important in this Email-Template:

Security-Features within the Buying-Form
There is a Box at the top of the Form with three HTML elements:

These are "Error-Messages" that popup in different scenarios and block the current registration. This is done by the use of the Show If and Validation Rule in the Details of each HTML element:
- "Slot already bought" >> is shown when there are already 2 participants in the Eventfile with that particicular URLID that also the new registration gets
- "Link in use by someone else" >> Is shown when there are currently more than 3 participants with the same URLID. Here the funciton DCount(;true) is used. This function counts also participants that are not yet registered and are in the process of the registration.
- "Link invalid" >> is shown when the URLID of the ongoing registration is not at all existing in the Eventfile currently. So if someone modifies the link, it is not possible for him to register.
The popup in the Buying-Form could for example look like this:

Refund-Form ("B_Refund-Form")
- Use: Seller can request a refund.
- General Settings Filer >> Considers only participants:
- that have not requested a Refund yet.
- Participantas that sold their slot.
- Where the URLID is only existing twice in the Eventfile

- Online Payment: Activate Refunds and select a Payment Method according to your needs

- After the Slot has been bought on the Platform, the Seller will be moved to a contest without any Entry-Fees set, therefore he will have a positive balance which can be payed back as a refund:

- After Save Actions: E-Mail-Confirmation is send out.
After going trough the Refund-Form the whole Slot-Transfer is completed.
The "Slot Transfer Platform" on my.raceresult.com
The platform itself can be configured as a dedicated tab on the my.raceresult.com page of the event:

Ideas of Improvement and further development
Of course there is room for improvement in the presented process, ideas could be:
-
Swap the Bib, so the buying participant is also receiving the Bib-Number of the selling participant
- Use the "selling option" directly in the usual changeform and not in a dedicated Selling-Form
- Make sure that the "selling option" is not visible for participants that have bought their slot on the Platform
- Give the oppurtunity to particpants, that have bought their slot on the platform, to sell it again.
Timing
The following articles show different ways to setup the timing of your event.
Setup Multiple Wave Starts
By default the Start Times (T0) will be set per Contest, however many races require wave starts according to other criteria such as age group, a pre-defined wave number or at scheduled intervals in races such as Time Trials, they may even be random waves with athletes checked in for each.
Pre-Assigned Waves
If wave starts are pre-defined by some criteria then you can set the Start Times to Wave Start according to: and then enter the required field or expression in the entry field, this can be any text or numerical value.
The list of Start Times will now show a record for each value which is entered in that field or returned by the expression, it will also return an entry with a blank title where no value is returned.
You can now enter a Start Time for each wave as normal.
Calculated Wave Starts
The alternative is to calculate a wave start time or assigned start time directly in a result, this is useful for Time Trials or races where waves of participants start at fixed intervals, such as pool-based triathlons.
In a result create the calculation, for example if participants are in pre-assigned waves and each wave starts 30 seconds apart then you could import the Wave number to an ATF and then your Start Time Calculation could be:
We still use T0 for the first wave to start and then for each wave 30 seconds is added, similar expressions could use a Bib number or sorting rank for individual time trial starts. This does rely on each wave starting on time.
When using a calculated wave start then you should disable Subtract Start Time (T0) in your Timing Point setup, and you would need to subtract the calculated start time for the relevant results.
Random Waves
The final option occurs when no fixed waves are assigned, participants may be checked in over a specific timing point and then started in groups of a certain size.
In this way T0 is irrelevant, so again ensure this is not subtracted from your results. Setup a result using an advanced rule to take the appropriate check-in time, most likely the Maximum detection at your check-in Timing Point.
You can then use the Marker on the decoder and capture a marker for each wave start, and use a second result with an advanced rule to look for the appropriate marker. This is most likely to be the First Marker after the check-in result.
You can now use this result as your reference to subtract as the Start Time.
Participants in the Wrong Wave
If a participant does not start in the correct wave then you can either change the value of the assigned wave value or overwrite the time in the individual participant's results. A second wave override ATF is also commonly used as part of an expression so that waves can be re-assigned if the waves are based on a fixed value such as Gender or Age Group.
Handle Multi-Day Races
When timing a race which will go through midnight over multiple days there are some special considerations to make with your setup in RACE RESULT.
Firstly it is important to understand how the software handles this, rather than using a date/time combination the times will simply continue to count up past 24:00:00 rather than restarting from 00:00:00, so for example 3:30:00am on day 2 would be a time of 27:30:00 or 1:03:30:00 in RACE RESULT.
When working with multi-day races you must set the event Date From and Date Until in the Basic Settings - Event Settings.
Only if this is set you will now be presented with three options in the Timing Settings, this controls how the software handles multi-day events.

Ignore date, time starts over at 0 after midnight - with this option the times will start from 00:00:00 at midnight again and RACE RESULT will NOT calculate results that go through midnight. This is useful for events over multiple days which may have different races on different days and so it makes sense to start each day from 00:00:00
Subtract Event Date - when selected this will automatically consider the Event Start Date as the starting point and the times will now continue to count up past 24:00:00 for every subsequent day after this date. With this setting the date will always be tied to the Event Date.
Subtract this start date - when selected this will by default set to the Event Date From, this date is considered the starting point and the times will now continue to count up past 24:00:00 for every subsequent day after this date. With this setting no matter if the date is changed the times will be correct.
Transponder Code Validation
The following functions allow you to validate that an input matches the pattern of a valid RACE RESULT Active Transponder code, for example if participants are required to enter an individual transponder code during registration. Note it does not truly validate if it is a valid Transponder code.
If you are using Check-In kiosks to assign transponders then it may be easier to use the option to only allow transponders which are in the chip file to validate against your own stock of transponders. You can import a chip file with all bibs set to 0 for this.
This can be entered as a User-Defined Function which takes an input to validate the value entered.
Create a user-defined for isTransponder(x), or an applicable function name with the following expression, this checks that the length is 7 characters, the first 5 digits should be letters and the last 2 digits should be numbers.
Len([x])=7 AND isAlpha(left([x];5))=1 AND isNumeric(right([x];2))=1
e.g. isTransponder([Transponder1]) would return 1 if the value in Transponder1 matches this pattern.
Scoring / Awards
The following articles show how to handle different scoring and awards setups.
Calculate the Average Time of a Contest, Based on the Finishers' Time
To calculate the average time for a specific contest based on finishers' times, a Team Score needs to be created. This will group all participants who have completed the same race.
To filter the participants, you can use the condition: [Finished] AND [Status]=0.
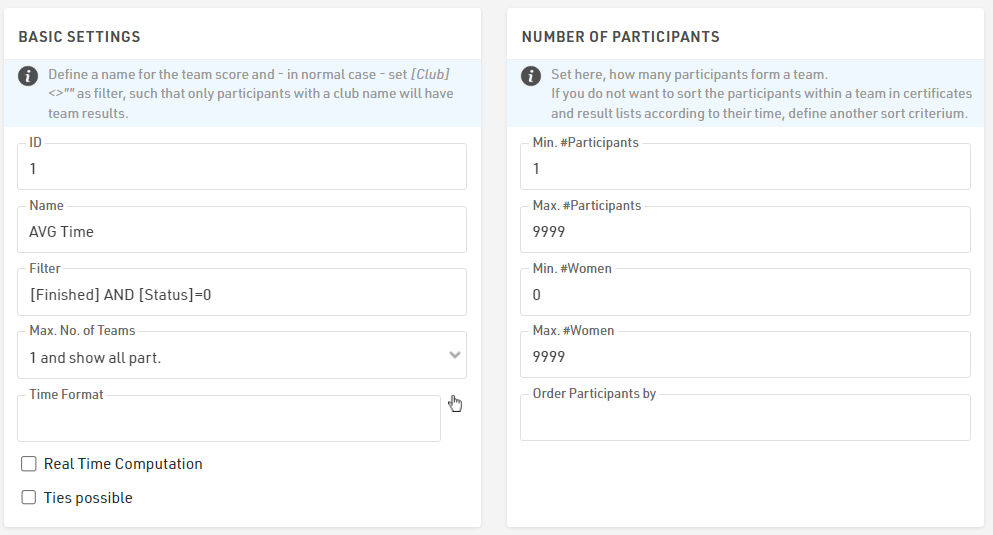
When configuring the Team Score, set the following parameters:
- Participants: Minimum 1, Maximum 9999
- Women: Minimum 0, Maximum 9999
- Max. No. of Teams: "1 and show all participants"
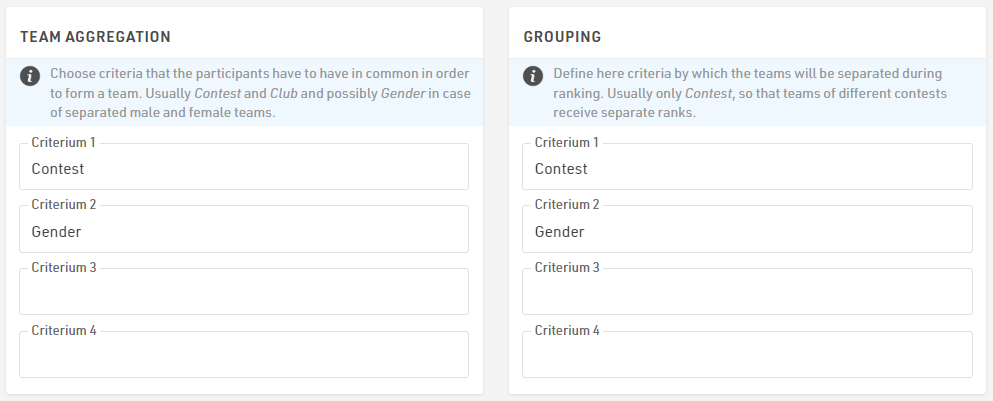
If you want to calculate the average time based on both Contest and Gender, ensure that these fields are included in the Team Aggregation and Grouping Settings.
To calculate the average time, go to the Result section of the Team Score and select the <Finish Result> with the "Average" mode.
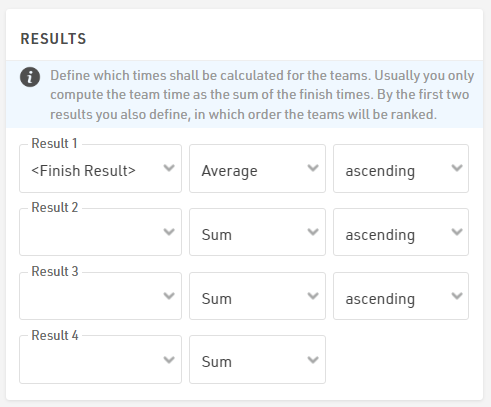
Finally, you can access the average time for each contest and gender by referencing the fields [TSX.Time1] or [TSX.DecimalTime1]. This allows you to perform additional calculations requested by the race organizer.
Add Penalties to the Finish Time
In some events, it may be necessary to apply penalties to participants, which are added to their finish times and can impact the final rankings.
Penalties can only be applied using Special Results. This article will guide you through implementing penalties when scoring a race using Splits and Special Results.
In both cases, don't forget to reference the FinishResult in your ranking calculations and output lists to consider the penalties!
Scoring via Splits
If you are scoring the race using Splits, follow these steps:
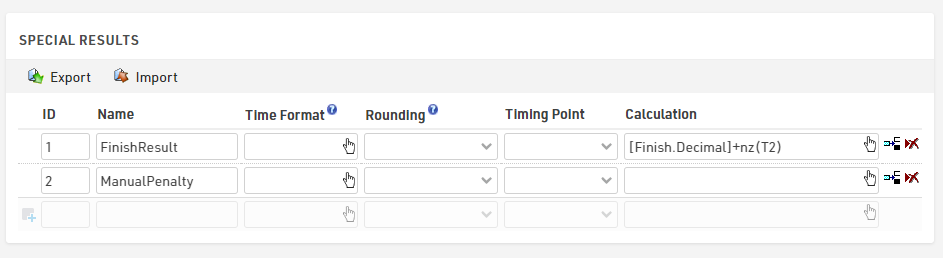
- ManualPenalty: Create a Special Result to store the penalties for each participant.
- FinishResult: Create a second Special Result where you reference the specific split time you wish to consider (e.g., [Finish.Decimal]) and add the penalties using the nz() function.
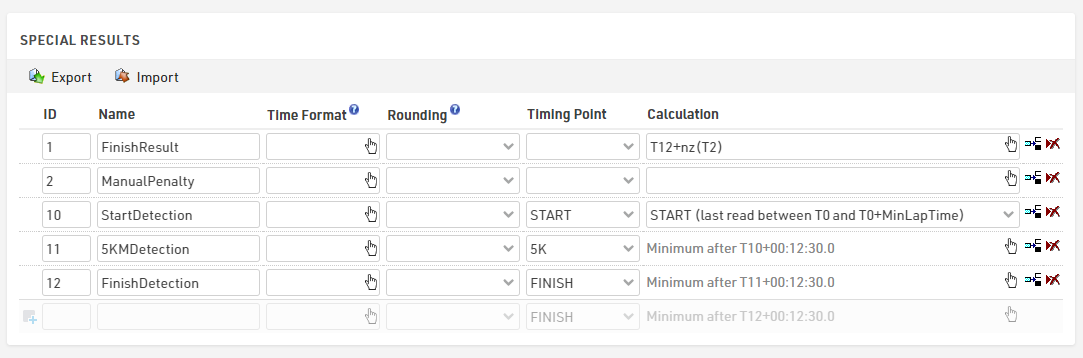
Scoring via Special Results
If your race is already scored using Special Results, simply create an additional Special Result to store the manual penalties. Then, add these penalties to the finish time using the nz() function.
Assigning penalties to Participants
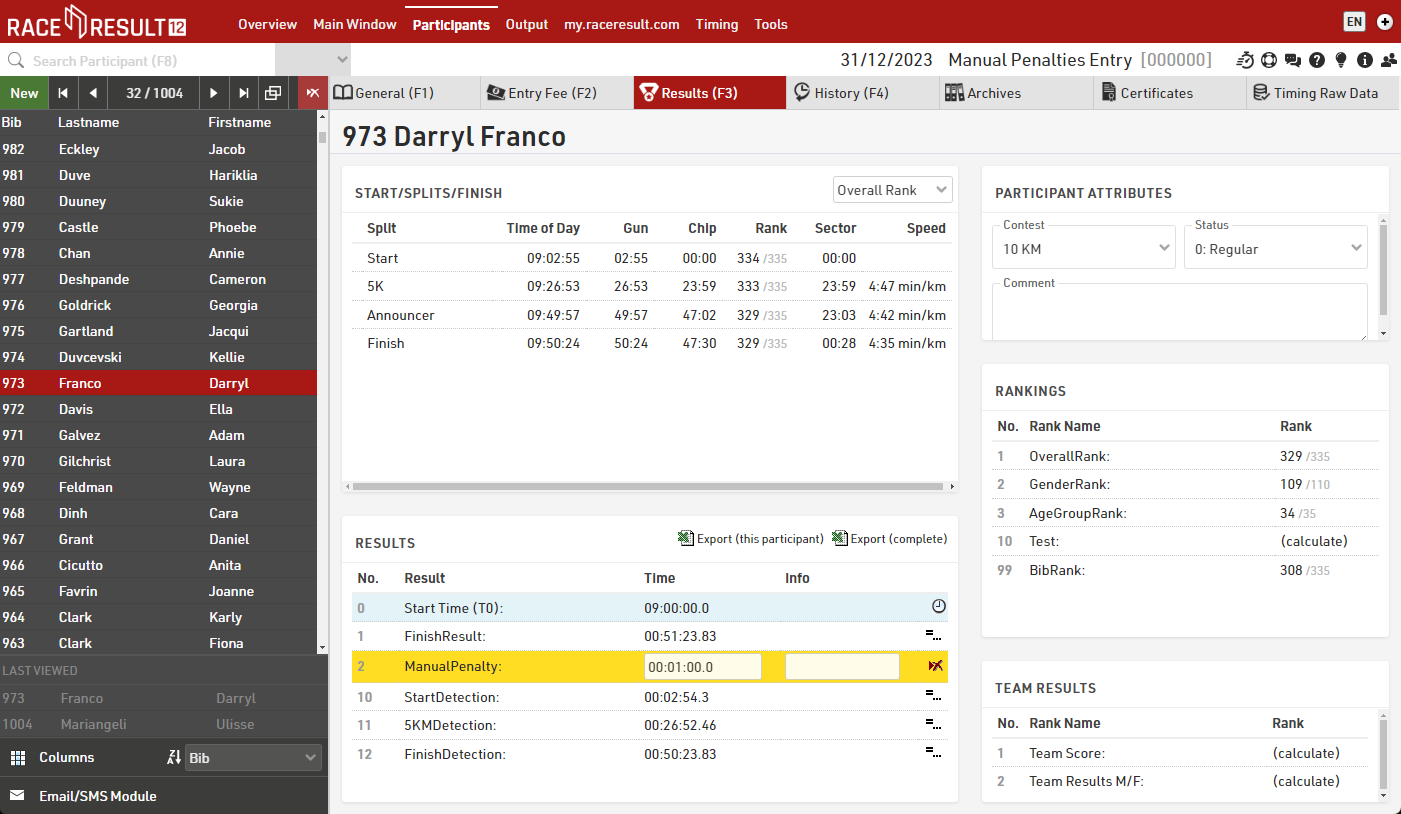
To manually assign penalties to individual participants, navigate to Participants > Results and enter the ManualPenalty in the appropriate field.
Pro tip: Use an Additional Field to Store Penalties
To allow referees to add penalties directly to specific participants, create an Additional Field to store the penalty time and include it in a Check-In Kiosk: reference now the additional field in the ManualPenalty result with the function TimeFromString().
Master, GrandMaster, and Double dipping
Our Knowledge Base article Stop "Double Dipping" for Age Group Award will explain the basics of double-dipping. This article will discuss an advanced double-dipping setup where you have a MasterRank and a GrandMasterRank.
User-Defined Fields/Fcts.
First, create UDFs to help us organize the various filters needed for our rankings. Listed below are the UDFs you will need.
These two UDFs check for rank eligibility. For example, IsMaster checks to see if the participant is aged 40 to 49.
| Name | Expression |
| IsMaster |
[Age] IN "40-49" |
| IsGrandMaster |
[Age]>=50 |
The award depths UDFs are where you store the award depth value for each ranking.
| Name | Expression |
| GenderAwardsDepth | 3 |
| MasterAwardsDepth | 1 |
| GrandMasterAwardsDepth | 1 |
These three check to see if someone is an award winner for that ranking. For example, IsGenderWinner checks to see if someone has a GenderRank greater than 0 and a GenderRank less than or equal to the GenderAwardsDepth. If they do, they are considered a winner for that ranking which will be represented by the number 1. Those who do not fit this filter will be represented with the number 0.
| Name | Expression |
| IsGenderWinner |
[GenderRank]>0 AND [GenderRank]<=[GenderAwardsDepth] |
| IsMasterAwardWinner |
[MasterRank]>0 AND [MasterRank]<=[MasterAwardsDepth] |
| IsGrandMasterAwardWinner |
[GrandMasterRank]>0 AND [GrandMasterRank]<=[GrandMasterAwardsDepth] |
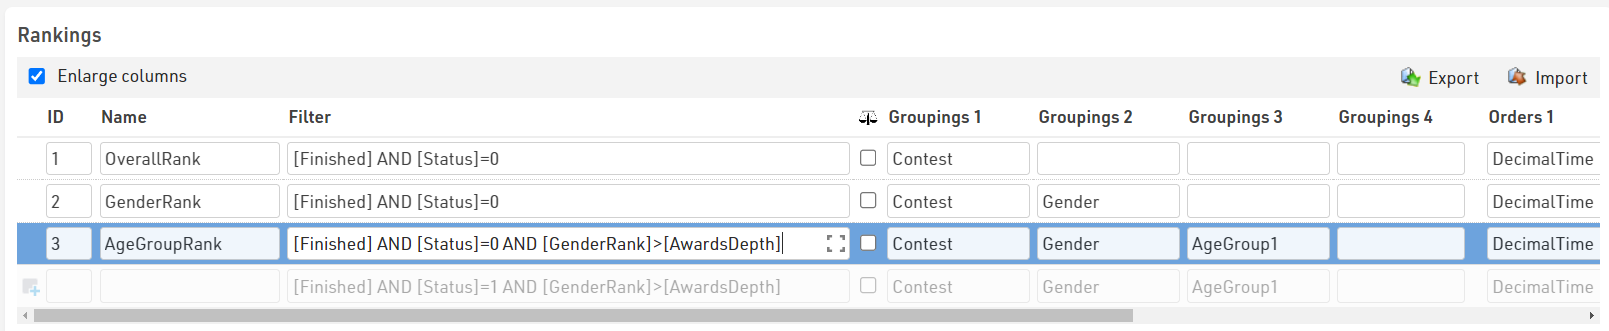
Rankings
The above UDFs can now be used to filter your rankings.
| Name | Filter |
| GenderRank |
[Finished] AND [Status]=0 |
|
MasterRank |
[Finished] AND [Status]=0 AND [IsMaster] AND [IsGenderWinner]=0 |
| GrandMasterRank |
[Finished] AND [Status]=0 AND [IsGrandMaster] AND [IsGenderWinner]=0 |
| AgeGroupRank |
[Finished] AND [Status]=0 AND [IsGenderWinner]=0 AND [IsMasterAwardWinner]=0 AND [IsGrandMasterAwardWinner]=0 |
GenderRank has the default filter checking for if the racer finished the race and if their status is normal (represented by a 0).
MasterRank, we add the filter
AND [IsMaster] AND [IsGenderWinner]=0
IsMaster checks to make sure the participant is eligible for the MasterRank. [IsGenderWinner]=0 checks to make sure the participant is not a GenderRank winner meaning they are not within the specified awards depth for GenderRank.
GrandMasterRank has a similar filter to MasterRank. The only difference is that IsMaster is changed to IsGrandMaster.
AgeGroupRank filters by all the IsWinner UDFs since it is last in the ranking order, we want to make sure that none of the previous winners are eligible for the AgeGroupRank.
Output Report
For an advanced awards report, please see Advanced Awards Report (Different Award Categories in one List).
To add a basic output report for MasterRank and GrandMasterRank you can simply copy the Gender Results report from our standard template. Make sure to update GenderRank to MastersRank in all three sections, Grouping/Sorting, Fields/Columns, and Filter.
Attached to this article is a copy of a basic event file with all of these functions, rankings, and output reports.
Advanced Awards Report (Different Award Categories in one List)
The following example shows how to create a single output list that lists all award winners in a single list. Note that this method is only possible when preventing "double dipping" - since each participant can only appear in the list once.
User Defined Functions
This setup uses some User Defined Functions, isGenderWinner, isAgeGroupWinner, and AwardsDepth to automate some of the calculations.
This assumes you are using one of the standard templates where your ranking that groups by gender is called GenderRank and your ranking that groups by age group is called AgeGroupRank. If your rankings are different, adjust accordingly.

Rankings
Add rules for double dipping to the Rankings settings, add the below to the filter of AgeGroupRank.
AND [GenderRank]>[AwardsDepth]
This will ensure the participants with GenderRank less than or equal to our AwardsDepth will not get a ranking for AgeGroupRank.
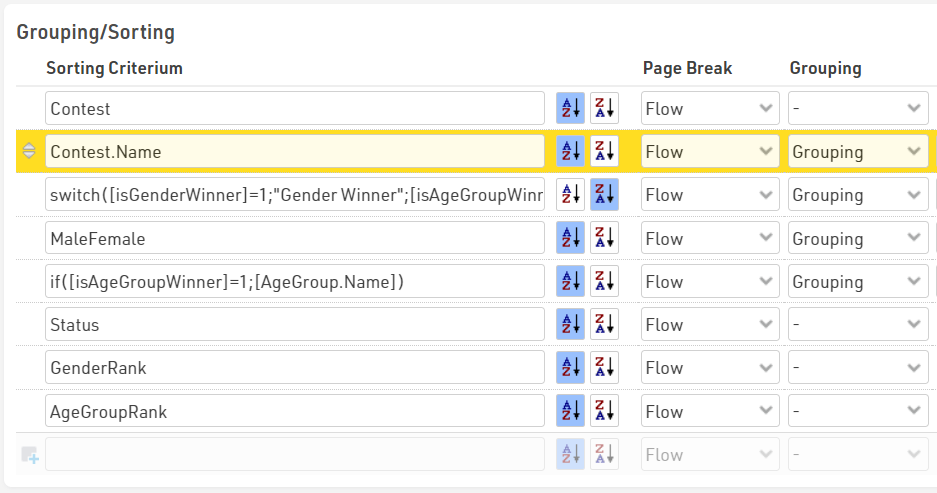
Output List
What makes this list work is the Grouping/Sorting and Filter settings. The first grouping should be [Contest.Name] so that all contests are separated in the report.
Use a switch() statement to determine who on the report is considered an OverallWinner and who is an AgeGroupWinner. The UDFs, isGenderWinner, and isAgeGroupWinner, will help with this.
switch([isGenderWinner]=1;"Gender Winner";[isAgeGroupWinner]=1;"Age Group Winner")
Since GenderRank and AgeGroupRank are grouped by Gender, use the UDF MaleFemale as the next grouping criteria. Next, group by AgeGroup.Name but only for the AgeGroup winners.
An if() statement can be used to check the isAgeGroupWinner UDF and return the data filed AgeGroup.Name for participants who are age group winners. Lastly, sort by Status, GenderRank, and then AgeGroupRank.
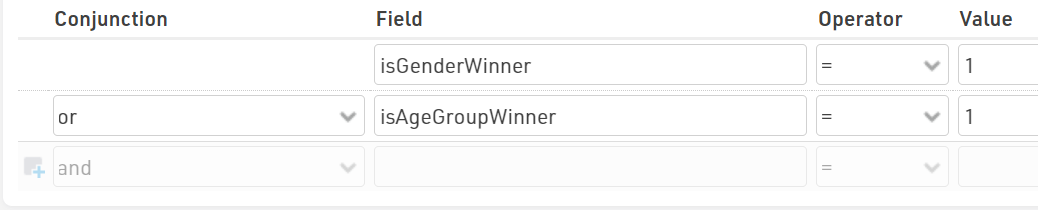
Output List Filter
For the Filter, the isGenderWinner and isAgeGroupWinner functions can be used. Looking back at the UDF setup, these UDFs are set to filter by Rank greater than 0 and Rank less than AwardsDepth. This ensures that only participants who are in the allotted awards depth will appear on the report.
Outputs / Displays
The following articles detail ways to customize lists and displays that can be used to streamline operations and improve visual elements of the event.
How to Create an Announcer Report
Below are two examples of how to create an announcer report in RACE RESULT Software. One is explained using Splits. The other is explained using Special Results.
Club registration list
In Lists you find a predefined club registration list that groups all participants from the same club, and automatically adds a subtotal of their entry fees.
If you want to create an additional receipt for each club, you can do as follows:
- "Scoring ⇒ Team Scores": Create a new Team Score with the filter [Club]<>"", a minimum number of participants of 1 (min. female 0), a maximum number of participants (and female) of 9999. Additionally, make sure to have [Club] as the only criterion for the team aggregation. Keep all other fields empty or delete the pre-set values, especially for the Result 1.
- Under "Certificates" you can import the attached file ClubReceipt.lvs. This is a receipt template that aggregates all entry fees of club members.
- Under "Certificate Sets" import the attached file CertSets_ClubReceipt.lvs. Make sure to have selected the Team Certificate (1 per team) and select the uploaded certificate design.
Now you can download/print all club receipts from the certificate sets. If you need a single club receipt, open any club member, navigate to the Certificates within the participant dataset, and open the certificate ClubReceipt.
QR code for Bib (& Transponder) Pick Up
This article describes the potential path a participant takes from event registration to collecting their race bibs (and transponders) on event day with the usage of a unique generated QR-Code and a Checkin Kiosk which is opened in the EventTools App.
The main idea here is, that the participant will receive a QR code which is sent with an e-mail template after completing the registration form.This QR code contains a personal and random value which identifies the participant uniquely.
During race pack collection the participant can show this QR code, which is then scanned in the search step of a Check-In Kiosk when working with the EventTools App.
With a dynamic bib assignment the volunteer picks up the first bib he picks from a box and assigns this bib number to the participant. If the event is timed with active technology, the volunteer can also dynamically assign active transponders to the participants.
Bib Numbers
The first step is to set up bib number ranges that are out of the real bib ranges that are going to be used on the event. The bib ranges are set up in the Participants Data in the Bib Numbers menu:
After the online-registration the participants are going to be saved in the event file with a bib number in these ranges. During the bib pick up, the bib number will be changed in the participant's data to the bib the participant receives at the bib pick up booth.
User Defined Fields and Advanced Settings in Registration
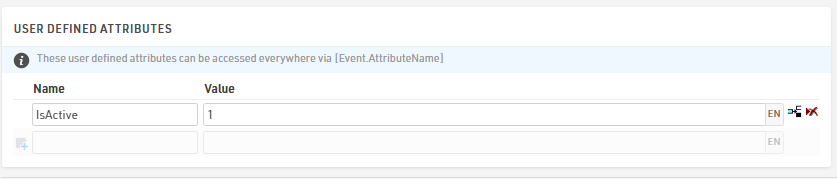
In the Event settings we add two User Defined Attributes. With the values we determine if this event is going to be an event timed with active or passive equipment. Depending on the entries here, we will later have different input possibilities in the Checkin Kiosk.
The next step is to add an additional field where we can save the string to uniquely identify the participant later.
We also add a field where the participant is able to upload a picture of himself. In order to enable a picture upload in the registration form, it is possible to select the Special Function "Upload Picture" in the Details of the corresponding Input Field.
In the registration form's Advanced Settings we add the additional field [IdentificationNo] to store an additional value with a specific expression:

With this expression a combination of the participant's entries ([Firstname], [Lastname], [YearOfBirth]) and a random value are saved in the additional field. The field [Random] is a Derived Field which returns a random number between 0 and 1.
QR Code Generation
The QR code is generated under Output >> Certificates via the small barcode icon on the right side in the tools section:
This will first create a barcode, but it can be changed to a QR code with the dropdown you find in the upper section.
After changing to the QR code we need to select the correct field which we want to save in the "QR code data". To do so, select the QR code and start typing the name of the field where you save the unique participant data during the online registration. Select the desired field from the dropdown of suggested datafields.
With a switch formula we show two different texts, depending if we set the event as an active or passive event by using the user defined attributes in the event settings.
Email Setup
The confirmation email is set up in the Email/SMS Templates. As the participant should receive his QR code with the confirmation email after the online registration, the pre-setup certificate needs to be added as an Attachment to the email:
Depending on the language the participant used on the my.raceresult.com website during the registration he will receive either a german or english certificate.
Checkin Kiosk Setup
The Checkin Kiosk is set up with three different steps. The first step is usually the Search step where we determine the search fields. The only Search field that should be used here is the field where the personal, unique identification code is saved after the finished registration.
The second step is only called Bib Pick up, as this step will only be visible if the event is going to be timed with passive transponders. The only Edit Field in this step is the [Bib] field. In the entry field's details it is possible to select a Scanner Input when using the Event Tools App. If a BLE Reader is available, the BLE Reader can be selected. With the Reader it is possible to scan the bib's transponder and use the read automatically as an entry for the input field.
If the bib number is also printed and encoded as a QR code on the bib itself, the QR Scanner option can be selected. With this option, the QR code can be scanned with the cell phone and the bib number will be entered automatically by encoding the QR code. Of course, manual entry is also possible, but this is prone to errors when typing the bib number in the entry field. The current bib value should be hidden, this is done with the corresponding Special function.

The third step on the other hand, will be only visible if the event is timed with active equipment. This step is not only used to assign a bib number, but also to assign an active transponder code to the participant.
Therefore two Edit Fields are added in this step. The first field is again the [Bib] field. As no passive transponders are going to be attached to the bibs in this case, either the QR scan option or the manual entry option (empty dropdown) can be selected. The second field is the [Transponder1] field where the active transponder code is going to be saved. It might be a smart move to attach a sticker on each active transponder with a QR code which contains the active transponder's chip-code. By doing so, it is possible to again use the QR scanner option for this input field. The volunteer later can then pick any transponder and just scan again the QR code on the active transponder to fill the [Transponder1] field.

Event Tools App usage
After logging in into the Event Tools App select your Event and open the Checkin Kiosk for the Bib-Pickup. If you plan to use a BLE Reader you can connect your smartphone with the reader now. If no Reader is going to be used, just push down the small pop up window:
By selecting the small, blue QR code symbol on the bottom of the smartphone the app enables a camera mode which allows it to scan QR codes for the search entry field. In this mode the QR code for the bib pickup can be scanned and the participant's information and edit fields are going to be displayed in the next step:

Selecting one of the entry fields on the smartphone, shows again the small blue QR code symbol in order to scan the QR codes from the active transponder and / or the bib to automatically enter their encoded information (transponder coder / bib number) to the corresponding entry-field.

After saving, the active transponder code and the re-assigned bib number are saved in the participants data.
Add a QR Code on Bib to download personal certificate with results
To make it easy for participants to download their finisher certificates, it is possible to add a QR Code on the Bib number with an encoded link to the personal certificate of that specific participant. The basic steps that need to be done are creating a certificate with the results of the race that should be able to download later, adding a certificate-set and then publishing this certificate-set online on the my.raceresult.com page of your event. These basic steps are explained in the following article.
In the following steps it is explained how to add a QR code on your certificate that is used for the bib layout and encode a personal link which leads the participant to the downloadable certificate.
Certificate (Bib) with attached QR code to link to personal result
A QR Code can be added to a certificate by clicking on the small bar code icon on the right tool side in the certificates designer. By doing so, a barcode will be added to the certificate in the first step. The type of the code can be changed via a dropdown in the upper tool bar.

After changing the code type, the link to the certificate with the personal result needs to be added in the entry line on the top left:
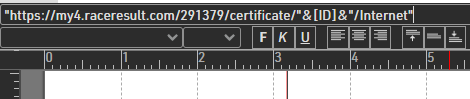
The link must be set into quotation marks and the field [ID], which links to the individual ID-Number of a participant, needs to be excluded from those:
"https://my4.raceresult.com/EventID/certificates/"&[ID]&"/Internet"
It is also possible to copy the general code from an opened certificate on the my.raceresult.com page to make sure that the correct format of the link is encoded in the QR code. Note, you need to adapt the part with the [ID] field, otherwise the link would be hard coded and would direct to a specific certificate.
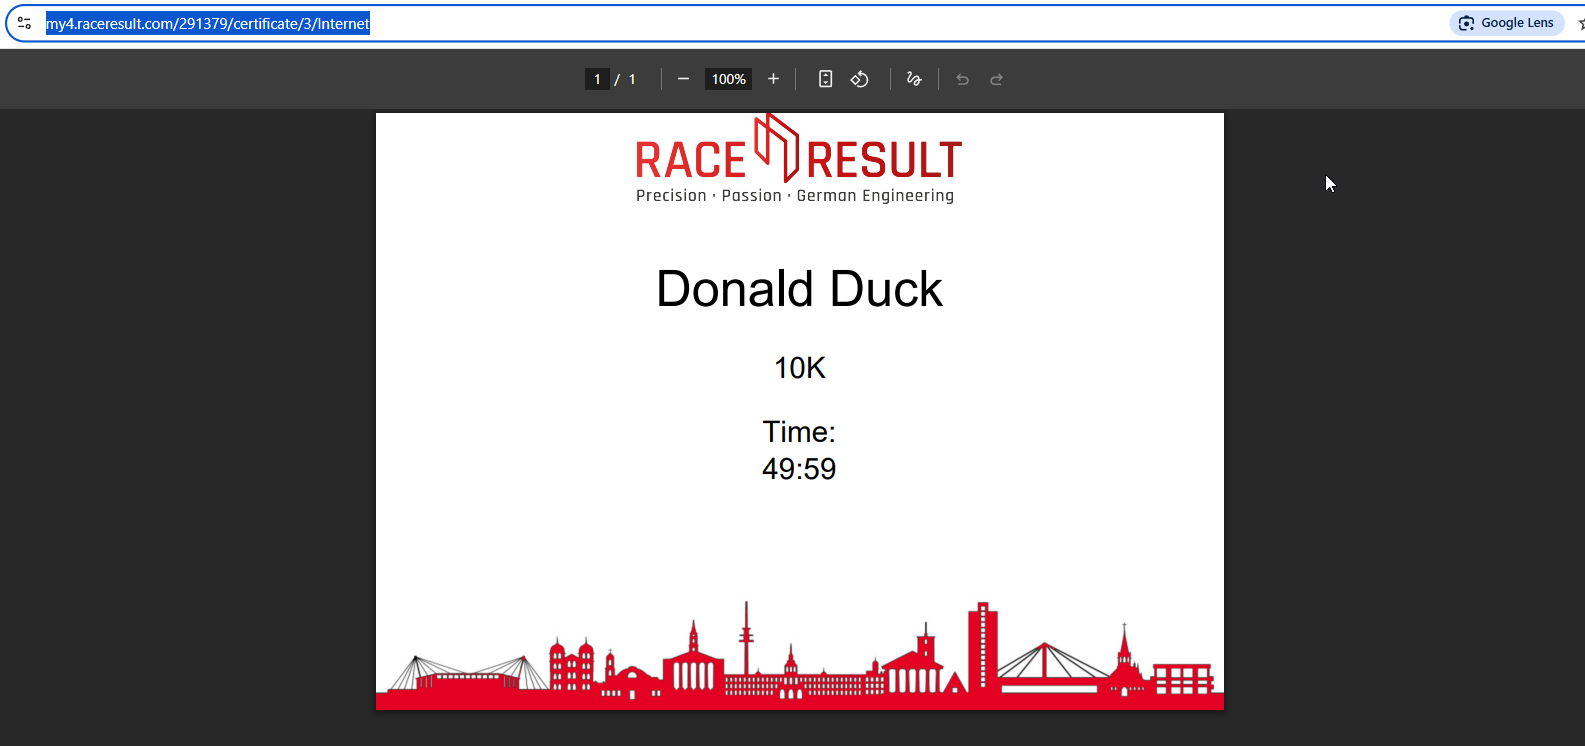
If now this participant's QR code is scanned with a smartphone, the published certificate will be automatically be downloaded:

Utilizing the BLE Reader to Display Results on a Presenter
RACE RESULT 14, in combination with the RACE RESULT Event Tools application, enables the creation of a presenter that can serve as a Selfie Screen before and after a race event.
In essence, the Event Tools application transmits transponder detections to RACE RESULT 14, which subsequently displays the data on a screen or LED wall via a presenter.
Create the Timing Structure
Create a Timing Point for the BLE Reader
Within the Main Window under the Timing Point section, create a timing point to store all detections received from the BLE Reader.

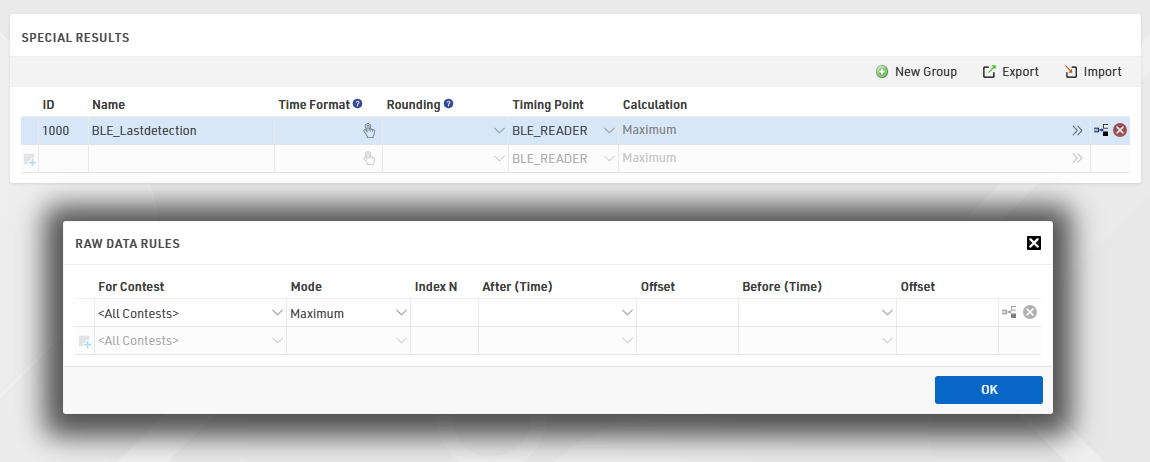
Create a Special Result for BLE Reader Detections
In the Main Window under Special Results, create a result that retains only the latest detection for each transponder. This ensures that if a transponder is scanned multiple times, only the most recent detection is updated and used for display in the Output List.
Create the Output Lists
Once the timing structure is configured, proceed with creating the desired output lists. To ensure that the most recent participant scanned by the BLE Reader is always displayed, adjust the following settings:
- Grouping/Sorting: Configure the sorting order (Z-A) based on the Special Result. This arrangement ensures that the most recent detection appears at the top of the list.

- Filter: Set the Maximum Number of Records to 1 to display only one participant at a time and apply a filter to include only those participants scanned by the BLE Reader.

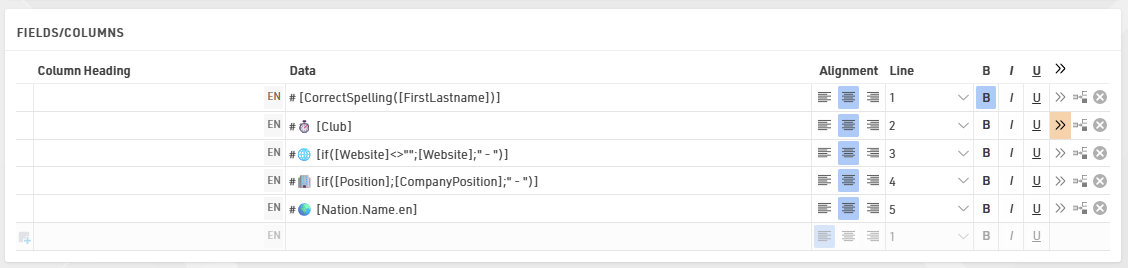
- Fields/Columns: define the information to be displayed on the presenter. For example, you may include the participant’s name, club details, company website, and nationality. The if() function is used to display a placeholder (e.g., “-”) when specific information is missing, and the use of the Line feature allows data to be displayed in a multi-line template.
Connecting the BLE Reader in Event Tools
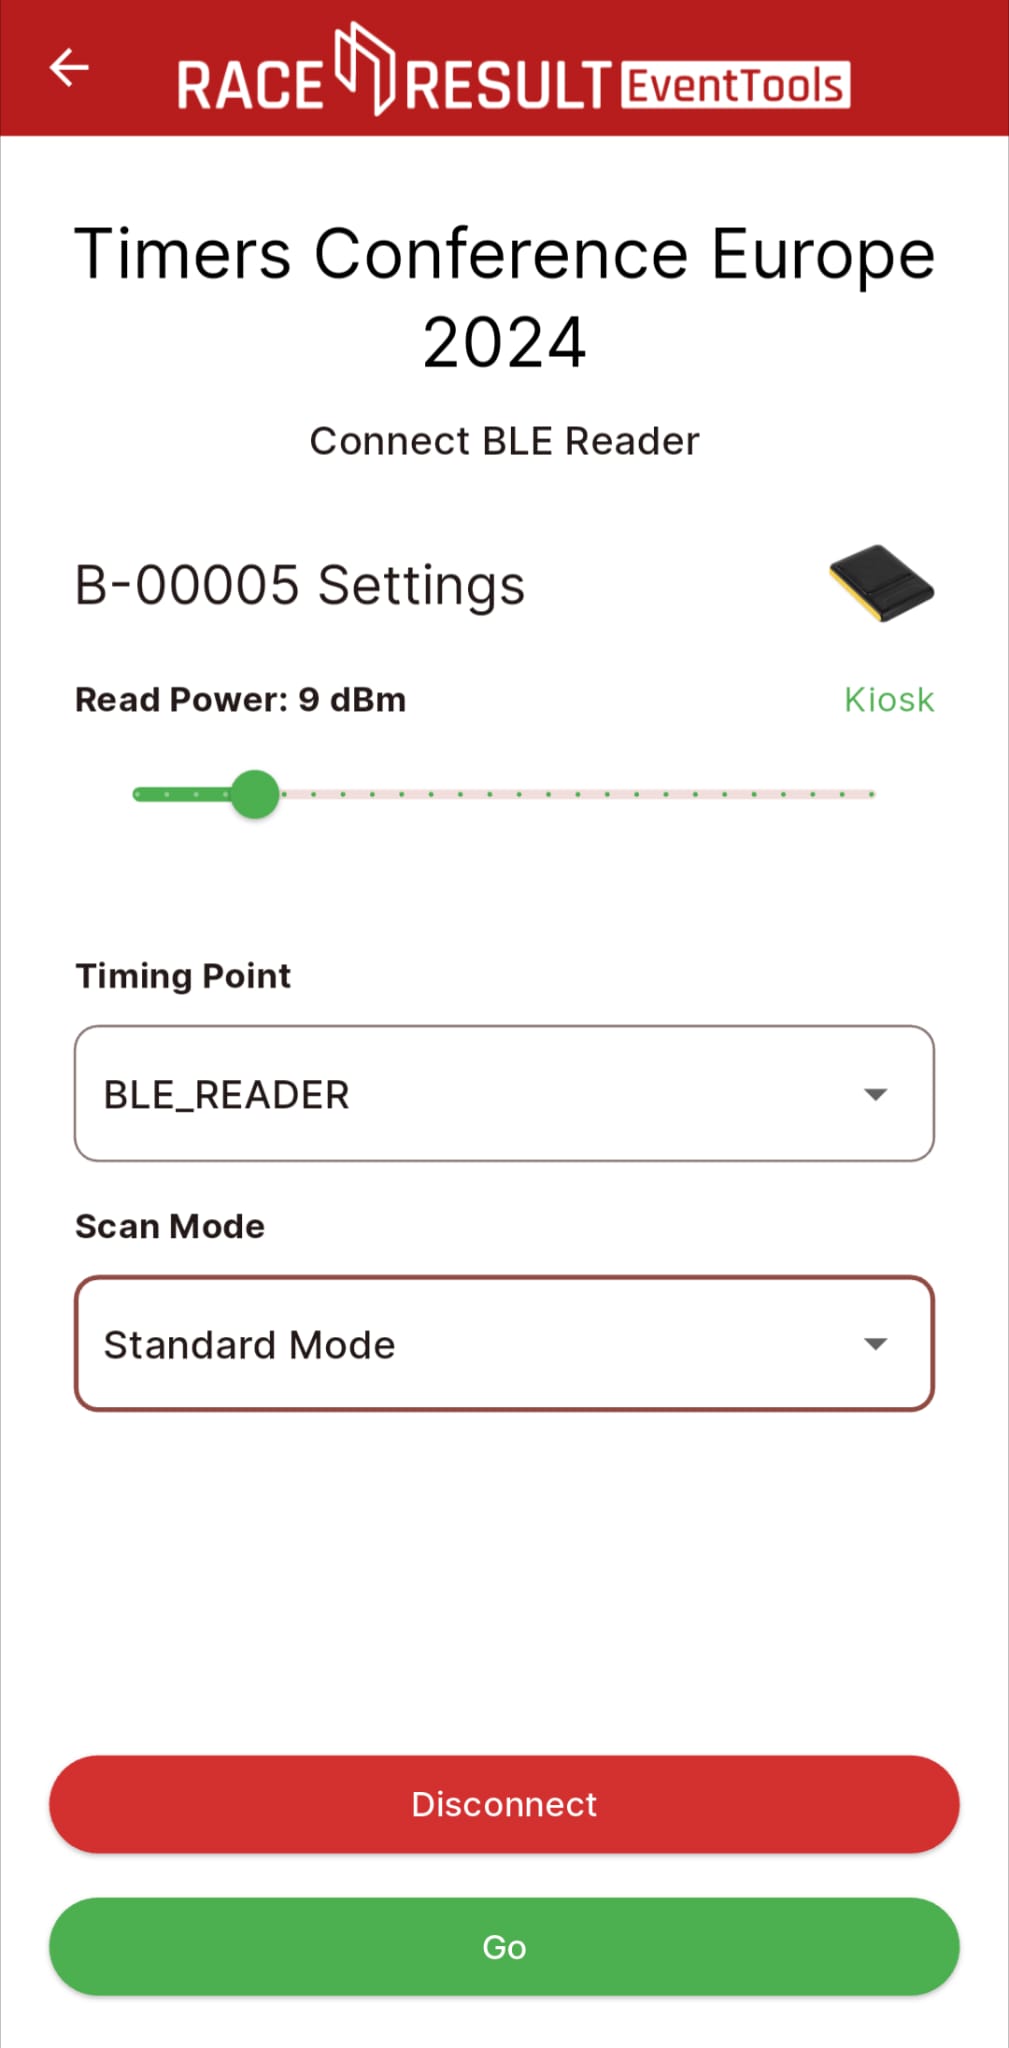
Within the RACE RESULT Event Tools application, connect the BLE Reader to the Timing Point created in RACE RESULT 14 by accessing the Event File, selecting the BLE Reader option, and then choosing Checkpoint. It is recommended to reduce the Reader Power to the “Kiosk” level to prevent the detection of transponders outside the intended range.
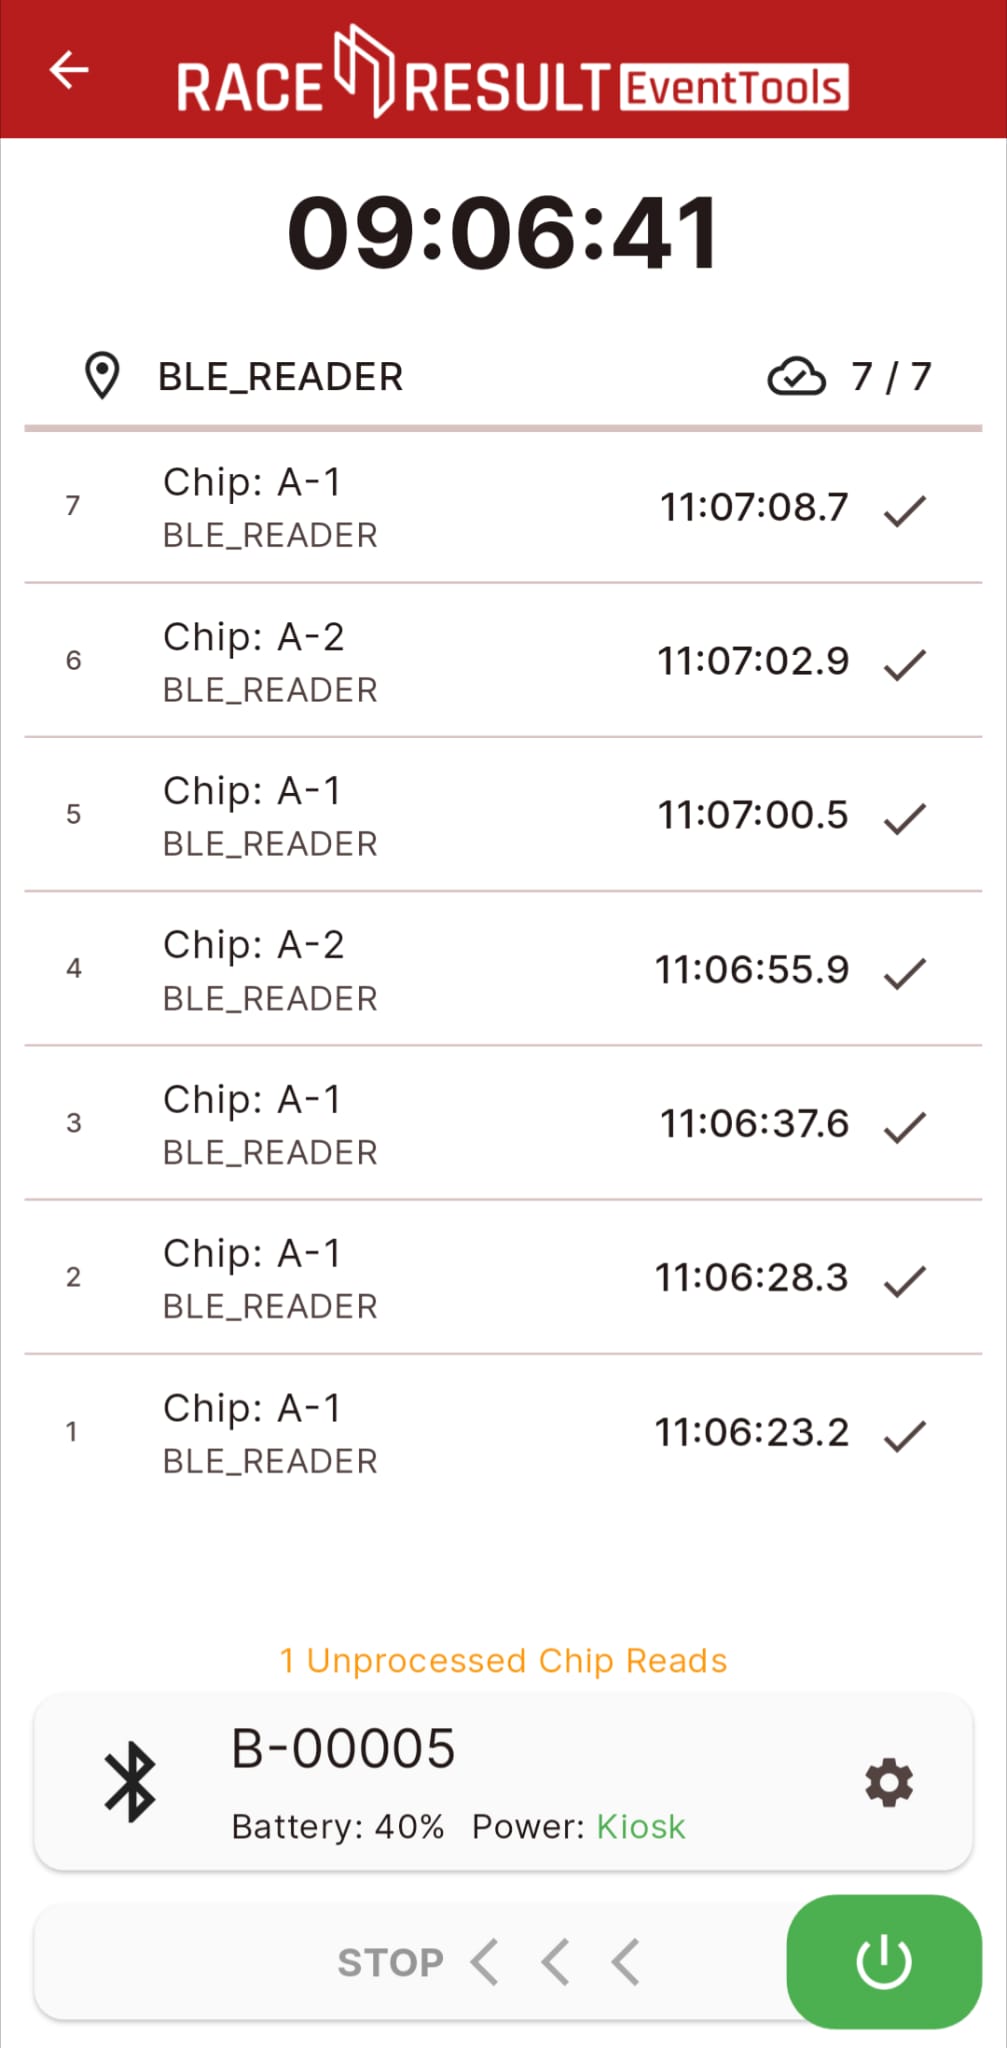
After swiping to the right, the BLE Reader begins transmitting transponder detections to the Event Tools application, which then uploads the data directly to the event file in RACE RESULT 14.
Alternative: Connecting to Manual Timing
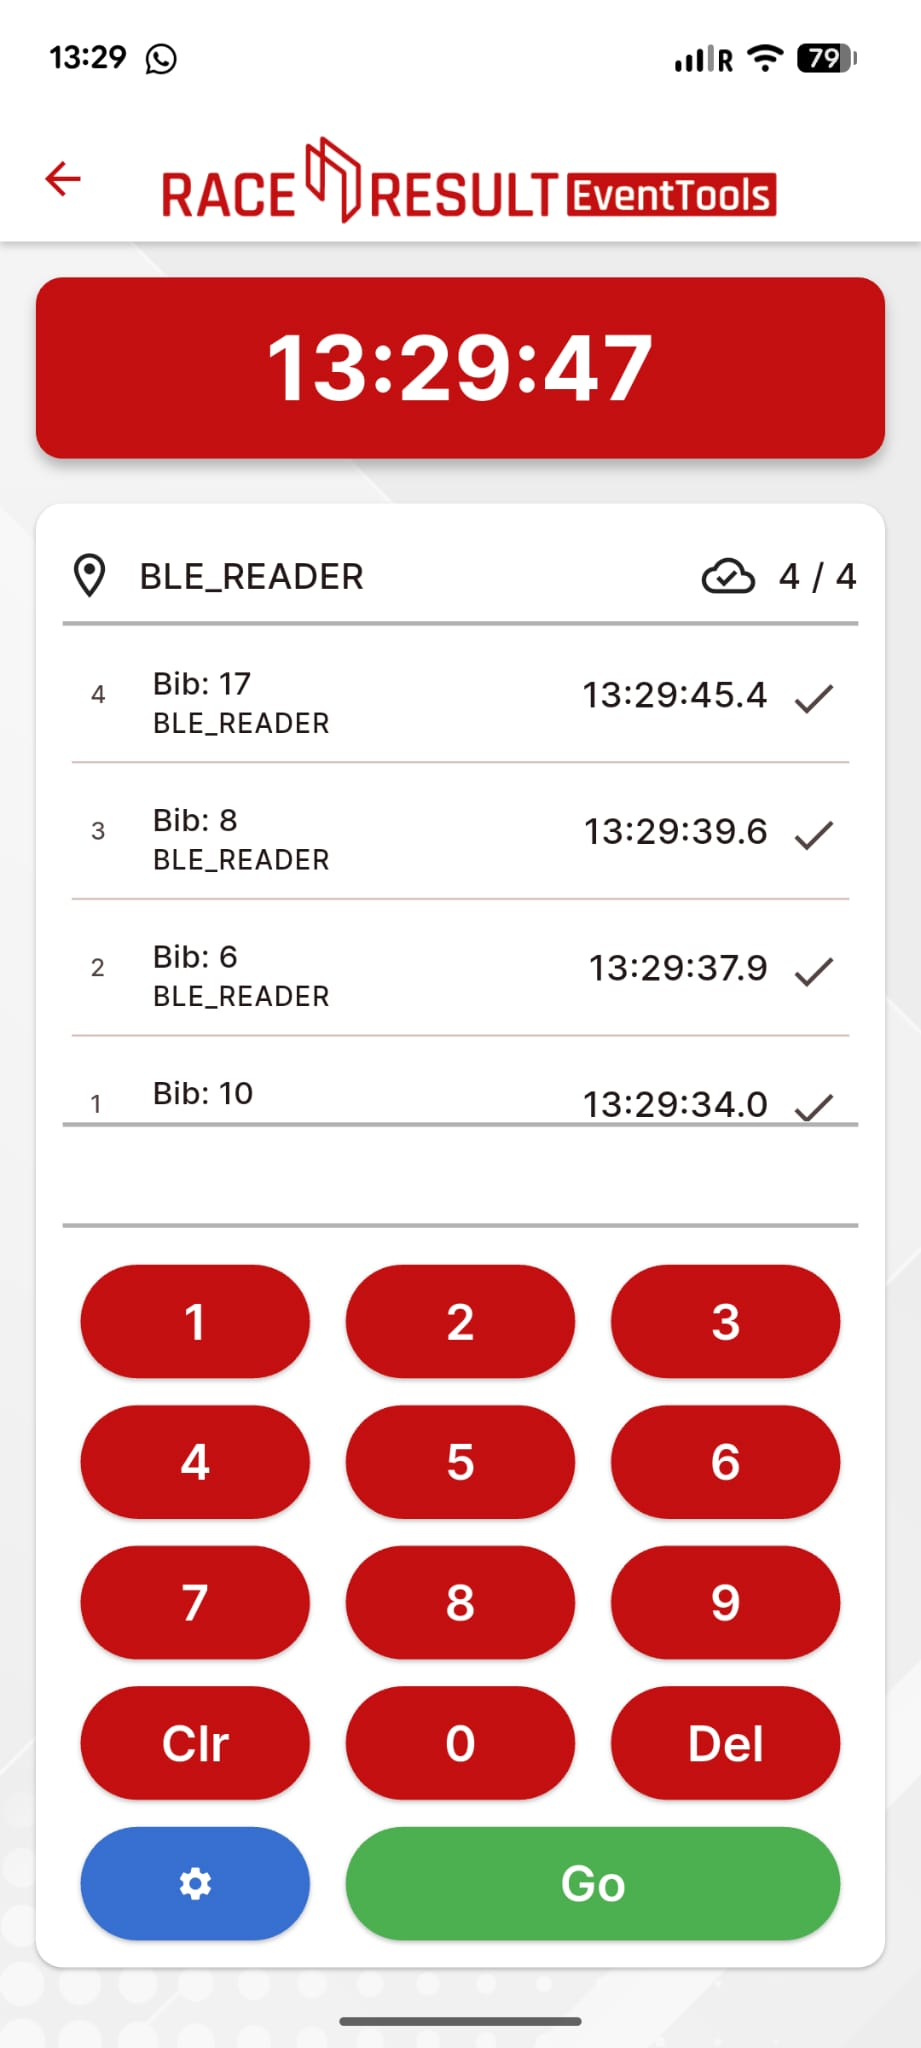
In case a BLE reader is not available, it's possible to use the Manual Timing tool in EventTools, in order to push manually to the Event File the detection of each participant who wants to see its information on Presenter.
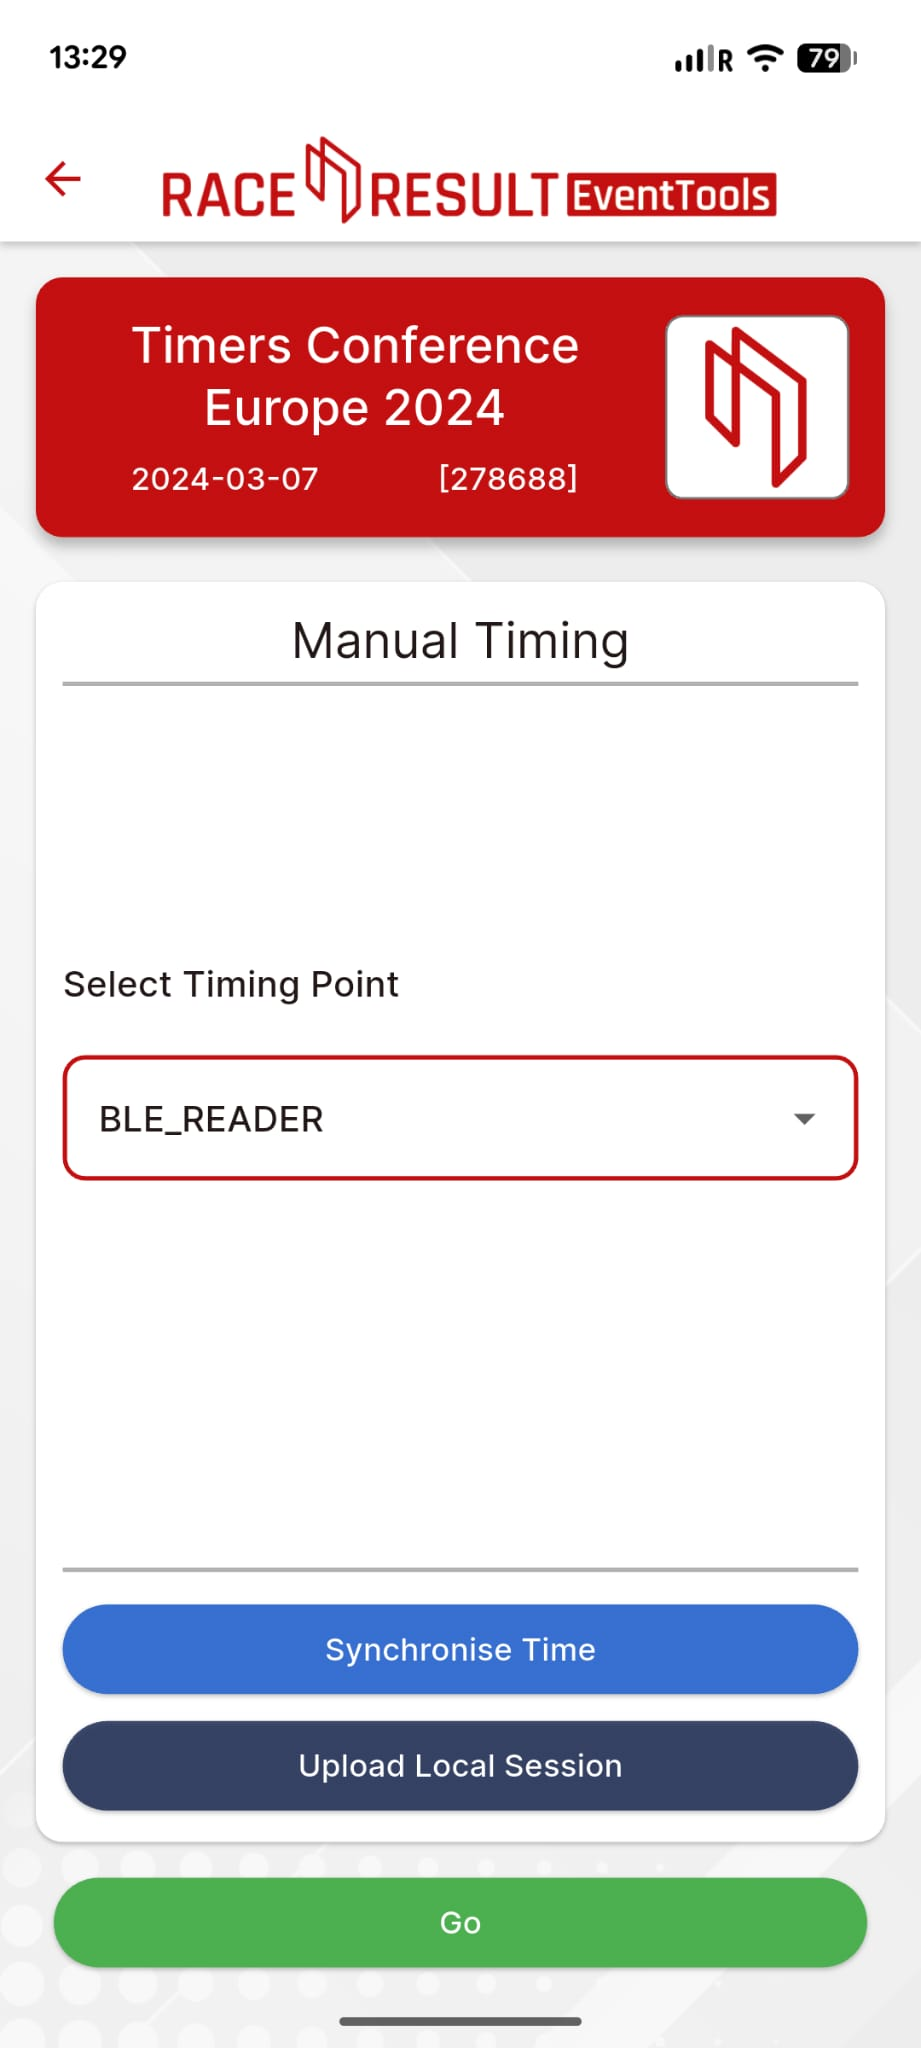
Once the Timing Point in Manual Timing is selected, it's possible to type the BIB of the participant and press GO to send the detection to the event file.
Creating the Presenter
After the output lists are configured, set up the presenter under Tools – Presenter to display the output on an LED wall or other screen.
For enhanced visual appeal, a background image may be added, with the output list positioned in the available space.
In the advanced settings of the presenter list (accessible via the grey arrows), configure the Font Size and set the page time to 1 second. This ensures that the presenter updates every second to capture new detections from the BLE Reader.

The final output should resemble the configuration illustrated above.

Equipment needed
BLE Reader:
For each presenter a customer wants to set up using the BLE Reader integration, the following components are required:
- one timing point
- one special result
- one BLE Reader
- one Smartphone/Tablet with EventTool session
Each presenter operates independently, meaning multiple presenters can run in parallel without interfering with each other.
Manual Input:
For each presenter a customer wants to set up using Manual input, the following components are required:
- one timing point
- one special result
- one Smartphone/Tablet with EventTool session
Each presenter operates independently, meaning multiple presenters can run in parallel without interfering with each other.
Publish a certificate
Certificates are a great way to reward participants with a personal memory and a shareable record of their performance. RACE RESULT Software allows you to generate and publish customized certificates for your participants directly online through my.raceresult.com.
Designing the Certificate Template
The process begins in the Certificates section of your event file. Here, you can design the layout and content of your certificate. The certificate editor allows you to place dynamic fields such as the participant’s name, finish time, position, or any other relevant data. You can fully customize the design to reflect your event’s branding.
Defining Eligibility via Certificate Sets
Once your template is ready, go to Certificate Sets. This section allows you to define which participants should receive which certificate. You can create multiple sets, each linked to a different certificate template, if needed.
For example, you might want to create separate certificates for different race distances, or only assign certificates to finishers. Certificate Sets use filters to target specific groups of participants based on result lists, timing points, or custom conditions.
Publishing Certificates Online
In the my.raceresult.com > Certificates/Details section, you can choose which Certificate Sets to publish and for which contests. You can enable or disable each set as needed, or set a time range during which the certificates will be available. By default, the system shows a preview of the certificate based on your design, but you can upload a custom image if you prefer. You can also change the name shown for the certificate by setting a custom label instead of using the default name of the Certificate Set.
Linking Certificates to the Personal Results Page
To show certificates directly on the personal results page, make sure the option “Link personal results page with certificates & details list” is enabled in each of the online pages you decided to publish.
When this is active, a pop-up window appears when a participant clicks on their result. This window shows extra details about their timing and also includes links to any certificates available for that participant.
Technical
The following articles detail some administrative and technical steps for Race Result Software.
Create Backups
Regularly there is need to create a Backup of an event file, for example
- when one of several contests is finished and you would like to save the current data status.
- before operations which concern several or all participants, e.g. when deleting data or manipulating data.
Creating a Backup
There are several options to create a backup file of an event:
- Inside the Dashboard -> Summary you will find a link to download a backup (Note, this option is not available if you are not the owner of the file).
- When working offline, a backup can be created easily by copying the event file. Select the file in Windows Explorer and press CTRL+C and then CTRL+V.
Restoring a Backup
If something goes wrong during an operation and you want to revert to the backup, take the following steps:
If you work offline, take these steps:
- Close the RACE RESULT Web Server and all other programs that access the file.
- Rename the backup file to show that you are working with this file now, and then continue working with it as before.
- Remember to create a new backup if you want to try to execute the previously failed operation again.
If you work online and want to access a backup offline on your computer, it is best you take these two steps:
- Check out the faulty event file. Close the file after the download and delete it.
- Then open the backup file and check it in instead of the faulty file.
Automatic Backups
Every night a backup of all your events saved online is created automatically. If you need access to one of these backups, you can request the backup via email from RACE RESULT.
Backup without Backup file
If you executed an incorrect data manipulation but did not create a backup prior, there is still the possibility to use the History to undo your changes: In the Participants Window under History you can create a complete export of the history and thus create an Excel file which will rewrite the old values via the Participant Import (with the option Update existing participants).
Live Backup
The Live Backup is a function to always have an up-to-date backup on another computer or an external drive (e.g. USB thumb drive). In case of a black-out of the main computer (e.g. hard drive crash) you can continue working with the backup file on another computer.
The live backup is started in the RACE RESULT Web Server via File->Start Live Backup Locally (backup on a local drive) or Start Live Backup Externally (backup on another computer on which the race result software needs to be running).
Move an Online Event to a Different Account
Events can be shared with multiple accounts through the Access Rights.
It is not possible to directly transfer an existing event to a different account, a copy of the event file must be uploaded to the second account which will generate a new Event ID. Note that unless you delete the original event file, it will still remain active.
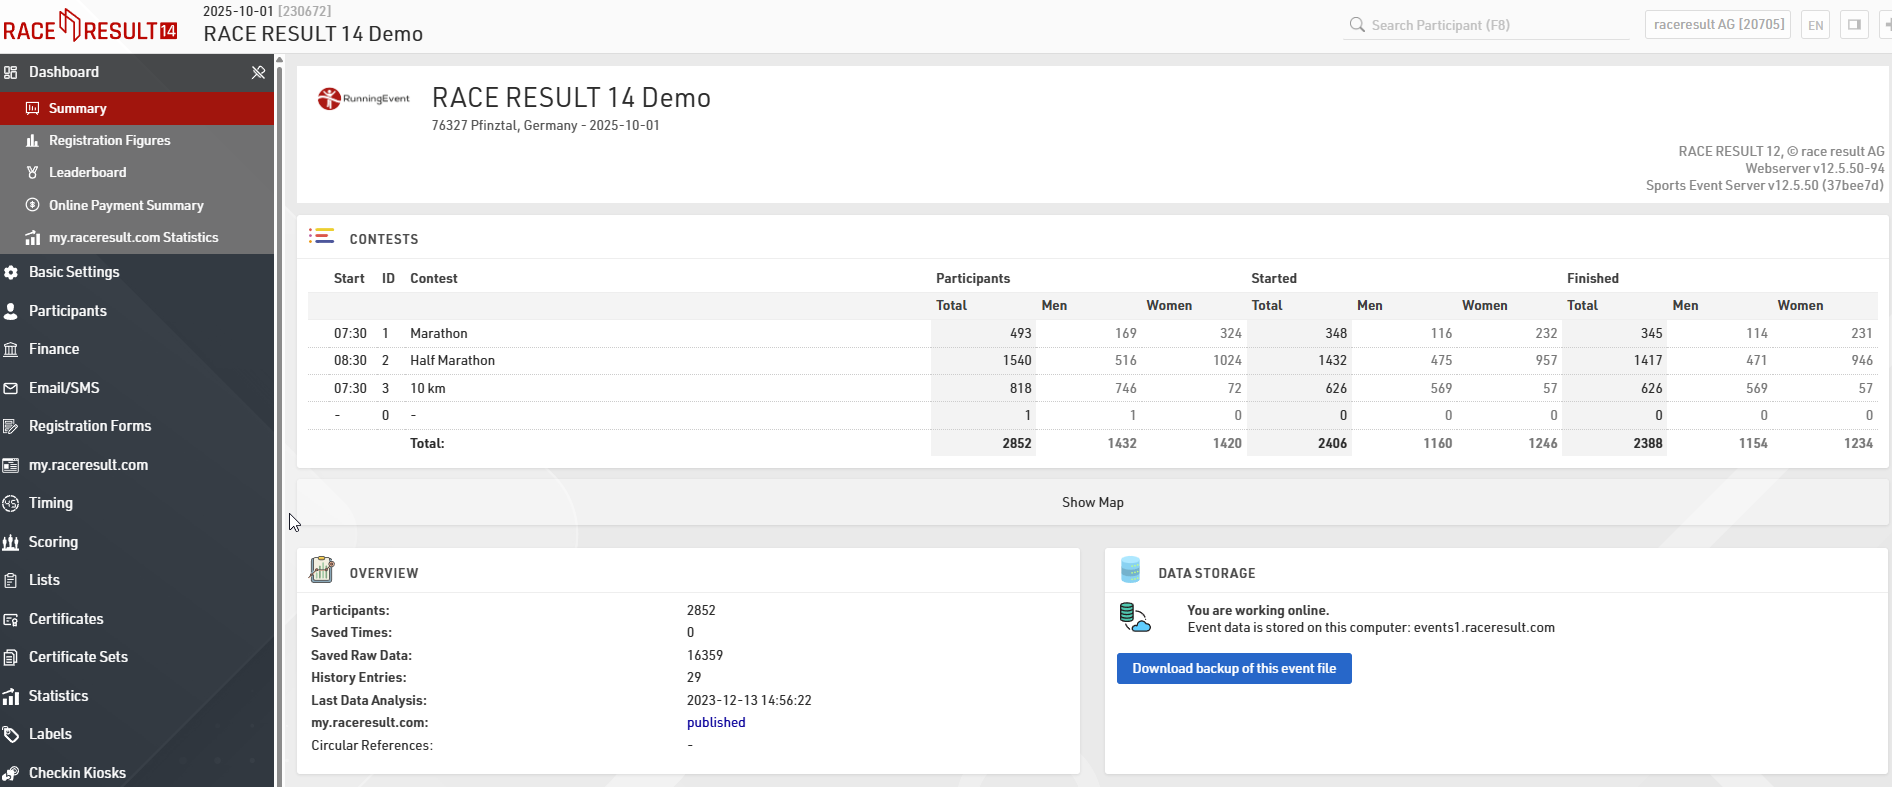
Download backup of the event file
Under Dashboard >Summary, download a backup copy of the event file.
Remove the connection to the event online
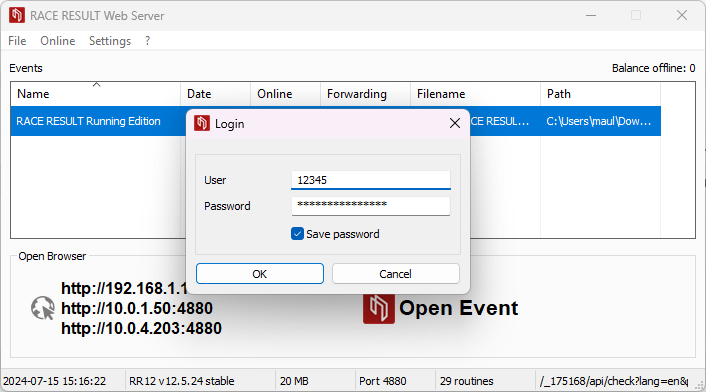
Once the event has been downloaded, open it in the offline RACE RESULT Web Server. At this time, the event is still linked to the original online Event ID (in this example, 175168).
Under Online>More, select Remove Connection to Event Online

Upload the event to the other account
Now that the event is no longer set to the original Event ID, it is possible to upload it to a second account by checking-in the file via Online > Move this Event to Server (Check-In).
The Web Server will warn that the event does not exist and will ask if it should be created, select ok to confirm the upload.
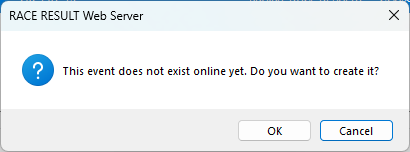
Use Custom Fonts
Fonts can be added to the RACE RESULT Software offline by installing them to your computer as you would install any new font. Fonts are reloaded into the software every 5 minutes or when restarting the RACE RESULT Web Server. These fonts can then be used for certificates, PDFs or even Presenter screens.
Browsers will cache the list of fonts for 24 hours so new fonts will not be visible until you clear your cache or wait 24 hours.
Offline fonts will NOT transfer online. The list of fonts online are fonts available from our servers. This list can not be added to at this time.
Insert Images / Files
Lists
Images stored here can be directly inserted into lists using the "[img:.....]" tag.
Certificates
Images can be inserted using either a standard image insert, which opens an image selection window when clicked, or as a data dependent image. For data dependent images you must use the image name, exactly as saved, as text in your expression.
my.raceresult.com Text Boxes
When inserting images in text boxes, such as the Info Page, you must use the image URL to insert the image. When an event file is accessible via my.raceresult.com each image has a publicly accessible URL which can be used to access images in all parts of the software. The format is as follows:
https://my.raceresult.com/EventID/elements/picture.php?eventid=EventID&name=imagename.png
where the EventID and imagename must be replaced with the corresponding Event ID and correct file name.
In the text box of your choice click on the image icon to add an image, the link icon can also be used to link to other files stored in your event file, such as PDFs which may be used for an event guide.

In the image properties box add relevant URL for your image, you can adjust the image size by using the width and height settings.
E-mails
Images can be inserted into Creating Email Templates in the same way as my.raceresult.com text boxes using the image url.
If attaching images or files as an attachment to your template then you must ensure that the file type is included in the attachment name, otherwise, the file will be sent with no type and the recipient may be unable to open the file correctly.
When inserting images into e-mail templates you can optimize the URL by using the Event.ID data field within the URL so it is automatically updated when you copy an event file. This can be useful for e-mail templates if you always use the same name for particular images such as headers or logos.
https://my.raceresult.com/[Event.ID]/elements/picture.php?eventid=[Event.ID]&name=imagename.png
Accessing images in folders
If your image is the common or my folder you need to use URL encoding to access that folder. When accessing a folder normally you would use a slash in between the folder and the file name. Here we want to replace the slash with the URL encoded version of a slash which is %5C. In this example, we are accessing the my folder.
https://my.raceresult.com/EventID/elements/picture.php?eventid=EventID&name=my%5Cimagename.png
How to use Swap Data
Bib Transponders
When participants have swapped their BIB Transponders, follow these steps depending on when the issue is identified:
-
Before the Race:
Simply swap the BIB numbers between the participants via the Swap Bib Numbers. This ensures that all associated data, including transponder readings, will be processed correctly. -
During the Race:
Use the "Swap Participants Data" function. This will update the participant data, swapping BIB numbers and raw timing data between the affected participants. -
After the Race:
As with during the race, use the "Swap Participants Data" function to swap BIB numbers and raw data.
Reusable Transponders
(A-Z Transponders, HuTags, Active Transponders, Bib transponders not linked to the bib number)
If participants swap Reusable Transponders, the approach depends on whether you’re using the Transponder Field or a Chip File for mapping:
Using the Transponder Field
-
Before the Race:
Manually update the transponder fields in the participants tab, to reflect the correct assignment. -
During the Race:
-
Pause timing to avoid further incorrect reads.
-
Use the "Swap Raw Data" function to correct timing data between participants.
-
Update the transponder fields in the participant records to reflect the correct assignment.
-
Resume timing.
-
-
After the Race:
Use the "Swap Raw Data" function to adjust results. Additionally, update the transponder fields if you need to replay timing reads later for verification.
Using the Chip File
-
Before the Race:
-
Edit the chip file, ensuring proper transponder-to-participant mapping.
-
-
During the Race:
-
Pause timing to prevent further incorrect reads.
-
Use the "Swap Raw Data" function to correct timing data between participants.
-
Update the chip file with the correct transponder assignments.
-
Resume timing.
-
-
After the Race:
-
Use the "Swap Raw Data" function to adjust results. Additionally, update the chip file if you plan to replay timing reads later for verification.
-