This section explains RACE RESULT 14 in more detail, including how it works, the available menus and settings, fields and functions and additional learning guides.
It is expected that you have a basic understanding of RACE RESULT 14, from the RACE RESULT 14 Introduction.
How RACE RESULT 14 works
RACE RESULT 14 is accessed through a web browser, either through the online version hosted through https://events.raceresult.com or as a locally installed software on either Windows or MacOS. At this time, there is no current support for Linux based systems.
One event may be accessed and worked on by multiple users simultaneously, or similarly you can access multiple events from the same device at the same time.
The functionality of both online and offline versions of RACE RESULT 14 is identical, although certain workflows do differ between the two versions depending on what you are needing to achieve.
Working online has a number of advantages, including:
- Online Registration through my.raceresult.com platform
- Immediate publishing of results through my.raceresult.com platform
- All your events are stored in one secure place and backed up
- Easy collaboration with colleagues, customers and RACE RESULT support from anywhere in the world
In some cases, for example when internet connectivity at an event may be limited, it can be beneficial to work offline during the event to ensure you are able to produce on-site results which can then be published online at a later stage. For such events, the event file can be checked out from the online server in order to work offline, it is still possible to publish online results using Online Forwarding, and after the race the file can be checked in to continue working online.
When using RACE RESULT 14 offline with RACE RESULT Systems only, it is free of charge. Otherwise - the pricing model for RACE RESULT 14 is easy: you pay a small fee per participant. See Participant Activation for details.
There are multiple elements to the RACE RESULT 14 software which are explained below, as well as some guides for working with the software either online or offline.
Working Online
RACE RESULT 14 can be accessed online by any device with an internet connection and web browser, laptops, mobile phones, tablets and more.
When working online, the software can be accessed through the Customer Area of www.raceresult.com or directly through https://events.raceresult.com. Once logged in you will be directed to the Start Menu which contains your list of events or allows you to create new events from the available templates or copy an existing file to use as a template.
When possible - working online throughout the event is always recommended, this allows for different users to access the software simultaneously, for example registration may be separate from the finish line where you are timing.
Working Offline
When working offline, you need to download and install the RACE RESULT software first, then start the RACE RESULT Web Server and check out the event file.
Working offline still allows you to completely time your race and can still produce results which can still be exported through lists to PDF, Excel or other standard formats.
Elements of RACE RESULT 14
Here you will find some typical scenarii and how things are connected to bring the times from your hardware to the event file in the Sports Event Server.
Legend
- Sports Event Server: manages your event file.
- RACE RESULT Web Server handles all networking elements of RACE RESULT 14
- RACE RESULT 14 Browser: the browser-based user interface of the software.
- RRS Proxy: an online storage and proxy to communicate to Track Boxes and decoders with upload enabled.
Arrows
- the arrow direction indicates who is responsible for initializing the connection.
- green: online connection
- black: local or network connection
- red: exporting
Boxes
- dark grey: local or LAN
- light grey: online
- red: user interface
Multi-Language Handling
Both inside RACE RESULT 14 and on my.raceresult.com the user can choose between different languages. RACE RESULT 14 contains a translation table for every language for any default / fixed texts and labels. Additionally your user defined texts like Event name, Contests, Additional Fields, List Headers, Email Templates and more can also be defined in different languages.
Default Fields
All text inputs which support multi-language translations have a language selector on the right:
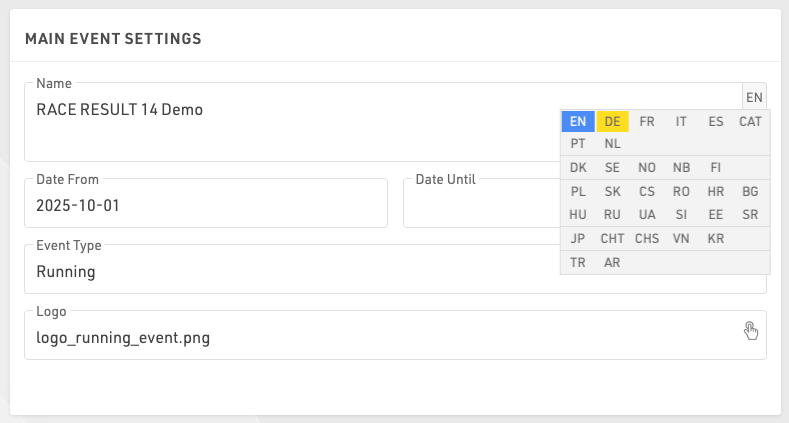
Simply move the mouse cursor there and select the language for which you would like to enter the translation. The languages that already have a translation are marked blue.
If a box has more than one language, it is marked blue as well:
Additional Fields
Values in Additional Fields. Each value can be defined in multiple languages, each value is contained within a brace with each language defined. e.g. "{de:Bier|en:Beer|jp:ビール}".
- Within the brace enter the language code followed by a colon, enter the respective value. Multiple languages are separated by a vertical bar.
- Close the brace and separate the next value with a semicolon as normal.
Displaying Translated Fields
On my.raceresult.com and when using links to Checkin Kiosks and Presenter Screens the default browser language will automatically be used.
A specific language can be set by appending the query parameter &lang=XX to the URL.
To display the value of a field (e.g. [Contest.Name] or [Event.Name]) in a specific language use the Text() function.
Text([Field];"lang")
For use in e-mail templates where the value for the participants Language field will be used to choose the template, you can replace "lang" with [Language].
If a field does not have a translation in the selected language then English will be shown instead as a fallback. If no English translation is found then the first available translation will be used.
Times in RACE RESULT 14
In RACE RESULT 14 all times are stored in the database as a value in seconds, this is referred to as a decimal time, a formatted time is a time string as you would expect to read it normally. For example:
Decimal Time: 36015.125
Formatted Time: 10:00:15.125
DecimalTime is considered a number whereas a formatted time is considered a string of characters. In computer programing, we call these different types of values Data Types.
In both of the above examples, we also have milliseconds which are represented by the numbers after the decimal place. The milliseconds will be the same in a formated time as they are in a decimal time.
When to use DecimalTime?
Decimal time should be used any time you need to make a mathematical calculation or when sorting/ordering by a time.
Mathematics
For example, say we want to add 00:30:00 to 00:15:00. As a human, we can easily see that this would add to 45 minutes but a computer does not see this as we do. For a computer, the times first need to be converted to decimal time, added together, then formatted as a time so we can easily read it.
00:30:00 is equivalent to 1800 seconds.
00:15:00 is equivalent to 900 seconds.
If we add 1800 to 900 we get 2700 seconds. We can then reformat this time to 00:45:00.
You can use tools like Time to Decimal Time or Decimal to Time to make these conversions.
Sorting/Ordering
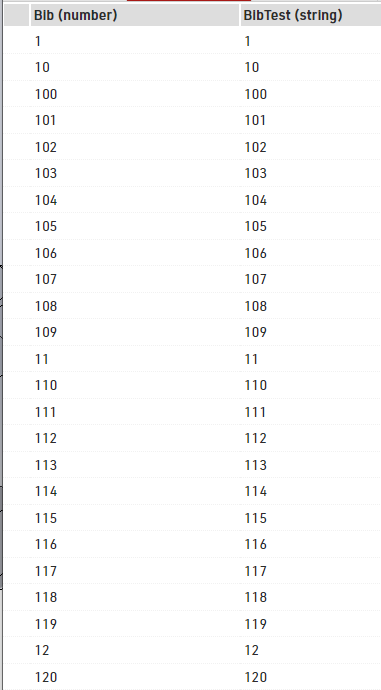
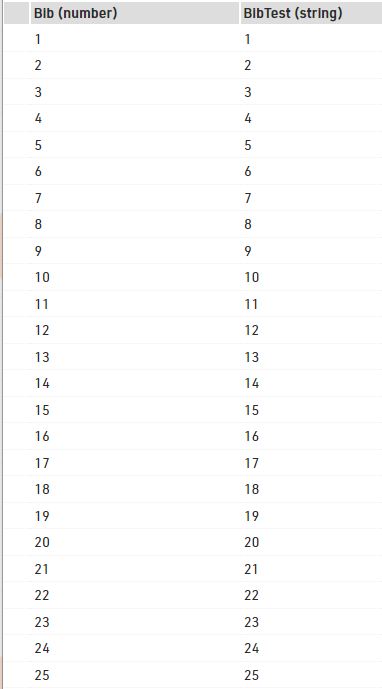
When sorting/ordering by a value you will also notice a difference between strings and numbers. On the left is a report sorted by BibTest which is a string. On the right is the same list sorted by Bib which is a number. When sorting by a string you can see the list is sorted by the first character then by the second character and so on. When sorting by a number the entire number is considered rather then just one character at a time.
Using RACE RESULT 14
Start
Events
The Event menu in RACE RESULT 14 is used to access your event files or create new ones, when working offline not all menu options will be accessible. Your most recently opened events will be shown first or browse your last (recent), next (upcoming) or all events. Using the search bar will search across all events.
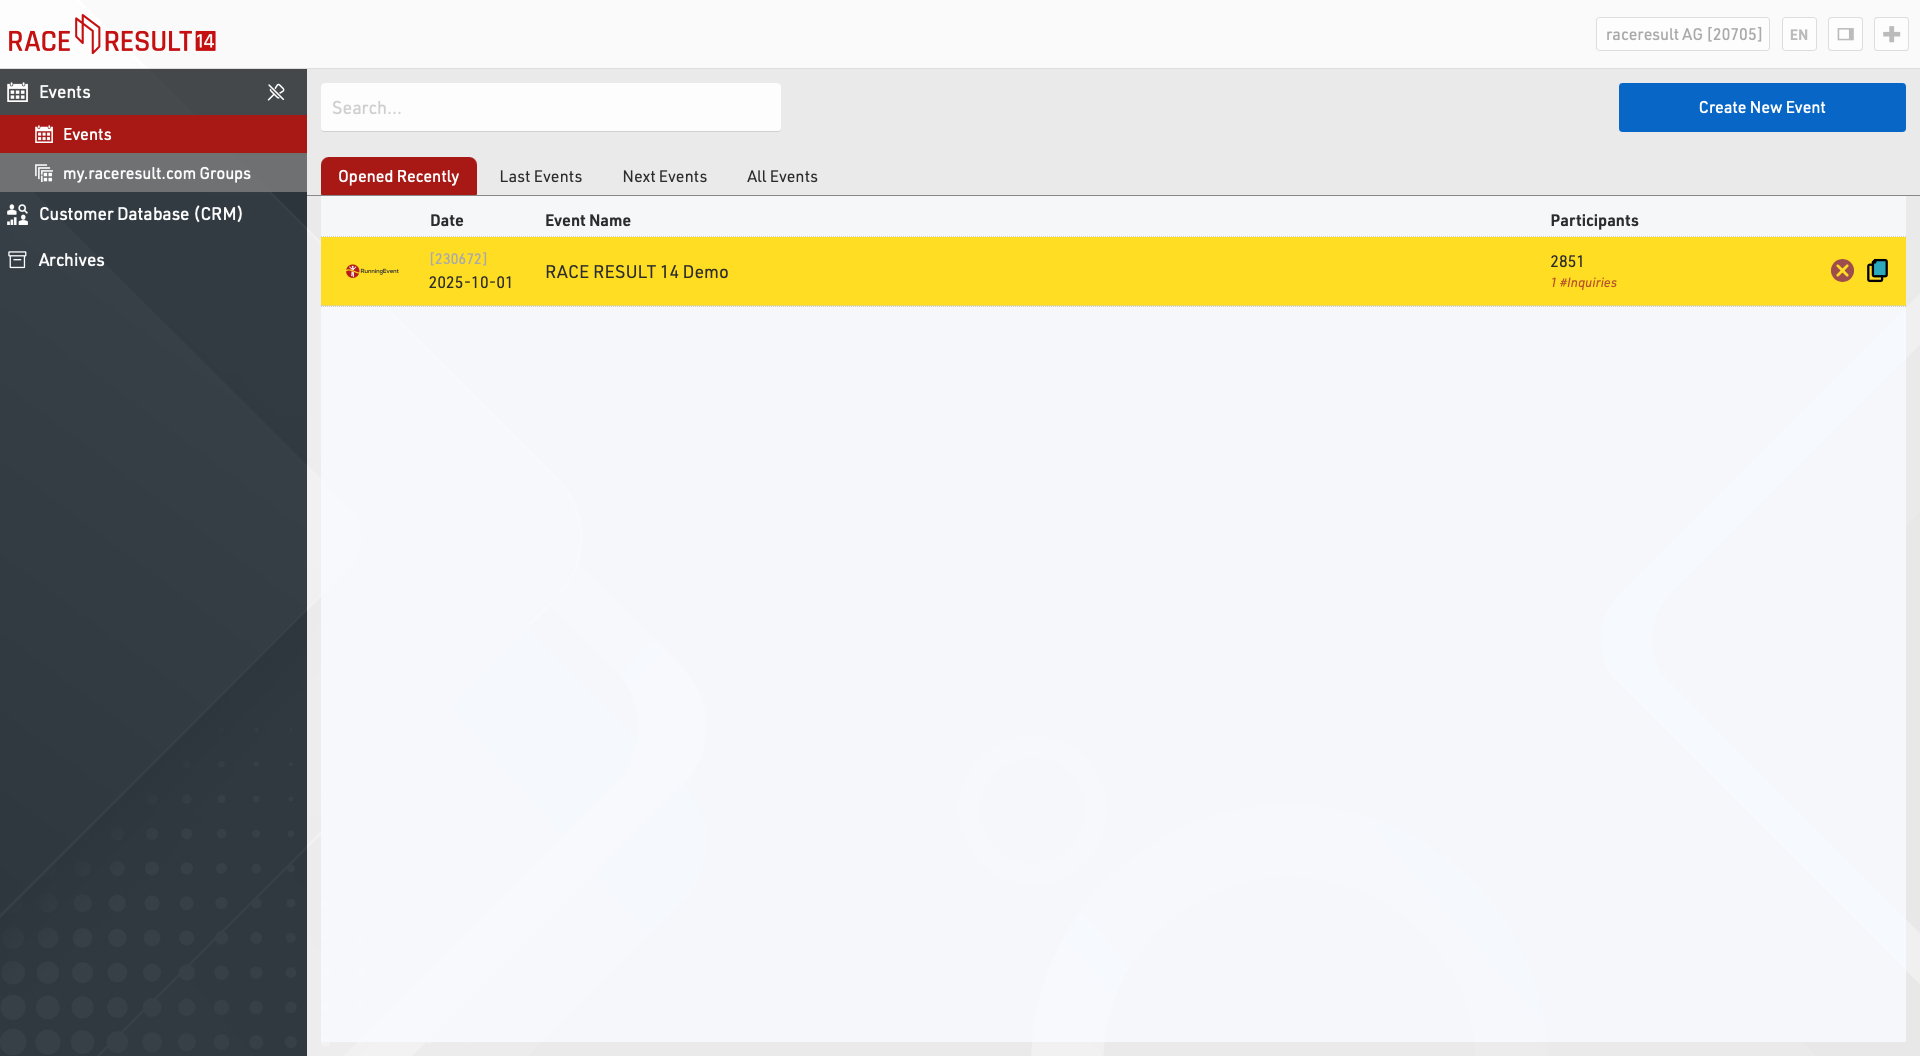
To create a new event, click on the button Create New Event, enter event name and date, select a template and click on Create (This function is only available when working online.
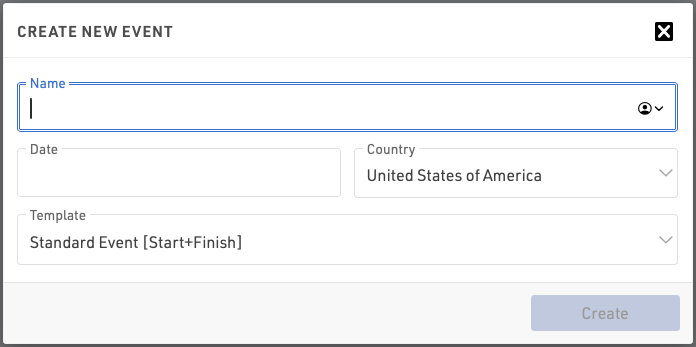
Offline, new event files can be created in the RACE RESULT Web Server).
To copy an event click the copy icon in the row of the original event to be copied.
To delete an event, click on the delete icon on the right (only available when working online). When deleting an event you will be asked for your login password (belonging to your customer number).
Participants Search
Using the Participants Search function you can search for participants across all your event files.
Event Groups
Event Groups is used to sort your events on my.raceresult.com into the different categories displayed. You can find more info in the Groups article.
Customer Analysis
The Customer Data Base (CRM) gives you valuable insights who your participants (customers) actually are, where and how often they race and where they are from.
Dashboard
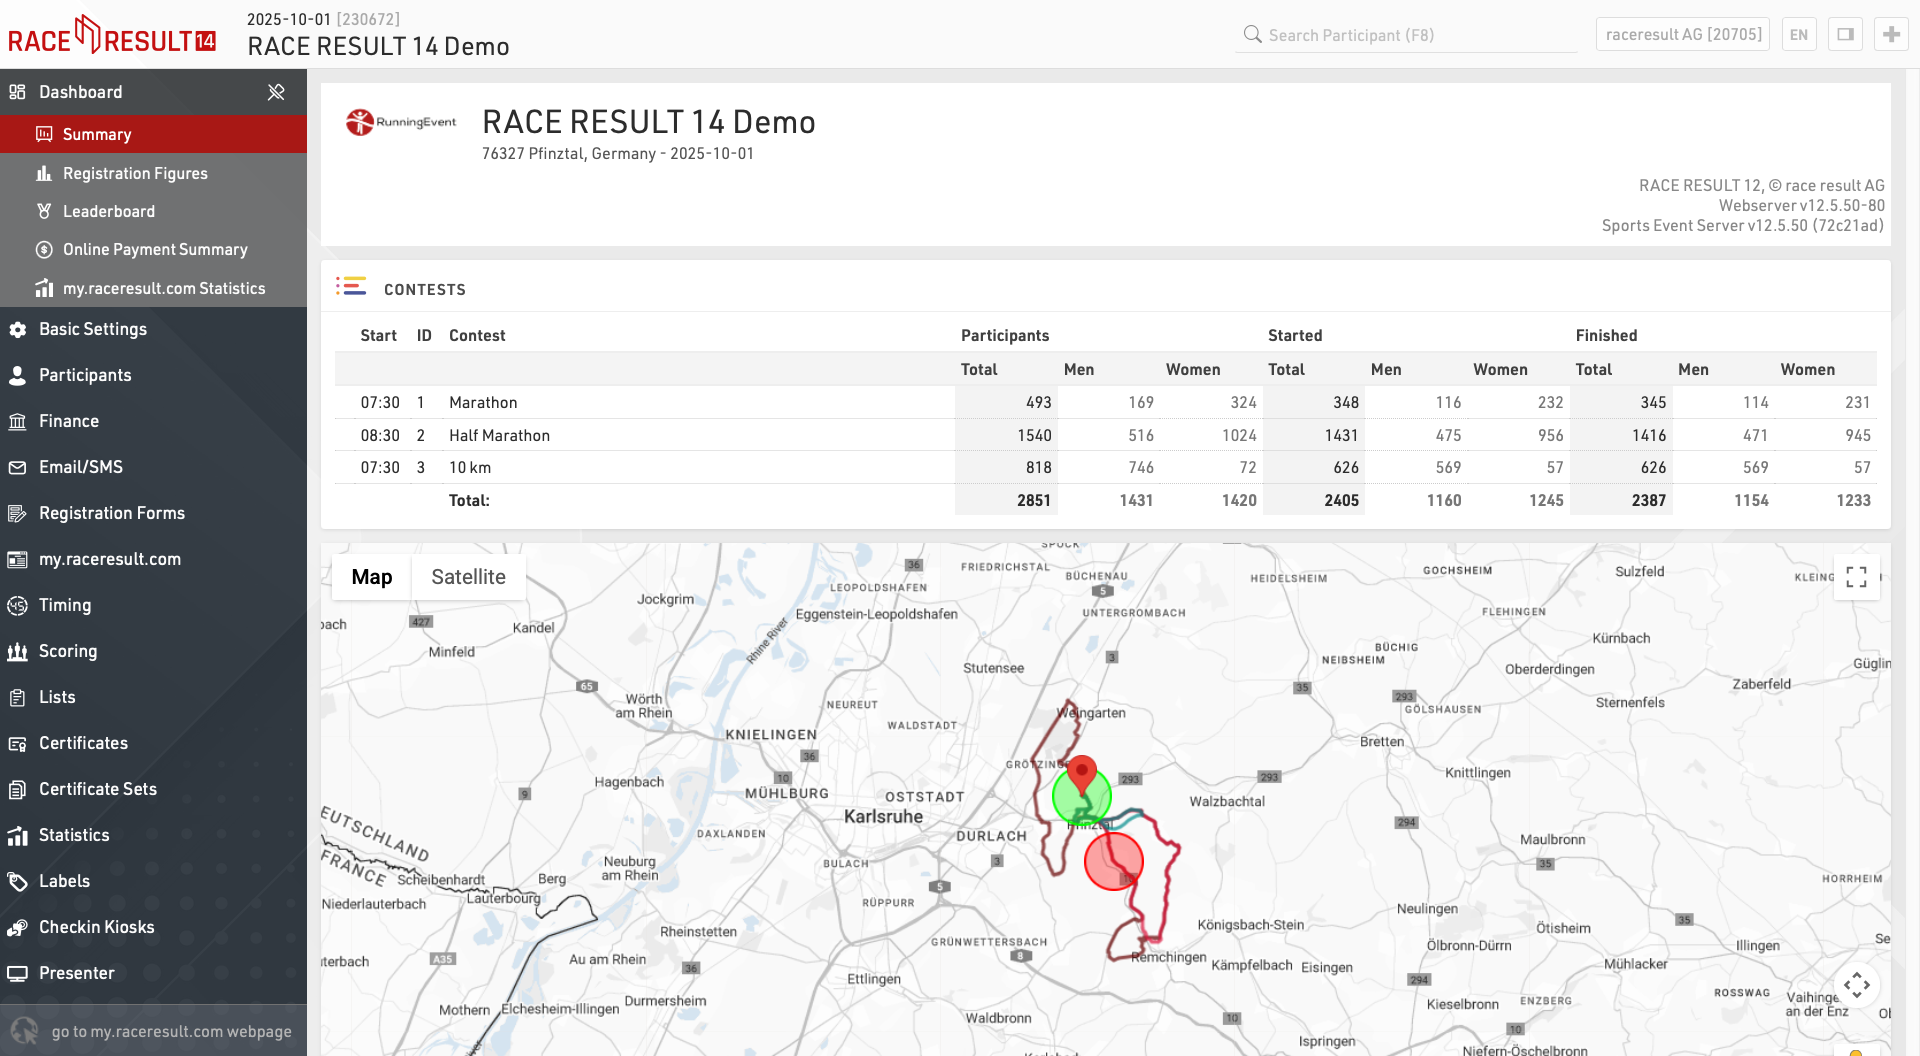
The Dashboard provides a quick overview of your event, in particular information about registration figures & payments.
Basic Settings
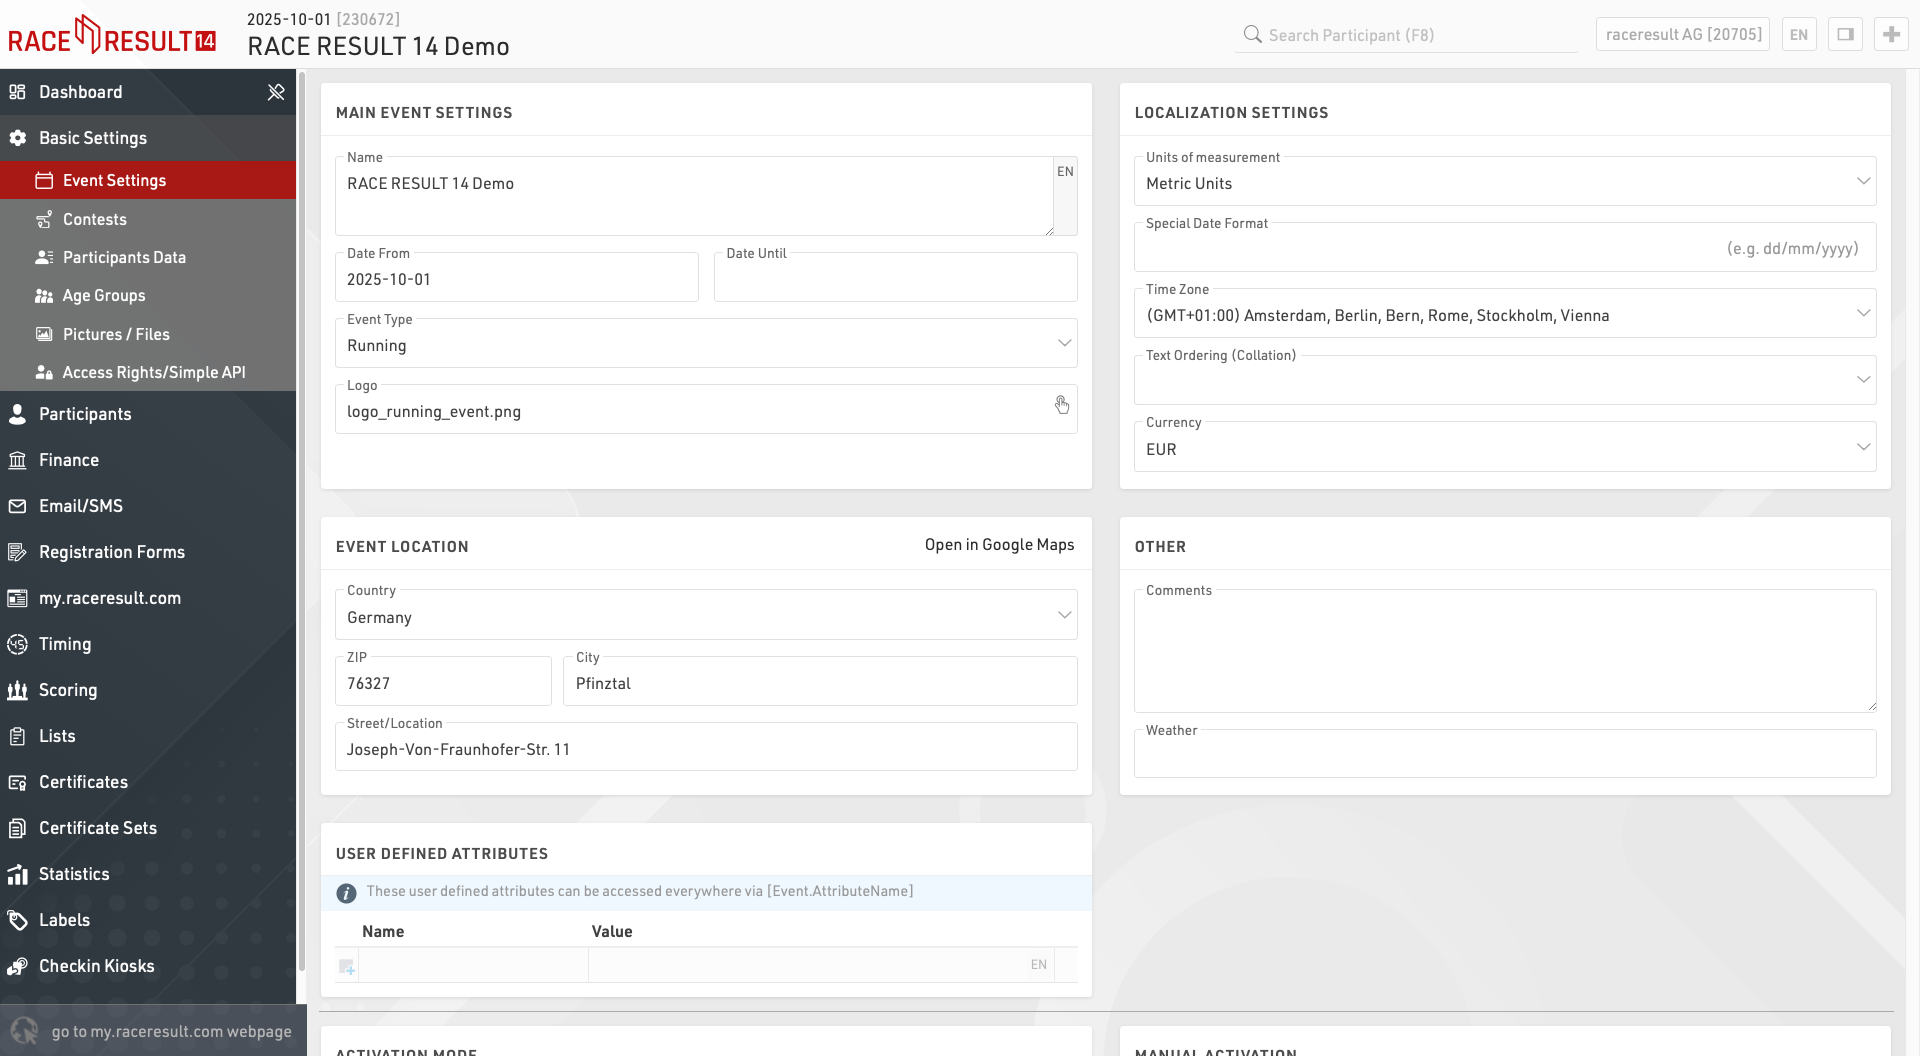
The Basic Settings define core settings of your event file.
Participants
The Participants Window is used to manage all participant data within the event file.
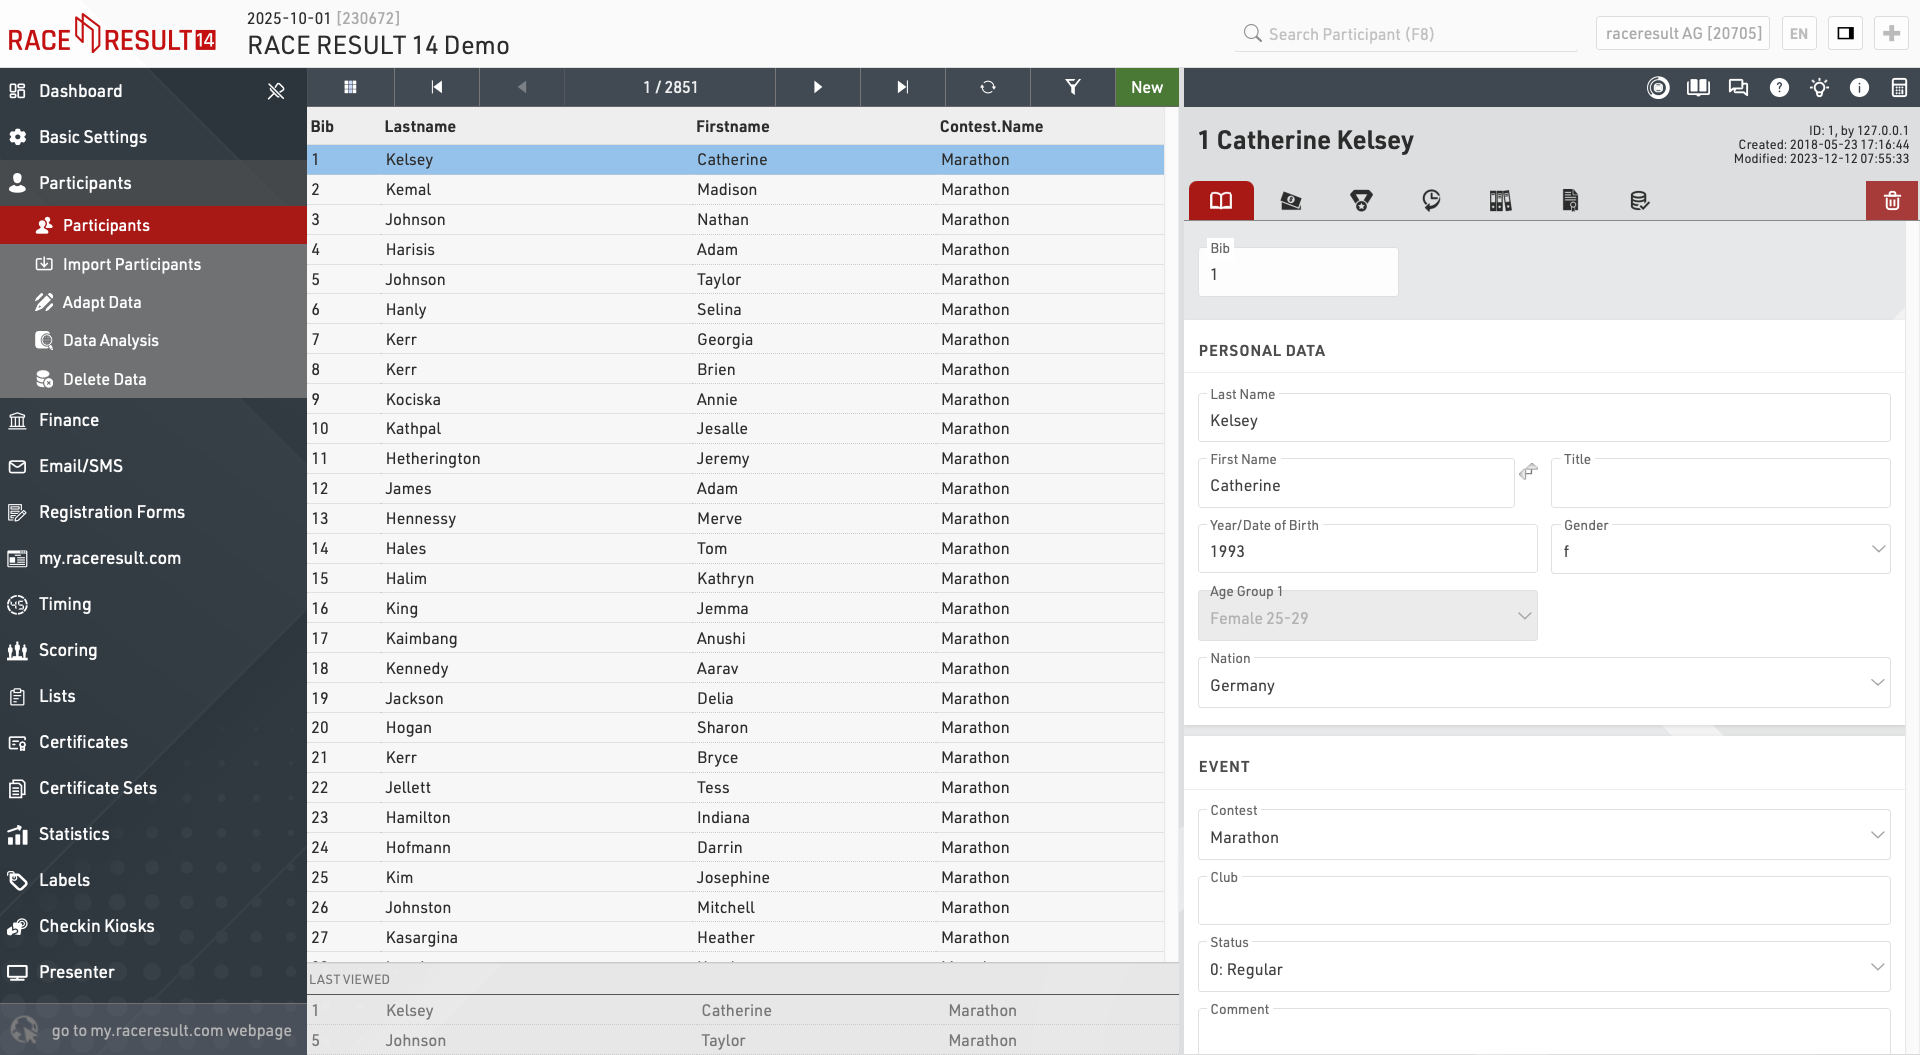
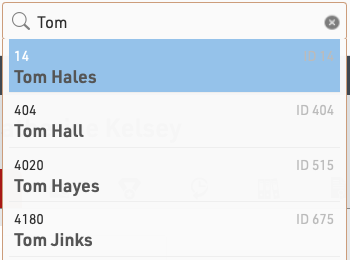
The participants window can also be accessed by using the search bar in the main navigation bar, selecting a name from the search will automatically open that participant in the main view.
Finance
Email / SMS
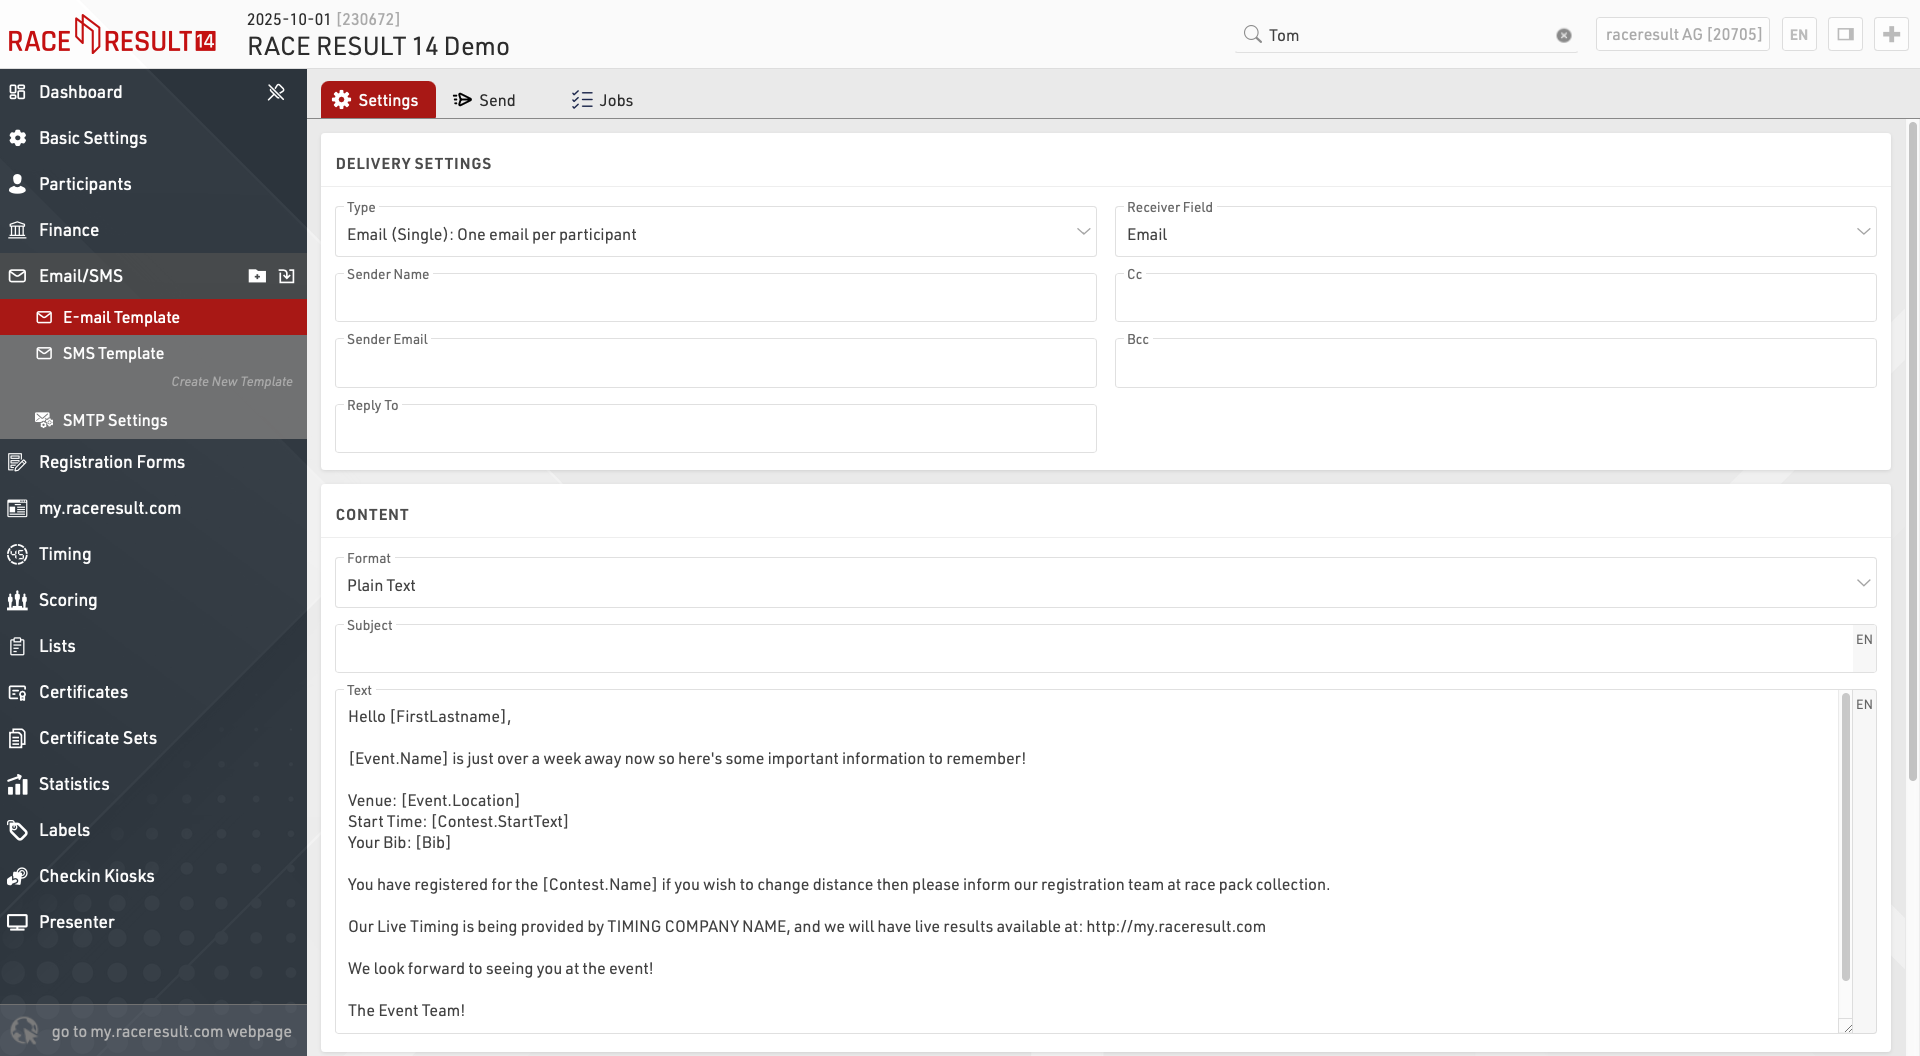
The Email / SMS Module allows for bulk sending of Emails or SMS to participants.
You can create an arbitrary number of templates for different purposes which can be sent through the E-mail / SMS window or may be triggered through an Exporters.
The list on the left shows all templates in your event file which can be rearranged using drag&drop by clicking the free space to the left of the template name.
Templates can be further sorted into folders, to create a new folder, click the Add Folder icon in the Email/SMS Header. By clicking the folder header, the folder can be expanded / collapsed, to sort the items within a folder alphabetically, click the  icon. Empty folders will be deleted automatically when you reload the window.
Clicking the name of a template from the menu opens the settings for that template where the template can then additionally be sent from.
Registration Forms
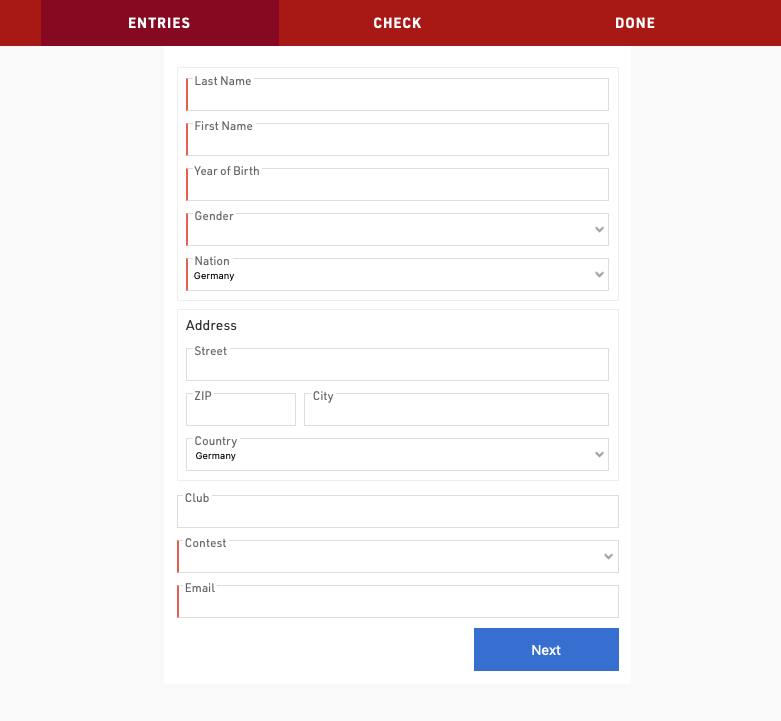
Registration Forms are used to provide both online and on-site registration, this can also be extended to online self-service allowing participants to update their data directly.
The list on the left shows all registration forms in your event file which can be rearranged using drag&drop by clicking the free space to the left of the form name.
Lists can be further sorted into folders, to create a new folder, click the Add Folder icon in the Lists Header. By clicking the folder header, the folder can be expanded / collapsed, to sort the items within a folder alphabetically, click the  icon. Empty folders will be deleted automatically when you reload the window.
Each registration form is fully customisable and multiple registration forms can be setup for different purposes and each form is one of four types:
- Single Registration
- Group Registration (Enter multiple registrations simultaneously)
- Single Self-Service
- Group Self-Service
To access self-service a unique URL is generated for each participant which contains a unique Key for security, the URL can be retrieved using the Changelink() function.
Each registration form will generate a unique URL which can be opened directly, or the form can be included in the my.raceresult registration page.
my.raceresult.com
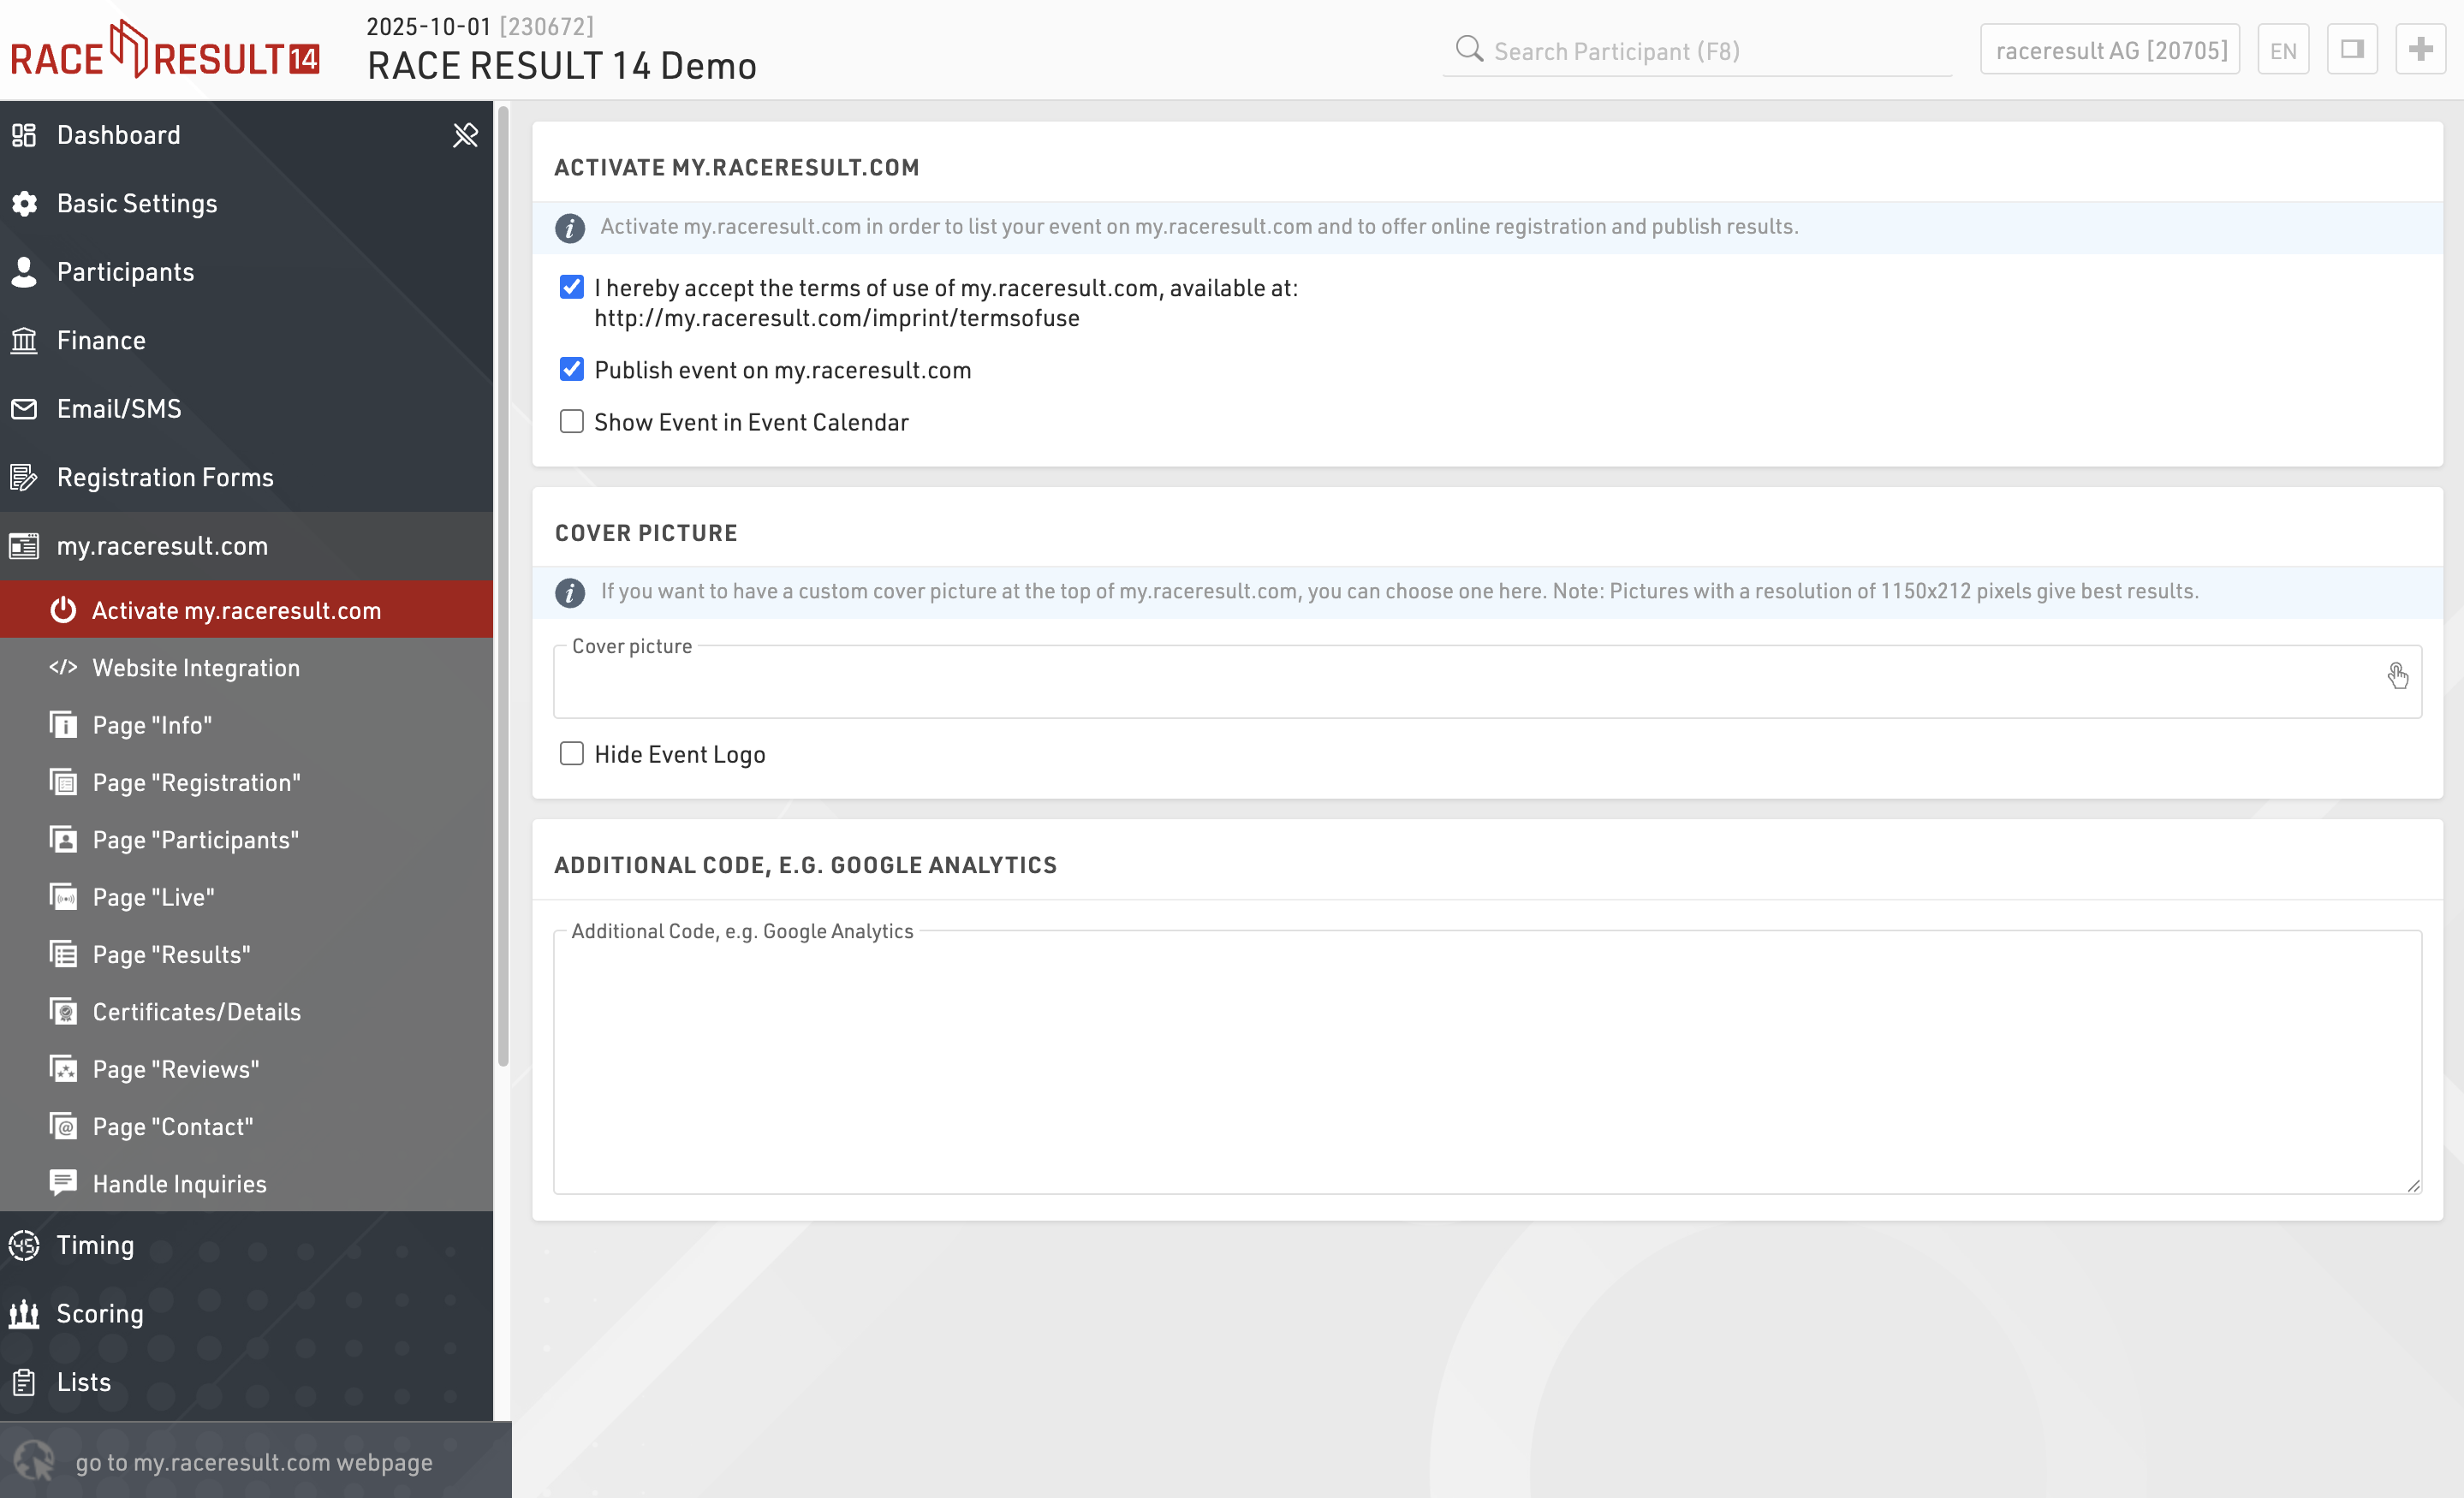
The my.raceresult.com page is used to configure the registration and results platform my.raceresult.com and to handle inquires from my.raceresult.com
Timing
The Timing window contains important timing settings and the main interface for connecting to timing systems during the event.
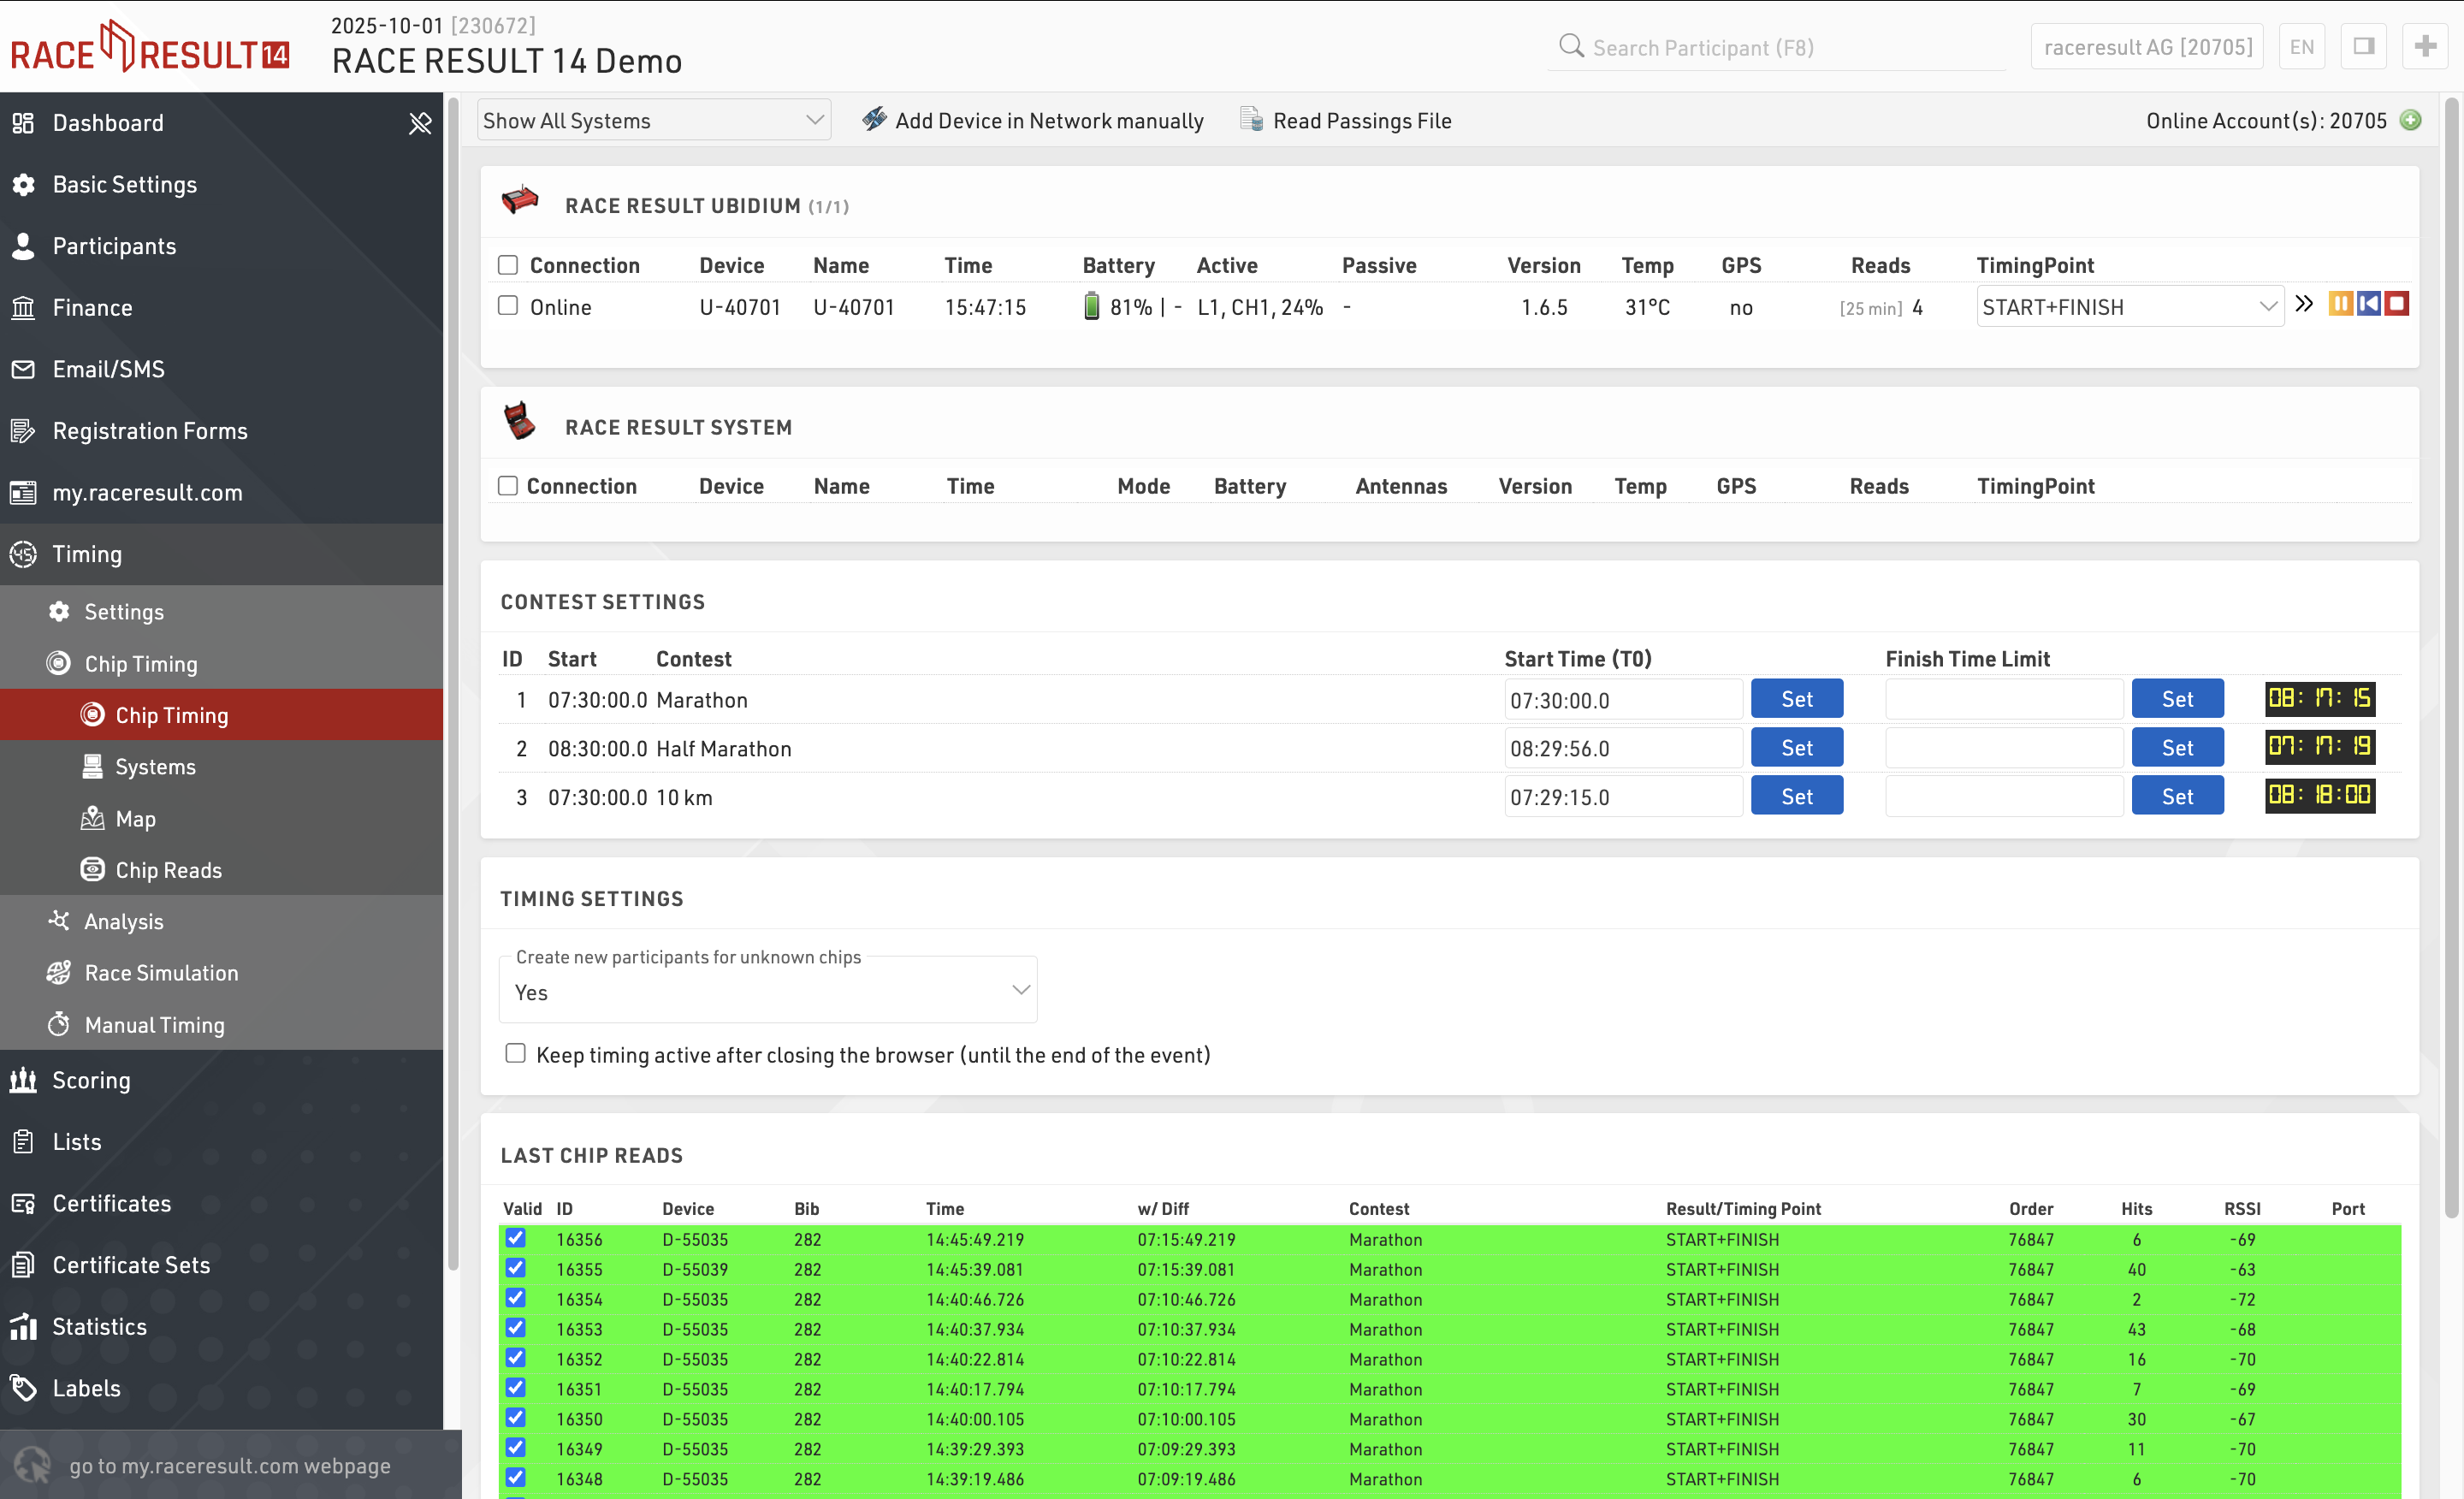
By default the Settings page will be opened if the current date is before the start of the event, after which the Chip Timing page will be opened automatically.
Scoring
The scoring settings define how RACE RESULT 14 uses your raw data to calculate times for each participant.
The most simple option is to use Splits which provide the quickest setup for races which follow a standard pattern, with a defined start and finish such as a point to point or a fixed number of laps. Splits will also automatically generate many of the times and ranks required for lists as well as additional / legs which may span a range of splits. Splits also generate a wide range of fields for each Split, including different time formats, ranks and pace.
For more complex races or for custom scoring methods you may need to define more advanced settings.
Special Results - Results are fields associated with a time, which can be pulled/calculated from Raw Data or calculated from Splits / other data. Results may be required for certain event types such as variable lap races.
Rankings - Checking the configuration of specific rankings, for example overall/gender/age group rank.
Team Scores - A team score will, for example, sum up the times of best three athletes of each club and create a ranking over the team time.
Note: By default, an event file already has overall/gender/age group rankings. You need to work on the rankings only if you want them to be calculated in a different way or if you want to calculate additional rankings.
Lists
Lists are the most important method for getting data out or RACE RESULT 14, and are used for a variety of applications - printed results, publishing online results, presenter screens, creating custom statistcs lists, checklists for verifying results or any custom report you need.
The list on the left shows all lists in your event file which can be rearranged using drag&drop by clicking the free space to the left of the list name, list names highlighted in blue are published online through my.raceresult.com.
Lists can be further sorted into folders, to create a new folder, click the Add Folder icon in the Lists Header. By clicking the folder header, the folder can be expanded / collapsed, to sort the items within a folder alphabetically, click the  icon. Empty folders will be deleted automatically when you reload the window.
Clicking the name of a list from the menu opens an overview page for that list.
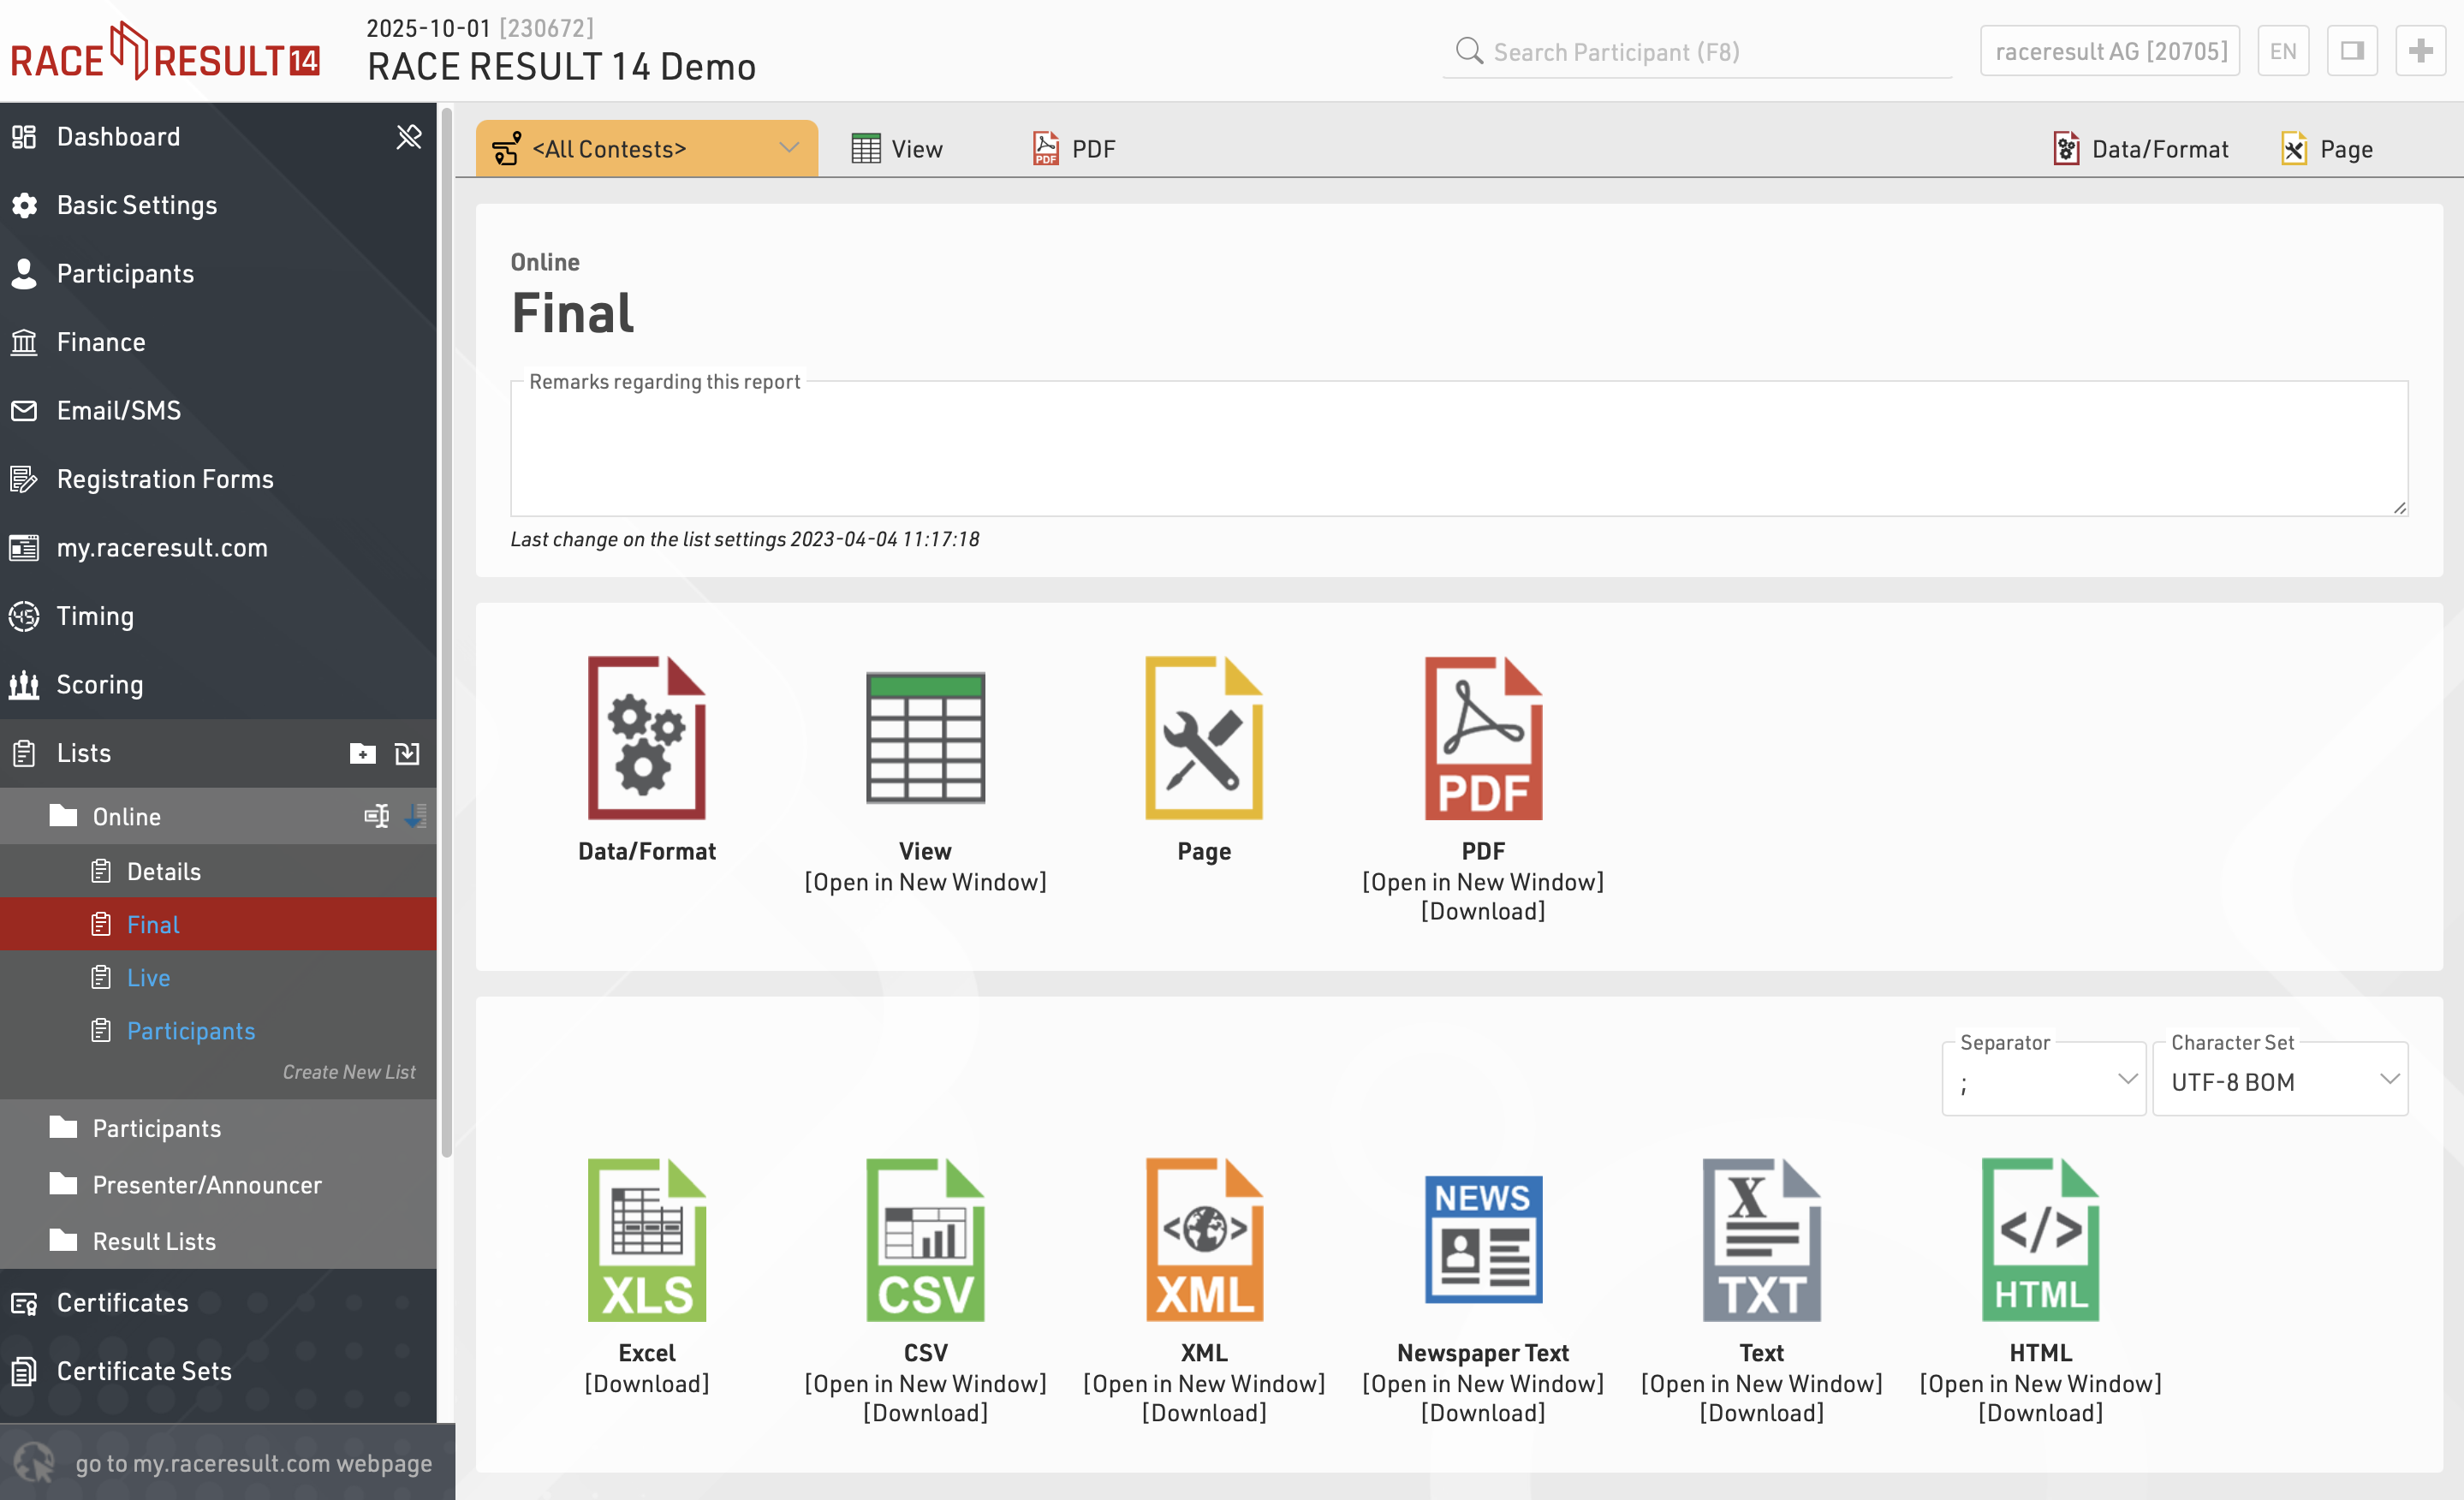
Lists show a defined set of fields for a specific set of records. The settings of a list determine:
- which participants are shown
- which data fields (columns) are shown
- how the records are sorted
- how the records are formatted
- how the page is formatted (page format, margin etc)
The settings of a list are split into the tabs Data/Format and Page. Data/Format contains all settings regarding the data shown on the list and how it is formatted, whereas the Page settings concern the general page layout and are only relevant for the PDF and HTML output form.
To view a list click the View button or tab, this can also be opened in a new window, lists can also be opened directly to the View tab by double clicking the list name from the menu. A PDF view of the list can also be previewed or downloaded.
Lists can also be exported in different formats as EXCEL, CSV, XML, TXT and HTML.
Certificate
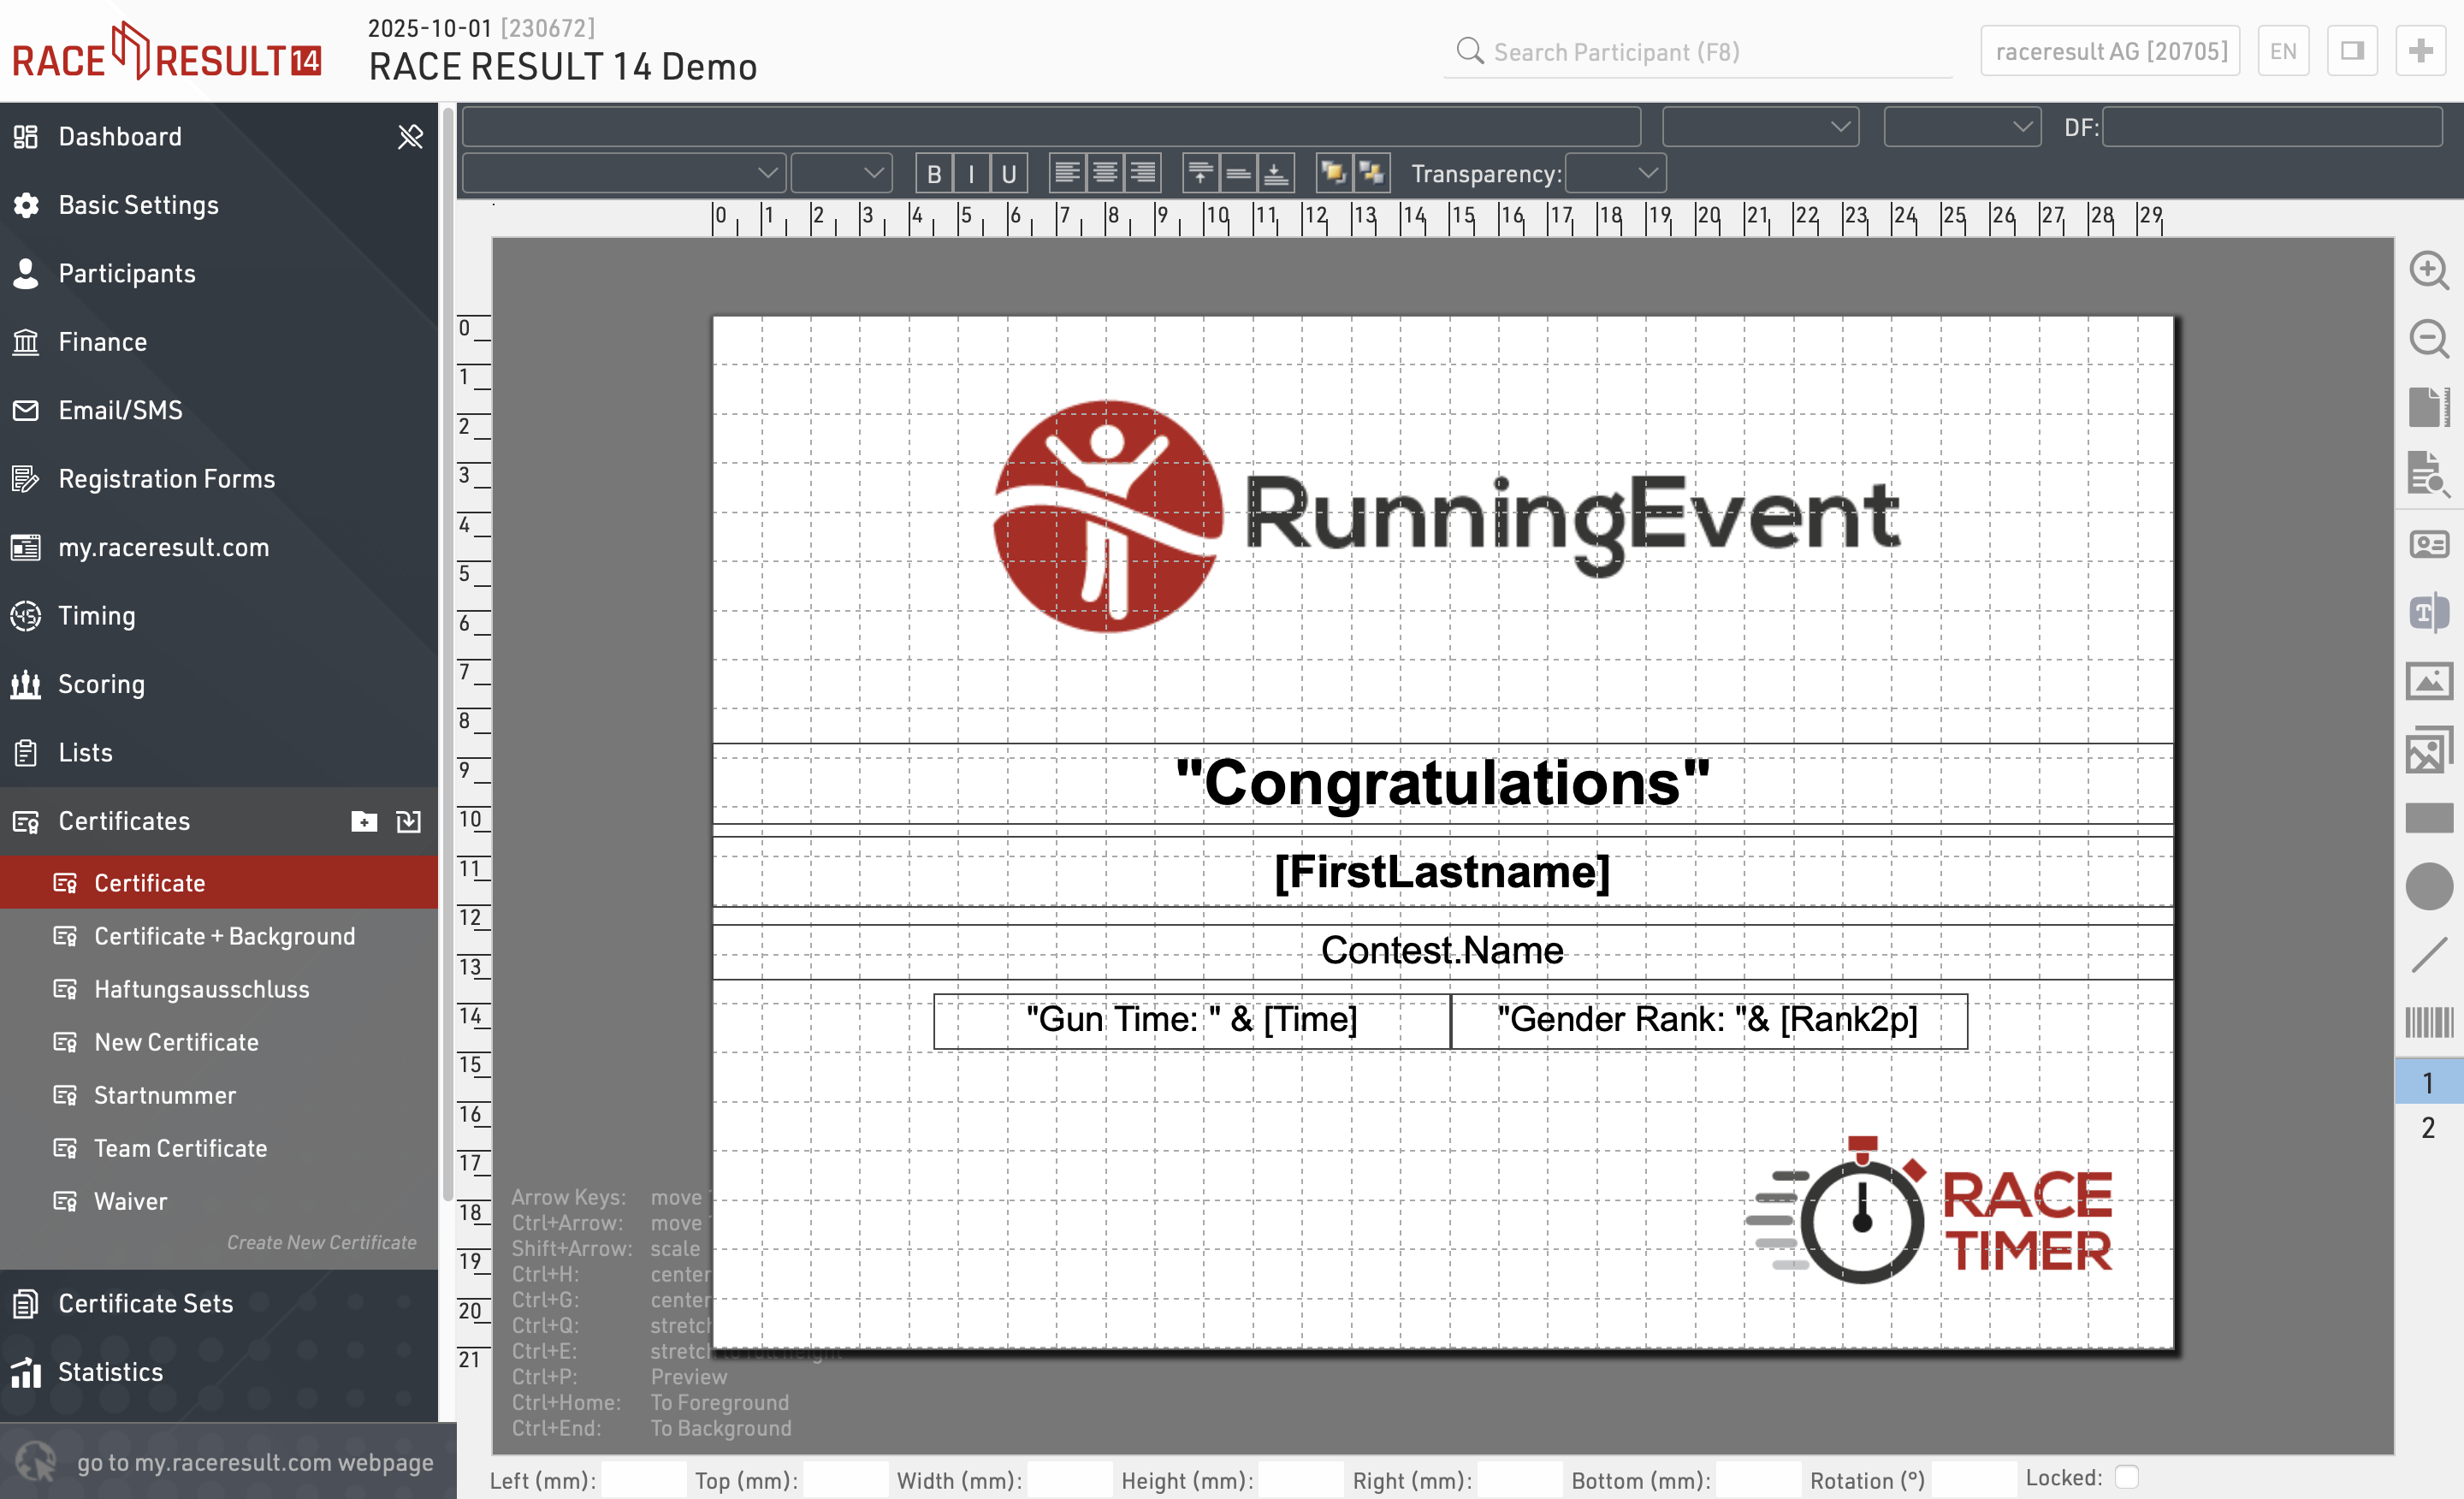
The Certificate creates a graphical layout which can contain, images, text and even data fields.
Certificates may be used for
- Layouts of Certificate Sets to generate individual participant certificates
- Background image for a List
- Cover sheet and closing page for a List
- Content of Labels
Certificates can be designed in any size format allowing them to be designed for different printer types, additionally - certificates may contain multiple pages.
The list on the left shows all certificates in your event file which can be rearranged using drag&drop by clicking the free space to the left of the list name. Certificates can be further sorted into folders, to create a new folder, click the Add Folder icon in the Certificates Header. By clicking the folder header, the folder can be expanded / collapsed, to sort the items within a folder alphabetically, click the  icon. Empty folders will be deleted automatically when you reload the window.
Clicking the name of a certificate from the menu opens the layout editor for that certificate.
Page Settings
First, define the page size and choose between landscape and portrait orientation:

Preview
At any time you can render a real preview of the certificate for any bib number using this button:

Adding Elements
The menu on the right offers different types of elements that can be placed on the certificate:
Data Field
You can enter a Field or an Expression in a Data Filed to display specific participant data. The example below displays the participant's first name.
Firstname
Using an expression you could display static text with dynamic text.
"Gender Rank: "&[GenderRank]
Text
The Text element can be used to display static text. Note, that you can not set Dynamic Formatting for text elements. Only Data Field elements can have Dynamic Formatting.
Image
The Image element can be used to display static images. When selecting this element, you will be given the option to select an image from the list of available images in your event file or from the available folders.
Data Dependent Image
The Data Dependent Image element can be used to display dynamic images using an Expression. The Expression should evaluate the name of the image, including the image extension (eg. .jpg).
For example, you can use the field Nation.Alpha2 in an expression to evaluate the name of each image file. The below would be evaluated to "flag_DE.jpg" assuming the participant was from Germany.
"flag_" & [Nation.Alpha2] & ".jpg"
Another example would be if you wanted to use a Control Function like an if() statement to determine what image to display. Here is one example
if([GenderRank] IN "1-3";"Winner.jpg";"Blank.jpg")
Shapes (Rectangle, Circle, and Line)
You can use the Rectangle, Circle, or Line options to display colored shapes. Using Dynamic Formatting, the colors can change dynamically for each participant.
Barcode/QR Code
You can encode any Field or Expression in one of the below format options.
- Barcode 39
- EAN 13
- Barcode 128
- QR Code
Element Setting Bar
Each element listed above has various settings. Not all available settings work for all elements. These settings are located at the top of the certificate window.
Top Row

The left text box is where you enter a field or expression for a given element. This is used for Data Field, Text, Image, and Data Dependent Image elements.
The two center drop-down lists pertain to team scores. This is discussed in more detail further down in this article.
The right text box labeled DF stands for Dynamic Formatting. Dynamic formatting can be used to change the formatting of an element dynamically. For example, you could change the text color depending on the participants finishing place.
if([GenderRank] IN "1-3";"C(#ffdb4d)";"C(#000000)")
Bottom Row

The bottom row of options has standard text formatting options like bold, italics, and unlined text. There are also options for text alignment within a text box, layering options, color, text outline, and element transparency.
Aligning Elements
After adding an element to the certificate you can position and scale it on the certificate with the mouse. Alternatively, you can use the cursor keys (see keyboard codes in the bottom left corner) or use the entry fields at the bottom of the screen to position and scale the element.
Select several elements at the same time by clicking and holding your mouse button and dragging the selection rectangle over the elements.
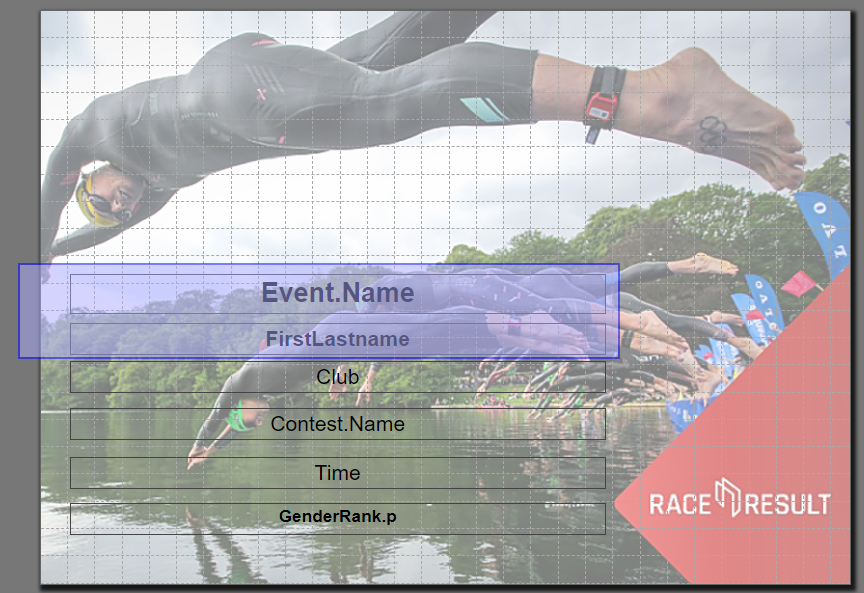
Alternatively, you can hold the Ctrl key on the keyboard and click one element after the other.
Then, these functions appear in the top left corner to align the elements:
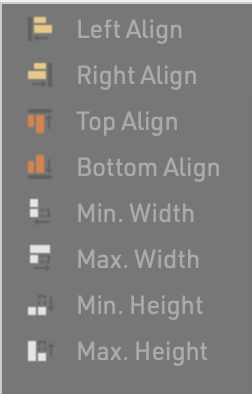
Pages
Optionally, a certificate can include more than one page. Simply click on "2" in the toolbar on the right to access page 2. Once you have placed an element there, you can add a page 3 and so on.
Team Certificates
Certificates for teams work exactly the same as a normal certificate. Instead of the individual rank and time, you would show the team’s rank and time. If you would like to show also information on the other team members, you can simply enter the field/expression in the top left corner and then select the team score and the participant.

For example, to show the last name of the second participant of the team (according to team score 1), the system will use the field TS1.P2.Lastname. In the preview, you can see that selecting a team score/participant only helps you to set up your certificate, but internally the field name will be used.

Certificate Set
Certificate Sets are used for the publishing and printing of certificates to determine for which participants a specific certificate should be generated, the complete set of certificates can be generated as a single PDF file if required.
Certificate sets make it possible to produce different certificates for different contests or subsets of participants - such as awards winners.
The list on the left shows all certificate sets in your event file which can be rearranged using drag&drop by clicking the free space to the left of the list name, certificate sets highlighted in blue are published online through my.raceresult.com.
Certificate sets can be further sorted into folders, to create a new folder, click the Add Folder icon in the Certificate Sets Header. By clicking the folder header, the folder can be expanded / collapsed, to sort the items within a folder alphabetically, click the  icon. Empty folders will be deleted automatically when you reload the window.
Clicking the name of a certificate set from the menu opens an overview page for that list.
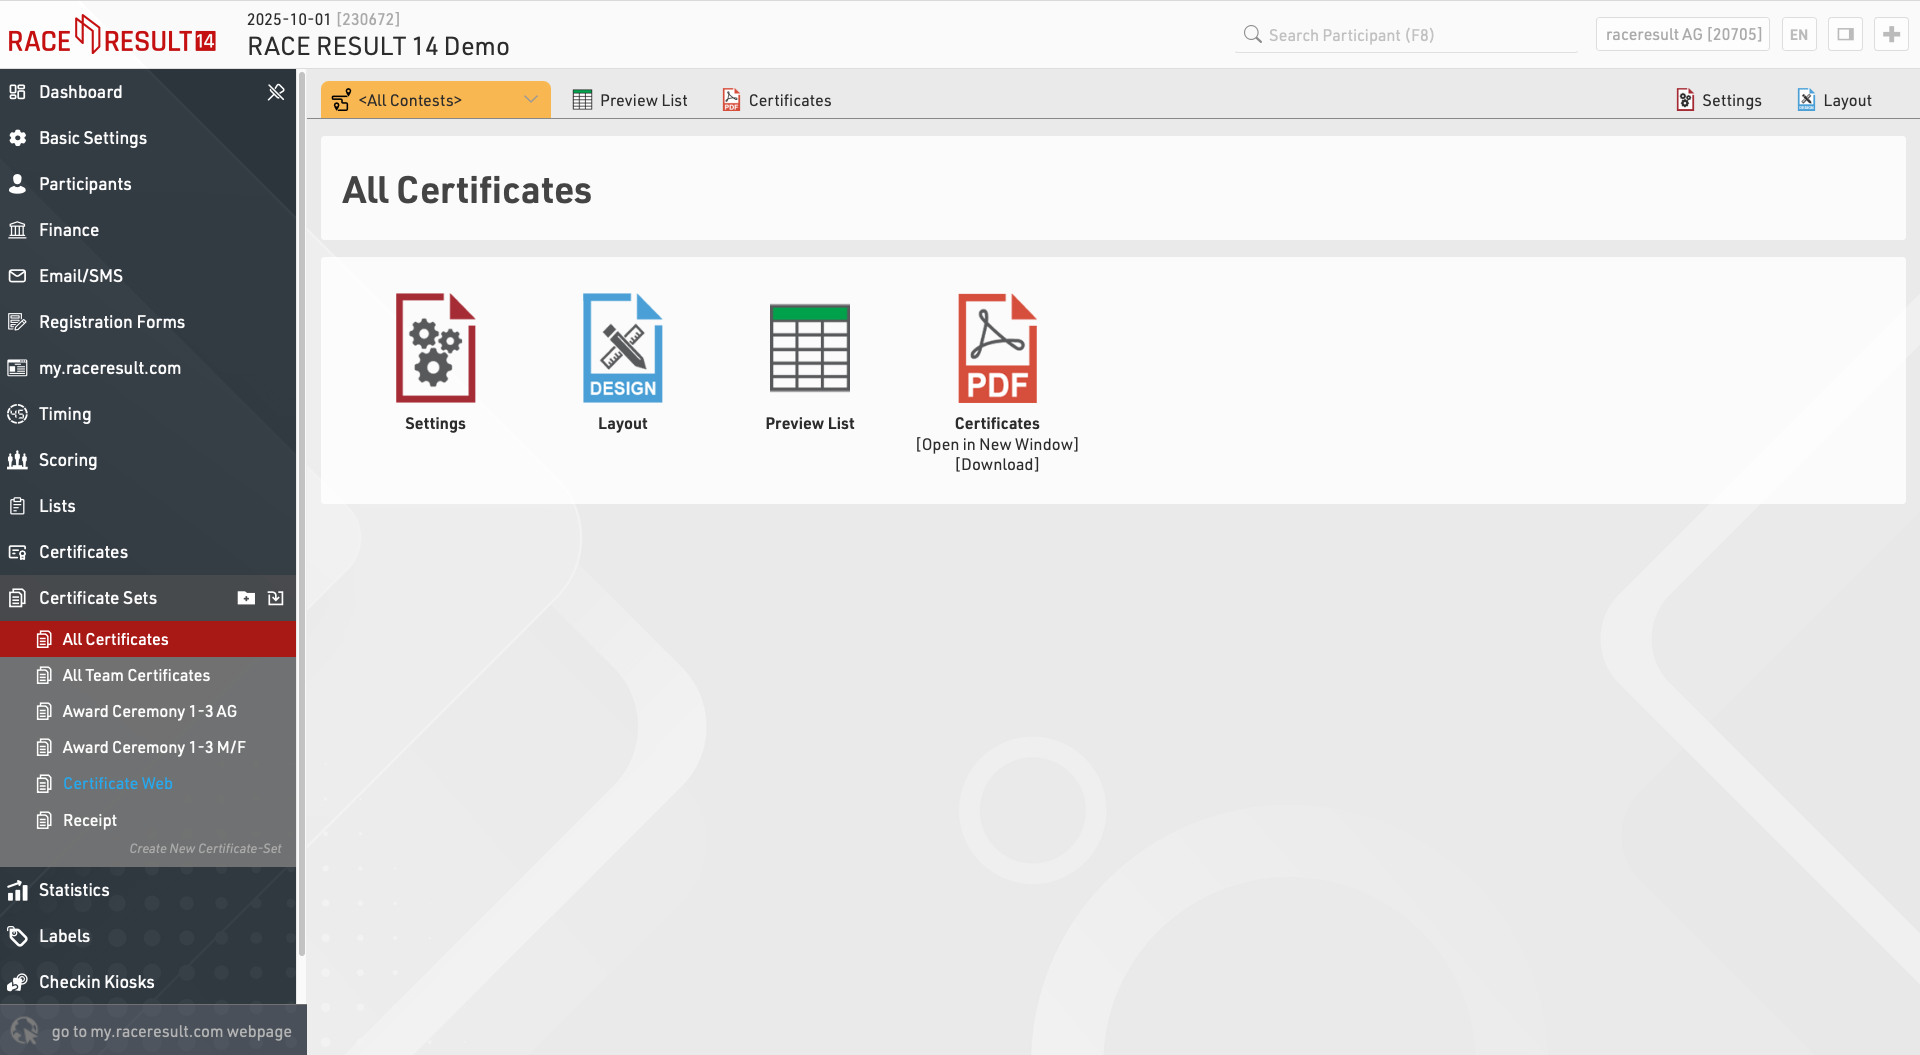
Settings
Certificate Layout
First, select the Certificate layout which should be used.
Then choose if you would like to create individual or team certificates. If you choose Team Certificate (1 per Participant), certificates will be created only for members of a team. If you select Team Certificate (1 per Team) a certificate will be printed only for the first member of each team.
For which Participant do you want to create certificates?
You can further limit for whom certificates will be printed. Oftentimes certificate sets are filtered by a rank, for example if you want to print certificates for only the best three. You can also enter a general filter.
Order of the Certificates
Determine in what order the certificates will be created.
Layout
Edit the Certificate Layout selected in the settings.
Preview List
A static list of the participants included in the certificate set and some basic values which may affect their eligibility.
Certificates
Generate all certificates in the set in a single PDF file.
Statistics
Statistics can create tables of statistical data either with custom rows/columns or using some of the pre-defined templates.
The list on the left shows all statistics tables in your event file which can be rearranged using drag&drop by clicking the free space to the left of the statistics name.
Statistics can be further sorted into folders, to create a new folder, click the Add Folder icon in the Statistics Header. By clicking the folder header, the folder can be expanded / collapsed, to sort the items within a folder alphabetically, click the  icon. Empty folders will be deleted automatically when you reload the window.
Clicking the name of a statistic from the menu opens an overview page for that list.
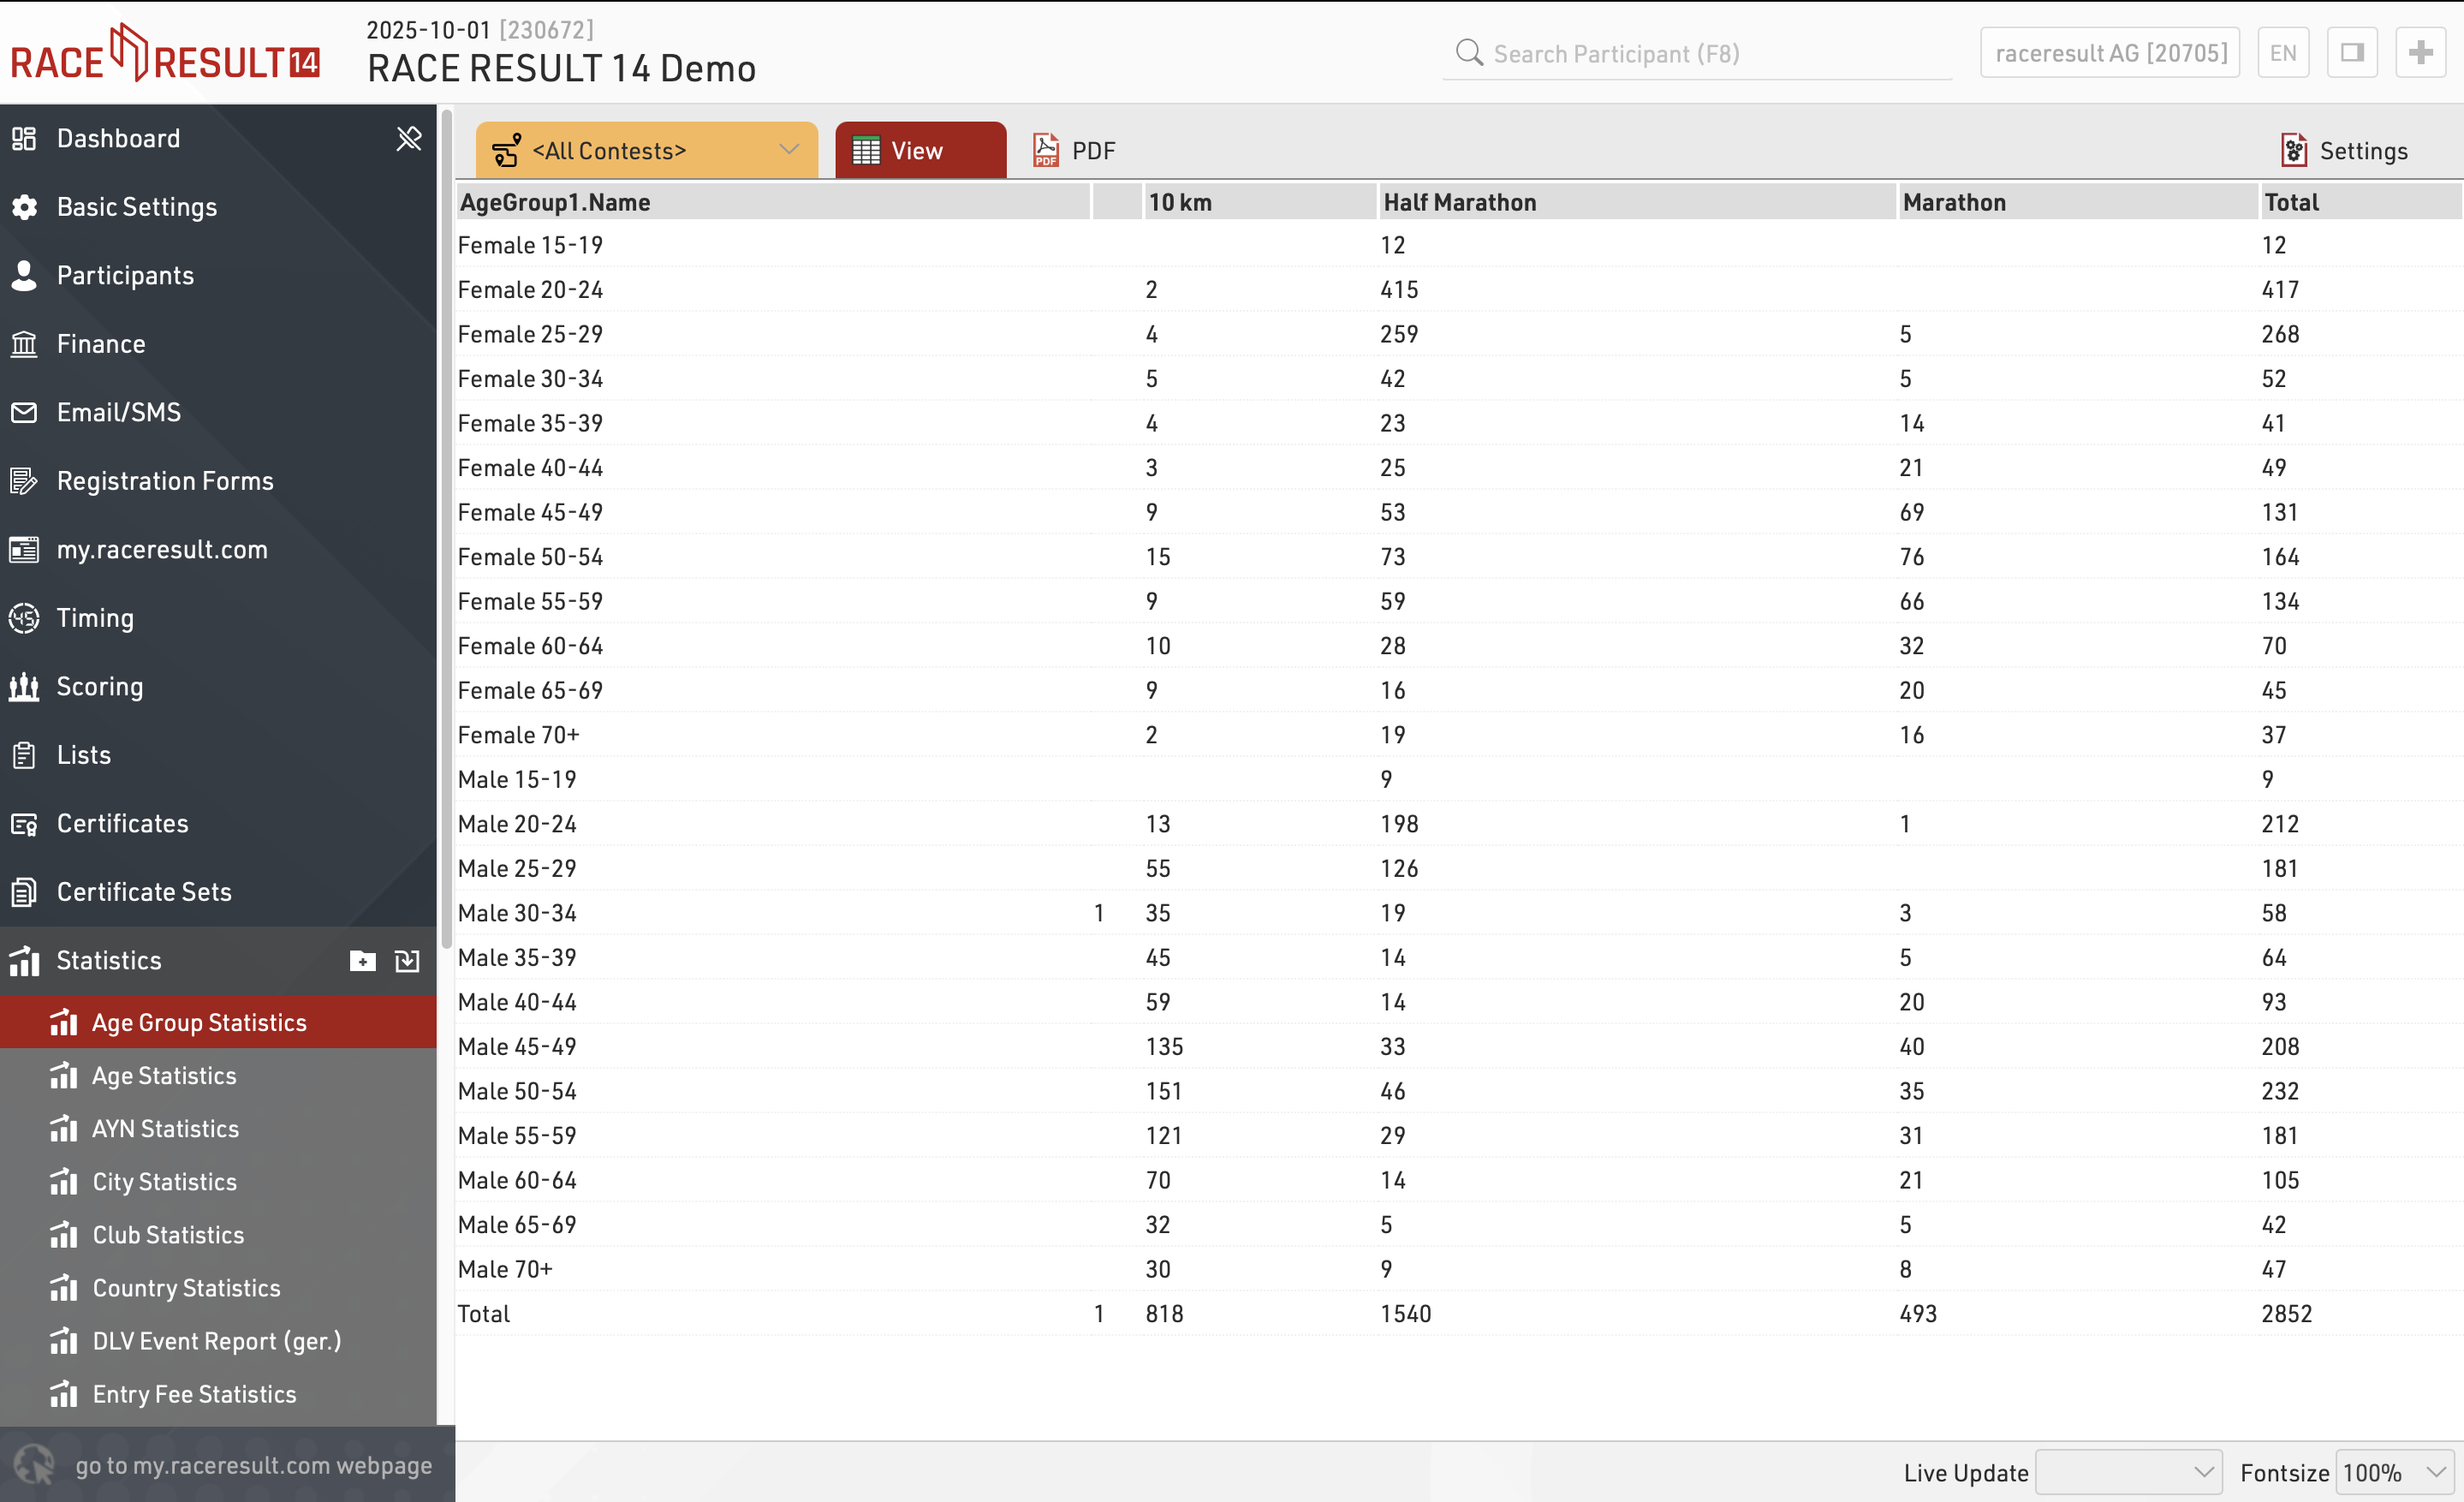
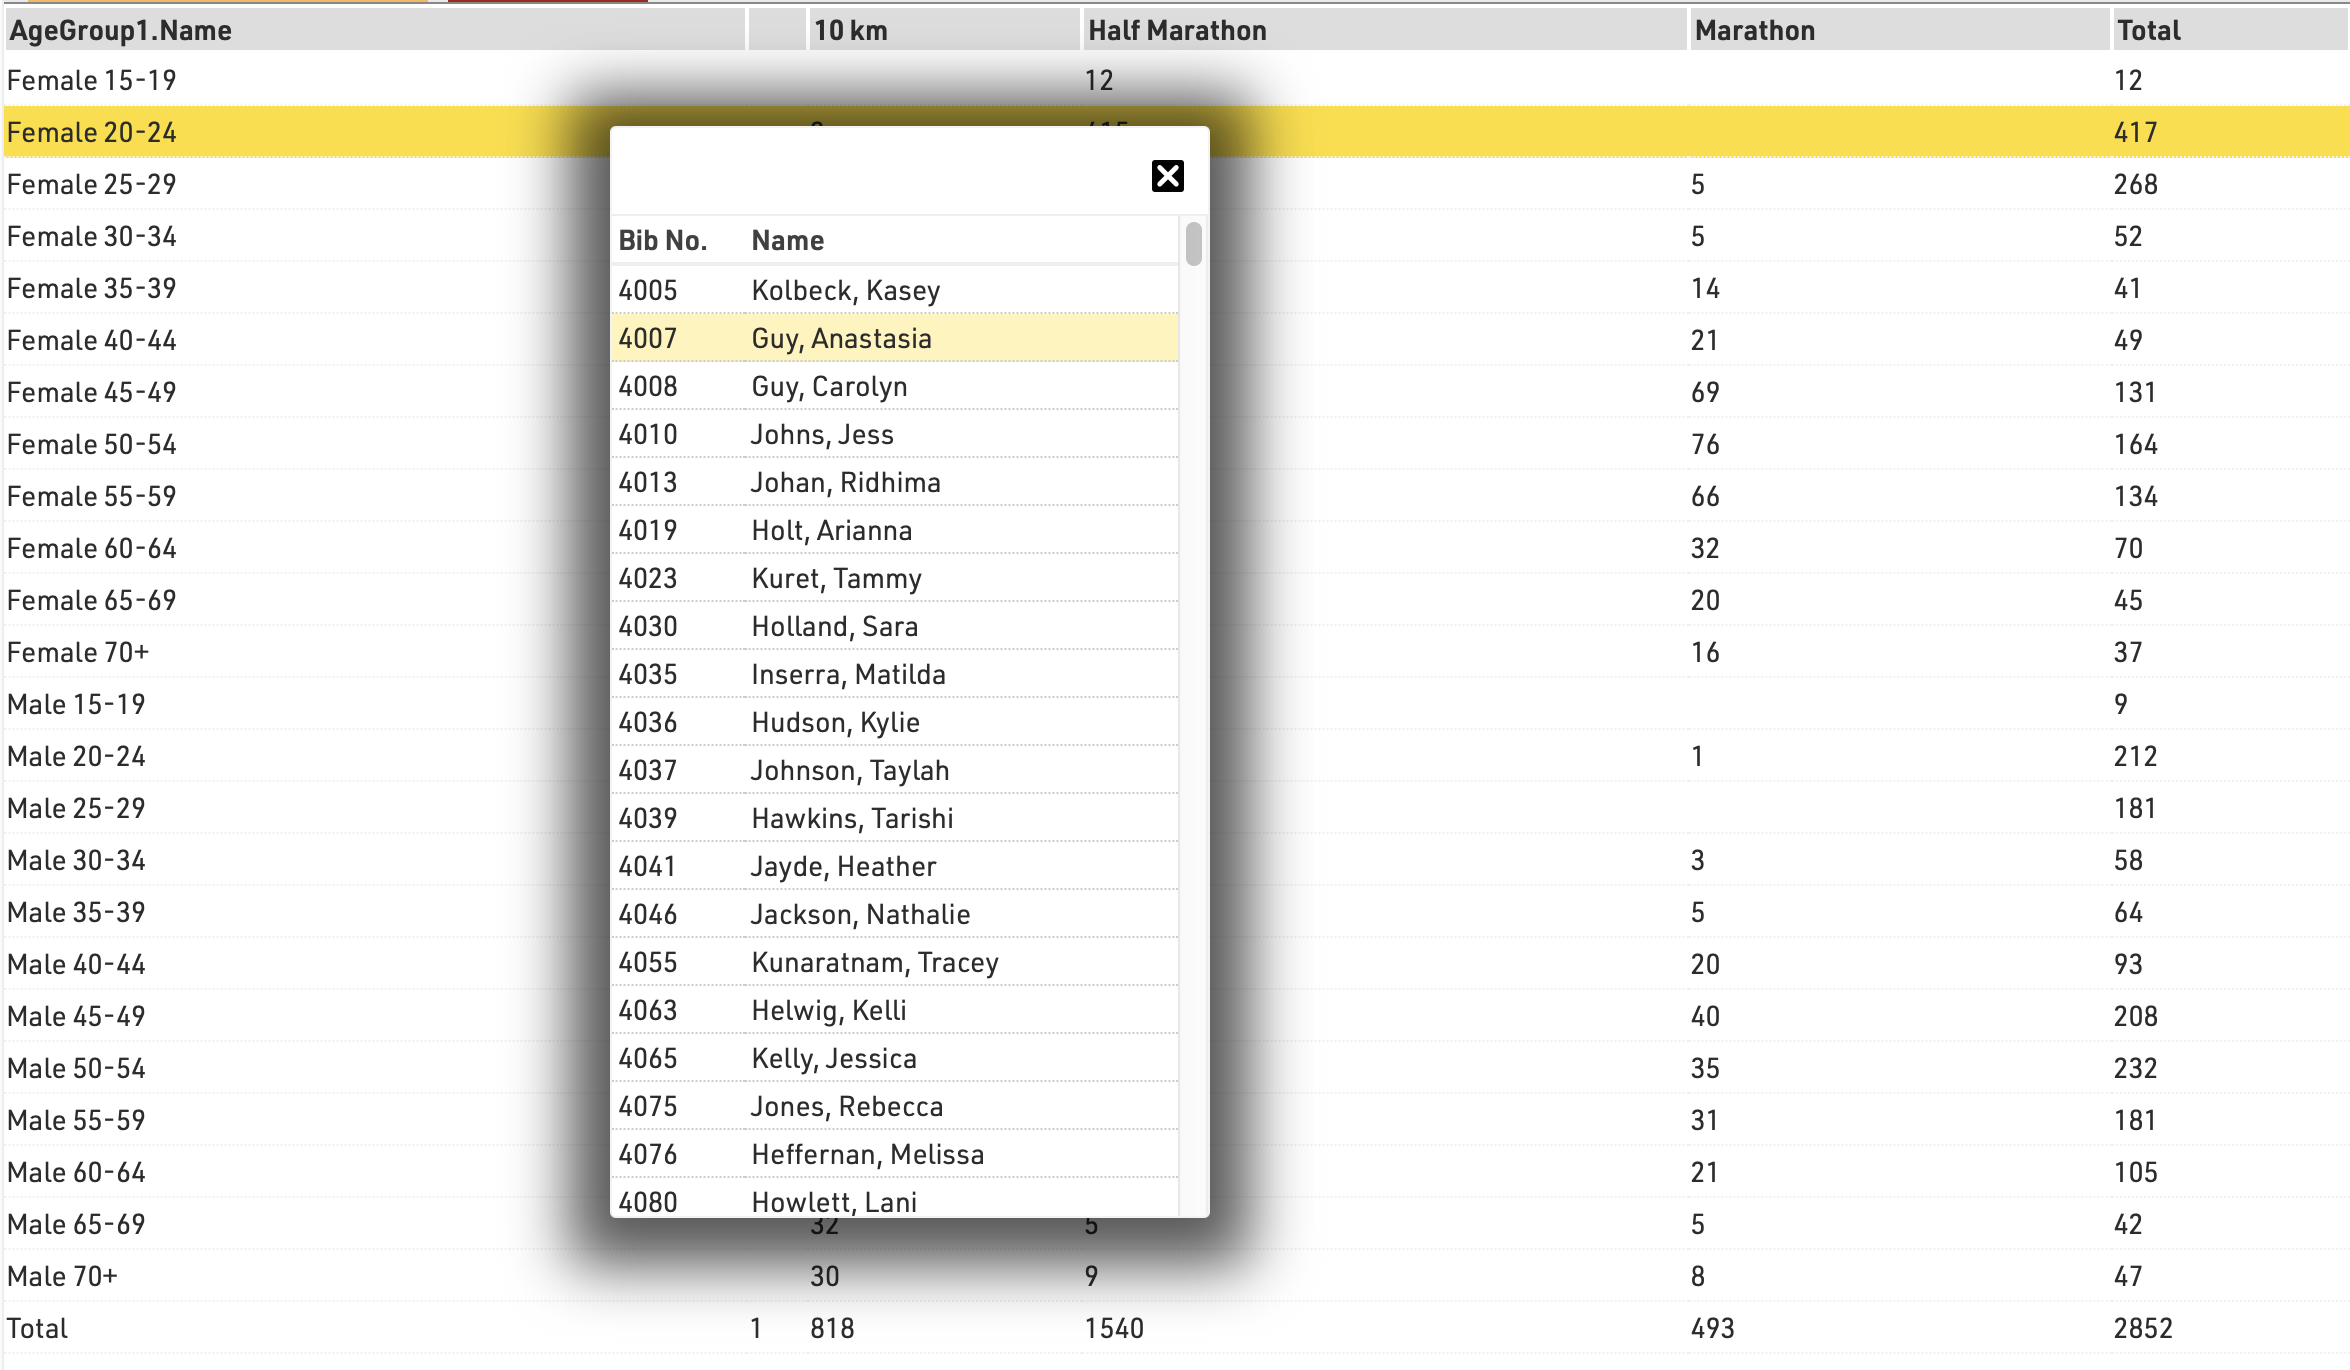
When viewing statistics, clicking on a value in the table will open a popup window with a breakdown of the participants considered in that item, clicking a participant will open that participants details in the right-side window.
Labels
Labels are normally printed on pre-cut label sheets and allow you to place either text or a certificate design on each label.
The Label Settings determine the basic layout and template for the labels.

Participants
A Filter that defines for which participants a label will be created.
Sorting Fields that define how the labels will be sorted.
Content
Enter an Expression that defines the content for each label. This is handled as a full-text expression and can support multiple lines.
Other
The Directional layout (row / column direction) of the labels.
Optionally a design to be printed instead of the Expression, see Labels with Design, if a design is selected then it can be edited directly through the Layout tab.
Optionally include an automatically generated Barcode for each label, the barcode will include the bib number. If using a certificate that already has a barcode, leave this blank
Font
Define the font, font size, formatting and alignment for text.
Page
Page settings for each sheet, these are normally provided by the manufacturer of the label sheets.
Label
The individual label sizing / spacing, these are normally provided by the manufacturer of the label sheets.
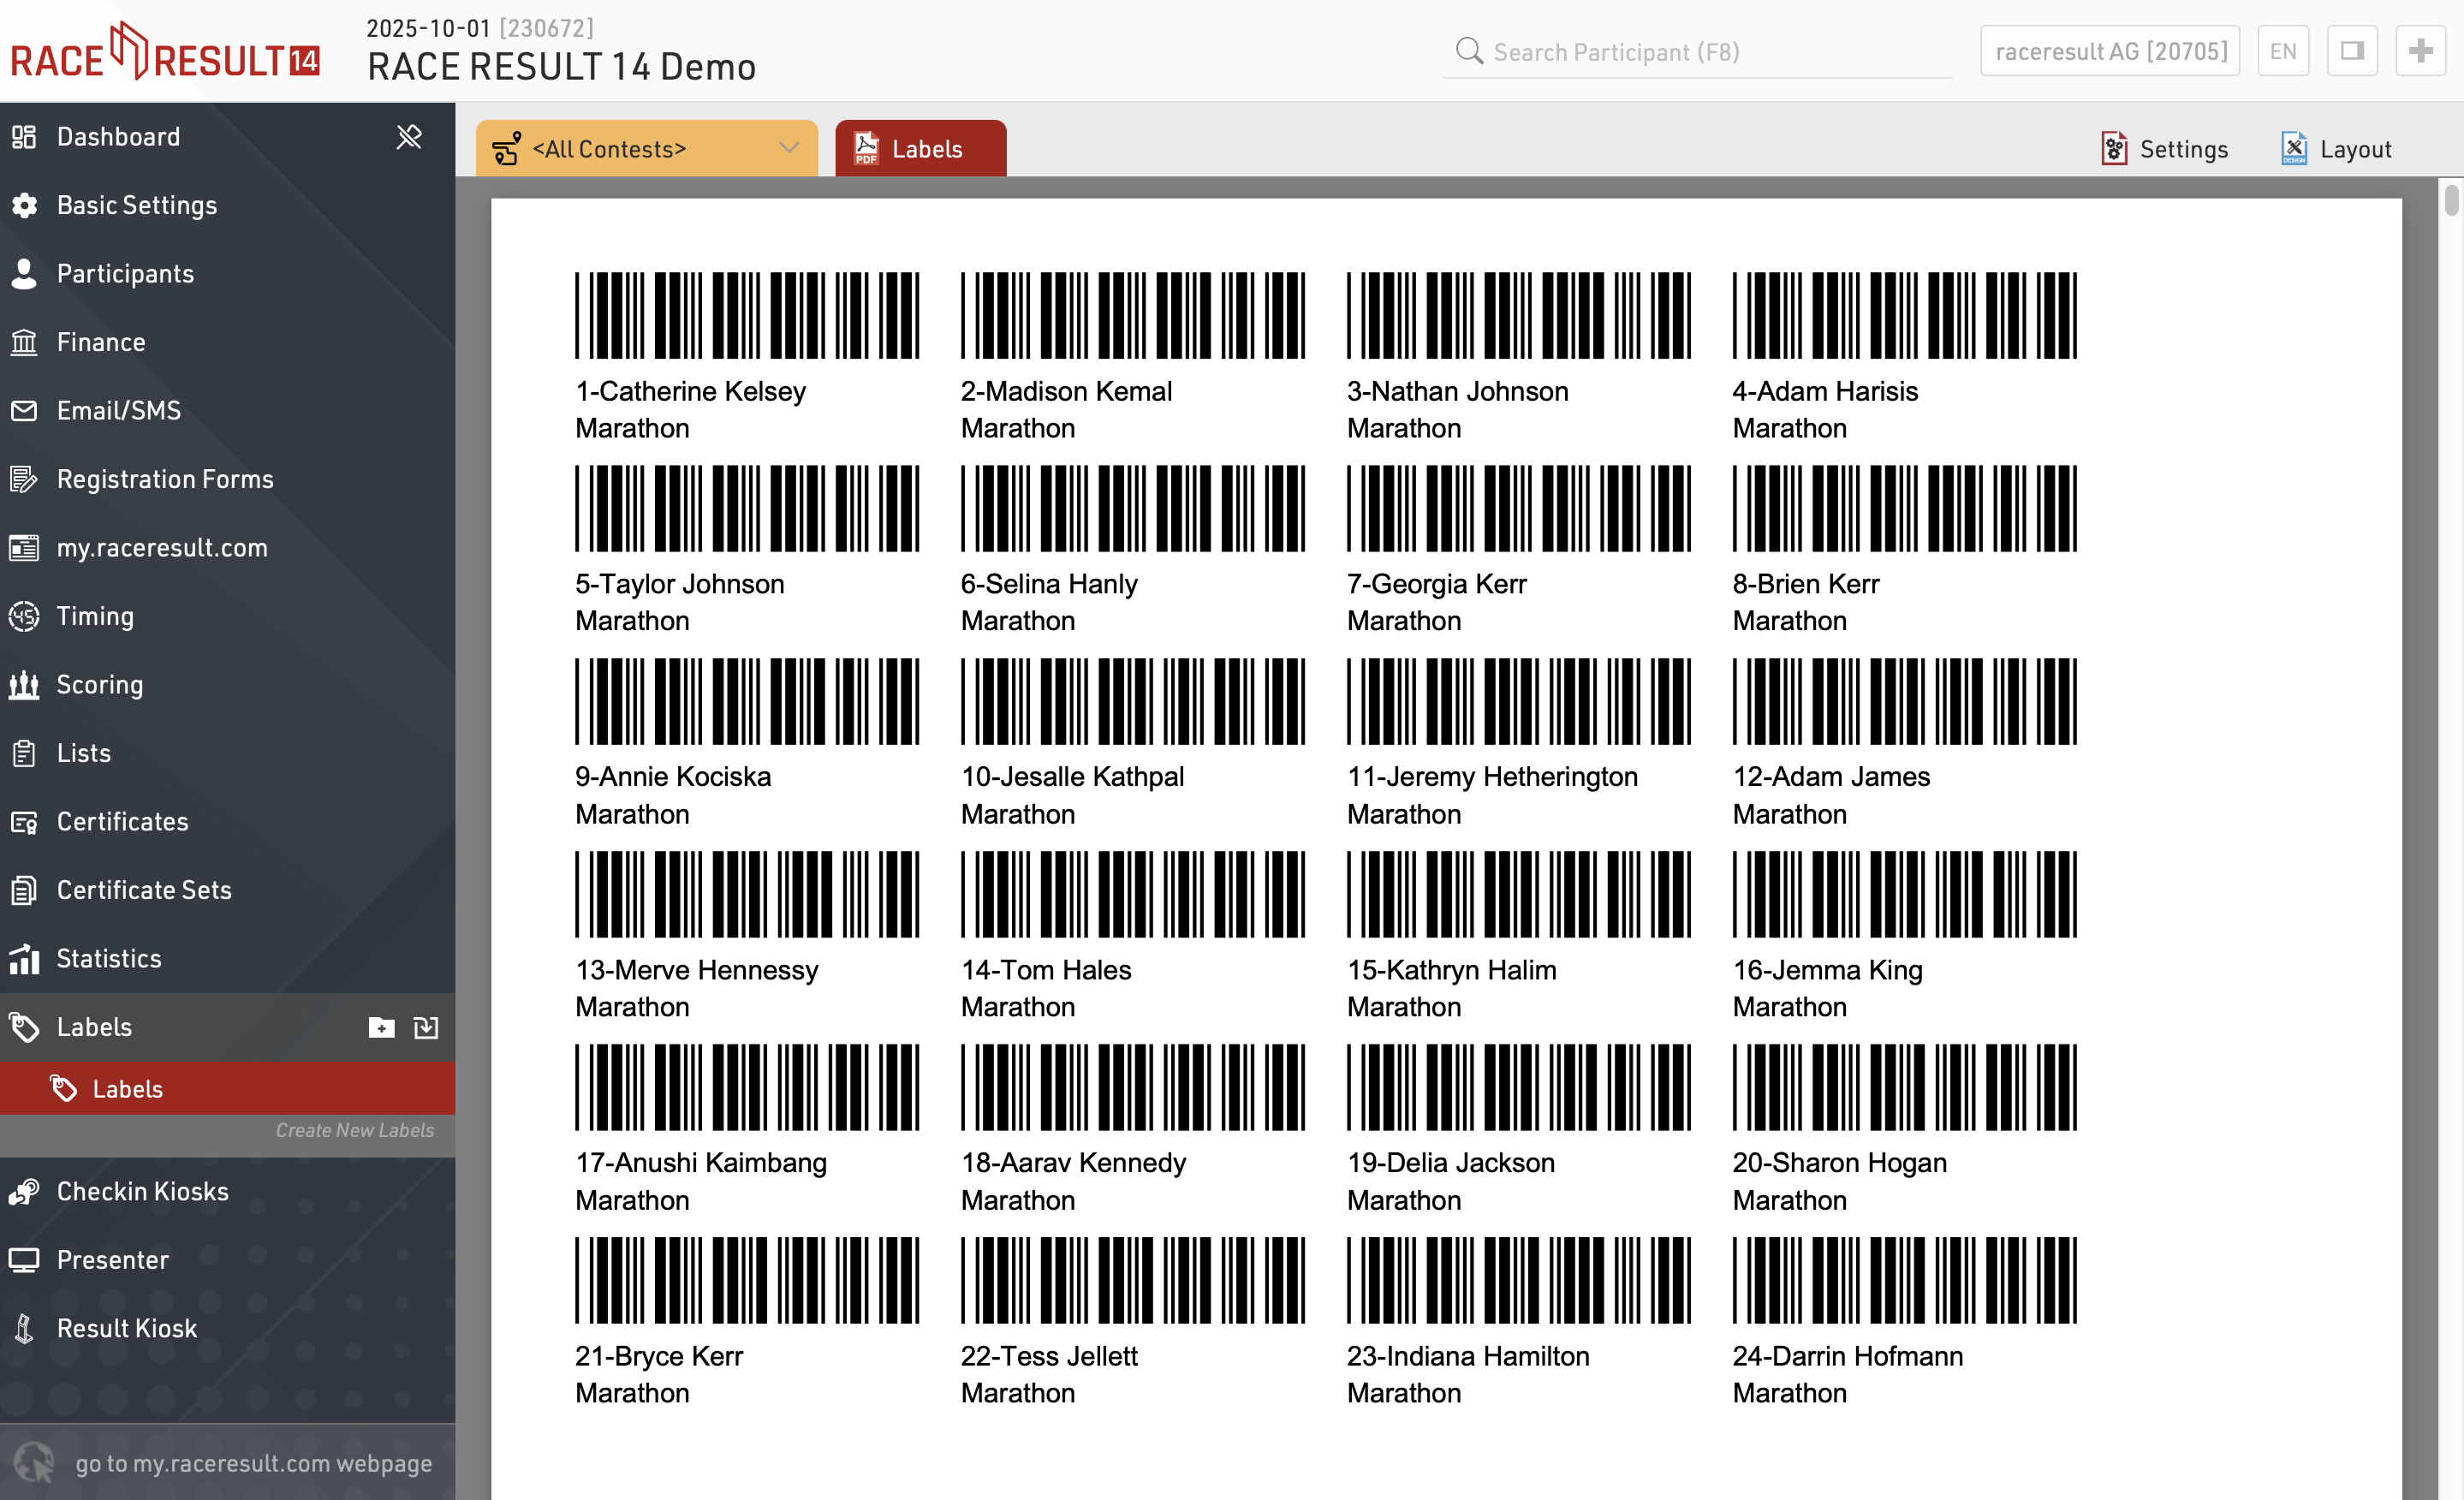
Once the settings are defined you can preview, download and print the labels through the Labels tab, an example might look like this.
Checkin Kiosks
The Kiosks provide a flexible tool for looking up and editing participant data during an event for example at registration, or giving access to individuals to easily lookup and edit fields without providing full access to RACE RESULT 14.
Within an event file multiple templates for kiosks can be created, each of which can be accessed by a unique URL, this allows different templates to be defined for different purposes.
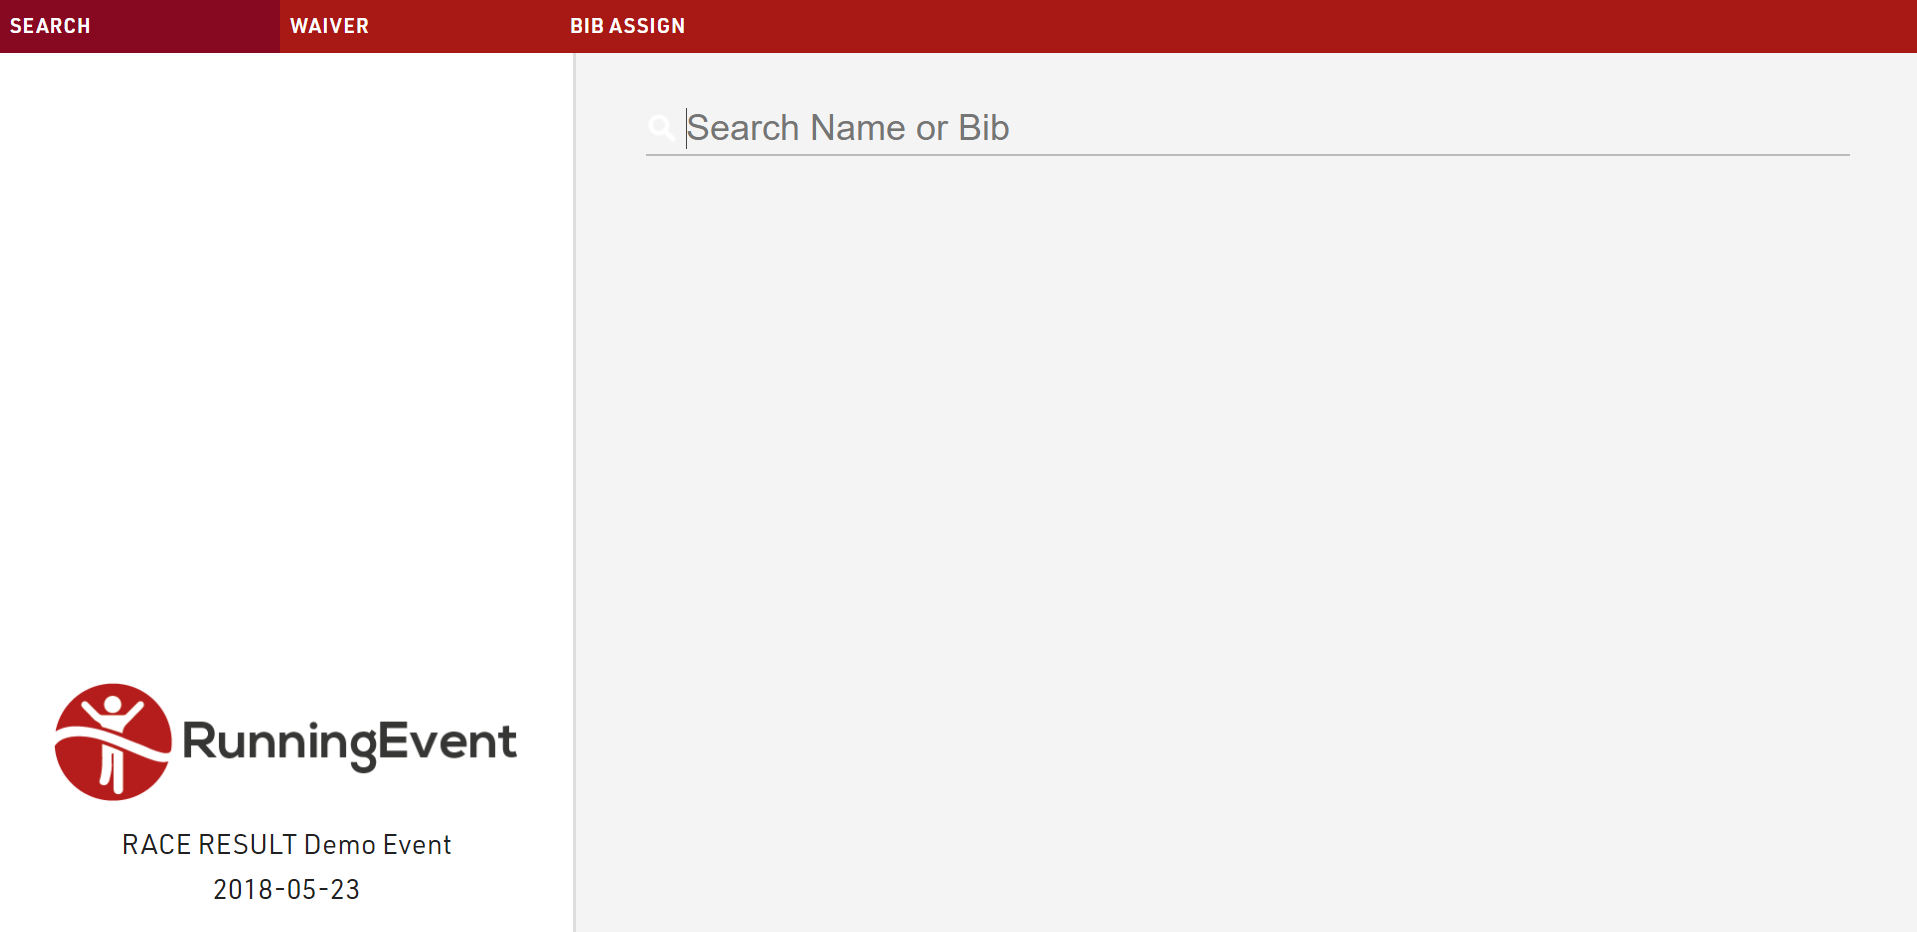
The given name to each kiosk will be shown in participants' history, when changes are made: in this way, you can always retrieve from which kiosk (and user) a change has been made.
Presenter
Presenter is used to create displays for primarily on-site results presentation, announcers or for other staff / volunteers to easily access data.
Within an event file multiple templates for presenter displays can be created, each of which can be accessed by a unique URL, this allows different templates to be defined for different purposes. The URLs can be accessed without logging in to RACE RESULT 14 meaning they can easily be shared without giving full access to the event file. By default, you will find three presenters in your event file: Chip Check, Present Results, and Show Last Chip Reads.
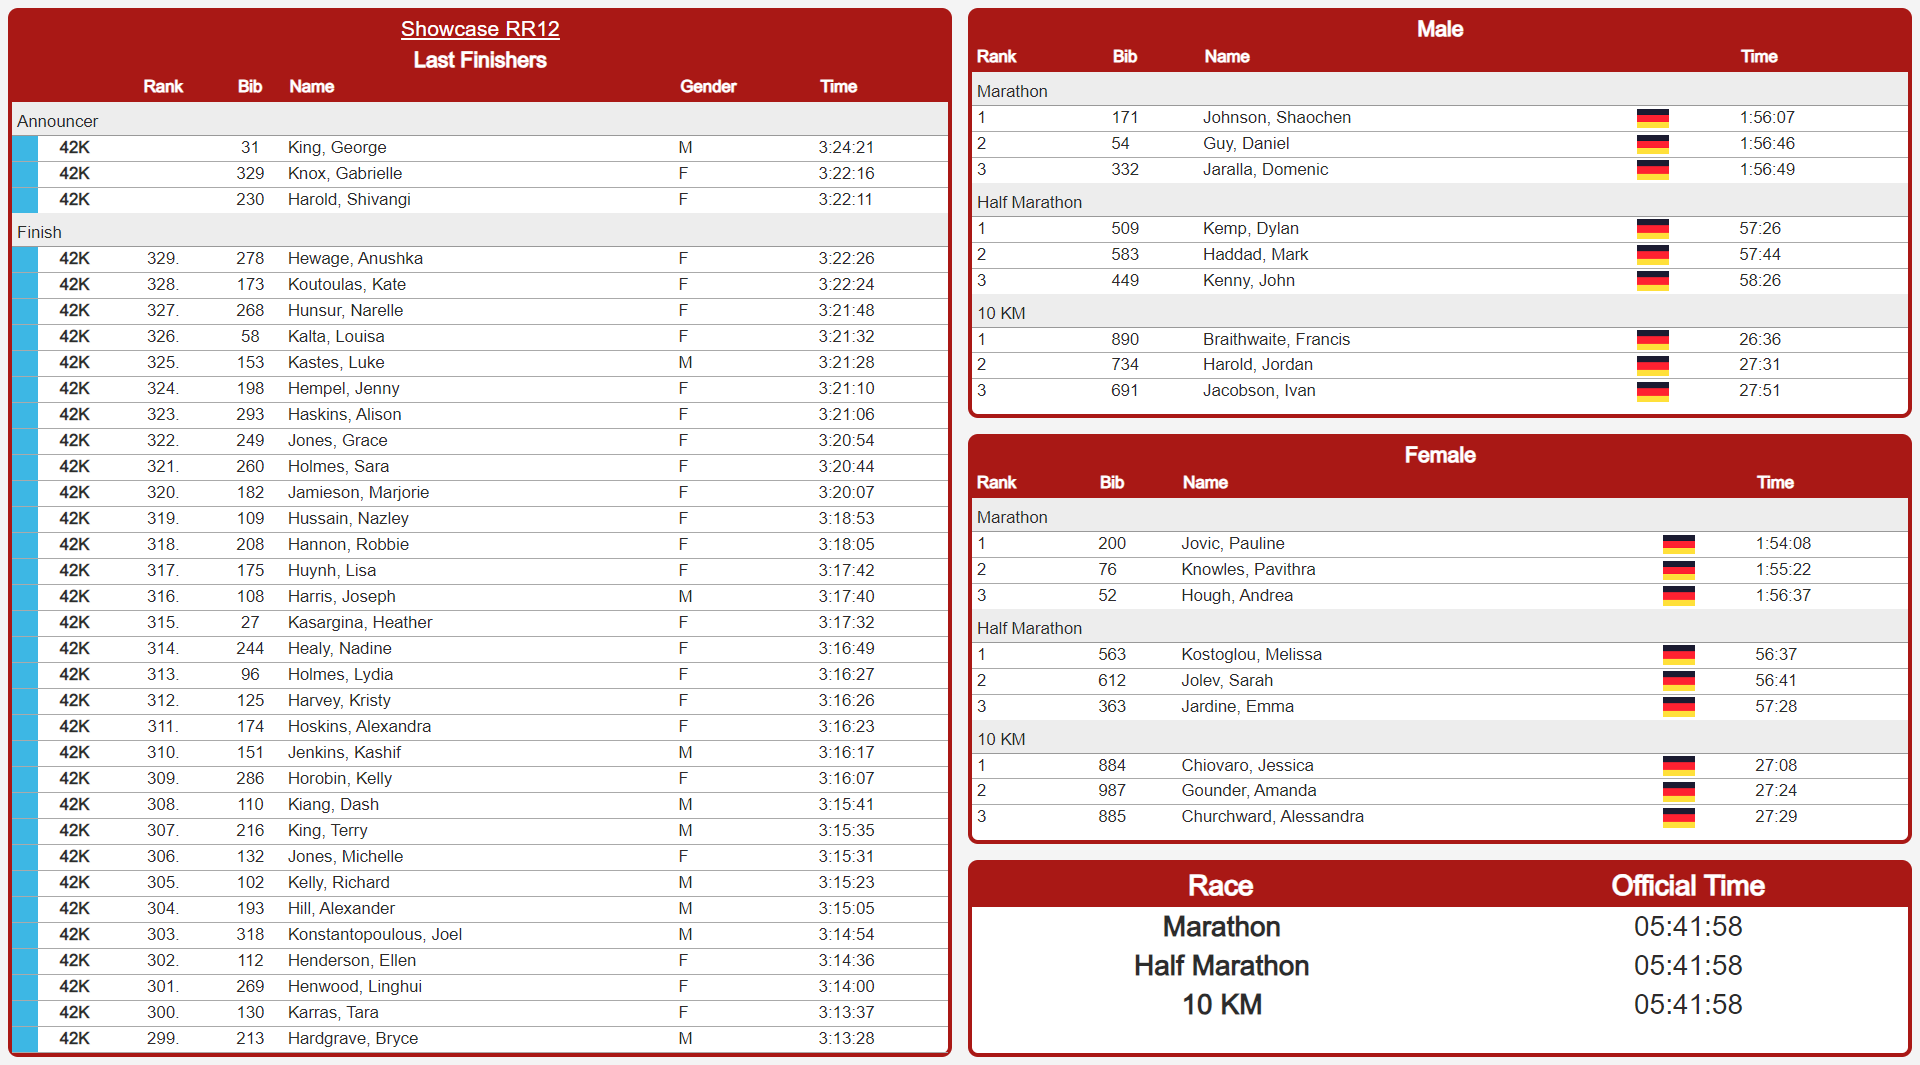
Displays may contain multiple screens which can be switched manually, using a touch screen or using the FN-Keys 1-4.
Result Kiosk
Athletes can use the Result Kiosk tool to check and/or print their result/race certificate on race day, most commonly it is used with a thermal receipt printer so participants can get a quick print out of their Results / Ranks to take home. It can be found in the Tools menu.
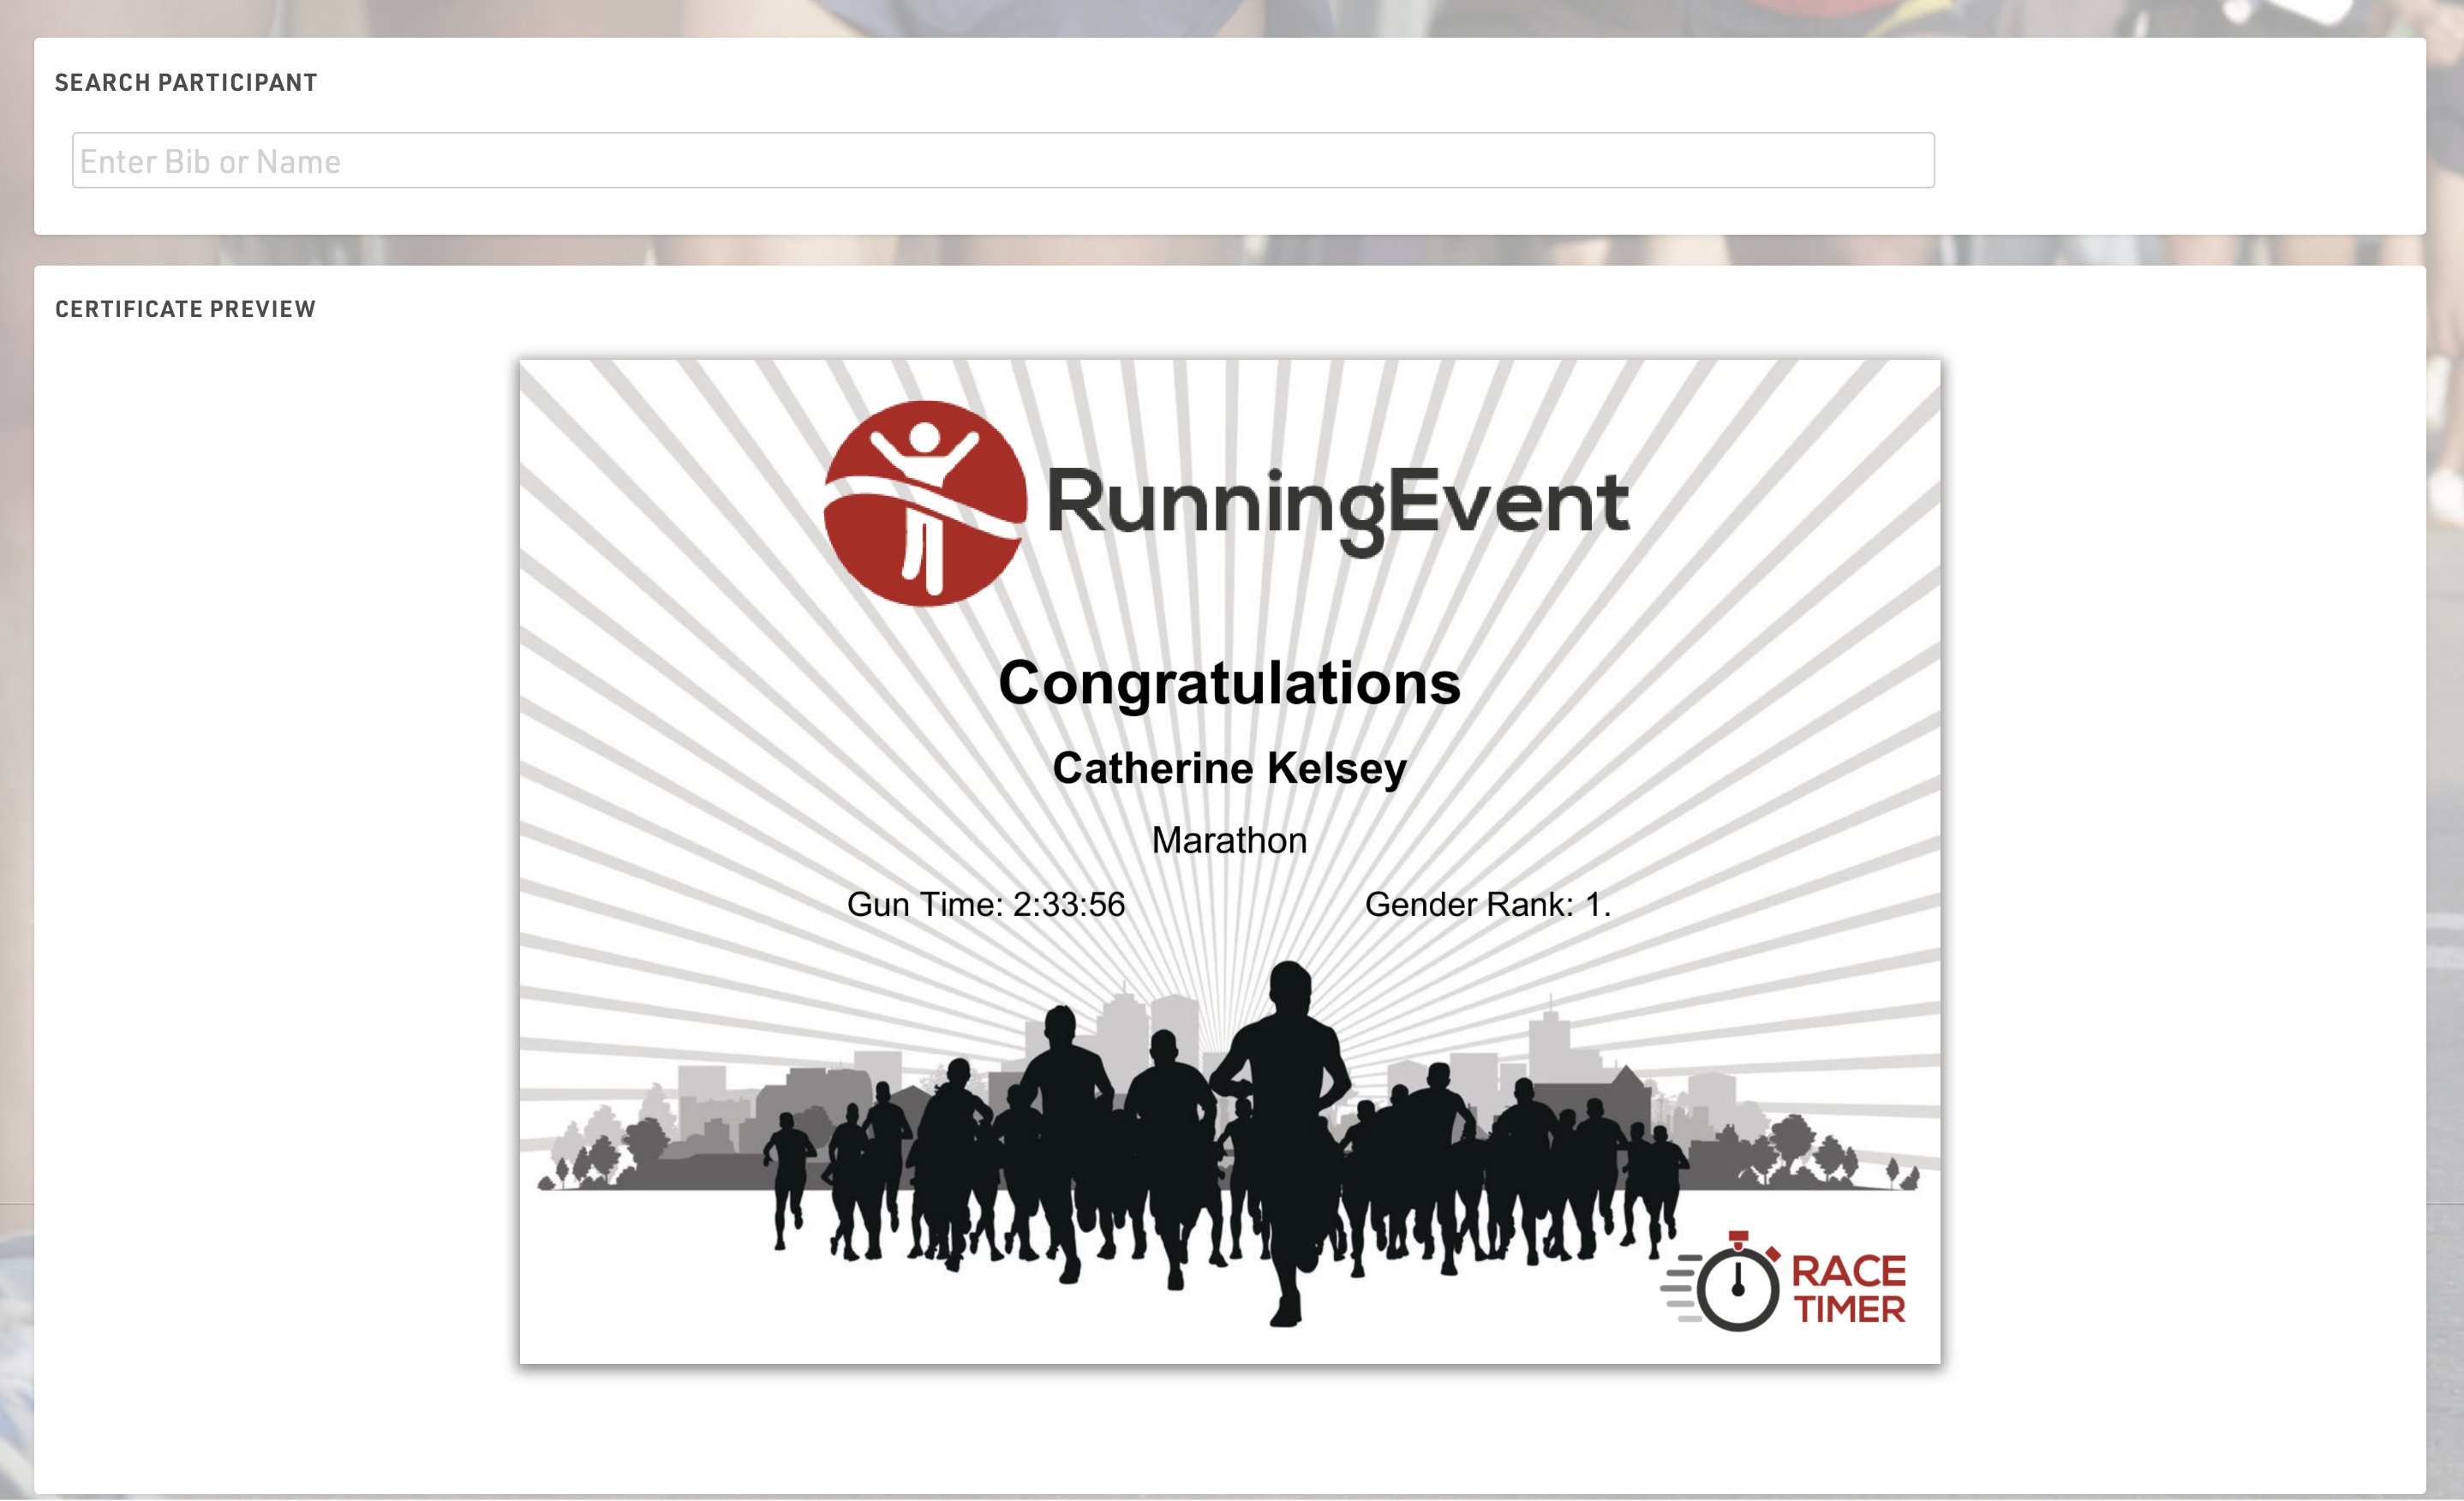
Settings
Make sure to define the following important settings:
- Decide if the user can view and/or print his race certificate. If you would like to support printing, RACE RESULT Web Server needs to be running.
- Select one or more Certificate Sets that can be shown/printed for each contest.
- Opitionally, you can add customs texts, automatically set an Additional Field and forbid multiple print outs for the same participant.
Input
The input field can search from either Bib or Name fields or lookup by Transponder Code when using alpha-numeric chip codes (note that standard passive transponders mapped in a chip file cannot be used at this time).
You can use the RACE RESULT Decoder. Tag Reader or USB Timing Box to scan transponders directly in to the search bar. To connect to a device click the connection icon in the top right of the search input, this will list available devices below and allow you to connect directly to the device for input of Transponder code. The RACE RESULT Web Server must be running for this.

Tools and Programs
Fields, Expressions and Functions
Fields contain data that can either be stored data or data calculated from other data like a rank.
Using Expressions and Functions you can combine fields, make calculations, modify values, and show the result on Lists or Certificates. For example, an Check Box Field has the value 1 if checked and 0 otherwise. Using an expression you can show yes/no or X/- instead.
Syntax
Definition of Syntax (programming languages): The syntax of a computer language is the set of rules that defines the combination of symbols that are considered to be a correctly structured document or fragment in that language.
Definition of Syntax: The arrangement of symbols and characters to form expressions or functions.
Symbols and their names
The following are symbols used to write Expressions and functions.
|
[ |
Open bracket |
| ] | Close bracket |
| ( | Open or left parenthesis |
| ) | Close or right parenthesis |
| " | Quote, quotation mark, or inverted comma |
| | | Pipe, or vertical bar |
| & | Ampersand |
| { | Open brace, squiggly brackets, or curly bracket |
| } | Close brace, squiggly brackets, or curly brackets |
| ; | Semicolon |
| : | Colon |
| # | Hash |
When to use each symbol
When to use Brackets?
Brackets are used when referencing a Field within an Expression or a function.
Example: If we want to reference a participant's Contest we would do this
[Contest]
Example: If we want to compare a participant's Contest to see if it matches a specified contest id we need to do this
[Contest] = 1
If a participant is in contest 1 when we reference [Contest] with the use of brackets we will get the value of 1 back. This would evaluate the above example as true because 1 does equal to 1.
When to use Parentheses?
Parentheses are used to contain parameters within a Function.
Example: If we wanted to write an if statement to return yes if a participant is in contest 1 otherwise return no we could do this
if([Contest]=1;"yes";"no")
In the above example, we are using an if statement with parentheses to contain our expression.
Parentheses are also used to define the order of operations.
Example: You have a variable laps race with a parade lap, where the parade lap is 1 mile and a full lap is 10 miles. You want to calculate how many miles each participant completes, including the parade lap. You could use parentheses to define the order of operations for this calculation.
(([NumberOfLaps]-1)*10)+1
First, we want to calculate the number of full laps a participant completes. To do this, we subtract 1 lap (the parade lap) from the NumberOfLaps data field. Then we need to multiply that value by 10 miles. Lastly, we need to add 1 mile for the parade lap. If we were to fill in the above example with 5 laps the result would be 41 miles, which is 4 10-mile laps and 1 parade lap of 1-mile distance. This example assumes that the start/lap/finish timing point is the same for all laps, normal laps and the parade lap.
When to use Braces?
Braces are used when referencing the value of a Record Multiplier within a List.
Example: If we wanted to reference laps 1 through 3 and the laps are named Lap1, Lap2, Lap3 under Main Window->Special Results then we could do this
[Lap{n}]
In the above example, we are referencing laps 1 through 3 by appending the text Lap with the value of the record multiplier which is defined within two braces.
Braces are also used to translate strings into different languages.
Example: If we want the example above to display "Yes" or "No" when using the software or my.raceresult.com in English, or "Si" or "No" for Spanish, we would write:
if([Contest]=1;"{EN:yes|ES:si}";"no")
Note that the value for the different languages is separated by a pipe.
Braces are also used to call a Splits Selector in an output list.
Example: To call a selector you need to surround the selector with braces like this:
{Selector}.TimePositive
When to use Quotes?
Quotes are used to reference a text string.
Definition of String (computer science): A string is traditionally a sequence of characters, either as a literal constant or as some kind of variable.
Example: If we wanted to find all participants with the first name of John then we could set a filter like this
[Firstname] = "John"
In the above example, John is in quotation marks because his name is a String we are trying to compare to. Firstname is in brackets because it is a filed that will return a String value to compare with the String John.
When to use a Semicolon?
Semicolons are used to separate parameters within an Function.
Example: In an if statement there are three parameters. Each parameter needs to be separated with a semicolon like this
if([Bib]=1;"yes";"no")
In the above example, we are checking to see if Bib is equal to 1. If Bib is equal to 1 (true) then we return Yes otherwise (false) we return "No".
When to use an Ampersand?
Ampersands are used to append one string to another.
Example: If you want to add a string like "John" to a data field like [Lastname] then you can do something like this
"John " & [Lastname]
In the above example if the value of [Lastname] was "Doe" then the returned string would be "John Doe". This is also known as concatenating two strings together.
When to use a Hash?
A hash indicates that the expression is full-text. This way, you don't need to use quotes around text strings, and to use ampersands to combine fields, strings and functions. Fields and functions do need to be in square brackets.
Example: You can obtain the same result as above by writing the expression like this:
#John [Lastname]
Expressions
RACE RESULT offers two types of expressions. In Normal Expressions fixed texts will be in quotations marks, fields, functions and user defined fields/functions in square brackets and the text operator & connects several parts:
"My name is " & [FirstName] & " " & [LastName]
If you use this expression on a certificate, it will show for example: My name is John Doe.
Full-Text Expressions, on the other hand, are more suitable for longer texts such as the text of the confirmation email of the online registration. They start with a hash tag (#) and fields, functions and user defined fields/functions will be in square brackets:
#My name is [FirstName] [LastName]
In expressions, you can use Fields, Functions, User Defined Functions, Operators and User Defined Fields.
Fields
Fields can be distinguished between Data Fields that are used to store information like Lastname or Club, and fields that have values calculated from other data like a rank.
All fields can either be shown on lists or certificates directly or be used in expressions. They can easily be selected in the Field Wizard.
Some fields use a Dot Logic, which means that for sets of data which all refer to the same context the same prefix is used and subsequent parameters can then be defined following a period.
For example Contest may have a variety of parameters relating to the Contest which can be appended such as Contest.Name or Contest.Length.
Operators
The following Operators can be used in expressions:
Arithmetic Operators
Using the following arithmetic operators you can make any type of calculation:
| + | addition |
| - | subtraction |
| * | multiplication |
| / | division |
| \ | integer division |
| % | the remainder after division of integers |
| ^ | exponentiation |
| ( | opening parenthesis |
| ) | closing parenthesis |
| : | time operator, multiplies the left operand with 60 and adds the right operand |
If you would like to add the race number and the year of birth and multiply the result with two, use the following expression:
([Bib] + [Year]) * 2
Comparison Operators
Use the following comparsion operators to compare two values:
| < | less than |
| > | greather than |
| = | equal |
| <> | not equal |
| <= | less than or equal to |
| >= | greater than or equal to |
Logical Operators
Using logical operators, you can combine two conditions, for example in a Filter. The following operators are available:
- OR (At least one of the values is true)
- XOR (Must be one OR the other, cannot be both)
- AND
Array Operators
- IN
- NIN (NOT IN)
If the Data field is IN or is NOT IN the text string, multiple values can be separated by commas.
Examples:
[Contest] IN "2,4,8-10"
[Lastname] NIN "Smith,Doe"
Functions
Functions add certain functionality to expressions. After the function name, the parameters follow separated by semicolons in parentheses:
FunctionName(parameter1; parameter2; parameter3; ...)
User Defined Fields
Using User Defined Fields you can can assign a specific name to any Expression. The expression can then be accessed throughout the event file.
For example, by default, the User Defined Field DisplayName is defined using this expression:
trim([Title] & "" & [Firstname] & "" & [Lastname])
DisplayName is being used on almost all lists to show that expression. If you do decide to use a different expression such as
UCase([Lastname]) & "" & [Firstname]
then you only have to change the User Defined Field once instead of modifying every single list.
User Defined Functions
Similar to User Defined Fields you can also define your own User Defined Functions.
Assume you would like to change the upper/lower case of words, so that the first letter is in upper case and the other letters in lower case. For this you could define a function RightCase:
RightCase(x)
lcase(left([x];1)) & lcase(mid([x]; 2))
You can use the new function like any other function now. For example this will return Raceresult:
RightCase("raCEreSuLt")
Functions can also have several parameters. As an example, define a function add:
add(x;y)
[x]+[y]
The names of the parameters can be defined freely. When using them in the definition of the function, they have to be in square brackets.
Filter
In many parts of RACE RESULT 12 you will find a textbox to enter a filter. A filter is an expression that returns true or false. It is based on the comparision, array, and logical operators.
Field names will be in square brackets and values (apart from numbers) in double quotation marks. For example:
[LastName]="Miller"
If you would like to connect several filters, you can use the logical operators AND and OR:
[LastName]="Miller" AND [City]="New York"
Dynamic Formatting
Dynamic Formatting allows to format the individual records of Lists and Certificates differently, for example men could be printed in blue and women in pink.
An Expression is used which generates a text with formatting instructions. This expression is entered for lists in the Extended Column Settings and for Certificates.
The formatting text can contain several instructions which are separated by semicolons:
Element1;Element2;...
These elements can be:
|
B |
Bold |
| I | Italic |
| U | Underlined |
| S | Strike-Through |
| AL | Align Left |
| AC | Align Center |
| AR | Align Right |
| C(X) | Font Color X |
| BG(X) | Background Color X |
| T(X) | Transparency level (0-100%) |
|
BTC(X) / BRC(X) BBC(X) / BLC(X) |
Border Top / Right / Bottom / Left Color X |
| BTW(X) / BRW(X) BBW(X) / BLW(X) |
Border Top / Right / Bottom / Left Width X |
| FS(X)* | Font Size X in pt |
| OC(X)** | Outline Text Color X |
| OW(X)** | Outline Width X Value 0-5 in 0.5 increments |
* only applicable to outputs in PDF and certificates in Designer. For PDF outputs X must be smaller than the default font size.
**only applicable to certificates in the Designer
Possible color values are:
See more information on colours HERE
Examples
A field will be printed italic for women:
if([Sex]="f"; "I"; "")
A field is formatted with a red background and white text for participants with Age less than 18.
if([Age]<18; "BG(#FF0000);C(#FFFFFF)"; "")
A field is marked red for participants from USA:
if([Nation.IOC]="USA"; "C(255,0,0)"; "")
Colors
The Colors of the text elements on Lists and Certificates can be adjusted. By default all texts are shown in RGB-black.
RACE RESULT 12 supports RGB colors as well as CMYK colors.
The colors of the columns in a list can be edited in the Extended Column Settings. You can use the following formats:
- a hex value, like in HTML (RGB), e.g. #FF3300
- RGB as a decimal value, e.g. 255,51,10
- CMYK as a decimal value, e.g. 30,30,30,100
In Certificates, both RGB and CYMK colors can be set via the tool bar at the top of the screen.
With the help of Dynamic Formatting, fields can be formatted differently for each data record.
The following website is useful for picking colours and can convert between HTML, RGB and CMYK: https://html-color-codes.info/
Field Wizard
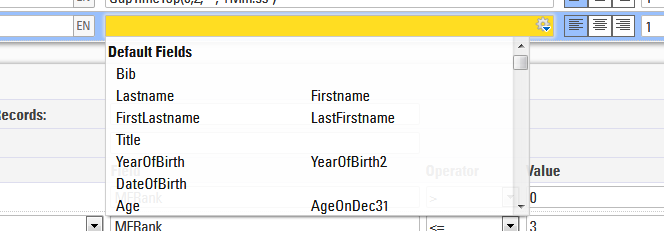
The Field Wizard pops up at many places in RACE RESULT 12 below setting fields, for example. in the settings of a lists or when defining ranks. The Field Wizard makes it easy to select the fields shown on a list for example. The field wizard will automatically appear when entering a new field, if editing an existing field then you can choose to show the wizard by clicking the gear icon on the right of the entry field.
How To...
Website Integration
You can embed the pages from my.raceresult.com on your own site using some simple Javascript. To find the source code for this you open any of your event files and navigate to my.raceresult.com > Website integration section.
You can use either the HTML code which uses javascript, or the Wordpress plugin, although this is much more limited.
CheckIn Kiosks
The following aticles show different ways how to use a Checkin Kiosk for different purposes.
Registration
The following articles show different ways to manage and customize the registration process.
Timing
The following articles show differnt ways to setup the timing of your event.
Scoring / Awards
The following articles show how to handle different scoring and awards setups.
Outputs / Displays
The following articles detail ways to customize lists and displays that can be used to streamline operations and improve visual elements of the event.
Technical
The following articles detail some administrative and technical steps for Race Result Software.
Learning Examples
Local 10K - Splits
Event Splits Setup
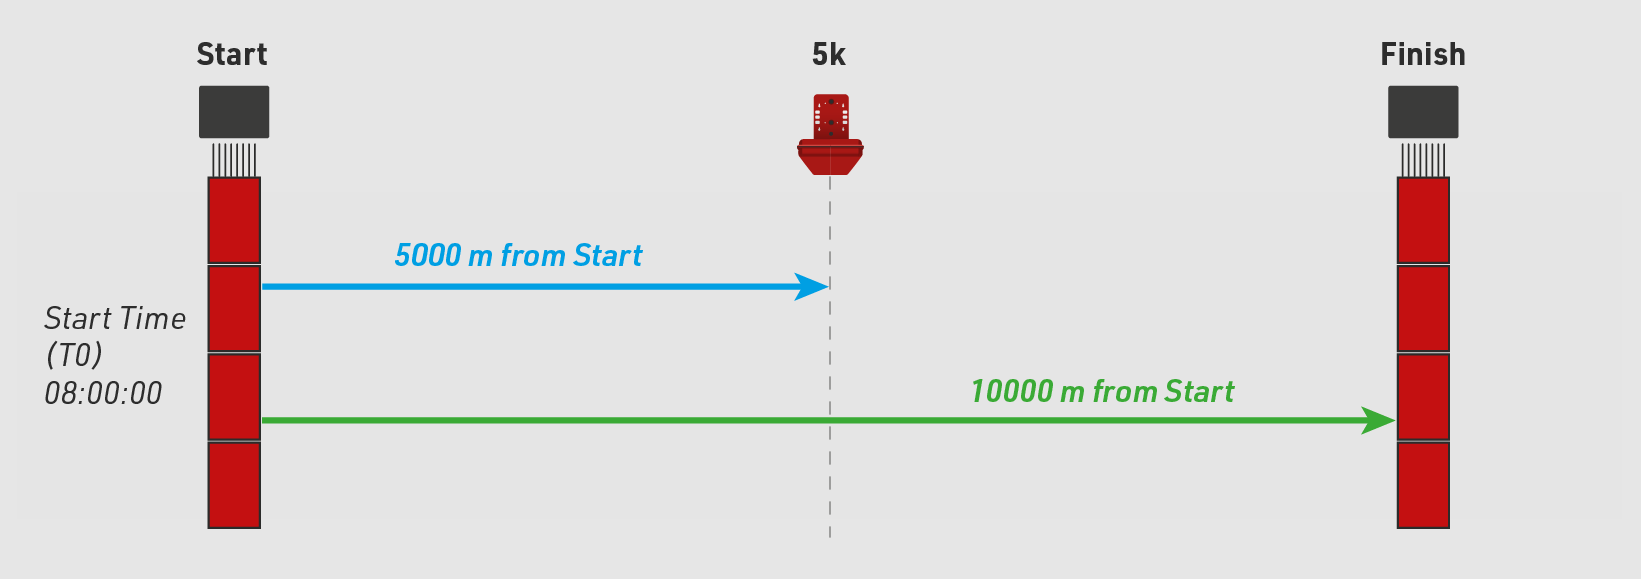
This event is a 10 km running event over a point-to-point course. We have a start line, 5K split point, and separate finish line.
The diagram below represents the setup of the event and will be referenced throughout setting up the Splits within RACE RESULT 12.
International Marathon
Event File
Participant times are recorded at the start, 10km split, 20km split, 21.1km split, 30km split, 40km split and finish. We also included an ‘announcer’ system, so we know who is about to cross the finish line.
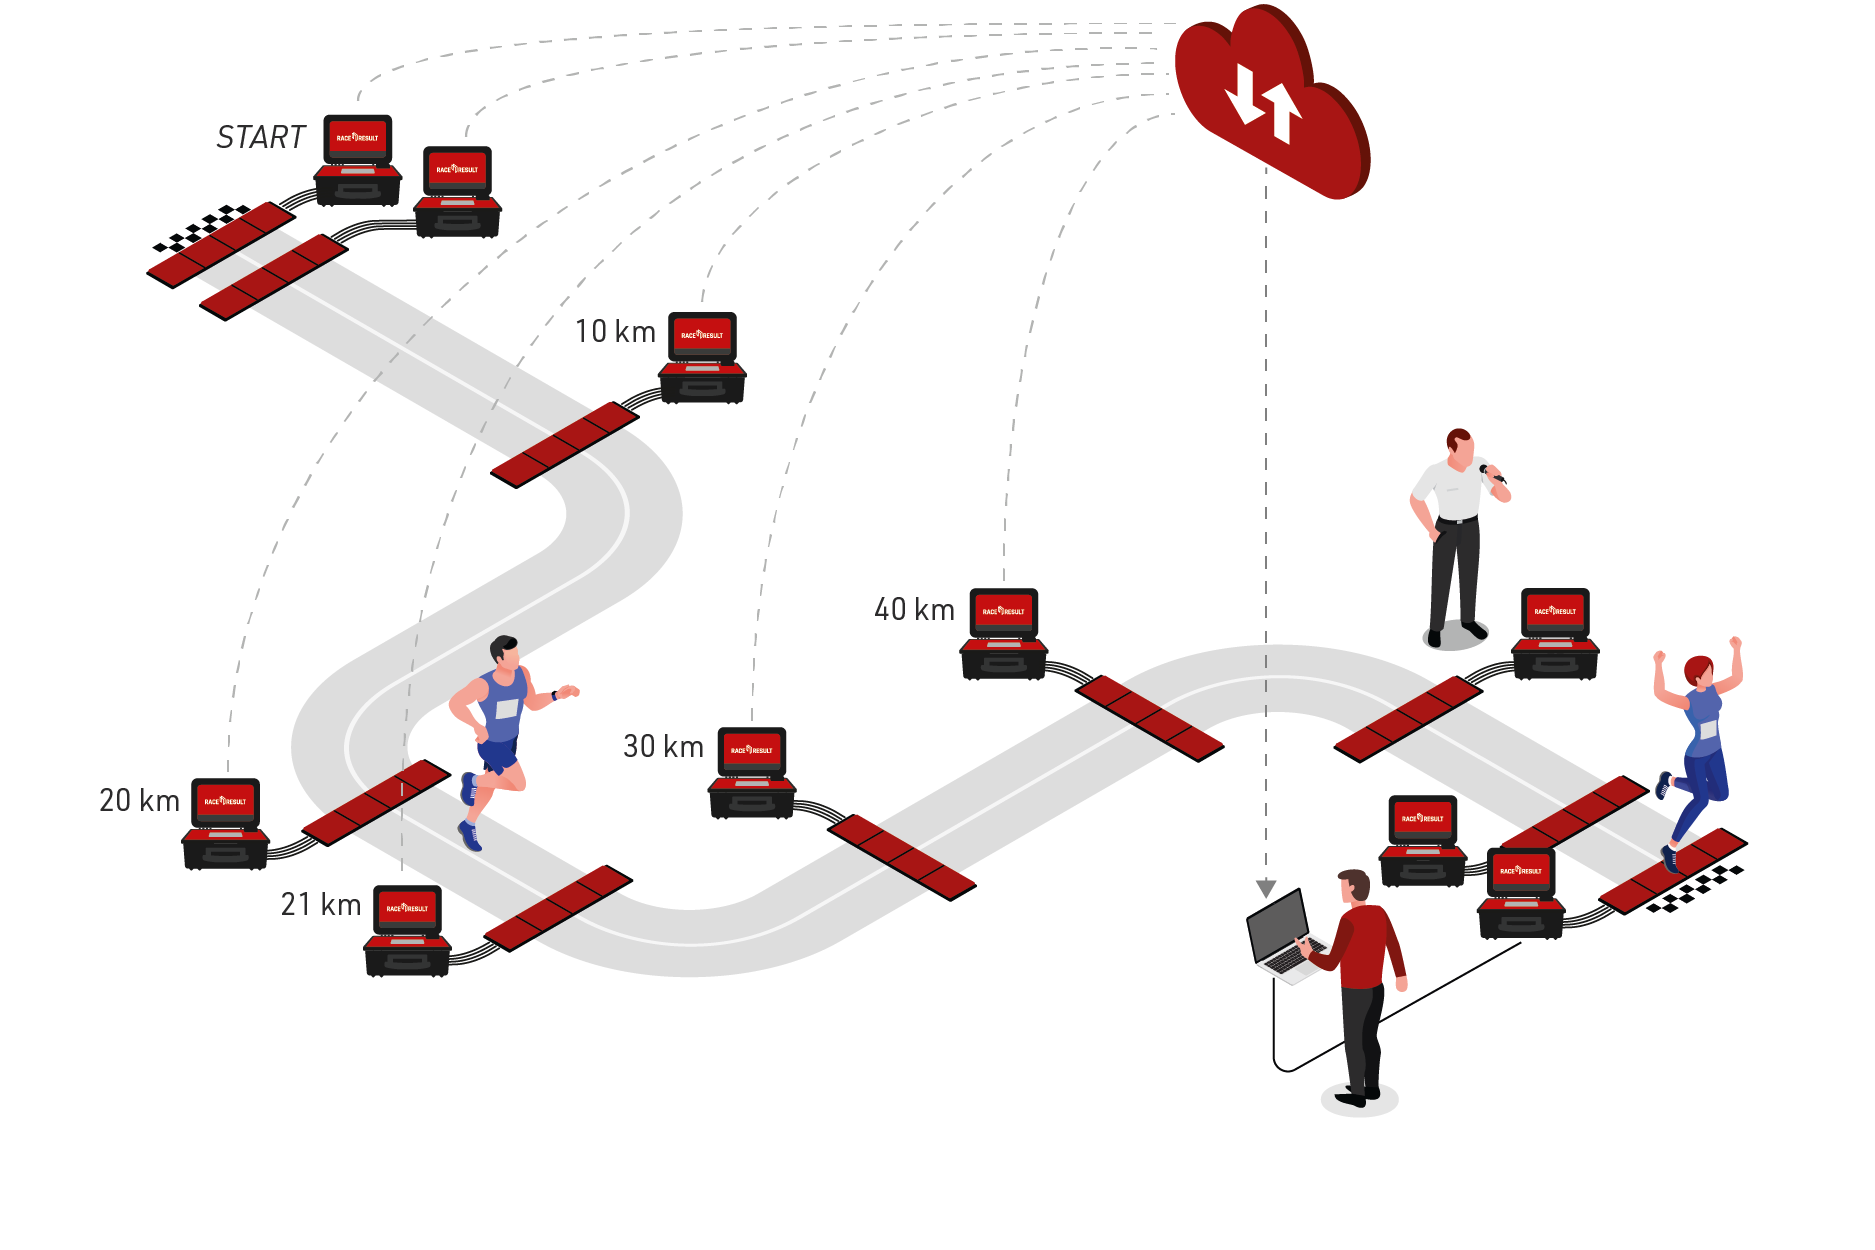
Preparing the Event File
- Download a copy of the marathon event file.
- Define the event settings (date, location, time zone)
- Import the participants
T0 Start Time
In this example we included an Additional Text Field ‘Wave’. It is used to show participants what wave they will start in depending on their time objective and set their T0 start time.
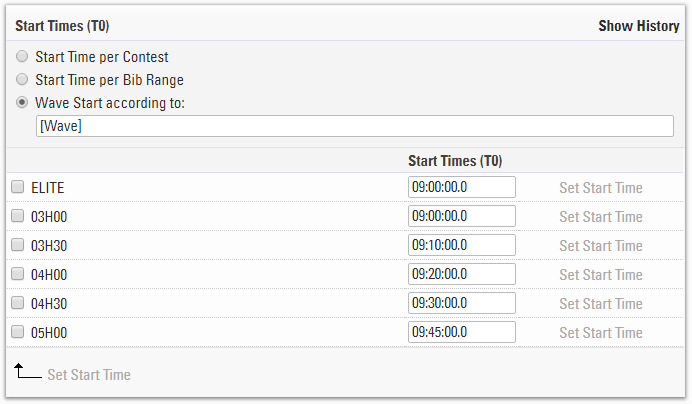
We set the Start Time (T0) by Wave Start according to the ATF [Wave]. This will enable us to enter in the start times for each wave.
Splits Setup
Time mode is set to score by Gun Time, which is according to their starting wave.
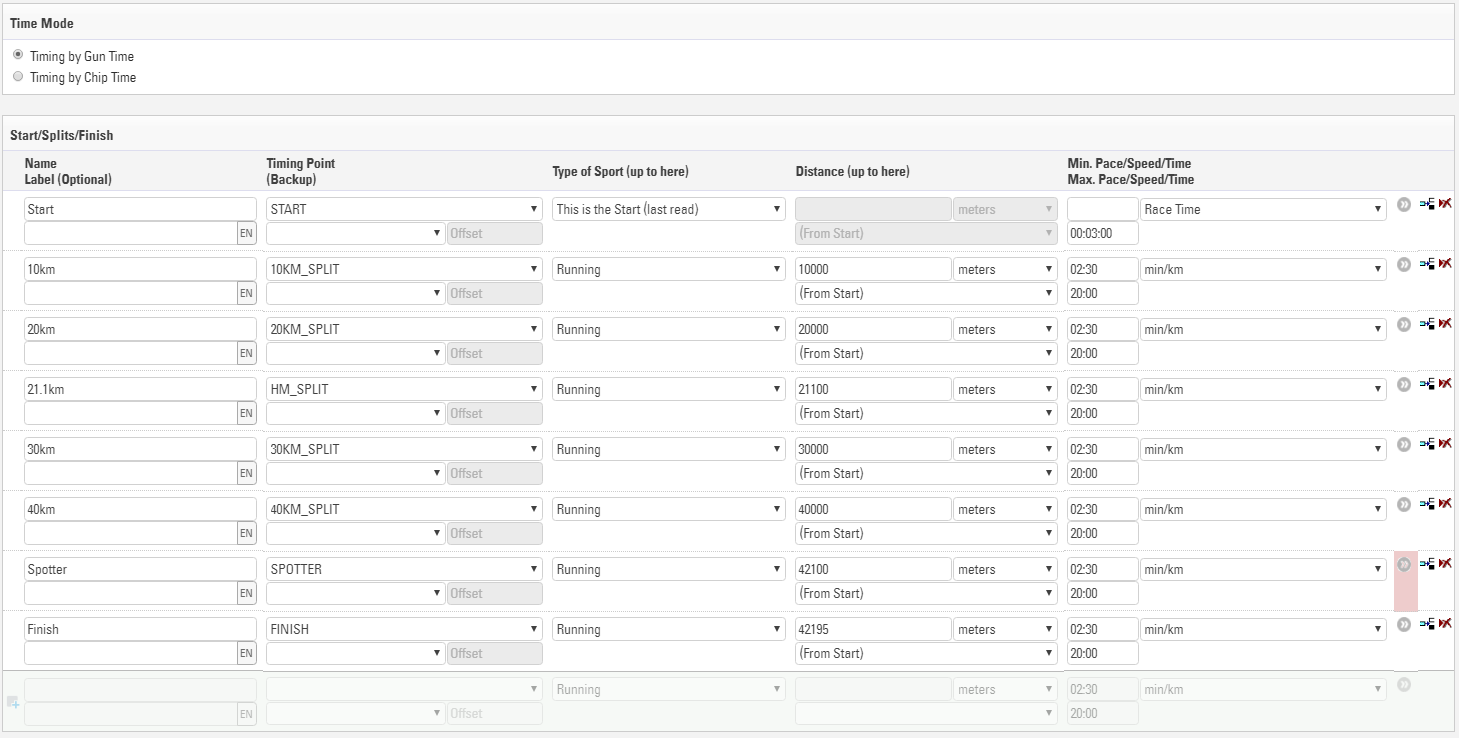
The spotter is set to an Internal so that this will not be published in the online leaderboards.
Legs are setup below, we have a leg defined for each half of the race.

Estimated Finish Time Calculation
Belinda Ward just crossed the 30km mark and we want to know what time she is expected to finish
Splits automatically provide predicted times for any Splits which haven't recorded a time. This is based on the participants current average pace, the sector distance and the sector minimum pace / time or maximum speed.

Predicted times are shown greyed out, but can be inserted as manual times by clicking the plus icon if needed. This can be accessed in an output list with [Finish.Predicted]
Speed and Pace Calculation
Each type of sport included with Splits has a default unit for speed or pace, this may also vary depending on region according to the normal unit for speed, this unit can also be edited for each split individually.
To call the speed or pace for a split simply use [SplitName.SpeedOrPace], in our Live list we use this with the selector to return their current pace, this also returns the unit as text.
{Selector}.SpeedOrPace
Announcer List
We want to enable the announcer to follow the race and to be able to know which participant is going to cross the line next.
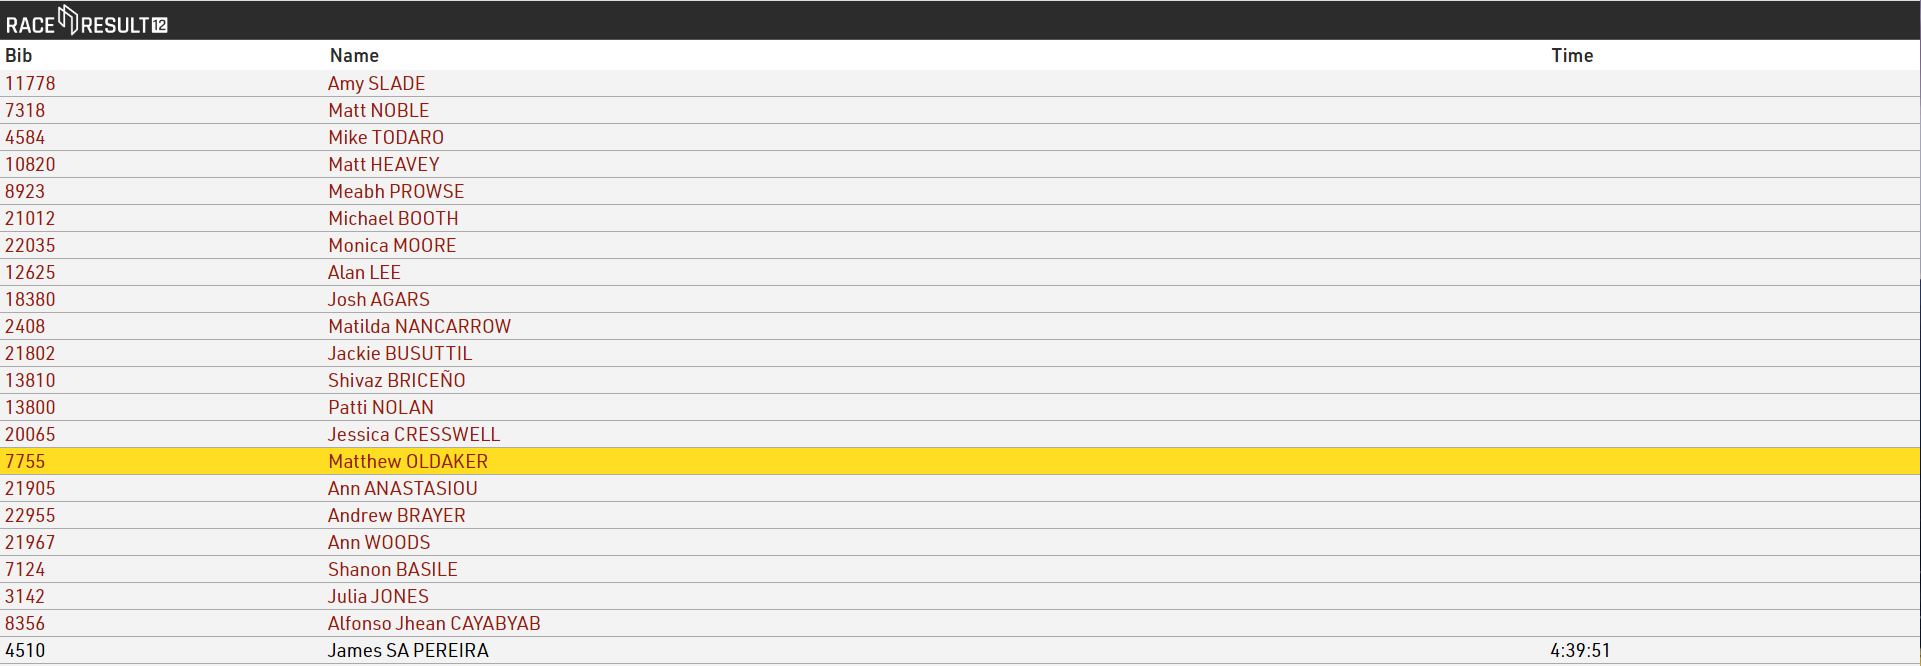
The Live Finish Line list is sorted by [Spotter.TOD] the time of day that the participant crosses the spotter system and we sort it in reverse order to show the last at the top.
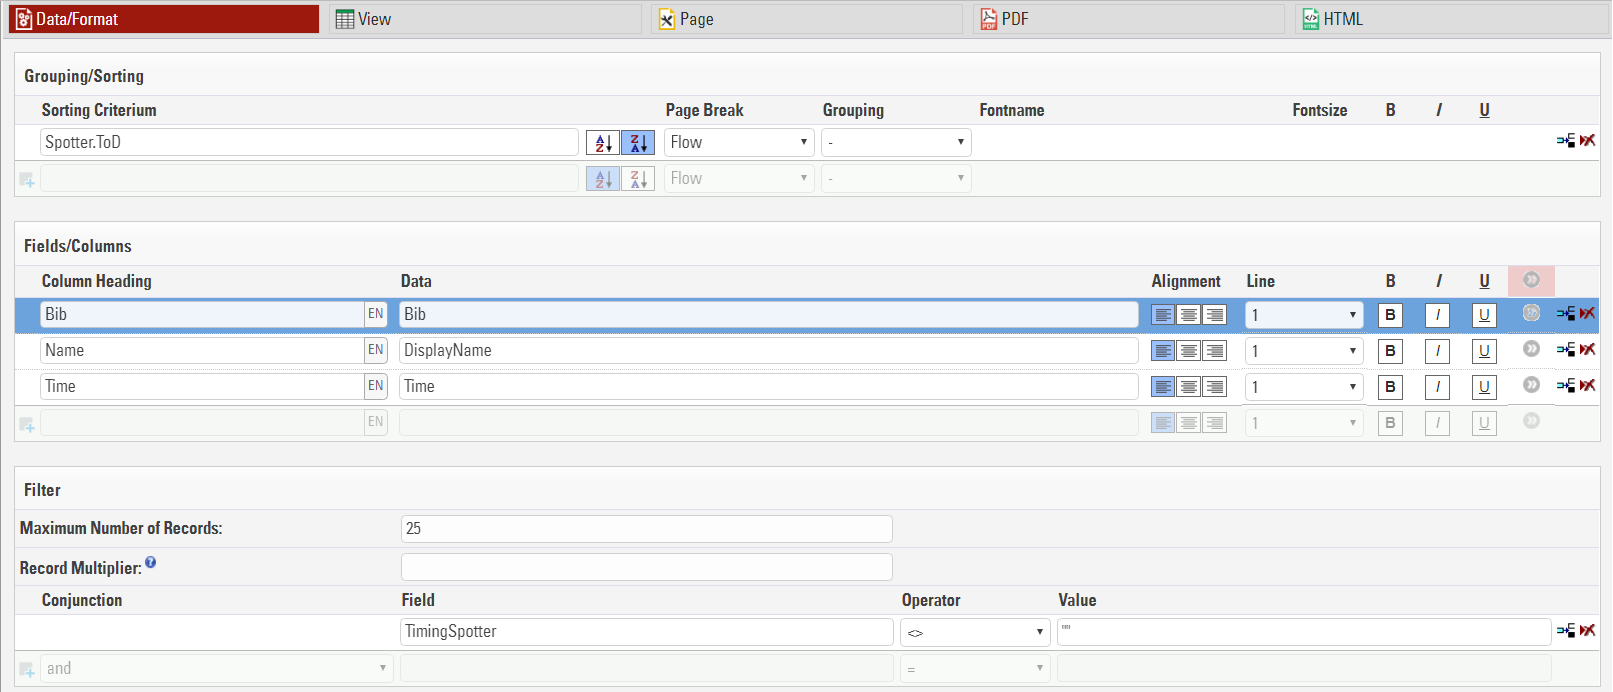
We can format the output list to show participants who have crossed the spotter but not yet crossed the finish line in a different colour using dynamic formatting. Participants will be shown in red when they are approaching the finish and turn black when finished.
The Present Results tool will display the results automatically in real time. Perfect for the announcer at the finish line.
Dyamic Formatting
If [Finished] is true then use color rgb color 0,0,0 (black), otherwise us rgb color 157,25,13 (red).
if([Finished];"C(0,0,0)";"C(157,25,13)")
Read more about the Dynamic Formatting options.
Online Result Output
- Live shows what location and time the participant was last seen, current net time, expected finish time of day and expected net time.
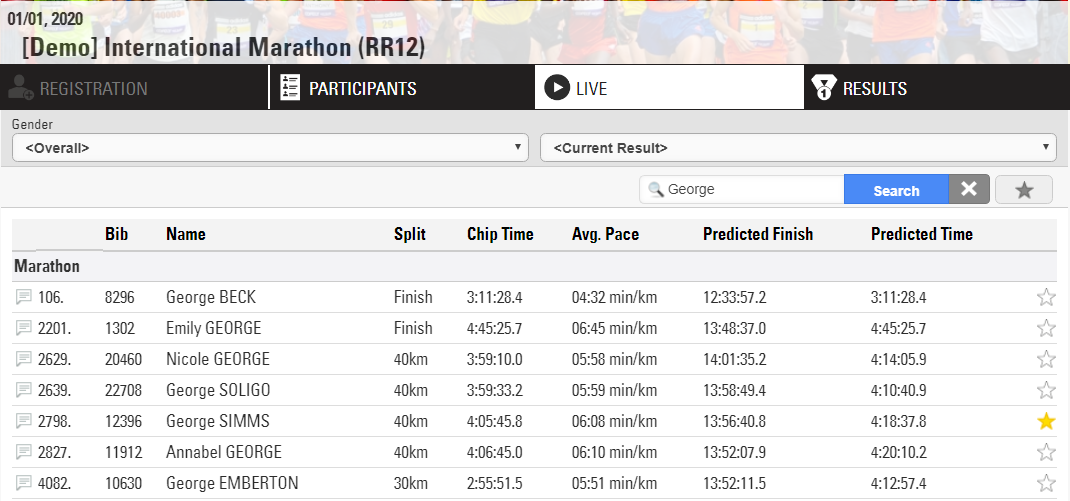
e.g. George Simms has passed the 40km in a current time of 4:05:45, at this pace he is expected to finish at 1:56pm with an expected net time of 4:18:37
Users can search for runners by name, bib, club, etc and can be marked as a favourite for one or multiple friends competing in the race
-
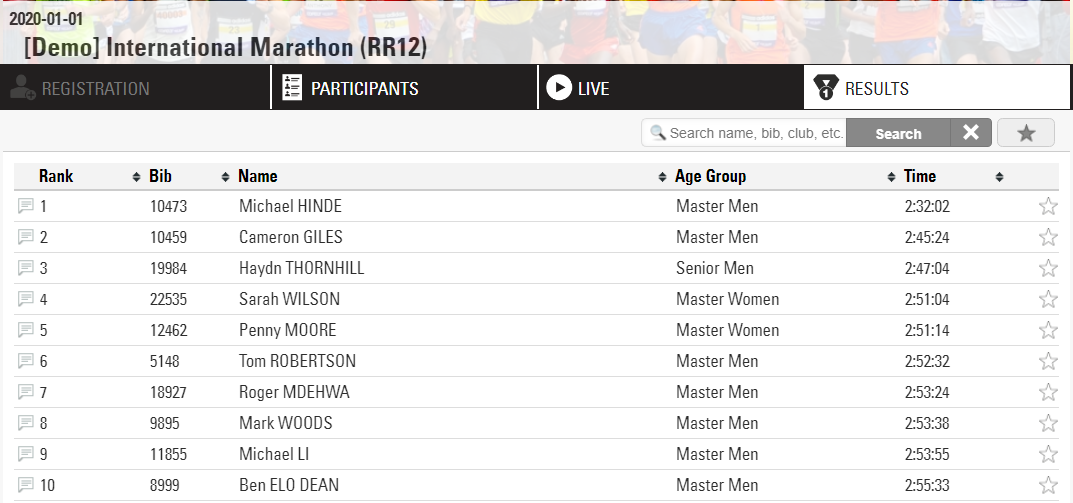
Results shows the rank, bib, name, age group and overall finish time.
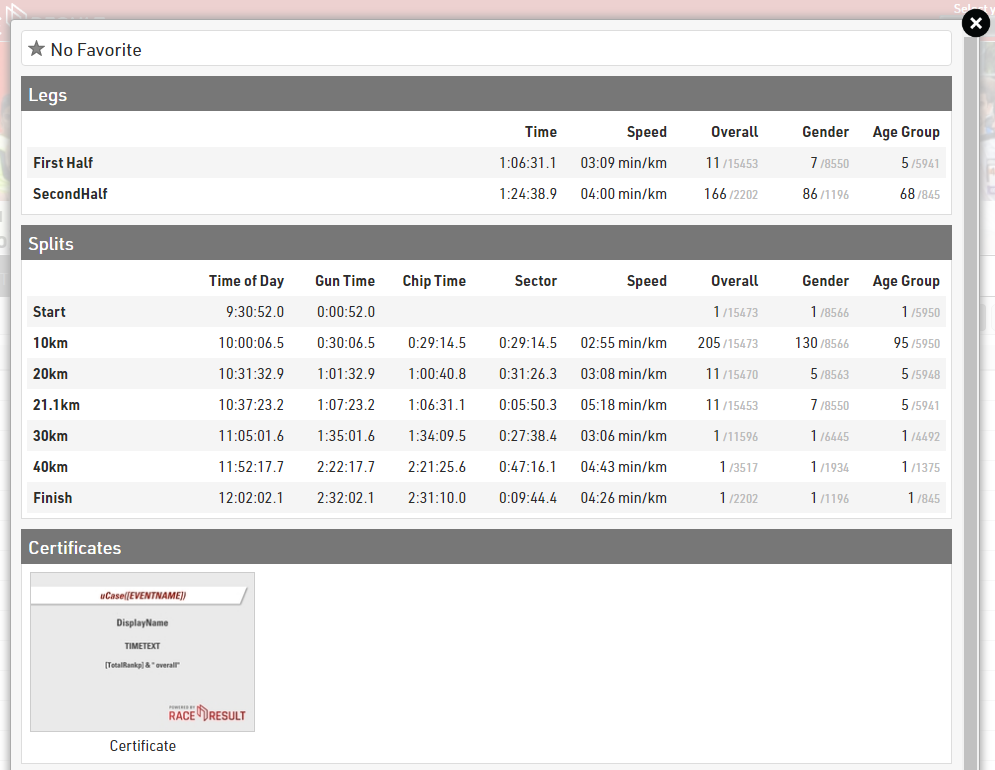
Selecting a specific runner displays an in-depth look at their run over the course with split times, age group rank, speed and pace.
Additional Tools
RACE RESULT 12 has a collection of tools to assist the in the presentation and analysis of results. Consider using Contest Overview, Present Results or Time Visulalisation at your next event.
Series Scoring
There are three ways how to score Series:
- All races of the series will be managed in one Event File. This is most feasible when the athletes keep their bib numbers for the entire series. The main advantage is that you can produce series results at any time, even while one race of the series is running.
The disadvantage is that you will have to set up separate Results, Rankings and Lists for each race of the series. This is similar to how a Stage Race would be setup.
- Alternatively, the event file can contain the result, relevant for the series scoring, from each race (like finish time or points) and is used for timing the current race at the same time. After each race, the finish times or points will be copied to a separate result, the file will be copied for the next race and the timing results will be deleted in the copy.
- The last alternative is to have one event file per race of the series and an additional event file for the series scoring into which the results of each race will be imported. Usually these races are completely independent. Athletes have different bib numbers per race. Often the races will even be organized by different race directors.
The sub-sections below give guides for options 2 and 3.
Event Series - Registration form, timing and results
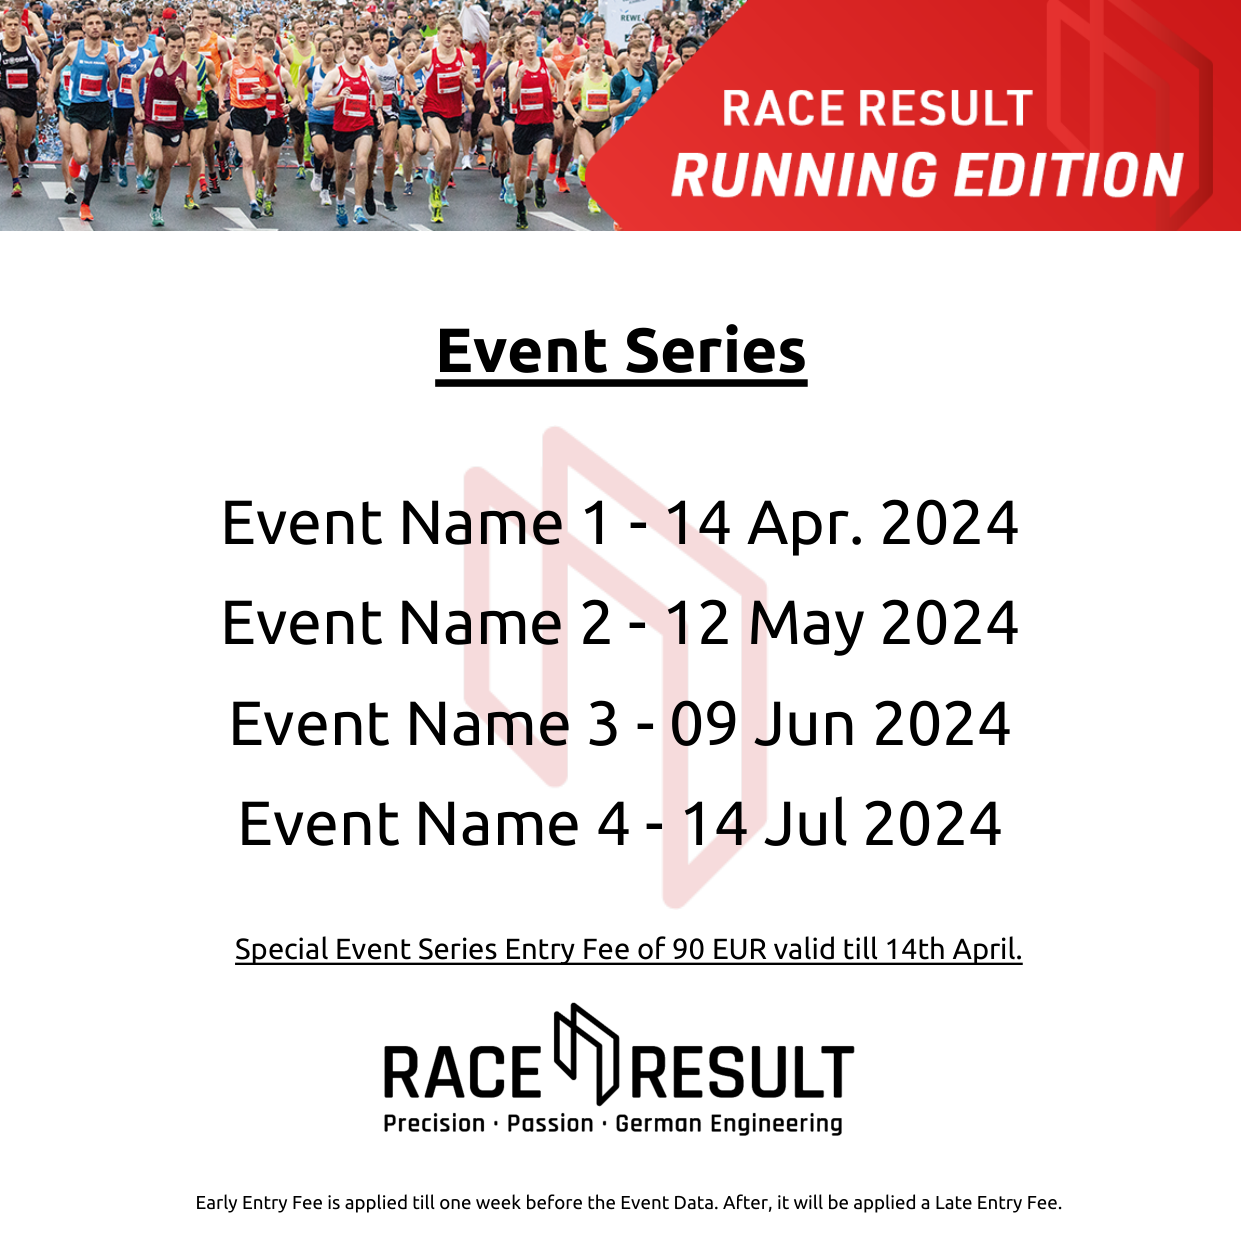
This event is meant to be used for an Event Series, where registration, timing and result presentation are all in the same event. We will be focusing on the main features of the event file, which allows you to make the participant's experience unique.
In this example, we will build a Series with 4 events, which will take place the second Sunday of each month from April to July 2024.
Relay Races
There are three ways how to set up a Relay Race:
- A relay-team can be recorded as one data-set like a normal single participant. The handling does not differ from handling of single participants. The team has only one chip. Data like name, age or sex of relay-members can be set in Additional Fields.
- Team members are saved as individual participant records, but the team has only one chip, so all times will be saved in one of the participant records.
- Team members are saved as individual participant records and each team member has his own chip.
Backyard Ultra
The example file is at the bottom of this article!
A backyard ultra is an endurance running event that challenges participants to complete a set distance, usually a loop course, within a specific time frame, typically one hour. The unique aspect of this race is that it repeats indefinitely, with participants starting a new loop every hour. If a participant completes a loop within the hour, they rest until the next hour begins, and then they start the next loop. The race continues until only one participant remains able to complete the loop within the hour, and that participant is declared the winner.
For this kind of race, the special results are the tool to use to run the proper calculations for the whole event.
MULTI-DAY EVENTS Settings
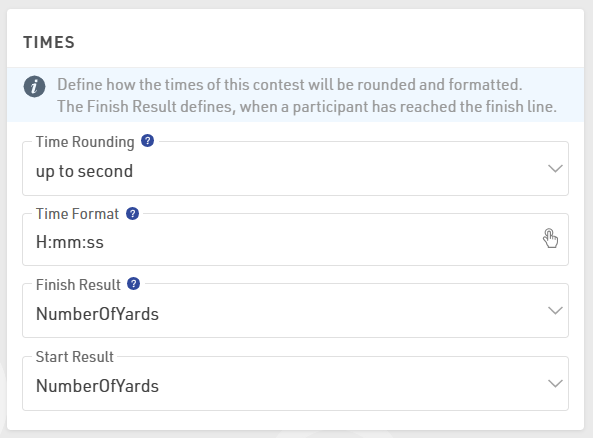
The first setting to apply is on the event date: since participants may run for more than 24 hours, it is mandatory to select a Date Until (under Basic Settings > Event Settings)
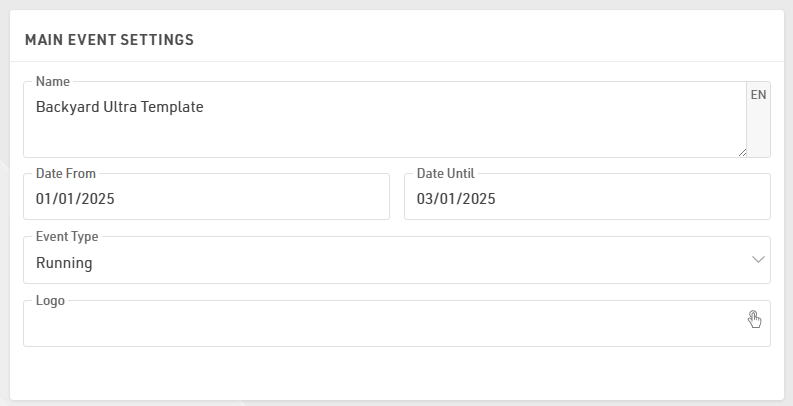
in order to unlock the section MULTI-DAY EVENTS under the Timing > Chip Timing.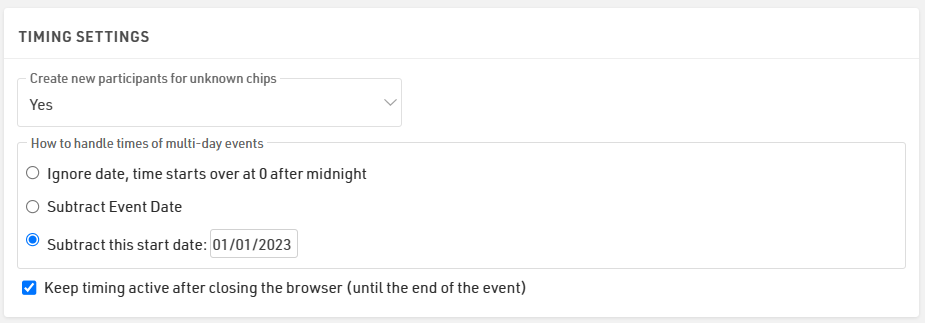
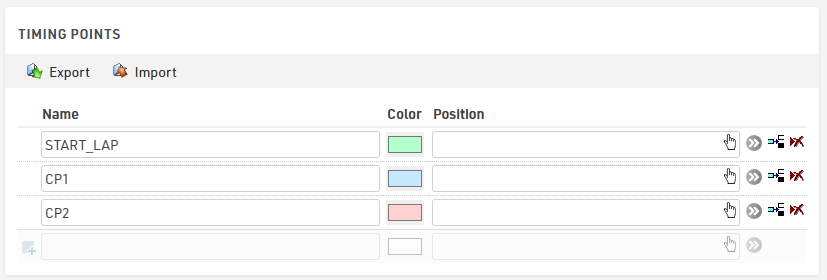
Define the timing points
In this example, we will use 3 different timing points: one decoder for the start/lap detection and 2 more decoders for 2 additional timing point on the course, which will be used as a check to check that all participants run the whole loop.
Build the Special Results
Since we are not going to use the official T0 the following settings are un-ticked to have a better control of all the special results.
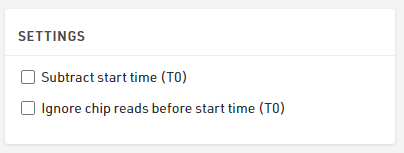
The T0 under Timing > Settings > Start Times / Finish Time Limit can be left to 00:00:00.
Dynamic Start Times
To define the start time of each lap, we need first to create a reference for the race start.
In T101 we store 10:00:00, which is the start time of the race.

In results T102-T106 we will store the start times of the next 6 yards (example has to be expanded accordingly!), which will be calculated dynamically for each participant, based on the calculation entered for those results: the time will be, indeed, calculated only if the participant finished the previous yard (T300X) in less than 1 h (3600 seconds).

To calculate the finish time of each yard, we need first to get all the right detections from our timing points.
Start, Checkpoint 1, Checkpoint 2 and Finish Detections
Since the current record for Backyard Ultra is 102 yards, our advanced results should be set by considering future developments: that's why we choose to store the Start/CP1/CP2/Finish detection at least 200 IDs apart from each other.
Start Detections T1001-T1006
For the Start, we always take the last detection between 10 s before and 30 s after the dynamic star time of each yard. This ensures to get a chip detection also for those who start slightly before or after the official start. For the calculation of the Yard Time, we will be taking the OfficialStart - the chip detection is used as a check.

CP 1 Detections T1201-T1206
For the first checkpoint, we consider valid the first read after the start of the respective yard, thus we set the reference with the relative Start Detection.

CP 2 Detections T1401-T1406
For the second checkpoint, we consider valid the first read after the first checkpoint of the respective yard, thus we set the reference with the relative CP1 Detection: this ensures that participants are running with the right course-direction and not in reverse.

Finish Detections T2001-T2006
For the finish detections, we have chosen to keep a bigger gap with the result IDs in order to have enough room in case the organizer wants to have extra checkpoints on the course.
In this case, for the finish, we consider valid every detection which occurs after at least 20 min from the Start Detection and before the end of the hour. For an extra-control, it could also be possible to reference the finish detection directly with the CP2 detection. 
Time Calculations
Now that we have all the detections, we can run our calculations for the run time of each yard, the running time of each checkpoint and the rest time that each athlete has after the conclusion of each yard. Once again, we keep the same IDs gap between the different calculations, in order to have consistency with the other results and to have enough room for development.
Yard Time
For calculating the time of each yard, we need to take each finish detection and subtract the relative official start time. In case the finish detection is missing (participant didn't complete the run, or participant finished the run above the time-limit) the Yard Time won't be calculated at all.

CP1 and CP2 running Time
For these, we subtract the CP detections with the relative start detection of each yard.

Rest Time
For the rest time, we calculate it by subtracting the next yard start time with the current finish detection. In this way, we are able to know how much time each athlete can spend resting before the next yard start.

Summary of results
With these functions, we can store all the info we may need for our output lists. 
Note that the CurrentYard result (ID7) stores the number of yards ran by the leading participant: this will be extremely useful for calculating automatically the status of every participant during the event.
The YardStarted (ID8) stores the number of Yards started by each participant and NumberOfYards (ID6) the number of Yards completed.
Displaying Results
With all the results calculated, we can now focus on result presentation.
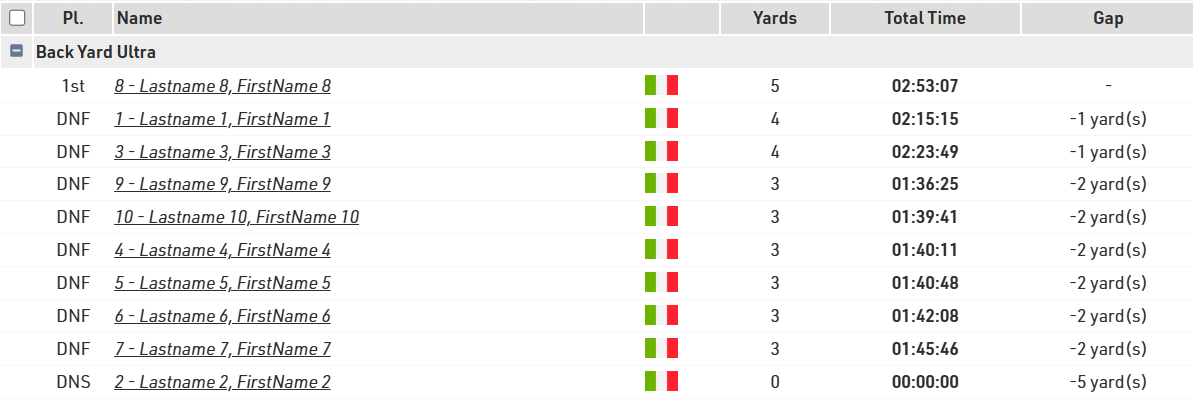
Final List
To automatically set the status DNF to all participants who didn't start the round on time, it is possible to create a User Defined Function with the following formula:
AutoStatus(x): switch([Status]>0;WithStatus();[Status]=0 AND T6<T7;"DNF";1;[x])
Trying to put the formula in words, if the status of a participant is already set different from regular, its status will be displayed straight forward. In case the status is regular ([Status]=0) and the NumberOfYards of that participant (T6) is smaller than the number of yards ran by the leading participant (T7), then we will automatically display "DNF"; for all other scenarios, we will display the field we want to show.
Final List
In this list, we want to display all participants who have started the race or if they have a status different from regular.
For that, we apply in the filter the following conditions:

where [Started] refers to the result selected under Basic Settings > Contests
To order participants properly, we sort by OverallRank.
Detail List
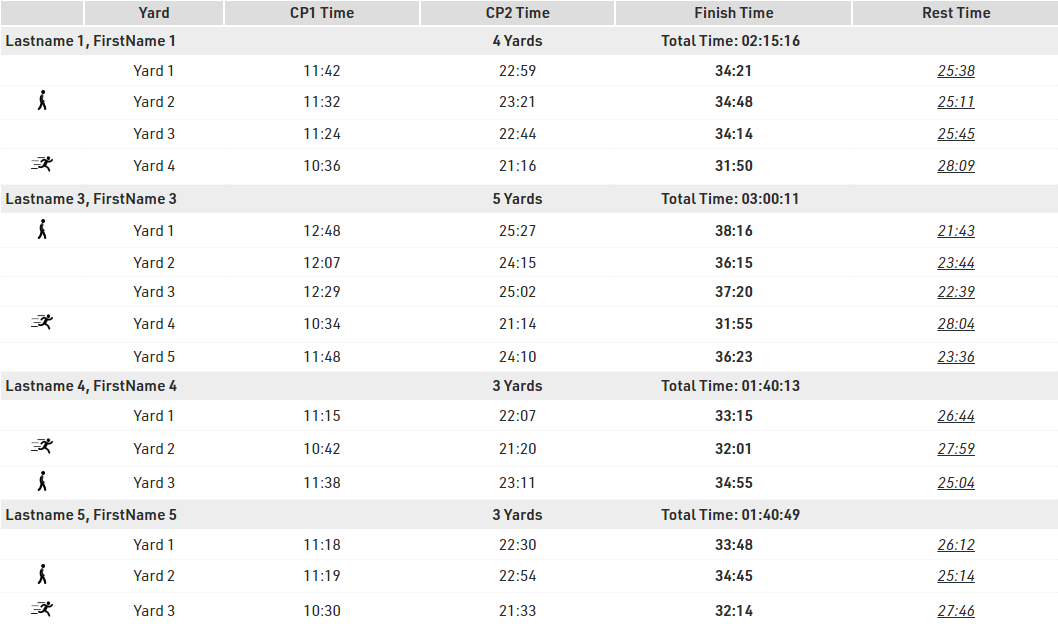
For showing each yard for each participant, we can prepare a detail list by using the record multiplier [NumberOfYards] which will create one line for each yard completed by each participant.
By referring to the row number via {n}, we can call each calculated time and with the format() function, we can show the times in the preferred format.
Two images are also been added based on the fastest and slowest yard completed: these refer to the row number and the values stored in the advanced results T3 and T5.
Live List
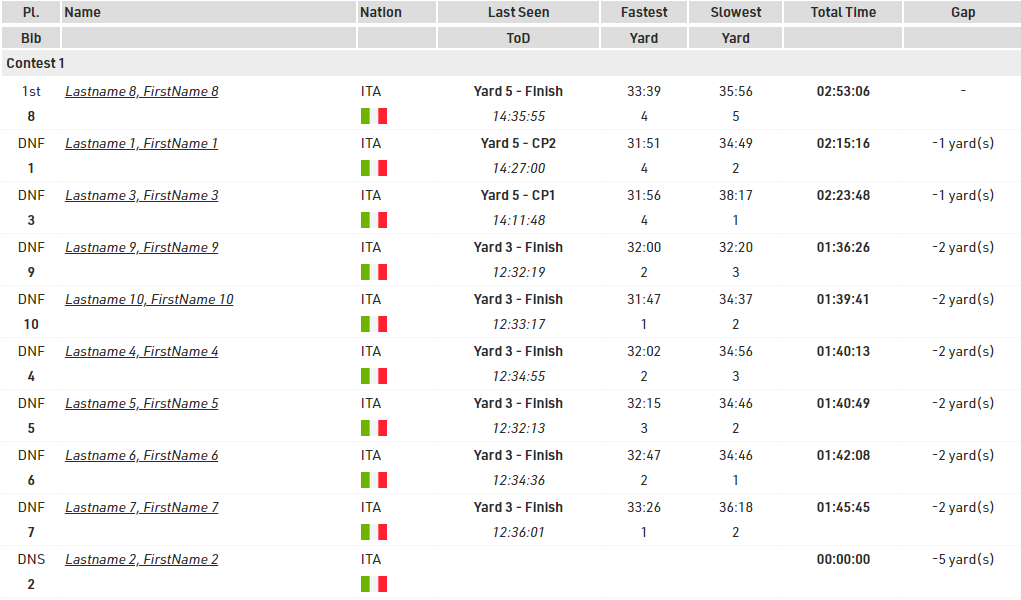
In the live list, we display the current position of each participant (Last Seen column), with the relative Time of Day (ToD) and Gap from the first participant.
Triathlon
Event File
Times are recorded at the entrance and exit of the transition area, and on the finish line.
An additional system is used as a swim check-in, to let the organizer know who actually started and make sure all participants come out of the water. The public can follow the race live on my.raceresult.com.
This example shows the ActivePro transponder in use with two Loop Boxes at the transition area wirelessly transmitting passings to a USB Timing Box at the finish line.
It is possible to use the passive system and HuTags, the setup of the event file remains the same.
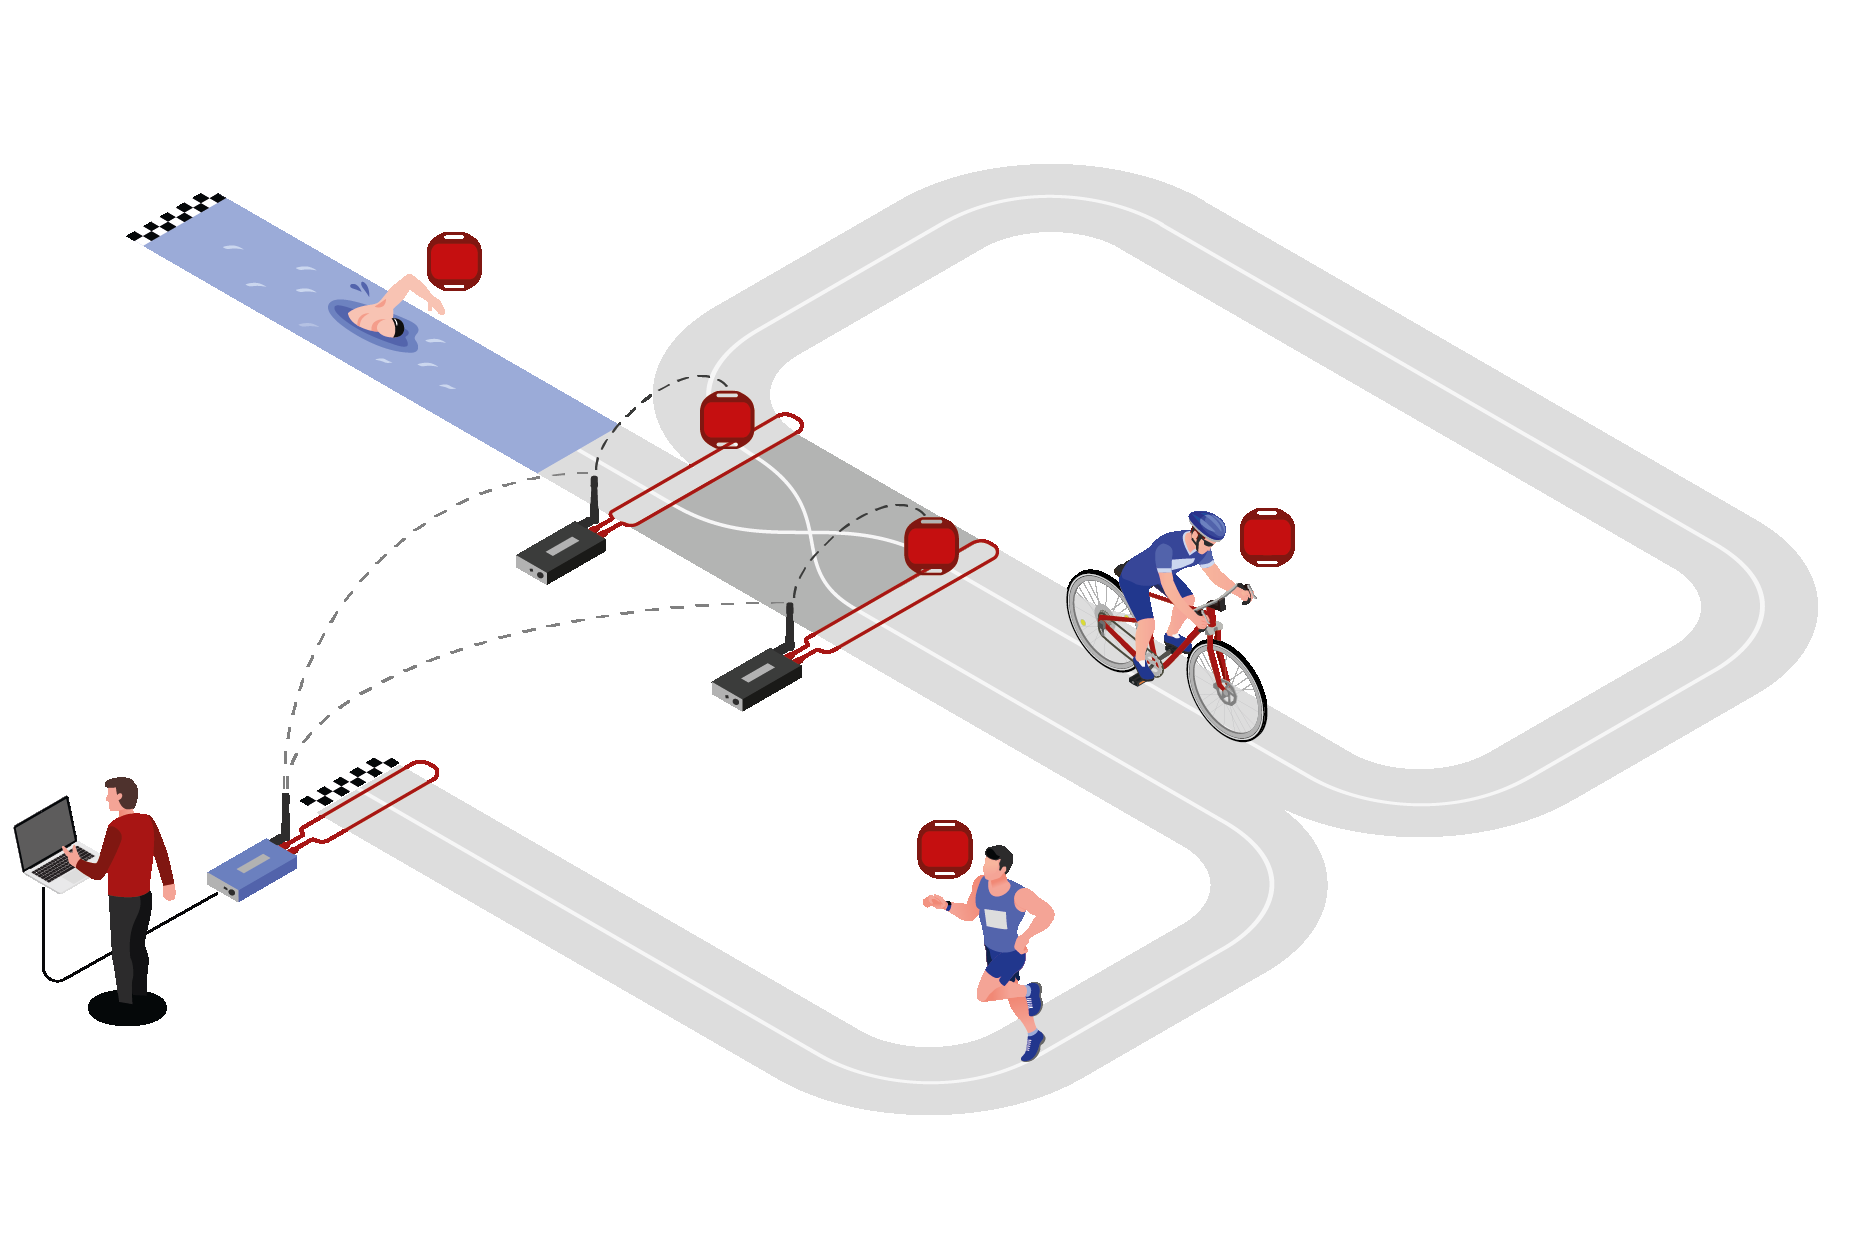
Timing Locations
Start Check-In, Transition In, Transition Out, Finish.
Preparing the Event File
- Download a copy of the triathlon event file.
- Define the event settings (date, location, time zone)
- Confirm the contest information
- Import the participants
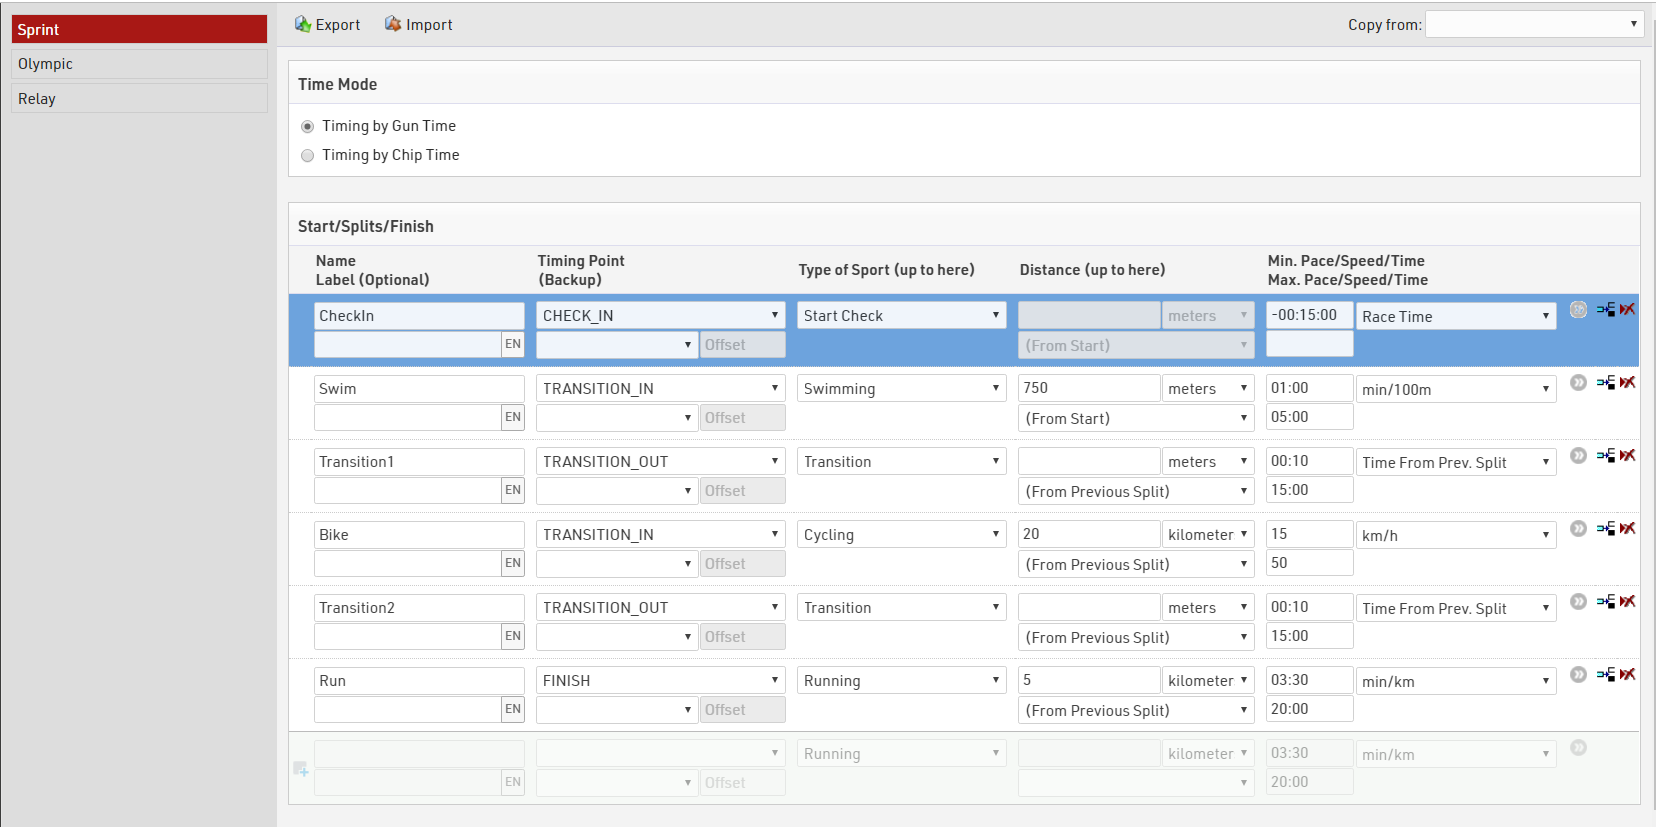
Splits Setup
Splits are setup for each Contest accordingly, Time Mode is set to Gun Time. Since we have no additional Splits we don't define additional Legs here as the Split Sector times will give us the leg times.
Team Members
In this example, a team member completes one leg of the course. One transponder is issued to the team and is transferred between team members after each leg.
Additional Text Fields are used to capture the firstname, lastname and gender of participant 2 and participant 3.
Displaying Team Members
To display all team members on multiple reports easily, we create a user-defined field to display the 2nd and 3rd participants. Another user-defined field DisplayName has already corrected firstname and lastname to the correct case for each team member.
DisplayNames:
[DisplayName] & if([DisplayName2]<>" ";" / " & [DisplayName2]) & if([DisplayName3]<>" ";" / " & [DisplayName3])
Output: Katherine WADDELL / Jo LAMBRICK / Marina TYSON
User Defined Functions - Determining Team Gender
We can determine the gender of the team automatically. To qualify as a single gender team, the genders of each participant must be the same. First we create a function to convert the gender to either 0, or 1 and add together the values for each team member, from the sum of these Gender values we can determine whether the team is all female, mixed or all male.
GenderToNumber(x): Translate([x];0;1)

GenderSum: Val(GenderToNumber([Gender])+GenderToNumber([Gender 2])+GenderToNumber([Gender 3]))

TeamGender: Choose([GenderSum]+1;"female";"mixed";"mixed";"male")
Statistic Report
At any time the organiser or officials may need to know how many participants are at what point on the course. We can determine an overview by using a statistic set. Our statistics set will look at a User-Defined FIeld called LastSeen, this is built using {LastSplit} a special function to enable the calling of fields from the last participant at which the participant recorded a time.
Switch([{LastSplit}.Name]="CheckIn";"0. Check-In";
[{LastSplit}.Name]="Swim";"1. Swim Finish";
[{LastSplit}.Name]="Transition1";"2.Bike Start";
[{LastSplit}.Name]="Bike";"3.Bike Finish";
[{LastSplit}.Name]="Transition2";"4. Run Start";
[{LastSplit}.Name]="Run";"5. Finish";
[Started]=0;"Not Started")
Using the Statistics Settings > Columns Format WithStatus([LastSeen])
The statistic set will produce the output below.

If a participants status is regular, the last split seen at will be used, otherwise their status is shown.
We can see in the Relay and Sprint Contests everybody is accounted for at the finish or recorded as DNF/DNS/DSQ. In the Olympic race 4 participants were last seen at the SwimFinish and so presumed to be still in Transition 1, 541 participants on the Bike course, 1 in Transition 2 and 1 on the Run course.
Result Outputs
- Live has a leaderboard which groups all participants by their last seen location, ranked by cumulative race time, we use the {LastSplit} special field to sort participants and show the relevant times. Using {LastSplit}.Gender we see their gender position at their last split, this will remain the same until they reach the next split.
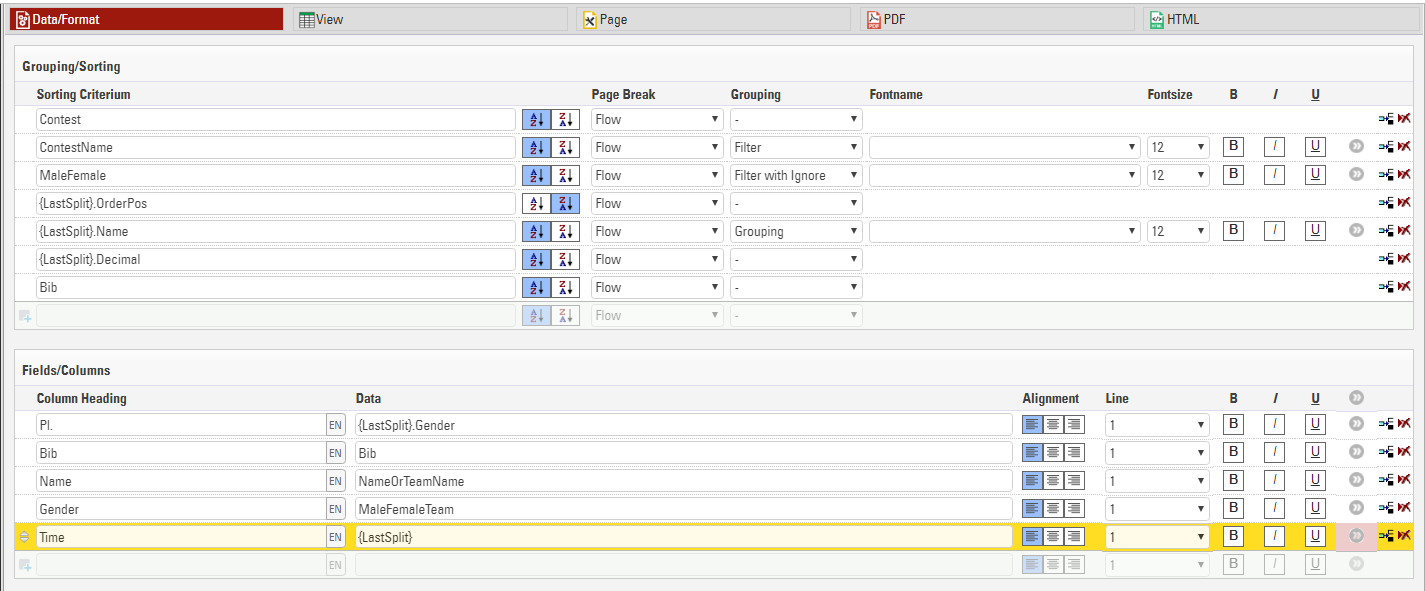
We enabled the filter for Contest and Gender so spectators can choose which race to look at and can look at a specific gender category if they choose.
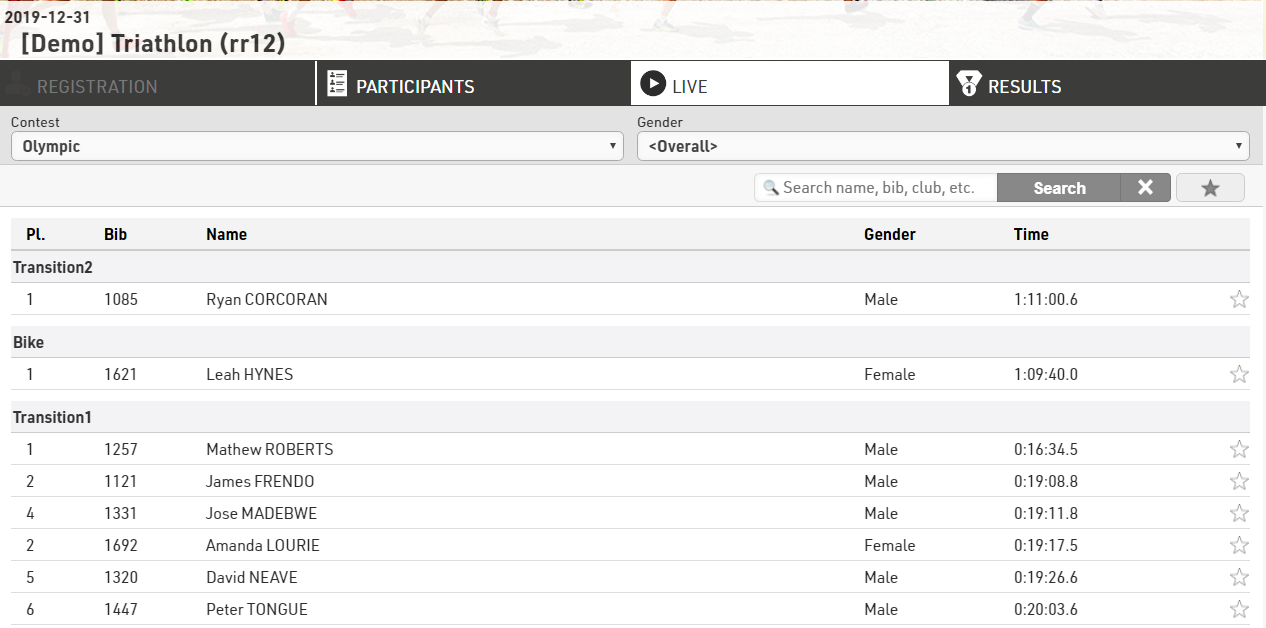
From this we can see that in the Olympic Contest Justin Appelman was the first Male to leave transition 1, however he has not been seen since and we have those who are further on the course ahead with their respective ranks at those splits.
- Final Results shows the rank, bib, name and split times for each leg and overall finish time.
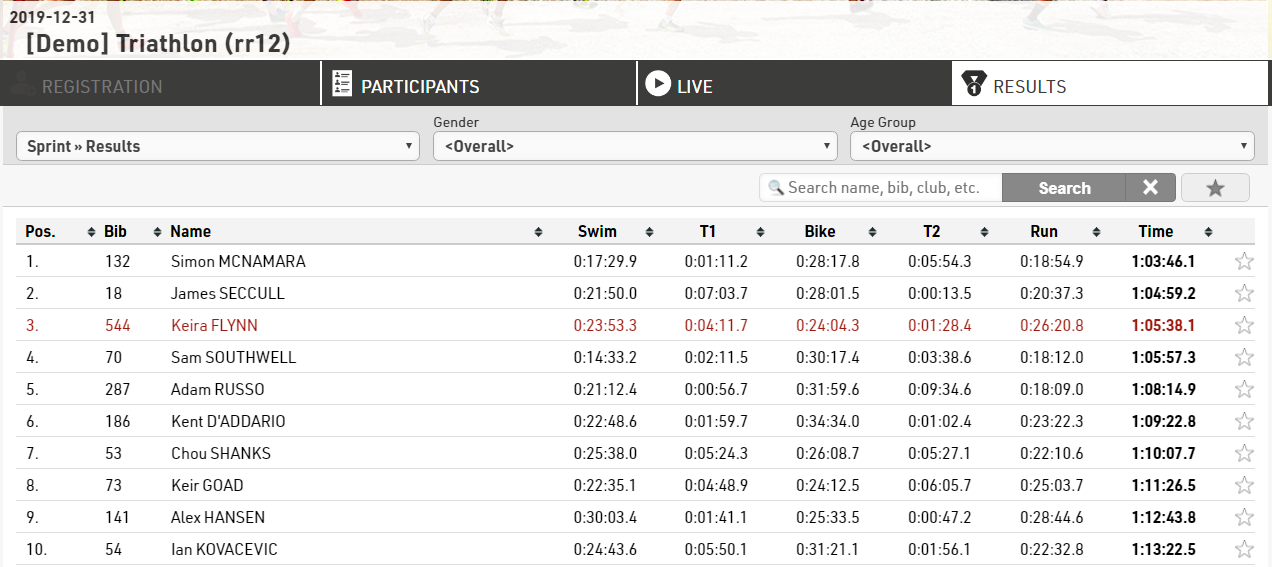
Details List
Selecting a specific participant displays an in-depth look at their Split times, and an additional details list with their personal info is shown below.
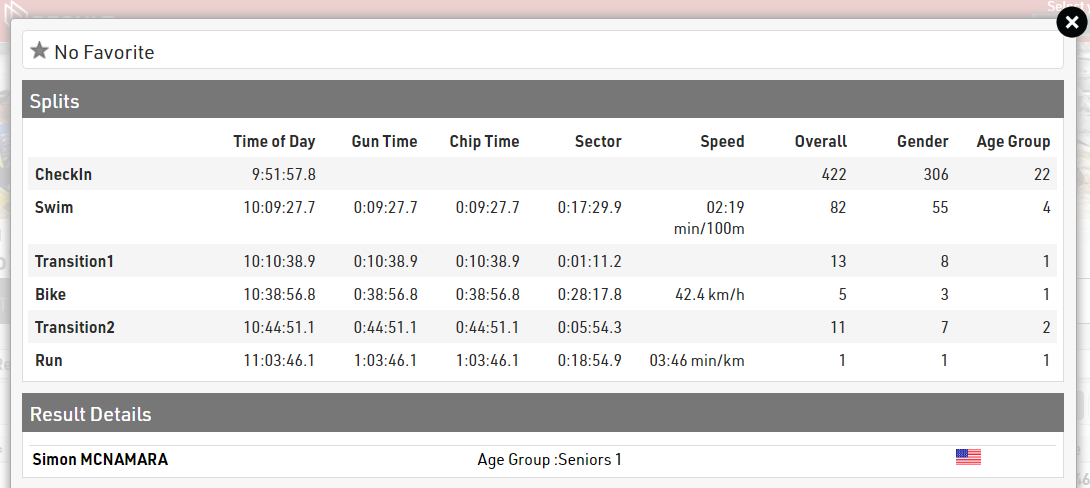
This is achieved by enabling Show Splits under Certificates / Details settings and also publishing the output Individual Details under the details list for the corresponding output.
Triathlon Elite Mixed Relay
Event File
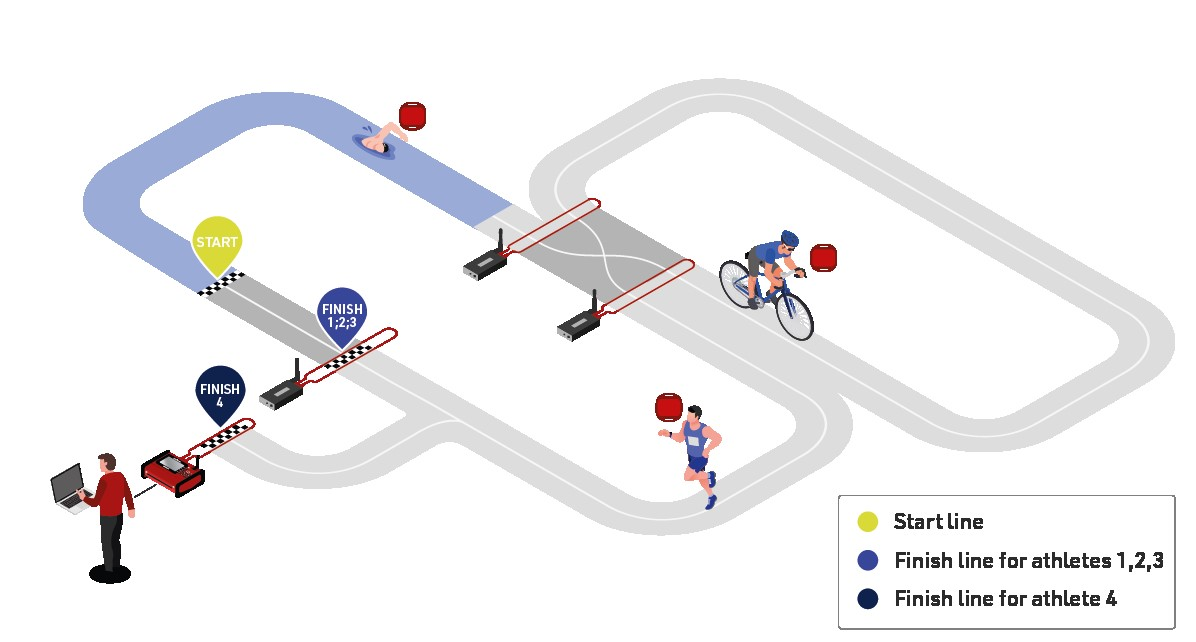
The relay consists of 4 team members, 2 males and 2 females. The first team member completes their triathlon before the next team member starts. 3 team members will finish at an alternative finishing line relay finish with the final team member running through the finish.
Timing Locations
Start, Swim Out, Transition Out, Transition In, Relay Finish, Finish
Result Calculations
Since each participant's start time depends on the previous team member's finish time, for this event type we will use the advanced results setup.
1 - 6: Times calculated for each split

10 - 20: Raw data from timing systems

30 - 36: Cumulative split times

101 – 102: Determine where the participant was last detected

Team Members
Participants are identified on course with their a combination of team number and letter to identify their position in their team. This can be calculated by combining two functions into one user defined field:
DisplayBib:
[TeamID] & choose(right([Bib];1);"/A";"/B";"/C";"/D")
DisplayBib: Take the team index, which is the first 1 or 2 bib numbers from the participant's bib, and the right most digit of the bib, if this is 1, display A, if 2 dispay B and so on. Bib 133 would be translated as 13/C (TeamID 13, team member C)
Ranks
The HelperRank orders team members by their RelayID. The RelayID is taken from the last digit of the bib number (1-4).
Start Time Calculation
The first team member's time is calculated from T0, the following participant's times are calculated from the previous team members finish time. Thanks to the dot logic we can identify the finish time of the previous team member as defined by the HelperRank (Rank100.Prev.T15).
switch([RelayID]=1;T0;[RelayID]>1 AND nz([Rank100.Prev.T15])>0;nz([Rank100.Prev.T15]))
Using RelayID the switch function identifes in which position the participant is starting, if RelayID is 1 use T0; if RelayID > 1 and the finish time of the previous team member is > 0 then use the finish time of the previous team member.
Finish Time Calculation
The first 3 team members use an alternate finish Relay Finish whilst the last team member uses the finish line. We can determine the finish location by using the choose function:
choose([RelayID];T15;T15;T15;T16)
If RelayID = 1,2 or 3 use time time from TimingRun (T15), if RelayID = 4 use the time from TimingFInishLine (T16).

e.g. The raw finish time for team member C (relay ID 3) is determined from the finish of TimingRun.
Team Score Calculation
Team members are determined by having the same contest and club name to a maxium of 4 participants. The overal finish result is the minimum time for the Result AfterFinishLine which only the 4th team member receives.
Live Output List
To enable the grouping by finishers and location we have several layers of grouping and sorting.
- Contest and ContestName
- RelayID and RelayName
- LastSplit and LastSplitName
- Time102 Time of the last split
A live rank has been used to determine the position on the couse at each of the timing locations. start, swim, transition1, bike, transition2, run and finish line.
The rank of the last split can be determined using Rank(x) with the LastSplitID Result:
Rank([LastSplitID])
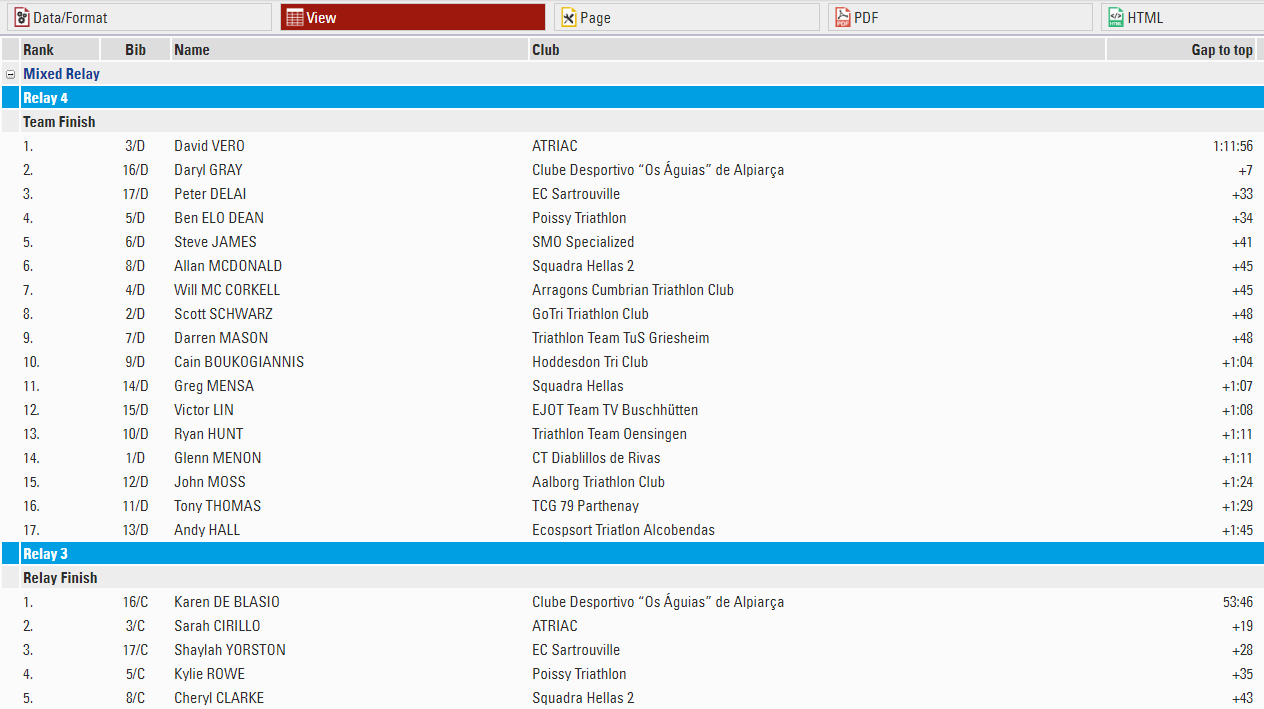
Final Result
Grouping Participants by Team
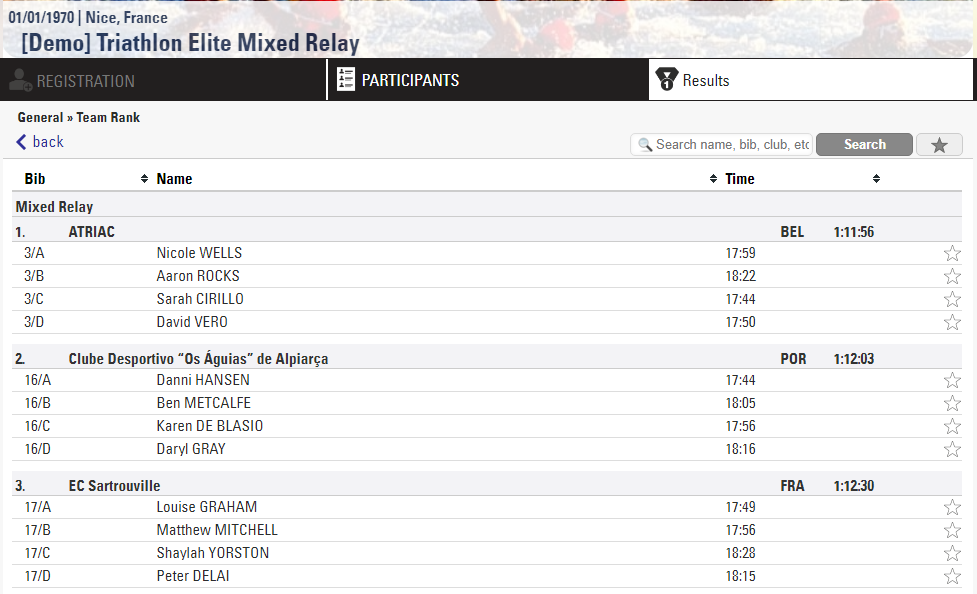
To group team members we use the user-defined function OrTeamStatus([TeamTime.Rank]) & ".///" & [Club] & "///" & [CountryIOC] & "///" & [TeamTime.Time1]
This will group all team members and sort by the overall rank of the team score, club name, country and team time. If the team has a status of non regular, the team status will be shown.
Using "///" will push the field into the next column along.
Qualifications / Heats / Finals
This example looks at how you can manage events with qualification rounds and progressive heats in RACE RESULT 12.
In this we show the core concepts of how to manage such events, but this example does not consider all possibilities, the basic methods shown here can be adapted to handle a range of requirements such as additional rounds, different genders, lap races and more.
Event Format
In this event we have all participants registered in a single Contest and only use a single Gender. The event is based on a simple short race (modelled on a 1km cycling time trial), with a fixed start time and single detection for each round. We keep this example short with just 16 participants starting.
The event starts with a Qualification round, where participants are assigned a unique individual start time.
From the Qualification round the best 8 will progress to the Semi-Finals, with 2 rounds of 4 participants.
The Finals will be formed of the best 2 participants from each Semi-Final round.
Timing Points
This setup uses a unique Timing Point for each, this isn't critical for this setup, but it makes it easier to understand the data later, especially if the event is spread out over multiple days

Results
The results setup here is kept as simple as possible.
Given that T0 is irrelevant in this type of event where the same participant has multiple starts, we do not subtract this in our settings.

For each round we have a start time, which is a fixed time and a single finish detection at the relevant Timing Point, which is simply the first time after the start, and then for each round we calculate the individual participant's time.
We also calculate the number of rounds each participant has completed and their best time of the 3 rounds.
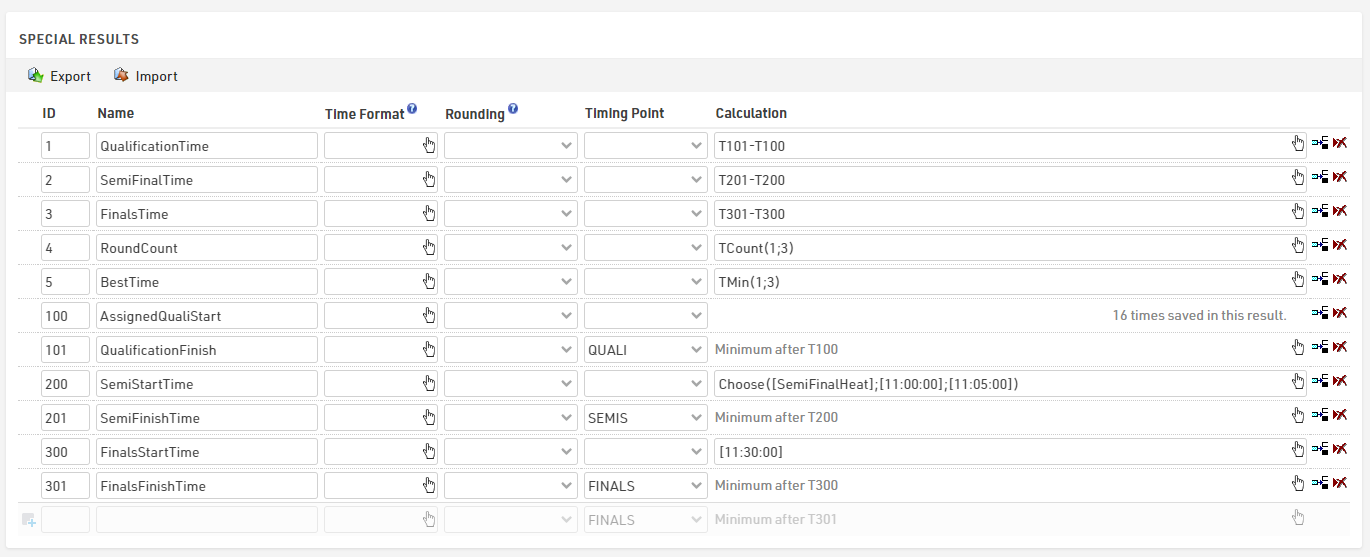
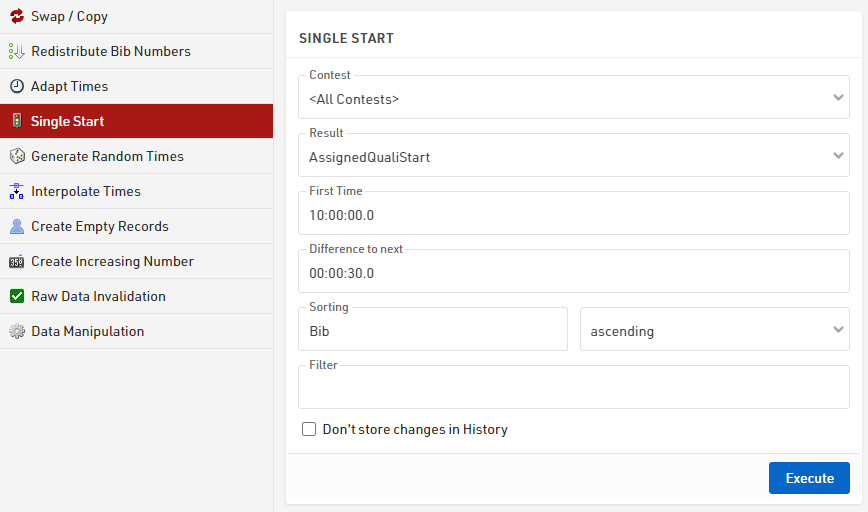
For the qualification we set the times using the Adapt Data - Single Start feature which sets a static time for each participant at set intervals according to the sorting criteria. This could alternatively be calculated directly in the result or imported with the participant data.
The Semi-Finals time uses a Choose() function based on the heat number (which we will calculate later) which then returns a time for each heat.

Since the Finals are a single round we have a fixed time in here.

Note that for both the Semi-Finals and Finals the times are in square brackets, this ensures that the software knows to convert this to a time that is internally stored as a decimal value in seconds.
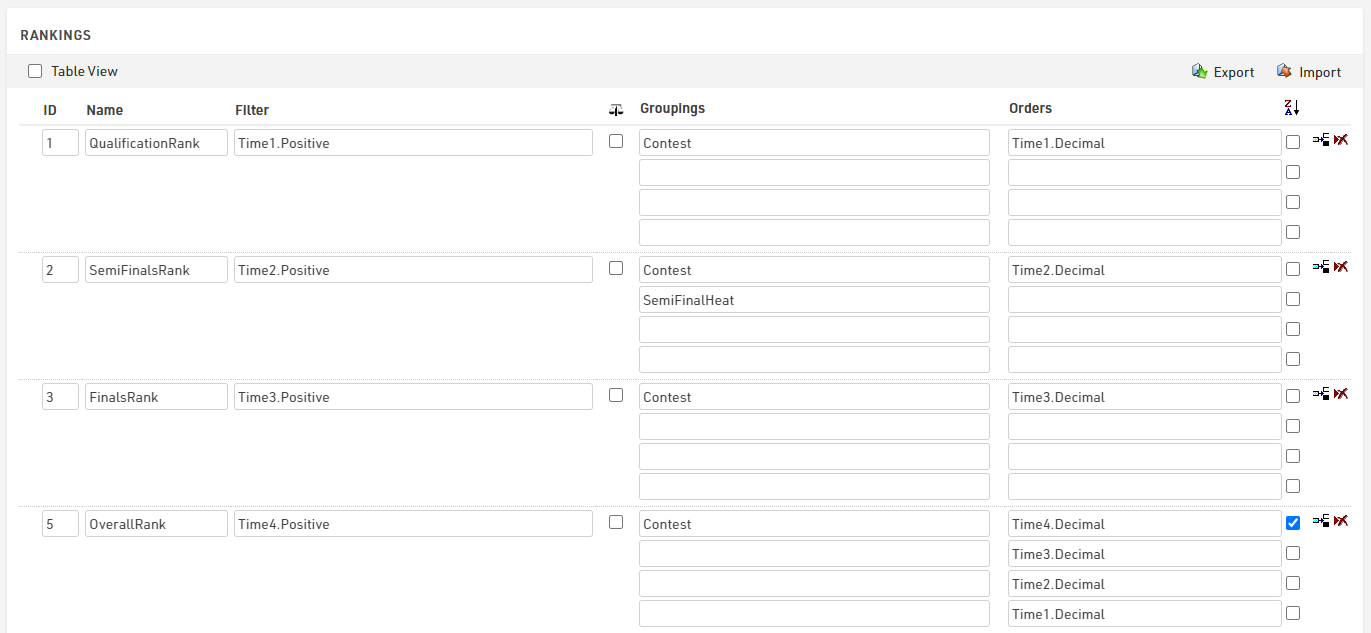
Rankings
For this we need 3 main ranks, one for each round, and also produce a final overall ranking which helps put everybody in one output list later on.
Each of the round ranks filters on TimeX.Positive, so only those with a time in the round are ranked, the Semi-Finals additionally groups by the HeatNumber so that we only compare those of the same heat for the progression to the finals.
Our final overall rank is based on the number of rounds completed from largest to smallest (so those who qualified for the Finals will have 3 rounds whereas those knocked out during Qualification will only have 1. We then sort based on their Finals time, Semi-Finals time and lastly the Qualification time.
Round Progression
The most important part of this setup is how participants progress from Qualification to Semi-Finals to Finals. This is calculated automatically and dynamically using 2 User-Defined Fields.
Each User-Defined Field looks at the relevant rank to return a heat number for the next round.
For the SemiFinalHeat we take their Qualification rank as an input and return the heat number based on this using a Choose() function.
Choose([QualificationRank];1;2;1;2;2;1;2;1)
To understand this, here is the mapping of the ranks to heats.
| Rank | Heat | Rank | Heat | |
| 1 | 1 | 5 | 2 | |
| 2 | 2 | 6 | 1 | |
| 3 | 1 | 7 | 2 | |
| 4 | 2 | 8 | 1 |
Those with a Qualification Rank of 9 or higher therefore do not receieve a SemiFinalHeat and do not progress.
For the Finals we can simplify this and us a simple If() statement to only take those in the top 2 of their Semi-Final heat, we need to also check that the rank is greater than 0, since those who are not ranked will return a rank of -1.
If([SemiFinalsRank]<=2 AND [SemiFinalsRank]>0;1)
Outputs
Start Lists
For each round we produce a Start List of participants, for the Semi-Finals and Finals this is filtered to only qualified riders, and within each heat participants are sorted by their time from the previous round.

For the Semi Finals we group by Contest and then concatenate "Semi Final " and their heat number, then sort by decimal value of their qualification time.

The filter is used to only take those who have a SemiFinalHeat assigned.

The Finals Start list applied the same logic but simply groups by "Finals" and filters on the FinalsHeat.
Results Lists
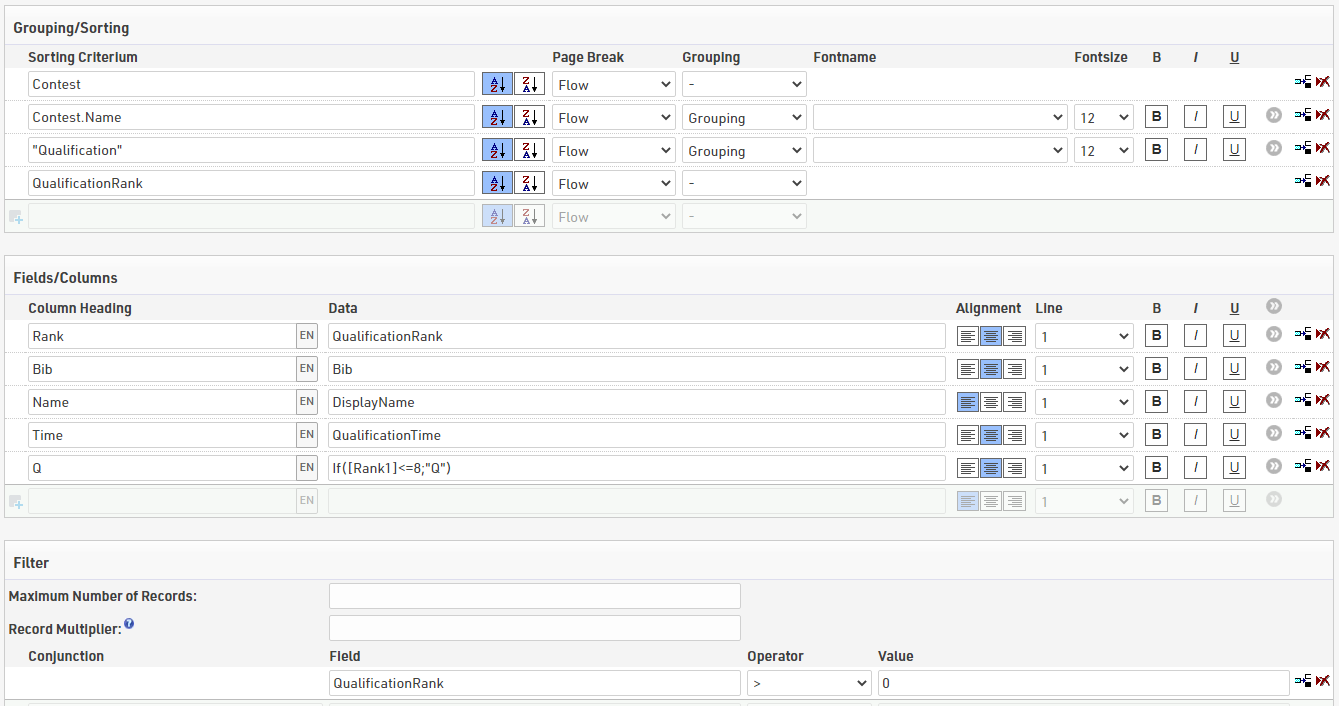
For results we want to show for each round the participants' times and also who has qualified to move on to the next round.
Each rounds result list is filtered and sorted by the corresponding rank, so they are only shown if they have completed the round. We also apply the same grouping / filtering logic from the Start Lists to group by the round / heat number.
To show who has qualified we add a column which looks at the relevant rank and if this is less than or equal to the maximum rank to qualify shows a Q, for qualification this is the top 8.
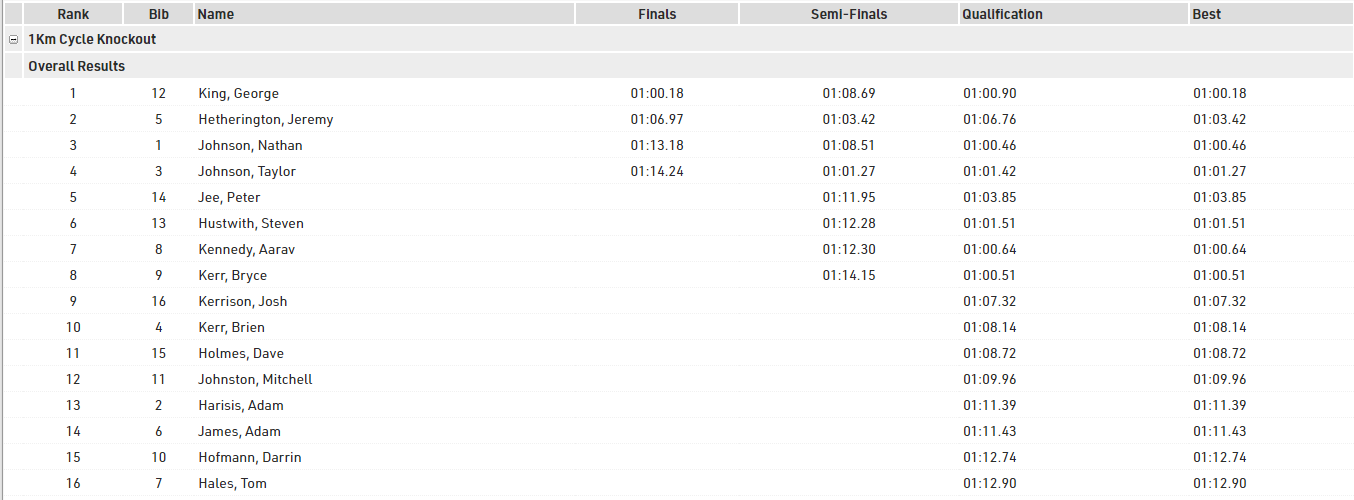
We also created an overall results list, which uses the overall rank setup earlier. With this as the main sorting criteria we can then also easily and clearly show who qualified for each round, and we also show their best time in an additional column.
Lap Race - Time Limit
This event is a general description of a lap race, where participants are allowed to race (in this example) for maximum 2 hours in a circuit of 2 km where the timing device is placed at the start/lap line. Scoring is anyway based on the most number of laps completed and then on the fastest total time.
Creation of a new event
When creating a new event, select the template Lap Race [variable number of laps], which is the perfect template for this kind of race. Once the template has been selected, define the Maximum #Laps expected to be completed from the winner. We highly suggest entering a number which is roughly the 5-10% higher of the expected laps, just for your safety. It would be inconvenient to adjust the event file during the race, if participants are running more laps than expected.
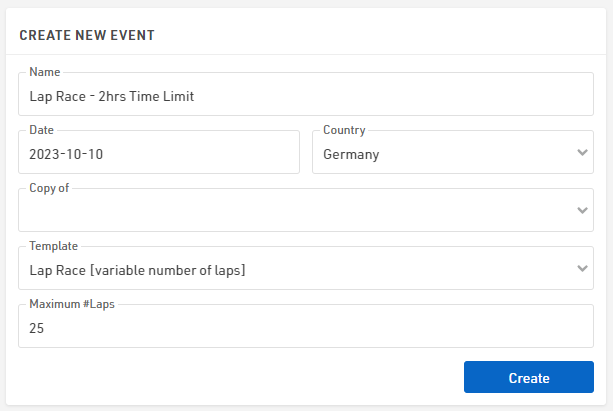
In this example, we expect participants to run with a pace above 3:00 min/km: even if a participant runs exactly at this pace, the laps completed in 2 hours will be 20, thus 25 Maximum Laps are more than enough for the following simulation.
Based on the laps entered, the template will generate Special Results accordingly: note that with more than 100 laps, the results for each lap will NOT be generated but everything is still calculated.
Definiton of the Raw Data Rules
Under Main Window > Special Results, the software has created already a set of special results reflecting the Maximum #Laps defined during the event's creation. These results are divided into 3 macro-sections, looking at the Results' IDs used.
Before looking at them, it is important to focus the attention on the Settings for Results with Raw Data Rules.
By default, in the template, the Minimum Lap Time is set to two minutes. In our case, considering that a lap is 2 Km long, we set 6:00 minutes, considering the fastest pace to be 3:00 min/km.
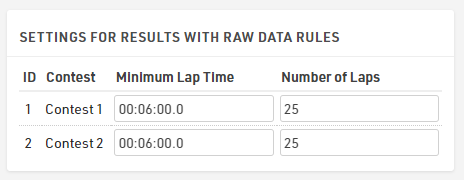
Lap Times (IDs 1000 - 1025)

This set of results calculates the time of each completed lap. Result 1000 takes the last read from the timing device, which occurs between the official race start and the minimum lap time set for this event. For all the other results, the software will consider, as a lap detection, the first detection which has occurred after the minimum lap time.
Cumulative Lap Times (IDs 2000 - 2025)

This set of results calculates the race time after Nth read.
Calculation Times (IDs 1 - 6)

This set of results is useful for creating rankings and output lists. For our final list, we want to order participants by number of laps completed (highest to lowest), and then for Finish Time (fastest to slowest). More info on Lap Race Rules.
Start Time and Finish Time Limit
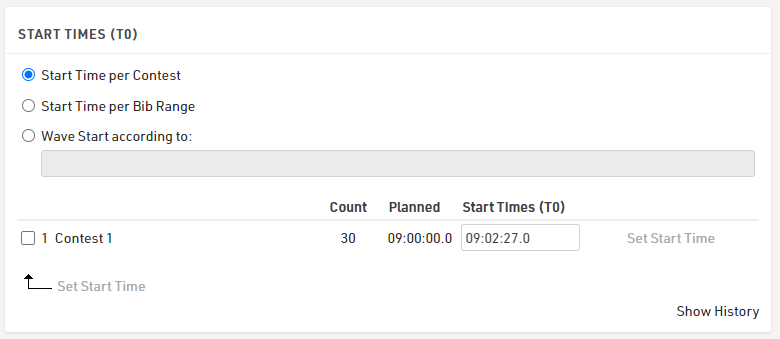
Under Main Window > Start Times / Finish Time Limit, it is possible to set the official start time of the race (T0) and, consequently, the official Finish Time Limit considering that our race has a limit of 2 hrs. Note that both times have to be expressed in Time of Day.
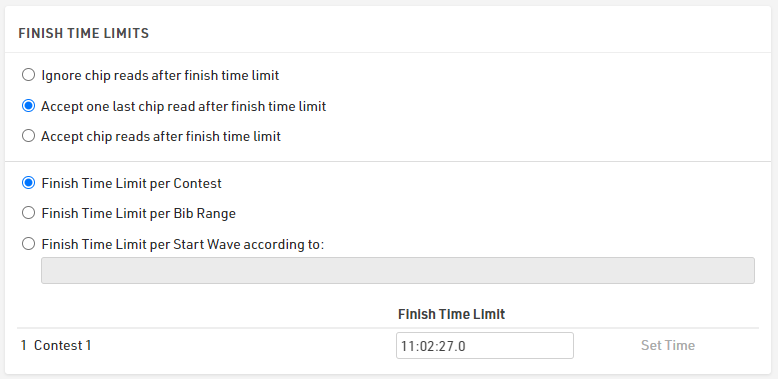
In the section Finish Time Limits, it is possible to define either to ignore any chip read after the 2 hours, or to allow one last chip read in order to allow participants who start their last lap before the finish time limit to complete this lap.
Rankings
By default, 3 Rankings are defined under Main Window > Rankings.
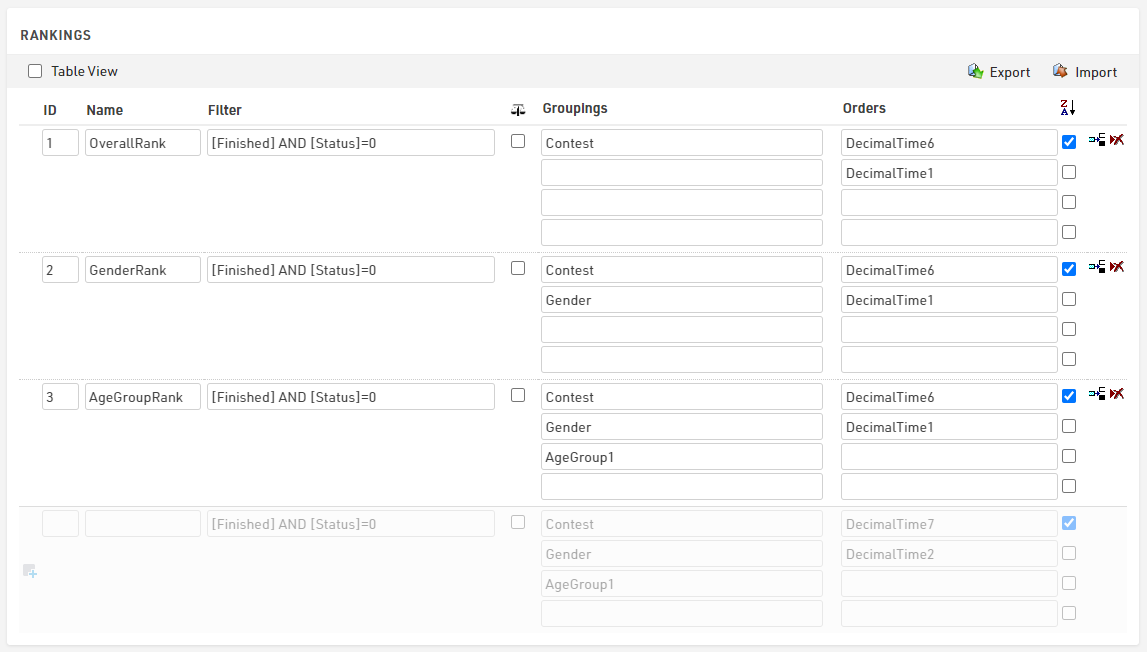
These differ from the groupings' settings, but all sort participants by NumberOfLaps (Special Result ID6) completed (Z>A), and then by FinishTime (Special Result ID1).
Output Lists
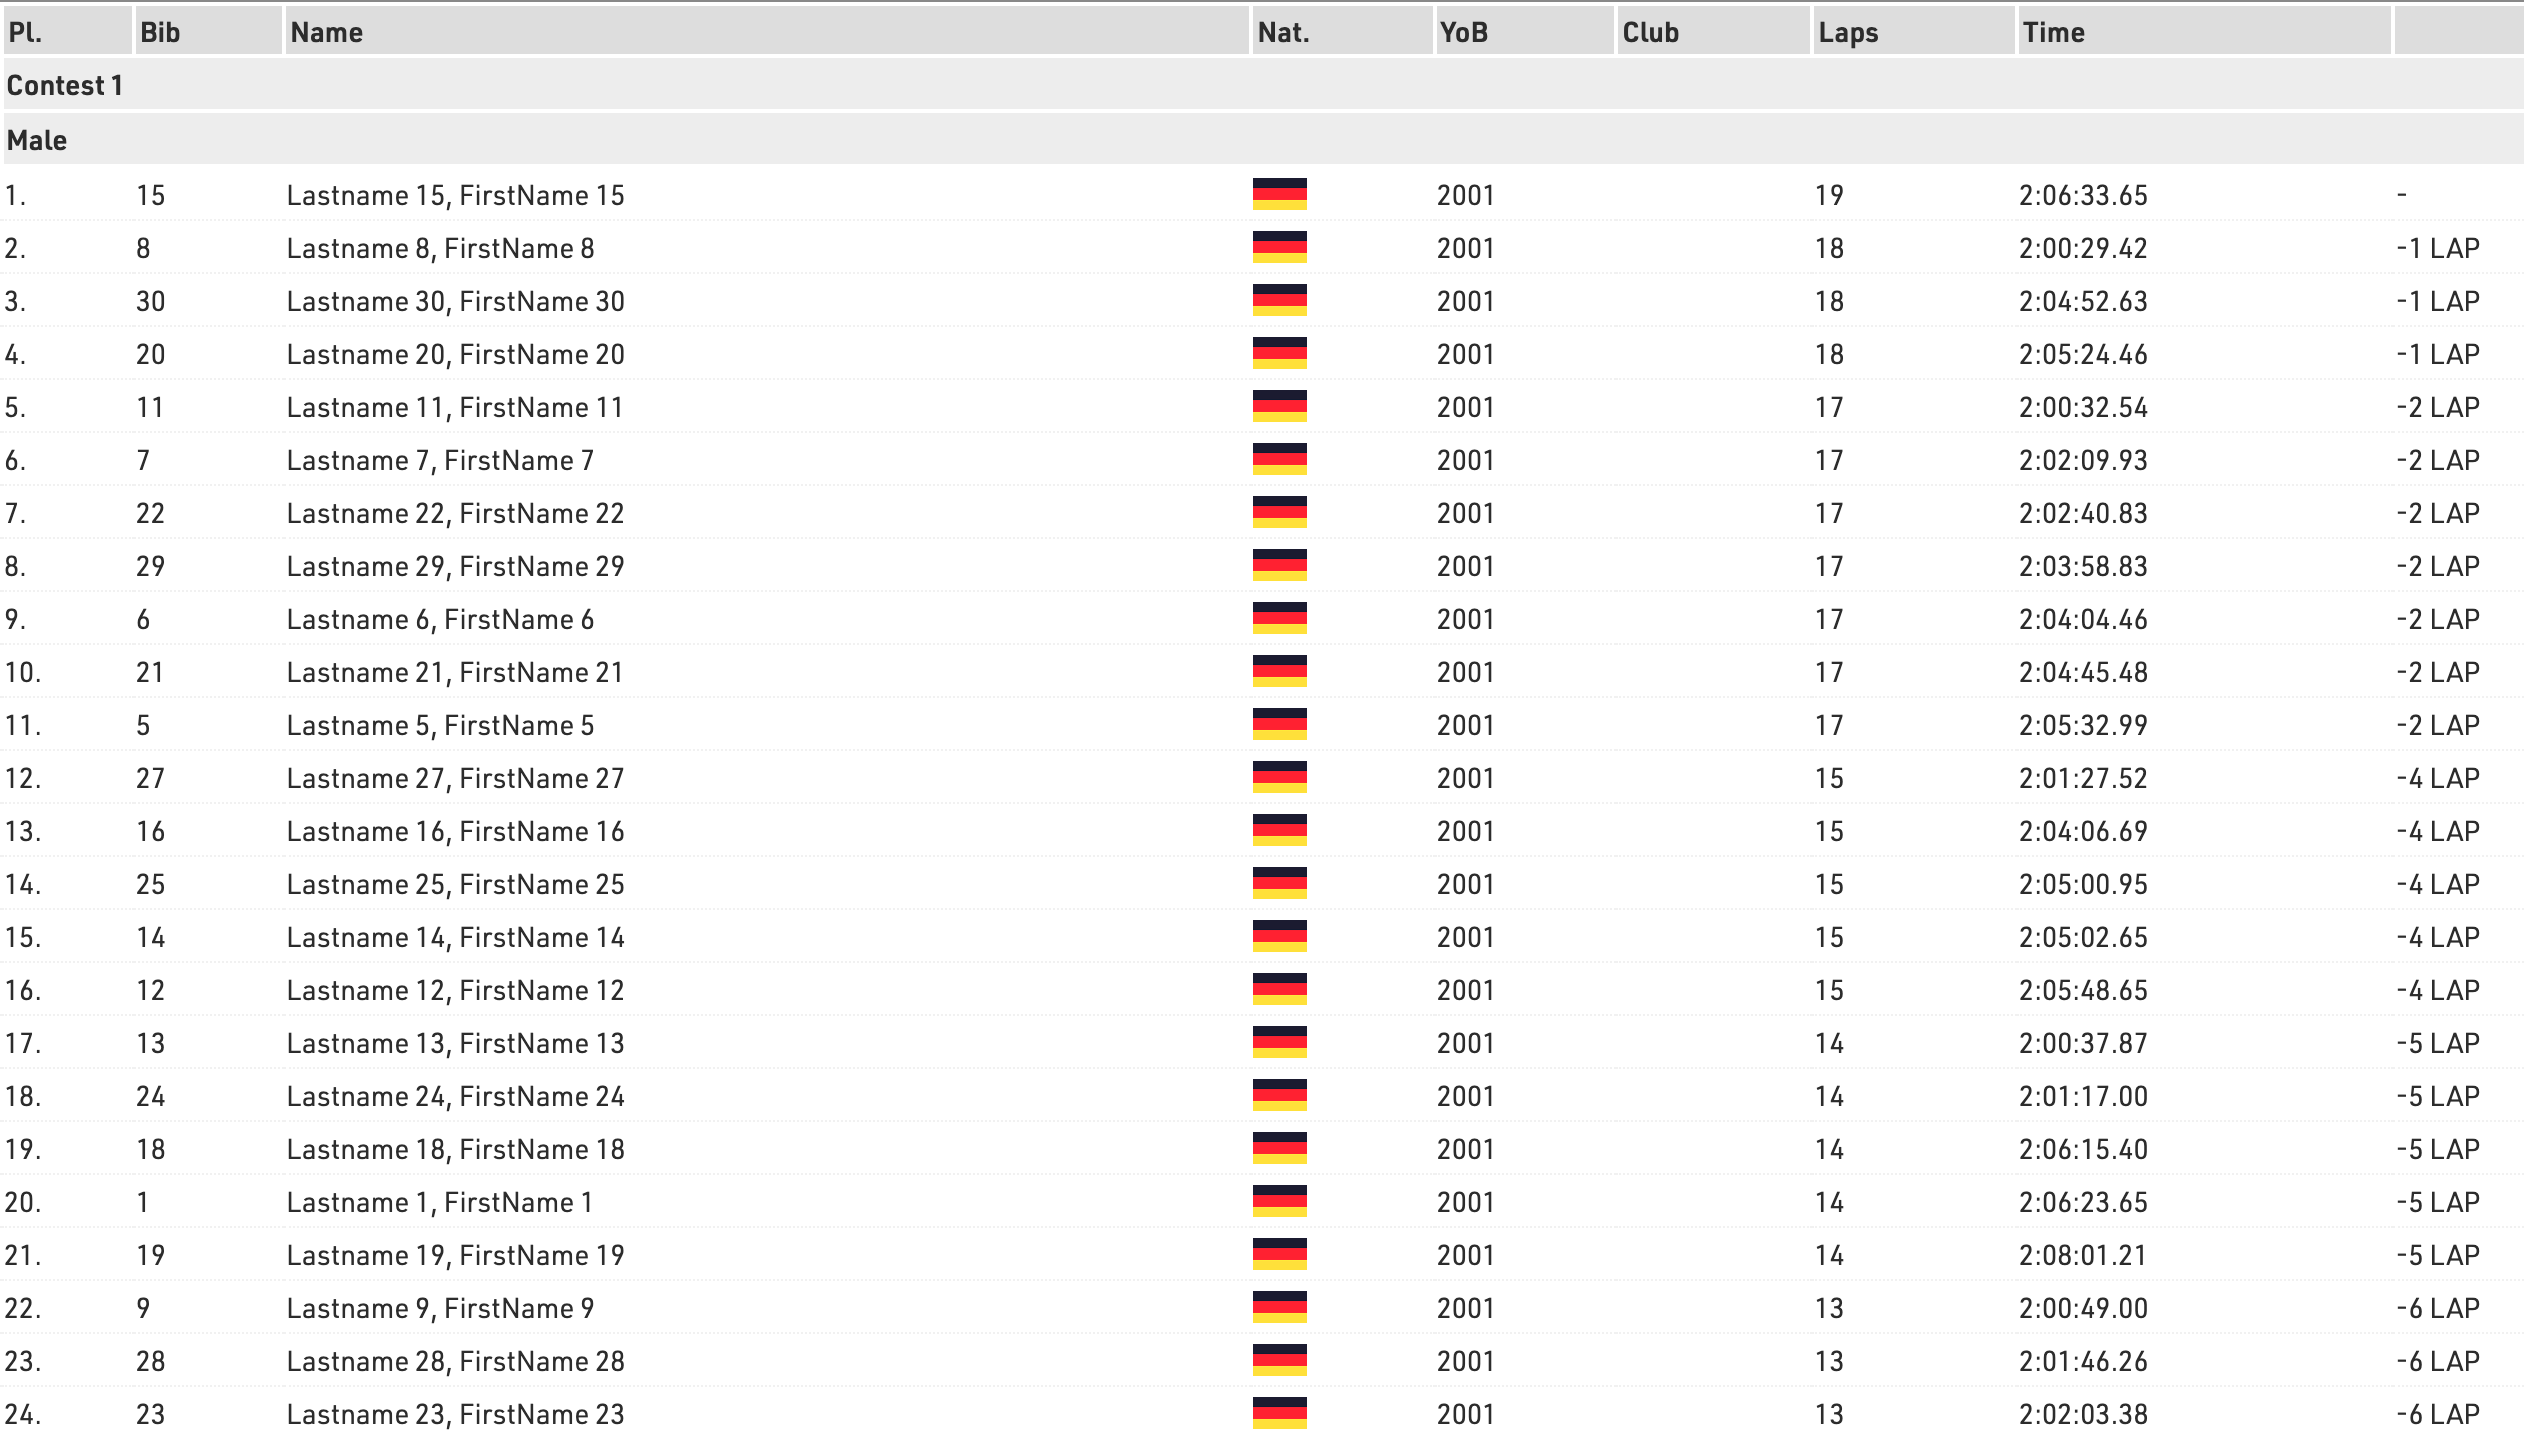
The template includes most of the output lists requested from the organizers. The final list displays the total number of laps and finish time of each participant, together with the gap time or the difference in number of laps from the first.
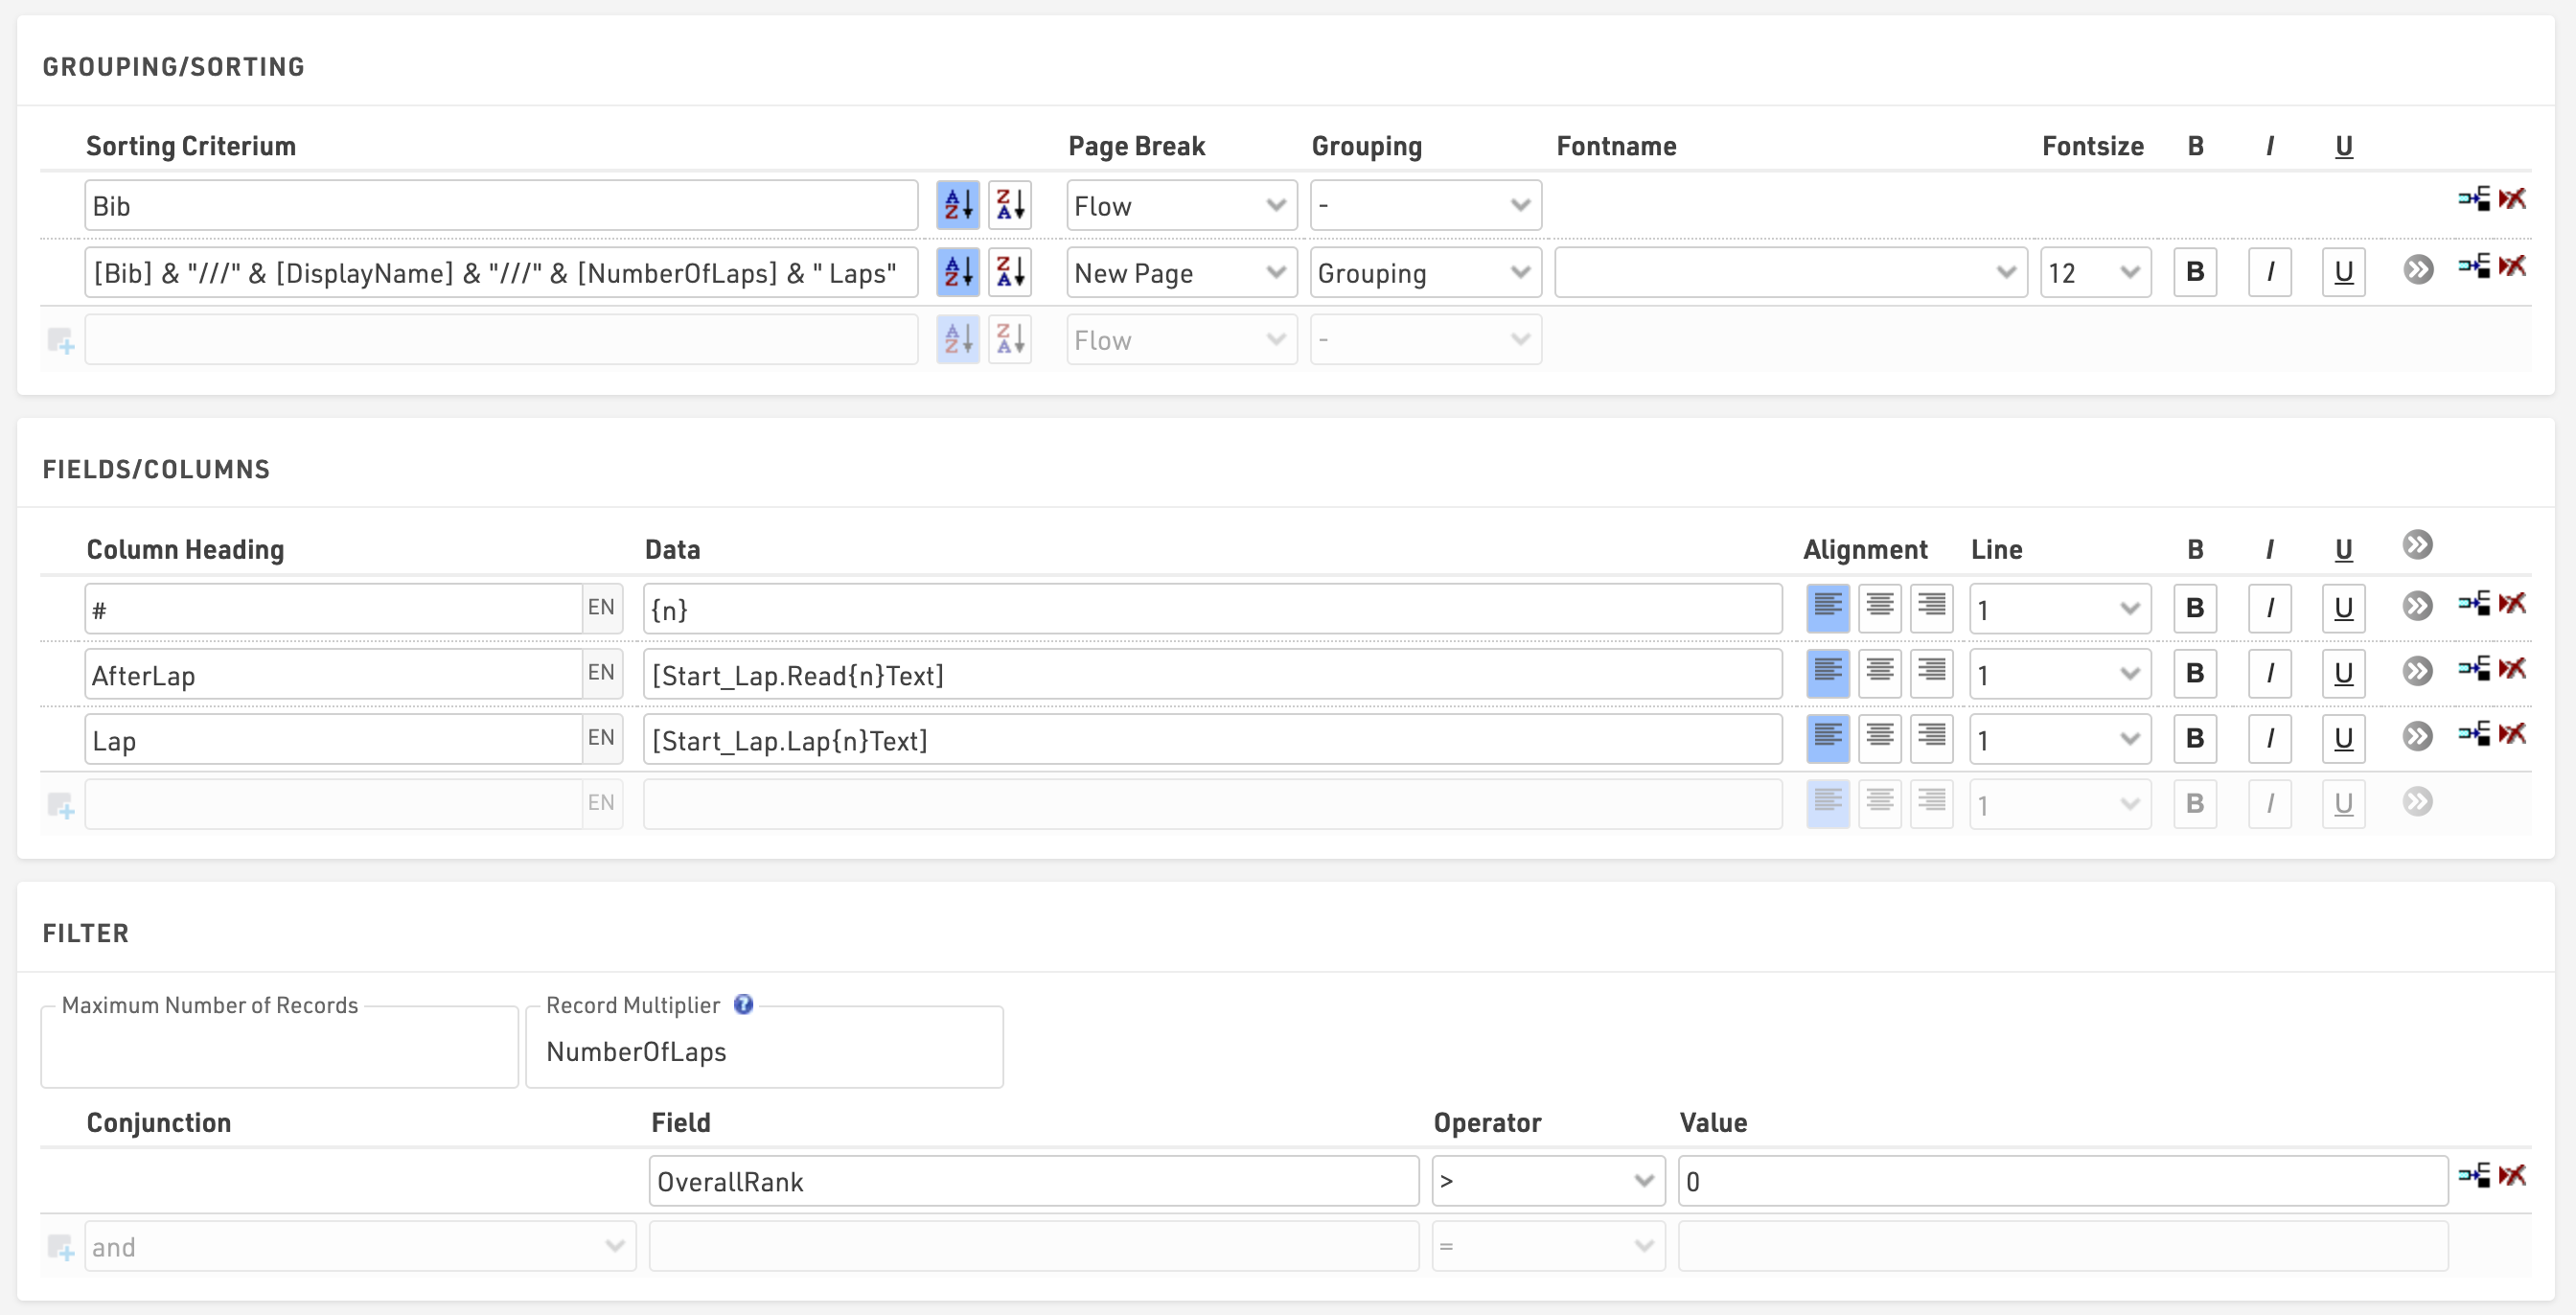
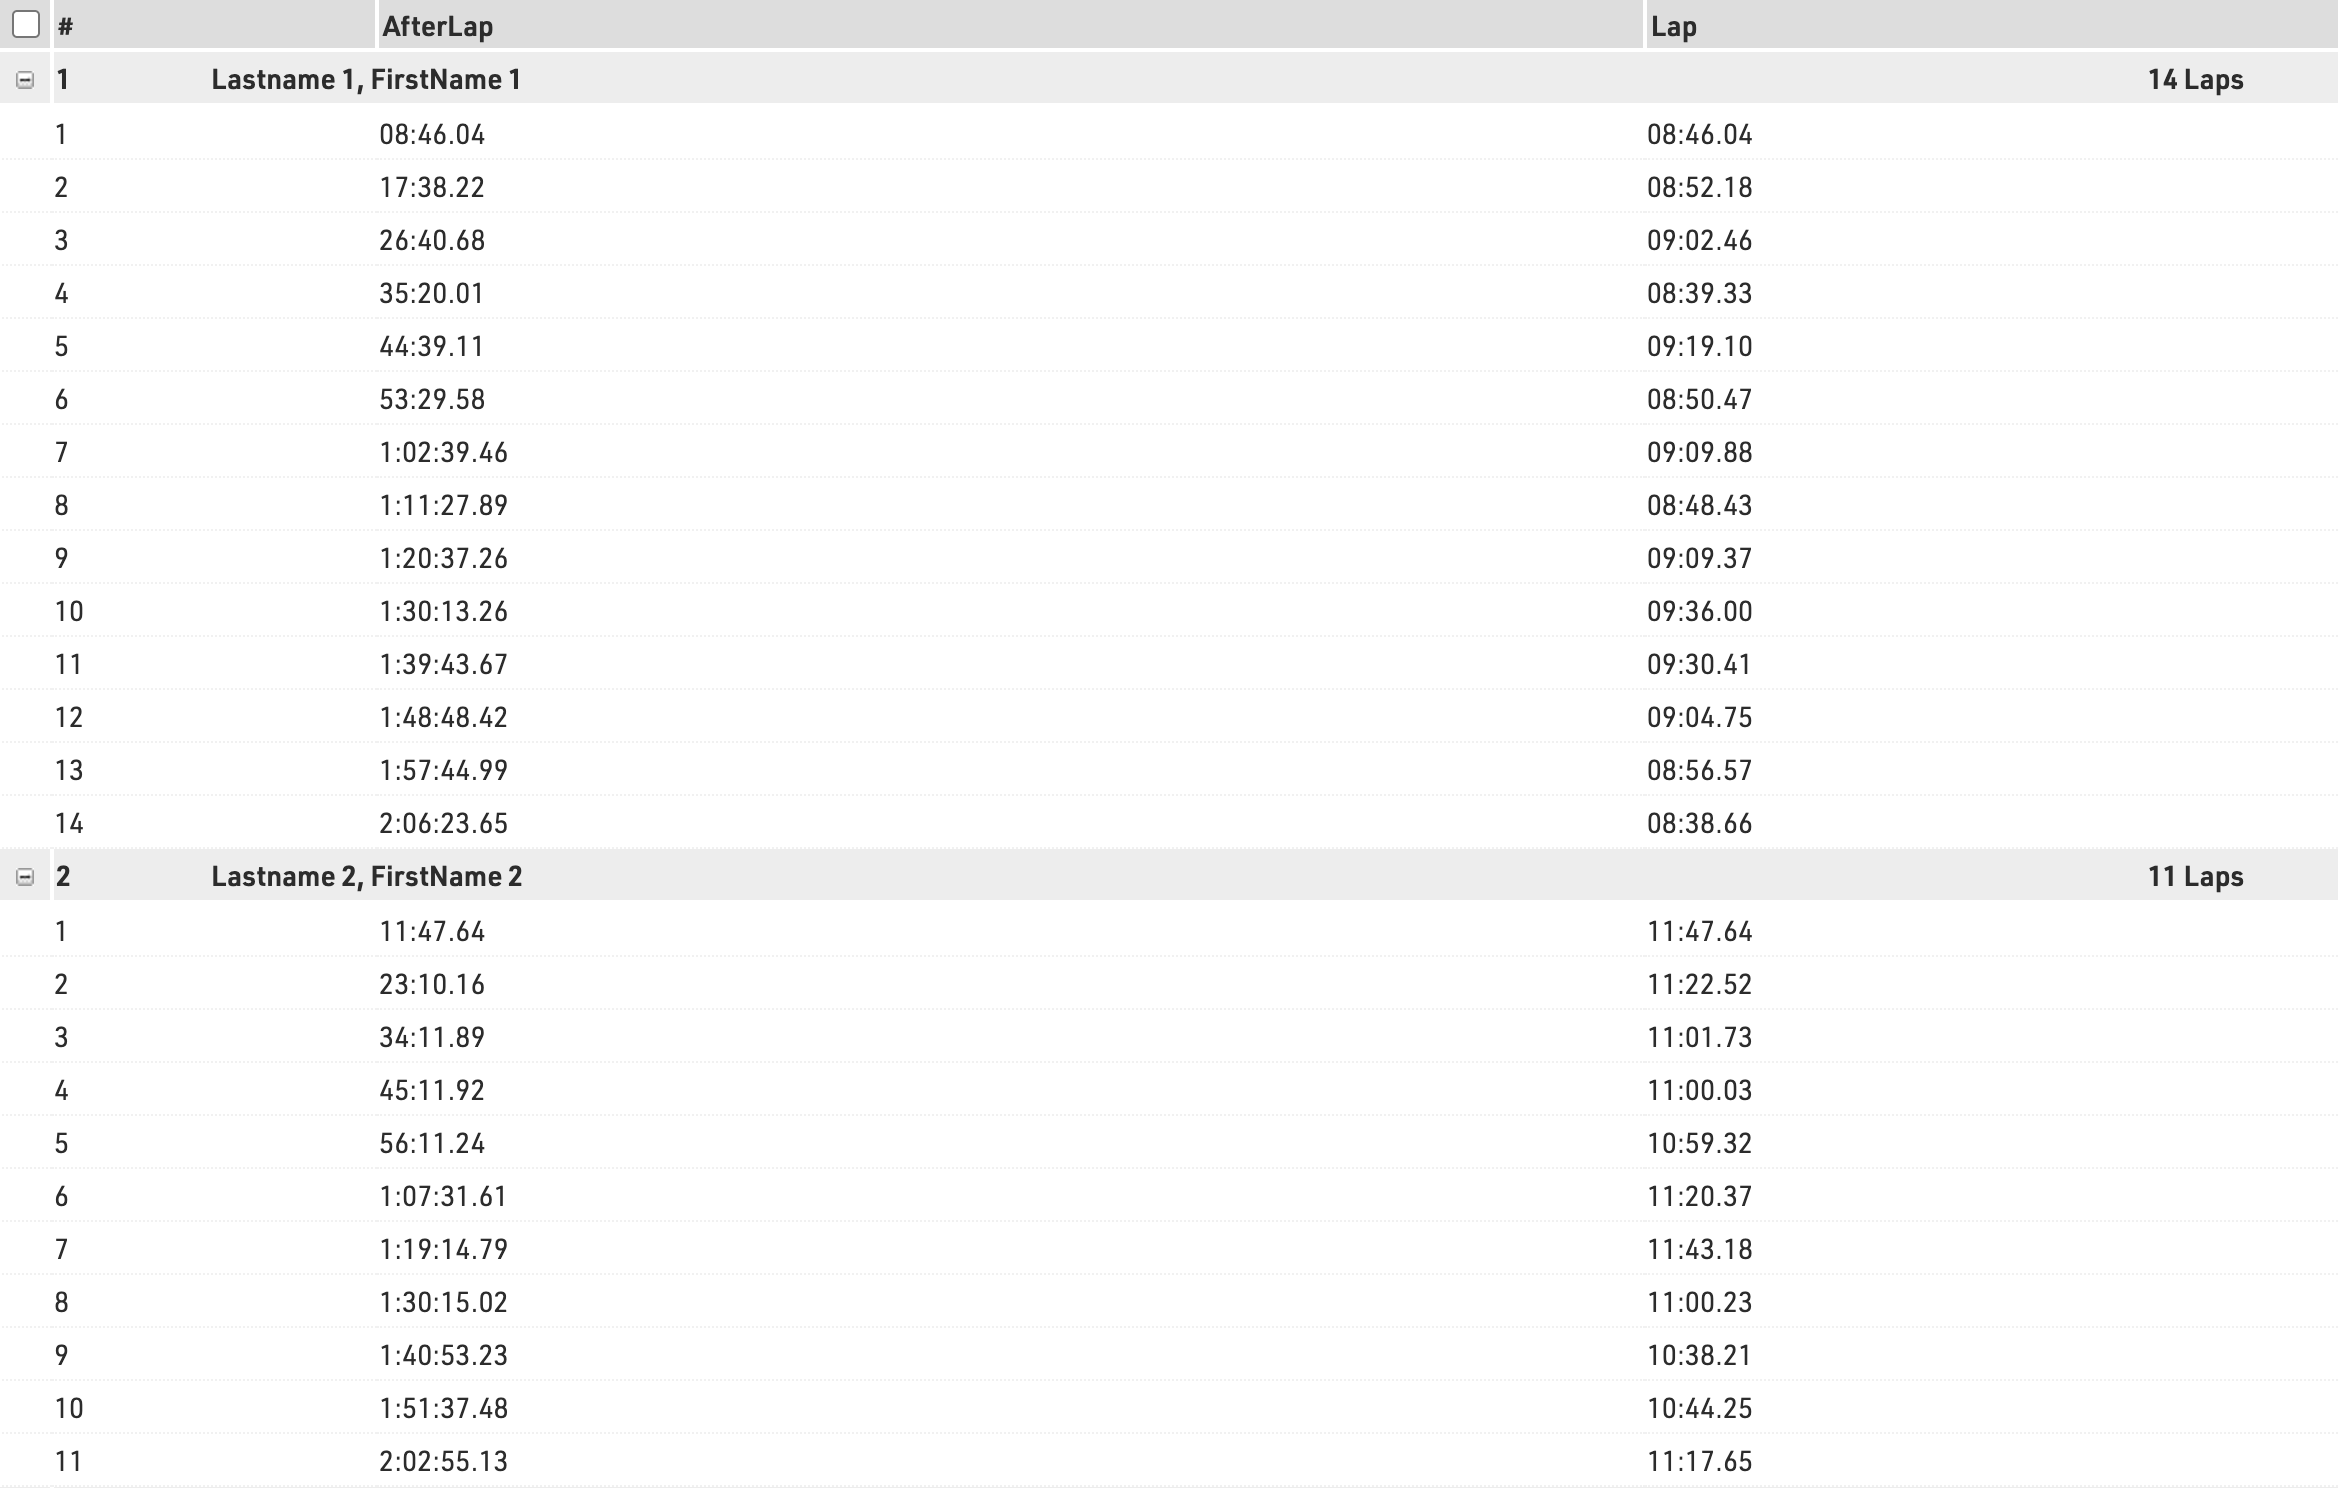
The Lap Details list displays the information of each lap of each participant, by using the advanced Record Multiplier. In the Record Multiplier field, the special result NumberOfLaps will define for each participant {n} lines matching the NumberOfLaps completed by each participant.
{n} will then trigger the calculation of the AfterLap and the Lap time for each lap.
This list will be accessible on my.raceresult.com, as a detailed list of the Final output published under the Result Tab, for each participant when clicking on the participant's name.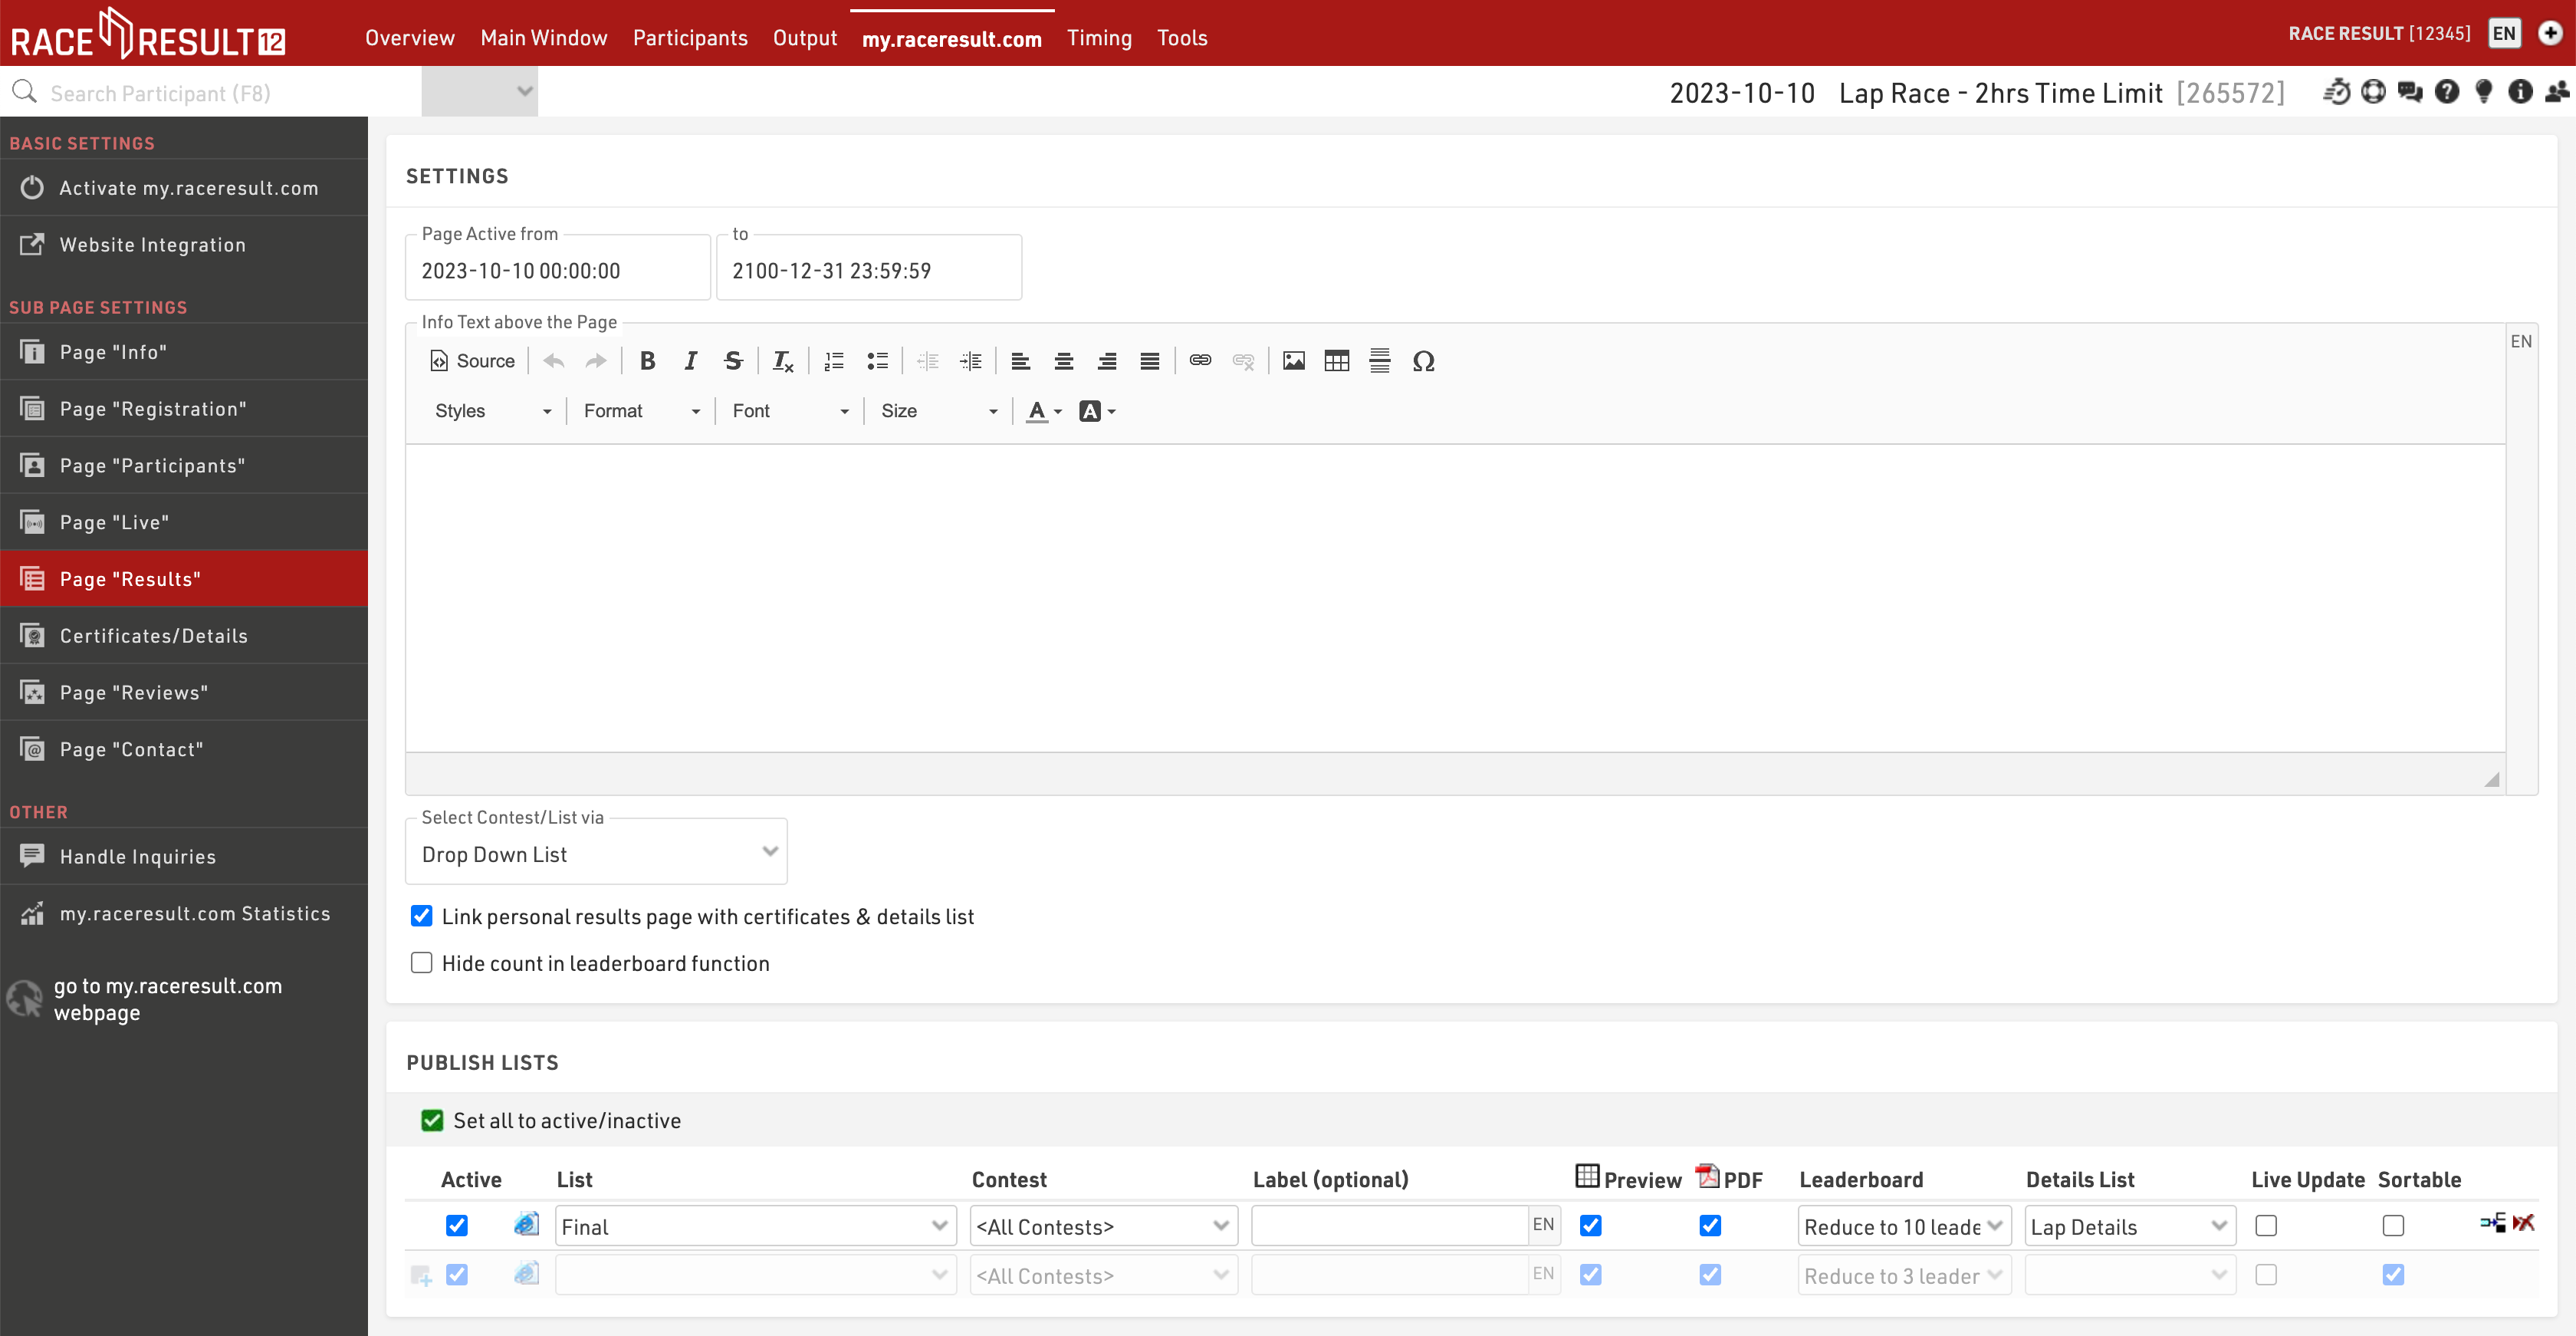
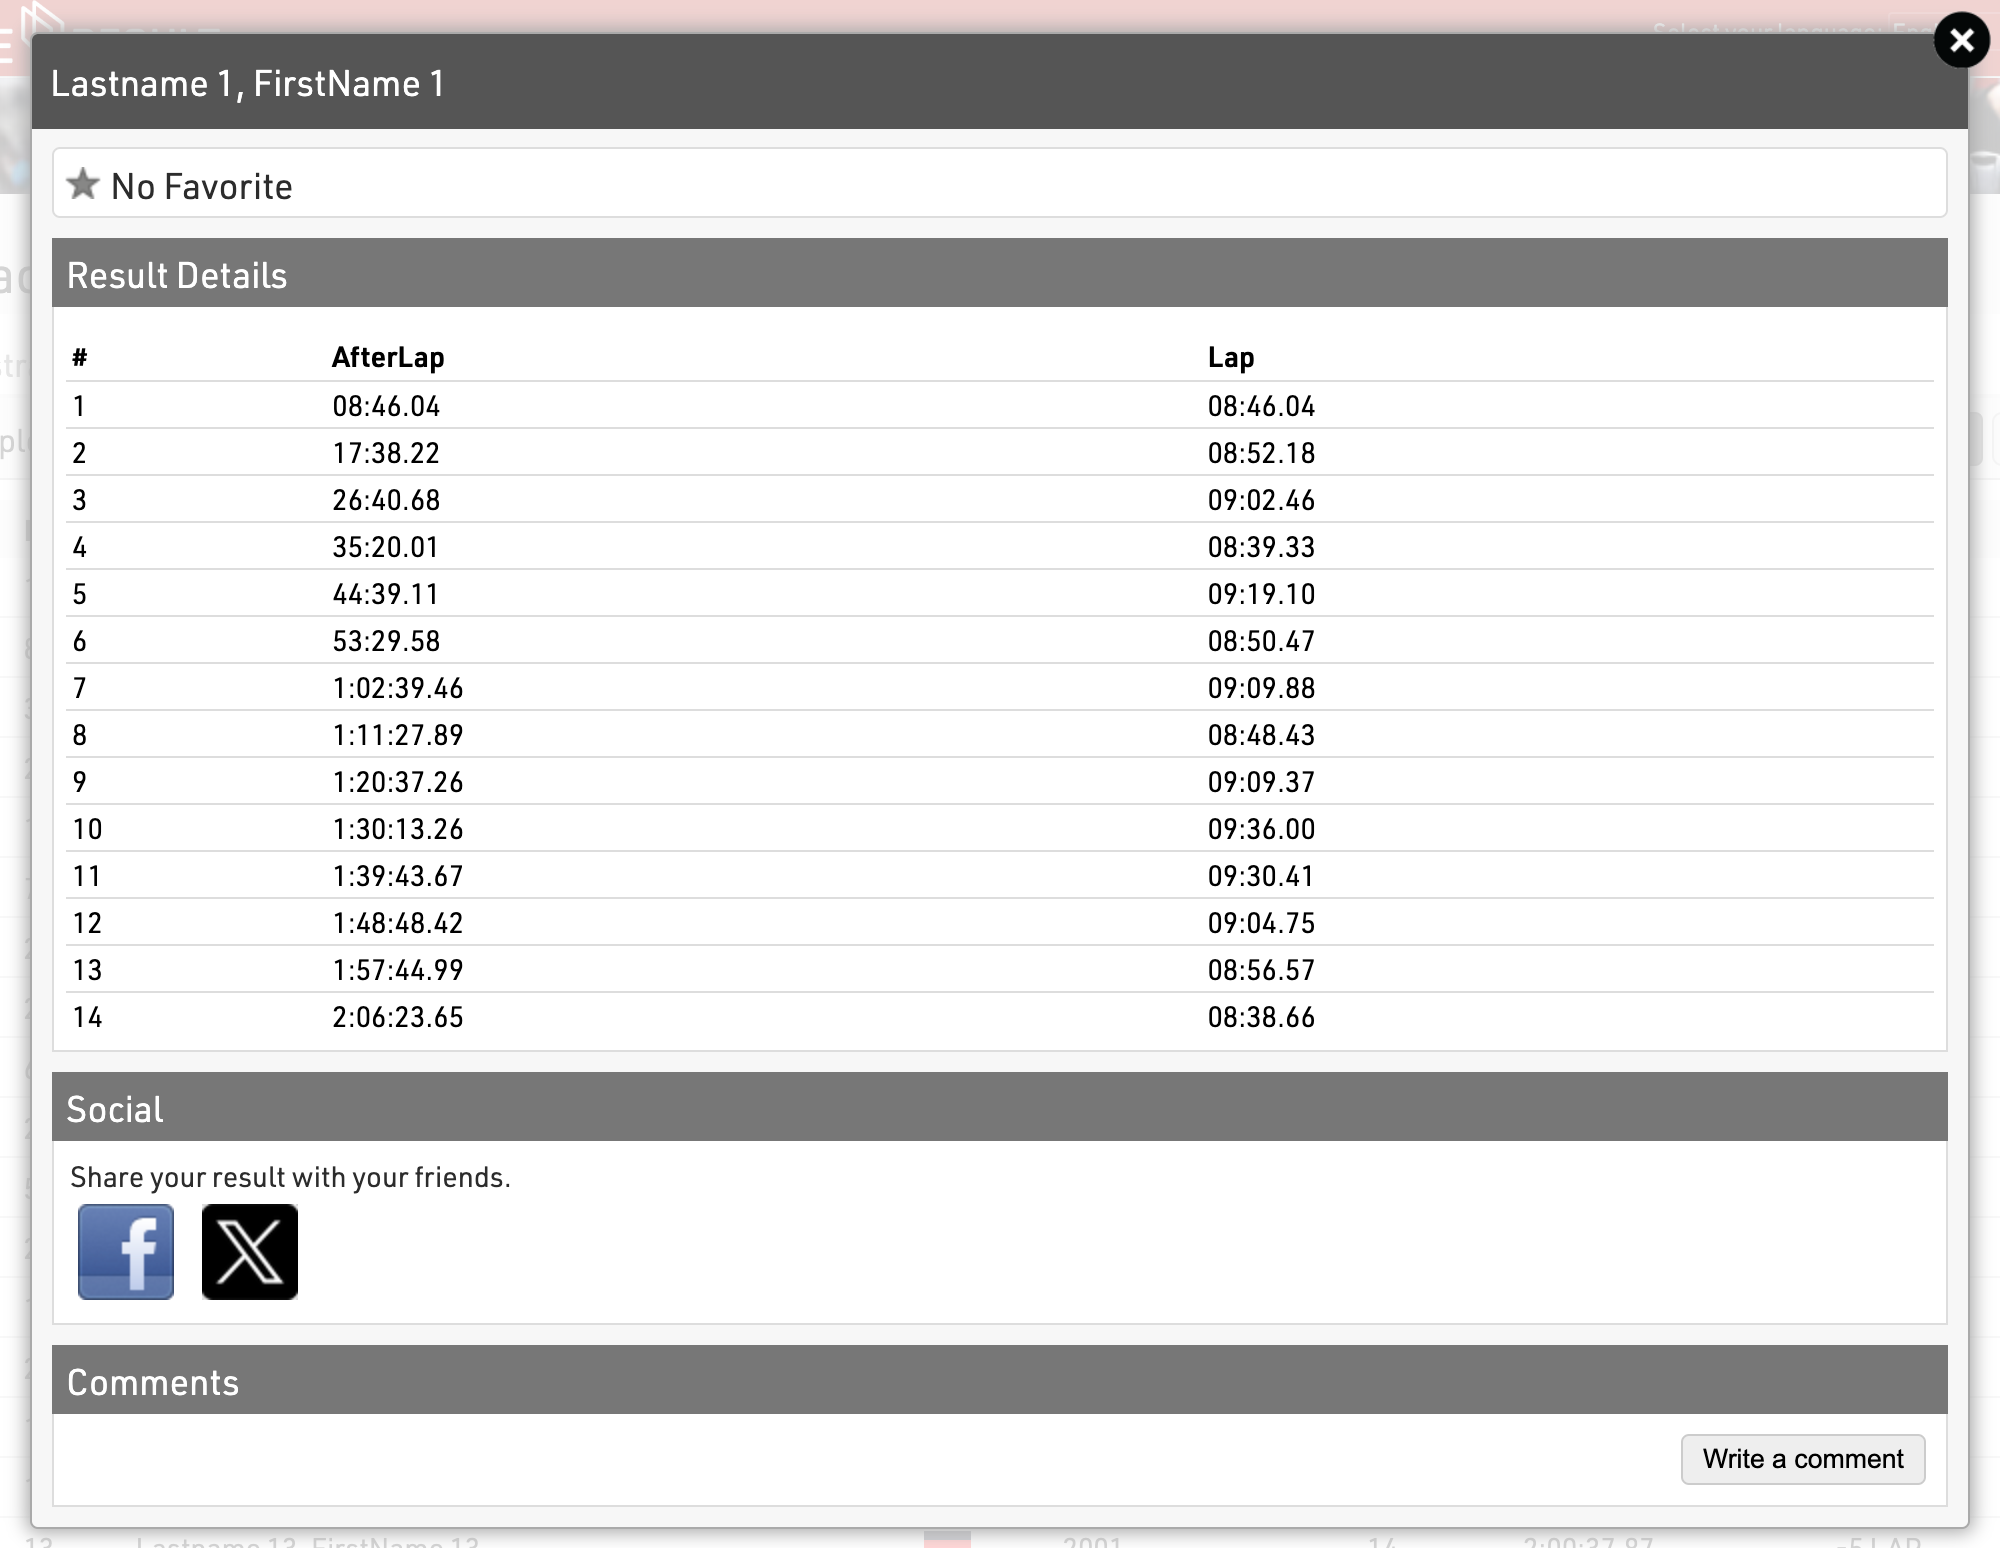
Stage Race - Simple
This is a simple setup to show the core concepts required in order to time a stage race or series race with all races setup in the same event file.
This event consists of 3 stages which all contribute to an overall tour rank based on the sum of times from each stage. There is also a team element, with teams scored on the best 2 times for each stage, to be considered for the team time for a stage a participant must have completed each previous stage as well.
Each stage is only scored on gun time.
All participants are entered in to a single Contest.
Timing Points
A unique timing point is created for each stage finish, since we are only scoring based on gun time for each stage.

Subtract start time (T0) is unticked, since we will not be referecing or using T0 at all in this setup.
Results
We'll first look at the individual results required for each stage and the overall tour.
Stage Results
To make results easier to understand we create distinct blocks of results for each stage, and use a specific Result ID range for each block.

We use results blocks of 100 for each stage (Stage 1 = 100-199, Stage 2 = 200-299, Stage 3 =300-399)
For each stage we create a result for:
- A start time as a time of day, ID X01
- A finish detection as a minimum after the start time of day, ID X02
- A calculated stage time as the finish detection minus the start time, ID X00
By following this pattern across all stages it makes later setup easier since IDs all follow the same pattern.
Tour Results
We need to know the total time at the end of each stage, for this we create a block of results with the total time at the end of each stage.

The time after stage 1 is simply the stage 1 time, subsequent stages are calculated as the time at the end of the previous stage plus the stage time. In this way a rider must complete each stage in order to have a total time. If we were to use a TTSum() to add stage times together then somebody who only completed 2 stages would still have a tour time and is likely to have a faster time than those who did complete all 3 stages.
Rankings
Individual rankings are setup for each stage, with both overall and gender ranks, then additional for the tour after each stage as both overall and gender ranks.

Team Scores
In this setup each team has 3 members, using the club field to denote who should be in the same team.
For each stage the best 2 times from the team are used to calculate the team's stage time, and then a team tour time / rank is also calculated for each stage. For the tour time / ranking a team member must have competed in each previous stage to be considered.
We created 2 team scores for each stage, the first calculates the teams' stage time, and the second is used to rank teams with their tour time.
Team Stage Time
For team scores we follow the same ID grouping to identify each stage.
The filter is set that they must have a club and must also have a total time after the corresponding stage, since we calculated this so they will only have a total time if they have completed each stage this filters as such too. For example bib 1 completed stages 1 and 3, but because they did not complete stage 2 they are not counted for the team's stage 3 time.
The Max number of teams is set to 1 and show part. w/o time this ensures that all team members with the same club are grouped together, and all receive the team time / rank.
For number of participants the min and max are both set to 2, since we are only considering the best 2 times from each team.

Teams are formed based on Contest and Club, and grouped according to Contest, since this setup only uses a single Contest and does not use any gender specific teams.
The results use the sum of each participant's Stage 1 time, and teams are sorted with times ascending.

Team Tour Time
To ensure we have the tour time for each team member we first call each stage time in to a result for eligble participants. To make this simpler we created a user-defined function called IfPositive(x)

This will check if X is greater than zero and if it is, will return X.
In the results for each stage we used this to call each team stage time.

The total time after each stage is then calculated in the same way as the individual totals, with a new block of results adding each team stage time individually.

To now rank teams according to their total time after each stage we create a second team score for each stage.This uses the same basic settings, aggregation and grouping, but the number of participants is set to a min / max of 1. Since all team members will have the team total time in their results we only need to look at one team member for each.
Since we are only looking at 1 participant to get the time we simply take the sum of the TeamAfterStage time, with times sorted ascending.

Output Lists
We needed to create output lists for both stage results and the overall tour results, and again for individuals and teams. Here we show 2 different approaches to producing lists, each with their own advantages / disadvantages. Some balance could be found between the 2 types, for example using a gender filter and autorank in the detailed results.
Quick Setup
The quick setup lists make use of the Results Selector which creates an additional drop down to select which result we want to look at. The selector allows for the quickest setup of a single output list to show different results in a single list, also making for a simpler online results setup. It is however limited without creating some advanced formulas, these are used briefly in the team quick results.
The selector calls the relevant stage time, or team stage time with the corresponding label and AutoRank is used to display the stage rank.

For individual results we also apply a filter to the Gender, allowing to quickly see gender specific results, or an overall result.

Team results have an additional filter to only show 1 record per team filtering by team score position is equal to 1. However as we need to look at a different team score depending on the selector we use a function here to take the ID of the selected result to calculate which team score to reference.
This is simplest in the Team Tour Results where the selector looks at results 21-23, so we use a choose() function with [SelectorID]-20, which will return 1,2 or 3, to return the corresponding stage team score.

Detailed Setup
The detailed results includes a more thorough breakdown, with this setup we had to create separate overall / gender outputs for individual results, for each stage.
The breakdown outputs use the ranks which were setup for each stage, so ensures that the rank displayed is correct. This becomes particularly import with more complex stage races which may have more advanced requirements for ranks.
By using a specific list for each display needed we can more easily include additional fields such as gaptime() which rely on a result ID and rank ID, which could otherwise only be shown with a more complex formula.
For team stage results we apply a grouping for each team to show each eligible team member who finished the stage, here we also highlight the team members who were used for scoring. To do this we use a simple IF statement looking at TSx.Scored which is true if their time was used for the team calculation.

Within the tour results we're also able to show the time for each stage up to and including that point in time, making for a more detailed breakdown of each team's time.
Stage Race / Series Considerations
This setup is a simple example to show the principles of how to setup a stage race or series in a single event file. When dealing with such events there may be a number of other aspects to consider, these include;
- different start waves for each stage
- bunch time calculations (for cycling)
- age group calculations
- penalties / bonuses
- points per stage / total
- subtract start date (requires use of d:hh:mm:ss for stage start times)
The same concept can be applied to all of these but the complexity can increase exponentially with such races.
MTB Downhill Enduro - 7 Stages
Introduction
In this guide we explain how a MTB Downhill Enduro event could be managed using RACE RESULT 12, providing timing, scoring and live results presentation.
For this example, the event consists of 7 stages, spread over two consecutive days. For each day there is an initial start which is later used to calculate a total sector time for the first stage of each day.
In this example, an Ubidium System is used for each stage Start and Finish to provide live results. A similar setup could be achieved using Loop Boxes in Store Mode for the stage starts, this would not impact the results setup but would limit the live results.
Day 1 - Stages 1, 2 and 3
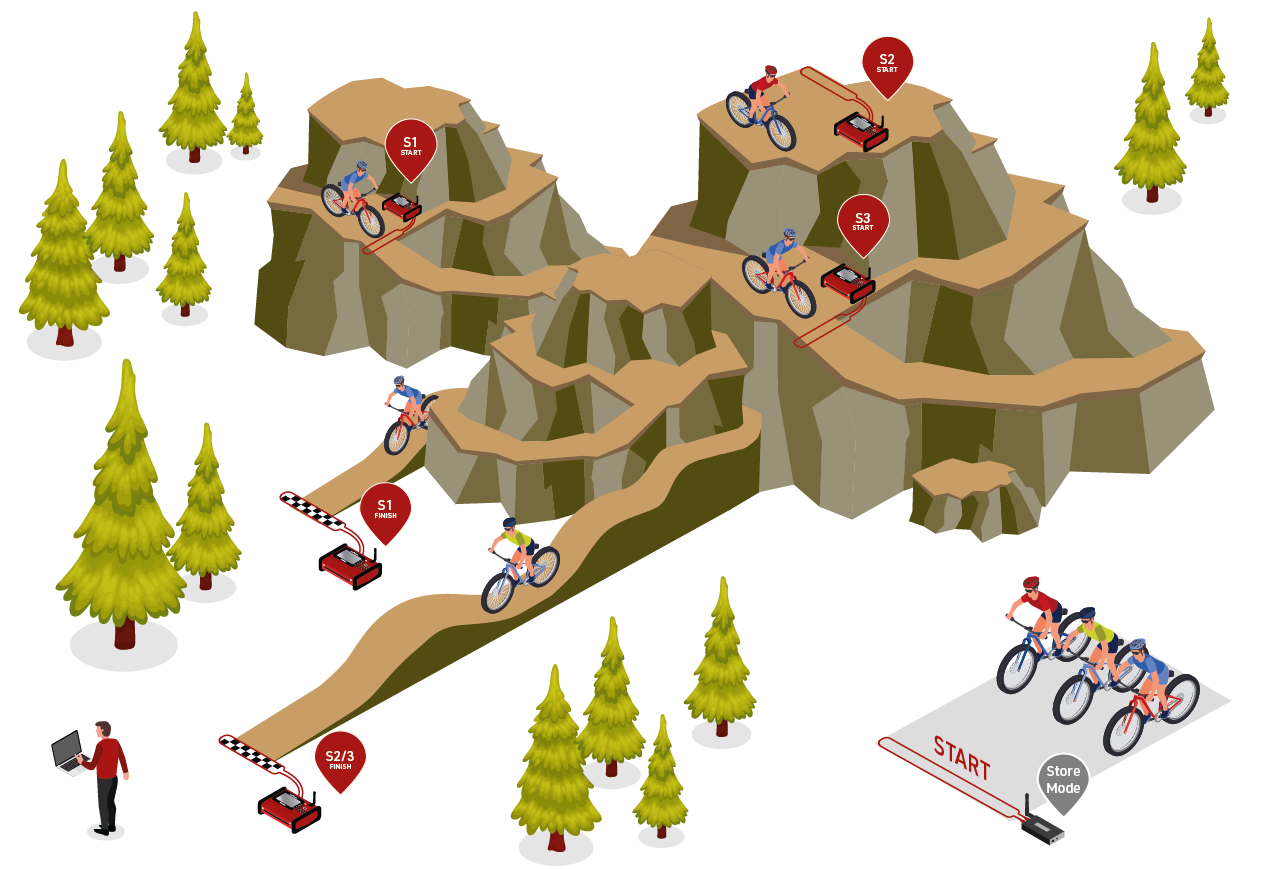
Day 2 - Stage 4, 5, 6 and 7
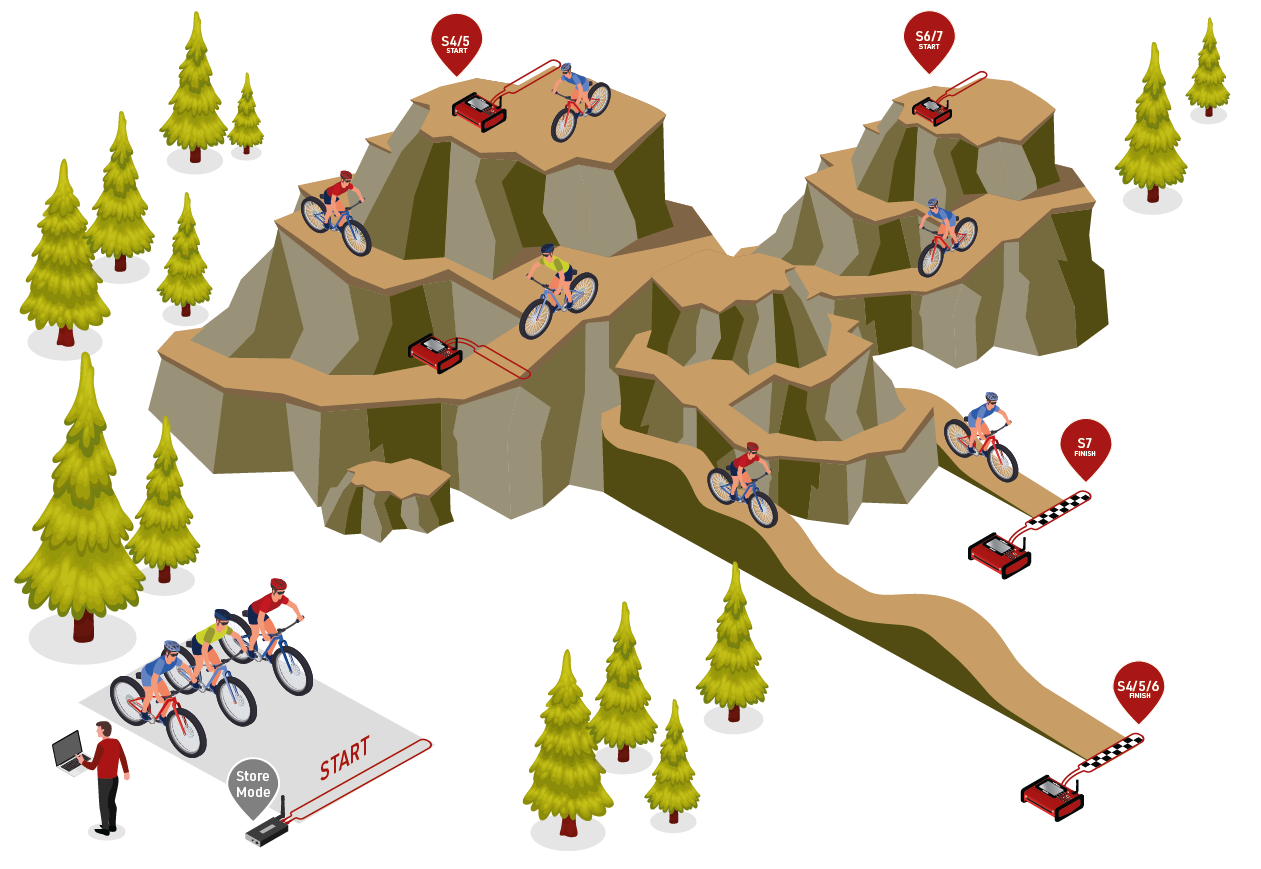
Semi-Permanent Events
This chapter is currently only available in German. The English version will follow soon.
Points Calculations
There are various ways to calculate points in races which may be used as part of a series, team scores or other special requirements, below are a few of the most common ways to calculate points in RACE RESULT 12.
Note that these examples only show the calculations which can be used, it may be necessary to apply additional filters (using If() or Switch() statements) to only assign points to participants who are finished or have a Rank>0 since they may still return a positive value otherwise.
Points = Rank
The most simple method is when the points equal the rank.
For example 1st place gets 1 point, 100th place gets 100 points.
To assign points in this way simply call the corresponding Rank field directly in to a result, you may wish to create a special rank for this which filters only elligible athletes.

Points = Inverted Rank
Commonly points are also assigned according to the number of athletes who finished a race.
For example, 367 males Finished, the 1st male gets 367 points and the 367th male gets 1 point.
To assign points in this way we write a short calculation in a result using the MaxRank and Rank fields.
([MaxRankX]+1)-[RankX]
The +1 is necessary to balance the equation, since otherwise the points would always be 1 less, first place would get MaxRankX-1 and last place would get 0 points.

Points At Fixed Interval
Points may be assigned that first place receives a certain value and each rank thereafter reduces by a fixed value. This can be done with a simple calculation. In this example, first place according to the Gender rank gets 1000 points, and each rank thereafter receives 10 points less (2nd = 990, 3rd = 980, 4th = 970...).
1000-(([GenderRank]-1)*10)
The starting value is defined as 1000, and we must in this case subtract 1 from the Rank to ensure that the assignment correlates correctly with our deduction as 10.

Simple Points Table
In some races points may be assigned specially to the Top X finishers, with all other finishers receiving a nominal value of points. This is done with another calculation but this time also using our Choose() function which returns a value according to their rank.
In this example 1st place according to the Gender rank gets 15 points, 2nd = 13, 3rd = 11, 4th = 9, 5th = 7 and all other finishers get 5 points.
Switch([GenderRank]<=5;Choose([GenderRank];15;13;11;9;7);[GenderRank]>0;5)
Our switch first checks if they have a GenderRank less than or equal to 5, if true then assigns the corresponding points using the Choose() function, next we check if their GenderRank is greater than 0 and if true assign 5 points.

Complex Points Table
In the event that points cannot be calculated or assigned with a simple calculation then you can create a points table in the Results to assign points accordingly. To do this we need to select the hand icon to open the calculation window and select Table.
Each table can have up to 4 indexes, these are the values which the calculation looks up in the table to assign the points, for example Rank and Gender. Note that since Indexes must be numerical it is necessary to convert our Gender to a number here.
This example assigns a points according to the GenderRank (Index 1) and Gender (Index 2, male = 1 / female = 2) , the points assigned reduce randomly.

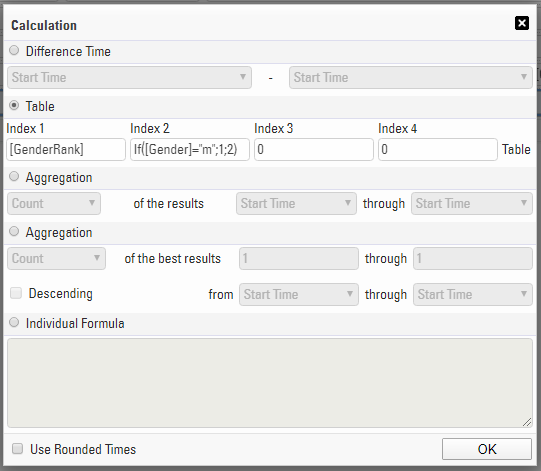
First assigned the Indexes which should be referenced, clicking Table bring up the index table where you can assign the index values and points value which should be returned. This can be imported from a standard excel file.
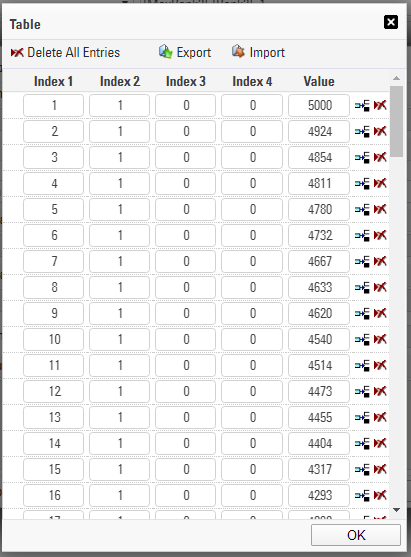
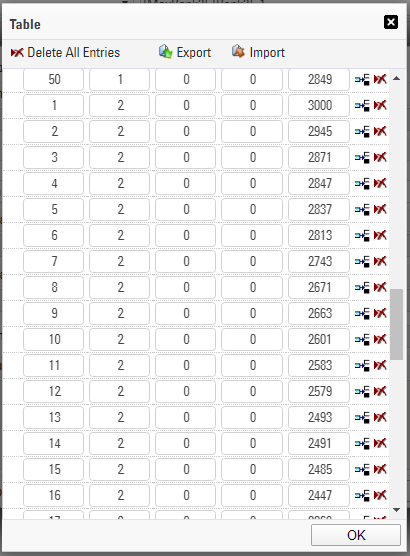
We can see that when Index 1 = 1 and Index 2 = 1 (GenderRank = 1 and Gender = Male) then 5000 points are assigned, down to Index 1 = 50 gets 2849 points. Moving to Index 2 = 2 then GenderRank = 1 gets 3000 points and so on.
Timing a Time Trial Race
Time Trials are a common race format in which participants start individually at different times, rather than all at once. These events require a different timing setup than mass start races, and RACE RESULT 12 offers two main approaches to handle them: using Splits or using Special Results.
While both methods ultimately give you each participant’s net time, the way they handle start times differs significantly. Choosing the right method depends mostly on how your event is structured — whether you have scheduled start times, use a light barrier, or simply let participants start freely, one by one.
To help you get started, a sample event file demonstrating both methods is available for download at the bottom of this article.
When to Use Splits vs. Special Results
The simplest and fastest method is to use Splits. This setup is ideal if participants start at their own discretion, and you're using chip detections to mark both the start and the finish. It’s quick to set up and works well in informal or smaller-scale time trials.
However, if your event requires precise control over start times — for example, if each participant has a scheduled start time, or you’re using a light barrier or a manual trigger at the start — then you’ll need to use Special Results. This method gives you much more flexibility and accuracy but involves a slightly more advanced setup.
Link to Finisher Video
It is possible to link your results page or details list to a finisher video showing each participant crossing the line, this example links to YouTube however the same principals may be applied to other hosting sites or even static photo sites.
Videos can be shot on any standard video camera, GoPros are a popular choice due to their versatility. Once the race is finished, it's a good idea to crop the video down, you'll want a bit of time (around 15 seconds or more depending on your finish setup) before the first finisher crosses the line.
The link for each participant contains three parts; the base URL, the VideoCode (a unique identifier for each video) and the playback controls which determine at what point the video should start playing from, when it should end and whether it should automatically play once loaded.
e.g. https://www.youtube-nocookie.com/embed/hZCHKy0ESPU?start=0&end=14&autoplay=1
links to Video hZCHKy0ESPU, starts automatically playing at 0 seconds and will automatically stop at 14 seconds.
(Our knowledge base uses 'www.youtube-nocookie.com' by default, which you use is up to you as both work the same)
In order to form this URL we first need to calculate the time difference between each participant and the first person to cross the finish line (based purely on finish order / time of day).
To do this it is useful to first call the Finish Time of Day in to a unique result, either using [SplitName.TOD.Decimal] or you may need to use Tx+T0.

We also need to Rank all participants according to this Finish time of day, this is done with a specific rank which has no grouping and sorts according to our result or split.

With these we can now calculate the gap time for each participant, there are a number of ways this can be calculated but using the GapTimeTop() Function is most simple. In this case we use GapTimeTop(1;4;0;"s") since the first participant should have a gap of 0 and the gap should be in seconds.
We also want to know the time in the video at which the first finisher crosses the line, or when their video should end, this is simply entered as a value in seconds.
These values are used to calculate the end time for each participant, so the video stops once they have finished.

We can now form the URL, this is done using 2 User-Defined fields so that the template can be copied across and have just the VideoCode updated rather than the full URL.

VideoLink: "https://www.youtube-nocookie.com/embed/" & [VideoCode] & "?start=" & Val([VideoOffset]-14) & "&end=" & [VideoOffset] & "&autoplay=1"
Note that the start must never be negative otherwise the video will fail to play automatically.
Now our VideoLink is calculated we can link this in an output list, this example has the video linked as part of the details window but it can be linked to any output or even under the Links in my.raceresult.com Certificates/Details
It's nice to use an image as a link rather than show the full URL, so in your output first insert an image, we use a png of the YouTube logo which has a transparent background.

Bring up the additional field details by clicking the grey arrows to the right side and in the HTML Link as Expression field enter our User-Defined Field [VideoLink].
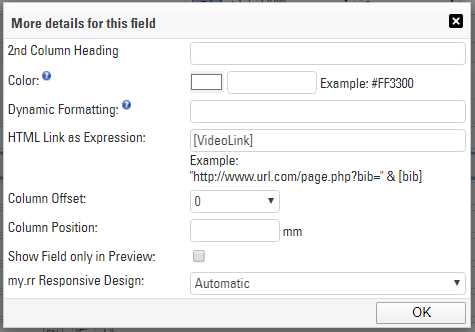
The image will now be a clickable link in the output list whichw will take you directly to the finisher video for the corresponding participant.
Fitness Race
The example file is at the bottom of this article!
Fitness races are becoming increasingly popular. They combine endurance and strength activities where participants alternate running legs with activity zones — for example, a format with eight running sections and eight workout activities.
This article explains a simple approach to setting up such an event using the Splits function in RACE RESULT 14.
Event Concept
In this example event file, four timing points are used:
- START
- IN_ZONE
- OUT_ZONE
- FINISH
Participants start the race, run 1 km, enter the IN_ZONE to perform the first activity, and exit via OUT_ZONE to begin the next running segment.
This pattern repeats until the final activity, after which competitors go directly to the FINISH, skipping the OUT_ZONE.
Splits Setup
The entire event is structured using the Splits table.
Each row defines either a running segment or an activity. Running legs are measured by distance (e.g., 1 km), while activities are time-based and use the “Other” sport type.
The Label field is used to name each split — for example, 1KM Running, 1000m SkiErg, or 50m Sled Push.
These labels can then be shown on the LIVE list, so spectators can follow which part of the race each participant is currently in.
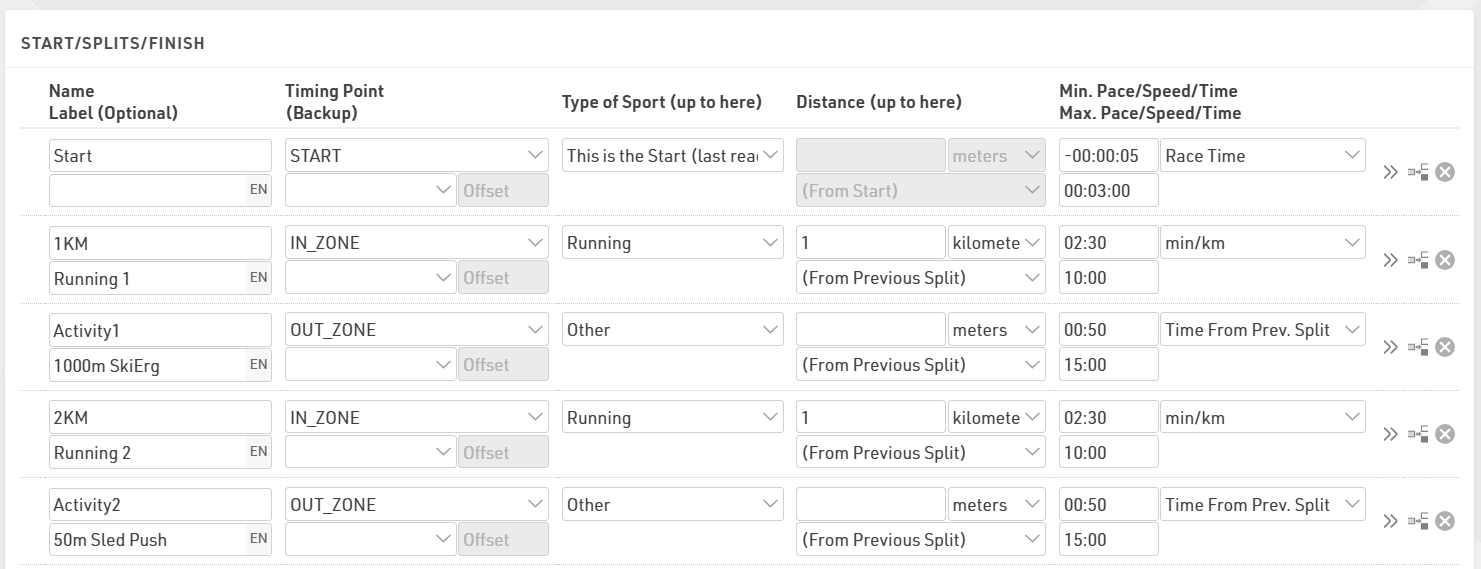
In this example, the event is set for a single contest (Race 1) with the Start split open for 3 minutes. All participants must cross the start line within this time window from the official race start (T0).
When working with multiple start groups, there are two different approaches depending on the structure of the event:
- Different race categories - Create separate Contests
For example, if your event has Elite Men, Elite Women, and Open divisions running independently, each category should have its own contest. This ensures separate rankings, timing logic, and results.
- Multiple start waves within the same category - Use Wave Starts
If participants in the same category simply start in several waves — for instance due to capacity limits or flow — you can use Wave Starts and assign participants based on their wave field. Waves allow staggered starts while still keeping the group ranked together in one contest.
Displaying Participant Progress
To make the LIVE view more interactive, a User Defined Function (UDF) is used to display a progress bar indicating how far a participant has advanced through the course.
The function, called ProgressBar(x), uses the number of completed splits {Selector}.SplitCount to determine progress:
choose(([x]-1)\2+1;
"□□□□□□□□"; "■□□□□□□□"; "■■□□□□□□"; "■■■□□□□□"; "■■■■□□□□"; "■■■■■□□□"; "■■■■■■□□"; "■■■■■■■□"; "■■■■■■■■")
Each full square (■) corresponds to the completion of an activity section. As participants complete runs and activities, the bar fills up, giving a clear visual overview of their progress.

Optional Improvements
This example keeps the setup simple, but it can easily be expanded.
For more detailed timing, you can add dedicated IN/OUT timing points for each activity to capture the exact time spent inside each station, rather than combining the short running transition.
Since these events typically attract large participation numbers, it’s strongly recommended to use a Check-In Kiosk. This helps efficiently manage and recycle transponders by reassigning them to new participants as soon as previous participants finish their race.
The event template attached already includes a Check-In Kiosk setup configured for this purpose. The kiosk uses Transponder Assign mode: Delete Existing Assignment, meaning that when a transponder is assigned to a new participant, any previous assignment is automatically removed.
This ensures a smooth transponder-reuse workflow without manual intervention.
Release Notes
race|result 10
| race|result 10.0.6.134 (2011-08-31) | |
| - | SMS Sender: new transfer protocol for faster sending (thanks @Aaron Clarke) |
| - | Online Registration: optional text for after registration period (thanks @Jan Andersson) |
| - | Transponder Module: problem Ultra fixed (thanks @Aaron Clarke, Andreas Bär) |
| race|result 10.0.6.133 (2011-07-11) | |
| - | Transponder Module: connections keep connection numbers after closing connections (thanks @Jan Andersson) |
| - | Transponder Module: new connection type "RFID Ultra" (thanks @Andrew Peterson) |
| - | Rundenmodus: new fields LTTeamMinLap und LTTeamMaxLap (thanks @Andreas Bär) |
| race|result 10.0.6.129 (2011-06-08) | |
| - | Improvements in the Output Window |
| - | Transponder Module: issue with option "Ignore Times Before" fixed (thanks @Andreas Seeli) |
| - | SES Import: new option not to add participants (thanks @Armin Bär) |
| - | IOC Code for Serbia added (thanks @Mario Persch) |
| - | Issue with Online Forwarding after changing event password fixed (thanks @Wolfgang Kiefer) |
| - | Issue with Live Backup fixed (thanks @Guido Jansen, Dirk Schafmeister) |
| race|result 10.0.6.123 (2011-05-05) | |
| - | Transponder Module: new setting "Do not create new participants" (thanks @Andreas Bär) |
| - | Max. field length for entry fee setting "Multiply with" extended (thanks @Reinhard Standke) |
| - | Max. field length for age group names extended (thanks @Reinhard Standke) |
| race|result 10.0.6.116 (2011-04-10) | |
| - | Manual Timing: supports "TimeMachine" device (thanks @Chris Oroshiba) |
| race|result 10.0.6.114 (2011-03-31) | |
| - | New event type "Women's Run" with different header picture on Your-Sports.com (thanks @Hanno Maier and Torsten Beeth) |
| - | Issue with basic settings of online registration fixed (thanks @Hanno Maier) |
| race|result 10.0.6.113 (2011-03-22) | |
| - | Main Window: GUI bug in result table definition fixed (thanks @Clemens Herz) |
| - | Announcer: can show data dependant images now (thanks @Clemens Herz) |
| - | List: can show [ContestStart] in list/page header/footer now (thanks @Horst Stuhlweissenburg) |
| - | Transponder Module: shows additional status information for AMB P3 connections now (thanks @Hanno Maier) |
| - | Transponder Module: shows disconnected connections in red now (thanks @Hanno Maier) |
| - | Some issues concerning Google Chrome fixed (thanks @Jenna Ginsberg) |
race|result 11.0
| race|result 11.0.0.210 (2014-03-31) | |
| - | Minor bugs fixed |
| race|result 11.0.0.207 (2014-03-14) | |
| - | Main Window->Adapt Data redesigned |
| - | New Option: Ignore Bib Number Ranges |
| - | New fields Position1, Position2, .. for numbering on lists within groups |
| - | Team scores with lap mode: minimum lap time |
| - | Team scores with lap mode: ignroe times before/after |
| race|result 11.0.0.204 (2014-03-04) | |
| - | Minor bugs fixed |
| race|result 11.0.0.202 (2014-01-29) | |
| - | New web-based Designer |
| - | Transponder Module with new Simple Mode |
| - | Support of Time Zones |
| race|result 11.0.0.195 (2013-12-23) | |
| - | Participants Window->Results: Export times |
| - | Excel Import: import age |
| - | Transponder Module: Supporting RRS chip codes |
| - | Minor bugs fixed |
| race|result 11.0.0.194 (2013-12-04) | |
| - | Minor bugs fixed |
| race|result 11.0.0.192 (2013-10-29) | |
| - | Minor bugs fixed |
| race|result 11.0.0.191 (2013-10-11) | |
| - | Issue with checkin/out on hebrew computers fixed |
| race|result 11.0.0.187 (2013-10-01) | |
| - | race|result Webserver optimized |
| - | Minor bugs fixed |
| race|result 11.0.0.140 (2013-07-15) | |
| - | race|result Webserver optimized |
| - | Minor improvements, minor bugs fixed |
| race|result 11.0.0.121 (2013-05-11) | |
| - | Minor bugs fixed |
| race|result 11.0.0.114 (2013-04-25) | |
| - | race|result Webserver optimized |
| - | Minor bugs fixed |
| race|result 11.0.0.98 (2013-04-09) | |
| - | Some new functions in the Designer |
| - | Minor bugs fixed |
| race|result 11.0.0.97 (2013-03-26) | |
| - | Issues with SMS Sender fixed |
| race|result 11.0.0.93 (2013-03-22) | |
| - | Some minor issues fixed |
| race|result 11.0.0.90 (2013-03-08) | |
| - | Some issues with new CameraServer fixed |
| race|result 11.0.0.89 (2013-02-27) | |
| - | Online registration: refinements |
| - | Transponder Module: bug in wave starts fixed |
| race|result 11.0.0.88 (2013-08-02) | |
| - | New program "Camera Server" for race|result Camera |
| - | Transponder Module can show the finish line photo from the Camera Server |
| - | New fucntions: isUCICode, isNumeric, isAlpha |
| - | Online registration: many new special settings |
| race|result 11.0.0.86 (2013-01-14) | |
| - | my.raceresult.com: certificates can now be linked on participants lists |
| - | Choose between program languages in top right corner |
| - | Edit groups: rename, cover picture, etc. |
| - | Q&A in dock window on right side |
| - | Online registration: configuration pages redesigend |
| - | Online registration: new element <HTML Line> |
| - | Online registration: new special functions: password etnry, select value, propose values, email addresse |
| - | New access rights control: several users can now get access to an event file |
| race|result 11.0.0.85 (2013-01-03) | |
| - | GUI layout adapted according zu race|result CI |
| - | Chat/Help/Info area revised |
| - | Fields "NationFlag" and "CountryFlag" added |
| - | Field "BasicFee" added (basic entry fee without optional fees) |
| - | SES import: selection of contest extended to 1-100 |
| - | Manual Timing: optimization for ALGE devices |
| - | Online registration -> Form Fields -> Validation Rules |
| - | New GUI for publishing lists on my.raceresult.com |
| - | Transponder Module: Option "Ignore Times After" added |
| - | Transponder Module: new tab "Overview Contests" |
| - | my.raceresult.com: event groups introduced |
| race|result 11.0.0.79 (2012-12-12) | |
| - | Transpondel Module: GUI redesigned |
| - | Presenter: slide mode "Manual Scrolling/Sliding" for result terminals with touch screen |
| - | my.raceresult.com: you can publish any kind of links on the personal result page (will be shown below the certificates) |
| - | Online Registration: additional options for fields: color, background, format |
| race|result 11.0.0.77 (2012-11-28) | |
| - | Output Window: list of contestes fixed |
| - | Confirmation email of online registration: can now have attachments |
| race|result 11.0.0.76 (2012-11-21) | |
| - | Output Window: you can bring all lists by one click to alphabetic order |
| - | Output Window: you can define colors for the page head, page footer, column heads and grouping heads |
| - | Output Window: you can define the background color of grouping heads |
| - | Participants Window: automatic upper case for city entries |
| - | When file is being checked out, active users will be "kicked out" |
| - | Designer: ruler added |
| - | Designer: Cut, Copy, Paste added to menue |
| - | Designer: Undo of last operation |
| - | Designer: Elements in the background can be scaled |
| - | Designer: Rename/page settings redone |
| - | Offline mode: no facebook, no Google maps |
| race|result 11.0.0.73 (2012-11-01) | |
| - | Terminal: can show a preview of the certificate |
| race|result 11.0.0.71 (2012-10-18) | |
| - | Minor bugs fixed |
| race|result 11.0.0.62 (2012-10-09) | |
| - | Minor bugs fixed |
| race|result 11.0.0.61 (2012-08-31) | |
| - | Minor bugs fixed |
| race|result 11.0.0.58 (2012-08-02) | |
| - | Minor bugs fixed |
| race|result 11.0.0.52 (2012-07-03) | |
| - | Connection issues via port 1023 in American mobile connection fixed by using alternative port 10023 |
| race|result 11.0.0.51 (2012-06-29) | |
| - | Minor bugs fixed |
| race|result 11.0.0.50 (2012-06-05) | |
| - | Minor bugs fixed |
| race|result 11.0.0.49 (2012-04-30) | |
| - | Participants Window: edit participants in the list view |
| - | Main Window->Age Groups: many new function |
| - | Main WIndow->Event Settings: regional settings added |
| race|result 11.0.0.46 (2012-03-12) | |
| - | Clicking a record in a list in the Output Window opens the record in the Participants Window |
| - | Participants: optional entry by age (thanks @Mark Bockmann, Alain Ferry) |
| - | New functions in new support |
| - | Problem with online forwarding fixed |
| - | Confirmation mails on my.raceresult.com can contain HTML tags |
| race|result 11.0.0.45 (2012-03-05) | |
| - | New support center integrated into race|result 11 |
| race|result 11.0.0.44 (2012-02-29) | |
| - | Transponder Module: many new features |
| - | Participants Window: new list view |
| race|result 11.0.0.42 (2012-02-12) | |
| - | Wave start times introduced (thanks @many) |
| - | New time editing function in participants window (thanks @Andi Seeli) |
| - | AM/PM time formats added (thanks @Mark Bockmann) |
| - | Settings->Archives: all additional fields can be selected/deselected (thanks @Andreas Bär) |
| - | Participants Window: mandatory fields can be defined (thanks @Andreas Bär) |
| race|result 11.0.0.40 (2012-01-05) | |
| - | Minor bugs fixed |
| race|result 11.0.0.39 (2011-12-12) | |
| - | rebranding |
| RunManager 11.0.0.31 (2011-11-07) | |
| - | Some minor bugs in RM11 fixed |
| RunManager 11.0.0.22 (2011-10-21) | |
| - | New GUI |
race|result 11.1
race|result 11.2
race|result 11.3
race|result 11.4
RACE RESULT 12.0
RACE RESULT 12.1
RACE RESULT 12.2
RACE RESULT 12.3
RACE RESULT 12.4
RACE RESULT 12.5
RACE RESULT 14.0
News
2020-04-09: RACE RESULT Online Training
We recently launched our RACE RESULT Online Training, hosted every Friday, giving you the chance to improve your knowledge and skills. Read more about it here.
2020-04-12: Happy Easter!

2020-04-27: New "Additional Fields"
Today we released RACE RESULT version 12.1.2 with a groundbreaking new feature. Additional Fields will now replace ATFs, AYNs and AYNTFs, letting you define an unlimited number of additional data fields. All existing fields will be converted automatically to the new structure and can still be called in the same way as before.
2020-05-23: Online Registration Backend Update
On Monday, May 25, we will launch an update to our online registration backend. We do not expect any outages or downtimes. In case you find something not working, please let us know immediately on support@raceresult.com.
2020-05-27: Customizable Confirmation Page
We have recently added support for a customizable confirmation page after the Online Registration. You can now call fields to display such as the bib number of the participant. Please note, for Group Registrations it will only show data for the first participant (GroupRegPos = 1).
2020-09-10: Decoder GPS Module
As we see the return of events after a longer than usual break you may need to take some extra time to sync the GPS time of your decoders. Over such a long break the GPS module may have lost all data or the satellite data is no longer accurate and will need to fully resynchronize which may take longer than usual. If you use the GPS time, we suggest putting the decoder outside, under clear skies for at least one hour before you need it, ideally at least the day before the event.
2021-01-18: Virtual Timers Conference
Around the world - around the clock. This is the motto of our Virtual Timers Conference on February 26. Learn and discover more about RACE RESULT and exchange with colleagues.
Click here to find more information on the conference and register free of charge.
2021-01-22: Event Groups
We have restructured the event groups for events on my.raceresult.com. You will now find event groups in the start page of RACE RESULT 12. When in an event, just click the RACE RESULT 12 icon. In the left navigation bar, you will find Event Groups in the left hand menu.
2021-02-11: RACE RESULT 12.2
If parties were allowed, our software department would be celebrating now:
The Sports Event Server (SES) has been completely reprogrammed in the past few months and is now officially online! The SES is the compute engine that does all data processing in the background of all RACE RESULT events. The new server runs 10 times faster than the old one. Loading large / complex lists should work much faster.
At the same time, RACE RESULT 12.2 was officially published and is available for download now.
2021-03-30: New "powered by" Logo in embed
We have changed the style of the "powered by RACE RESULT" logo for the website integration of RACE RESULT 12 events. The logo now changes its color depending on the background. This also applies to all previous embeddings.
2021-04-04: Happy Easter!

2021-04-15: Online Training 2021
As part of the RACE RESULT Academy, we started a new series on free live webinars. The sessions cover different functions and features in RACE RESULT 12. We offer English webinars twice to cover all different time zones! A detailed schedule and the registration can be found here: https://my.raceresult.com/167431/.
2021-05-11: my.raceresult.com relaunch
We relaunched my.raceresult.com to improve the user experience for athletes and the service for timers. Major update are the new groups categories Race Organizers, Clubs, Series, Timers, Themes. Please check if your existing event groups are sorted correctly and improve them by uploading additional information and header pictures/logos.
More information can be found in this Knowledge Base article.
2021-06-07: New Decoder Firmware
With decoder firmware version 2.58 we are removing the option for TCP + HTTP upload and defaulting to TCP upload only.
If for any reason you use any connection method which relies solely on the HTTP upload (Transponder module, Connector or Deprecated Storage APIs) you will need to switch the decoder upload target to HTTP. Please note there should be no need to use any of these modules, the Timing tab within RACE RESULT 12 is always the best choice.
For full details see the firmware release notes: https://www.raceresult.com/fw/support/kb.php?id=23806-Version-258
2021-07-05: RACE RESULT Kiosks
The all new Checkin Kiosks provide a flexible solution for dynamic bib assignment and so much more! You'll find them under the Tools menu inside RACE RESULT 12.
Find out more about how they work and the flexibility they offer in the Knowledge Base
2021-10-18: Important software update
With version 12.3.17 we released an important update to RACE RESULT 12 which is required when timing online. You will need to run the RACE RESULT Webserver from this version (or newer) in order to connect to local systems in the Timing Tab. This replaces the Local Adapter although, for the time being, this will still be used for connecting to tools and when timing offline.
2021-11-30: Bye bye Instant Push
From December 1, 2021 Instant Push will be deprecated and no longer available. Instant Push used to allow you automated sending E-Mails, SMS or WebService calls triggered by raw data. This functionality has now been moved to the Exporters. Learn more about it here.
2023-01-21: New Online Training!
Have you seen the most recent update to our Academy page? Check out our new Online Training and take a look at the dates of our upcoming 2023 Training/Networking Sessions:
2023-03-04: New Presenter
This week we have launched the new tool Presenter which will replace the tools "Show Last Chip Read" and "Present Results" shortly. The new presenter contains the functionality of those tools but at the same time offers many more different display options and lets you customize the screen in various ways.
Learn more about it in our Knowledge Base.
2023-03-09: Chip Check moves to Presenter
After launching the new tool Presenter last week we continue developing. The tool Chip Check will also move to Presenter soon. The functionality remains the same, but as with Show Last Chip Reads and Present Results, the new Presenter offers various display options and lets you use all those tools much more flexible, and most importantly, without providing a login to RACE RESULT 12. All Presenters can be accessed by a fixed URL.
2023-07-07: New Default Language Field
As we are adding new functionality in to RACE RESULT 12 a new default field has been added to the database - Language. This is primarily used for E-mail / SMS Templates, which can now be multi-lingual. This does however mean that existing Additional Fields / User-Defined Fields using this name may not work as expected as the new field will take higher priority.
2023-07-24: Coming Soon - New Online Registration
On 1st August 2023 we will launch a new, updated online registration platform which brings new functionality and enhancements to give your participants an event better user experience. All events generated from this date will use the new platform automatically, any events created before this date (including those with active online registration) will be unaffected.
Get a preview of the new features in our Knowledge Base.
2023-08-01: New Online Registration Tool
As of today, the new registration forms tool is live. It's essential to know that nothing changes for events already set up, including those with active online registration. There's no action required on your part in such cases.
All newly created events will benefit from the advantages of the new registration process. You can find the new tool in RACE RESULT 12 under Main Window → Event → Registration Forms. Both individual and group registration templates have already been set up.
We have thoroughly documented the new features and settings in this Knowledge Base article.
If you copy old events for the new year, a conversion program in the background will try to convert your old registration into the new format. However, this is done without guarantee!
Please check all your forms for completeness and function before publication.
2023-08-11: New Splits Calculation Algorithm
As Splits are used in more events every week, we have refined the algorithm for how Splits are calculated. In your Splits setup you can choose between Version 1 or Version 2, which is now the default for newly created events.
The new algorithm is designed to offer better handling of missed detections and is explained in the following knowledge base article
Old events will not be changed to prevent impacting any old results.
2023-09-14: New Location for "Designer" Tool
With version v12.5.7-25, the "Designer" tool has been removed from the "Tools" tab. It can now be found under "Output → Certificates":

2023-09-22: Settings moved
- The setting "Chip reads after Finish Time Limit" has been moved from "Timing Points" to "Start Times / Finish Time Limit"
- The settings "Subtract start times (T0)" and "Ignore chip reads before start time (T0)" have been moved from "Timing Points" to "Results (Advanced)"
2023-09-25: Settings moved
- Main Window -> Bib Numbers has been integrated into Main Window -> Participants Data.
2023-10-11: Access rights
With today's update we slightly change the behavior of access rights when copying an event. From now on, all access rights will be copied together the event!
If you don't want the same user accounts to access the copied event file, please remove the access rights after copying the file.
2024-01-31: New WordPress Plugin for new registration
We updated the WordPress plugin for the website integration. Especially when using the new registration, please update the plugin in your WordPress page and use the updated Shortcodes. You'll find the plugin under "my.raceresult.com > Website Integration".
Alternatively, use the regular code snippet for your website integration.
2024-02-27: DIY-PayPal NVP API deprecated
For reliability reasons we disabled the old PayPal NVP API for all events with IDs higher than 278685. The NVP API was requiring a username, password and signature. In case you see an error when trying to checkout through your own PayPal account, please update to the ClientID and SecretKey. You will need to create these in your PayPal business settings.
2024-11-28: Discontinuation of Old Online Registration
One and a half years after we first introduced our new registration forms, the old online registration functionality will be disabled in the first week of January 2025. What does this mean? Events with an ID smaller than 255225 where registration should remain open need to switch to the new registration forms. The easiest way to do so is to copy the event. For assistance, please refer to the Knowledge Base: Registration Forms.
If you are using the deprecated [ChangeLink] please update your templates to work with the new ChangeLink().
For users of the deprecated [PaymentLink], please create a simple self service form to use together with the ChangeLink(). We put together a guide here: Sending a Payment Link with a Self Service Form.
2024-12-30: Categories for various settings
Today, we introduced categories, similar to those used in output lists and certificate sets, to other settings such as registration forms, email templates, certificates, labels, statistics, presenters, and Checkin-Kiosks.
Caution: Moving existing templates into newly created categories will change the underlying file name, which will affect pre-existing access URLs for registration forms, presenters, and Checkin-Kiosks as well as references for statistics or custom strings in Simple APIs.
2025-01-16: Two-Factor Authentication (2FA)
Today, we have introduced 2FA for access to your customer account. For now, 2FA is optional and needs to be enabled from your customer area. You can use any Authenticator App providing a Time-based one-time password (TOTP). 2FA helps protect you against unauthorised access to your event files and the associated data.
Third-party platforms which interface directly with RACE RESULT 12 should switch to using API Keys for authentication.
2025-03-17: Major Refactoring
We performed a major refactoring under the hood of RACE RESULT 12. Consequently, if you want to check-out an event or open an offline backup copy, you are required to have RACE RESULT version 12.5.34 (or newer) installed on your local machine.
2025-04-08: Handling of [Created] and [Modified]
The internal handling of dates in RACE RESULT 12 has changed. We recommend using the date() function to query the date/time from such strings as needed.
For example, use date("yyyy-mm-dd";[Created]) to call the date of the Created timestamp or date("hh:nn:ss";[Created]) for the time of the creation.
2025-05-15: Refactoring Online-Payment statistics
We have refactored the online-payment statistics. From now on, you will find a "Sales list" in the Online-Payment overview. In here, define a timeframe and receive an accumulated overview of calculated entry fees within the given timeframe. Please note, the timeframe refers to the time of creation of a transaction, not the date of the payout.
2025-06-27: Search bar functionality
Did you know you can enter a formula as a filter in the search bar to preview all participants matching that filter? Instantly see how many participants match, review the records, or simply validate your filter. Try it out by entering [Contest]=1.
2025-07-21: New TagTool released
A new version of TagTool has been released here. It includes the Firmware 2.6 for download and installation on USB Timing Box and Management Box. TagTool 4.1.0 requires Firmware 2.6 to be installed on your Active Devices.
2025-09-24: Shutdown of SOFORT payment
As the SOFORT payment method is being discontinued by the provider, we will no longer be able to offer it from 26 September onwards. If affected, please select from the range of other payment methods.
2026-01-05: New Online-Payment fields
We added support for a more fine-grained overview of payments. You can now monitor and call fields for each payment. Check out the new Payment & Finance Fields.