Inicio
Eventos
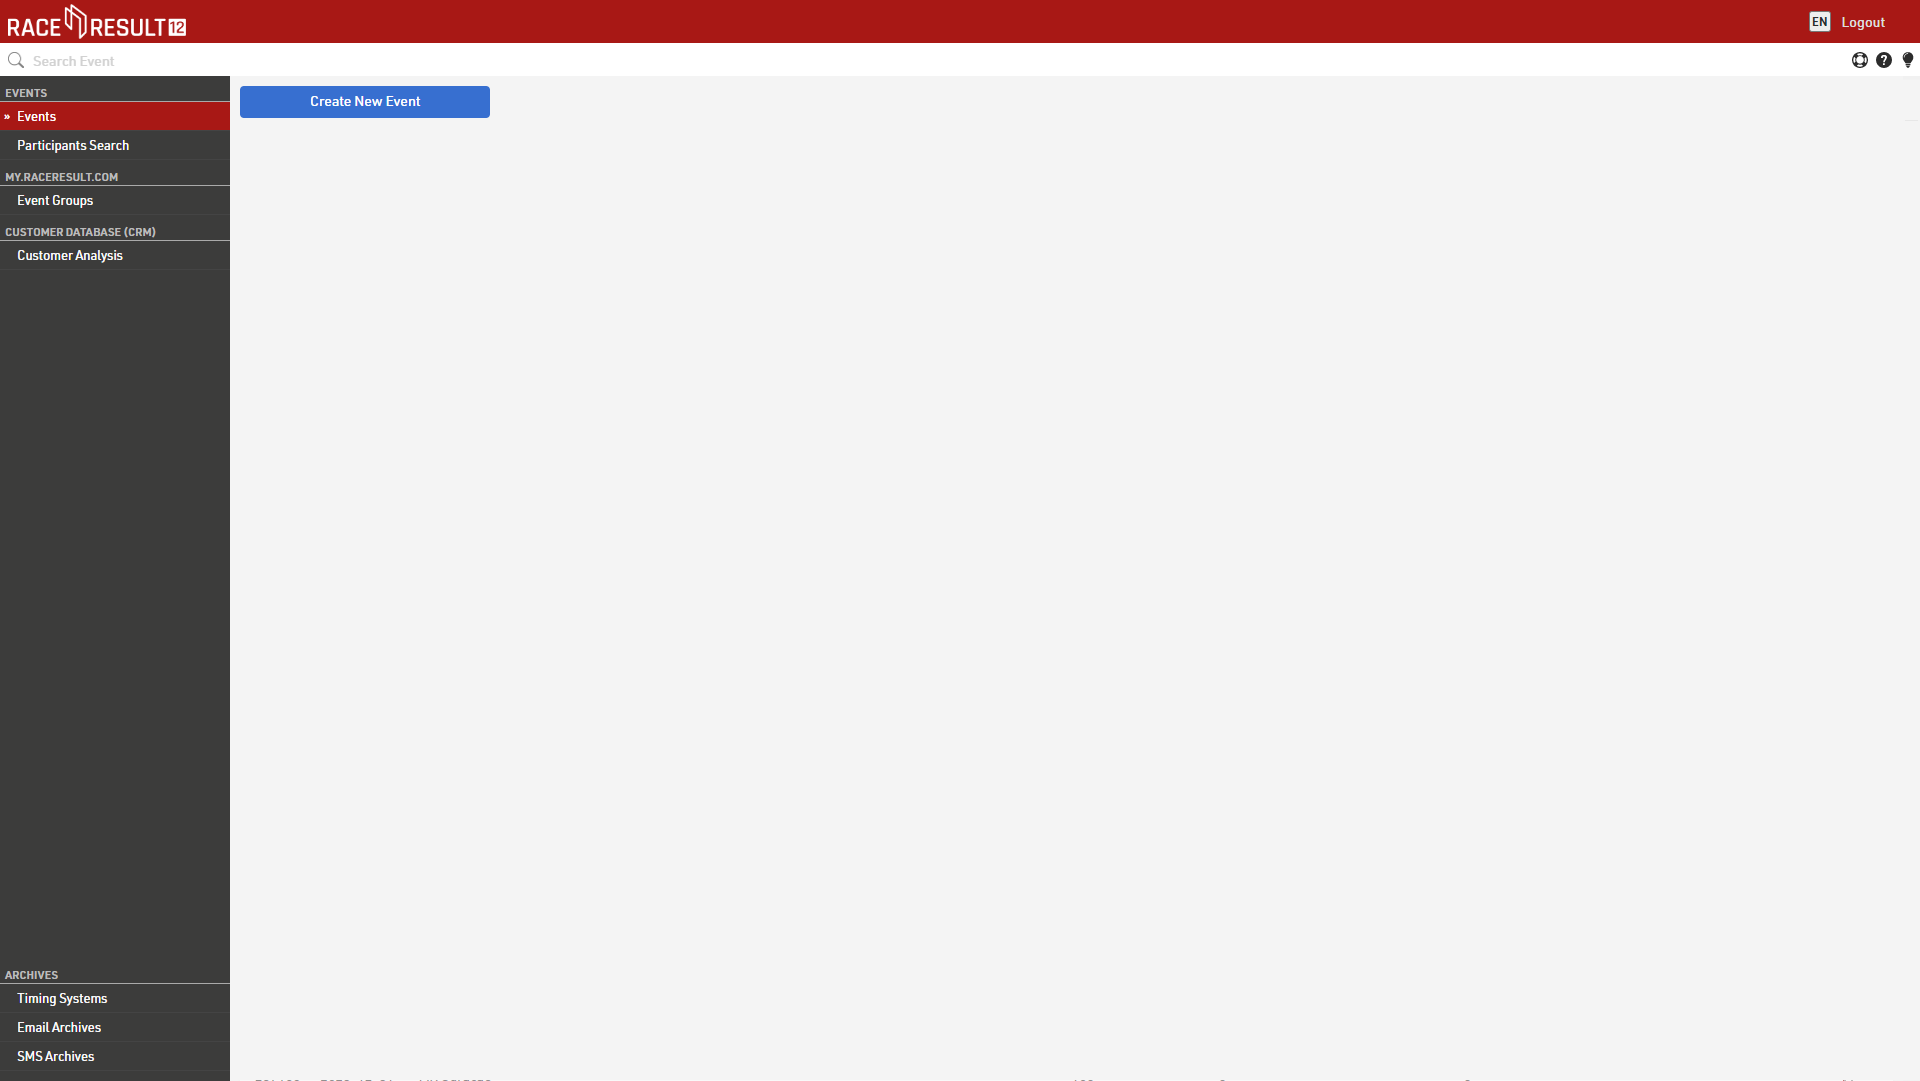
El Menú de Inicio en RACE RESULT 12 se usa principalmente para crear nuevos archivos de eventos y para abrir o eliminar archivos existentes, Cuando se trabaje sin conexión, no se podrá acceder a todas las opciones del menú.

Para crear un nuevo evento, simplemente haga clic en el botón Nuevo Evento, ingrese el nombre del evento y la fecha, seleccione una plantilla y haga clic en Crear (esta función solo está disponible cuando se trabaja online. Si trabaja offline, puede crear nuevos archivos de evento en el Servidor Web RACE RESULT).
Haga clic en un evento existente para abrirlo, o ingrese el nombre del evento en el cuadro de búsqueda en la parte superior de la pantalla y presione "Entrar".
Para eliminar un evento, haga clic en el icono de eliminar a la derecha (solo disponible cuando trabaja online). Al eliminar un evento, se le pedirá su contraseña de inicio de sesión (que pertenece a su número de cliente).
Participantes
Con la función Participantes, puede buscar participantes en todos los archivos de eventos.
Grupos de Eventos
Grupos de eventos se utiliza para ordenar sus eventos en my.raceresult.com en las diferentes categorías que se muestran. Puedes encontrar más información en el artículo Groups.
Análisis de clientes
La base de datos de clientes (CRM) le brinda información valiosa sobre quiénes son realmente sus participantes (clientes), dónde y con qué frecuencia compiten y de dónde son.
Grupos
La sección Grupos de eventos se encuentra en la página principal de RACE RESULT 12 en línea, donde puede crear nuevos grupos y administrar sus grupos existentes.
Esos grupos se utilizan para ordenar sus eventos en my.raceresult.com en las diferentes categorías que se muestran.
Organizadores de carreras - Clubes - Series - Cronometradores - Temas
Tenga en cuenta que se puede agregar un evento a varios grupos y también puede crear grupos internos que no son visibles en my.raceresult.com.
Crear Nuevos Grupos
Si crea un grupo nuevo, asígnele un nombre significativo que sea fácil de entender.
Grupos Públicos
Puede agregar sus eventos a grupos públicos y puede hacer que su grupo esté disponible para otros usuarios de RR12. Utilice esta función de forma responsable. Cuanto más eficazmente se clasifiquen los eventos, más fácil será para los usuarios encontrarlos en la plataforma:
- Solo agregue eventos a un grupo si mejorarán o potenciarán la experiencia del usuario final (participante/espectador).
- Antes de crear un grupo público, verifique si dicho grupo ya existe.
- Si cree que necesita acceso a un grupo existente (club, serie de eventos, tema), intente comunicarse con el cronometrador existente de ese grupo.
Publish Group on my.raceresult.com
Si desea que el grupo aparezca públicamente, marque la casilla para publicar en my.raceresult.com y asegúrese de asignarlo a la categoría correspondiente. De esta manera, el grupo se muestra en la pestaña correcta en my.raceresult.com y los usuarios pueden encontrarlo fácilmente.
Categoría del Grupo
Para la categoría de grupo tienes las siguientes opciones:
- Serie de eventos: si tiene varios eventos que, p. tener una puntuación global, pertenecer a una liga, copa, etc.
- Clubes: agregue todos los eventos organizados/celebrados por el mismo club. Un grupo de este tipo podría integrarse fácilmente en el sitio web de un club.
- Otros temas: esta es una categoría que podría tener sentido para otros cronometradores/organizadores que no encajan en ninguna de las otras categorías, como eventos dentro de una región específica.
- Cronometrador: esta categoría le permite, como temporizador, enumerar todos sus eventos publicados a la vez, para mostrar a los clientes potenciales la variedad de sus eventos.
- Organizador de carrera: enumere todos los eventos del mismo organizador de carrera para ayudar a promover otros eventos relacionados
Recuerde, todos los eventos publicados se enumeran en "Todos los eventos" en my.raceresult.com, donde los participantes pueden filtrar por deporte, fecha, país, etc. Incluir un evento en cualquiera de las categorías anteriores es una función adicional opcional.
Especialmente para los grupos de temporizadores, puede tener sentido marcar la casilla para incluir todos los archivos de eventos en este grupo; cada vez que cree un nuevo evento, se agregará automáticamente.
Imagen de Portada
Cargar una imagen de encabezado hará que la página del grupo se vea mucho más atractiva. El tamaño óptimo para esas imágenes es 1150 x 212 px. Otros formatos cambiarán de tamaño automáticamente. Si no carga una imagen, se utilizará una plantilla predeterminada.
Logo
Sube un logotipo para aumentar tu valor de reconocimiento! Sugerimos cargar un archivo con una resolución de 300 x 300 px. Otros formatos cambiarán de tamaño automáticamente.
Información del contacto
Proporcione información de contacto relevante para el grupo. Estos campos son opcionales pero útiles para completar. Especialmente proporcionar una dirección de correo electrónico brinda a los participantes y prospectos una manera fácil de ponerse en contacto.
Algoritmo de clasificación
En segundo plano, my.raceresult puntúa todos los eventos según la actividad reciente del usuario (es decir, número de clics, registros, vistas de lista y más). Cuanto más popular sea un evento, más arriba se mostrará en los eventos recientes y futuros.
Para los grupos, el algoritmo suma todas las puntuaciones de los eventos dentro de cada grupo. Cuanta más actividad de usuario haya dentro de un grupo, más destacado se mostrará el grupo. Esto también significa que la clasificación puede actualizarse a lo largo de un día si se ejecutan varios eventos populares.
Para refinar aún más la experiencia de los participantes, el sistema también verifica la configuración regional del navegador y mostrará primero los resultados de este país. El campo de búsqueda detecta ubicaciones conocidas y ordenará los resultados según la ubicación geográfica de la dirección del evento/cronómetro. Si escribe Berlín, los resultados de la búsqueda se ordenarán según la distancia a Berlín.
Editar/ocultar información en my.raceresult.com
Los grupos se pueden editar/actualizar fácilmente, y es recomendable mantener los banners y logotipos actualizados si cambian con el tiempo, un grupo se puede ocultar de my.raceresult.com en cualquier momento desactivando la opción de publicar. el evento.
Para el lanzamiento de la plataforma, nos tomamos la libertad de cargar algunos logotipos de temporizadores y ordenar todos los grupos existentes en las nuevas categorías. Si cree que hay problemas mayores, comuníquese con support@raceresult.com.
Archives
Los archivos están vinculados a su cuenta de cliente de RACE RESULT y brindan acceso a información histórica; parte de esta información también está disponible directamente a través de RACE RESULT 12.
Sistemas de Cronometraje
Los archivos de los sistemas de cronometraje enumeran todos los sistemas que alguna vez se han conectado a los servidores de RACE RESULT utilizando su ID de cliente. También se muestra información básica sobre el sistema.
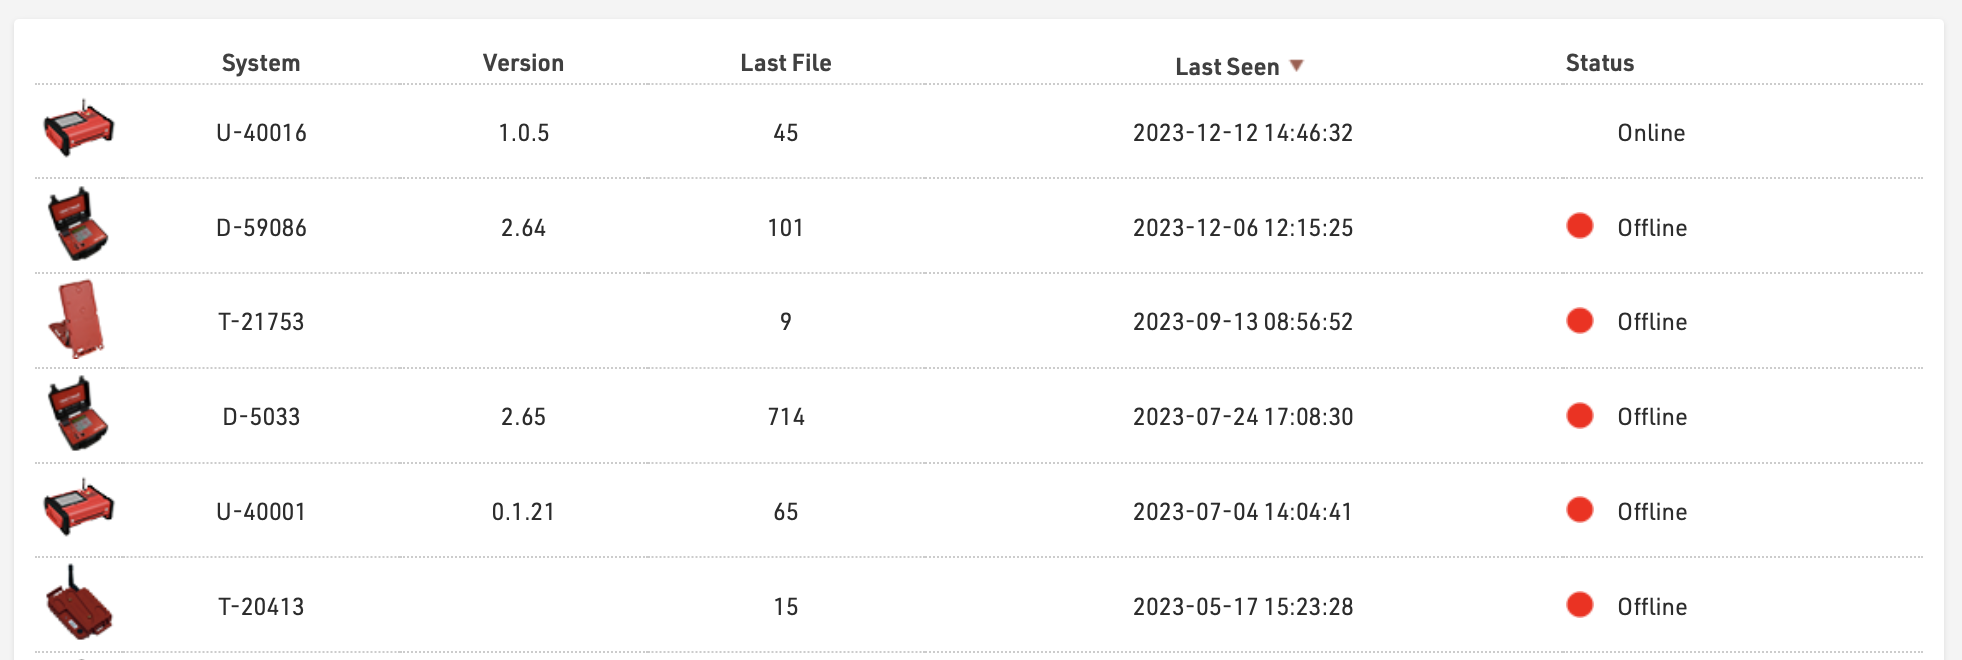
Al hacer clic en un sistema se abrirá una ventana que enumera todos los archivos de pases que se han cargado para ese sistema; el mapa del lado izquierdo muestra la posición GPS del sistema en el momento en que se creó el archivo.

Al hacer clic en un archivo, se descargará un archivo txt de ese archivo de pases que luego se puede importar manualmente a través de RACE RESULT 12 en Timing Tab si es requerido. Al hacer clic en Última posición, se acercará a la última posición conocida del dispositivo (de acuerdo con las llamadas de estado del dispositivo).
Archivos de correo electrónico
Al enviar correos electrónicos a través de RACE RESULT 12 en línea, ya sea a través del Email / SMS Module, Registration Forms o Raw Data Exporters luego, se guardará una copia básica del correo electrónico en los archivos, junto con el estado del correo electrónico si lo devuelve el servidor de correo. Al hacer clic en un elemento se abrirá una vista previa con el contenido completo del correo electrónico.
Archivos SMS
Al enviar SMS a través de RACE RESULT 12 online, ya sea a través del Email / SMS Module, Registration Forms o Raw Data Exportersluego se guardará una copia básica del SMS en los archivos, junto con el estado del SMS.

Pestaña General
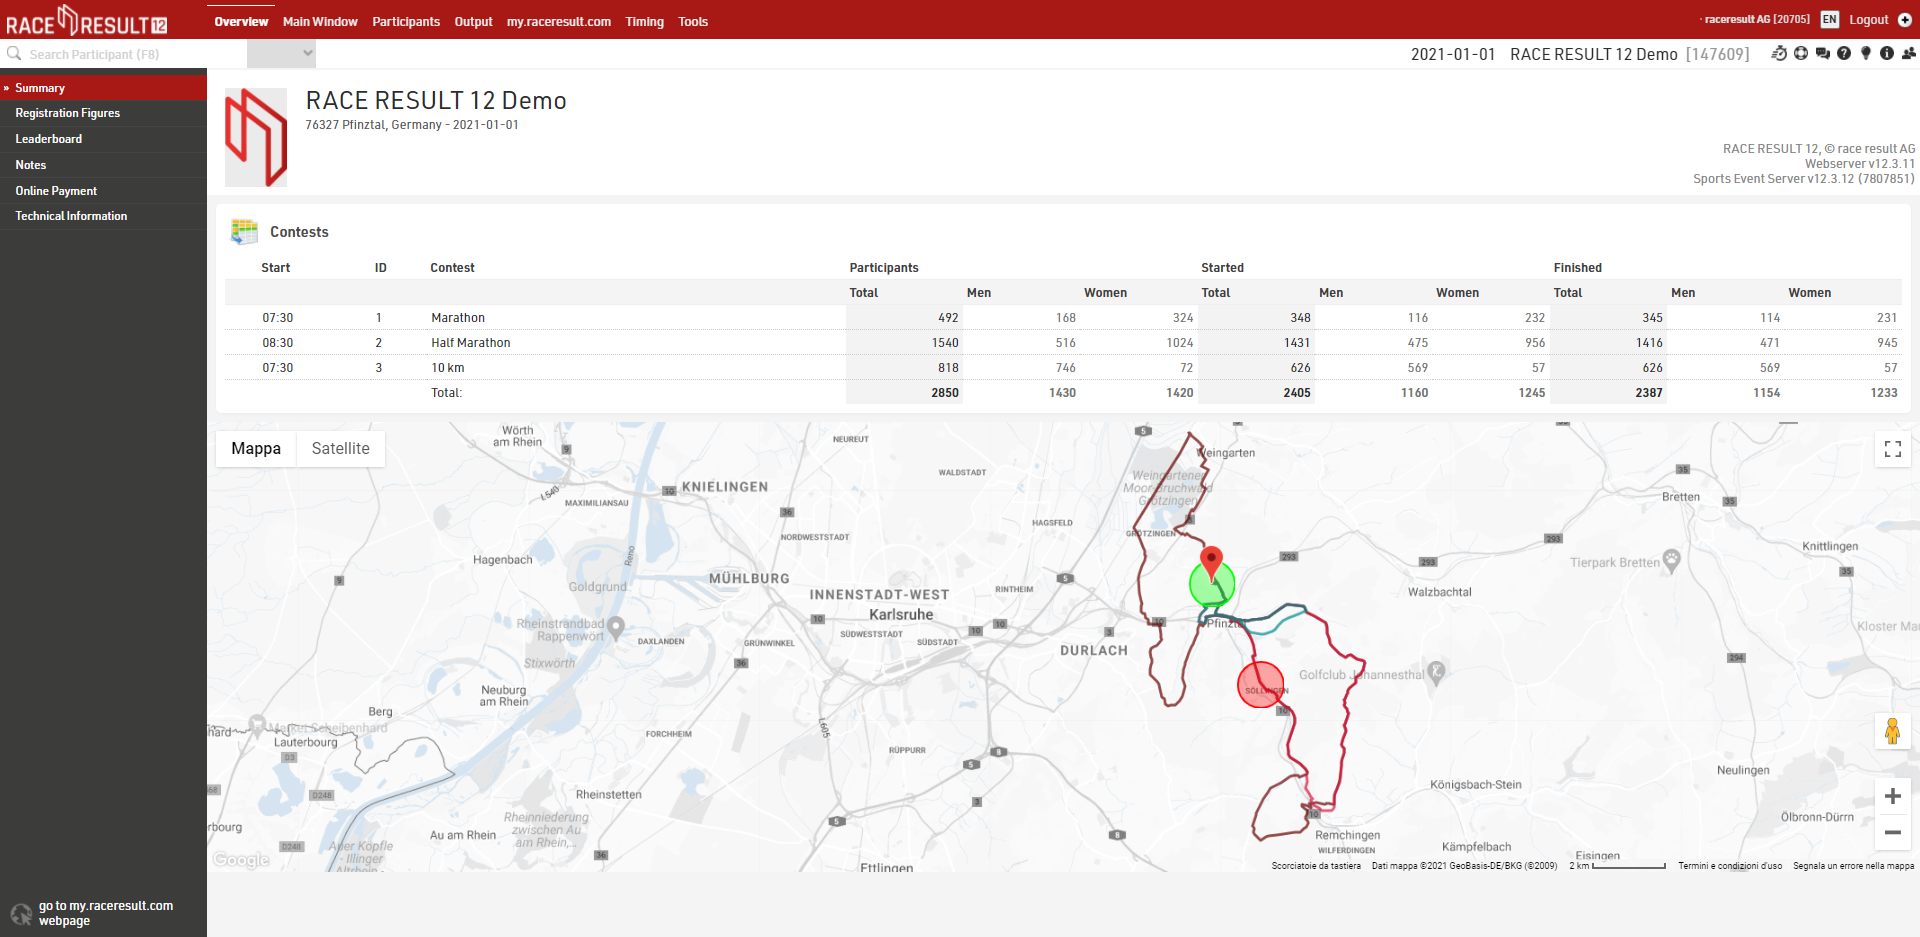
La Pestaña General proporciona una descripción general rápida de su evento, en particular información sobre cifras de registro y pagos.
Cifras de Registro
Las Cifras de registro en la ventana Descripción general muestran información sobre la distribución del registro de los participantes antes de la Fecha del evento.

La ventana consta de 2 secciones: el Cuadro de registro, que muestra un gráfico con vistas acumulativas, de día, semana y mes, y las Cifras de registro, que muestran cuántos participantes se registraron para cada concurso y en qué día, expresado como D-X, donde D es la fecha del evento y x es el número de días antes de esta fecha.
También es posible comparar las cifras de inscripción con otro evento propiedad de la misma cuenta, útil para comparar las inscripciones año tras año para el mismo evento, por ejemplo.
Tabla de Líderes
La tabla de clasificación en el Overview Window muestra los ganadores o líderes actuales del evento. A través de la configuración en la parte inferior de la pantalla, puede seleccionar un Ranking y un número x para que se muestren los primeros x participantes de cada grupo del ranking.
Si desea mostrar diferentes columnas (o utilizar un formato diferente), también puede seleccionar una List del cual se tomarán las configuraciones de la columna.
Habilite la casilla de verificación Actualización automática para actualizar automáticamente la página cada 30 segundos.
Notas
La sección de Notas en el Overview Window se puede utilizar para escribir notas y realizar un seguimiento de las tareas pendientes.
Resumen de pagos en línea
La sección Pago en Línea en el Overview Windowmuestra todas las transacciones del Online Payment y un resumen de los pagos mensuales. En la Descripción general de pagos en línea también puede cancelar pagos si es necesario. Para los débitos directos SEPA diferidos, esto puede ser necesario en caso de que se cancele su evento.
Información Técnica
La sección Información Técnica en el Overview Window muestra información importante sobre el archivo de su evento, como el número de participantes, los tiempos o las entradas de datos sin procesar.
Además, muestra las dependencias de puntuación entre sus Results, Ranks, y Team Scores y avisa si el archivo tiene alguna Circular References. También puede descargar una copia del archivo de su evento desde aquí.
Ventana Principal
Principalmente, la Ventana Principal sirve para definir la configuración de su Archivo de Eventos, así como para importar, verificar, cambiar y eliminar los datos de los participantes.
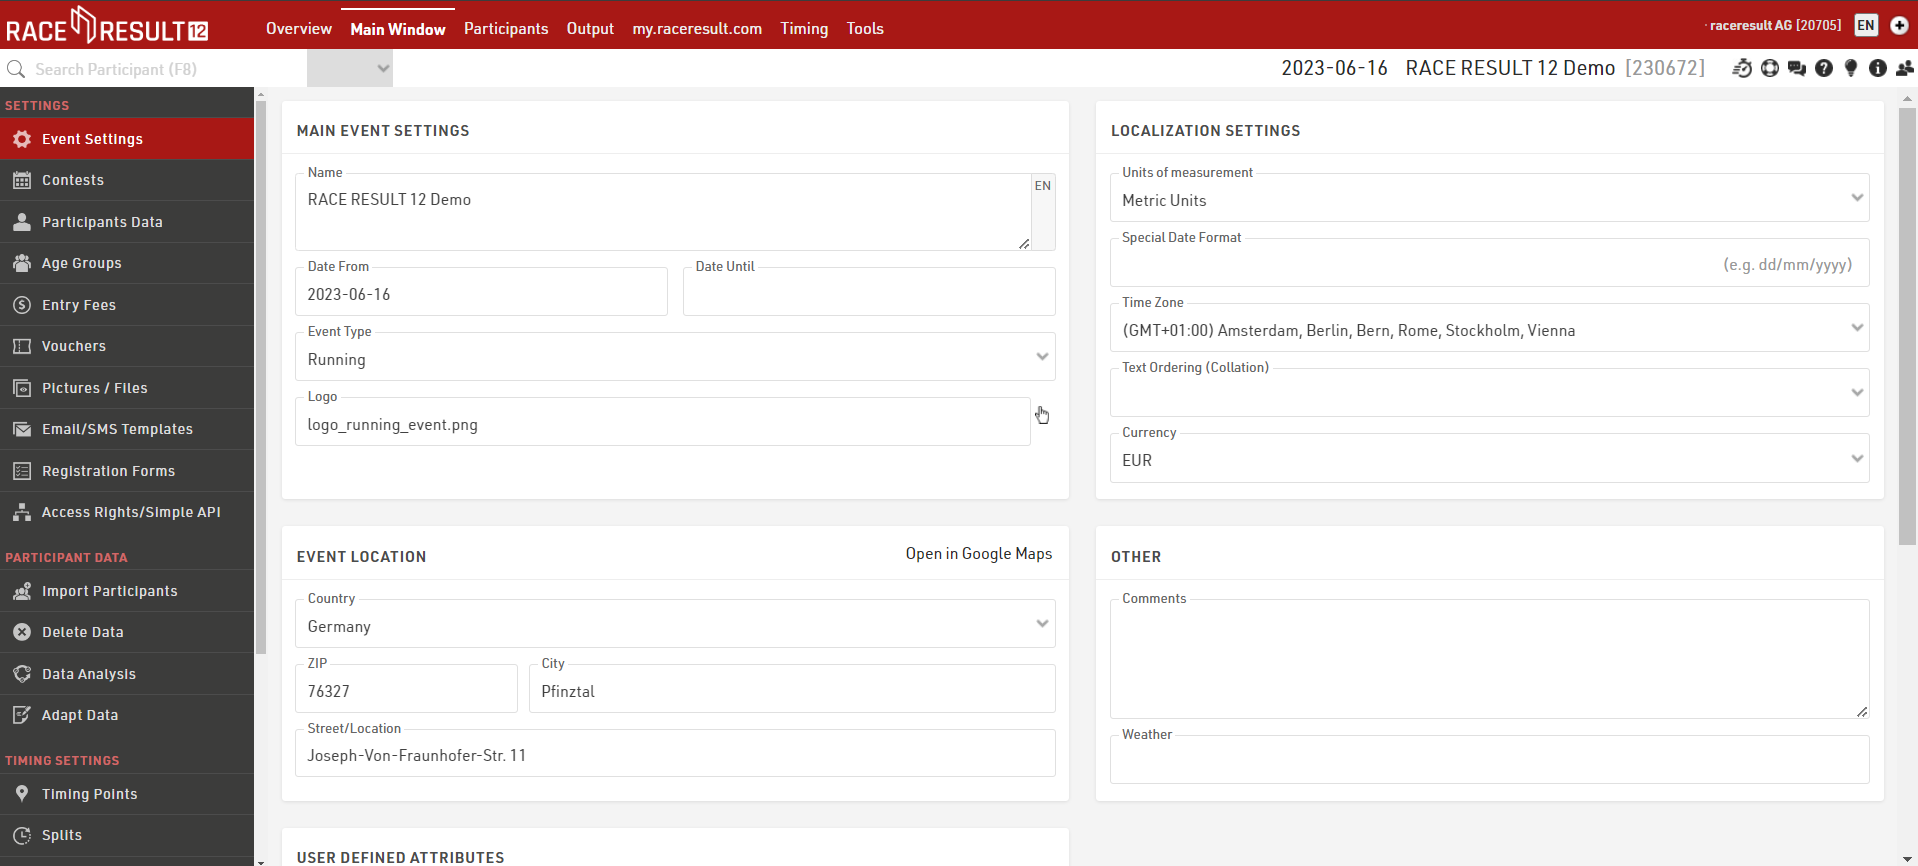
Ajustes
Estas son las configuraciones fundamentales para cualquier evento que determinan principalmente la estructura de datos del evento y una serie de funciones principales que se utilizan en todo el software.
Información de los Participantes
Ajustes del Cronometraje
La configuración de cronometraje define qué tiempos espera registrar para un participante y cómo se deben utilizar estos tiempos. Hay tres puntos clave para la configuración del cronometraje:
Puntos de Cronometraje - Los puntos en los que registrará datos de sincronización sin procesar ("lecturas de chip"). Por ejemplo, la SALIDA, la LLEGADA o los puntos de tiempo dividido en el recorrido.
Tiempos de inicio / Límites de tiempos de finalización- La hora de inicio oficial (T0) que se utilizará para cronometrar la carrera; esto lo utiliza la configuración de Splits o Resultados especiales para calcular los tiempos de la carrera. Opcionalmente en algunos casos un tiempo máximo.
Splits: La configuración de los Puntos de Cronometraje en el orden en que se cruzarán en la carrera y cuándo, permitiendo el cálculo de tiempos y clasificaciones.
Para configuraciones más complejas donde no se pueden usar divisiones, puede ser necesario usar Resultados especiales en Configuración de puntuación avanzada.
Ajustes del Puntaje
Para carreras más complejas o para métodos de puntuación personalizados, es posible que necesites definir configuraciones de puntuación avanzadas. Existen 3 tipos de configuraciones de puntuación avanzadas.
Resultados Especiales - Los resultados son campos asociados con un tiempo, que se pueden extraer/calcular a partir de datos sin procesar o calcular a partir de divisiones/otros datos. Es posible que se requieran resultados para ciertos tipos de eventos, como carreras de vuelta variable.
Clsificaciones - Checar la configuración de las Clasificaciones, por ejemplo, clasificación general / por género / por edades.
Resultados por equipos - Opcionalmente, definir puntajes por equipo. Un puntaje de equipo, por ejemplo, resumirá los tiempos de los mejores tres atletas de cada club y creará una Clasificación en función del tiempo del equipo.
Note: De manera determinada, un archivo de evento contiene una clasificación general / por género / por edades. Solo debe modificar la clasificación si desea que se calculesn de manera diferente o si desea calcular clasificaciones adicionales.
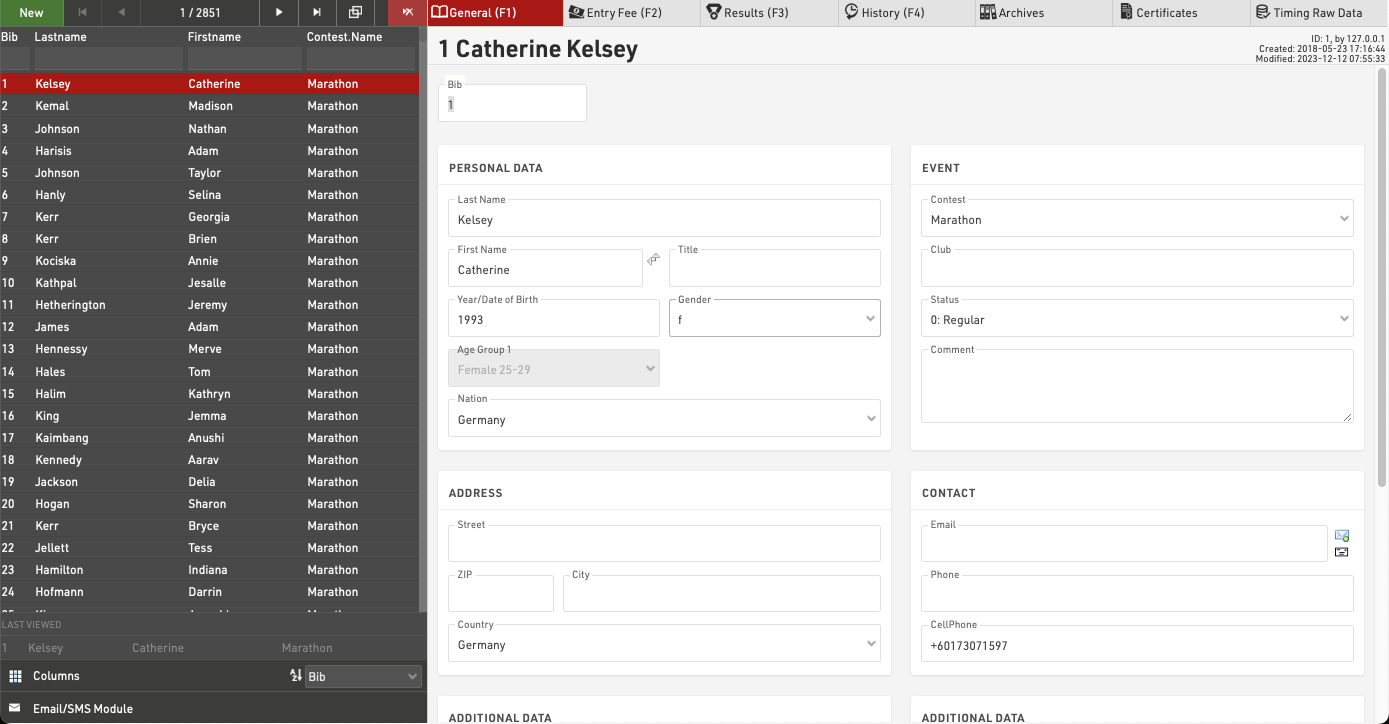
Pestaña Participantes
La Pestaña Participantes sirve para agregar nuevos participantes y editar participantes existentes. Los tiempos y rangos también se pueden controlar y editar si es necesario.
La Pestaña Participantes ya fue introducida en la Introducción a RACE RESULT 12, la cual cubre agregar/cambiar datos y buscar participantes.
Lea más sobre Cómo configurar la Pestaña Participantes para elegir qué campos de datos se mostrarán en la pestaña General.
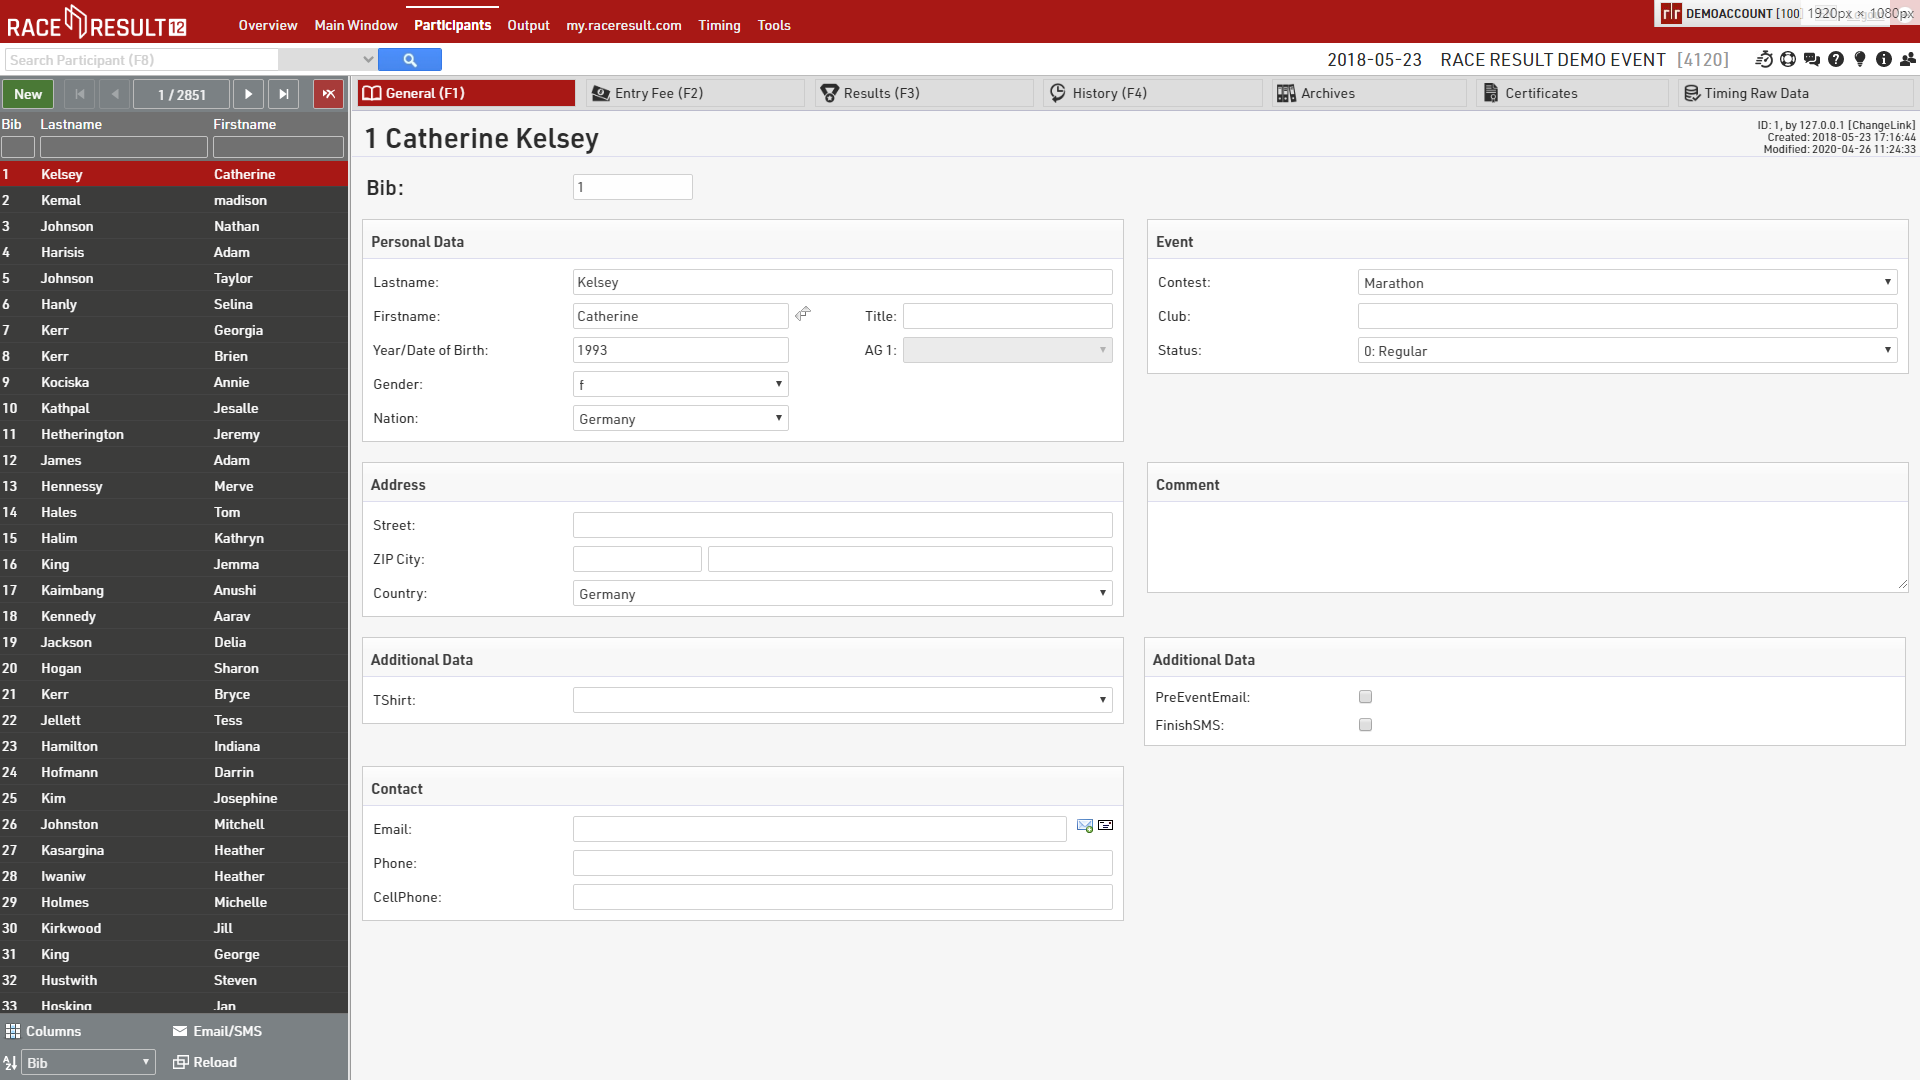
Vista de la lista
El lado izquierdo de la ventana Participantes presenta a los participantes en una vista de lista y ofrece una descripción general de todos los registros de participantes en su archivo de evento. Se mostrará una lista de los participantes vistos recientemente en la parte inferior para volver rápidamente a un participante en particular.
Navegar y editar participantes
La barra de navegación le permite crear nuevos registros de participantes, eliminar registros de participantes o desplazarse por la lista de participantes. Al utilizar los botones de navegación para primero/anterior/siguiente/último, estos considerarán la clasificación en la vista de lista para la clasificación de los participantes.
Al hacer clic en un participante en la vista de lista, se abrirán los detalles completos de los participantes en el lado derecho de la ventana, lo que permitirá ver/editar todos sus datos.
Tenga en cuenta que el navegador almacenará en caché la lista de participantes, por lo que al importar nuevos participantes o editar grandes lotes de datos, es posible que deba volver a cargar los datos usando el botón de recarga.  en la barra de navegación.
Ordenar/Buscar y Filtrar
Al hacer clic en el encabezado de una columna, puede ordenar la tabla según esta columna. Presione el mismo encabezado de columna por segunda vez para ordenar en orden descendente.
Los cuadros de texto debajo de los encabezados de las columnas se pueden utilizar para filtrar la lista. Simplemente ingrese un valor para buscar, o algunos campos proporcionarán un menú desplegable con múltiples valores de selección.
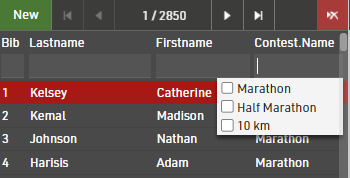
Además, en la parte inferior de la vista de lista hay un menú desplegable con algunas opciones rápidas para ordenar de la A a la Z.

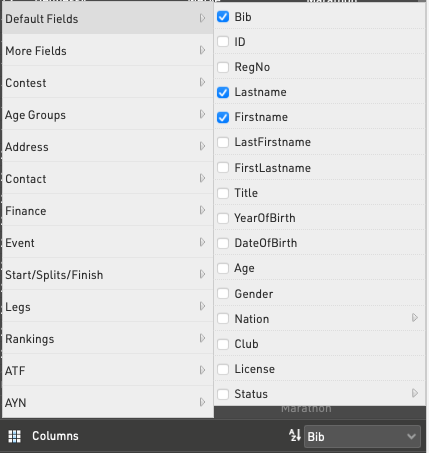
Configuración de columnas
Además de las columnas estándar, puede agregar otras columnas a la Vista de lista u ocultar columnas que no sean necesarias. Para cambiar las columnas visibles, coloque el cursor sobre el icono de columnas en la parte inferior de la vista de lista y aparecerá una descripción general con todos los campos disponibles, lo que le permitirá marcar y desmarcar los campos.
Email / SMS Module
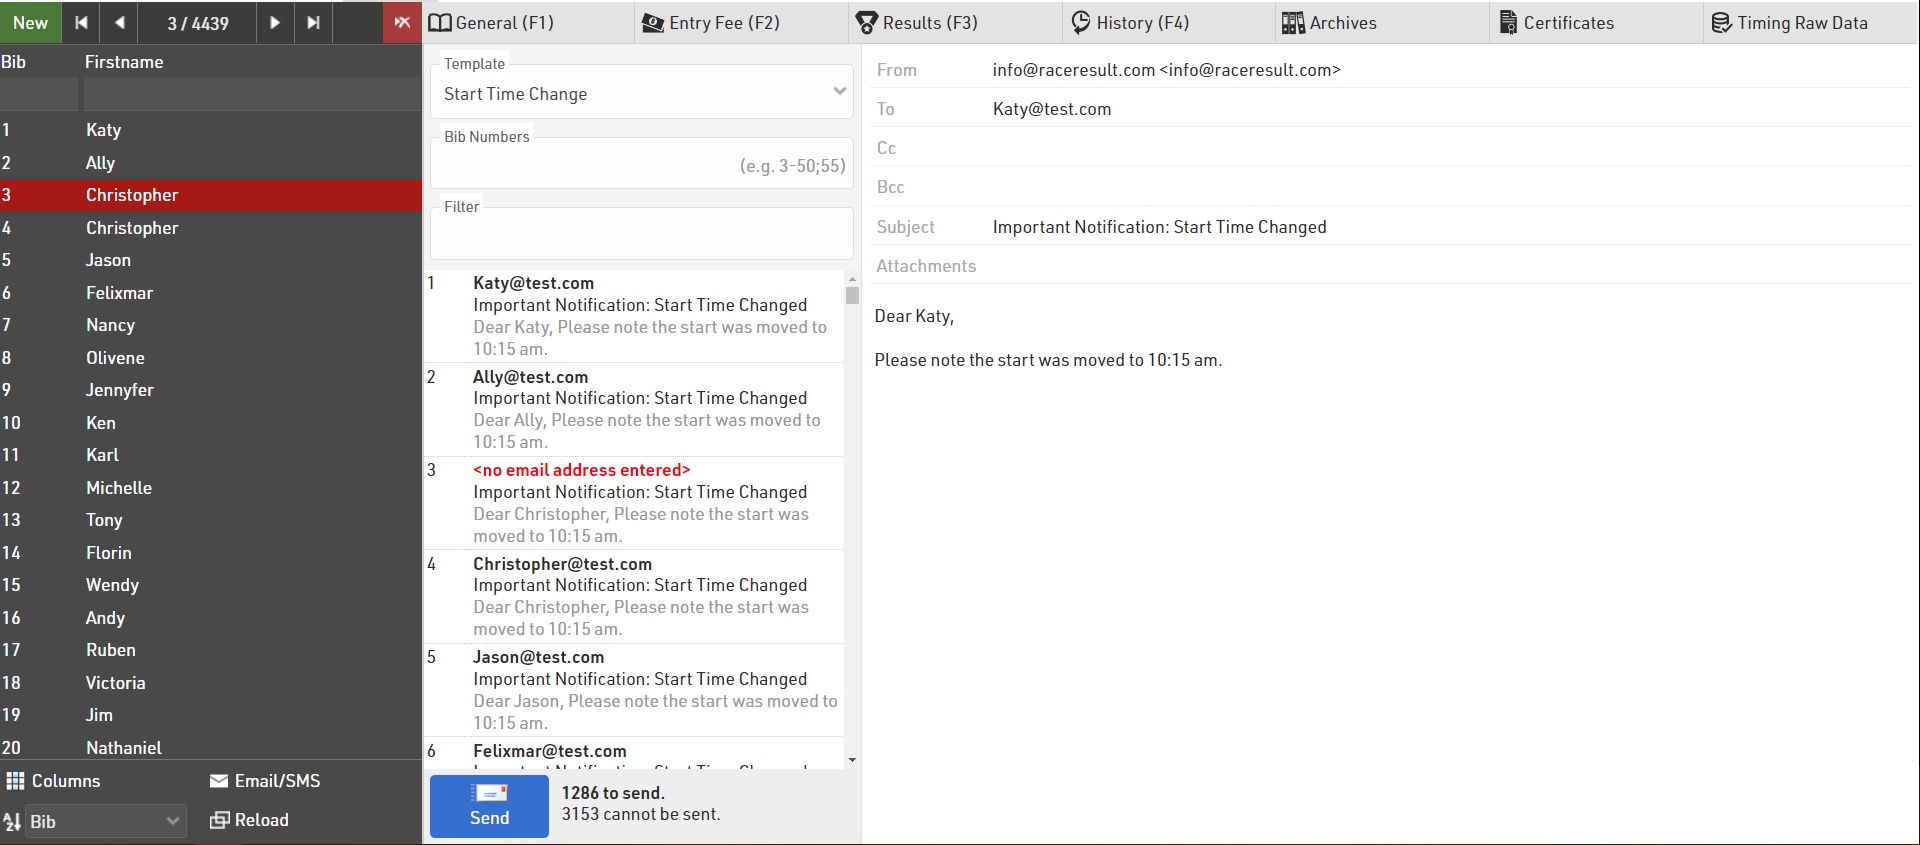
The Email / SMS Module allows for bulk sending of Email/SMS Templates to participants.
Select a template from the dropdown and a list of all messages to send will be populated below. You can additionally check if the filter is correct and adapt this if necessary.
Clicking on an item from the list will show a full preview of the message on the right side, note that individual e-mails cannot be edited.
If a participant does not have a valid email address, it will be marked red with <no email address entered>.
At the bottom of the list you can see the number of messages which will be sent, and how many cannot. Clicking the Send button will start sending the messages, note that these are sent individually and so you need to keep the window open until sending is complete.
Entry Fee
If using online registration and payment through my.raceresult.com you can review each participants payment details.
Type displays the following;
- Entry Fee - A break down of each fee due according to the entry fee table.
- User Fees - Transaction fees based on the selected payment option.
- Payment - Any payment which has been received for the entry.
The Payment details also provide a unique payment reference and ID, the payment method, date and time and also the amount billed / received.
Below this are 2 sets of information;
- "OPEntryFee - EntryFee" - The entry fee which has been billed subtract the total amount due for the entry.
- "OPBalance" - The actual amount received minus what is owed, if negative then not paid completely, if positive then too much has been paid.
OPBalance may be non-zero if the participant changes contest / details which affect the entry fee they should have paid.
Results
The Results tab shows the relevant information according to your timing and scoring setup for that participant.
The Results Tab will show different tables for Splits, Legs and Results, Ranks, Team Scores and Participant Attributes, each showing the corresponding information.
For each Split the table shows Time of Day, time from Gun, time from Chip, Rank (from Gun or Chip according to the Contest Time Mode), Sector time (from previous Split) and Speed.
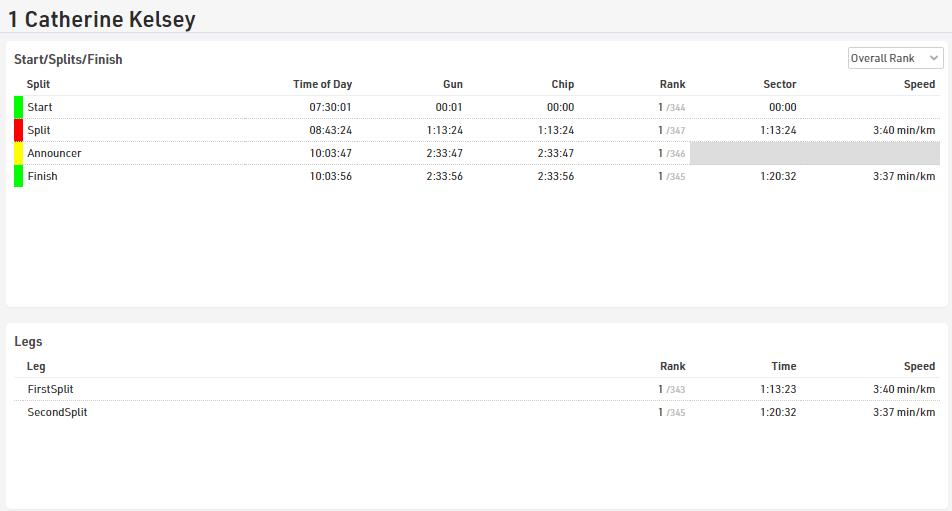
For splits which have not yet been reached or are missed then the Predicted Times are shown, a predicted time can be turned in to a manual Raw Data Record by clicking the + symbol. The Time of Day can then be edited and saved by pressing the enter key.
The Rank includes a drop-down to switch between Overall, Gender, Age Group or None, speed shows the SpeedOrPace field for the sector according to the default format of the split.
For each Leg the Rank, Leg Time and Leg SpeedOrPace is shown, the Rank is controlled by the same dropdown as per the Splits table.
Results are listed in order of the Result ID with T0 always listed first, Ranks and Team Results are shown in order of their ID so you can quickly look up an individual's rank.
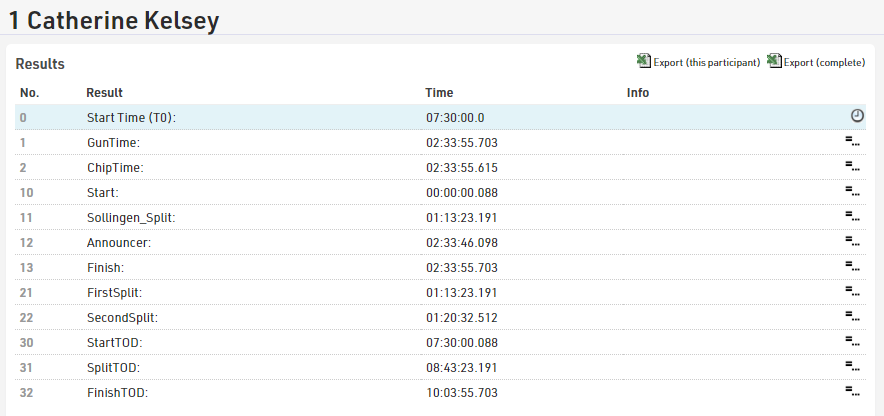
Using Raw Mode a Result can be manually overwritten by hovering over the result and selecting the edit icon. The result field will become editable. Once entered the adjusted result will turn red indicating the time has been overwritten. Should the raw data be recalculated, the overwritten value will remain.
To delete the overwritten result, select the red cross next to the result to return the raw data calculation. If you need to delete all overwritten results refer to Delete Overwrite Values.
History
The History records all changes made on a participant's record. This concerns all data fields such as name, contest, additional fields or status of the participant.
You can review all these changes in the Participants Window in the History tab, here you can see all of the changes which have been made to which field, and by which user or software tool. Additionally you can revert changes either individually or in bulk, by using the checkboxes.

In case there are a lot of changes in your Event File, the history might inflate the file. You can delete all History entries via the Delete Data function.
The history can also be downloaded as an excel for an individual participant or for all participants if you need to review bulk changes or as a backup before deletion.
Archives
In the Archives tab, there are three sections:
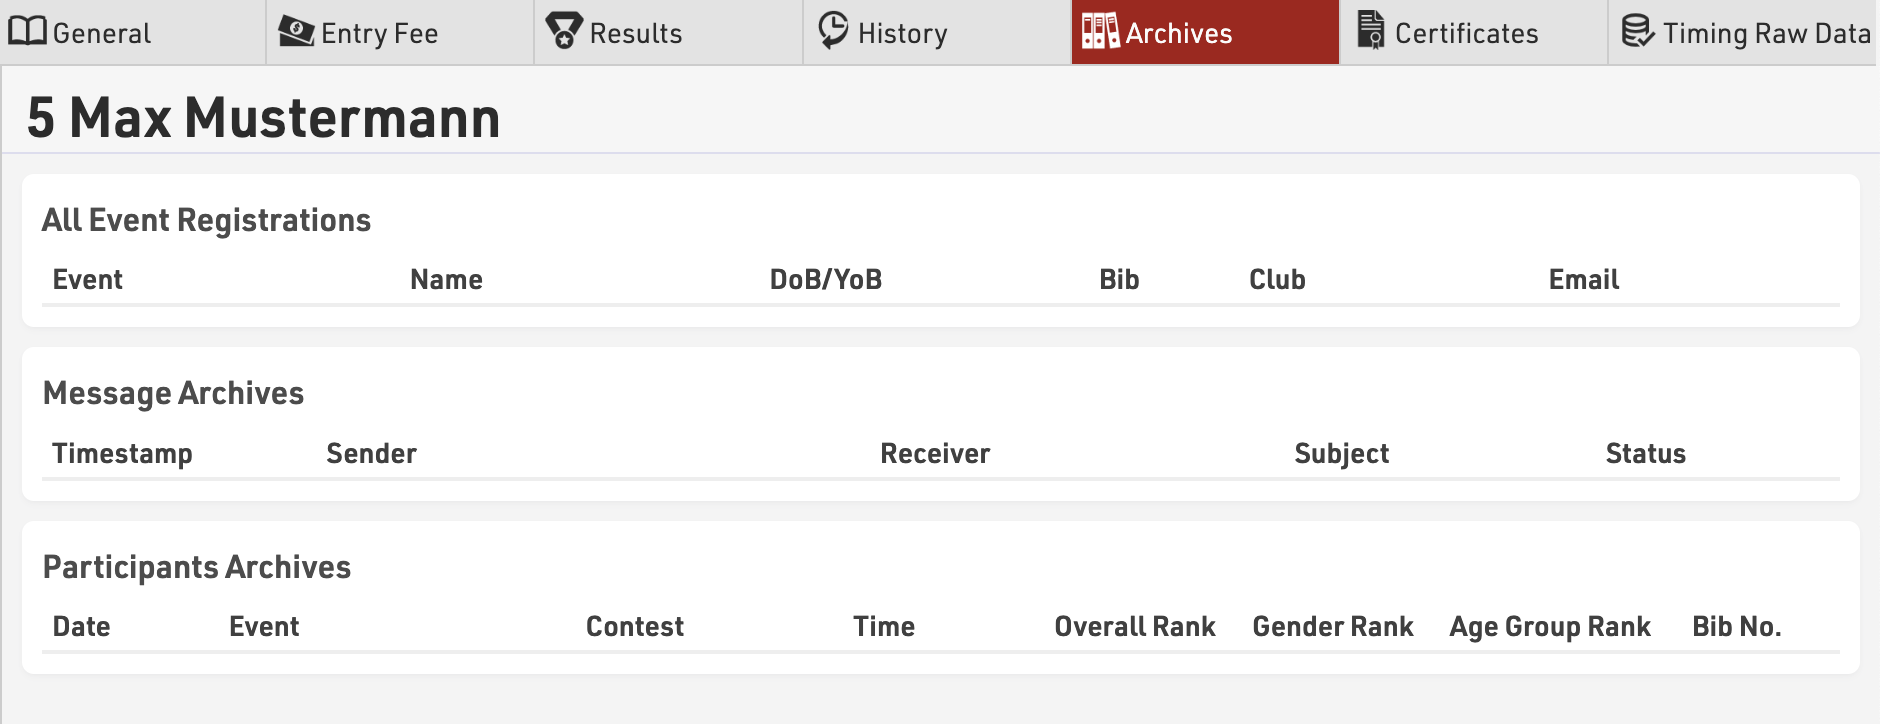
- under All Event Registrations, you will be able to see in which other event of yours the participant is registered. This will allow you to cross-check some information like the Club and the Email address. This section is part of the Customer Database (CRM) which you can find in the RACE RESULT 12 start page.
- Message Archives gives you an overview of all the emails/sms sent to the participant. In this way, you can check the status of emails to be sure that messages have been delivered. This section is part of the Email Archives which you can find in the RACE RESULT 12 start page.
- Participants Archives shows the participant's past results if you have imported past event Archives in your event file.
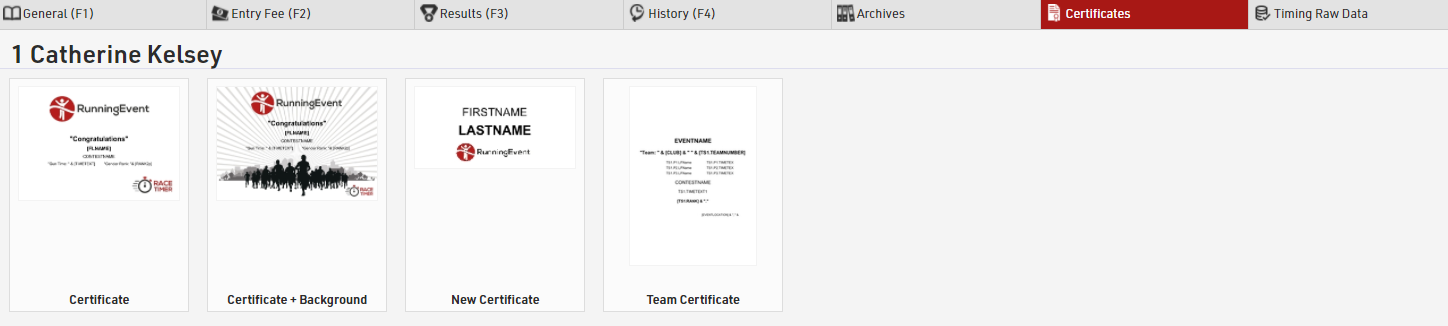
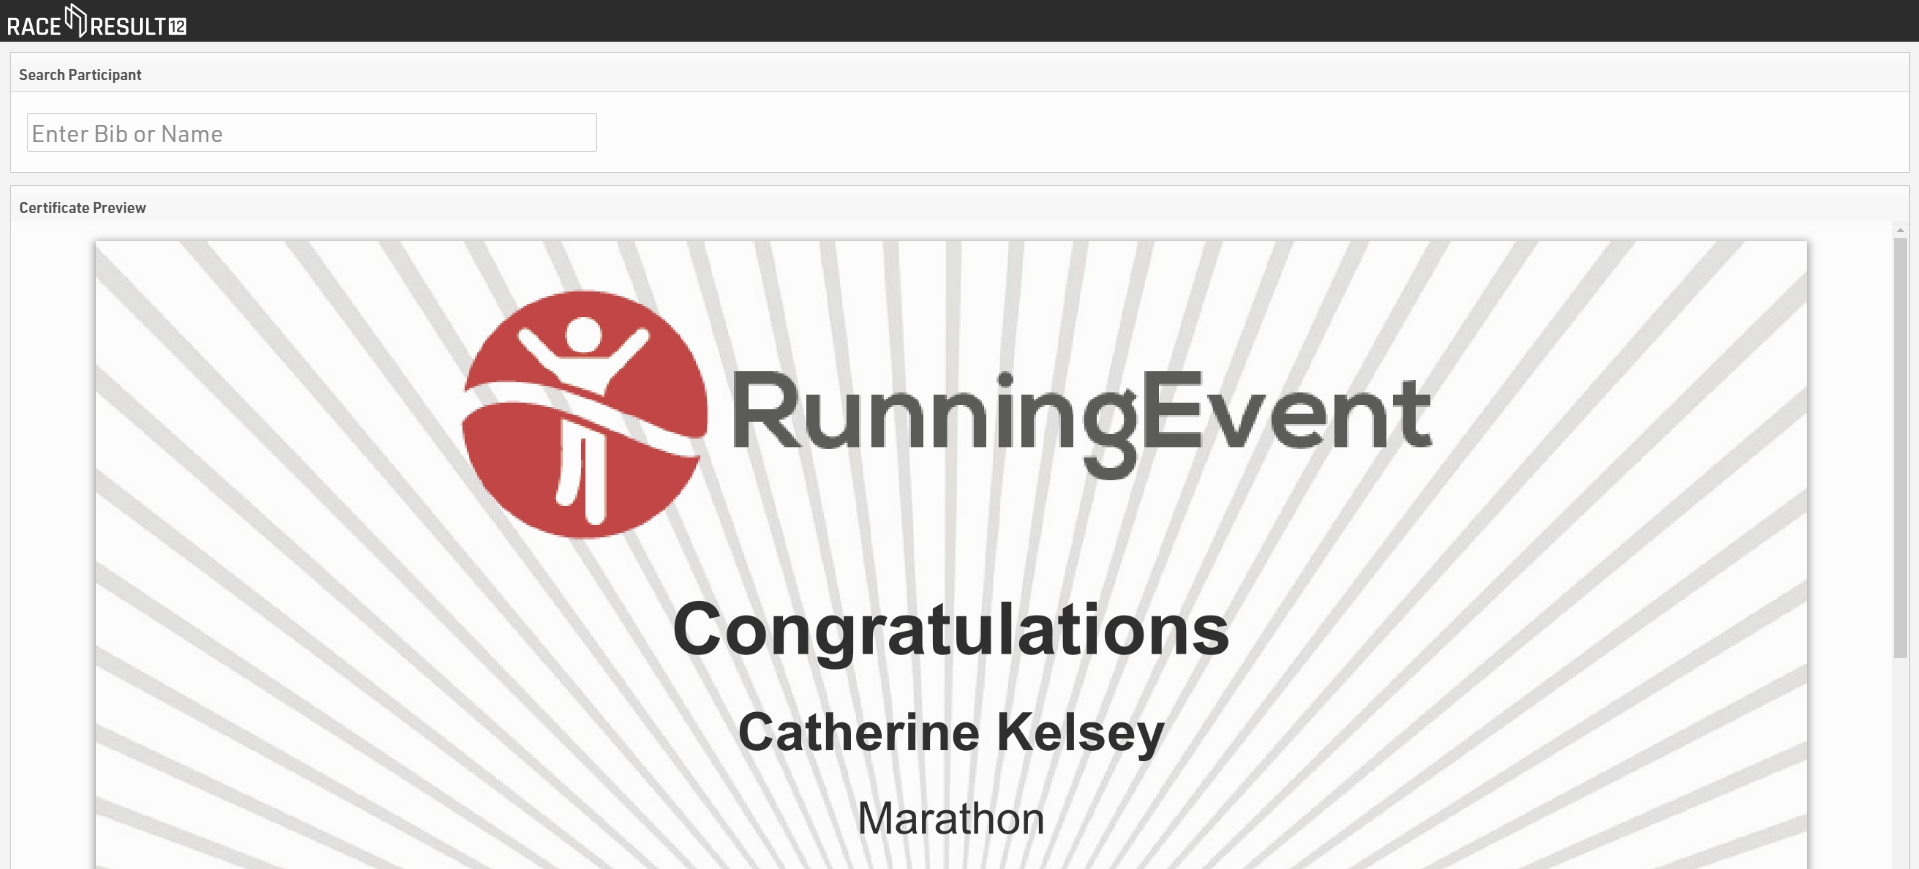
Certificates
The certificates tab provides a quick way to preview and print / download a participants certificates. A Certificate will be generated for each layout regardless of Certificate Sets.
Simply click the certificate you wish to view and a preview will be generated which you can download / print straight from the preview window.
Timing Raw Data
When working in Raw Data Mode all of the passings for a participant are saved to the event, you can view all of a participants data in the Participants Window - Timing Raw Data tab.
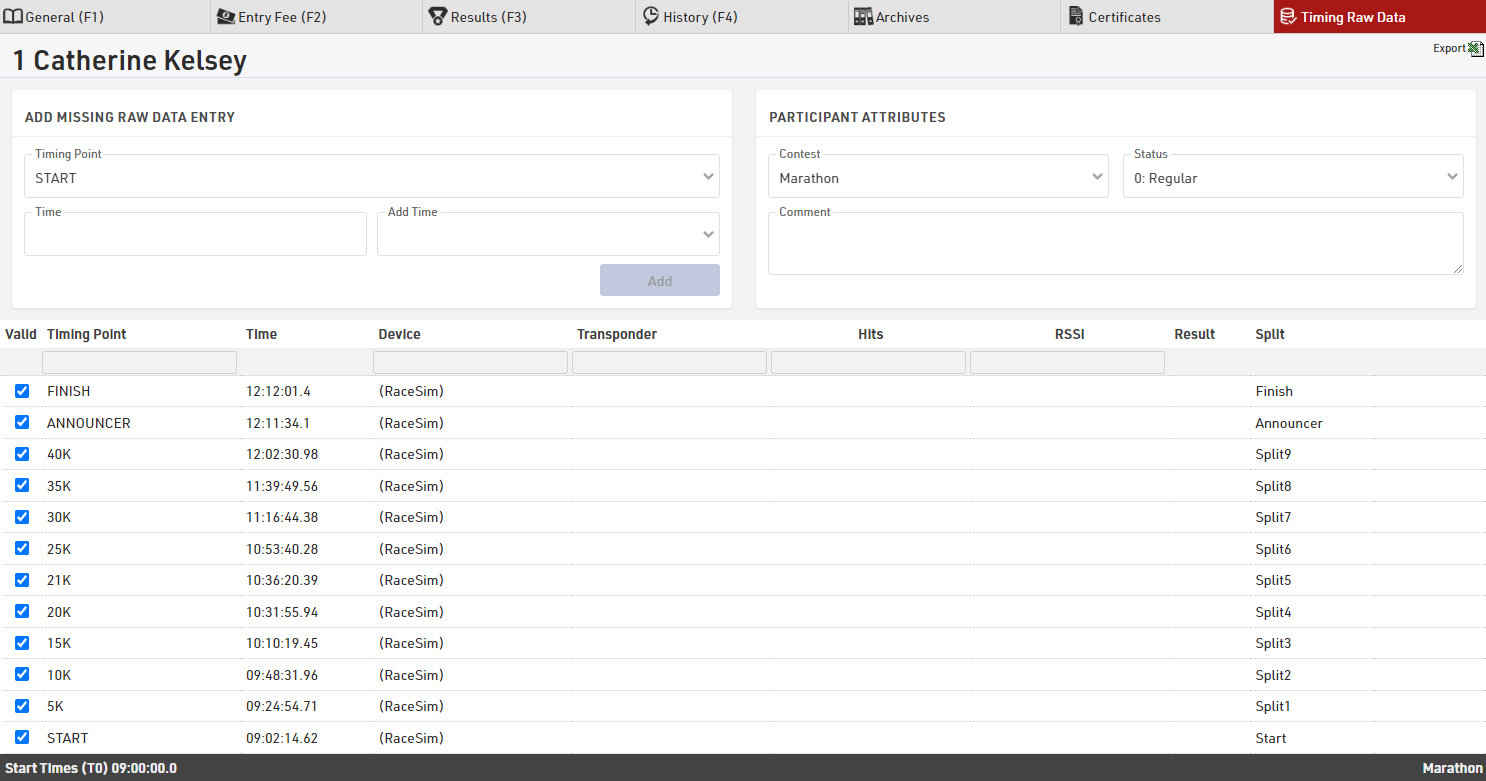
Here you have every recorded passing for the participant, technical information about the passing, and which result the passing has been used for, if any. See Passing Information for more details about understanding the technical information.
If a time should be ignored then untick the box in the first column and the time will be greyed out and ignored for raw data calculations, re-tick the box to use it again. Results will be re-calculated automatically.
If you have missing passings or need to enter additional raw data then you can do this below the table, just select the timing point and enter the time. You can enter the time as time of day, or as a race time / split time and then have the option to add T0 or any other result to this time, useful if you have a net time for a participant or need to add a missing split without calculating the time of day.
If you want to save a copy of all the raw data for review then the export function allows you to export all raw data for just the current participant or all participants.
Output
The Output Window is used for the presentation / displaying of data, broken down to 5 categories (accessible from the buttons in the top-left corner).
Lists
The most important method for getting data out of RACE RESULT 12. Create any list of data - whether for printed results, publishing online results, results screens, tools for the announcer, your own checklists for verifying results or any custom report you need.
Certificates
A design tool for creating layouts with text and images on a page. They are mainly used for race certificates, but also for individual result print outs or to create receipts/invoices.
Certificate Sets
Determine which participants should receive a particular certificate, these sets can then be printed or published online or accessed through tools such as the Results Kiosk.
Labels
Create label sheets with rows and columns for printing personalised labels
Statistics
Create standard or custom statistics from the participants data.
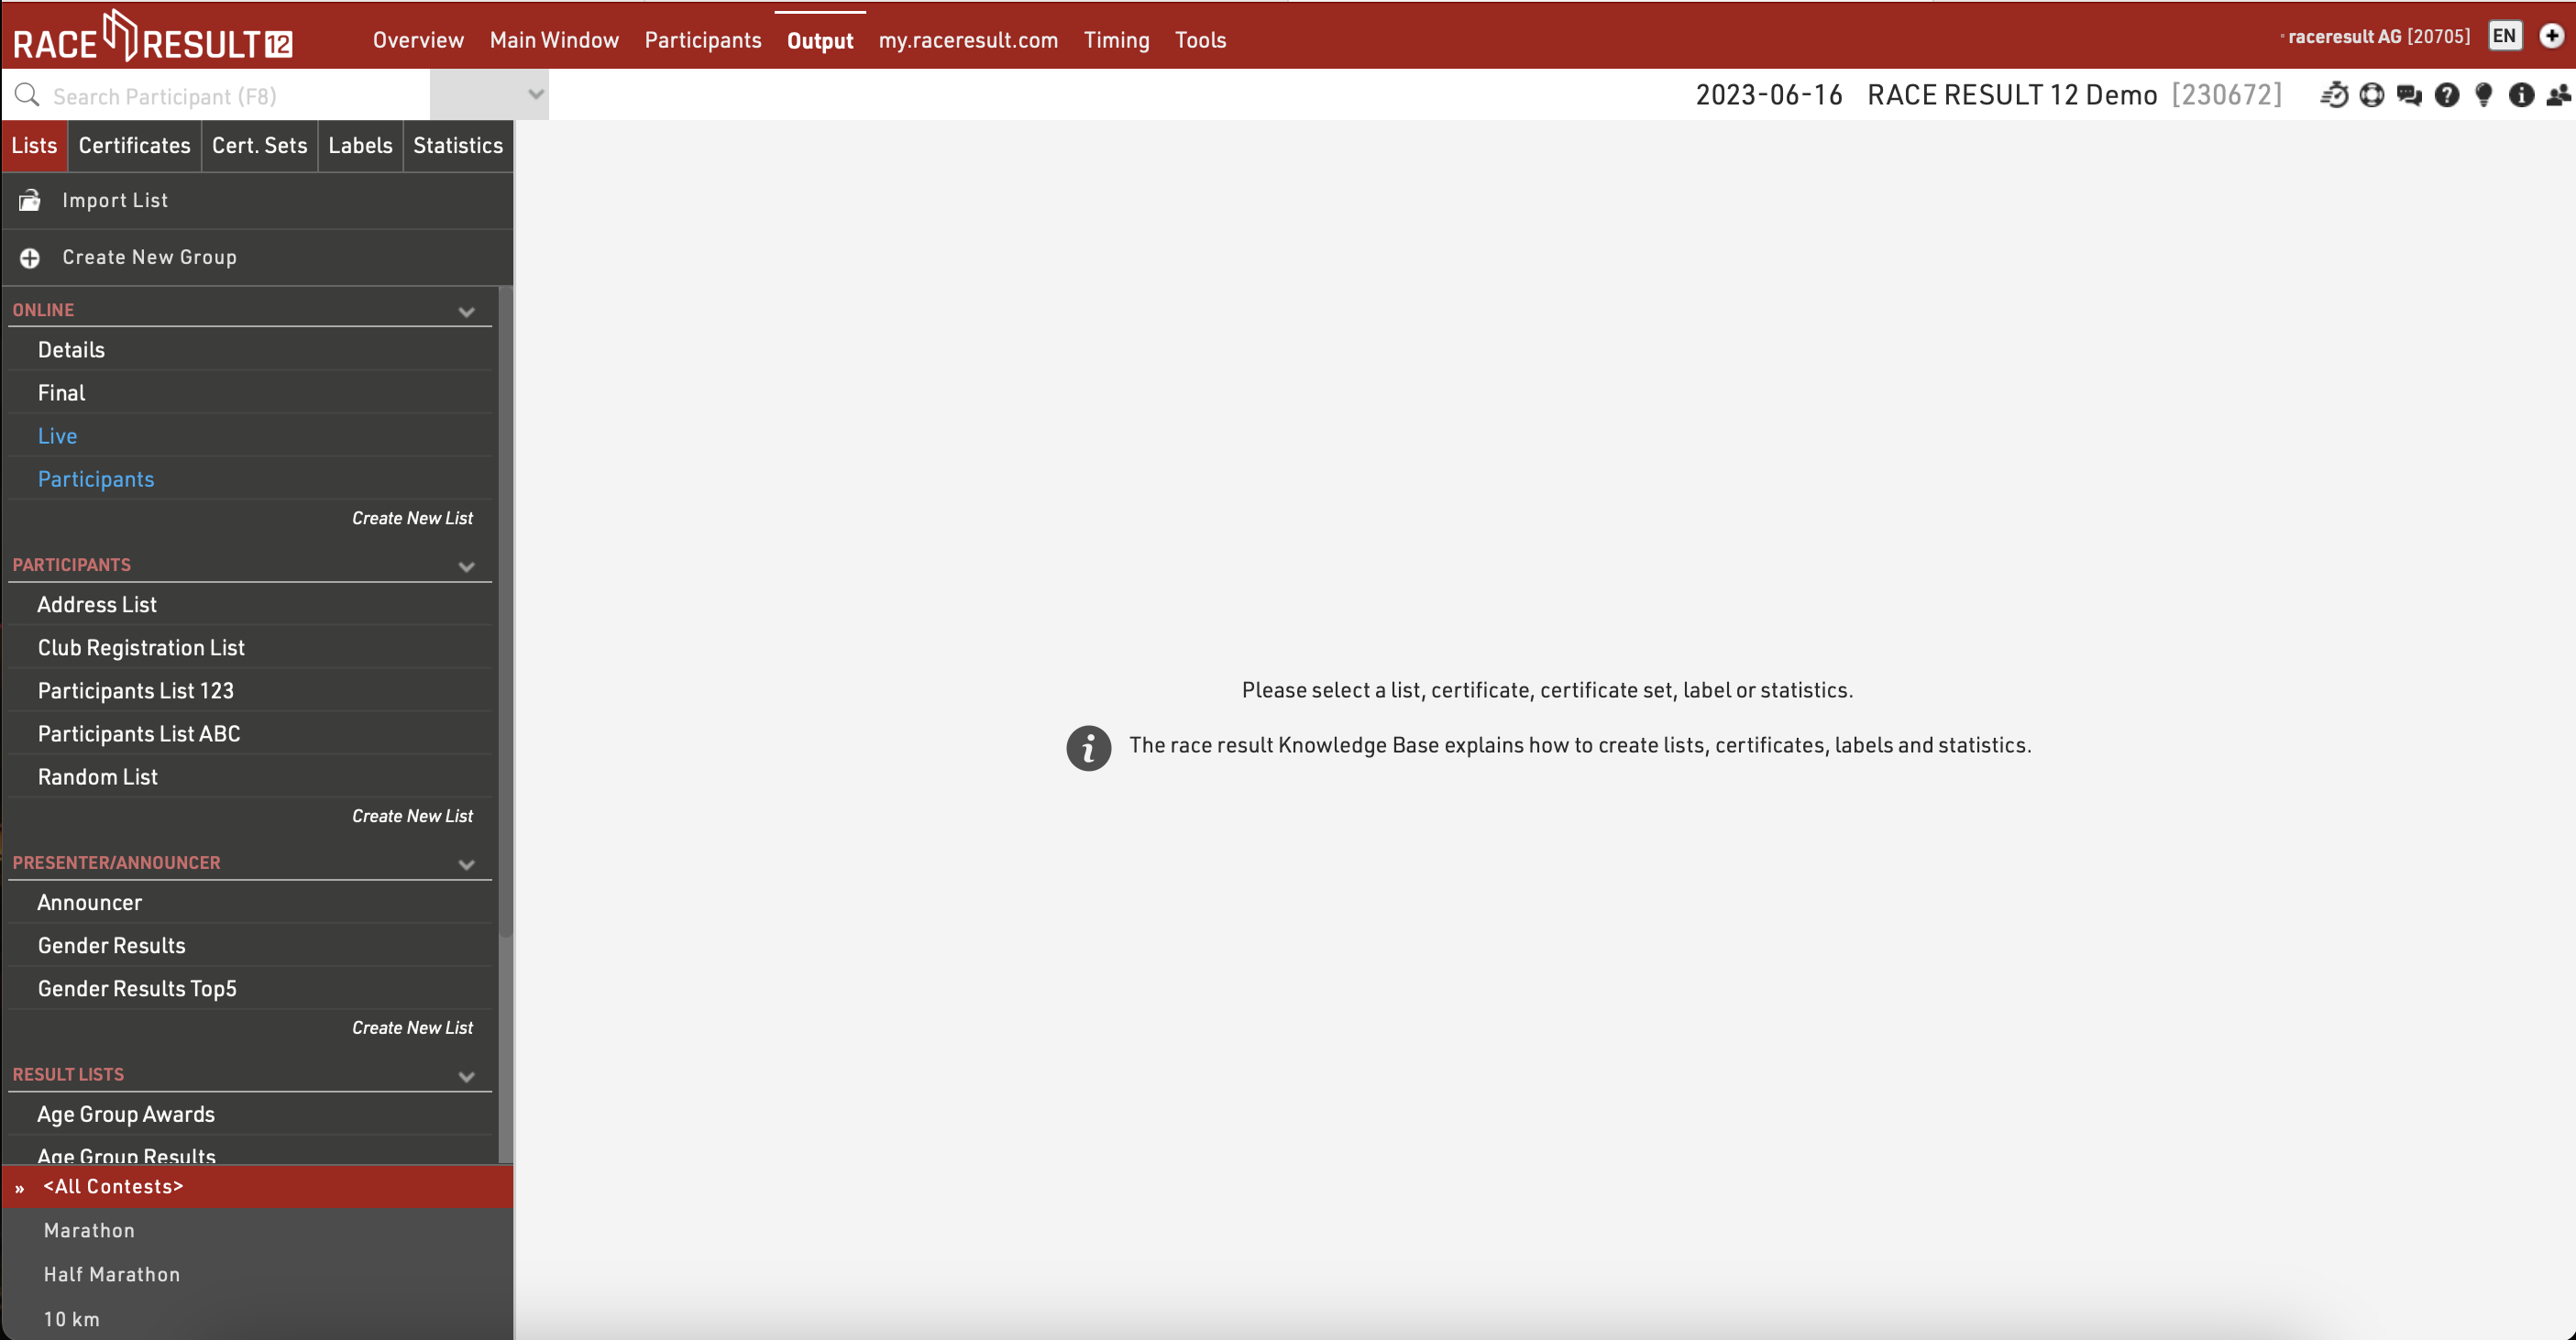
The bottom left contains a filter for Contests, by default Outputs will automatically be loaded for All Contests, but you can quickly filter an output to specific Contests by selecting them from this list, or select multiple Contests using the checkboxes when hovering an item.
Lists
Lists show a defined set of fields for a specific set of records. The settings of a list determine:
- which participants are shown
- which data fields (columns) are shown
- how the records are sorted
- how the records are formatted
- how the page is formatted (page format, margin etc)
Lists are additionally sorted into categories. By clicking the category head, the category can be collapsed and uncollapsed. To create a new category, click the New List Category link at the top. You can also rename List categories.
Lists can be sorted manually via drag&drop. Therefore move the cursor to the free space left of the list name. You can also drag&drop the list into another category. To sort the lists in a category alphabetically, click the  icon. Empty categories will be deleted automatically when you reload the window.
Clicking the name of an output list opens an overview page for that list.
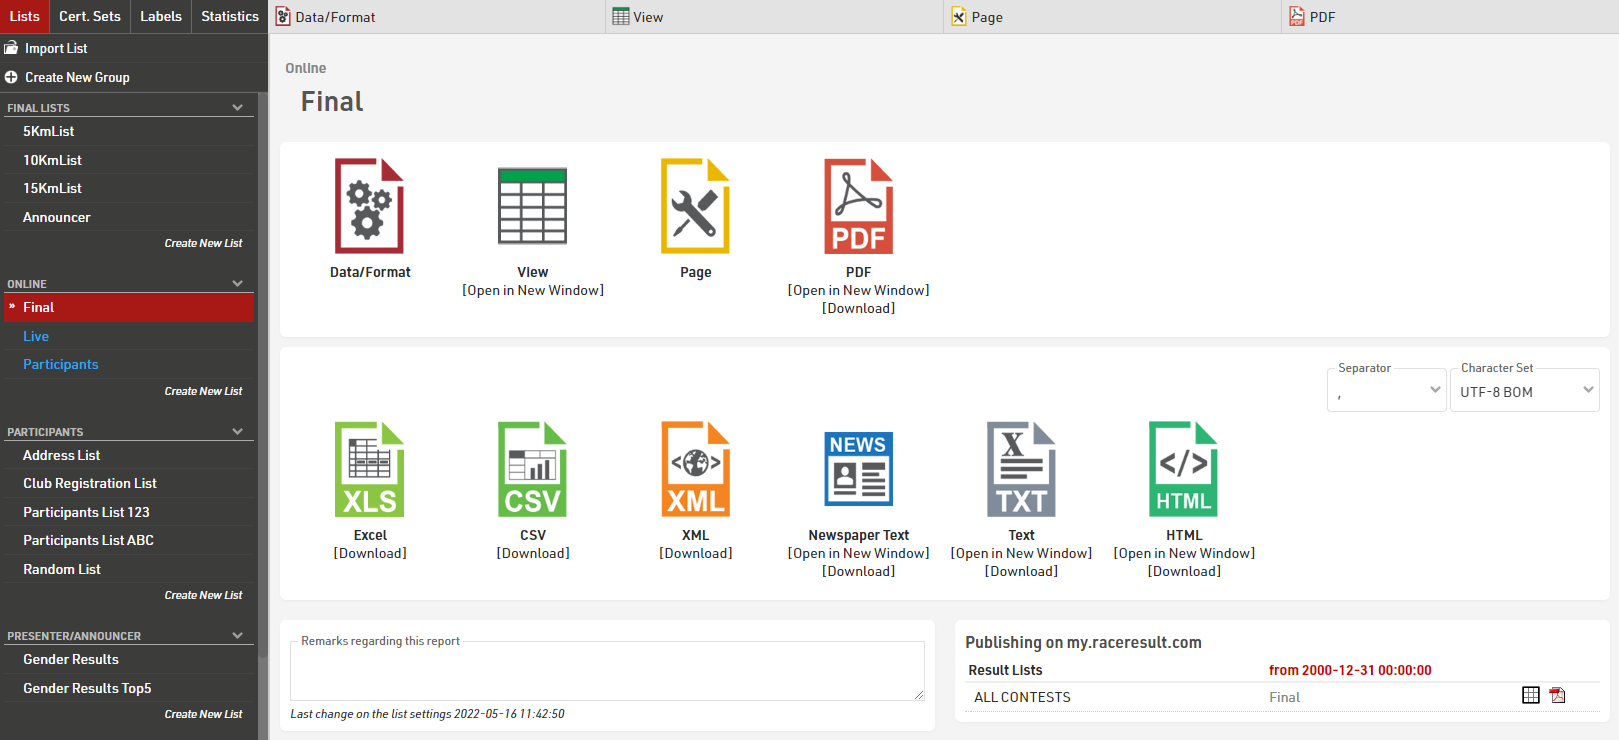
The settings of a list are split into the tabs Data/Format and Page. Data/Format contains all settings regarding the data shown on the list and how it is formatted, whereas the Page settings concern the general page layout and are only relevant for the PDF and HTML output form.
To view a list click the View button or tab, this can also be opened in a new window, lists can also be opened directly to the View tab by double clicking the list name from the menu. A PDF view of the list can also be previewed or downloaded.
Lists can also be exported in different formats as EXCEL, CSV, XML, TXT and HTML.
Certificados/Certif. Sets
A diferencia de una Lista, un Certificado crea una página para cada participante. Los textos e imágenes se pueden colocar libremente en la página. Un certificado sirve principalmente para:
- Imprimir el nombre, tiempo etc. en un certificado pre-impreso durante el evento.
- Presentación/Impresión de certificados en my.raceresult.com (completos com imagen de fondo).
Además, los certificados pueden ser usados para:
- otras impresiones, como confirmación de inscripción, facturas, recibos, informes de vueltas en una carrera de 24 horas, etc.
- Imagen de fondo en una Lista
- Portada y contraportada de una Lista
- Contenido de Etiquetas
Los diseños de certificados primero deben crearse en la pestaña Certificados que abre la herramienta de diseño para crear diferentes diseños para diferentes propósitos.
Una vez que haya configurado el certificado, Conjunto de Certificados define para qué participantes se creará un certificado en específico. Puede editar la configuración de un Conjunto de Certificados haciendo click en Ajustes después de seleccionar el conjunto de certificados en la Pestaña Output.
Los Conjuntos de Certificados sirven para imprimir certificados en conjunto. Para imprimir certificados individuales, diríjase a la opción Certificados en la Pestaña Participantes.
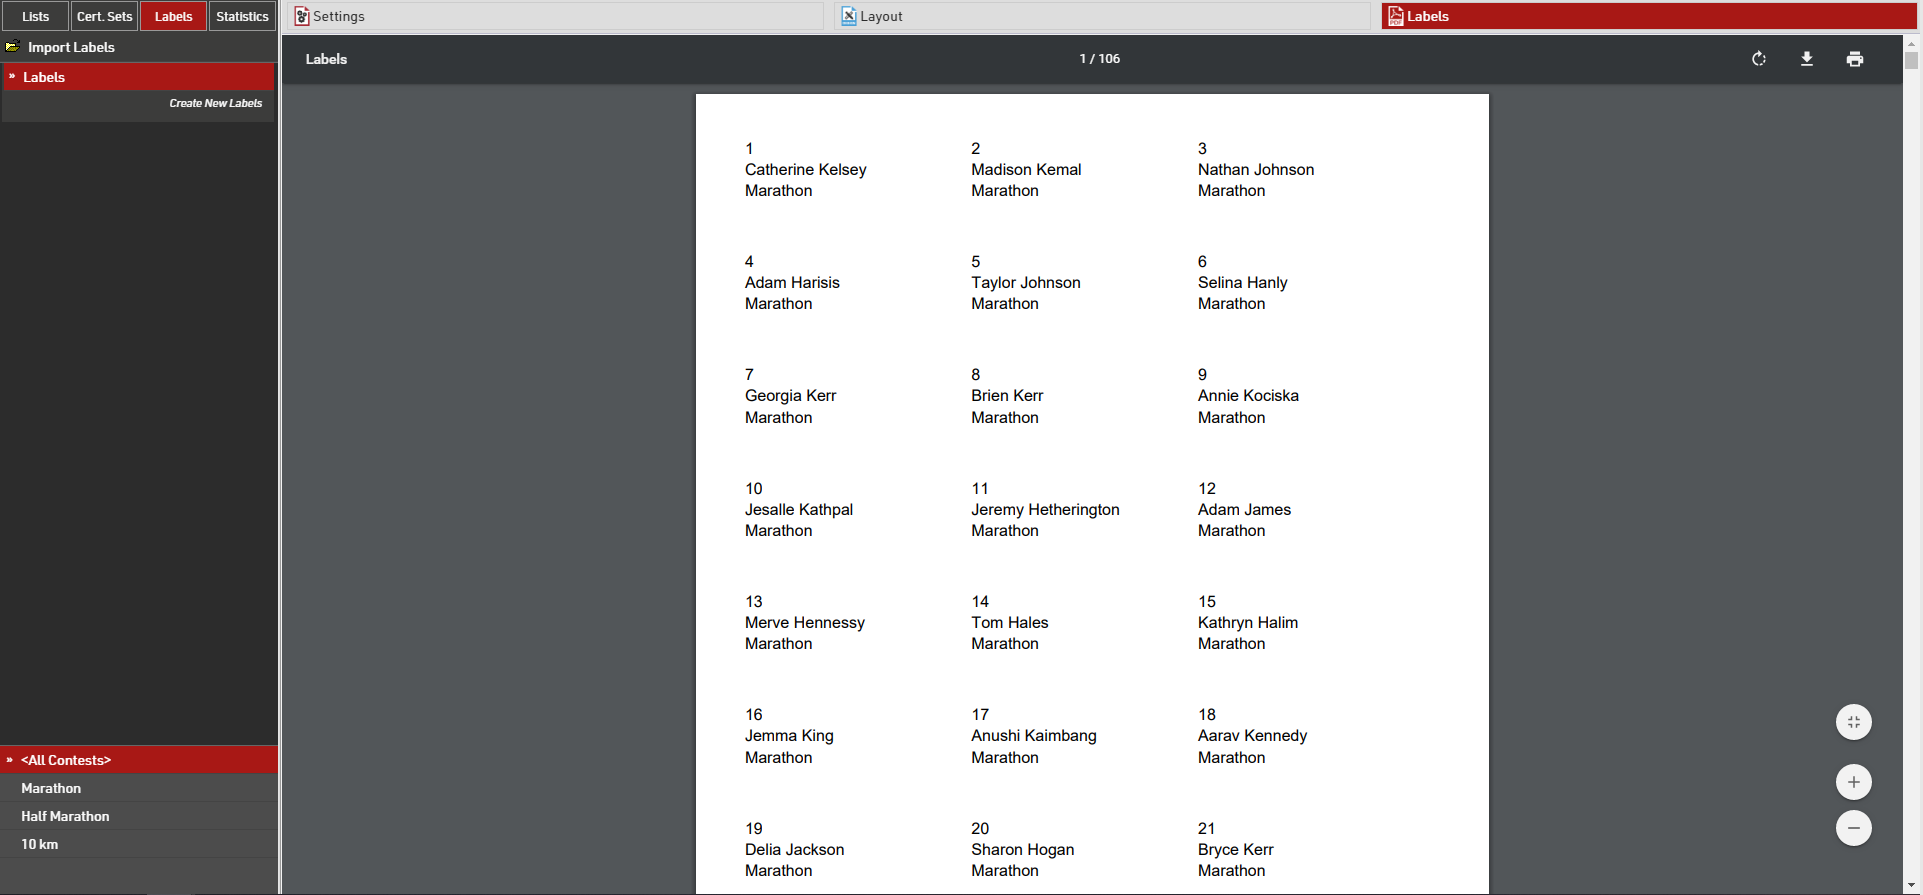
Labels
Labels are normally printed on pre-cut label sheets and allow you to place either text or a certificate design on each label.
The Label Settings determine the basic layout and template for the labels.
Participants
A Filter that defines for which participants a label will be created.
Sorting Fields that define how the labels will be sorted.
Content
Enter an Expression that defines the content for each label.
Other
The Directional layout (row / column direction) of the labels.
Optionally a design to be printed instead of the Expression, see Labels with Design, if a design is selected then it can be edited directly through the Layout tab.
Optionally replace the content of the label with an automatically generated Barcode for each label, the barcode will include the bib number.
Font
Define the font, font size, formatting and alignment for text.
Page
Page settings for each sheet, these are normally provided by the manufacturer of the label sheets.
Label
The individual label sizing / spacing, these are normally provided by the manufacturer of the label sheets.
Once the settings are defined you can preview, download and print the labels through the Labels tab, an example might look like this.
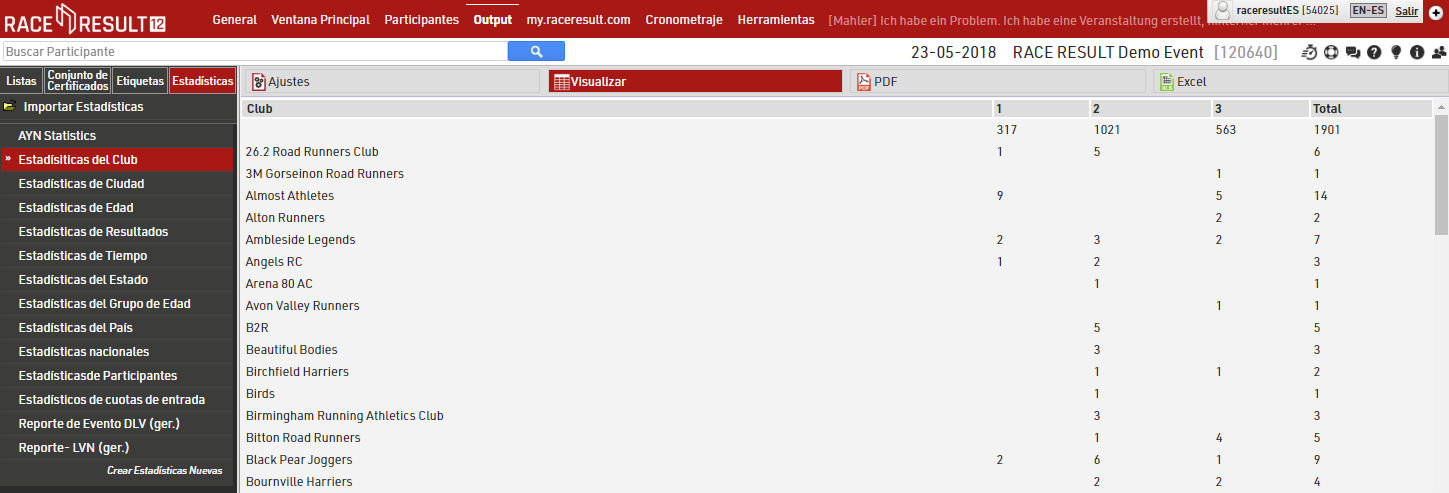
Estadísticas
Cada archivo de evento nuevo contiene Estadísticas predeterminadas, por ejemplo Estadísticas de Club, las cuales muestran el número de participantes por competencia y ciudad:
Dynamic Formatting
Dynamic Formatting allows to format the individual records of Lists and Certificates differently, for example men could be printed in blue and women in pink.
An Expression is used which generates a text with formatting instructions. This expression is entered for lists in the Extended Column Settings and for Certificates.
The formatting text can contain several instructions which are separated by semicolons:
Element1;Element2;...
These elements can be:
|
B |
Bold |
| I | Italic |
| U | Underlined |
| S | Strike-Through |
| AL | Align Left |
| AC | Align Center |
| AR | Align Right |
| C(X) | Font Color X |
| BG(X) | Background Color X |
| T(X) | Transparency level (0-100%) |
|
BTC(X) / BRC(X) BBC(X) / BLC(X) |
Border Top / Right / Bottom / Left Color X |
| BTW(X) / BRW(X) BBW(X) / BLW(X) |
Border Top / Right / Bottom / Left Width X |
| FS(X)* | Font Size X in pt |
| OC(X)** | Outline Text Color X |
| OW(X)** | Outline Width X Value 0-5 in 0.5 increments |
* only applicable to outputs in PDF and certificates in Designer. For PDF outputs X must be smaller than the default font size.
**only applicable to certificates in the Designer
Possible color values are:
See more information on colours HERE
Examples
A field will be printed italic for women:
if([Sex]="f"; "I"; "")
A field is formatted with a red background and white text for participants with Age less than 18.
if([Age]<18; "BG(#FF0000);C(#FFFFFF)"; "")
A field is marked red for participants from USA:
if([Nation.IOC]="USA"; "C(255,0,0)"; "")
Colors
The Colors of the text elements on Lists and Certificates can be adjusted. By default all texts are shown in RGB-black.
RACE RESULT 12 supports RGB colors as well as CMYK colors.
The colors of the columns in a list can be edited in the Extended Column Settings. You can use the following formats:
- a hex value, like in HTML (RGB), e.g. #FF3300
- RGB as a decimal value, e.g. 255,51,10
- CMYK as a decimal value, e.g. 30,30,30,100
In Certificates, both RGB and CYMK colors can be set via the tool bar at the top of the screen.
With the help of Dynamic Formatting, fields can be formatted differently for each data record.
The following website is useful for picking colours and can convert between HTML, RGB and CMYK: https://html-color-codes.info/
my.raceresult.com
The my.raceresult.com tab serves to configure the registration and results platform my.raceresult.com and to handle inquires from my.raceresult.com
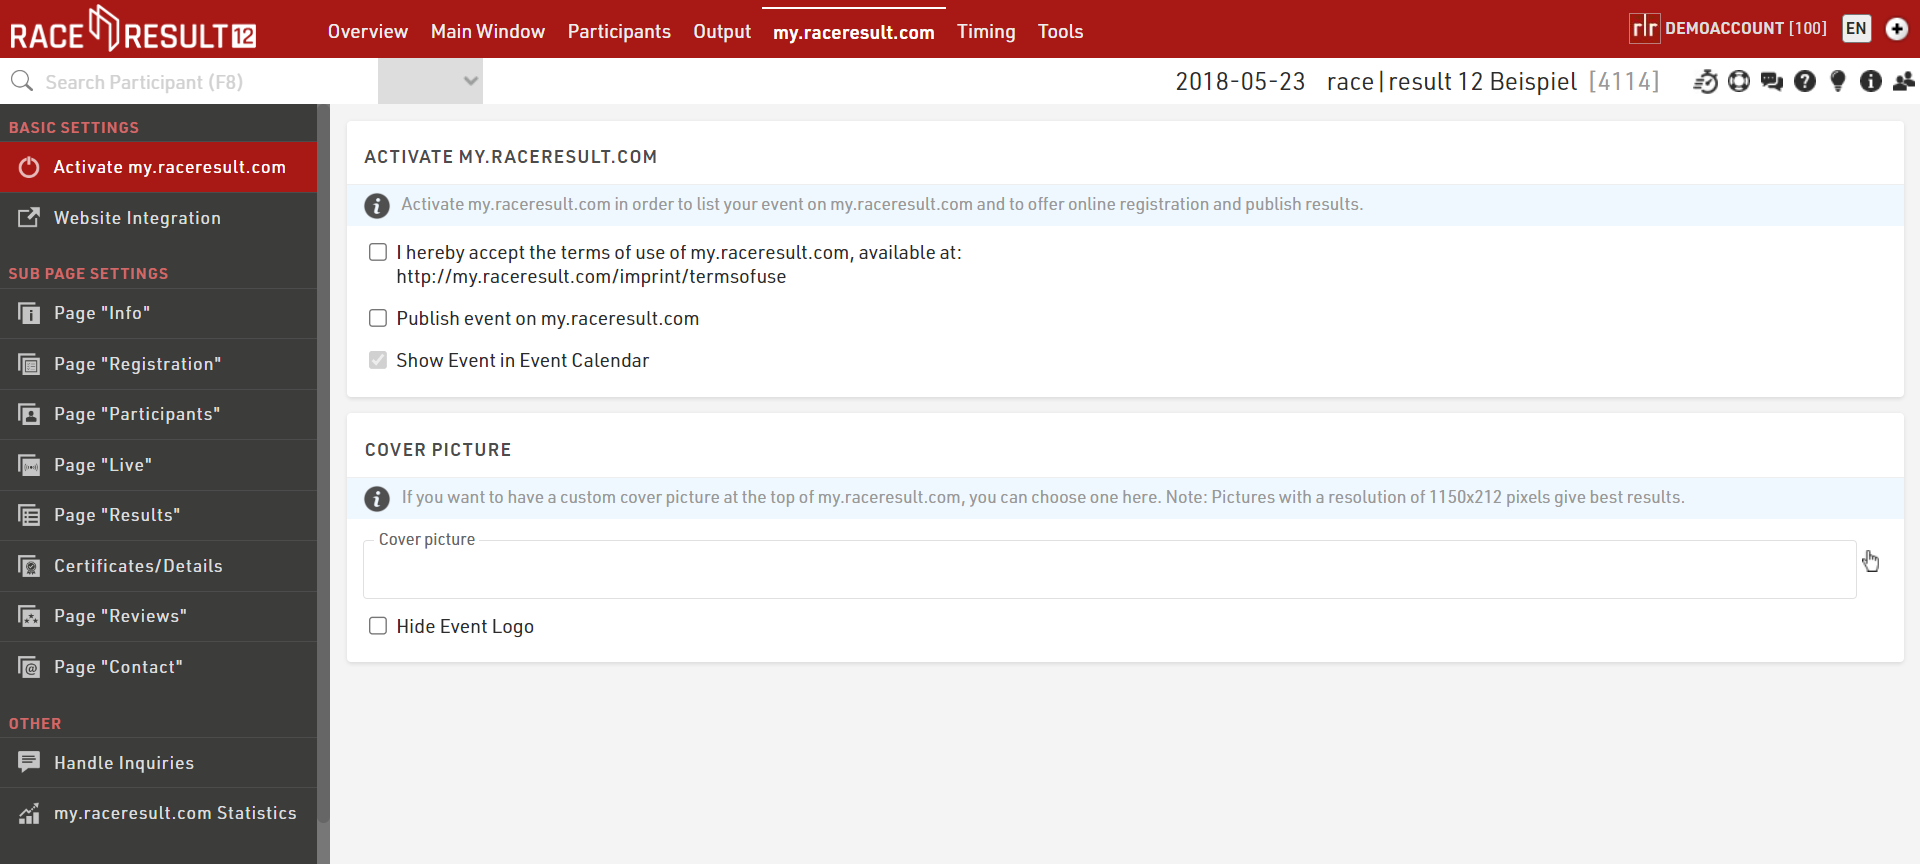
Basic Settings
Sub Page Settings
my.raceresult.com contains multiple sub pages for each event which can be used for different purposes, and can be hidden / displayed separately.
Other
Timing
The Timing Tab is used to connect to your RACE RESULT timing systems and includes the Data Exporters for forwarding of data to third party software/systems, it also contains a group of other tools designed to make Timing a race as simple and easy as possible. It should be your go-to window when timing an event.
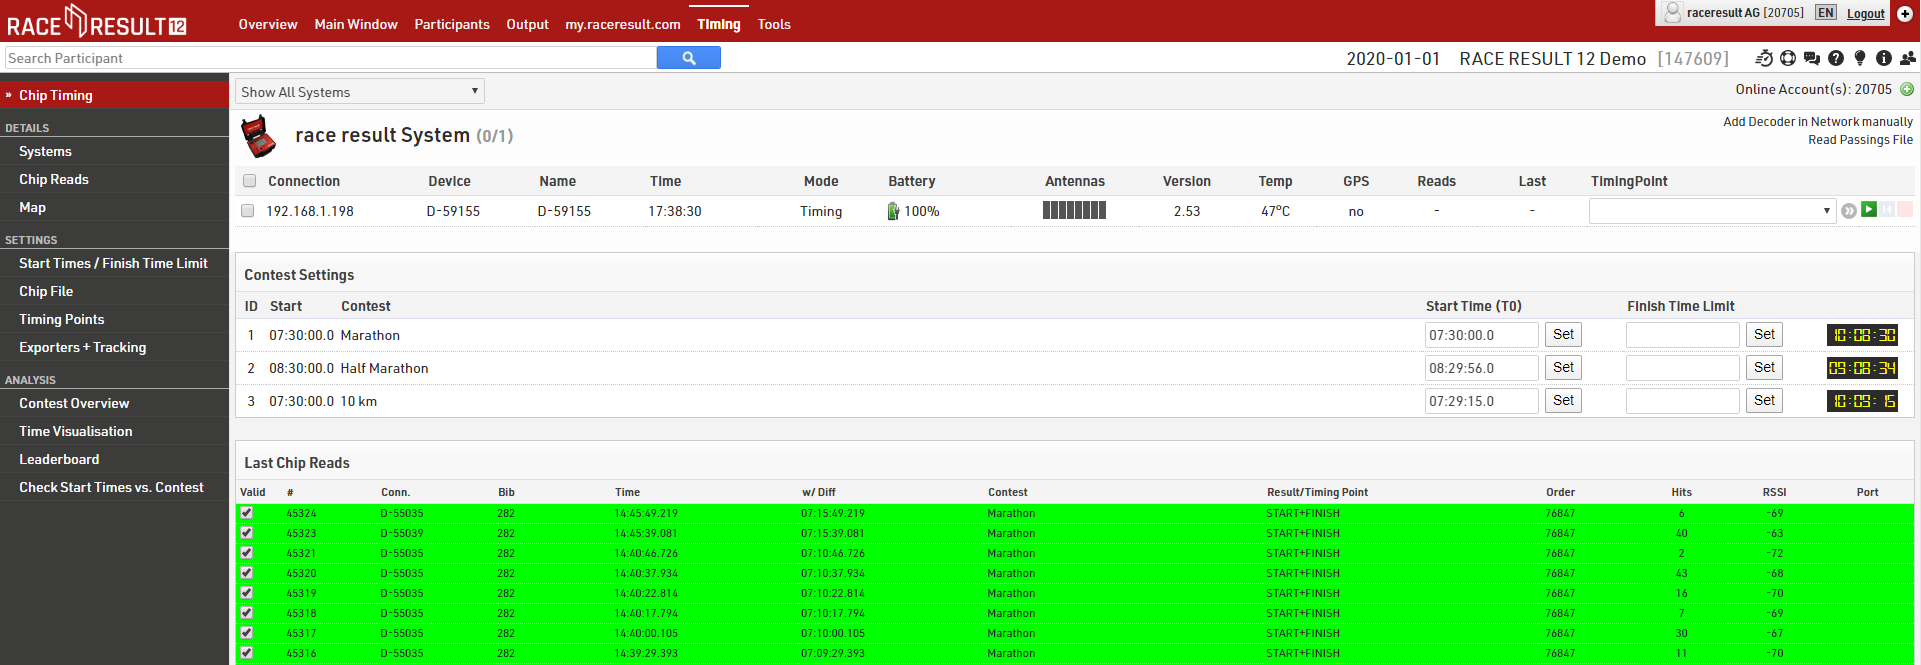
Chip Timing
When opening the Timing Module you will first be presented with the Chip Timing window, which gives you a brief overview of your timing systems and the first steps to timing a race.
This window can be used for most types of races if you have everything setup already, the functionality of parts of the Chip Timing window is explained in the additional sections below.
Alternatively there are advanced options on the other windows for more complex requirements such as when you have multiple Timing Systems to monitor and some additional tools which are useful during the event. Connecting to systems and the additional tools and functions are described in the sections below.
Details
Settings
In order to make the Timing more streamlined we moved a number of key settings to the new Timing Module so that they are just a click away.
From here you can edit: Start Times (T0) / Finish Time Limits , Chip File and Automatic Timing Point Selection
This section also includes the setup for Raw Data Exporters + Tracking Forwarding.
Analysis
Under Analysis you will find some tools which are useful for analysing your event whilst it is ongoing, these are designed you aid you with Timing the event by identifying any erroneous data, most often caused by participant error.
Contest Overview
This gives you an overview of each contest, showing the number of participants signed up, started / on-course and finished in each contest. Hovering over any of the segments gives a breakdown by gender also. You will also see a running clock next to each Contest which shows the elapsed time since T0.

Time Visualisation
Time Visualisation is a very helpful tool to check if participants miss reads and if times are realistic, or in other words to identify cheaters.
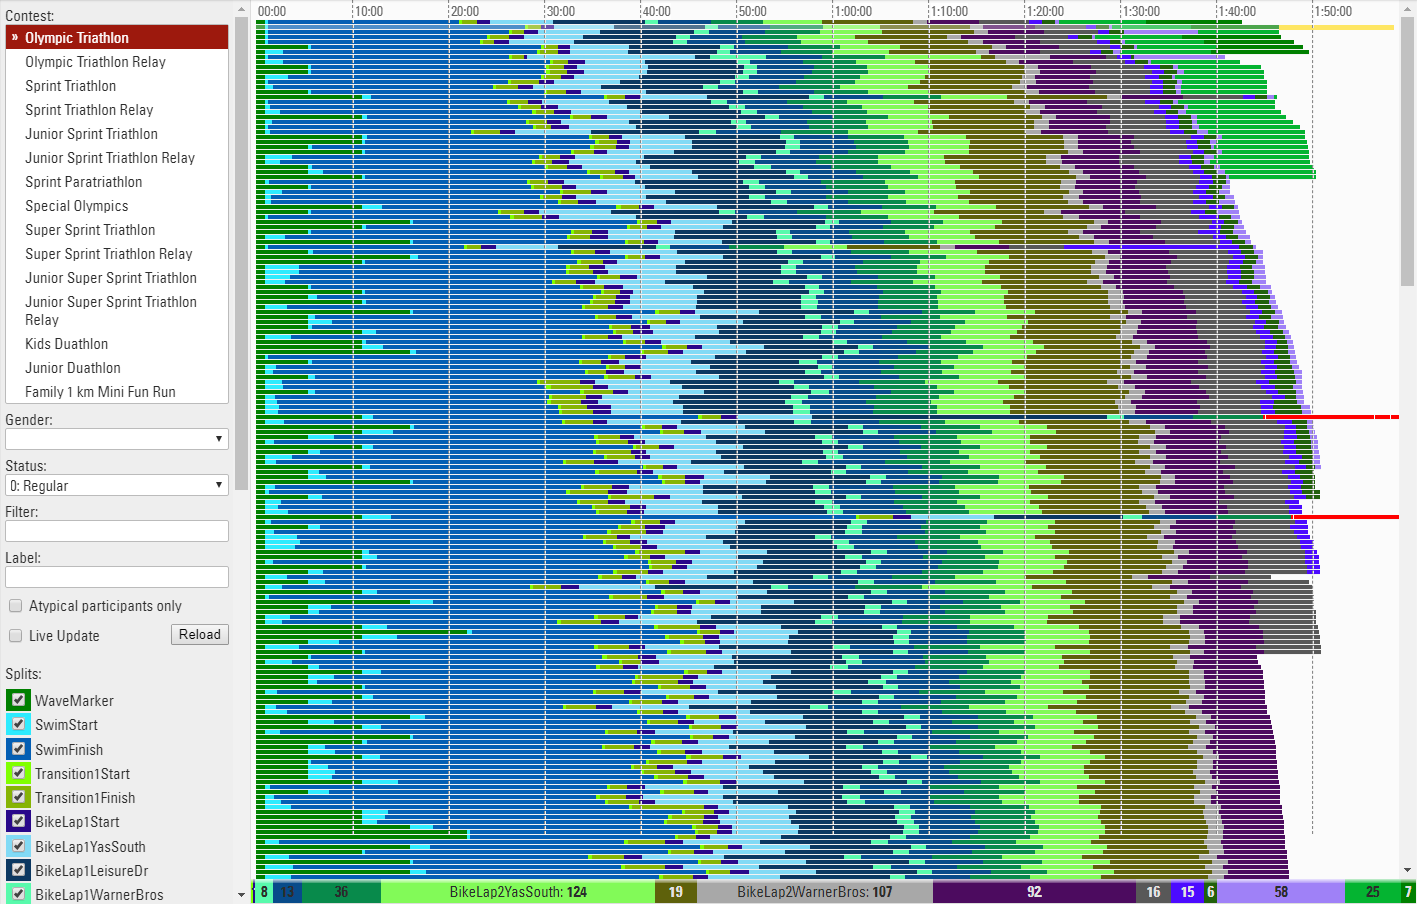
The tool shows one line for each participant. The different colors represent the section times between two split timing points. The length of the bar represents the time and the fastest athletes are at the top.
If you click a line you will see the details and can immediately disqualify the participant.
Use the settings bar on the left to select the contest(s), gender, status or apply any other filter, you should also select the splits or results that will be part of the visualisation. Sometimes you may want to exclude certain times. Usually you will want to see just the key timing data for each Timing Point, not the intermediate split times. A label can be applied to each line, this could be particularly useful when comparing multiple contests together.
If you only want to see participants who are missing data then click "Atypical Participants Only", the view also has a live update checkbox which will refresh the visualisation as new Results are calculated, this is useful for monitoring a race whilst it is in progress.
Best Practice Tip: If you have a large number of splits and the data does not make sense, try deselecting Timing Points to just keep the important Results which show where somebody is on the course as opposed to split times between 2 Results. Sometimes participants standing at the side lines can cause some erratic data as the Visualisation cannot determine the correct order of the Timing Points, it is often best to ignore this data in the participant record.
Read Rates
Read rates offers additional analysis of Splits to compare detection rates across the Primary & Backup timing points and also considering any manual raw data entries.
For each Split the expected number of participants is calculated, either based on the number of finishers (if Finishers only is ticked) or by the number of participants seen at this Split or a later one. This is then used to calculate the percentage of participants detected at the main timing point, backup timing point, a combined rate across both, the number of manual reads and the total participants detected at this point across all.
A table is generated for each Contest independently and the total read rates across all Splits is also shown at the bottom of the table.
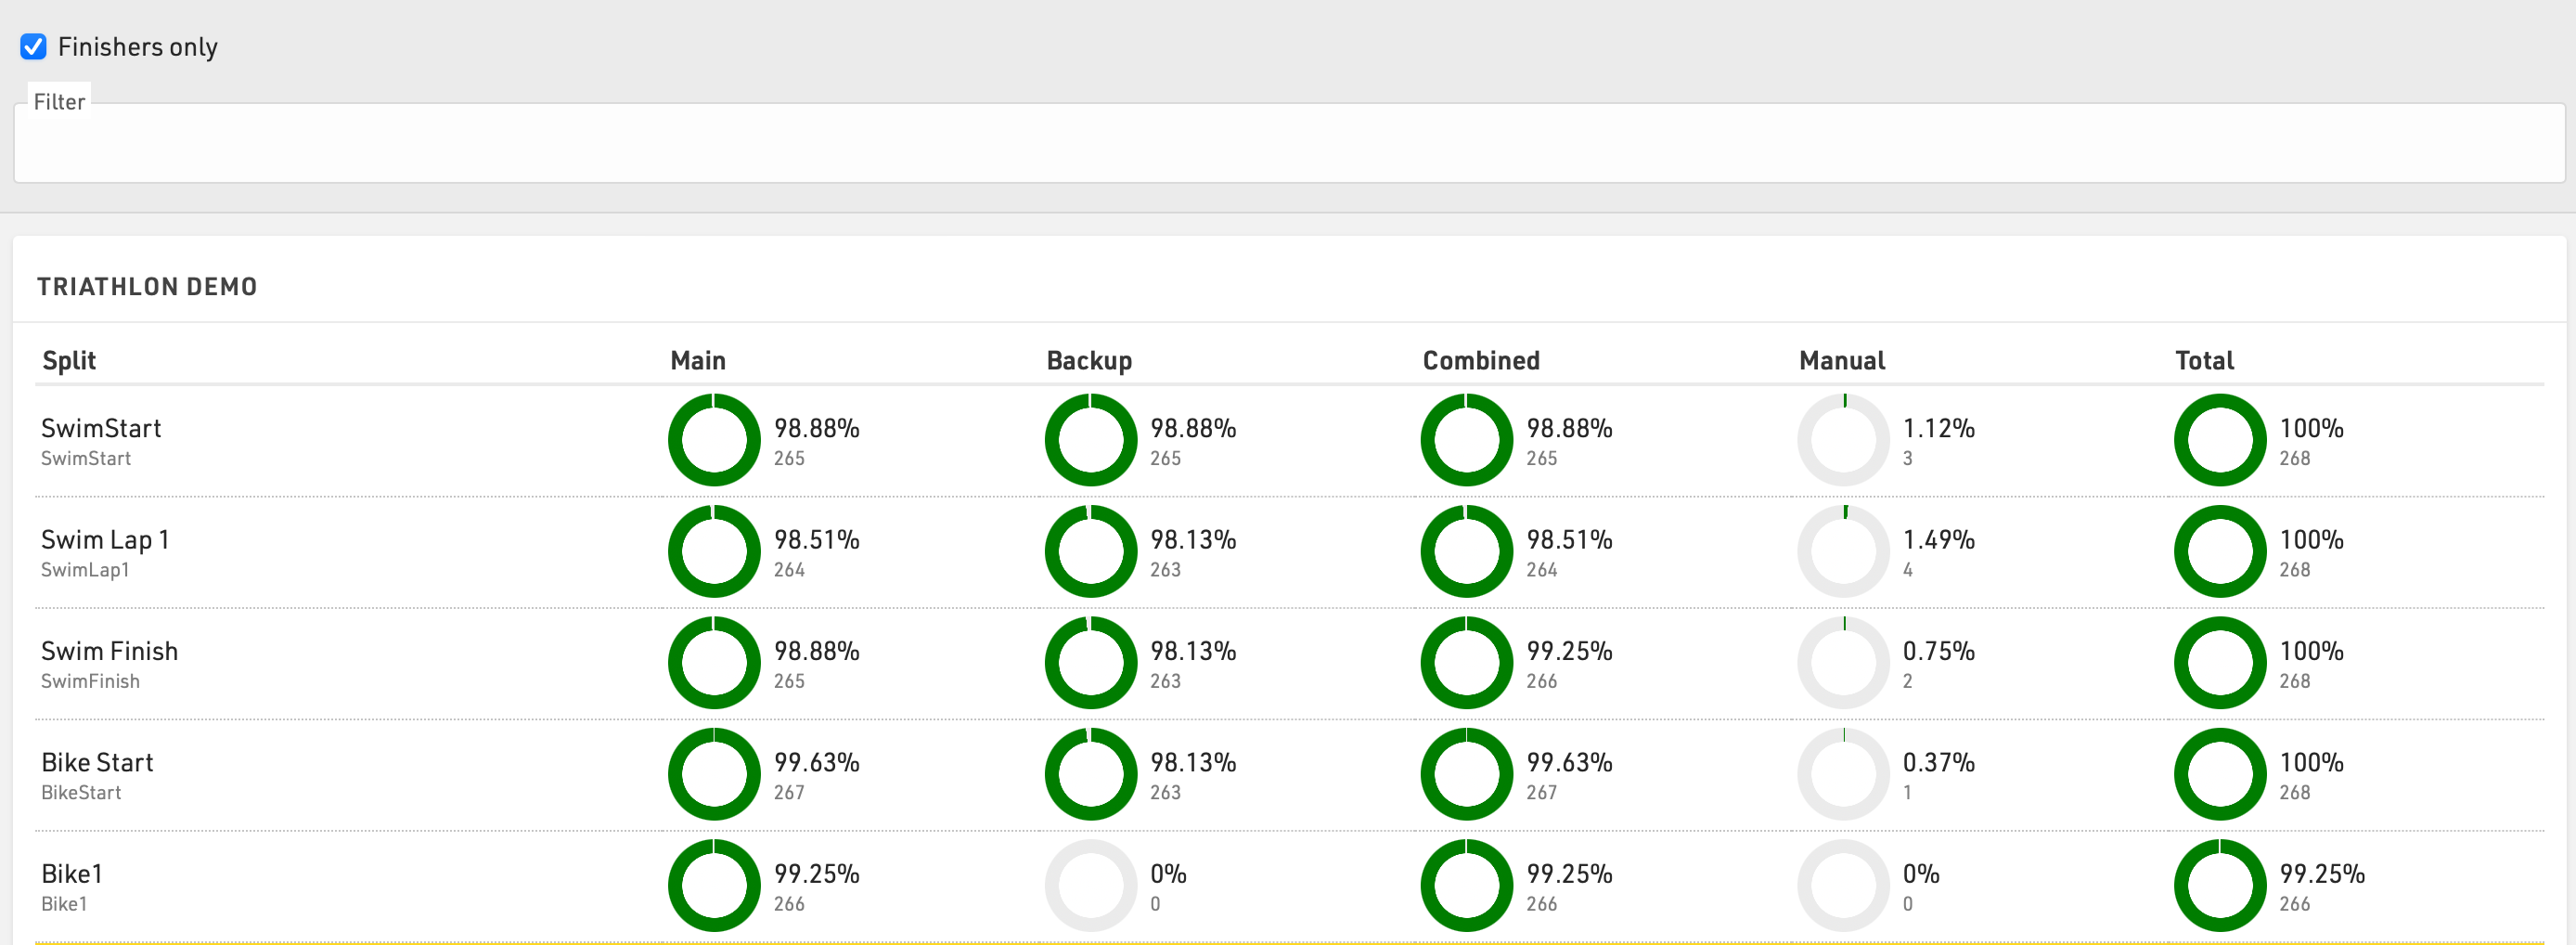
An additional optional filter can be applied.
Leaderboard
The Leaderboard in the Overview Window shows the winners or current leaders of the event. Through the settings at the bottom of the screen, you can select a Ranking and a number x so that the first x participants in each group of the ranking will be shown.
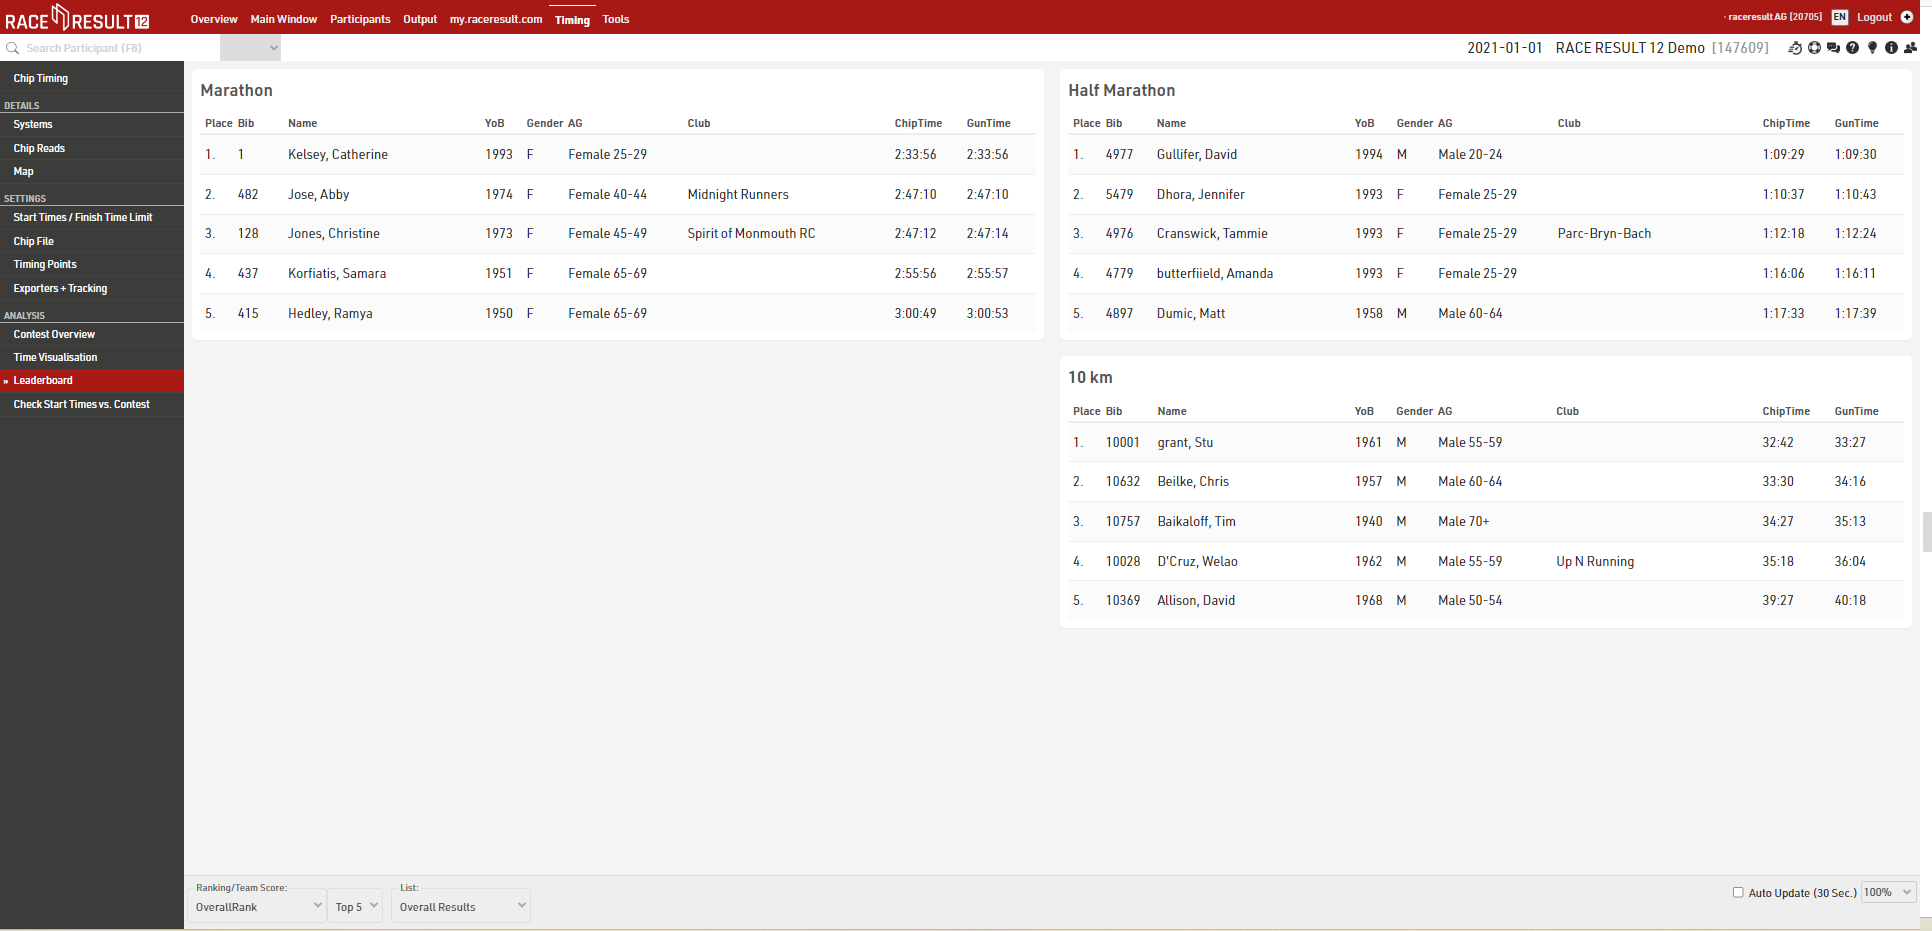
If you would like to show different columns (or use a different format), you can also select a List from which the column settings will be taken.
Enable the Auto Update checkbox to auto refresh the page every 30 seconds.
Check Start Times vs. Contest
Check Start Times vs. Contest is a helpful tool to find particiants who started in a contest other than the one they registered for. In particular when using Raw Data Mode, these may have no times in their results at all because all raw data detections are filtered due to the wrong contest. In consequence it would be difficult without this tool to find these participants.
Preconditions
Please consider the following preconditions for the tool to work:
- Only works with advanced Results at this time
- The timing system is running on time of day
- Start times will be kept
- The result that holds the start time is selected as Start Result in the Contest Settings.

What you see
- Underneath the headline with the name of the contest, those participants are listed that are registered for that contest, but started probably in another contest.
- The area with gray background color shows the time span the majority of participants needed to complete the proposed contest.
- The red bar, on the contrary, shows the time span of the contest the participant is actually registered for.
- The vertical lines show the participants' chip reads. The legend at the bottom of the screen shows which color belongs to which timing point.
- If there are many reads of the same chip with only small gaps in between, the reads may appear like a bar.
Making changes
You can either change the contest of the participant or change the status (for example to DSQ). When clicking on the bib number, the Participants Window shows on the right side of the screen and you can check the Raw Data in detail before making any changes.
Exporters / Forwarding
The exporter feature built in to the Timing tab of RACE RESULT 12 can be used to trigger the sending of data to external sources, this can be used to either send E-mail / SMS templates or export timing data to other systems such as third party timing software, tracking partners, LED clocks and more.
Exporters include some built-in functionality for specific partners but it is designed to be fully flexible to support a wide range of uses.
The exporter runs on both online and offline versions of RACE RESULT 12.
Herramientas y Programas
Presenter
Presenter is used to create displays for primarily on-site results presentation, announcers or for other staff / volunteers to easily access data.
Within an event file multiple templates for presenter displays can be created, each of which can be accessed by a unique URL, this allows different templates to be defined for different purposes. The URLs can be accessed without logging in to RACE RESULT 12 meaning they can easily be shared without giving full access to the event file. By default, you will find three presenters in your event file: Chip Check, Present Results, and Show Last Chip Reads.
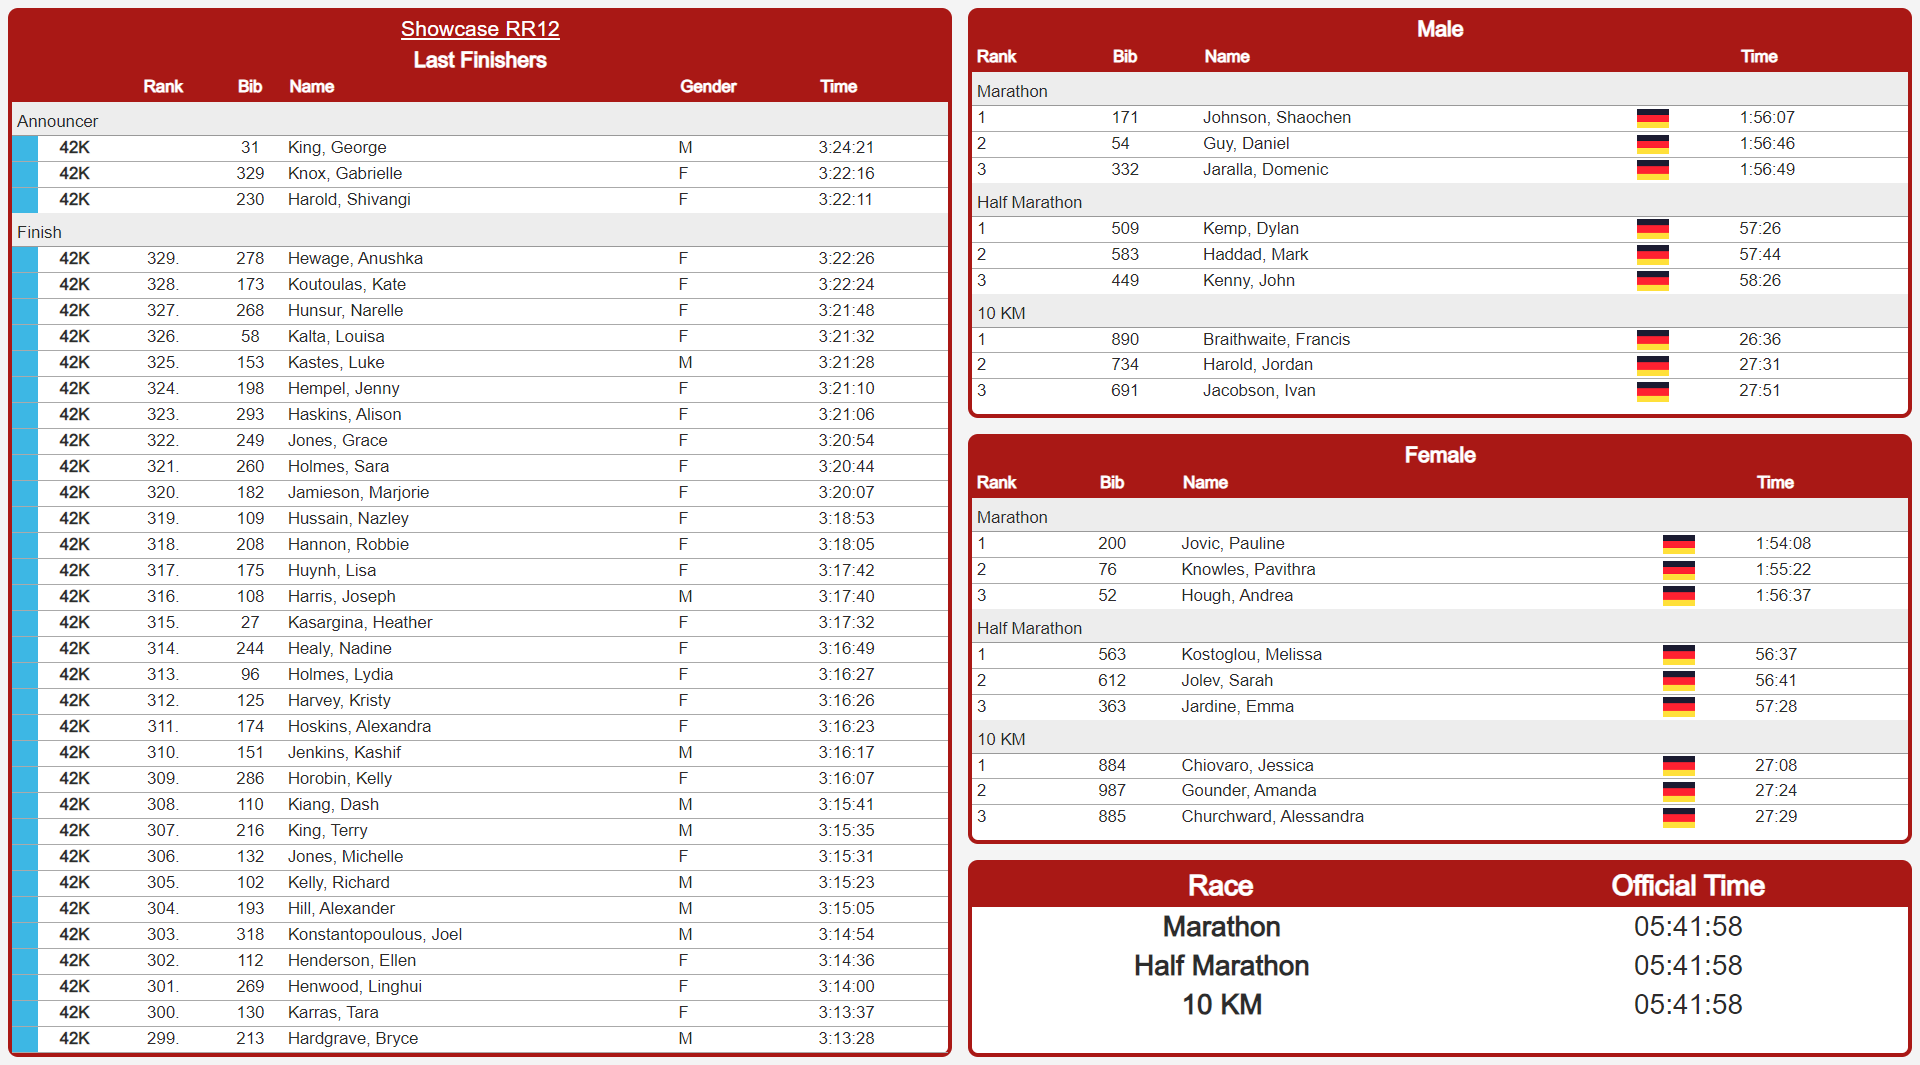
Displays may contain multiple screens which can be switched manually, using a touch screen or using the FN-Keys 1-4.
Checkin Kiosks
The Kiosks provide a flexible tool for looking up and editing participant data during an event for example at registration, or giving access to individuals to easily lookup and edit fields without providing full access to RACE RESULT 12.
Within an event file multiple templates for kiosks can be created, each of which can be accessed by a unique URL, this allows different templates to be defined for different purposes.
The given name to each kiosk will be shown in participants' history, when changes are made: in this way, you can always retrieve from which kiosk (and user) a change has been made.
Cronometraje Manual
La herramienta Cronometraje Manual se puede utilizar para registrar tiempos manualmente para cada participante, ya sea como una hora de Split primaria o finalización o como una copia de seguridad manual. También se puede para conectarse a dispositivos seriales que transmiten datos.
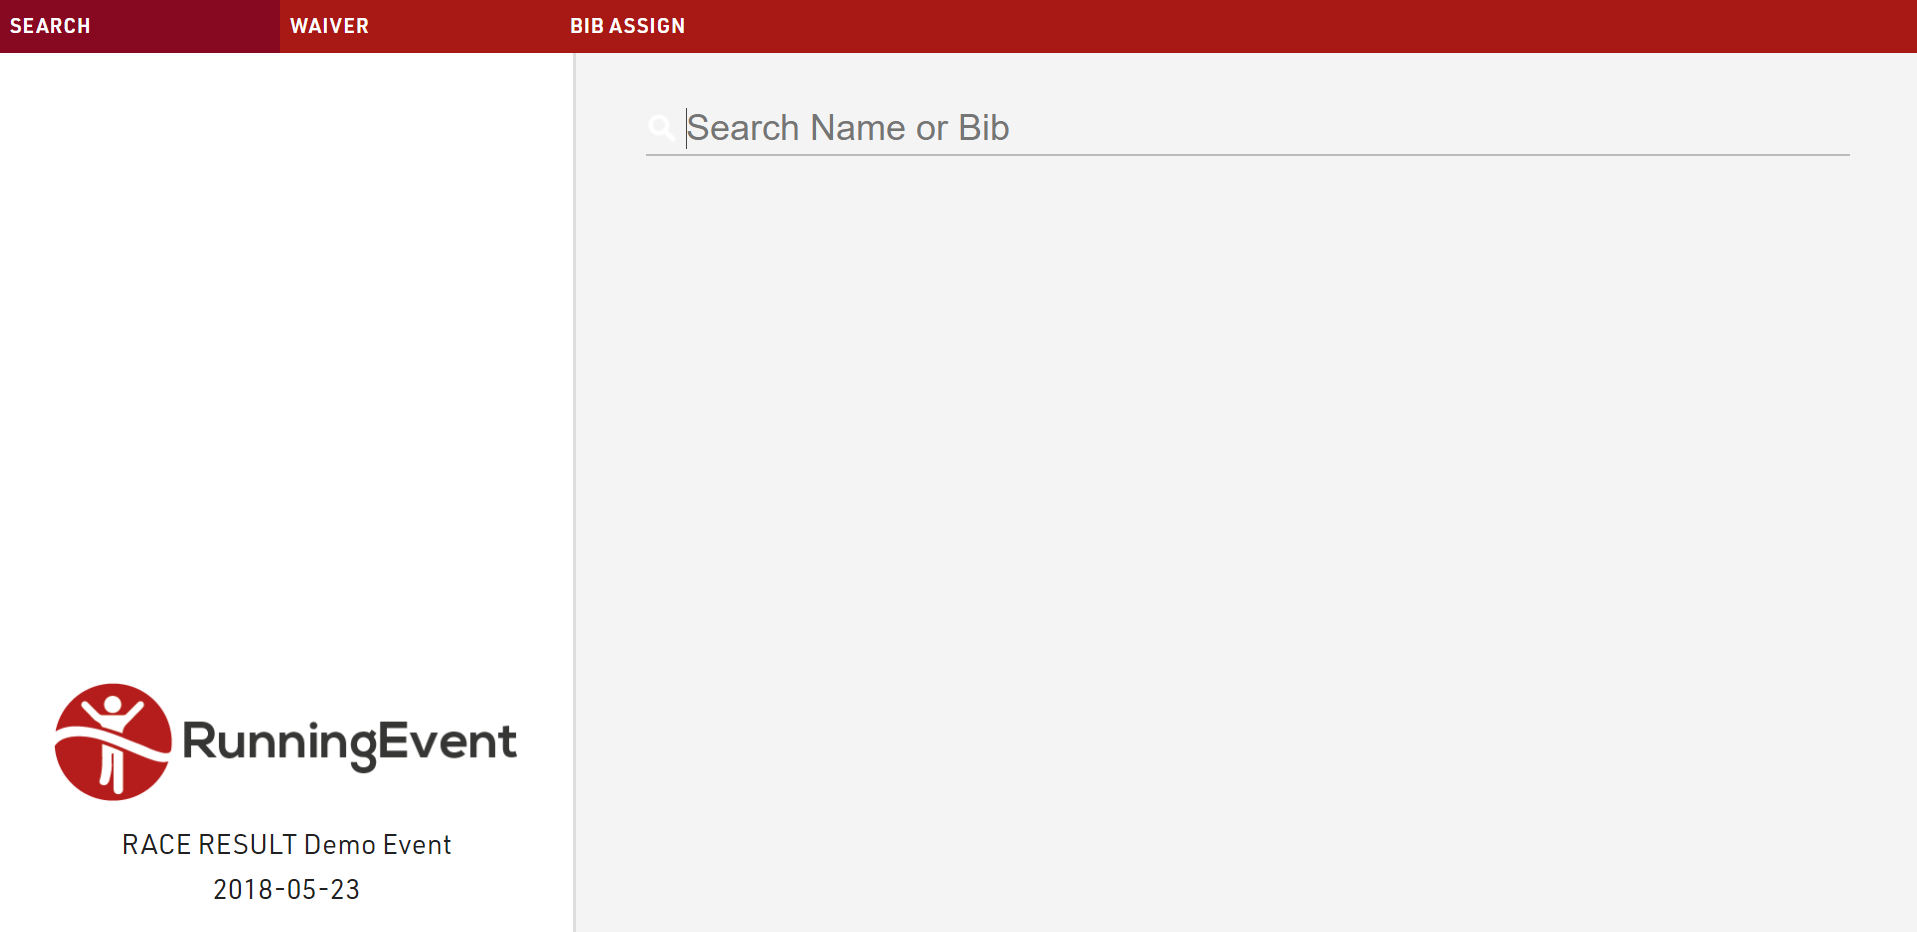
Result Kiosk
Athletes can use the Result Kiosk tool to check and/or print their result/race certificate on race day, most commonly it is used with a thermal receipt printer so participants can get a quick print out of their Results / Ranks to take home. It can be found in the Tools menu.
Settings
Make sure to define the following important settings:
- Decide if the user can view and/or print his race certificate. If you would like to support printing, RACE RESULT Web Server needs to be running.
- Select one or more Certificate Sets that can be shown/printed for each contest.
- Opitionally, you can add customs texts, automatically set an Additional Field and forbid multiple print outs for the same participant.
Input
The input field can search from either Bib or Name fields or lookup by Transponder Code when using alpha-numeric chip codes (note that standard passive transponders mapped in a chip file cannot be used at this time).
You can use the RACE RESULT Decoder. Tag Reader or USB Timing Box to scan transponders directly in to the search bar. To connect to a device click the connection icon in the top right of the search input, this will list available devices below and allow you to connect directly to the device for input of Transponder code. The RACE RESULT Web Server must be running for this.

Windows-Based Tools
Note that all of the functionality from the windows-based tools has been replaced by an alternative in the browser, and so there should only be rare cases where these are required.
Most of RACE RESULT 12 is run directly from the browser page, however the standard installation also includes some tools as separate windows-based programs which run independently from the main web server.
Each of these can connect to either a local file, a web server on the local network or the online web server.
To connect to the event file you are working on open the relevant program, and open the File menu, select either 'Open Event' to open an SES file or Connect to Sports Events Server.
To connect to a web server on the local network enter the IP address of the web server or enter events.raceresult.com to connect to an online file and click connect, you will then need to enter your customer ID and password if connecting to the online server.
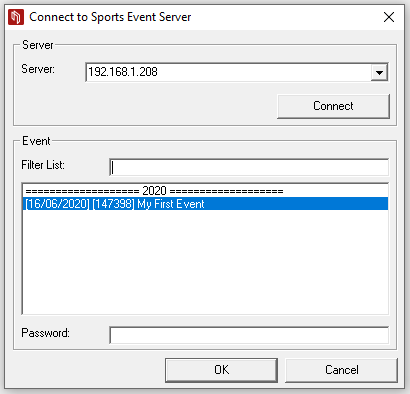
The open files in the web server or your available online files will be listed below and can then be opened by the program.