Esta sección explica RACE RESULT 12 con más detalle, incluido cómo funciona, los menús y configuraciones disponibles, campos y funciones y guías de aprendizaje adicionales.
El objetivo de esta sección es que tengas un conocimiento básico de RACE RESULT 12, desde la Introducción a RACE RESULT 12.
Cómo funciona RACE RESULT 12
Se accede a RACE RESULT 12 a través de un navegador web, o bien a través de la versión online alojada a través del Área de Clientes.
Alternativamente, puede iniciar sesión directamente en https://events.raceresult.com o como software instalado localmente para sistemas operativos basados en Windows.
En este momento, solo se admiten versiones x86 de los sistemas operativos Windows debido a restricciones con dependencias de alto nivel que existen dentro del software. Actualmente no hay soporte para procesadores ARM, sistemas basados en MacOS o Linux.
Varios usuarios pueden acceder a un evento y trabajar en él simultáneamente, o de manera similar, puede acceder a varios eventos desde el mismo dispositivo al mismo tiempo.
Trabajar en línea tiene una serie de ventajas, que incluyen:
- Las inscripciones en línea se guardarán directamente en su archivo de eventos (sin necesidad de importarlas).
- Su archivo de eventos suministra directamente los resultados en línea (no es necesario exportarlos).
- Todos sus eventos están en un solo lugar.
- Puede colaborar a través de internet con colegas, clientes y el equipo de soporte de RACE RESULT desde cualquier parte del mundo.
Sin embargo, también es posible trabajar sin conexión, independientemente de Internet. Los datos se almacenarán en su computadora, pero seguirá usando el software a través de su navegador. Esta es la forma recomendada para trabajar el día de la carrera y así ser independientes de la conectividad a Internet. El procedimiento normal es así:
- Meses antes de la carrera, cree un archivo de eventos online.
- Configure el archivo, active el registro online.
- Instale RACE RESULT 12 en su computadora, y poco después del día de la carrera salga (check out) del Archivo de Eventos.
- Cronometree y puntúe la carrera offline. También puede encender el Reenvío Online para contar con resultados en vivo online.
- Después de la carrera, registre (check in) el evento de nuevo. Continúe trabajando online.
El modelo de precios de RACE RESULT 12 funciona fácilmente: usted paga una pequeña tarifa por cada participante. Vea Activación del Participante para más detalles. Si utiliza RACE RESULT 12 offline y únicamente con Sistemas RACE RESULT, este será libre de cargos.
Estos son los puntos básicos que necesita saber sobre cómo funciona RACE RESULT 12. Las siguienes subsecciones los explican con más detalles.
Trabajar Online
Se puede acceder a RACE RESULT 12 en línea desde cualquier dispositivo con conexión a Internet y navegador web, computadoras portátiles, teléfonos móviles, tabletas y más.
Cuando trabaje online, simplemente inicie sesión en www.raceresult.com (o https://events.raceresult.com). Varias personas pueden trabajar en el mismo archivo de eventos al mismo tiempo. También el día de la carrera, puede abrir su evento incluso desde diferentes ubicaciones y colaborar a través de Internet.
Una vez que haya iniciado sesión, será dirigido al Start Menu que contiene su lista de eventos o le permite crear nuevos eventos a partir de las plantillas disponibles o copiar un archivo existente para usarlo como plantilla.
Trabajar online antes y después de la carrera siempre es recomendable. Puede que sea necesario trabajar en línea en el día de la carrera, por ejemplo si necesita acceder al archivo de eventos desde diferentes ubicaciones que se encuentren demasiado lejos como para conectarlas con un cable de red. Por ejemplo, la oficina de la carrera podría estar en la línea de meta y, al mismo tiempo, las personas en la recolección de paquetes tendrán la opción de ingresar y editar registros.
Trabajar Offline
Cuando trabaje sin conexión, primero debe descargar e instalar el software RACE RESULT 12, luego iniciar el servidor web de RACE RESULT 12 y revisar el archivo de eventos.
Trabajar sin conexión aún te permite cronometrar completamente tu carrera y aún puede producir resultados que aún se pueden exportar a través de listas de salida a PDF, Excel u otros formatos estándar.
Cronometraje y Otras Conexiones
Aquí encontrará algunos escenarios típicos y cómo se conectan las diferentes cosas para llevar los tiempos de su hardware al archivo de eventos en el Sports Event Server.
Leyenda
- Sports Event Server: Administra sus archivos de eventos.
- RACE RESULT Web Server maneja todos los elementos de red de RACE RESULT 12.
- Navegador RACE RESULT 12: Interfaz de usuario del software basada en navegador .
- RRS Proxy: Almacenamiento online y un proxy para comunicarse con Track Boxes y Decodificadores con carga habilitada.
Flechas
- azul: conexión online
- negro: conexión local o de red
- púrpura: exportando
Cuadros
- gris-marrón: local o LAN
- azul: online
- rojo: interfaz de usuario
Manejo de Múltiples Idiomas
Tanto dentro de RACE RESULT 12 como en my.raceresult.com el usuario puede elegir entre diferentes idiomas. RACE RESULT 12 contiene una tabla de traducción para cada idioma para cualquier texto y etiqueta predeterminados/fijos. Además, los textos definidos por el usuario, como nombre del evento, concursos, campos adicionales, encabezados de lista, plantillas de correo electrónico y más, también se pueden definir en diferentes idiomas.
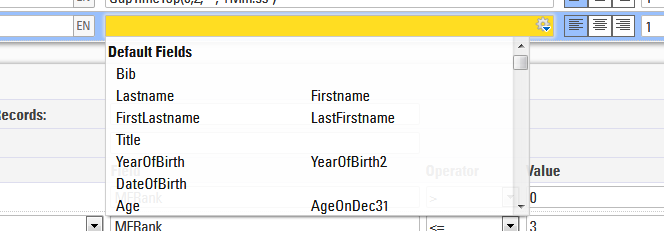
Campos Predeterminados
Todas las entradas de texto que admiten traducciones en varios idiomas tienen un selector de idioma a la derecha:
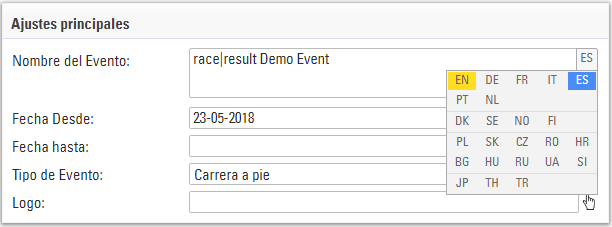
Simplemente mueva el cursor del mouse allí y seleccione el idioma en el que desea ingresar la traducción. Los idiomas que ya tienen una traducción están marcados en azul.
Si un cuadro tiene más de un idioma, también está marcado en azul:
Campos Adicionales
Valores en campos adicionales. Cada valor se puede definir en varios idiomas, cada valor está contenido dentro de una llave con cada idioma definido. p.ej. "{de:Bier|en:Beer|jp:ビール}".
- Dentro de la llave ingrese el código de idioma seguido de dos puntos, ingrese el valor respectivo. Varios idiomas están separados por una barra vertical.
- Cierre la llave y separe el siguiente valor con un punto y coma como de costumbre.
Mostrar campos traducidos
En my.raceresult.com y cuando se utilizan enlaces a quioscos de registro y pantallas de presentador, se utilizará automáticamente el idioma predeterminado del navegador.
Se puede configurar un idioma específico agregando el parámetro de consulta &lang=XX a la URL.
Para usar en plantillas de correo electrónico donde el valor del campo Idioma de los participantes se usará para elegir la plantilla, puede reemplazar "lang" con [Idioma].
Para mostrar el valor de un campo (por ej. [Competencia.Nombre] or [Evento.Nombre]) en un idioma específico use la funcion Text().
Text([Field];"lang")
Si el idioma seleccionado en my.raceresult.com aún no tiene una traducción, se mostrará en inglés. Si inglés tampoco está disponible, se usará la primera traducción que se encuentre.
Tiempos en RACE RESULT 12
En RACE RESULT 12, todos los tiempos se almacenan en la base de datos como un valor en segundos, esto se conoce como tiempo decimal, un tiempo formateado es una cadena de tiempo como se esperaría leer normalmente. Por ejemplo:
Tiempo Decimal: 36015.125
Tiempo Formateado: 10:00:15.125
El tiempo decimal se considera un número, mientras que la hora formateada se considera una cadena de caracteres. En programación informática, llamamos a estos diferentes tipos de valores Data Types.
En los dos ejemplos anteriores, también tenemos milisegundos que están representados por los números después del decimal. Los milisegundos serán los mismos en un tiempo formateado que en un tiempo decimal.
¿Cuándo utilizar el tiempo decimal?
El tiempo decimal debe usarse cada vez que necesite realizar un cálculo matemático o al clasificar/ordenar por tiempo.
Matemática
Por ejemplo, digamos que queremos agregar 00:30:00 a 00:15:00. Como humanos, podemos ver fácilmente que esto sumaría 45 minutos, pero una computadora no ve esto como lo hacemos nosotros. Para una computadora, los tiempos primero deben convertirse a tiempo decimal, sumarse y luego formatearse como tiempo para que podamos leerlos fácilmente.
00:30:00 equivale a 1800 segundos.
00:15:00 equivale a 900 segundos.
Si sumamos 1800 a 900 obtenemos 2700 segundos. Luego podemos reformatear esta hora a 00:45:00.
Puedes utilizar herramientas como Time to Decimal Time o Decimal to Time para hacer estas conversiones
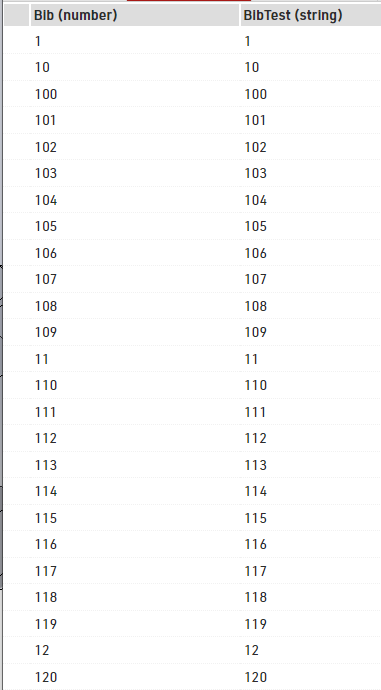
Clasificar/ordenar
Al clasificar/ordenar por un valor, también notarás una diferencia entre cadenas y números. A la izquierda hay un informe ordenado por BibTest que es una cadena. A la derecha está la misma lista ordenada por Bib que es un número. Al ordenar por cadena, puede ver que la lista se ordena por el primer carácter, luego por el segundo y así sucesivamente. Al ordenar por número, se considera el número completo en lugar de solo un carácter a la vez.
Navegador Windows
Inicio
Eventos
El Menú de Inicio en RACE RESULT 12 se usa principalmente para crear nuevos archivos de eventos y para abrir o eliminar archivos existentes, Cuando se trabaje sin conexión, no se podrá acceder a todas las opciones del menú.

Para crear un nuevo evento, simplemente haga clic en el botón Nuevo Evento, ingrese el nombre del evento y la fecha, seleccione una plantilla y haga clic en Crear (esta función solo está disponible cuando se trabaja online. Si trabaja offline, puede crear nuevos archivos de evento en el Servidor Web RACE RESULT).
Haga clic en un evento existente para abrirlo, o ingrese el nombre del evento en el cuadro de búsqueda en la parte superior de la pantalla y presione "Entrar".
Para eliminar un evento, haga clic en el icono de eliminar a la derecha (solo disponible cuando trabaja online). Al eliminar un evento, se le pedirá su contraseña de inicio de sesión (que pertenece a su número de cliente).
Participantes
Con la función Participantes, puede buscar participantes en todos los archivos de eventos.
Grupos de Eventos
Grupos de eventos se utiliza para ordenar sus eventos en my.raceresult.com en las diferentes categorías que se muestran. Puedes encontrar más información en el artículo Groups.
Análisis de clientes
La base de datos de clientes (CRM) le brinda información valiosa sobre quiénes son realmente sus participantes (clientes), dónde y con qué frecuencia compiten y de dónde son.
Pestaña General
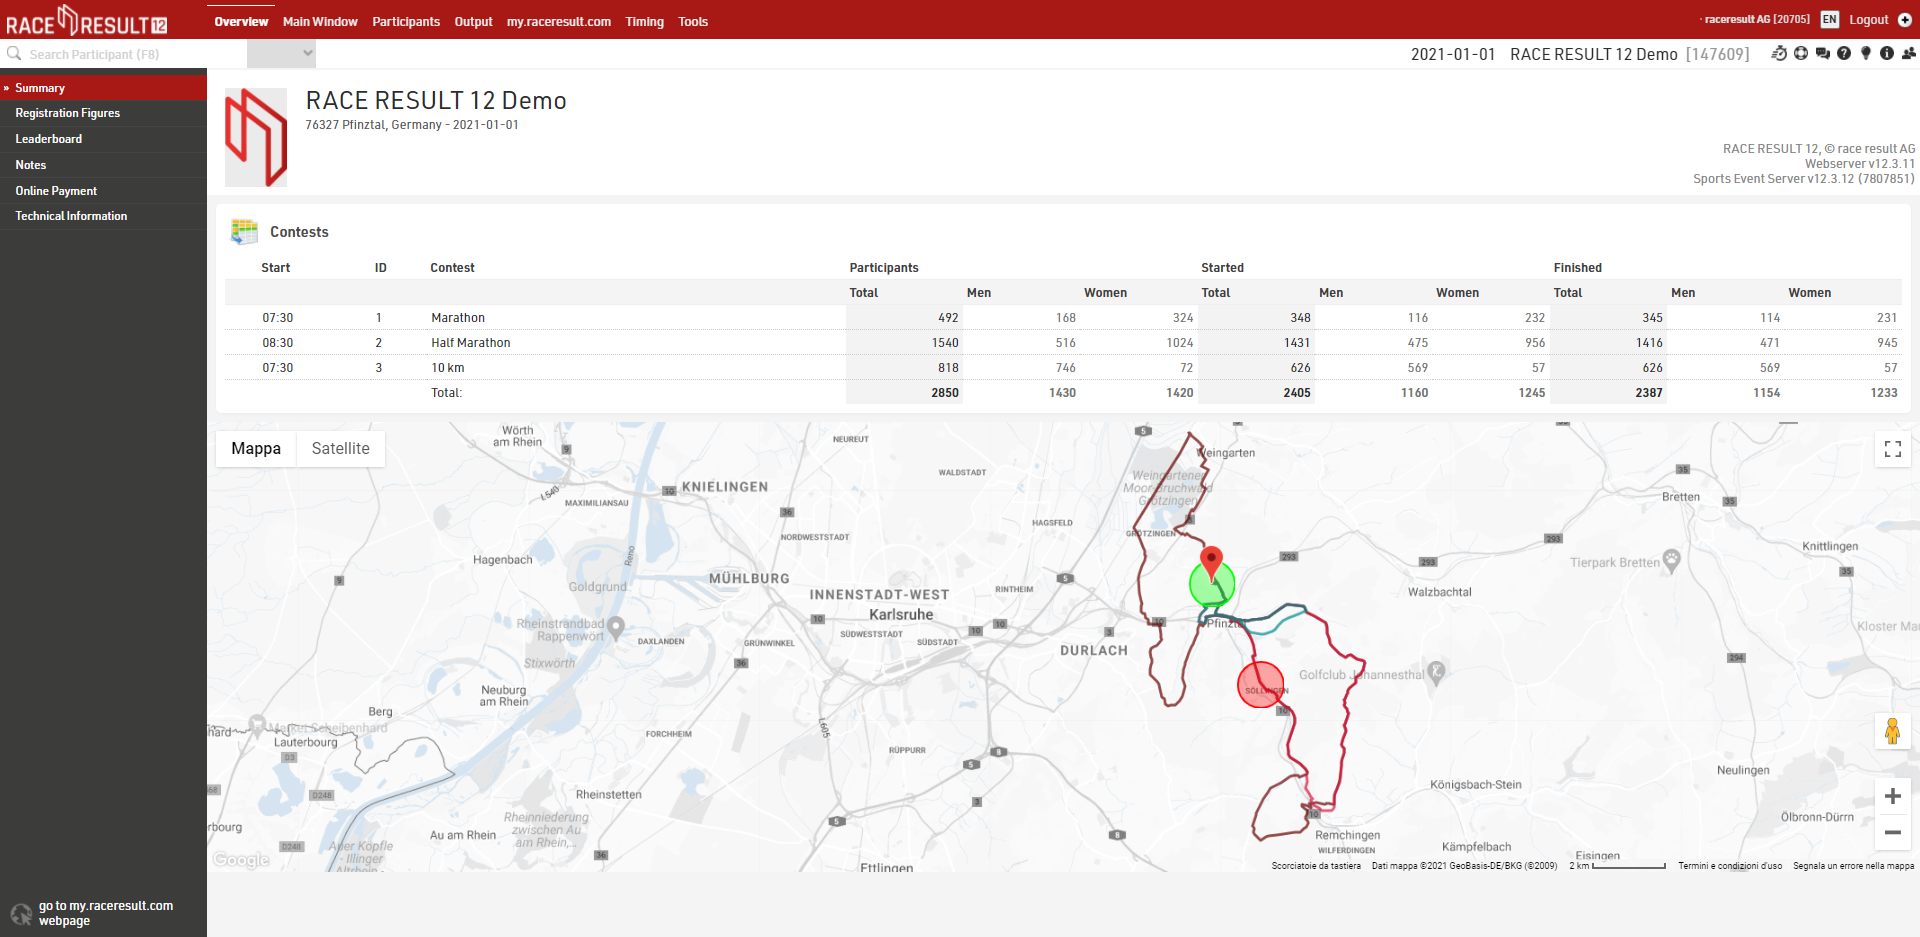
La Pestaña General proporciona una descripción general rápida de su evento, en particular información sobre cifras de registro y pagos.
Ventana Principal
Principalmente, la Ventana Principal sirve para definir la configuración de su Archivo de Eventos, así como para importar, verificar, cambiar y eliminar los datos de los participantes.
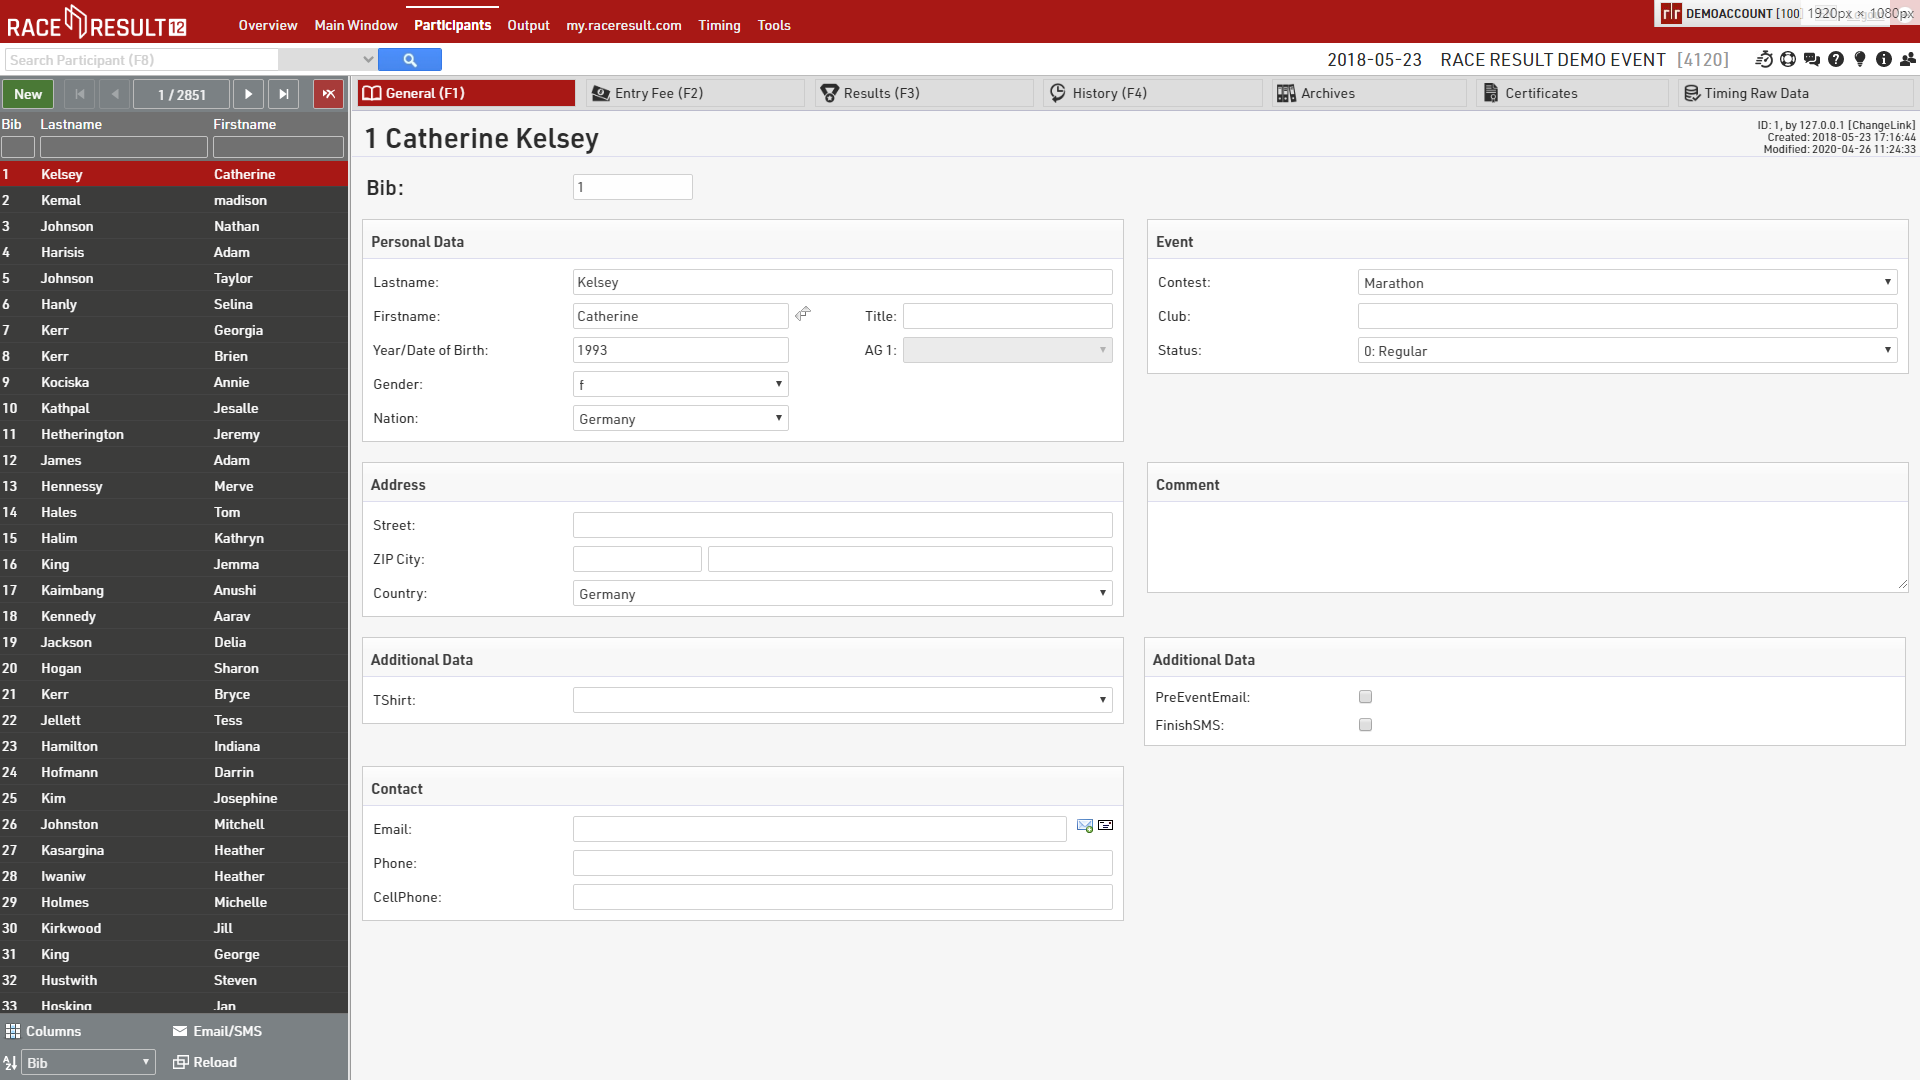
Pestaña Participantes
La Pestaña Participantes sirve para agregar nuevos participantes y editar participantes existentes. Los tiempos y rangos también se pueden controlar y editar si es necesario.
La Pestaña Participantes ya fue introducida en la Introducción a RACE RESULT 12, la cual cubre agregar/cambiar datos y buscar participantes.
Lea más sobre Cómo configurar la Pestaña Participantes para elegir qué campos de datos se mostrarán en la pestaña General.
Output
The Output Window is used for the presentation / displaying of data, broken down to 5 categories (accessible from the buttons in the top-left corner).
Lists
The most important method for getting data out of RACE RESULT 12. Create any list of data - whether for printed results, publishing online results, results screens, tools for the announcer, your own checklists for verifying results or any custom report you need.
Certificates
A design tool for creating layouts with text and images on a page. They are mainly used for race certificates, but also for individual result print outs or to create receipts/invoices.
Certificate Sets
Determine which participants should receive a particular certificate, these sets can then be printed or published online or accessed through tools such as the Results Kiosk.
Labels
Create label sheets with rows and columns for printing personalised labels
Statistics
Create standard or custom statistics from the participants data.
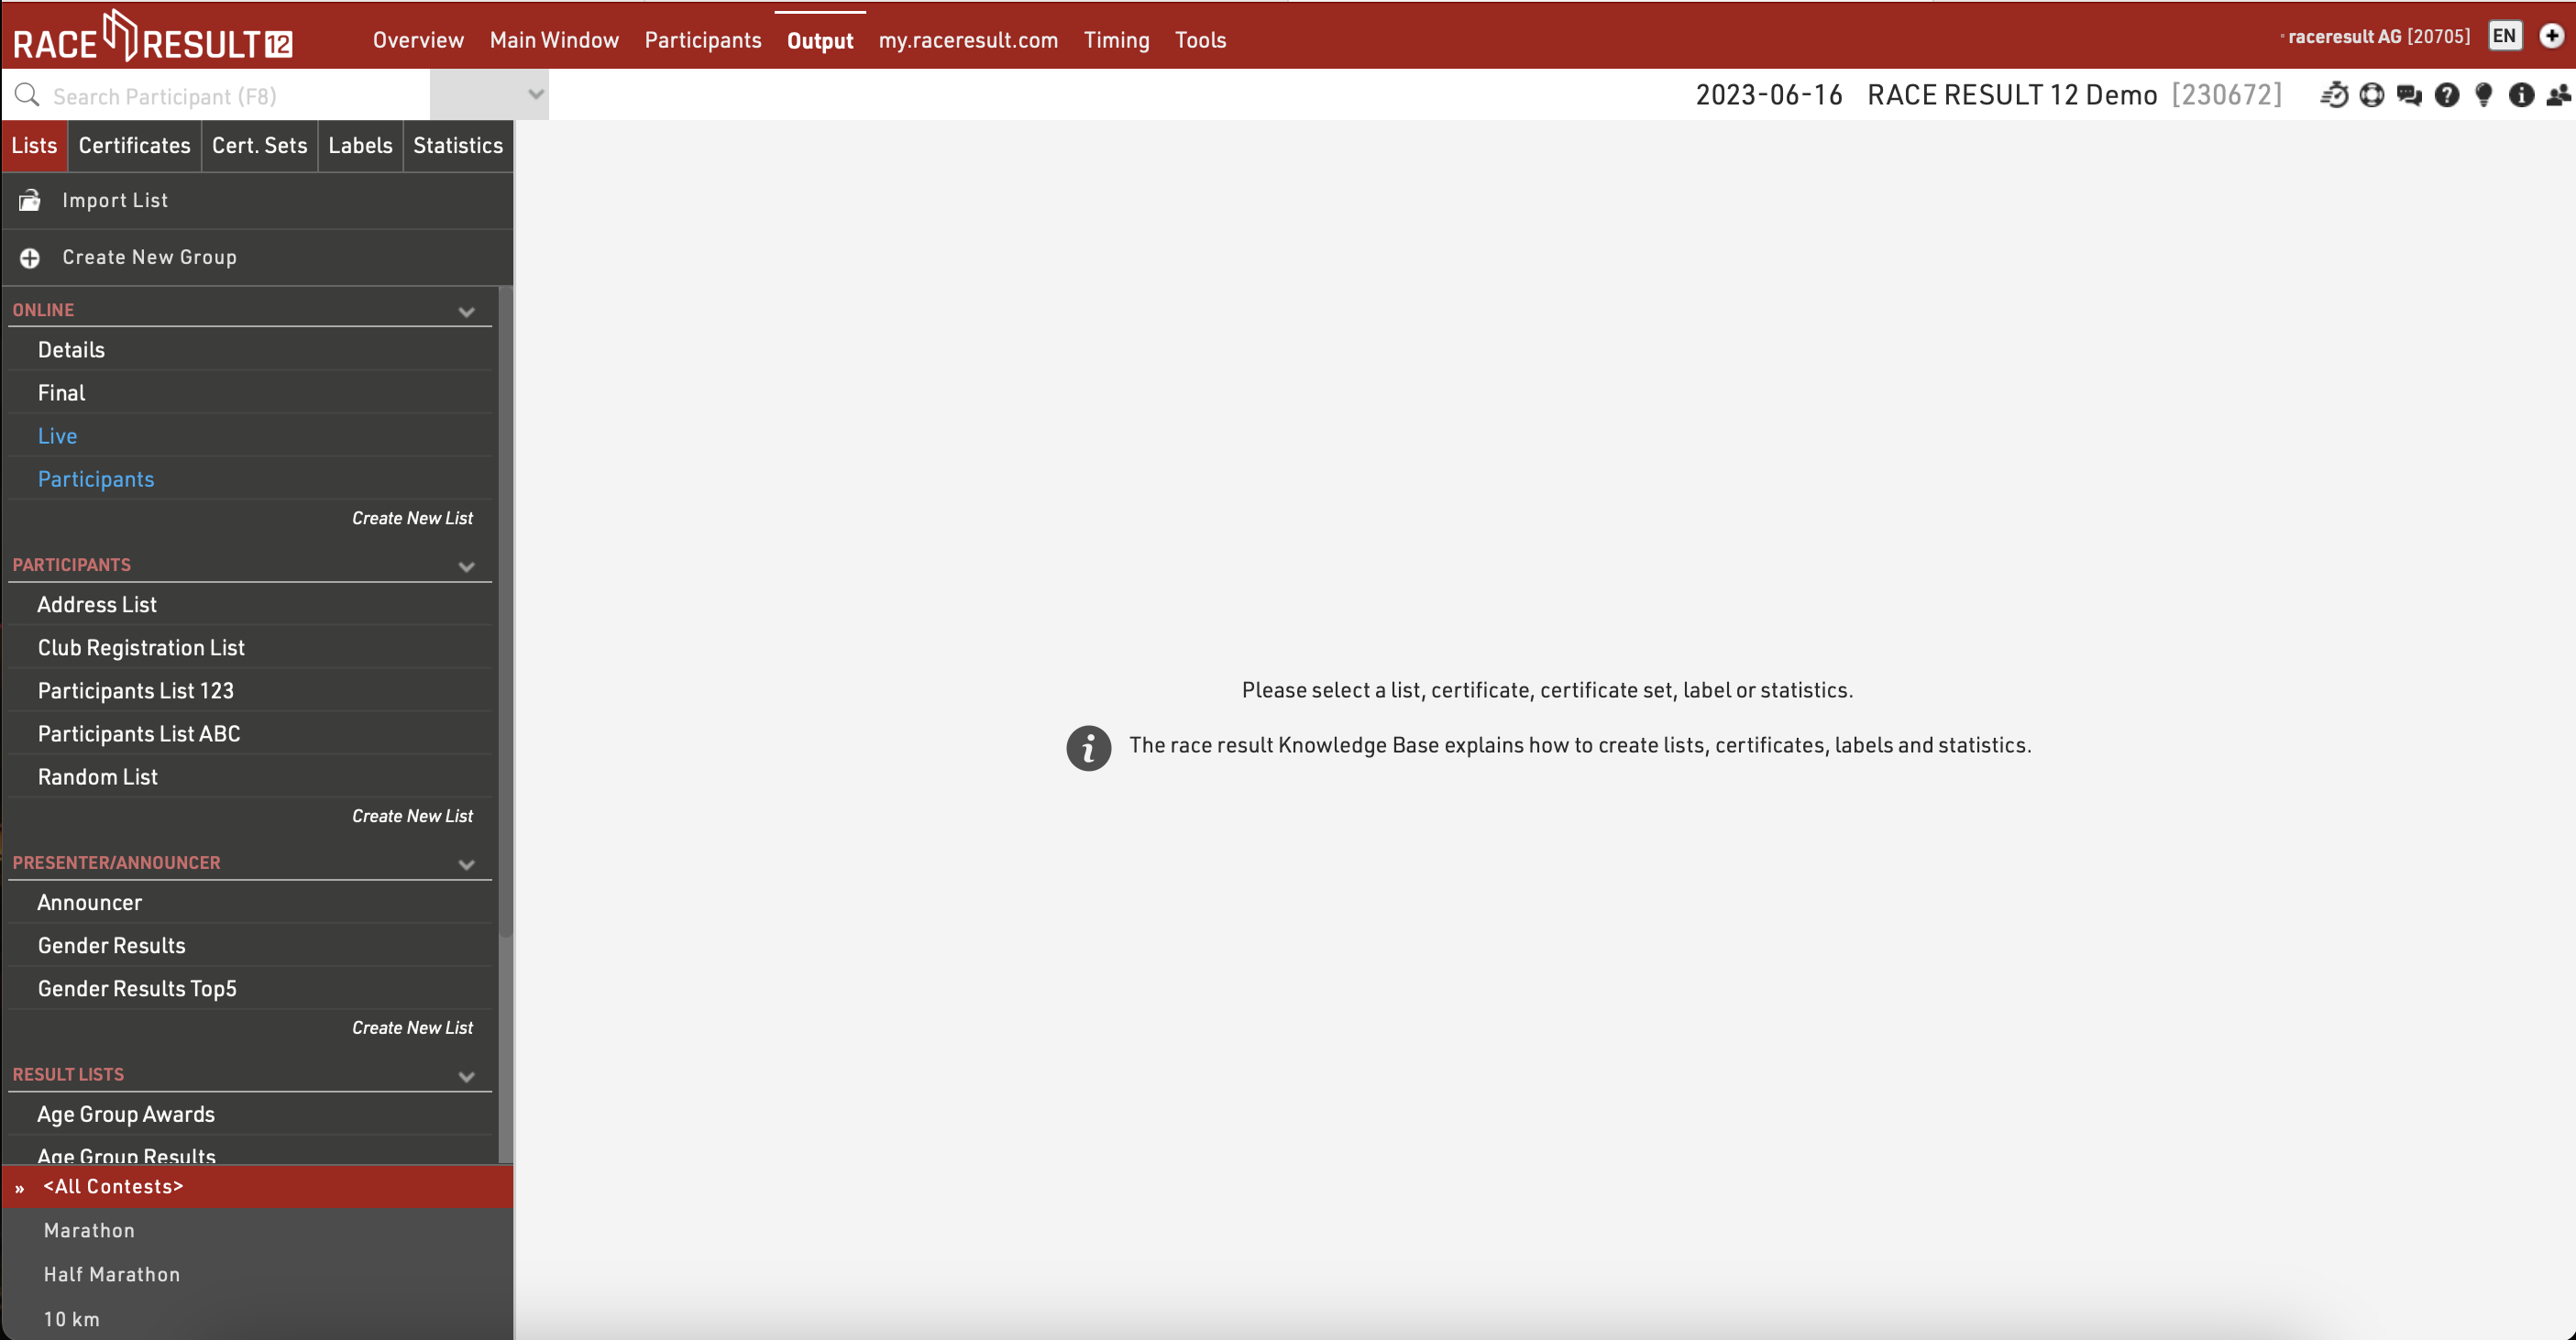
The bottom left contains a filter for Contests, by default Outputs will automatically be loaded for All Contests, but you can quickly filter an output to specific Contests by selecting them from this list, or select multiple Contests using the checkboxes when hovering an item.
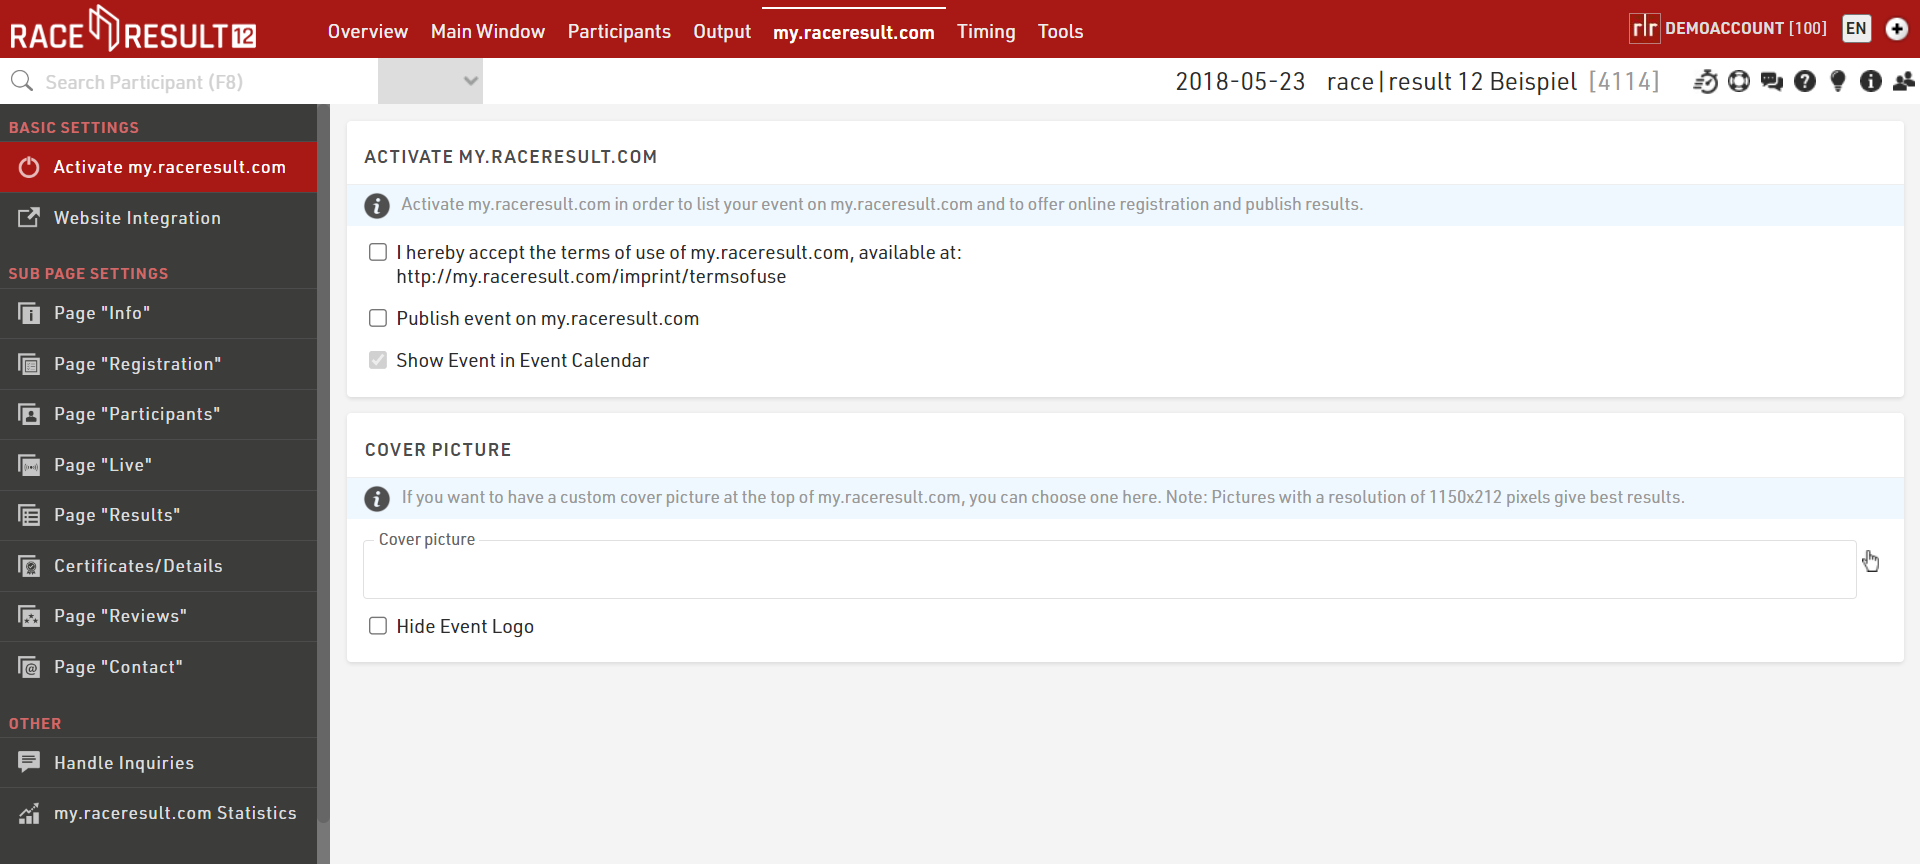
my.raceresult.com
The my.raceresult.com tab serves to configure the registration and results platform my.raceresult.com and to handle inquires from my.raceresult.com
Timing
The Timing Tab is used to connect to your RACE RESULT timing systems and includes the Data Exporters for forwarding of data to third party software/systems, it also contains a group of other tools designed to make Timing a race as simple and easy as possible. It should be your go-to window when timing an event.
Chip Timing
When opening the Timing Module you will first be presented with the Chip Timing window, which gives you a brief overview of your timing systems and the first steps to timing a race.
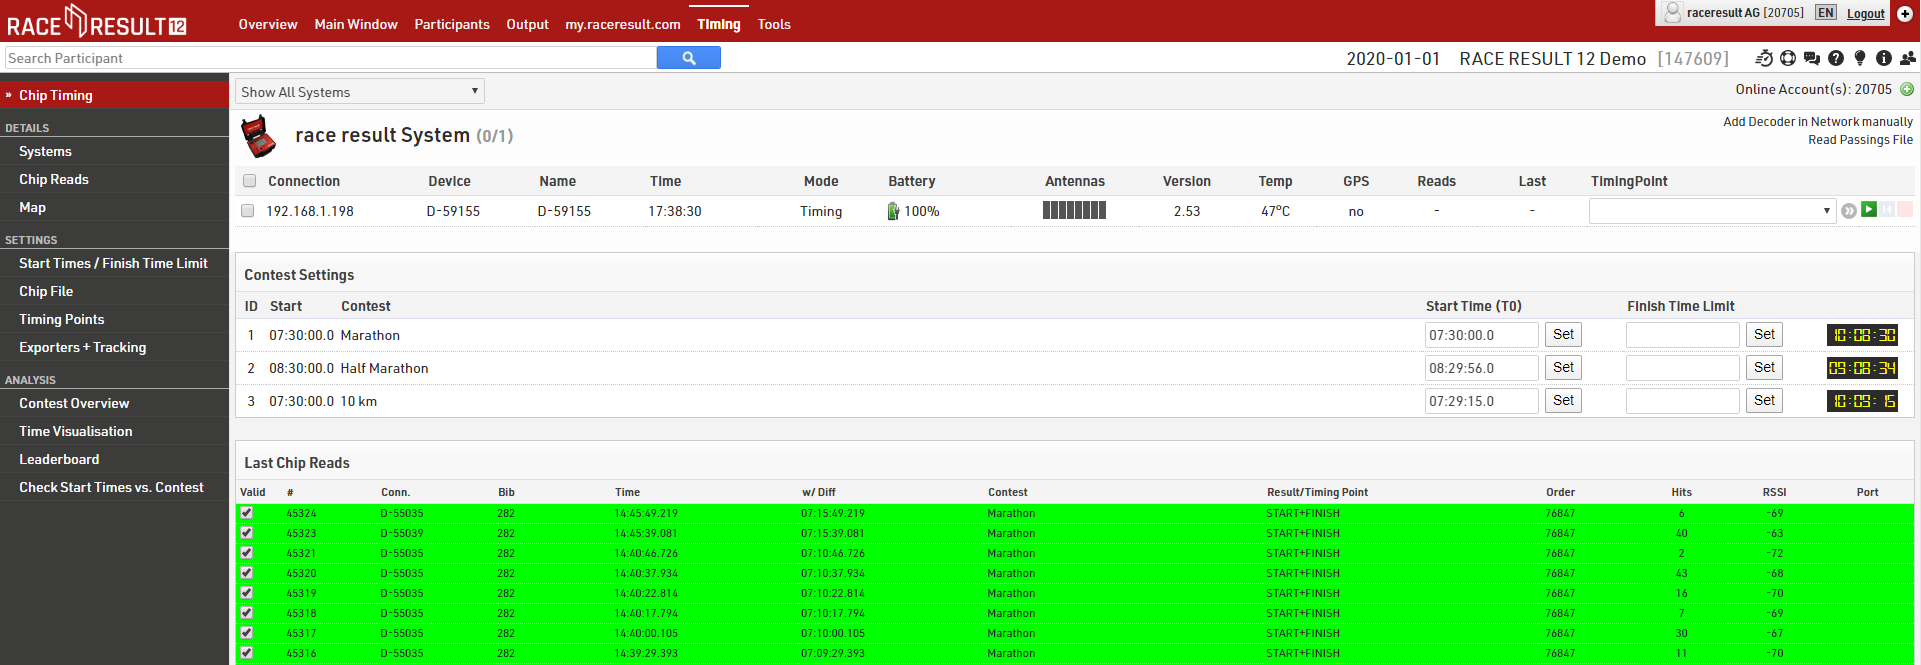
This window can be used for most types of races if you have everything setup already, the functionality of parts of the Chip Timing window is explained in the additional sections below.
Alternatively there are advanced options on the other windows for more complex requirements such as when you have multiple Timing Systems to monitor and some additional tools which are useful during the event. Connecting to systems and the additional tools and functions are described in the sections below.
Herramientas y Programas
Campos, Expresiones y Funciones
Los Campos contienen datos los cuales pueden ser datos almacenados o datos calculados a partir de otros datos como un rango.
Al usar Expresiones y Funciones puede combinar campos, hacer cálculos, modificar valores, y mostrar el resultado en Listas or Certificados. Por ejemplo, un Campo Adicional de Si/No tiene el valor 1 si se está marcado y 0 en caso contrario. Usando una expresión puede mostrar si/no o X/- en su lugar.
Syntax
Definition of Syntax (programming languages): The syntax of a computer language is the set of rules that defines the combination of symbols that are considered to be a correctly structured document or fragment in that language.
Definition of Syntax: The arrangement of symbols and characters to form expressions or functions.
Symbols and their names
The following are symbols used to write Expressions and functions.
|
[ |
Open bracket |
| ] | Close bracket |
| ( | Open or left parenthesis |
| ) | Close or right parenthesis |
| " | Quote, quotation mark, or inverted comma |
| | | Pipe, or vertical bar |
| & | Ampersand |
| { | Open brace, squiggly brackets, or curly bracket |
| } | Close brace, squiggly brackets, or curly brackets |
| ; | Semicolon |
| : | Colon |
| # | Hash |
When to use each symbol
When to use Brackets?
Brackets are used when referencing a Field within an Expression or a function.
Example: If we want to reference a participant's Contest we would do this
[Contest]
Example: If we want to compare a participant's Contest to see if it matches a specified contest id we need to do this
[Contest] = 1
If a participant is in contest 1 when we reference [Contest] with the use of brackets we will get the value of 1 back. This would evaluate the above example as true because 1 does equal to 1.
When to use Parentheses?
Parentheses are used to contain parameters within a Function.
Example: If we wanted to write an if statement to return yes if a participant is in contest 1 otherwise return no we could do this
if([Contest]=1;"yes";"no")
In the above example, we are using an if statement with parentheses to contain our expression.
Parentheses are also used to define the order of operations.
Example: You have a variable laps race with a parade lap, where the parade lap is 1 mile and a full lap is 10 miles. You want to calculate how many miles each participant completes, including the parade lap. You could use parentheses to define the order of operations for this calculation.
(([NumberOfLaps]-1)*10)+1
First, we want to calculate the number of full laps a participant completes. To do this, we subtract 1 lap (the parade lap) from the NumberOfLaps data field. Then we need to multiply that value by 10 miles. Lastly, we need to add 1 mile for the parade lap. If we were to fill in the above example with 5 laps the result would be 41 miles, which is 4 10-mile laps and 1 parade lap of 1-mile distance. This example assumes that the start/lap/finish timing point is the same for all laps, normal laps and the parade lap.
When to use Braces?
Braces are used when referencing the value of a Record Multiplier within a List.
Example: If we wanted to reference laps 1 through 3 and the laps are named Lap1, Lap2, Lap3 under Main Window->Special Results then we could do this
[Lap{n}]
In the above example, we are referencing laps 1 through 3 by appending the text Lap with the value of the record multiplier which is defined within two braces.
Braces are also used to translate strings into different languages.
Example: If we want the example above to display "Yes" or "No" when using the software or my.raceresult.com in English, or "Si" or "No" for Spanish, we would write:
if([Contest]=1;"{EN:yes|ES:si}";"no")
Note that the value for the different languages is separated by a pipe.
Braces are also used to call a Splits Selector in an output list.
Example: To call a selector you need to surround the selector with braces like this:
{Selector}.TimePositive
When to use Quotes?
Quotes are used to reference a text string.
Definition of String (computer science): A string is traditionally a sequence of characters, either as a literal constant or as some kind of variable.
Example: If we wanted to find all participants with the first name of John then we could set a filter like this
[Firstname] = "John"
In the above example, John is in quotation marks because his name is a String we are trying to compare to. Firstname is in brackets because it is a filed that will return a String value to compare with the String John.
When to use a Semicolon?
Semicolons are used to separate parameters within an Function.
Example: In an if statement there are three parameters. Each parameter needs to be separated with a semicolon like this
if([Bib]=1;"yes";"no")
In the above example, we are checking to see if Bib is equal to 1. If Bib is equal to 1 (true) then we return Yes otherwise (false) we return "No".
When to use an Ampersand?
Ampersands are used to append one string to another.
Example: If you want to add a string like "John" to a data field like [Lastname] then you can do something like this
"John " & [Lastname]
In the above example if the value of [Lastname] was "Doe" then the returned string would be "John Doe". This is also known as concatenating two strings together.
When to use a Hash?
A hash indicates that the expression is full-text. This way, you don't need to use quotes around text strings, and to use ampersands to combine fields, strings and functions. Fields and functions do need to be in square brackets.
Example: You can obtain the same result as above by writing the expression like this:
#John [Lastname]
Expressions
RACE RESULT offers two types of expressions. In Normal Expressions fixed texts will be in quotations marks, fields, functions and user defined fields/functions in square brackets and the text operator & connects several parts:
"My name is " & [FirstName] & " " & [LastName]
If you use this expression on a certificate, it will show for example: My name is John Doe.
Full-Text Expressions, on the other hand, are more suitable for longer texts such as the text of the confirmation email of the online registration. They start with a hash tag (#) and fields, functions and user defined fields/functions will be in square brackets:
#My name is [FirstName] [LastName]
In expressions, you can use Fields, Functions, User Defined Functions, Operators and User Defined Fields.
Campos
Los Campos se pueden diferenciar entre Campos de Datos, los cuales se usan para almacenar información como Apellido o Club, y campos que contienen valores calculados de otros datos como rango.
Todos los campos se pueden mostrar en listas o certificados directamente o se pueden usar en expresiones. Se pueden seleccionar fácilmente en el Asistente de Campo.
Algunos campos utilizan una lógica de puntos, lo que significa que para los conjuntos de datos que todos hacen referencia al mismo contexto se utiliza el mismo prefijo y parámetros subsiguientes se pueden definir despúes de un período.
Por ejemplo, la Competencia puede tener una variedad de parámetros relacionados con la competencia que se pueden anexar, como Nombre.Competencia o Longitud.Competencia.
Operators
The following Operators can be used in expressions:
Arithmetic Operators
Using the following arithmetic operators you can make any type of calculation:
| + | addition |
| - | subtraction |
| * | multiplication |
| / | division |
| \ | integer division |
| % | the remainder after division of integers |
| ^ | exponentiation |
| ( | opening parenthesis |
| ) | closing parenthesis |
| : | time operator, multiplies the left operand with 60 and adds the right operand |
If you would like to add the race number and the year of birth and multiply the result with two, use the following expression:
([Bib] + [Year]) * 2
Comparison Operators
Use the following comparsion operators to compare two values:
| < | less than |
| > | greather than |
| = | equal |
| <> | not equal |
| <= | less than or equal to |
| >= | greater than or equal to |
Logical Operators
Using logical operators, you can combine two conditions, for example in a Filter. The following operators are available:
- OR (At least one of the values is true)
- XOR (Must be one OR the other, cannot be both)
- AND
Array Operators
- IN
- NIN (NOT IN)
If the Data field is IN or is NOT IN the text string, multiple values can be separated by commas.
Examples:
[Contest] IN "2,4,8-10"
[Lastname] NIN "Smith,Doe"
Funciones
Las funciones añaden cierta funcionalidad a las expressions. Después del nombre de la función, siguen los parámetros separados por punto y coma entre paréntesis:
FunctionName(parameter1; parameter2; parameter3; ...)
Campos/ Funciones personalizados
Utilizando los campos/ funciones personalizados puede asignar un nombre específico a cualquier [@1056|Expression]]. La expresión puede entonces ser accedida en todo el archivo de eventos. Se definen en Ventana Principal->Datos de Participantes->Campos/ Funciones personalizados.
Por ejemplo, por defecto, el campo personalizados DisplayName se define utilizando esta expresión:
trim([Title] & "" & [Nombre] & "" & [Apellido])
DisplayName se utiliza en casi todas las listas para mostrar esa expresión. Si decide utilizar una expresión diferente como
UCase([Apellido]) & "" & [Nombre]
entonces sólo tiene que cambiar el campo personalizado una vez en lugar de modificar cada lista.
User Defined Functions
Similar to User Defined Fields you can also define your own User Defined Functions. They will also be defined in the Main Window->Participants Data->User Defined Fields/Fcts.
Assume you would like to change the upper/lower case of words, so that the first letter is in upper case and the other letters in lower case. For this you could define a function RightCase:
RightCase(x)
lcase(left([x];1)) & lcase(mid([x]; 2))
You can use the new function like any other function now. For example this will return Raceresult:
RightCase("raCEreSuLt")
Functions can also have several parameters. As an example, define a function add:
add(x;y)
[x]+[y]
The names of the parameters can be defined freely. When using them in the definition of the function, they have to be in square brackets.
Filtro
In many parts of RACE RESULT 12 you will find a textbox to enter a filter. A filter is an expression that returns true or false. It is based on the comparision, array, and logical operators.
Field names will be in square brackets and values (apart from numbers) in double quotation marks. For example:
En muchas partes de RACE RESULT 12 encontrará un cuadro de texto para introducir un filtro. Un filtro es una expresión que devuelve verdadero o falso. Se basa en los operators de comparación, de matriz y lógicos.
Los nombres de los campos irán entre corchetes y los valores (aparte de los números) entre comillas dobles. Por ejemplo:
[Apellido]="Miller"
Si desea conectar varios filtros, puede utilizar los operadores lógicos AND y OR:
[Apellido]="Miller" AND [City]="New York"
Field Wizard
The Field Wizard pops up at many places in RACE RESULT 12 below setting fields, for example. in the settings of a lists or when defining ranks. The Field Wizard makes it easy to select the fields shown on a list for example. The field wizard will automatically appear when entering a new field, if editing an existing field then you can choose to show the wizard by clicking the gear icon on the right of the entry field.
How To...
CheckIn Kiosks
The following aticles show different ways how to use a Checkin Kiosk for different purposes.
Registration
Awards
Configurar Inicios de Oleada Multiple
Por defecto los Tiempos= Iniciales (T0) se establecerán por concurso, sin embargo muchas carreras requieren inicios de oleada de acuerdo con otros criterios como el grupo de edad, un número de oleada predefinido o a intervalos programados en carreras como las contrareloj, incluso pueden ser oleadas aleatorias con atletas registrados para cada uno.
Oleadas Preasignadas
Si los inicions de Oleada están predefinidos según algunos criterios, puede establecer los Tiempos de inicio para Inicio de Oleada de acuerdo con: Y luego ingrese el campo o expresión requerido en el campo de entrada, esto puede ser cualquier texto o valor númerico.
La lista de Hora de Inicio ahora mostrará un registro para cada valor que se especifica en ese campo o devuelto por la expresión, también devolverá una entrada con un título en blanco donde no se devuelve ningún valor.
Ahora puede introducir una hora de inicio para cada oleada de forma normal.
Inicios de Oleada Calculada
La alternativa es calcular una hora de inicio de oleada o la hora de incio asignada directamente en un resultado, esto es útil para las contrareloj o carreras donde las oleadas de los participantes comienzan a intervalos fijos, como los triatlones basados en piscinas.
En un resultado, cree el cálculo, por ejemplo, si los participantes están en oleadas preasignadas y cada olada comienza con 30 segundos de diferencia, entonces podría importar el número de onda a un ATF y, a continuación, su cálculo de hora de inicio podría ser:
Todavia usamos T0 para que comience la primera oleada y luego para cada oleada se añaden 30 segundos, expresiones similares podrían usar un numero de desplegable o un rango de clasificación para inicios de contrareloj individuales. Esto depende de cada oleada que empiece a tiempo.
Al utilizar un inicio de oleada calculado, debe deshabilitar Substraer Tiempo de Inicio (T0) en la configuración de Punto de Cronometraje, y tendría que restar la hora de incio calculada para los resultados relevantes.
Oleadas Aleatorias
La opción final se produce cuando no se asignan oleadas fijas, los participantes se pueden registrar sobre un punto de sincronización específico y luego iniciarse en grupos de un tamaño determinado.
De esta manera T0 es irrelevante, así que de nuevo asegúrarse de que esto no se resta de sus resultados, Configure un resultado utilizando una regla avanzada para tomar el tiempo de Check-in adecuado, probablemente la Detección máxima en su punto de tiempo de Check-in.
A continuación, puede utilizar Marcador en el decodificador y capturar un marcador para cada inicio de oleada, y utilizar un segundo resultado con una regla avanzada para buscar el marcador adecuado. Es muy probable que este sea el primer marcador después del resultado del Check-in.
Ahora puede utilizar este resultado como referencia para restar como la hora de inicio.
Participantes en la Oleada Equivocada
Si un participante no comienza en la oleada correcta, puede cambiar el valor del valor de oleada asignado o sobrescribir el tiempo en los resultados de los participantes individuales. Un segundo ATF de invalidación de Oleada también se utiliza normalmente como parte de una expresión para que las oleadas se puedan reasignar si las ondas se basan en un valor fijo como Genero o Grupo de edad.
Manejar carreras de varios días
Al cronometrar una carrera que durará hasta la medianoche durante varios días, hay que tener en cuenta algunas consideraciones especiales con la configuración en RACE RESULT 12.
En primer lugar, es importante entender cómo el software maneja esto, en lugar de usar una combinación de fecha/hora, los tiempos simplemente continuarán contando hasta después de las 24:00:00 en lugar de reiniciar desde las 00:00:00, por ejemplo, las 3:30. :00 am del día 2 sería un tiempo de 27:30:00 o 1:03:30:00 en el RACE RESULT 12.
Cuando trabajes con carreras de varios días, debes configurar la Fecha desde y la Fecha hasta del evento en la Ventana principal - Configuración básica.
Solo si esto está configurado, ahora se le presentarán tres opciones en el Timing Settings,esto controla cómo el software maneja eventos de varios días.

Ignorar fecha, el tiempo comienza de nuevo a las 0 después de medianoche - con esta opción los tiempos comenzarán nuevamente a partir de las 00:00:00 de la medianoche y RACE RESULT 12 NO calculará los resultados que lleguen hasta la medianoche. Esto es útil para eventos de varios días que pueden tener diferentes carreras en diferentes días, por lo que tiene sentido comenzar cada día a partir de las 00:00:00.
Restar fecha del evento - cuando se selecciona, esto considerará automáticamente la fecha de inicio del evento como el punto de partida y los tiempos ahora continuarán contando después de las 24:00:00 para cada día posterior a esta fecha. Con esta configuración la fecha siempre estará ligada a la Fecha del Evento.
Resta esta fecha de inicio- cuando se selecciona, esto se establecerá de manera predeterminada en la fecha del evento desde, esta fecha se considera el punto de inicio y los tiempos ahora continuarán contando después de las 24:00:00 para cada día posterior a esta fecha. Con esta configuración, no importa si se cambia la fecha, las horas serán correctas.
Transponder Code Validation
The following fucntions allow you to validate an input matches the pattern of a valid RACE RESULT Active Transponder code, for example if participants are required to enter an individual transponder code during registration. Note it does not truly validate if it is a valid Transponder code.
If you are using Check-In kiosks to assign transponders then it may be easier to use the option to only allow transponders which are in the chip file to validate against your own stock of transponders. You can import a chip file with all bibs set to 0 for this.
This can be entered as a User-Defined Function which takes an input to validate the value entered.
Create a user-defined for isTransponder(x), or an applicable function name with the following expression, this checks that the length is 7 characters, the first 5 digits should be letters and the last 2 digits should be numbers.
Len([x])=7 AND isAlpha(left([x];5))=1 AND isNumeric(right([x];2))=1
e.g. isTransponder([Transponder1]) would return 1 if the value in Transponder1 matches this pattern.
Insert Images / Files
Output Lists
Images stored here can be directly inserted into Outputs using the "[img:.....]" tag.
Certificates
Images can be inserted using either a standard image insert, which opens an image selection window when clicked, or as a data dependent image. For data dependent images you must use the image name, exactly as saved, as text in your expression.
my.raceresult.com Text Boxes
When inserting images in text boxes, such as the Info Page, you must use the image URL to insert the image. When an event file is accessible via my.raceresult.com each image has a publicly accessible URL which can be used to access images in all parts of the software. The format is as follows:
https://my.raceresult.com/EventID/elements/picture.php?eventid=EventID&name=imagename.png
where the EventID and imagename must be replaced with the corresponding Event ID and correct file name.
In the text box of your choice click on the image icon to add an image, the link icon can also be used to link to other files stored in your event file, such as PDFs which may be used for an event guide.

In the image properties box add relevant URL for your image, you can adjust the image size by using the width and height settings.
E-mails
Images can be inserted into Creating Email Templates in the same way as my.raceresult.com text boxes using the image url.
If attaching images or files as an attachment to your template then you must ensure that the file type is included in the attachment name, otherwise, the file will be sent with no type and the recipient may be unable to open the file correctly.
When inserting images into e-mail templates you can optimize the URL by using the Event.ID data field within the URL so it is automatically updated when you copy an event file. This can be useful for e-mail templates if you always use the same name for particular images such as headers or logos.
https://my.raceresult.com/[Event.ID]/elements/picture.php?eventid=[Event.ID]&name=imagename.png
Accessing images in folders
If your image is the common or my folder you need to use URL encoding to access that folder. When accessing a folder normally you would use a slash in between the folder and the file name. Here we want to replace the slash with the URL encoded version of a slash which is %5C. In this example, we are accessing the my folder.
https://my.raceresult.com/EventID/elements/picture.php?eventid=EventID&name=my%5Cimagename.png
Website Integration
You can embed the pages from my.raceresult.com on your own site using some simple Javascript. To find the source code for this you open any of your event files and navigate to my.raceresult.com > Website integration section.
You can use either the HTML code which uses javascript, or the Wordpress plugin, although this is much more limited.
Create Backups
Regularly there is need to create a Backup of an event file, for example
- when one of several contests is finished and you would like to save the current data status.
- before operations which concern several or all participants, e.g. when deleting data or manipulating data.
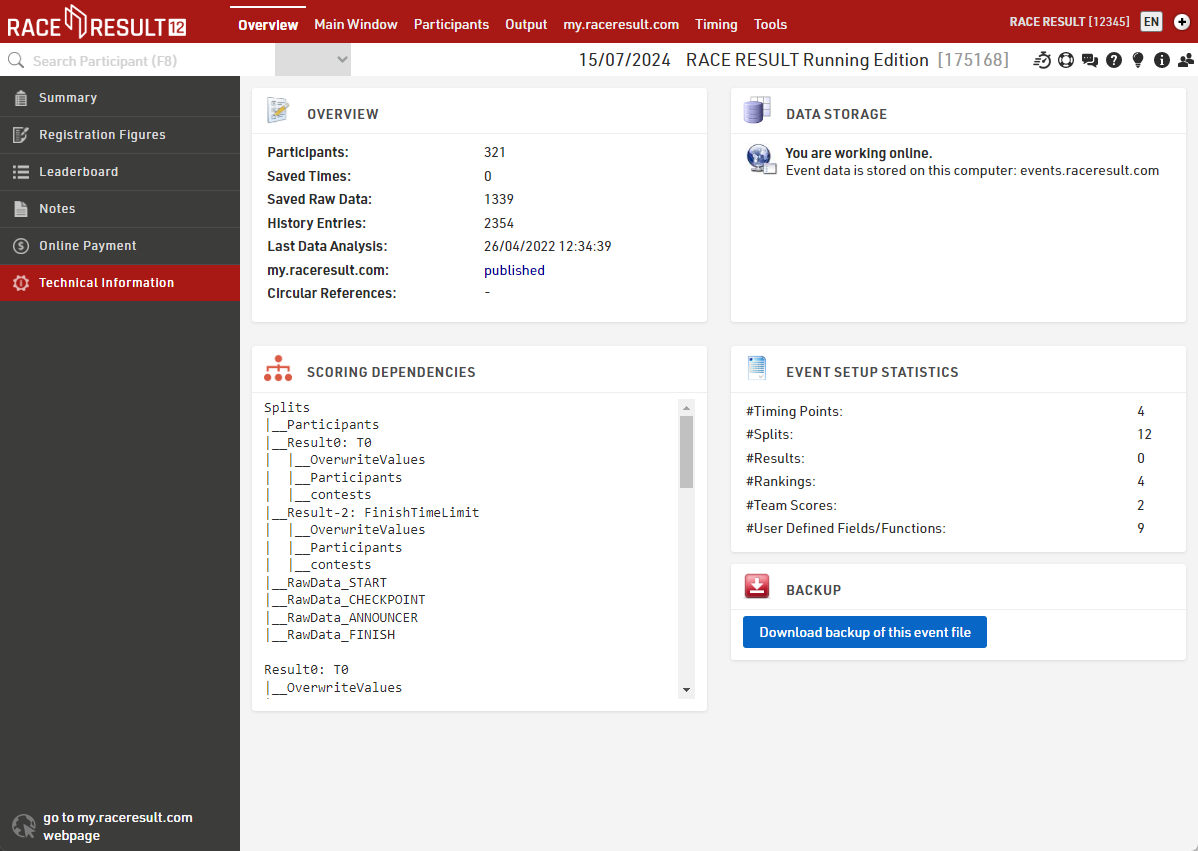
Creating a Backup
There are several options to create a backup file of an event:
- Go to Overview -> Technical Information. You will find a link to download a backup (Note, this option is not available if you are not the owner of the file).
- When working offline, a backup can be created easily by copying the event file. Select the file in Windows Explorer and press CTRL+C and then CTRL+V.
Restoring a Backup
If something goes wrong during an operation and you want to revert to the backup, take the following steps:
If you work offline, take these steps:
- Close the RACE RESULT Web Server and all other programs that access the file.
- Rename the backup file to show that you are working with this file now, and then continue working with it as before.
- Remember to create a new backup if you want to try to execute the previously failed operation again.
If you work online and want to access a backup offline on your computer, it is best you take these two steps:
- Check out the faulty event file. Close the file after the download and delete it.
- Then open the backup file and check it in instead of the faulty file.
Automatic Backups
Every night a backup of all your events saved online is created automatically. If you need access to one of these backups, you can request the backup via email from RACE RESULT.
Backup without Backup file
If you executed an incorrect data manipulation but did not create a backup prior, there is still the possibility to use the History to undo your changes: In the Participants Window under History you can create a complete export of the history and thus create an Excel file which will rewrite the old values via the Participant Import (with the option Update existing participants).
Live Backup
The Live Backup is a function to always have an up-to-date backup on another computer or an external drive (e.g. USB thumb drive). In case of a black-out of the main computer (e.g. hard drive crash) you can continue working with the backup file on another computer.
The live backup is started in the RACE RESULT Web Server via File->Start Live Backup Locally (backup on a local drive) or Start Live Backup Externally (backup on another computer on which the race result software needs to be running).
Move an Online Event to a Different Account
Events can be shared with multiple accounts through the Access Rights.
It is not possible to directly transfer an existing event to a different account, a copy of the event file must be uploaded to the second account which will generate a new Event ID. Note that unless you delete the original event file, it will still remain active.
Download backup of the event file
Under Overview>Technical Information, download a backup copy of the event file.
Remove the connection to the event online
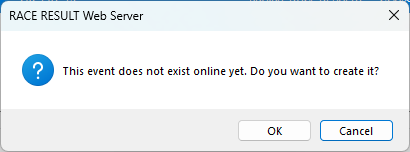
Once the event has been downloaded, open it in the offline RACE RESULT Web Server. At this time, the event is still linked to the original online Event ID (in this example, 175168).
Under Online>More, select Remove Connection to Event Online

Upload the event to the other account
Now that the event is no longer set to the original Event ID, it is possible to upload it to a second account by checking-in the file via Online > Move this Event to Server (Check-In).
The Web Server will warn that the event does not exist and will ask if it should be created, select ok to confirm the upload.
Use Custom Fonts
Fonts can be added to RR12 offline by installing them to your computer as you would install any new font. Fonts are reloaded into RR12 every 5 minutes or when restarting the RACE RESULT Web Server. These fonts can then be used for certificates, PDFs or even Presenter screens.
Browsers will cache the list of fonts for 24 hours so new fonts will not be visible until you clear your cache or wait 24 hours.
Offline fonts will NOT transfer online. The list of fonts online are fonts available from our servers. This list can not be added to at this time.
How to use Swap Data
Bib Transponders
When participants have swapped their BIB Transponders, follow these steps depending on when the issue is identified:
-
Before the Race:
Simply swap the BIB numbers between the participants via the Swap Bib Numbers. This ensures that all associated data, including transponder readings, will be processed correctly. -
During the Race:
Use the "Swap Participants Data" function. This will update the participant data, swapping BIB numbers and raw timing data between the affected participants. -
After the Race:
As with during the race, use the "Swap Participants Data" function to swap BIB numbers and raw data.
Reusable Transponders
(A-Z Transponders, HuTags, Active Transponders, Bib transponders not linked to the bib number)
If participants swap Reusable Transponders, the approach depends on whether you’re using the Transponder Field or a Chip File for mapping:
Using the Transponder Field
-
Before the Race:
Manually update the transponder fields in the participants tab, to reflect the correct assignment. -
During the Race:
-
Pause timing to avoid further incorrect reads.
-
Use the "Swap Raw Data" function to correct timing data between participants.
-
Update the transponder fields in the participant records to reflect the correct assignment.
-
Resume timing.
-
-
After the Race:
Use the "Swap Raw Data" function to adjust results. Additionally, update the transponder fields if you need to replay timing reads later for verification.
Using the Chip File
-
Before the Race:
-
Edit the chip file, ensuring proper transponder-to-participant mapping.
-
-
During the Race:
-
Pause timing to prevent further incorrect reads.
-
Use the "Swap Raw Data" function to correct timing data between participants.
-
Update the chip file with the correct transponder assignments.
-
Resume timing.
-
-
After the Race:
-
Use the "Swap Raw Data" function to adjust results. Additionally, update the chip file if you plan to replay timing reads later for verification.
-
Ejemplos para aprender
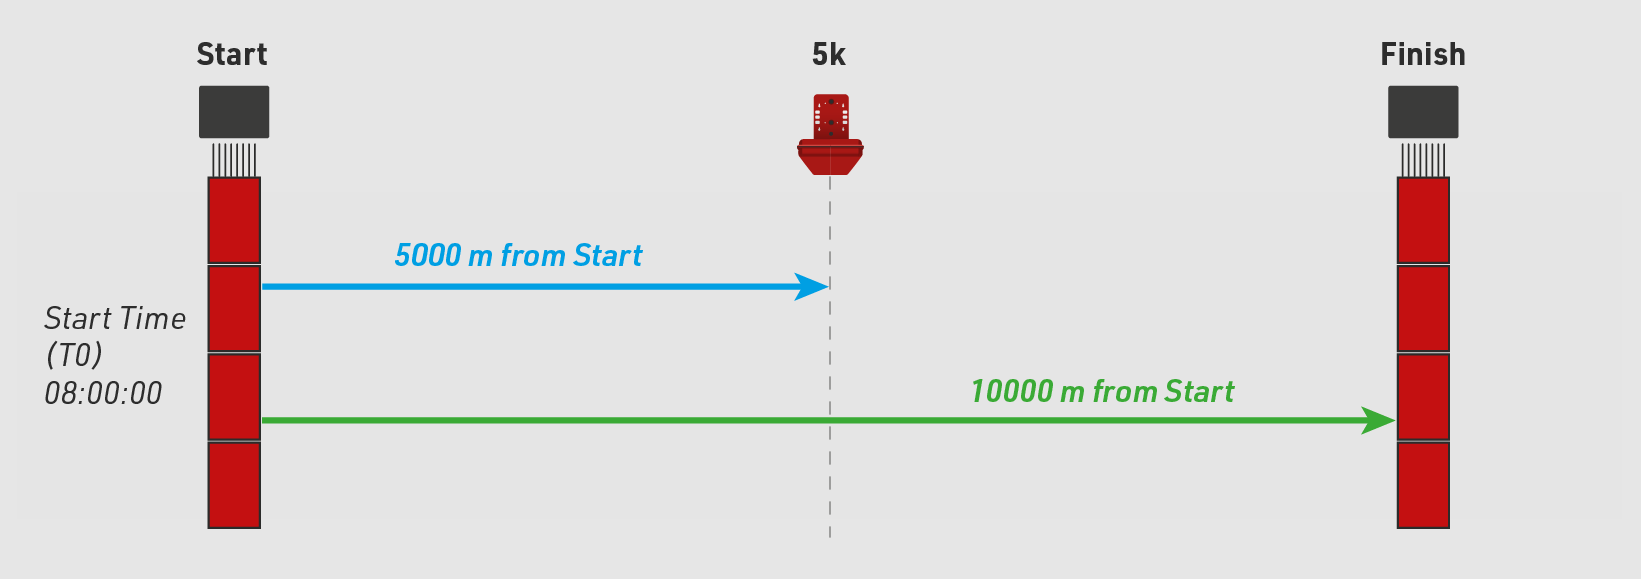
Local 10K - Splits
Event Splits Setup
This event is a 10 km running event over a point-to-point course. We have a start line, 5K split point, and separate finish line.
The diagram below represents the setup of the event and will be referenced throughout setting up the Splits within RACE RESULT 12.
Maratón Internacional
Archivo del Evento
Los tiempos de los participantes se registran en el inicio, split de 10km, split de 20km, split de 21.1 km, split de 30km y en la meta. Además incuimos un sistema para el anunciador, para que sepamos quién está por cruzar la línea de meta.
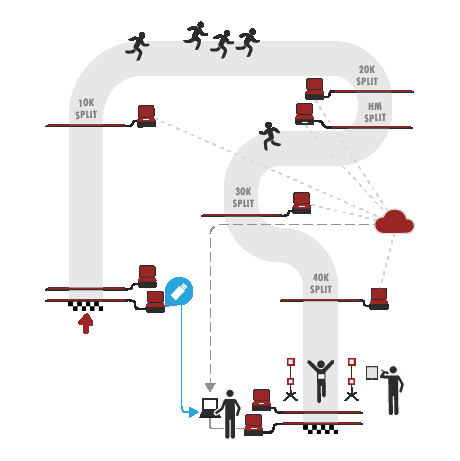
Prepara el Archivo del Evento
- Descarga una copia del archivo de eventos de maratón.
- Define las datos del evento (fecha, ubicación, zona horaria)
- Importa los participantes
Tiempo Inicial T0
En este ejemplo hemos incluido el Campo de Texto Adicional "Wave" ("Oleada"). Se usa para mostrar a los participantes en qué oleada comenzarán dependiendo de su objetivo de tiempo y para establecer su Tiempo Inicial T0.
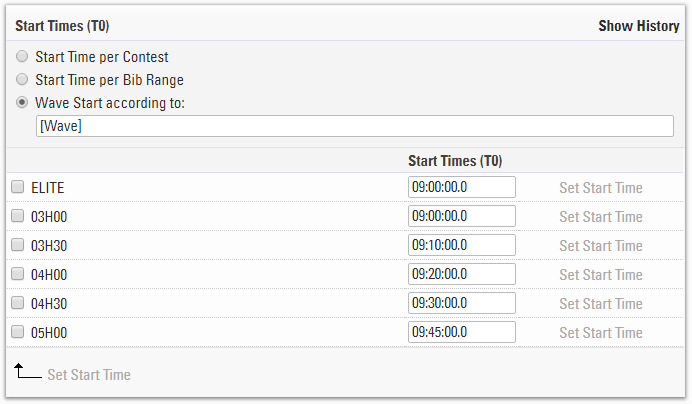
Establecemos el Tiempo Inicial (T0) en Inicio de Oleada de acuerdo con: y el CTA [Wave]. Esto nos permitirá ingresar los tiempos iniciales para cada oleada.
Configuración de Splits
El modo del cronometraje se establece en Cronometraje con Tiempo de Pistola, el cual es de acuerdo a la oleada inicial.
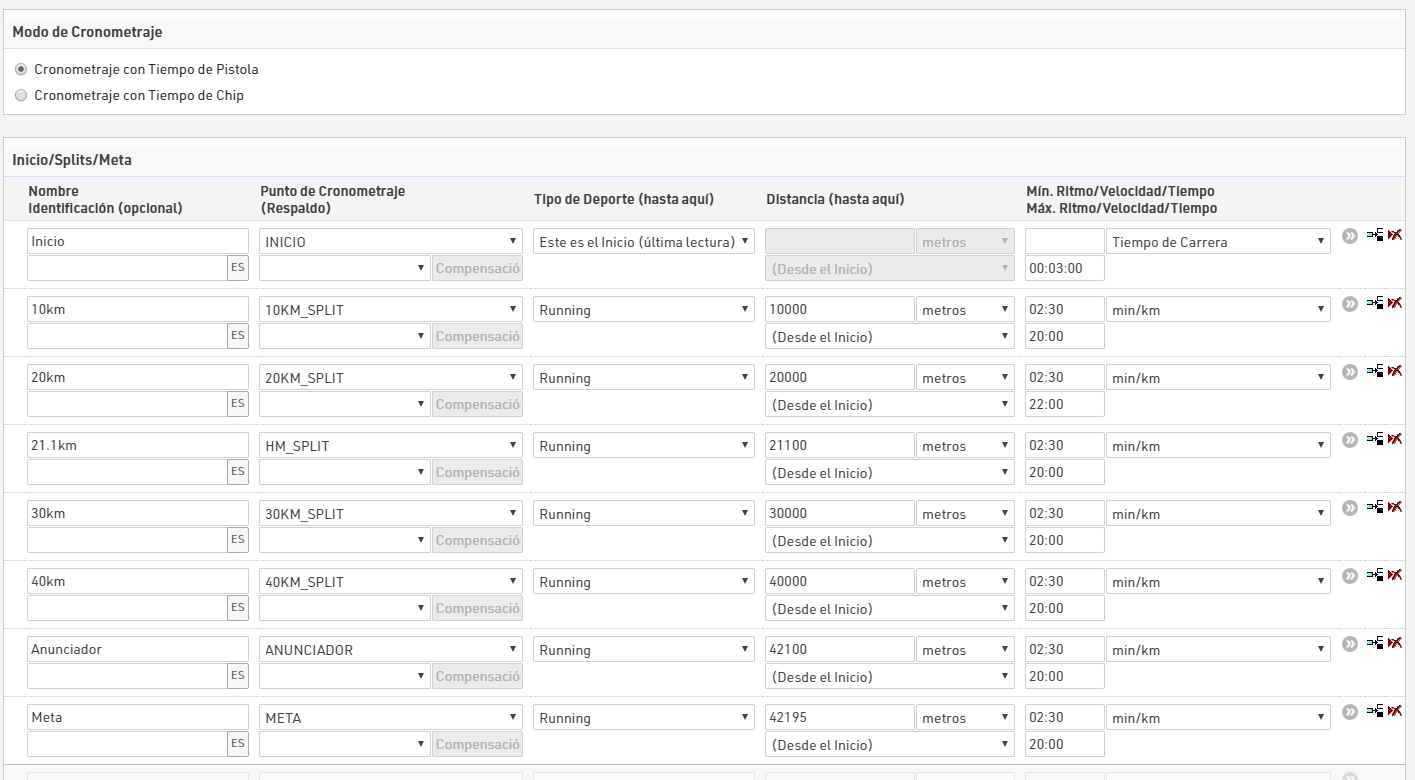
El Anunciador se establece en Interno para que no se publique en las tablas de posiciones en línea.
Las Etapas se configuran abajo, tenemos una etapa definida para cada mitad de la carrera.

Cálculo Estimado del Tiempo de Meta
Belinda Ward acaba de cruzar la marca de los 30 km y queremos saber en cuánto tiempo se espera que termine
Splits automáticamente proporciona tiempos previstos para cualquier Split que aún no haya registrado un tiempo. Esto se basa en el ritmo promedio actual de los participantes, la distancia del sector y el ritmo/tiempo mínimo del sector o la máxima velocidad.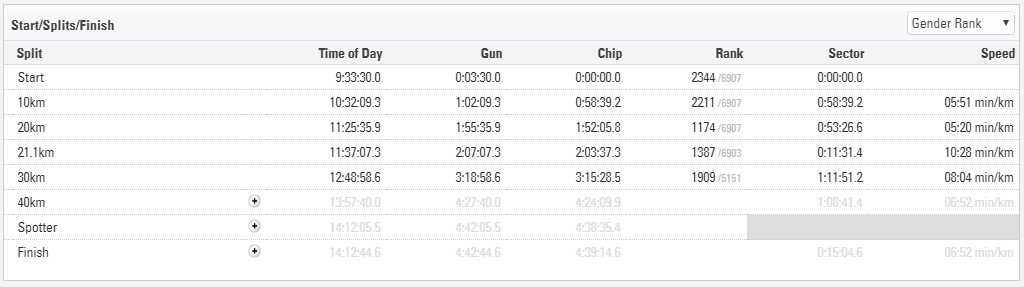
Los tiempos pronosticados se muestran en gris, pero se pueden insertar como tiempos manuales haciendo clic en el icono de más si es necesario. Se puede acceder a esto en una lista de output con [Finish.Predicted]
Cálculo de Velocidad y Ritmo
Cada tipo de deporte incluido con Splits tiene una unidad predeterminada para velocidad o ritmo, esto también depende de la región y la unidad de velocidad que se utilice, esta unidad se puede editar para cada split individualmente.
Para denominar la velocidad o el ritmo para un split simplemente use [SplitName.SpeedOrPace], en nuestra lista En Vivo lo usamos con el selector para devolver el ritmo actual, esto también devuelve la unidad como texto.
{Selector}.SpeedOrPace
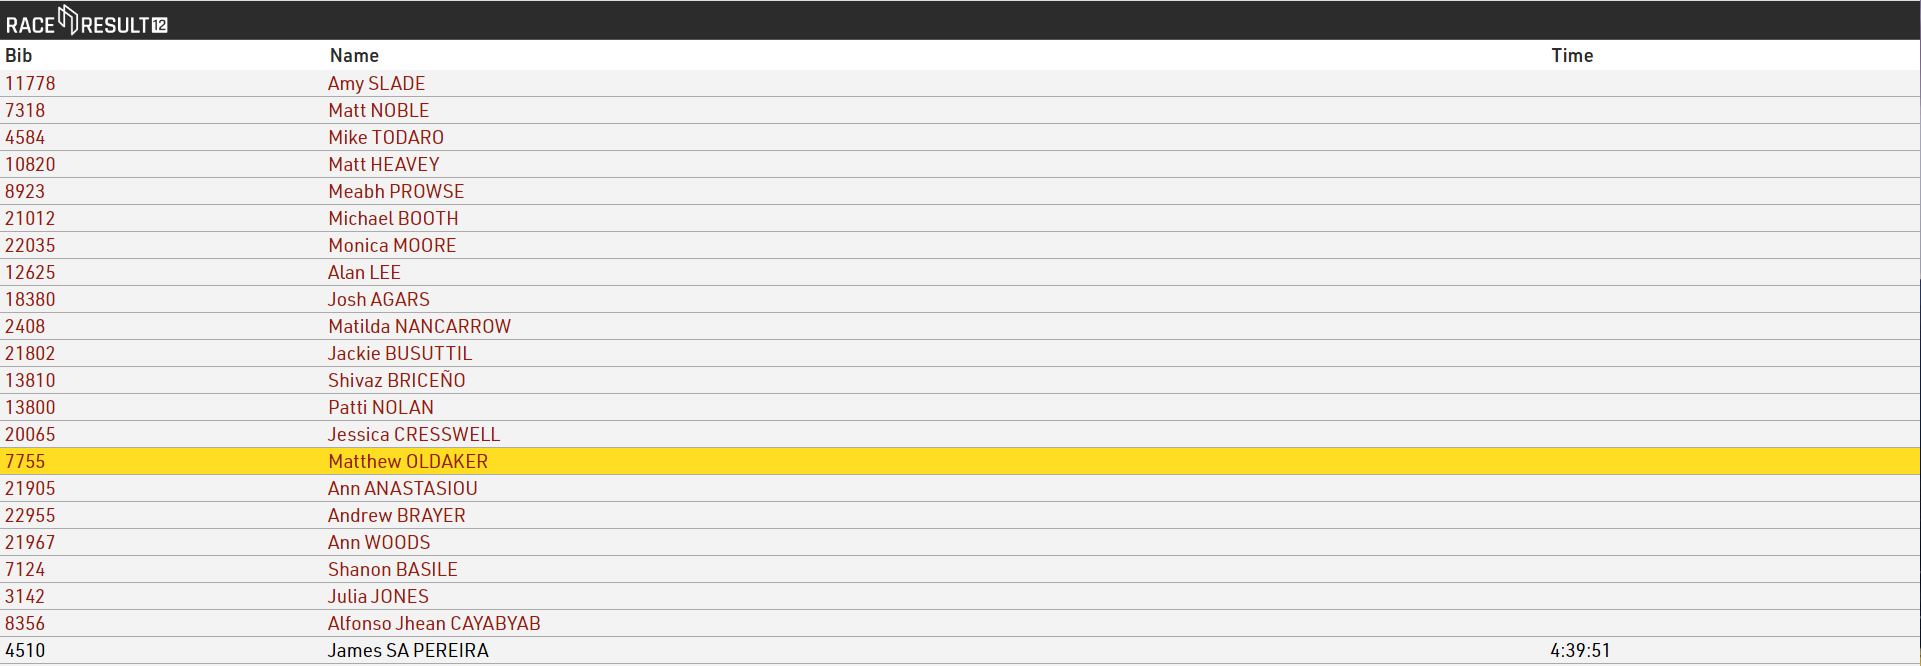
Lista del Anunciador
Queremos permitirle al anunciador seguir la carrera y que sea capaz de saber qué participante es el siguiente en cruzar la línea.
La Línea de Meta En Vivo se ordena con [Anunciador.TOD] la hora del día en que el participante cruza el sistema del anunciador y nosotros lo ordenamos al revés para mostrar el último hasta arriba.
Podemos darle un formato a la lista de output para que muestre a los participantes que han cruzado el Anunciador pero aún no la línea de meta con diferentes colores usando el Formateo Dinámico. Los participantes se mostrarán en rojo cuando se estén acercando a la meta y se mostrarán en negro cuando hayan terminado.
La herramienta para Presentar Resultados mostrará los resultados automáticamente en tiempo real. Perfecto para el anunciador en la línea de meta.
Formateo Dinámico
Si [Finalizado] es verdadero, entonces usar color 0,0,0 (negro), de otra manera usar 157,25,13 (rojo).
if([Finished];"C(0,0,0)";"C(157,25,13)")
Lea más sobre las opciones de Formateo Dinámico.

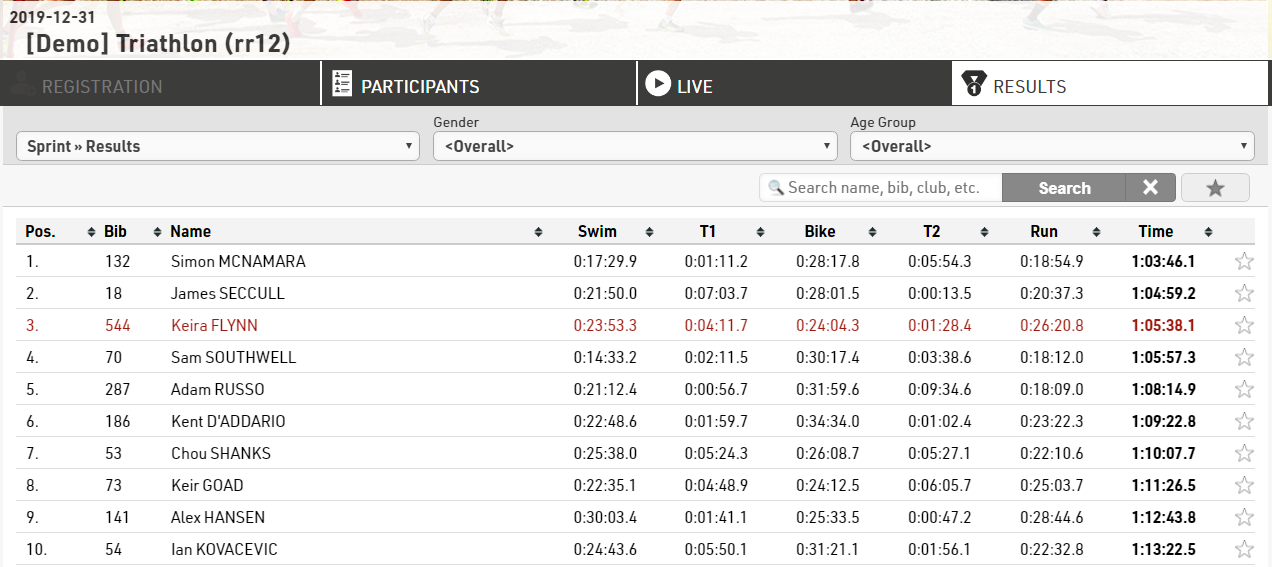
Output Resultados Online
- En Vivo (Live) muestra en qué ubicación y tiempo se le vio al participante por última vez, el tiempo neto actual, hora de meta prevista y tiempo neto previsto.
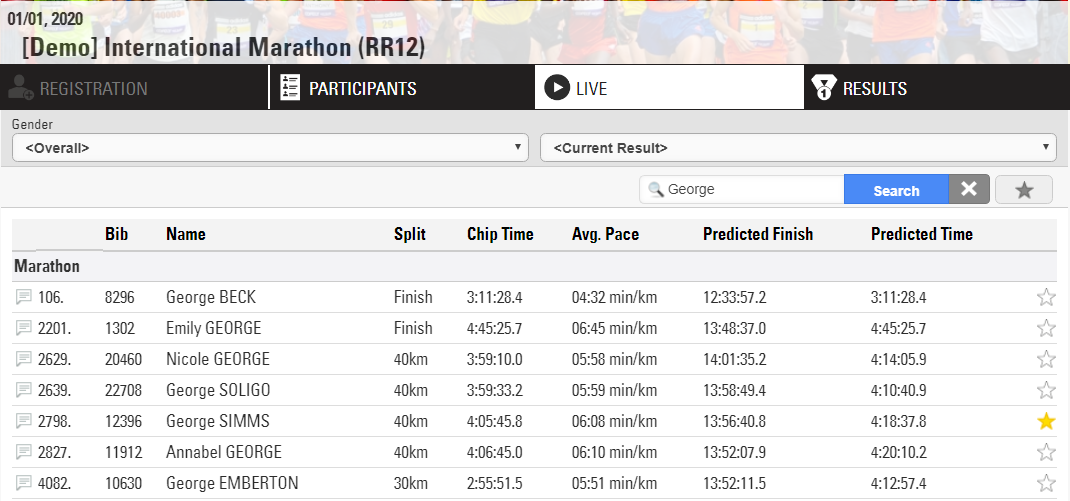
por ejemplo George Simms pasó los 40km con un tiempo de 4:05:45, a este ritmo se espera que finalice a la 1:56 pm con un tiempo neto previsto de 4:18:37
Los usuarios pueden buscar corredores por nombre, dorsal, club, etc. y pueden ser marcados como favoritos por si uno o varios amigos compiten en la carrera.
-
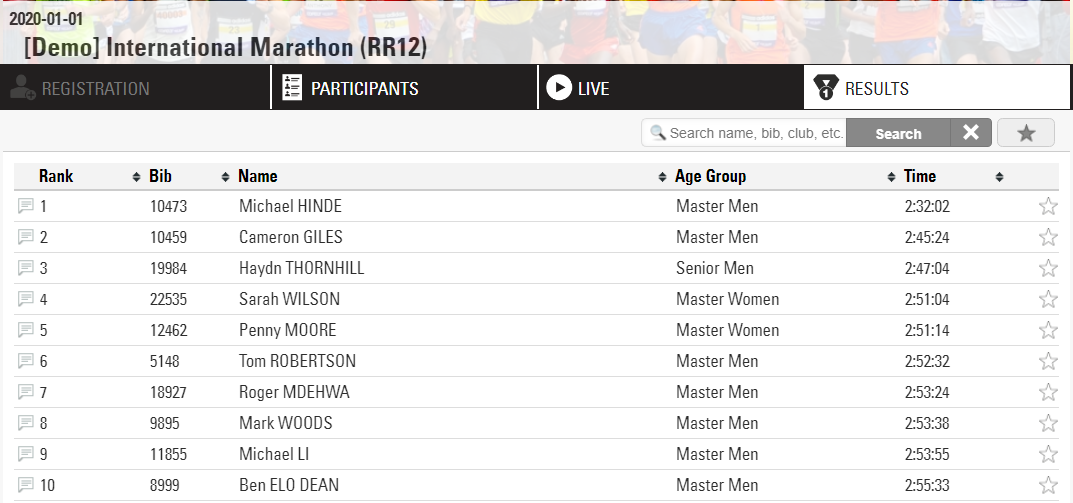
Los Resultados muestran el rango, dorsal, nombre, grupo de edad y el tiempo total de finalización.
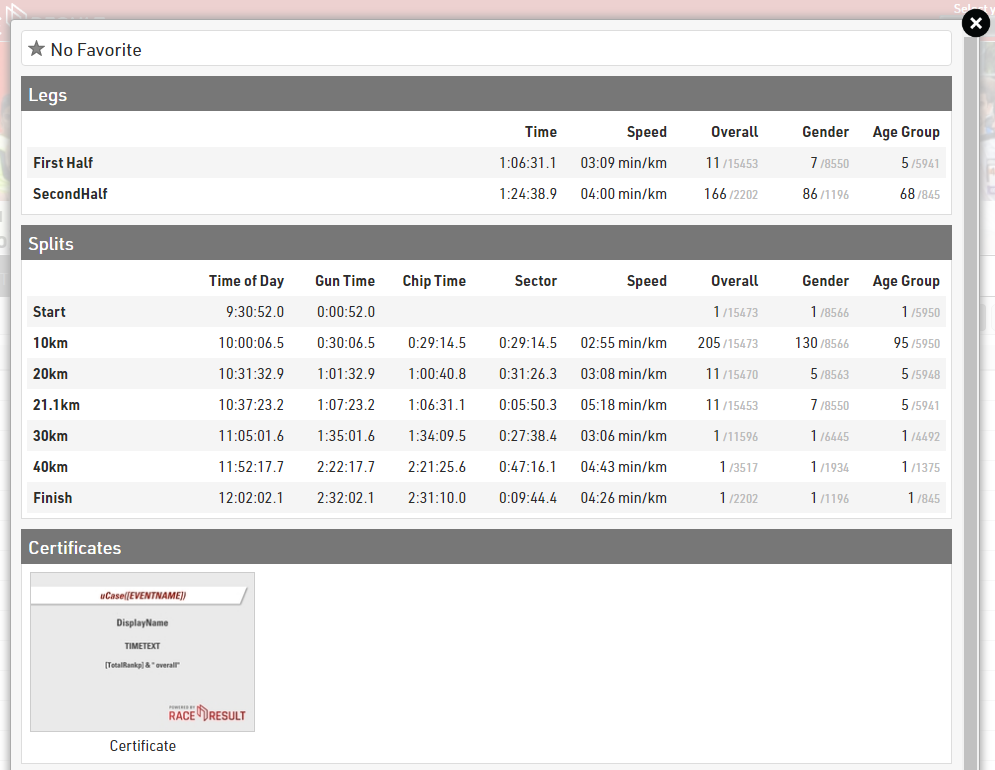
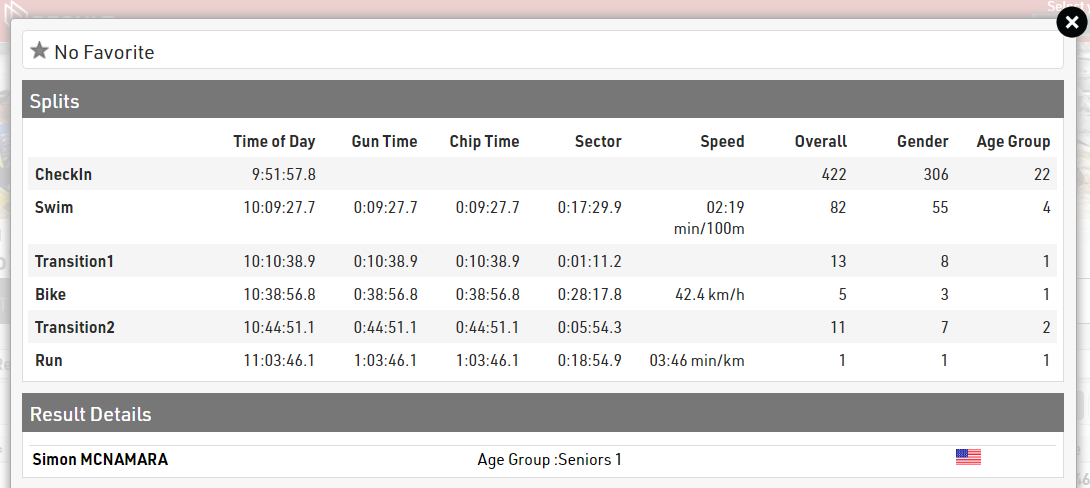
Al seleccionar un corredor en específico, se muestra un vistazo profundo a su carrera con tiempos parciales, clasificación de grupo de edad, velocidad y ritmo.
Herramientas Adicionales
RACE RESULT 12 cuenta con una colección de herramientas para asistir en la presentación y análisis de resultados. Considera utilizar Perspectiva General de la Competencia, Presentar Resultados o Visualización de Tiempos en tu próximo evento.
Puntuación de la Serie
Hay tres maneras de puntuar Series:
- Todas las carreras de la serie se gestionarán en un solo Archivo del Evento. Esto es más factible cuando los atletas mantienen sus dorsales para toda la serie.La principal ventaja es que puedes producir resultados de series en cualquier momento, incluso mientras una carrera de la serie está en marcha. La desventaja es que tendrá que configurar Resultados, Clasificaciones y Listas para cada carrera de la serie. Esto es similiar a cómo un Carrera por Etapas seria configurada.
- Alternativamente, el archivo de evento puede contener el resultado, relevante para la puntuación de la serie, de cada carrera (como el tiempo de finalización o puntos) y se utiliza para cronometrar la carrera actual al mismo tiempo. Después de cada carrera, los tiempos de finalización o los puntos se copiarán a un resultado separado, el archivo se copiará para la siguiente carrera y los resultados de tiempo se eliminarán en la copia.
-
La última alternativa es tener un archivo de evento por carrera de la serie y un archivo de evento adicional para la puntuación de la serie en la que se importarán los resultados de cada carrera. Por lo general, estas carreras son completamente independientes. Los atletas tienen diferentes dorsales por carrera. A menudo las carreras incluso serán organizadas por diferentes directores de carreras.
Las subsecciones siguientes proporcionaran guías para las opciones 2 y 3.
Event Series - Registration form, timing and results
This event is meant to be used for an Event Series, where registration, timing and result presentation are all in the same event. We will be focusing on the main features of the event file, which allows you to make the participant's experience unique.
In this example, we will build a Series with 4 events, which will take place the second Sunday of each month from April to July 2024.

Relay Races
There are three ways how to set up a Relay Race:
- A relay-team can be recorded as one data-set like a normal single participant. The handling does not differ from handling of single participants. The team has only one chip. Data like name, age or sex of relay-members can be set in Additional Fields.
- Team members are saved as individual participant records, but the team has only one chip, so all times will be saved in one of the participant records.
- Team members are saved as individual participant records and each team member has his own chip.
Backyard Ultra
The example file is at the bottom of this article!
A backyard ultra is an endurance running event that challenges participants to complete a set distance, usually a loop course, within a specific time frame, typically one hour. The unique aspect of this race is that it repeats indefinitely, with participants starting a new loop every hour. If a participant completes a loop within the hour, they rest until the next hour begins, and then they start the next loop. The race continues until only one participant remains able to complete the loop within the hour, and that participant is declared the winner.
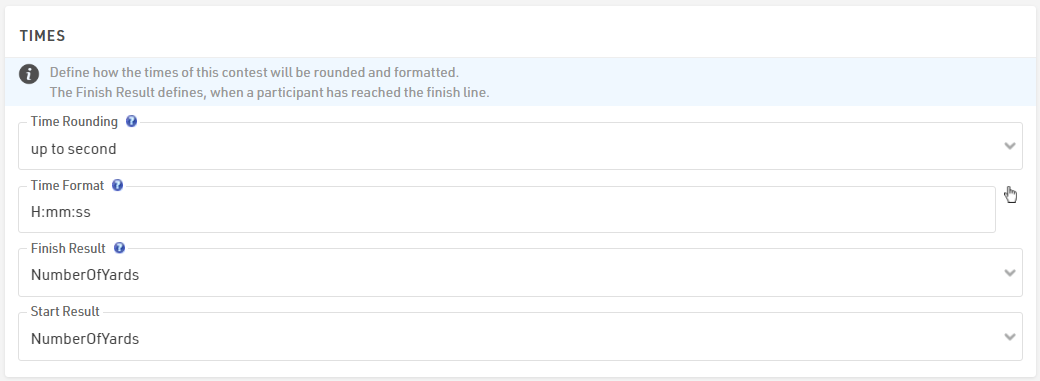
For this kind of race, the special results are the tool to use to run the proper calculations for the whole event.
MULTI-DAY EVENTS Settings
The first setting to apply is on the event date: since participants may run for more than 24 hours, it is mandatory to select a Date Until (under Main Window>Basic Settings)
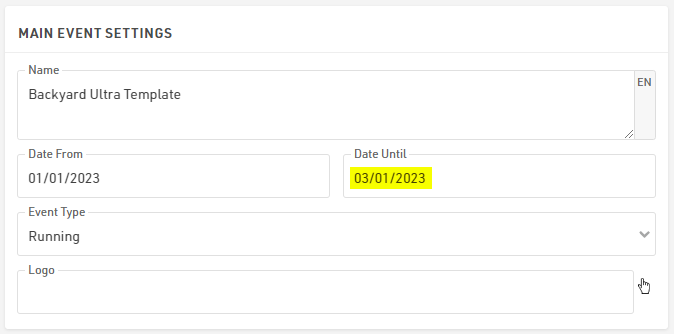
in order to unlock the section MULTI-DAY EVENTS under the Timing module.
Define the timing points
In this example, we will use 3 different timing points: one decoder for the start/lap detection and 2 more decoders for 2 additional timing point on the course, which will be used as a check to check that all participants run the whole loop.

Build the Special Results
Since we are not going to use the official T0 the following settings are un-ticked to have a better control of all the special results.
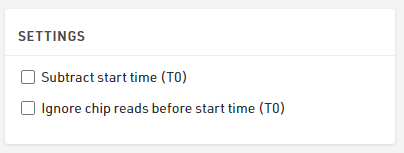
The T0 under Main Window > Start Times / Finish Time Limit can be left to 00:00:00.
Dynamic Start Times
To define the start time of each lap, we need first to create a reference for the race start.
In T101 we store 10:00:00, which is the start time of the race.

In results T102-T106 we will store the start times of the next yards, which will be calculated dynamically for each participant, based on the calculation entered for those results: the time will be, indeed, calculated only if the participant finished the previous yard (T300X) in less than 1 h (3600 seconds).

To calculate the finish time of each yard, we need first to get all the right detections from our timing points.
Start, Checkpoint 1, Checkpoint 2 and Finish Detections
Since the current record for Backyard Ultra is 102 yards, our advanced results should be set by considering future developments: that's why we choose to store the Start/CP1/CP2/Finish detection at least 200 IDs apart from each other.
Start Detections T1001-T1006
For the Start, we always take the last detection between 2 s before and 2 s after the dynamic star time of each yard. This ensures to get a chip detection also for those who start slightly before or after the official start.

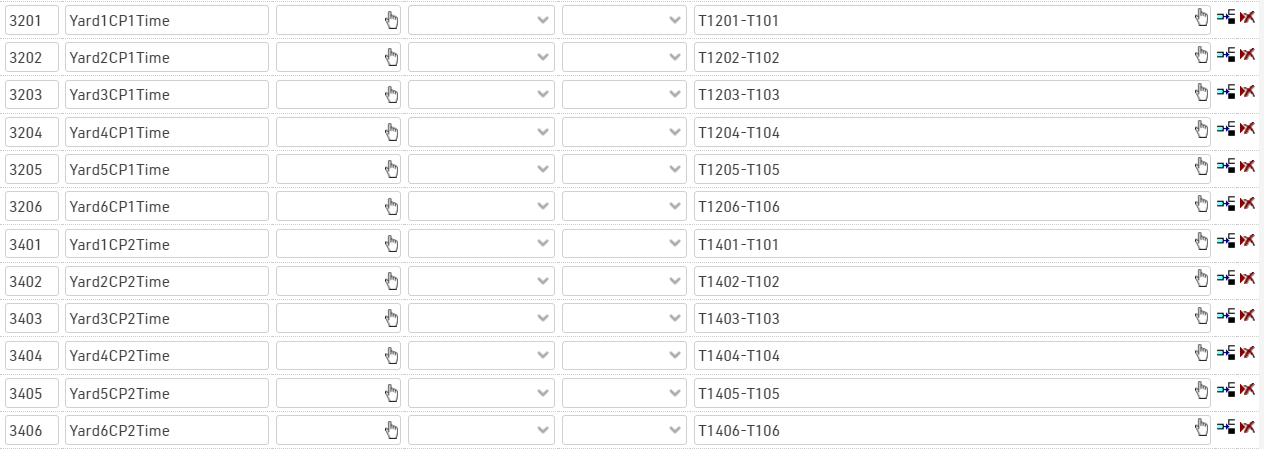
CP 1 Detections T1201-T1206
For the first checkpoint, we consider valid the first read after the start of the respective yard, thus we set the reference with the relative Start Detection.

CP 2 Detections T1401-T1406
For the second checkpoint, we consider valid the first read after the first checkpoint of the respective yard, thus we set the reference with the relative CP1 Detection: this ensures that participants are running with the right course-direction and not in reverse.

Finish Detections T2001-T2006
For the finish detections, we have chosen to keep a bigger gap with the result IDs in order to have enough room in case the organizer wants to have extra checkpoints on the course.
In this case, for the finish, we consider valid every detection which occurs after at least 20 min from the Start Detection and before the end of the hour. For an extra-control, it could also be possible to reference the finish detection directly with the CP2 detection. 
Time Calculations
Now that we have all the detections, we can run our calculations for the run time of each yard, the running time of each checkpoint and the rest time that each athlete has after the conclusion of each yard. Once again, we keep the same IDs gap between the different calculations, in order to have consistency with the other results and to have enough room for development.
Yard Time
For calculating the time of each yard, we need to take each finish detection and subtract the relative start detection. In case the finish detection is missing (participant didn't complete the run, or participant finished the run above the time-limit) the Yard Time won't be calculated at all.

CP1 and CP2 running Time
For these, we subtract the CP detections with the relative start detection of each yard.
Rest Time
For the rest time, we calculate it by subtracting the next yard start time with the current finish detection. In this way, we are able to know how much time each athlete can spend resting before the next yard start.

Summary of results
With these functions, we can store all the info we may need for our output lists. 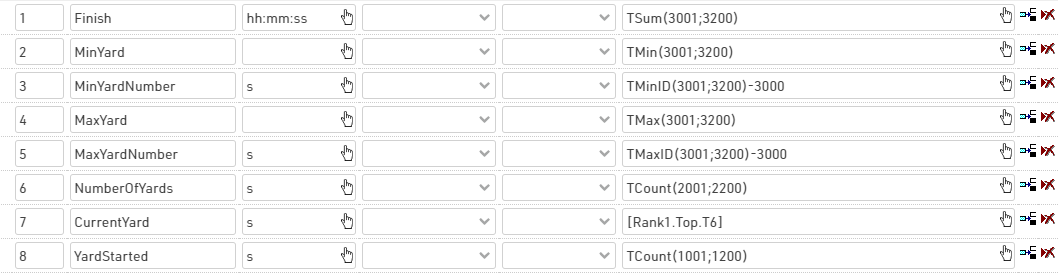
Note that the CurrentYard result (ID7) stores the number of yards ran by the leading participant: this will be extremely useful for calculating automatically the status of every participant during the event.
The YardStarted (ID8) stores the number of Yards started by each participant and NumberOfYards (ID6) the number of Yards completed.
Displaying Results
With all the results calculated, we can now focus on result presentation.
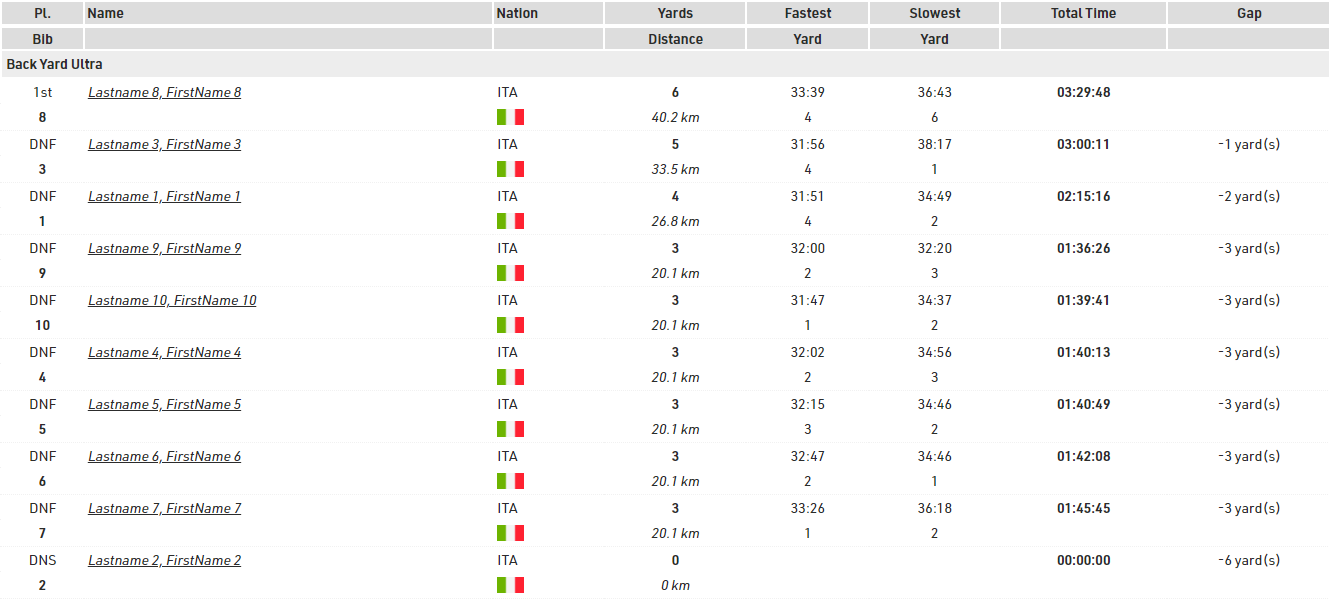
Final List
To automatically set the status DNF to all participants who didn't start the round on time, it is possible to create an additional field (in this case we called it AutoStatus) with the following formula:
AutoStatus(x): switch([Status]>0;WithStatus();[Status]=0 AND T6<T7;"DNF";1;[x])
Trying to put the formula in words, if the status of a participant is already set different from regular, its status will be displayed straight forward. In case the status is regular ([Status]=0) and the NumberOfYards of that participant (T6) is smaller than the number of yards ran by the leading participant (T7), then we will automatically display "DNF"; for all other scenarios, we will display the field we want to show.
Final List
In this list, we want to display all participants who have started the race or if they have a status different from regular.
For that, we apply in the filter the following conditions:
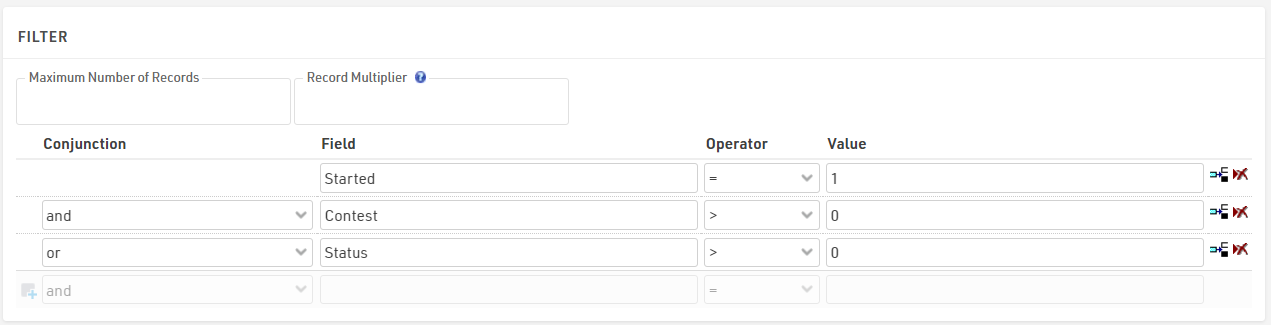
where [Started] refers to the result selected under Contest>Times
To order participants properly, we sort by OverallRank.
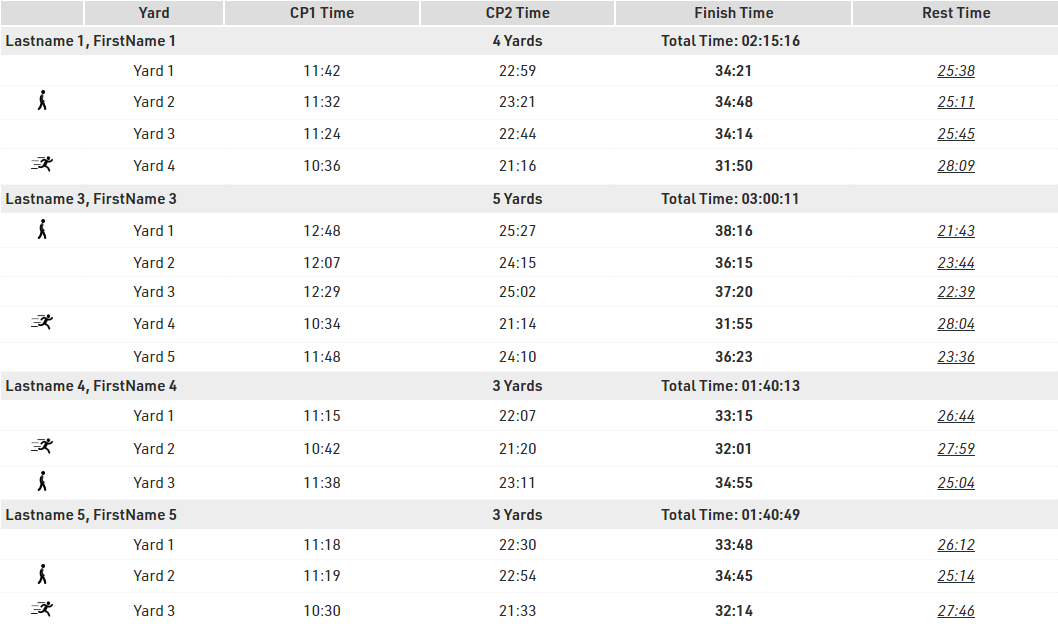
Detail List
For showing each yard for each participant, we can prepare a detail list by using the record multiplier [NumberOfYards] which will create one line for each yard completed by each participant.
By referring to the row number via {n}, we can call each calculated time and with the format() function, we can show the times in the preferred format.
Two images are also been added based on the fastest and slowest yard completed: these refer to the row number and the values stored in the advanced results T3 and T5.
Live List
In the live list, we display the current position of each participant (Last Seen column), with the relative Time of Day (ToD) and Gap from the first participant.
Triatlón
Archivo del Evento
Se registran tiempos en la entrada y salida del área de transición, y en la línea de meta.
Se utiliza un sistema adicional como control de natación, para que el organizador sepa quién comenzó realmente y se asegure de que todos los participantes salieron del agua. El público puede seguir la carrera en vivo en my.raceresult.com.
Este ejemplo muestra al transpondedor ActivePro en uso con dos Loop Boxes en el área de transición transmitiendo los pases de forma inalámbrica a una USB Timinf Box en la línea de meta.
También es posible usar el sistema pasivo y HuTags, la configuración del archivo del evento sigue siendo la misma.
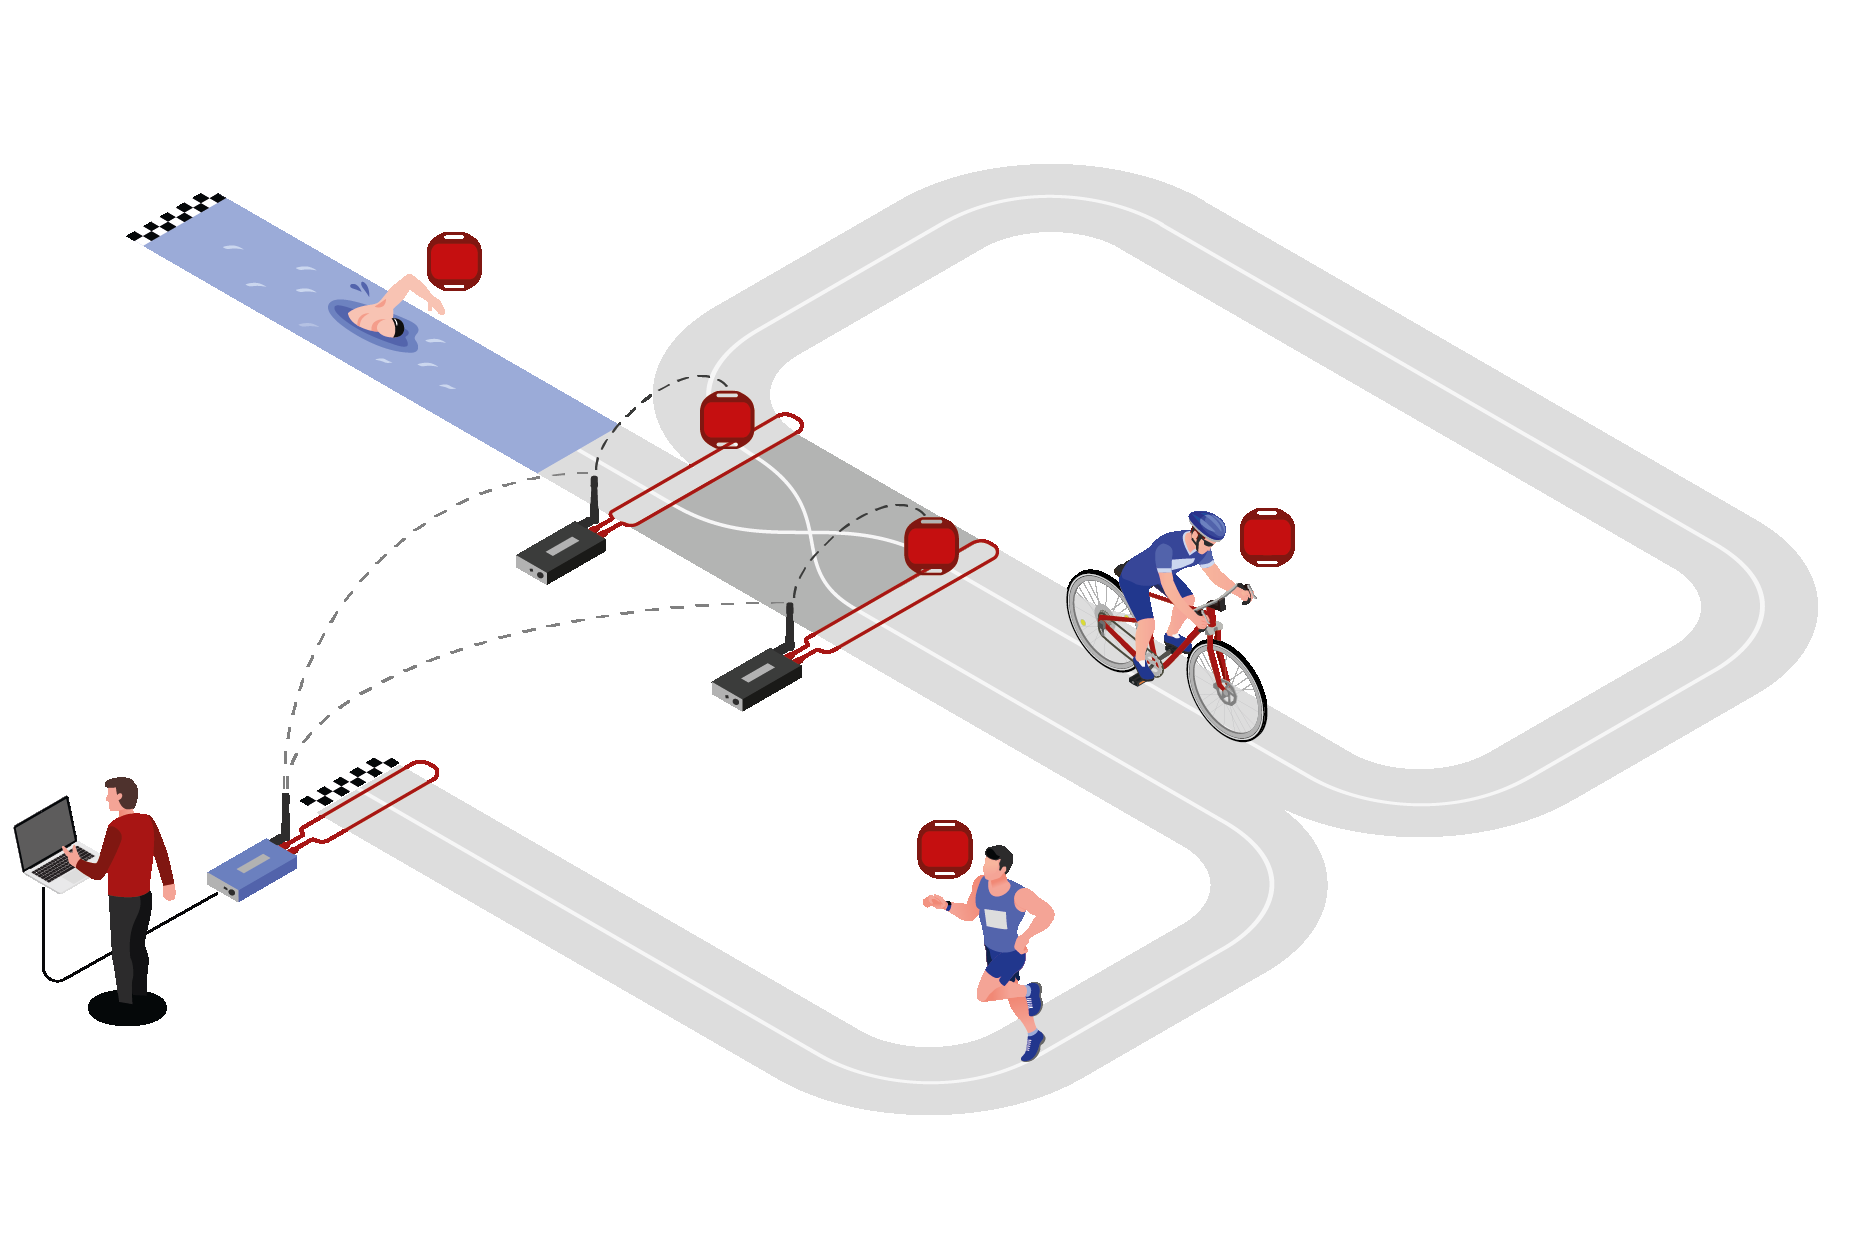
Posiciones del Cronometraje
Control Inicial, Entrada Transición, Salida Transición, Meta.
Preparar el Archivo del Evento
- Descargar una copia del archivo de evento de triatlón.
- Definir los datos del evento (fecha, ubicación, zona horaria)
- Confirmar la información de la competencia
- Importar participantes
Ajustes de Splits
Los Splits se configuran para cada competencia individualmente, el Modo de Cronometraje se establece en Tiempo de Pistola. Ya que no contamos con Splits adicionales, no definimos Etapas adicionales aquí ya que los tiempos de sector nos darán los tiempos por etapas.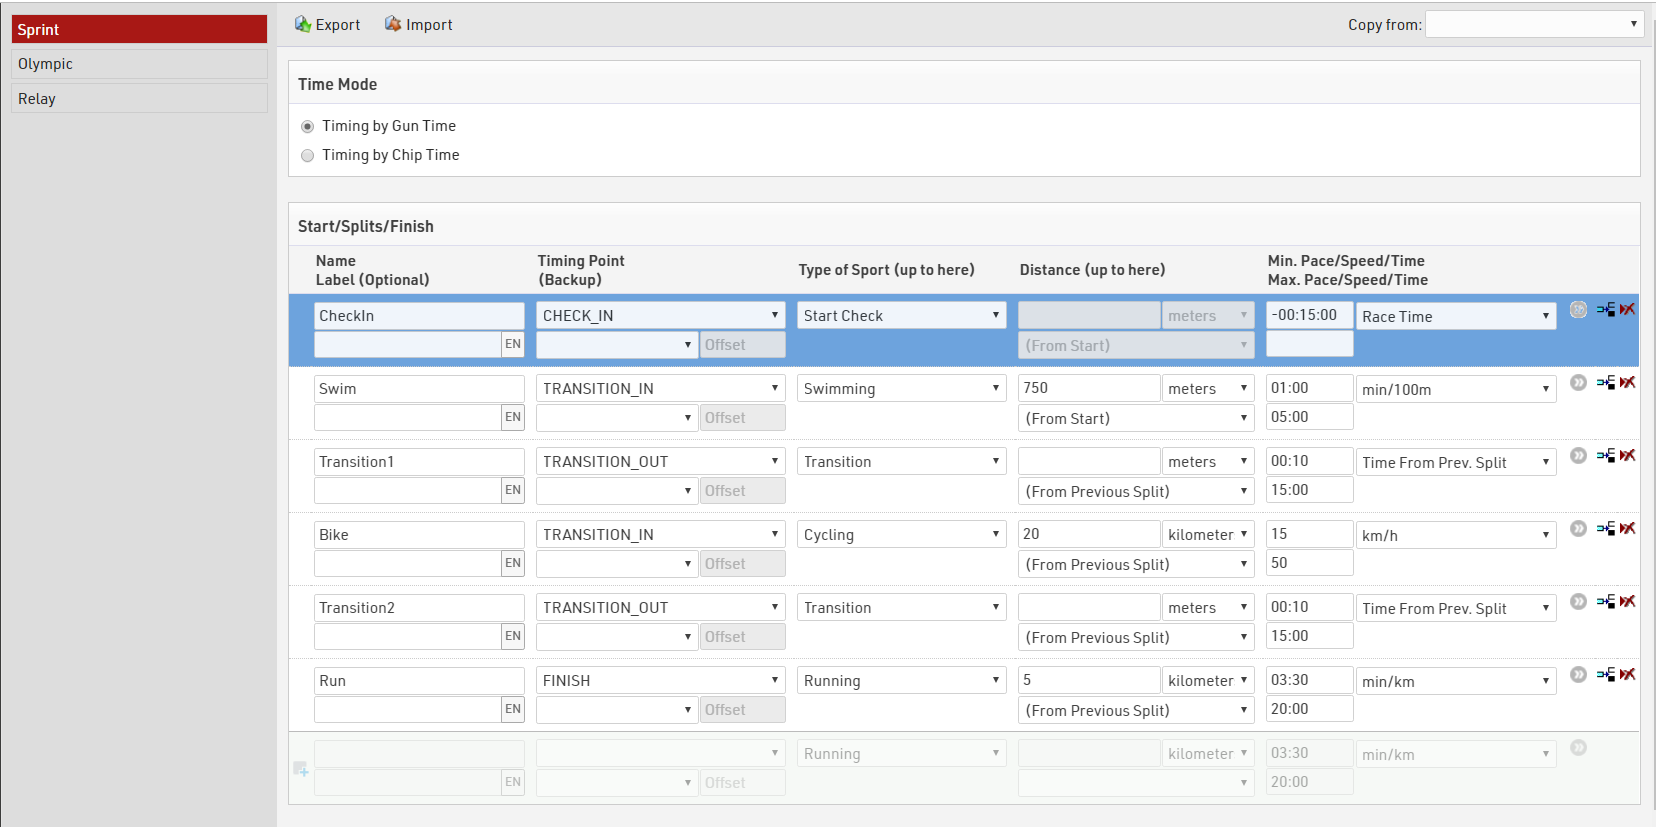
Miembros del Equipo
En este ejemplo, un miembro del equipo completa una etapa del curso. Se entrega un transpondedor al equipo y se pasa entre los miembros del equipo después de cada etapa.
Se usan Campos de Texto Adicional para capturar el nombre, apellido y sexo del participante 2 y participante 3.
Mostrar Miembros del Equipo
Para mostrar todos los miembros del equipo en múltiples reportes de manera fácil, creamos un campo definido por el usuario para mostrar los segundos y terceros participantes. Otro campo DisplayName ya habrá corregido el nombre y apellido al caso correcto para cada miembro del equipo.
DisplayNames:
[DisplayName] & if([DisplayName2]<>" ";" / " & [DisplayName2]) & if([DisplayName3]<>" ";" / " & [DisplayName3])
Output: Katherine WADDELL / Jo LAMBRICK / Marina TYSON
Funciones Definidas por el Usuario - Determinar Sexo del Equipo
Podemos determinar el sexo del equipo automáticamente. Para calificar como equipo de un solo sexo, el sexo de los miembros debe ser el mismo. Primero creamos una función para convertir el sexo ya sea a 0 o 1, y sumamos los valores por cada miembro, de la suma de estos valores podemos determinar si el equipo es únicamente de mujeres, hombres o si es mixto.
GenderToNumber(x): Translate([x];0;1)

GenderSum: Val(GenderToNumber([Gender])+GenderToNumber([Gender 2])+GenderToNumber([Gender 3]))

TeamGender: Choose([GenderSum]+1;"female";"mixed";"mixed";"male")
Reporte de Estadísticas
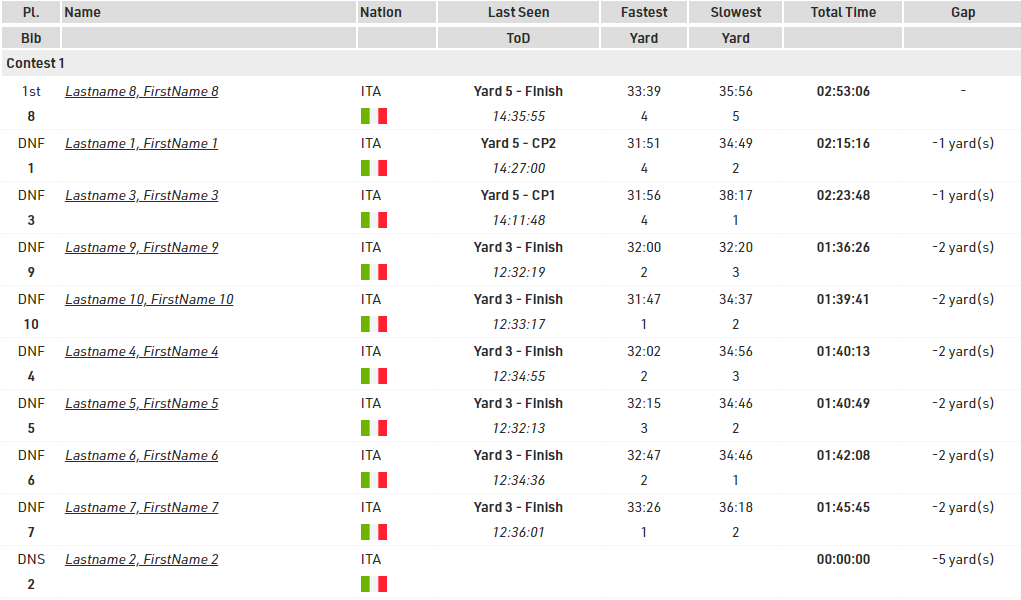
En cualquier momento el organizador o los encargados pueden necesitar saber cuántos participantes hay en cada momento del curso. Podemos determinar una visión general utilizando un conjunto de estadísticas. Nuestro conjunto de estadísticas revisará nuestro campo llamado LastSeen, este se hace {LastSplit}, una función especial para permitir la consulta de los campos del último participante en los que este participante registró un tiempo.
Switch([{LastSplit}.Name]="CheckIn";"0. Check-In";
[{LastSplit}.Name]="Swim";"1. Swim Finish";
[{LastSplit}.Name]="Transition1";"2.Bike Start";
[{LastSplit}.Name]="Bike";"3.Bike Finish";
[{LastSplit}.Name]="Transition2";"4. Run Start";
[{LastSplit}.Name]="Run";"5. Finish";
[Started]=0;"Not Started")
Usando los Ajustes de Estadísticas > Formato de Columna WithStatus([LastSeen])
El conjunto de estadísticas producirá el output siguiente:

Si el estado de un participante es regular, se usará el últimpo split donde se le vio, de otra manera se mostrará su estado.
Podemos ver que en Relay y Sprint todos están reportados al final o registrados como DNF/DNS/DSQ. En la carrera olímpica, 4 participantes fueron vistos por última vez en SwinFinish y por lo tanto se presume que todavía están en la Transición 1, 541 participantes en el curso de Bicicleta, 1 en la Transición 2 y 1 en el curso de Correr.
Outputs de Resultados
- En Vivo cuenta con una tabla de posiciones la cual agrupa a todos los participantes por la ubicación donde fueron vistos por última vez, clasificados por tiempo de carrera acumulado, utilizamos el campo especial {LastSplit} para ordenar a los participantes y mostrar los tiempos relevantes. Usando {LastSplit}.Gender vemos su sexo en su último split, esto permanecerá igual hasta que lleguen al siguiente split.

Habilitamos el filtro de Competencia y Sexo para que los espectadores puedan elegir qué carrera mirar y puedan mirar una categoría de género específica si así lo desean.
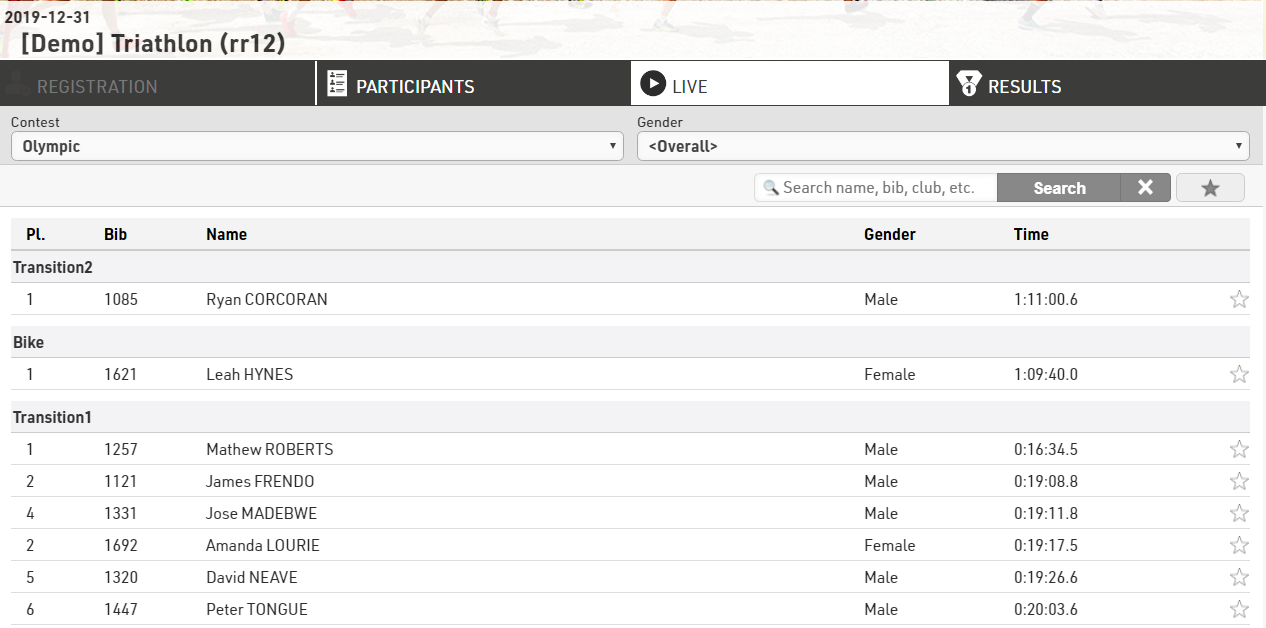
Desde aquí podemos ver que en la competencia Olympic, Justin Appelman fue el primer Hombre en dejar la transición 1, sin embargo no se le ha visto desde entonces y tenemos a los que están más adelante en el curso con sus respectivas filas en esos splits.
- Los Resultados Finales muestran clasificación, dorsal, nombre y tiempos de splits para cada etapa y tiempo de meta general.
Lista de Detalles
Seleccionar un participante específico muestra un vistazo profundo a sus tiempos de Splits, y una lista de detalles adicionales con su información personal se muestra debajo.
Esto se logra habilitando la casilla Mostrar Splits en la opción Certificados/Detalles de la pestaña my.raceresult.com y también publicando el output Detalles Individuales debajo de la lista de detalles para el output correspondiente.
Triathlon Elite Mixed Relay
Event File
The relay consists of 4 team members, 2 males and 2 females. The first team member completes their triathlon before the next team member starts. 3 team members will finish at an alternative finishing line relay finish with the final team member running through the finish.
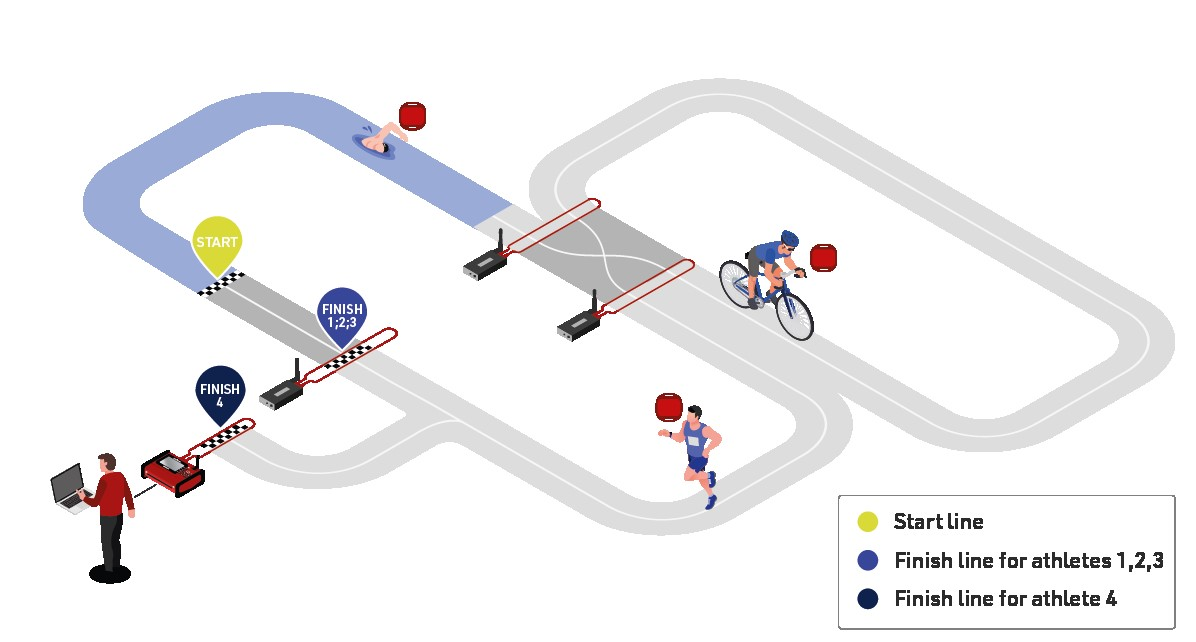
Timing Locations
Start, Swim Out, Transition Out, Transition In, Relay Finish, Finish
Result Calculations
Since each participant's start time depends on the previous team member's finish time, for this event type we will use the advanced results setup.
1 - 6: Times calculated for each split

10 - 20: Raw data from timing systems

30 - 36: Cumulative split times

101 – 102: Determine where the participant was last detected

Team Members
Participants are identified on course with their a combination of team number and letter to identify their position in their team. This can be calculated by combining two functions into one user defined field:
DisplayBib:
[TeamID] & choose(right([Bib];1);"/A";"/B";"/C";"/D")
DisplayBib: Take the team index, which is the first 1 or 2 bib numbers from the participant's bib, and the right most digit of the bib, if this is 1, display A, if 2 dispay B and so on. Bib 133 would be translated as 13/C (TeamID 13, team member C)
Ranks
The HelperRank orders team members by their RelayID. The RelayID is taken from the last digit of the bib number (1-4).
Start Time Calculation
The first team member's time is calculated from T0, the following participant's times are calculated from the previous team members finish time. Thanks to the dot logic we can identify the finish time of the previous team member as defined by the HelperRank (Rank100.Prev.T15).
switch([RelayID]=1;T0;[RelayID]>1 AND nz([Rank100.Prev.T15])>0;nz([Rank100.Prev.T15]))
Using RelayID the switch function identifes in which position the participant is starting, if RelayID is 1 use T0; if RelayID > 1 and the finish time of the previous team member is > 0 then use the finish time of the previous team member.
Finish Time Calculation
The first 3 team members use an alternate finish Relay Finish whilst the last team member uses the finish line. We can determine the finish location by using the choose function:
choose([RelayID];T15;T15;T15;T16)
If RelayID = 1,2 or 3 use time time from TimingRun (T15), if RelayID = 4 use the time from TimingFInishLine (T16).

e.g. The raw finish time for team member C (relay ID 3) is determined from the finish of TimingRun.
Team Score Calculation
Team members are determined by having the same contest and club name to a maxium of 4 participants. The overal finish result is the minimum time for the Result AfterFinishLine which only the 4th team member receives.
Live Output List
To enable the grouping by finishers and location we have several layers of grouping and sorting.
- Contest and ContestName
- RelayID and RelayName
- LastSplit and LastSplitName
- Time102 Time of the last split
A live rank has been used to determine the position on the couse at each of the timing locations. start, swim, transition1, bike, transition2, run and finish line.
The rank of the last split can be determined using Rank(x) with the LastSplitID Result:
Rank([LastSplitID])
Final Result
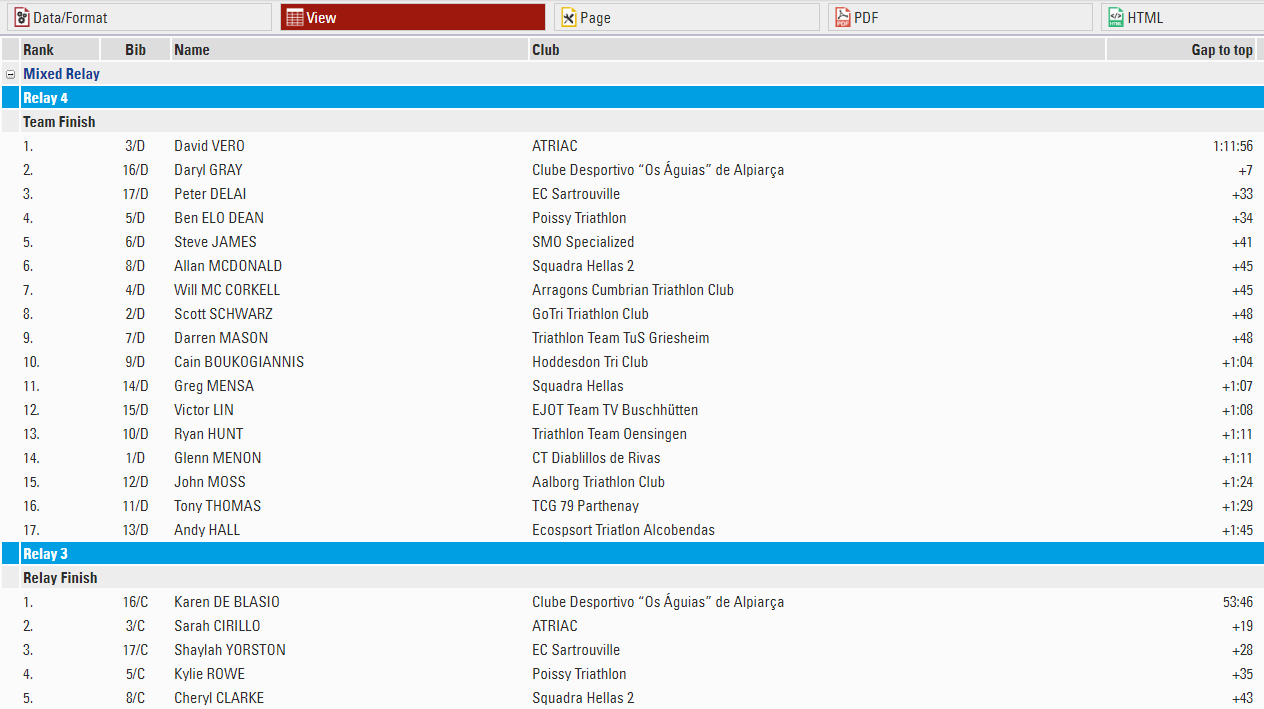
Grouping Participants by Team
To group team members we use the user-defined function OrTeamStatus([TeamTime.Rank]) & ".///" & [Club] & "///" & [CountryIOC] & "///" & [TeamTime.Time1]
This will group all team members and sort by the overall rank of the team score, club name, country and team time. If the team has a status of non regular, the team status will be shown.
Using "///" will push the field into the next column along.
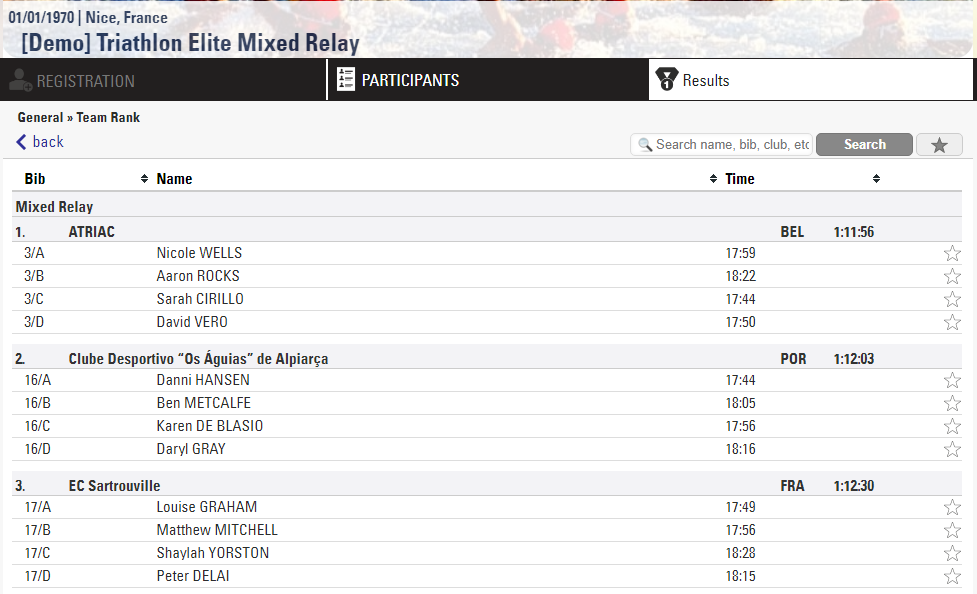
Qualifications / Heats / Finals
This example looks at how you can manage events with qualification rounds and progressive heats in RACE RESULT 12.
In this we show the core concepts of how to manage such events, but this example does not consider all possibilities, the basic methods shown here can be adapted to handle a range of requirements such as additional rounds, different genders, lap races and more.
Event Format
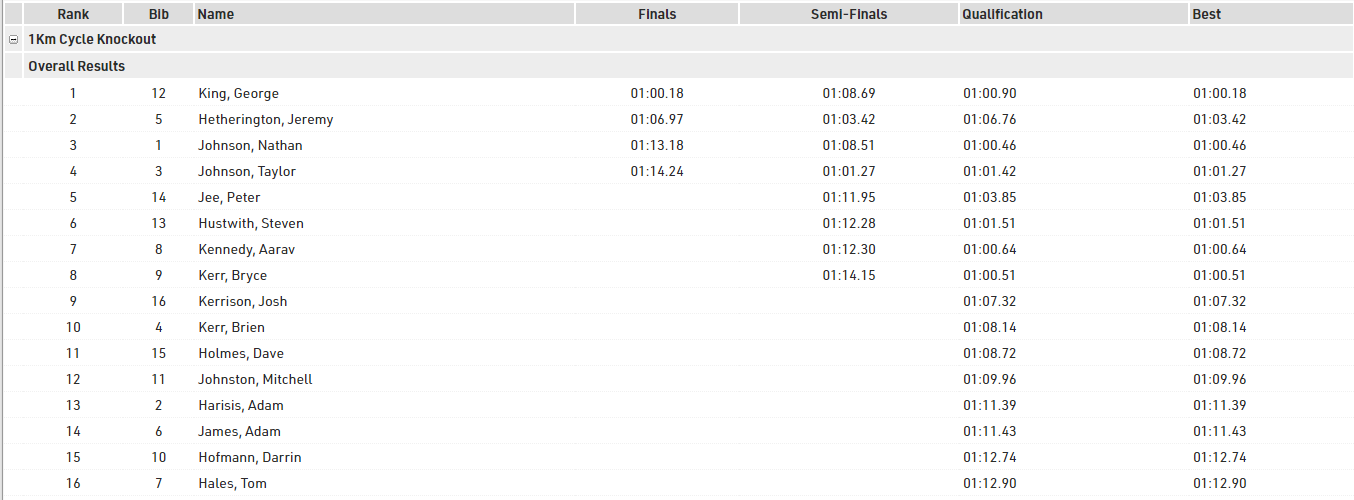
In this event we have all participants registered in a single Contest and only use a single Gender. The event is based on a simple short race (modelled on a 1km cycling time trial), with a fixed start time and single detection for each round. We keep this example short with just 16 participants starting.
The event starts with a Qualification round, where participants are assigned a unique individual start time.
From the Qualification round the best 8 will progress to the Semi-Finals, with 2 rounds of 4 participants.
The Finals will be formed of the best 2 participants from each Semi-Final round.
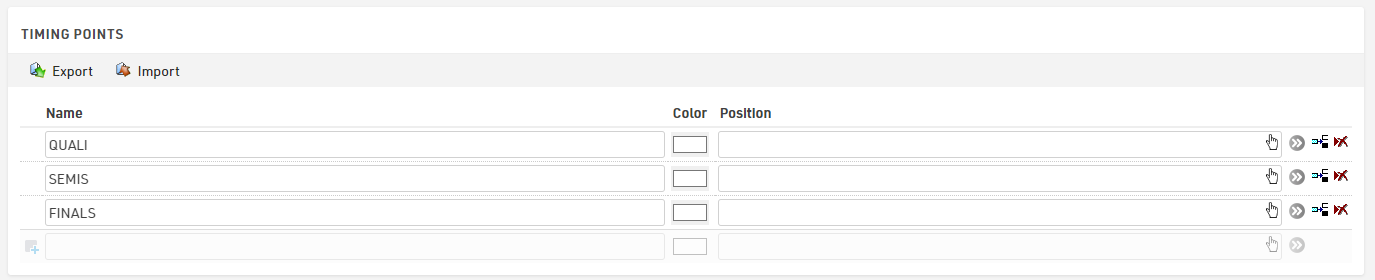
Timing Points
This setup uses a unique Timing Point for each, this isn't critical for this setup, but it makes it easier to understand the data later, especially if the event is spread out over multiple days
Results
The results setup here is kept as simple as possible.
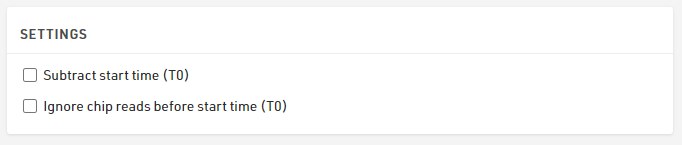
Given that T0 is irrelevant in this type of event where the same participant has multiple starts, we do not subtract this in our settings.
For each round we have a start time, which is a fixed time and a single finish detection at the relevant Timing Point, which is simply the first time after the start, and then for each round we calculate the individual participant's time.
We also calculate the number of rounds each participant has completed and their best time of the 3 rounds.
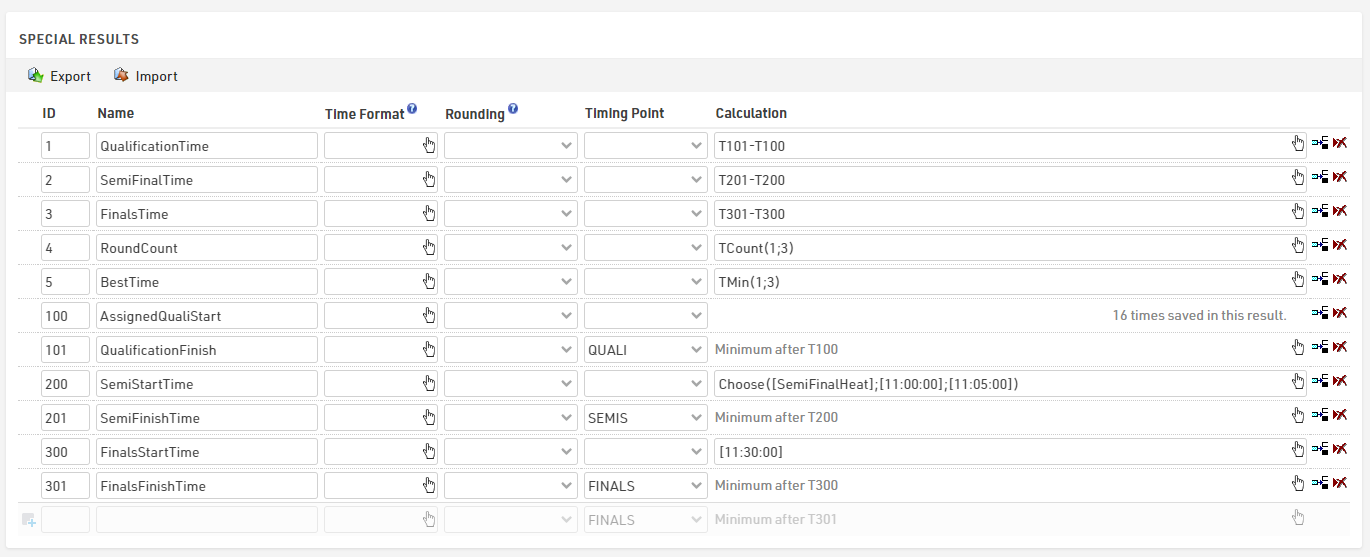
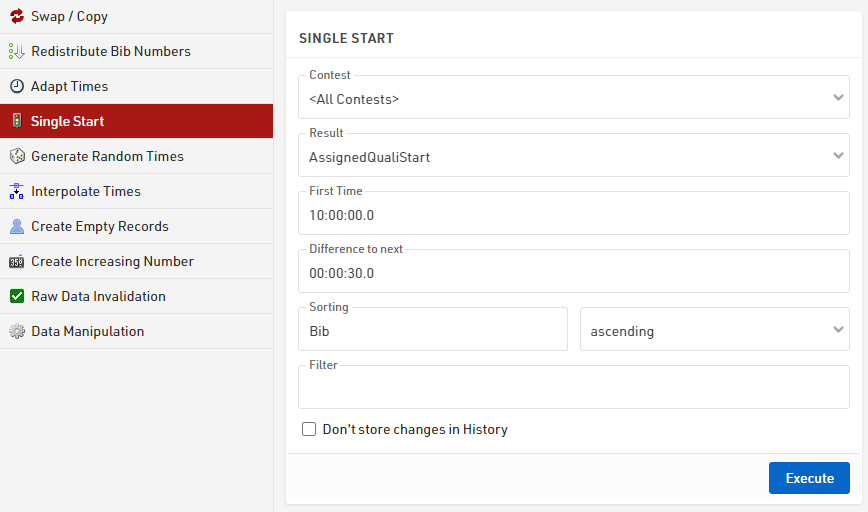
For the qualification we set the times using the Adapt Data - Single Start feature which sets a static time for each participant at set intervals according to the sorting criteria. This could alternatively be calculated directly in the result or imported with the participant data.
The Semi-Finals time uses a Choose() function based on the heat number (which we will calculate later) which then returns a time for each heat.

Since the Finals are a single round we have a fixed time in here.

Note that for both the Semi-Finals and Finals the times are in square brackets, this ensures that the software knows to convert this to a time that is internally stored as a decimal value in seconds.
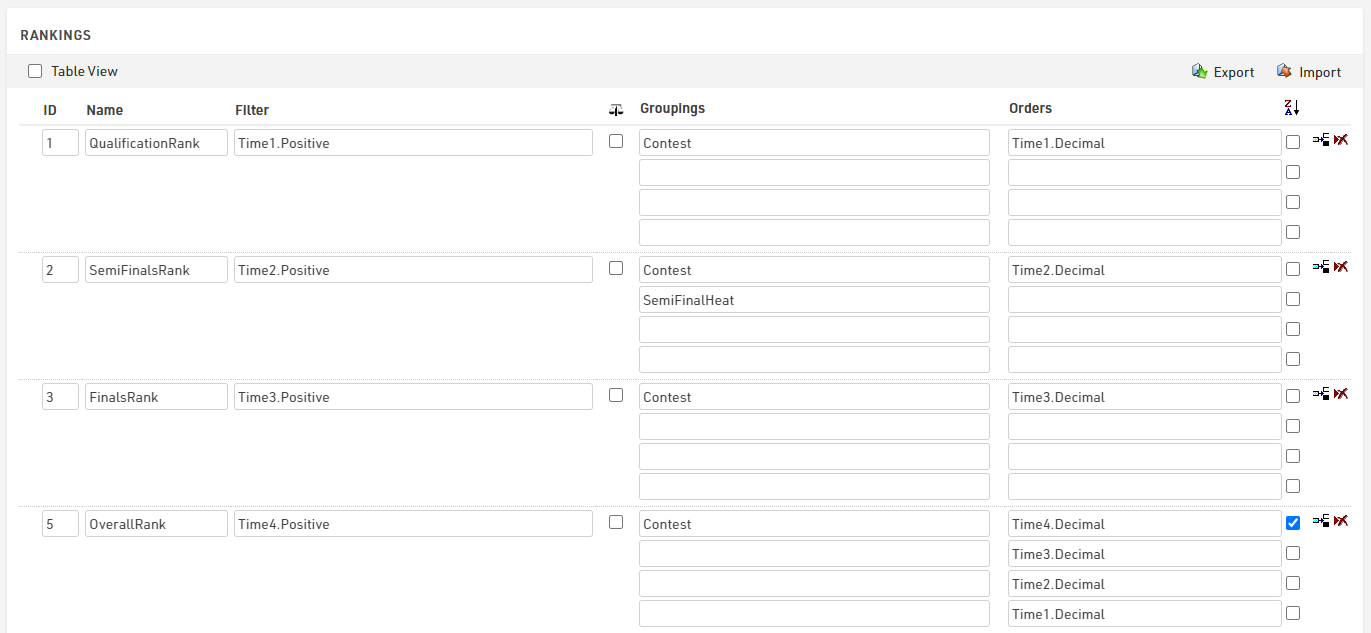
Rankings
For this we need 3 main ranks, one for each round, and also produce a final overall ranking which helps put everybody in one output list later on.
Each of the round ranks filters on TimeX.Positive, so only those with a time in the round are ranked, the Semi-Finals additionally groups by the HeatNumber so that we only compare those of the same heat for the progression to the finals.
Our final overall rank is based on the number of rounds completed from largest to smallest (so those who qualified for the Finals will have 3 rounds whereas those knocked out during Qualification will only have 1. We then sort based on their Finals time, Semi-Finals time and lastly the Qualification time.
Round Progression
The most important part of this setup is how participants progress from Qualification to Semi-Finals to Finals. This is calculated automatically and dynamically using 2 User-Defined Fields.
Each User-Defined Field looks at the relevant rank to return a heat number for the next round.
For the SemiFinalHeat we take their Qualification rank as an input and return the heat number based on this using a Choose() function.
Choose([QualificationRank];1;2;1;2;2;1;2;1)
To understand this, here is the mapping of the ranks to heats.
| Rank | Heat | Rank | Heat | |
| 1 | 1 | 5 | 2 | |
| 2 | 2 | 6 | 1 | |
| 3 | 1 | 7 | 2 | |
| 4 | 2 | 8 | 1 |
Those with a Qualification Rank of 9 or higher therefore do not receieve a SemiFinalHeat and do not progress.
For the Finals we can simplify this and us a simple If() statement to only take those in the top 2 of their Semi-Final heat, we need to also check that the rank is greater than 0, since those who are not ranked will return a rank of -1.
If([SemiFinalsRank]<=2 AND [SemiFinalsRank]>0;1)
Outputs
Start Lists
For each round we produce a Start List of participants, for the Semi-Finals and Finals this is filtered to only qualified riders, and within each heat participants are sorted by their time from the previous round.
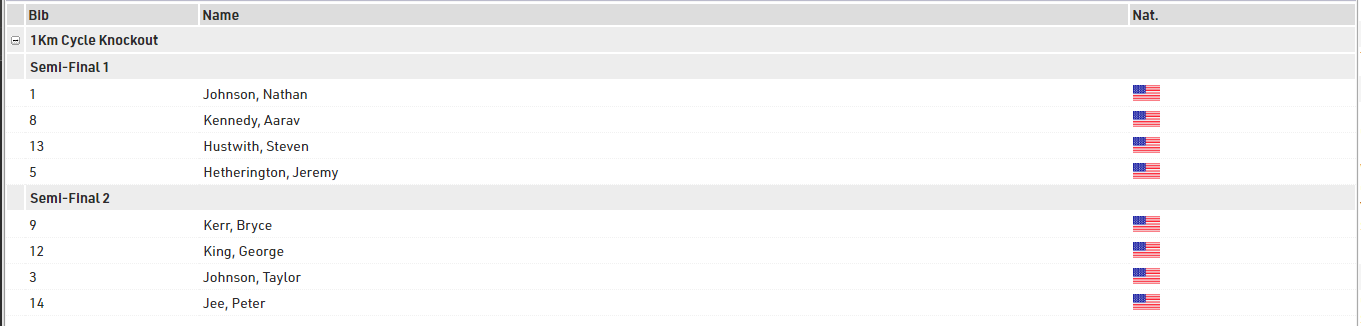
For the Semi Finals we group by Contest and then concatenate "Semi Final " and their heat number, then sort by decimal value of their qualification time.

The filter is used to only take those who have a SemiFinalHeat assigned.

The Finals Start list applied the same logic but simply groups by "Finals" and filters on the FinalsHeat.
Results Lists
For results we want to show for each round the participants' times and also who has qualified to move on to the next round.
Each rounds result list is filtered and sorted by the corresponding rank, so they are only shown if they have completed the round. We also apply the same grouping / filtering logic from the Start Lists to group by the round / heat number.
To show who has qualified we add a column which looks at the relevant rank and if this is less than or equal to the maximum rank to qualify shows a Q, for qualification this is the top 8.
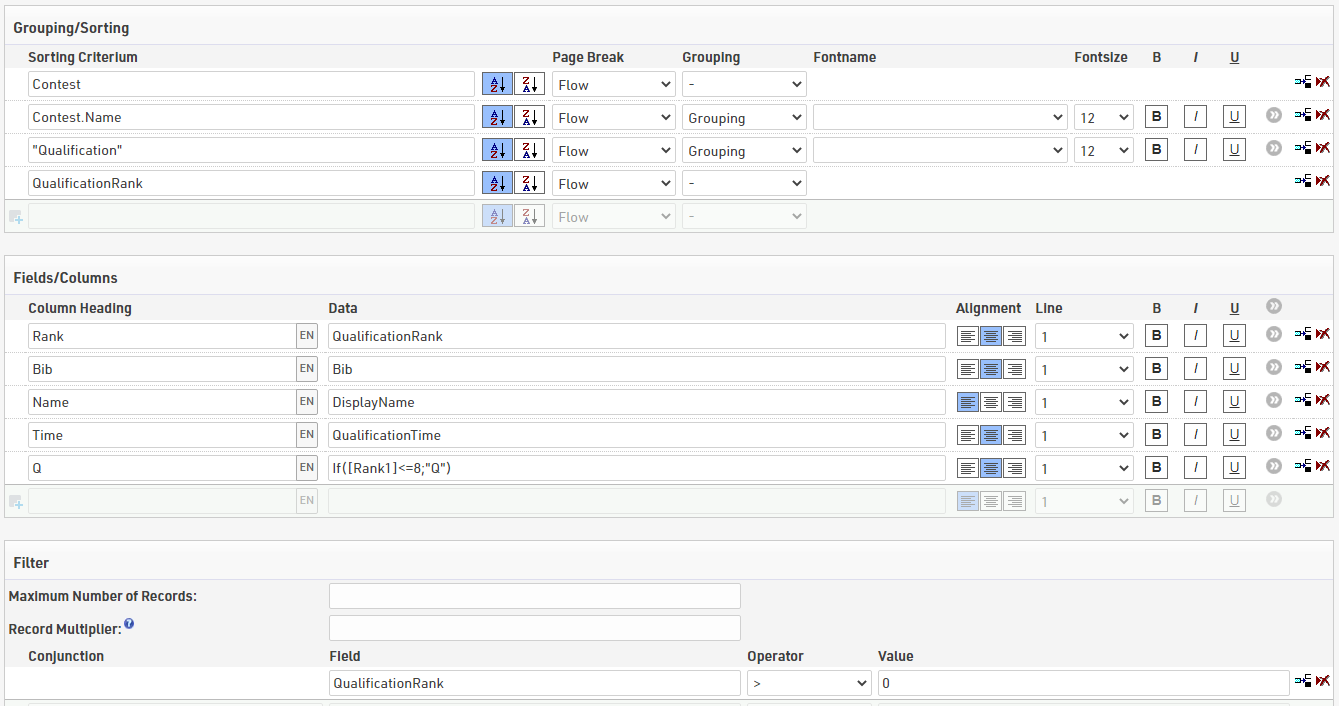
We also created an overall results list, which uses the overall rank setup earlier. With this as the main sorting criteria we can then also easily and clearly show who qualified for each round, and we also show their best time in an additional column.
Lap Race - Time Limit
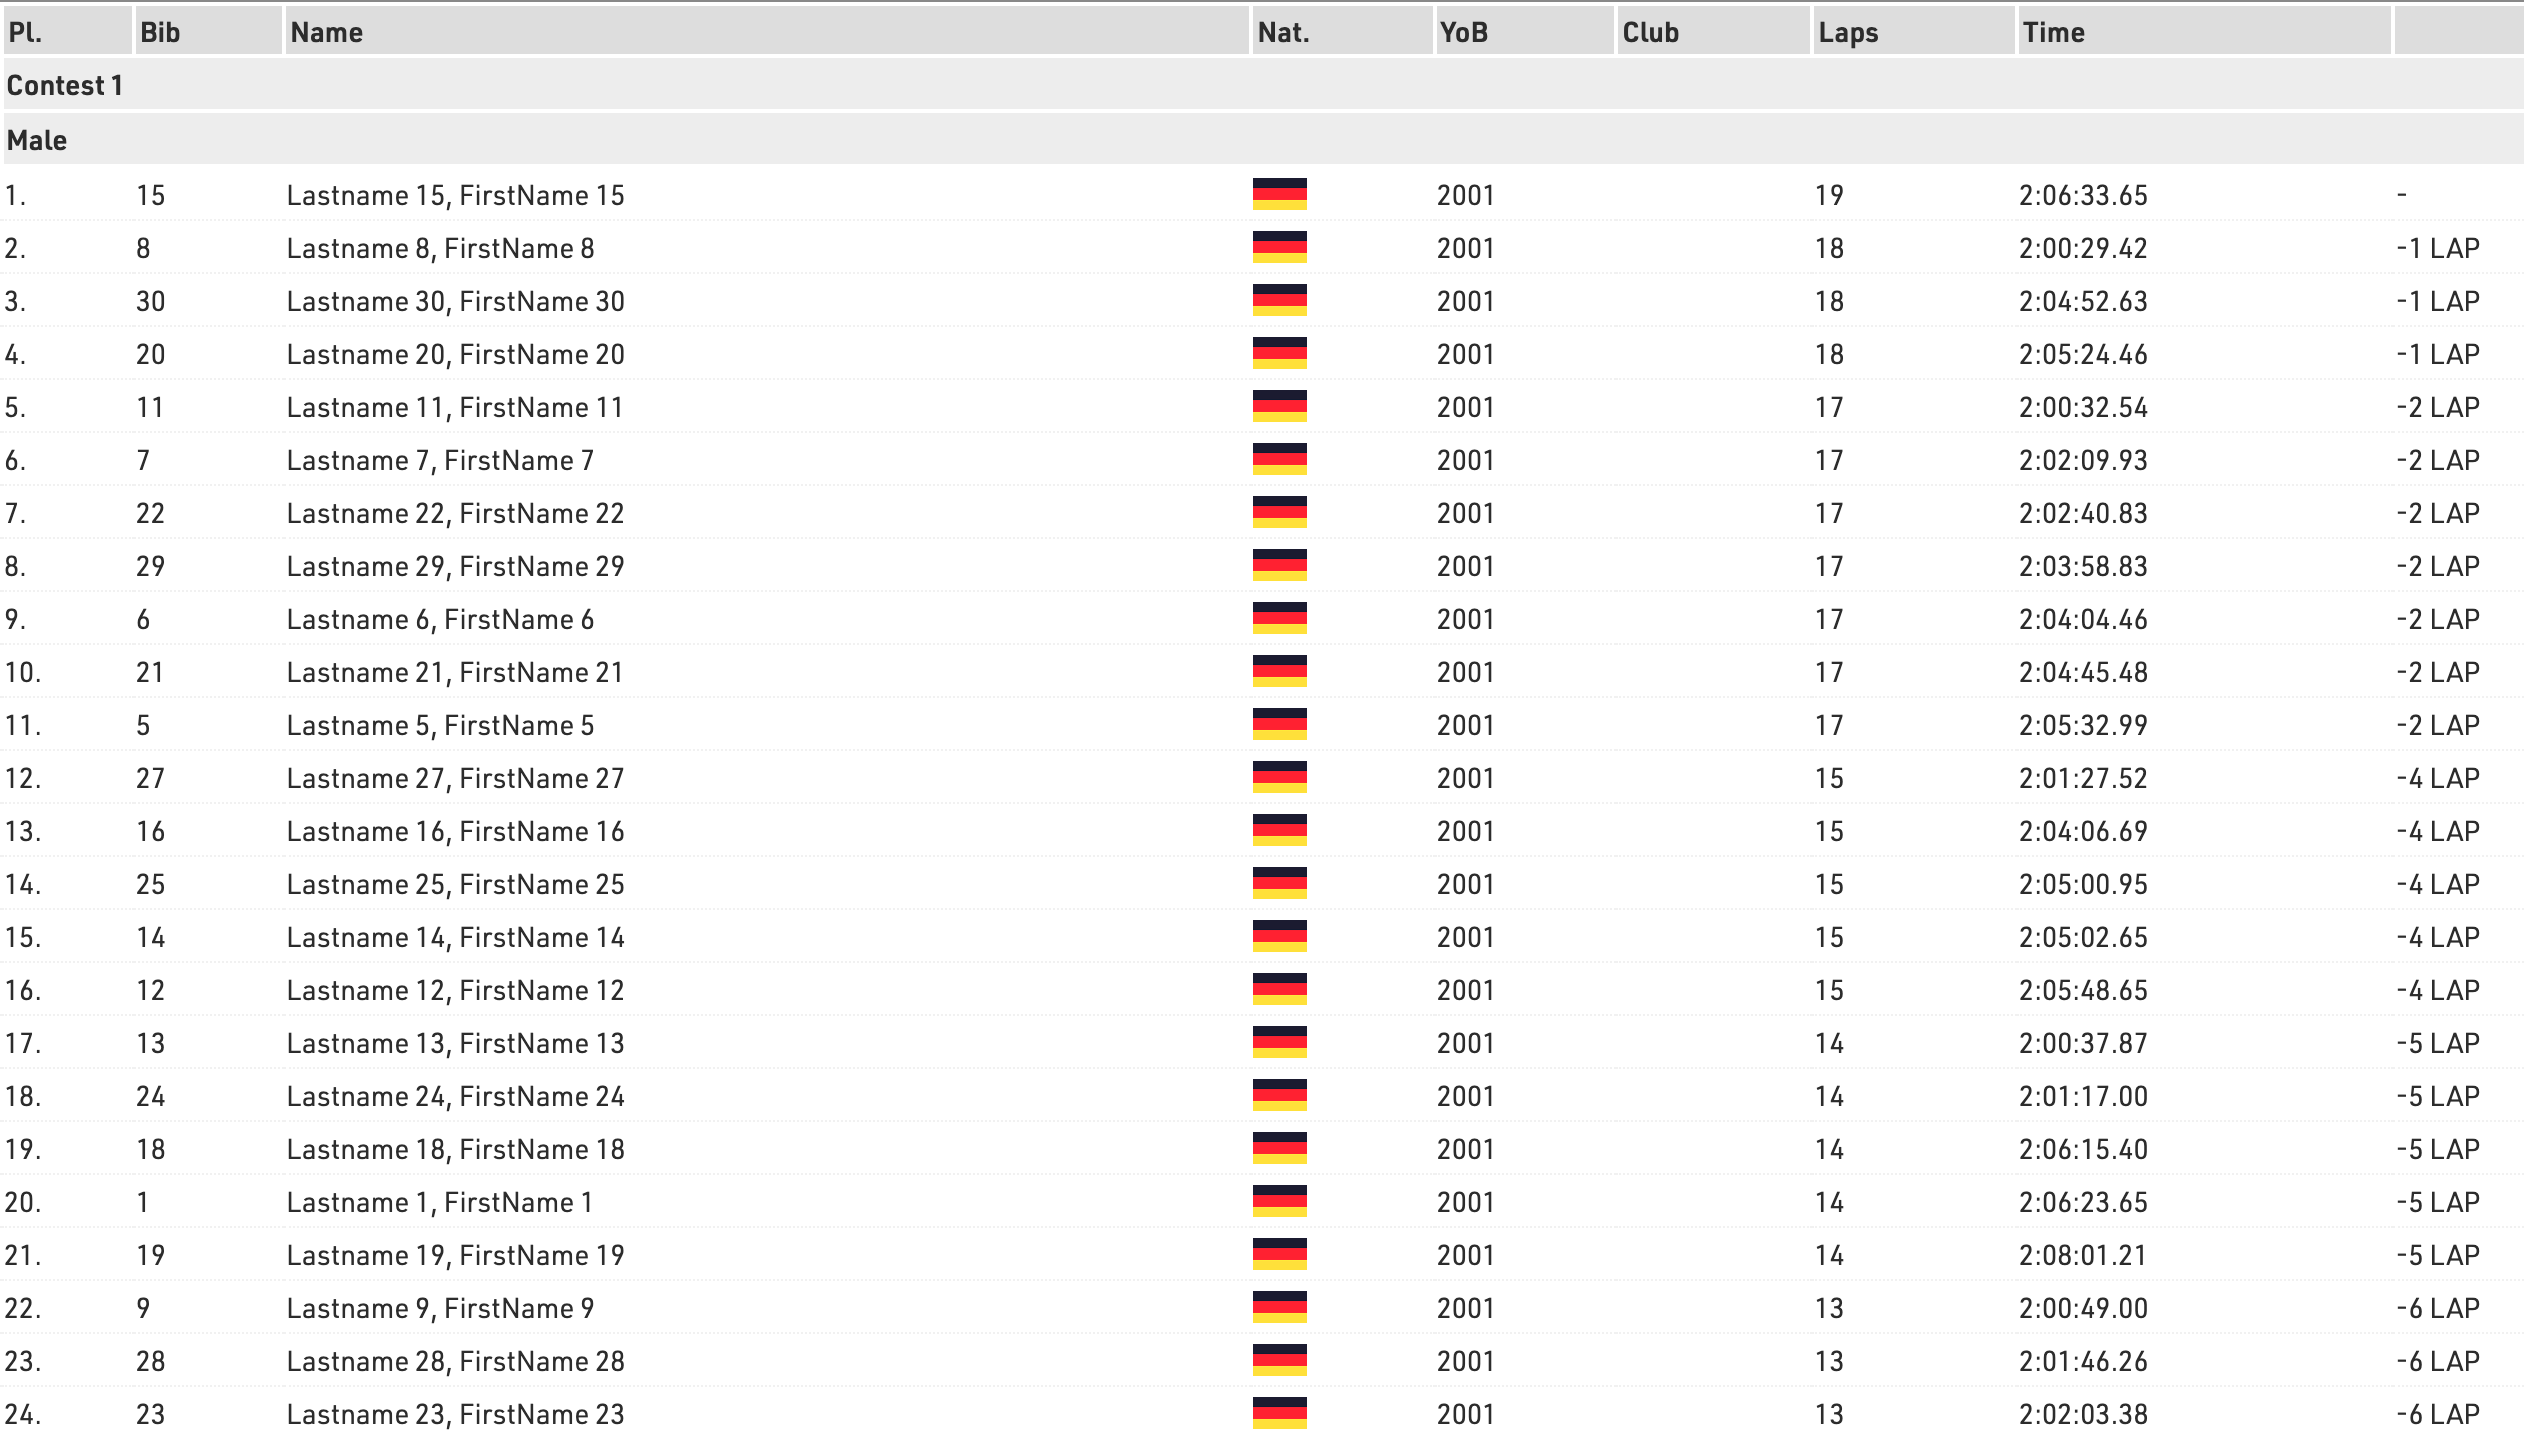
This event is a general description of a lap race, where participants are allowed to race (in this example) for maximum 2 hours in a circuit of 2 km where the timing device is placed at the start/lap line. Scoring is anyway based on the most number of laps completed and then on the fastest total time.
Creation of a new event
When creating a new event, select the template Lap Race [variable number of laps], which is the perfect template for this kind of race. Once the template has been selected, define the Maximum #Laps expected to be completed from the winner. We highly suggest entering a number which is roughly the 5-10% higher of the expected laps, just for your safety. It would be inconvenient to adjust the event file during the race, if participants are running more laps than expected.
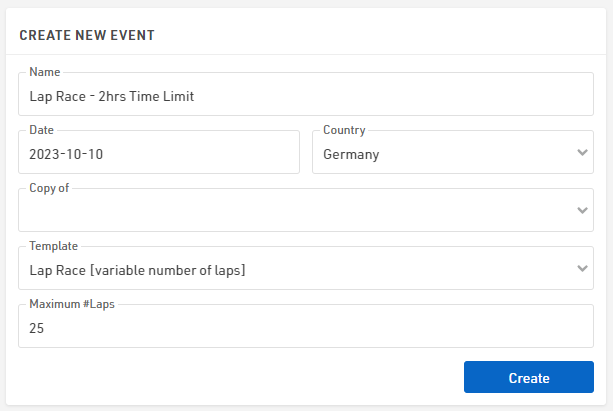
In this example, we expect participants to run with a pace above 3:00 min/km: even if a participant runs exactly at this pace, the laps completed in 2 hours will be 20, thus 25 Maximum Laps are more than enough for the following simulation.
Based on the laps entered, the template will generate Special Results accordingly: note that with more than 100 laps, the results for each lap will NOT be generated but everything is still calculated.
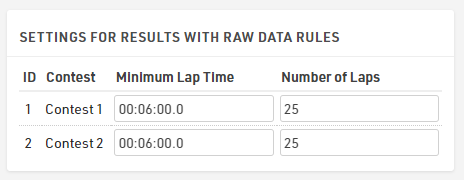
Definiton of the Raw Data Rules
Under Main Window > Special Results, the software has created already a set of special results reflecting the Maximum #Laps defined during the event's creation. These results are divided into 3 macro-sections, looking at the Results' IDs used.
Before looking at them, it is important to focus the attention on the Settings for Results with Raw Data Rules.
By default, in the template, the Minimum Lap Time is set to two minutes. In our case, considering that a lap is 2 Km long, we set 6:00 minutes, considering the fastest pace to be 3:00 min/km.
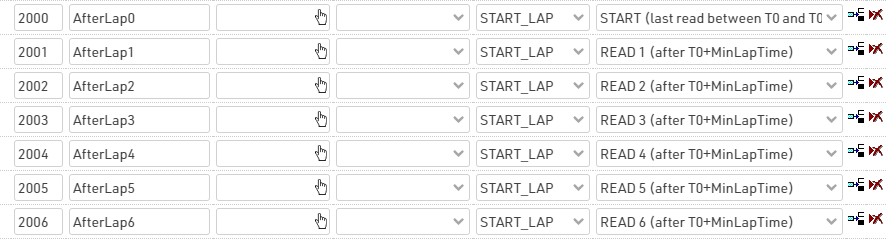
Lap Times (IDs 1000 - 1025)
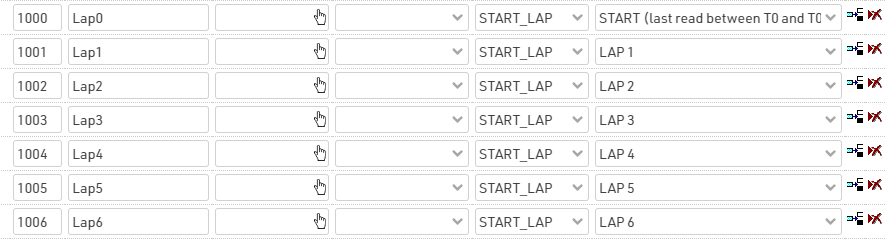
This set of results calculates the time of each completed lap. Result 1000 takes the last read from the timing device, which occurs between the official race start and the minimum lap time set for this event. For all the other results, the software will consider, as a lap detection, the first detection which has occurred after the minimum lap time.
Cumulative Lap Times (IDs 2000 - 2025)
This set of results calculates the race time after Nth read.
Calculation Times (IDs 1 - 6)
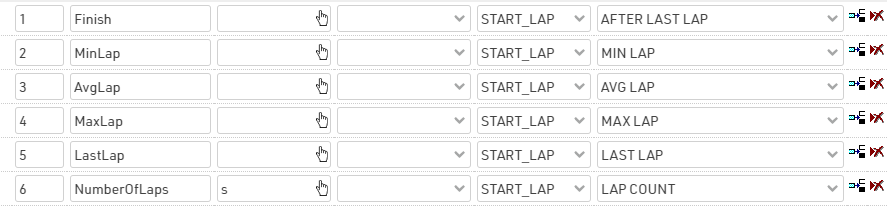
This set of results is useful for creating rankings and output lists. For our final list, we want to order participants by number of laps completed (highest to lowest), and then for Finish Time (fastest to slowest). More info on Lap Race Rules.
Start Time and Finish Time Limit
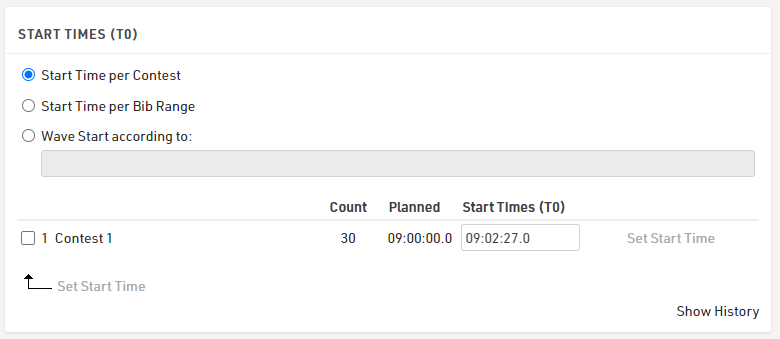
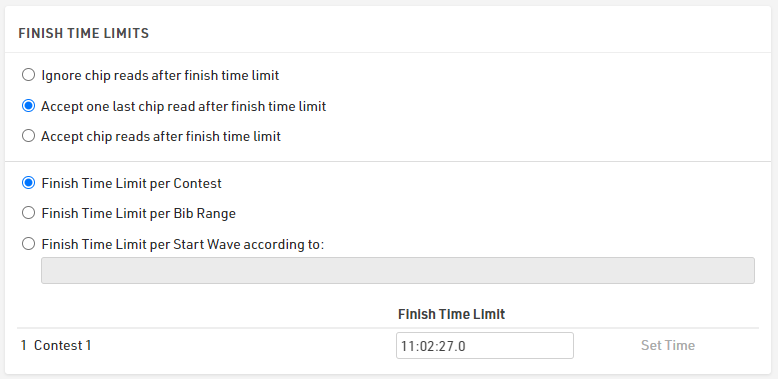
Under Main Window > Start Times / Finish Time Limit, it is possible to set the official start time of the race (T0) and, consequently, the official Finish Time Limit considering that our race has a limit of 2 hrs. Note that both times have to be expressed in Time of Day.
In the section Finish Time Limits, it is possible to define either to ignore any chip read after the 2 hours, or to allow one last chip read in order to allow participants who start their last lap before the finish time limit to complete this lap.
Rankings
By default, 3 Rankings are defined under Main Window > Rankings.
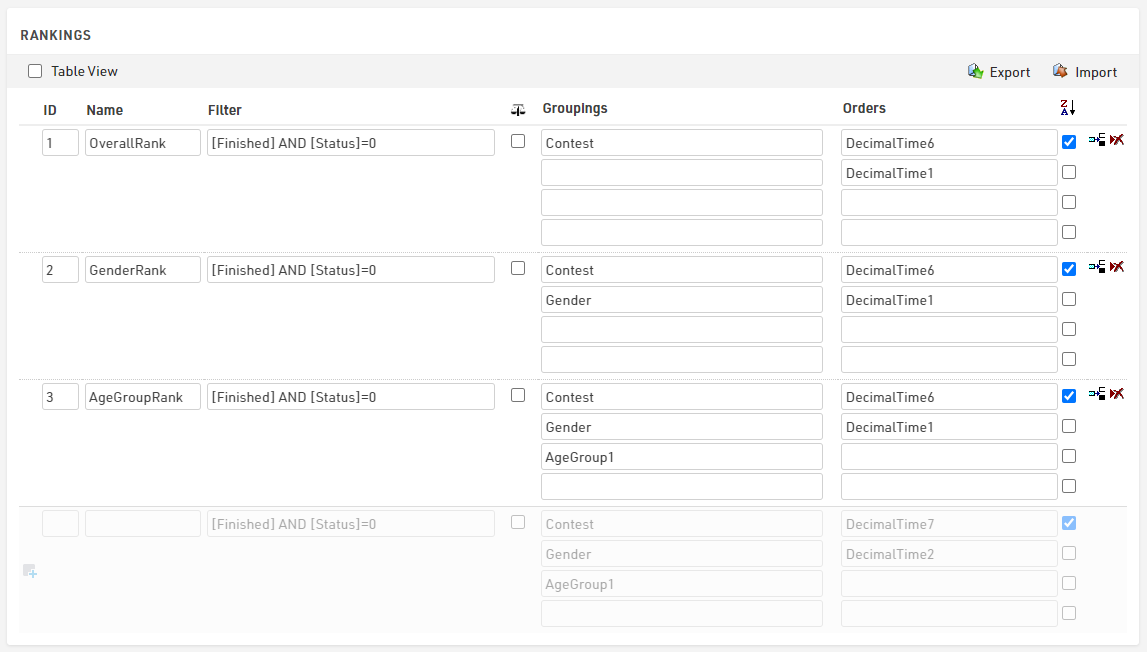
These differ from the groupings' settings, but all sort participants by NumberOfLaps (Special Result ID6) completed (Z>A), and then by FinishTime (Special Result ID1).
Output Lists
The template includes most of the output lists requested from the organizers. The final list displays the total number of laps and finish time of each participant, together with the gap time or the difference in number of laps from the first.
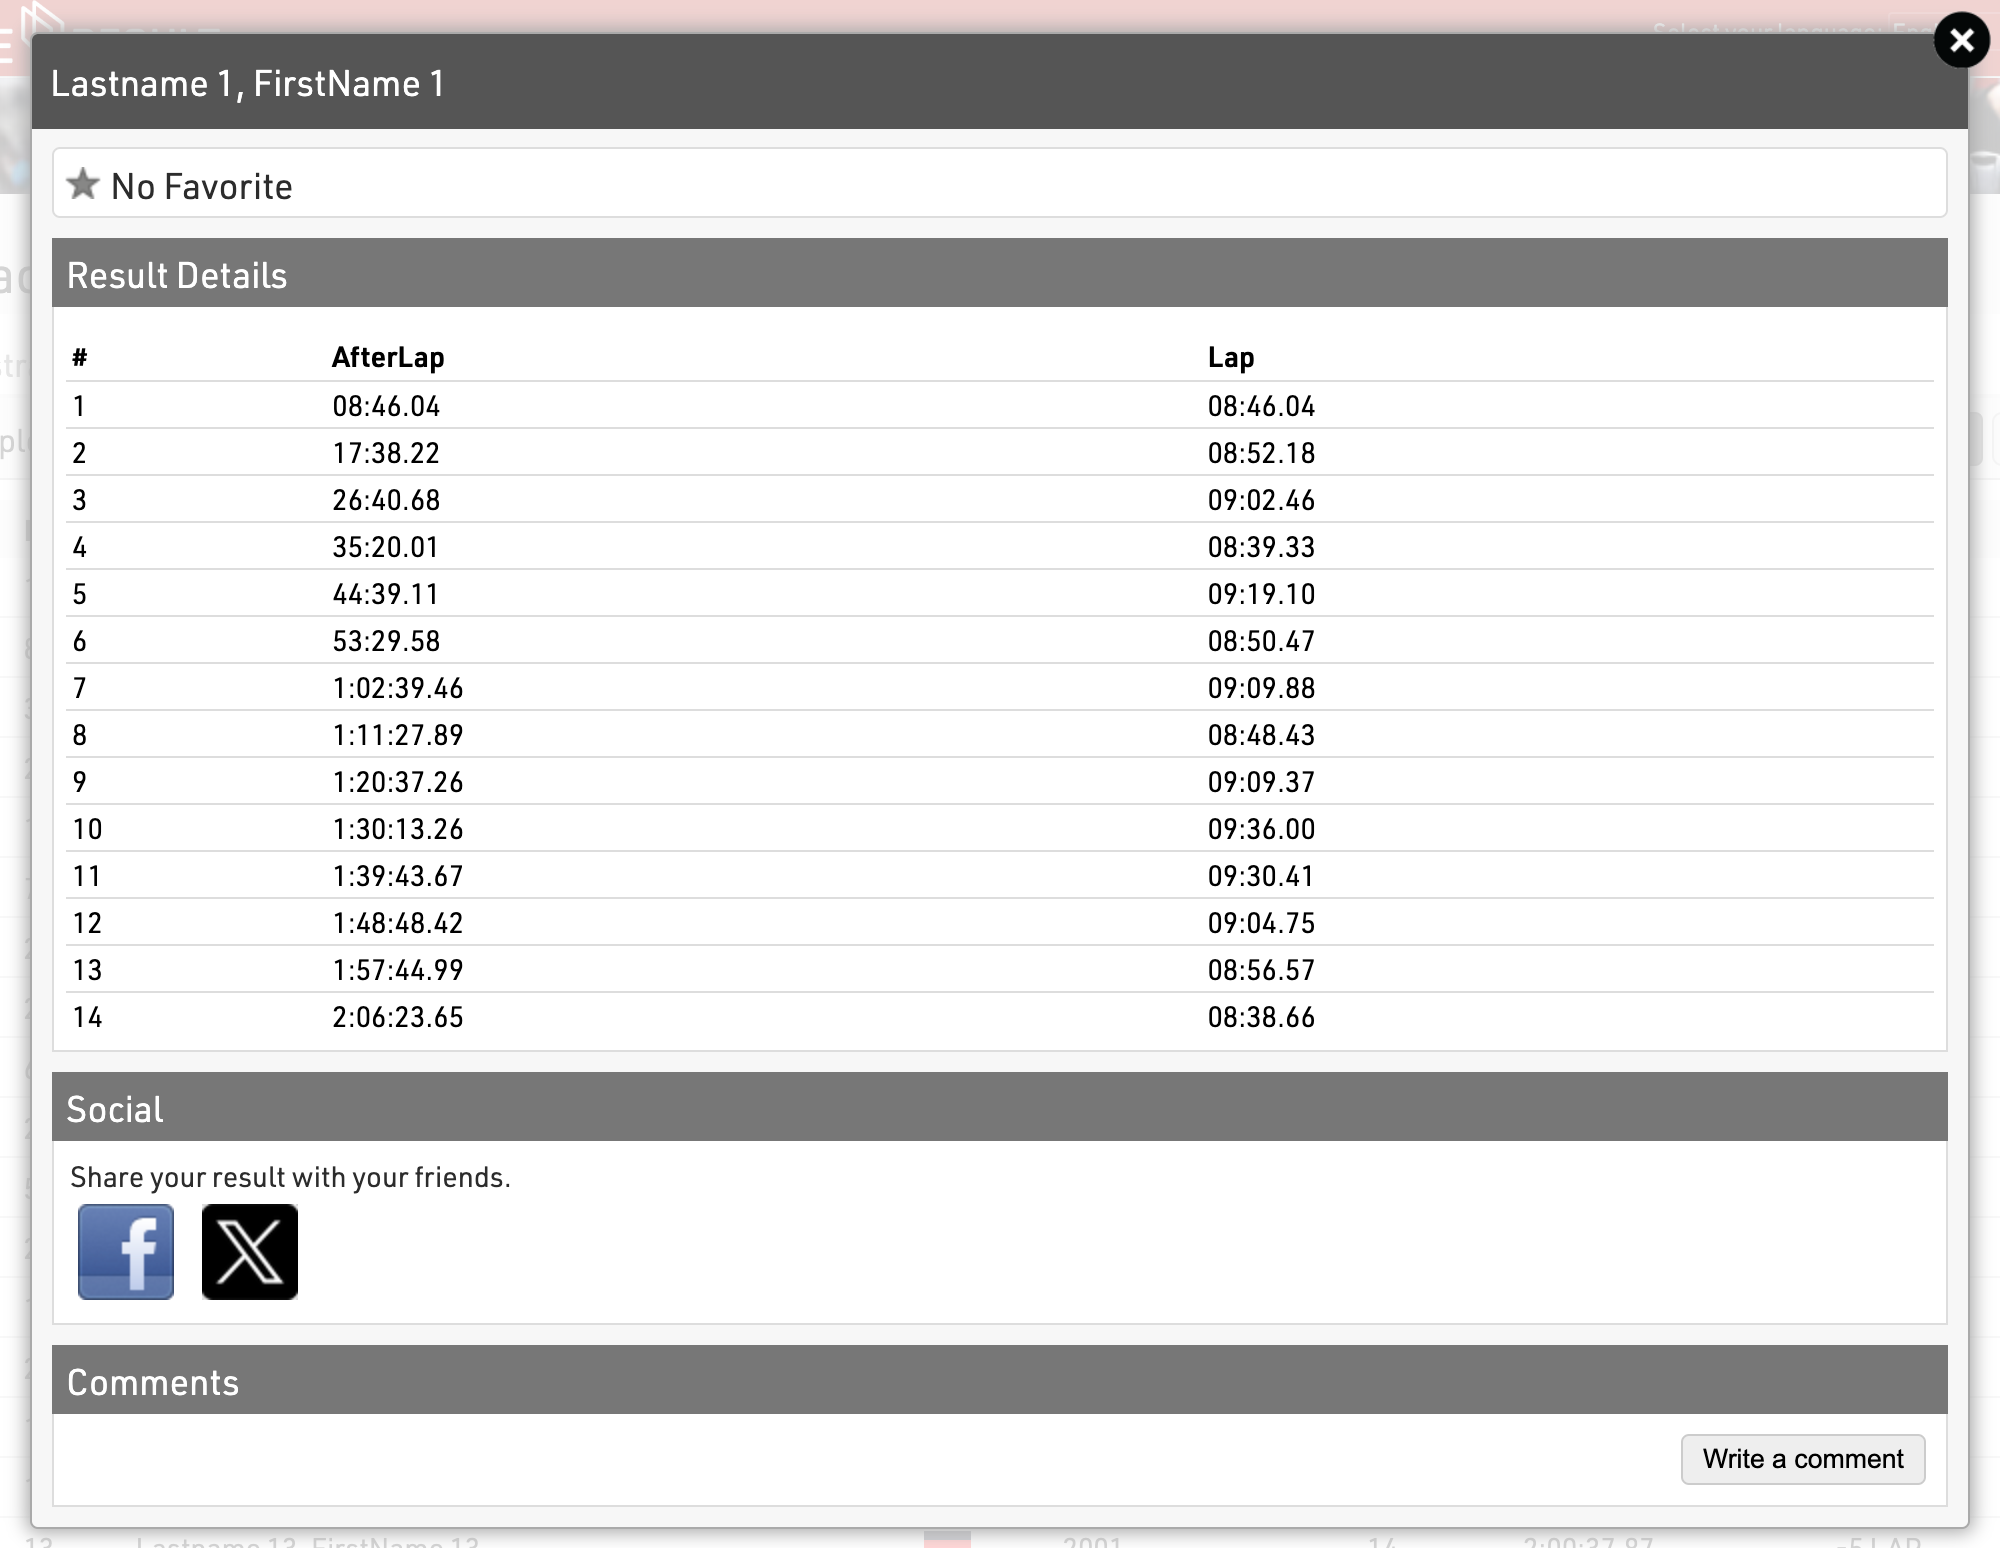
The Lap Details list displays the information of each lap of each participant, by using the advanced Record Multiplier. In the Record Multiplier field, the special result NumberOfLaps will define for each participant {n} lines matching the NumberOfLaps completed by each participant.
{n} will then trigger the calculation of the AfterLap and the Lap time for each lap.

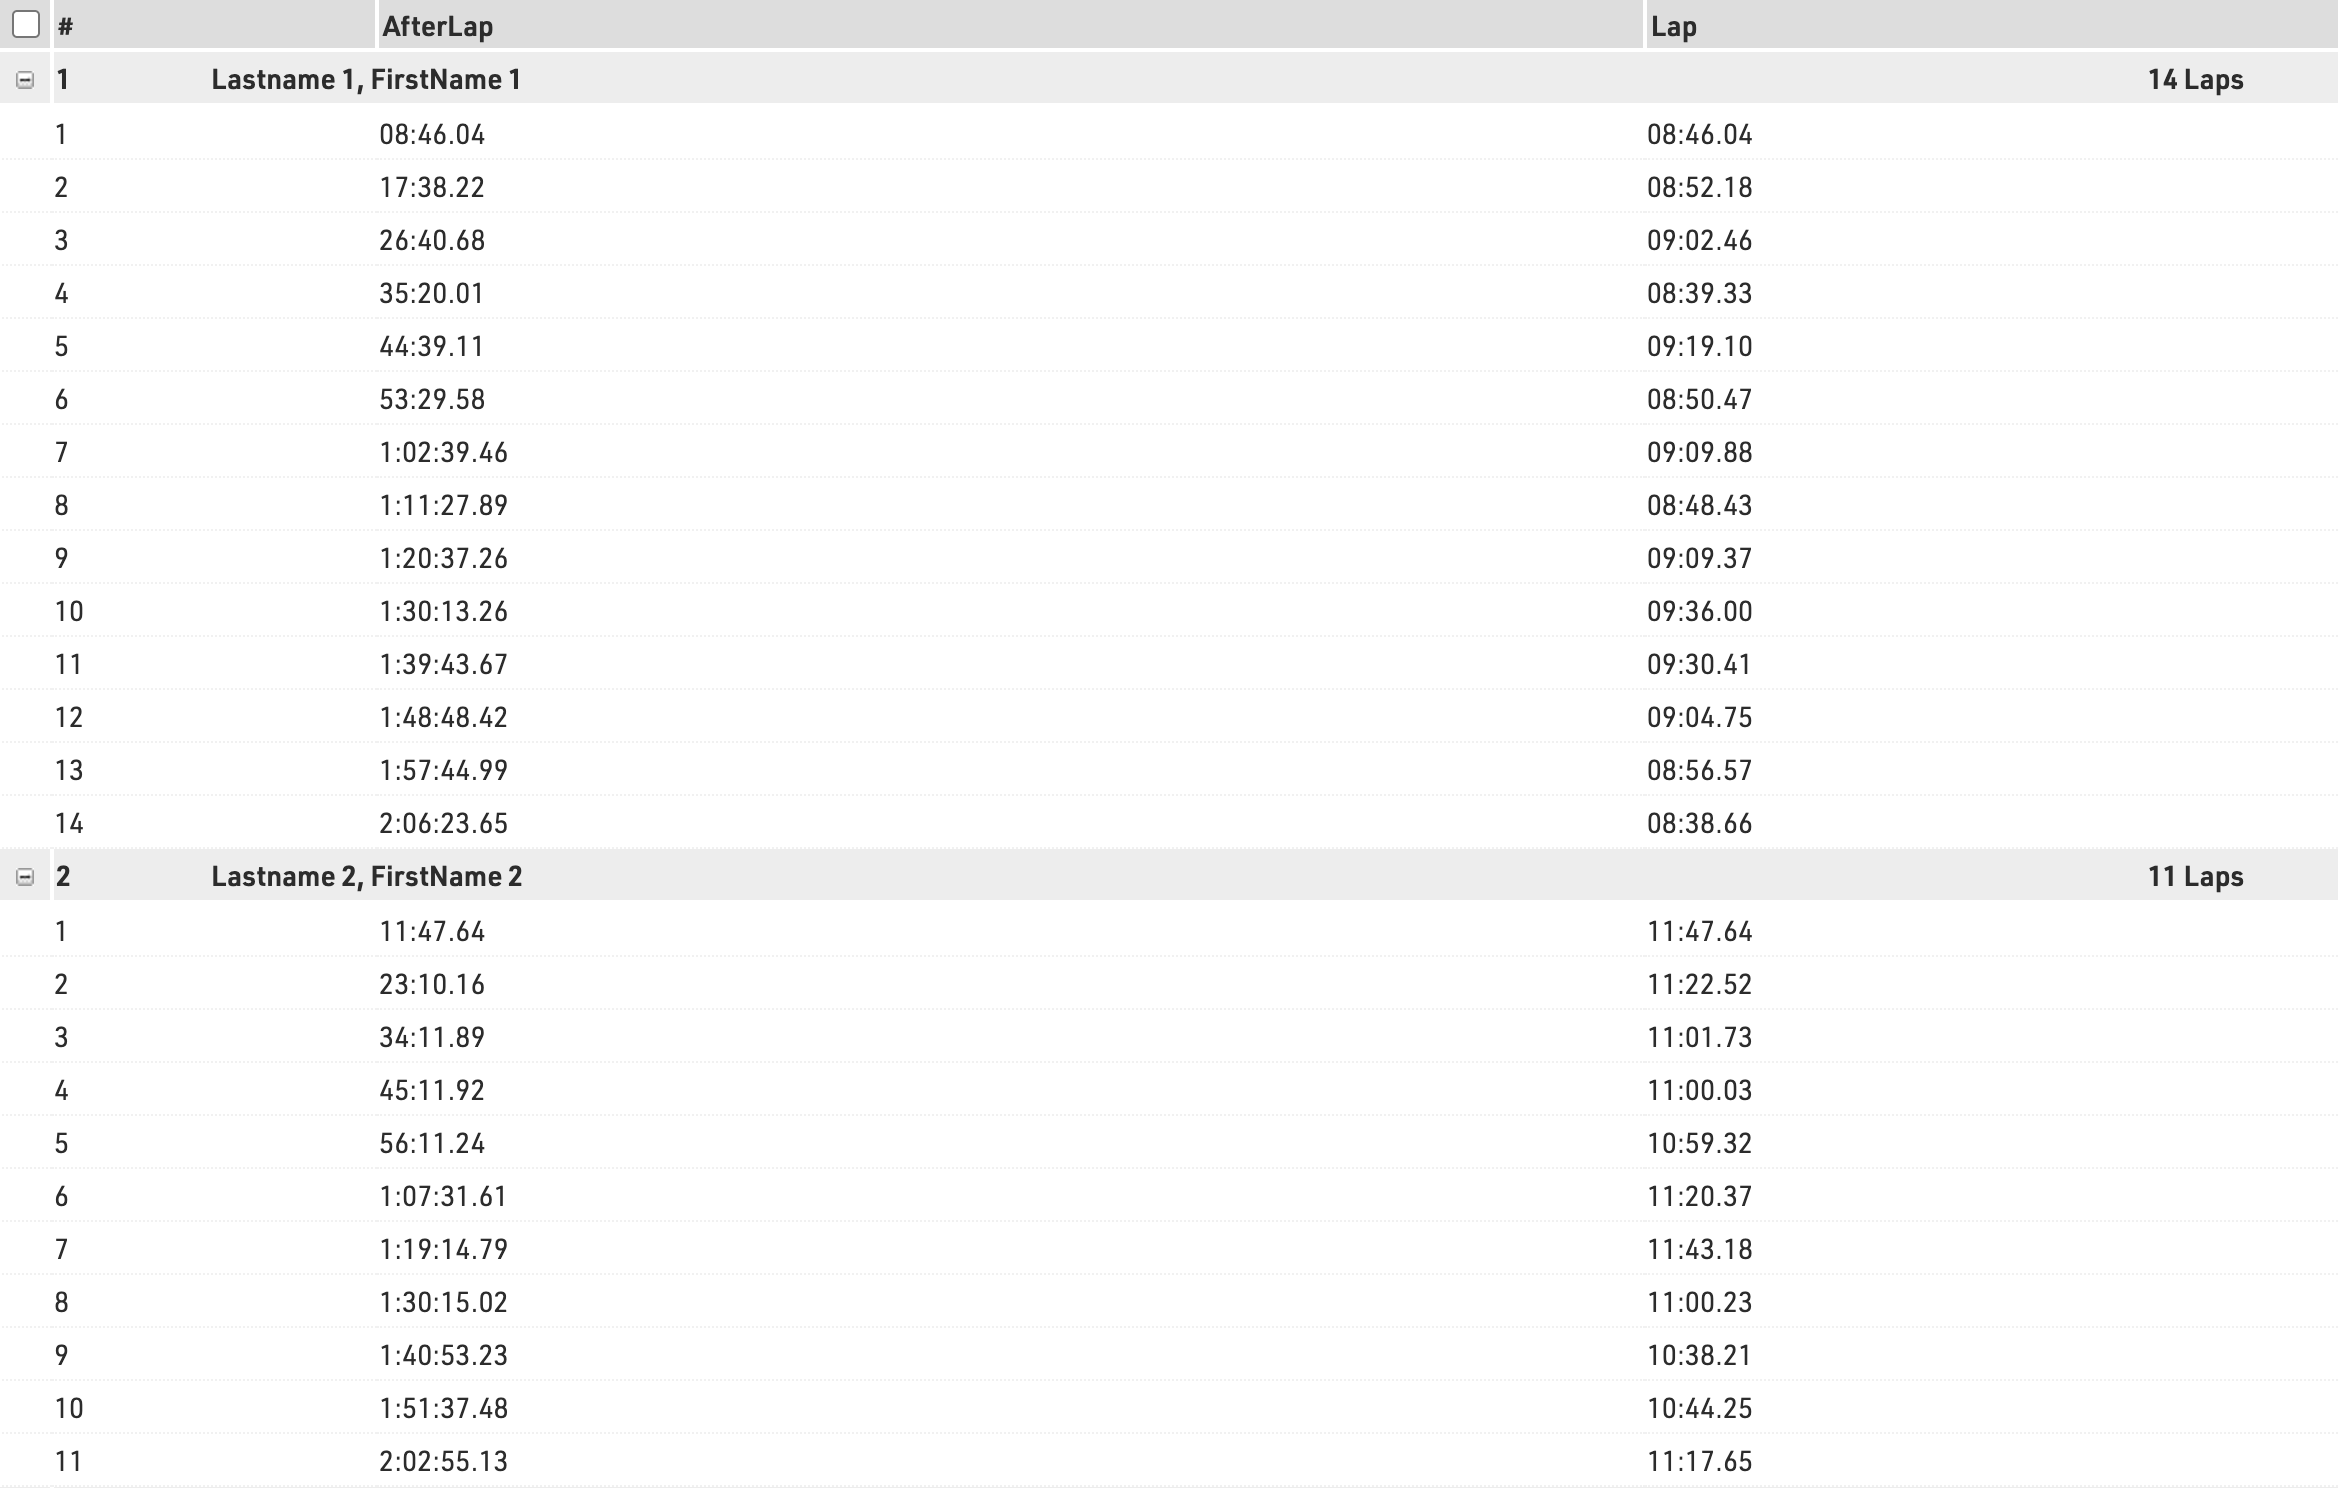
This list will be accessible on my.raceresult.com, as a detailed list of the Final output published under the Result Tab, for each participant when clicking on the participant's name.
Stage Race - Simple
This is a simple setup to show the core concepts required in order to time a stage race or series race with all races setup in the same event file.
This event consists of 3 stages which all contribute to an overall tour rank based on the sum of times from each stage. There is also a team element, with teams scored on the best 2 times for each stage, to be considered for the team time for a stage a participant must have completed each previous stage as well.
Each stage is only scored on gun time.
All participants are entered in to a single Contest.
Timing Points
A unique timing point is created for each stage finish, since we are only scoring based on gun time for each stage.
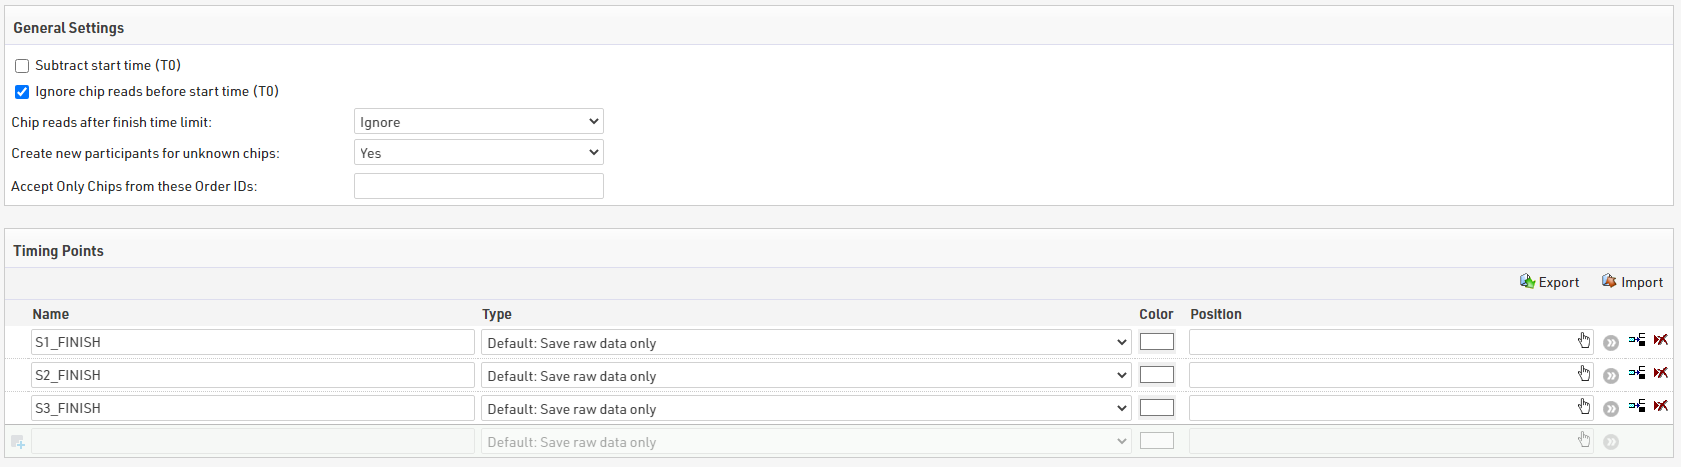
Subtract start time (T0) is unticked, since we will not be referecing or using T0 at all in this setup.
Results
We'll first look at the individual results required for each stage and the overall tour.
Stage Results
To make results easier to understand we create distinct blocks of results for each stage, and use a specific Result ID range for each block.

We use results blocks of 100 for each stage (Stage 1 = 100-199, Stage 2 = 200-299, Stage 3 =300-399)
For each stage we create a result for:
- A start time as a time of day, ID X01
- A finish detection as a minimum after the start time of day, ID X02
- A calculated stage time as the finish detection minus the start time, ID X00
By following this pattern across all stages it makes later setup easier since IDs all follow the same pattern.
Tour Results
We need to know the total time at the end of each stage, for this we create a block of results with the total time at the end of each stage.

The time after stage 1 is simply the stage 1 time, subsequent stages are calculated as the time at the end of the previous stage plus the stage time. In this way a rider must complete each stage in order to have a total time. If we were to use a TTSum() to add stage times together then somebody who only completed 2 stages would still have a tour time and is likely to have a faster time than those who did complete all 3 stages.
Rankings
Individual rankings are setup for each stage, with both overall and gender ranks, then additional for the tour after each stage as both overall and gender ranks.
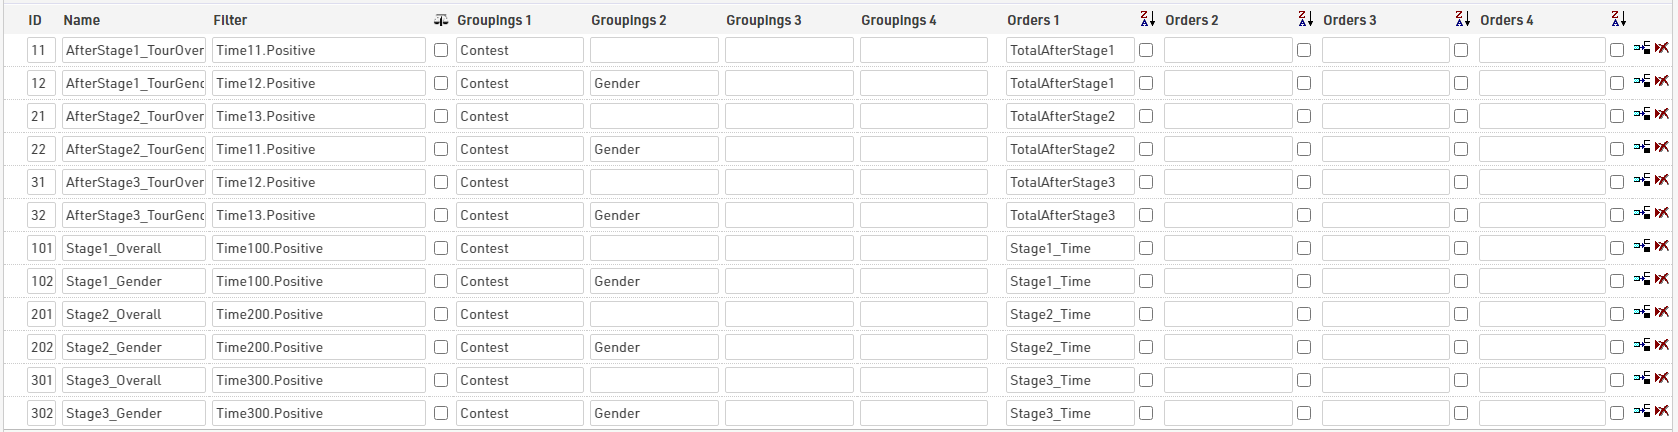
Team Scores
In this setup each team has 3 members, using the club field to denote who should be in the same team.
For each stage the best 2 times from the team are used to calculate the team's stage time, and then a team tour time / rank is also calculated for each stage. For the tour time / ranking a team member must have competed in each previous stage to be considered.
We created 2 team scores for each stage, the first calculates the teams' stage time, and the second is used to rank teams with their tour time.
Team Stage Time
For team scores we follow the same ID grouping to identify each stage.
The filter is set that they must have a club and must also have a total time after the corresponding stage, since we calculated this so they will only have a total time if they have completed each stage this filters as such too. For example bib 1 completed stages 1 and 3, but because they did not complete stage 2 they are not counted for the team's stage 3 time.
The Max number of teams is set to 1 and show part. w/o time this ensures that all team members with the same club are grouped together, and all receive the team time / rank.
For number of participants the min and max are both set to 2, since we are only considering the best 2 times from each team.
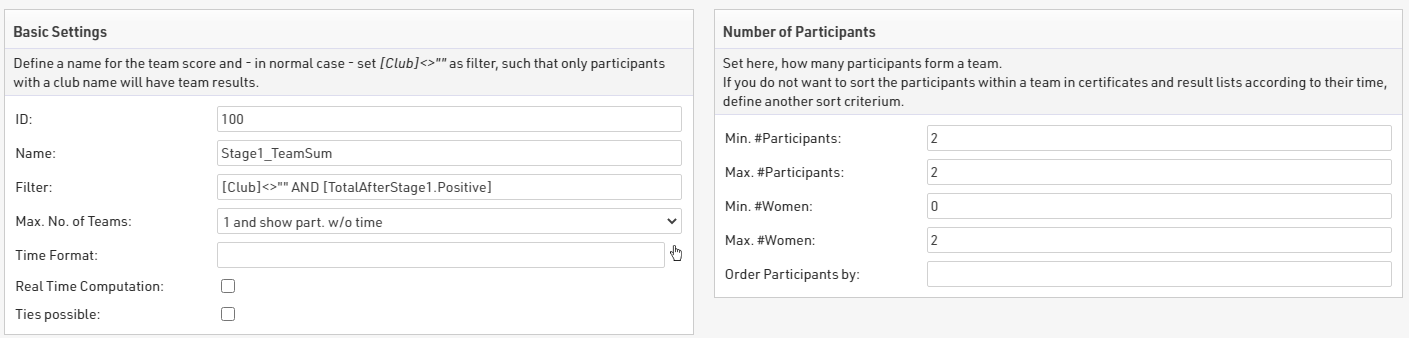
Teams are formed based on Contest and Club, and grouped according to Contest, since this setup only uses a single Contest and does not use any gender specific teams.
The results use the sum of each participant's Stage 1 time, and teams are sorted with times ascending.

Team Tour Time
To ensure we have the tour time for each team member we first call each stage time in to a result for eligble participants. To make this simpler we created a user-defined function called IfPositive(x)

This will check if X is greater than zero and if it is, will return X.
In the results for each stage we used this to call each team stage time.

The total time after each stage is then calculated in the same way as the individual totals, with a new block of results adding each team stage time individually.

To now rank teams according to their total time after each stage we create a second team score for each stage.This uses the same basic settings, aggregation and grouping, but the number of participants is set to a min / max of 1. Since all team members will have the team total time in their results we only need to look at one team member for each.
Since we are only looking at 1 participant to get the time we simply take the sum of the TeamAfterStage time, with times sorted ascending.

Output Lists
We needed to create output lists for both stage results and the overall tour results, and again for individuals and teams. Here we show 2 different approaches to producing lists, each with their own advantages / disadvantages. Some balance could be found between the 2 types, for example using a gender filter and autorank in the detailed results.
Quick Setup
The quick setup lists make use of the Results Selector which creates an additional drop down to select which result we want to look at. The selector allows for the quickest setup of a single output list to show different results in a single list, also making for a simpler online results setup. It is however limited without creating some advanced formulas, these are used briefly in the team quick results.
The selector calls the relevant stage time, or team stage time with the corresponding label and AutoRank is used to display the stage rank.

For individual results we also apply a filter to the Gender, allowing to quickly see gender specific results, or an overall result.

Team results have an additional filter to only show 1 record per team filtering by team score position is equal to 1. However as we need to look at a different team score depending on the selector we use a function here to take the ID of the selected result to calculate which team score to reference.
This is simplest in the Team Tour Results where the selector looks at results 21-23, so we use a choose() function with [SelectorID]-20, which will return 1,2 or 3, to return the corresponding stage team score.

Detailed Setup
The detailed results includes a more thorough breakdown, with this setup we had to create separate overall / gender outputs for individual results, for each stage.
The breakdown outputs use the ranks which were setup for each stage, so ensures that the rank displayed is correct. This becomes particularly import with more complex stage races which may have more advanced requirements for ranks.
By using a specific list for each display needed we can more easily include additional fields such as gaptime() which rely on a result ID and rank ID, which could otherwise only be shown with a more complex formula.
For team stage results we apply a grouping for each team to show each eligible team member who finished the stage, here we also highlight the team members who were used for scoring. To do this we use a simple IF statement looking at TSx.Scored which is true if their time was used for the team calculation.
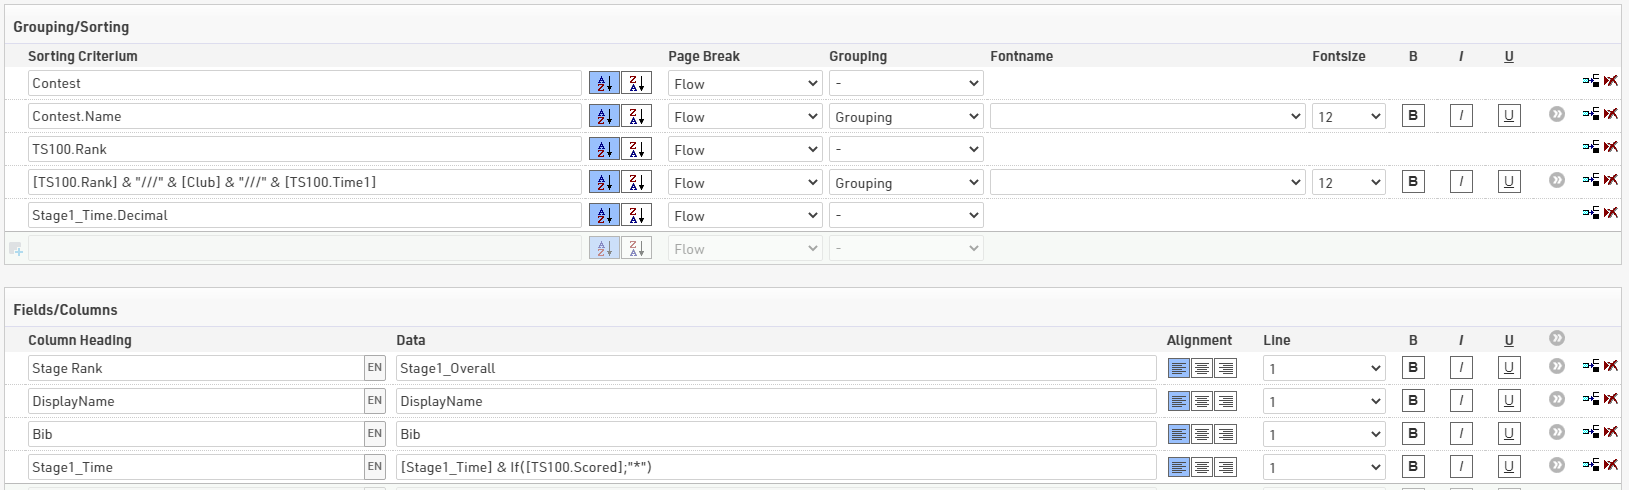
Within the tour results we're also able to show the time for each stage up to and including that point in time, making for a more detailed breakdown of each team's time.
Stage Race / Series Considerations
This setup is a simple example to show the principles of how to setup a stage race or series in a single event file. When dealing with such events there may be a number of other aspects to consider, these include;
- different start waves for each stage
- bunch time calculations (for cycling)
- age group calculations
- penalties / bonuses
- points per stage / total
- subtract start date (requires use of d:hh:mm:ss for stage start times)
The same concept can be applied to all of these but the complexity can increase exponentially with such races.
MTB Downhill Enduro - 7 Stages
Introduction
In this guide we explain how a MTB Downhill Enduro event could be managed using RACE RESULT 12, providing timing, scoring and live results presentation.
For this example, the event consists of 7 stages, spread over two consecutive days. For each day there is an initial start which is later used to calculate a total sector time for the first stage of each day.
In this example, an Ubidium System is used for each stage Start and Finish to provide live results. A similar setup could be achieved using Loop Boxes in Store Mode for the stage starts, this would not impact the results setup but would limit the live results.
Day 1 - Stages 1, 2 and 3
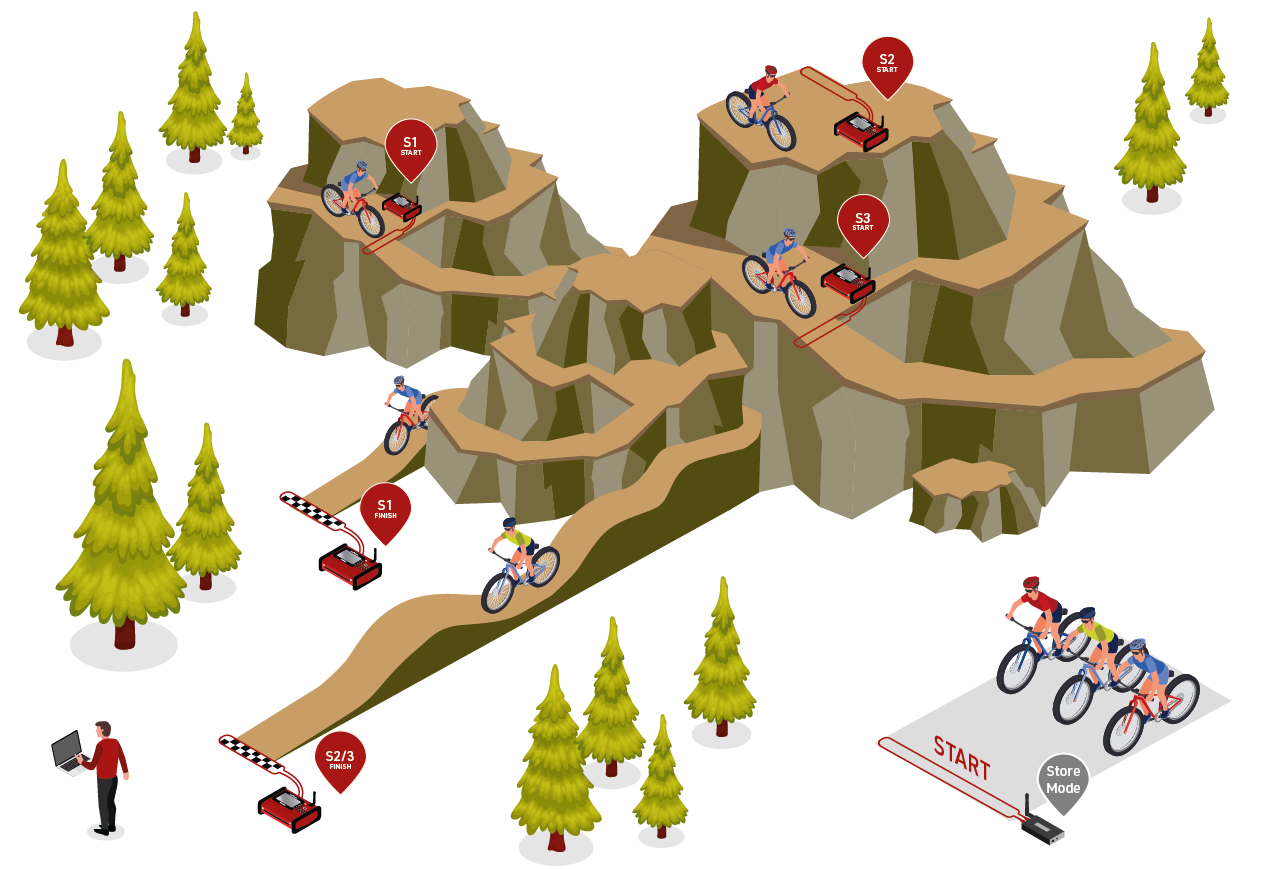
Day 2 - Stage 4, 5, 6 and 7
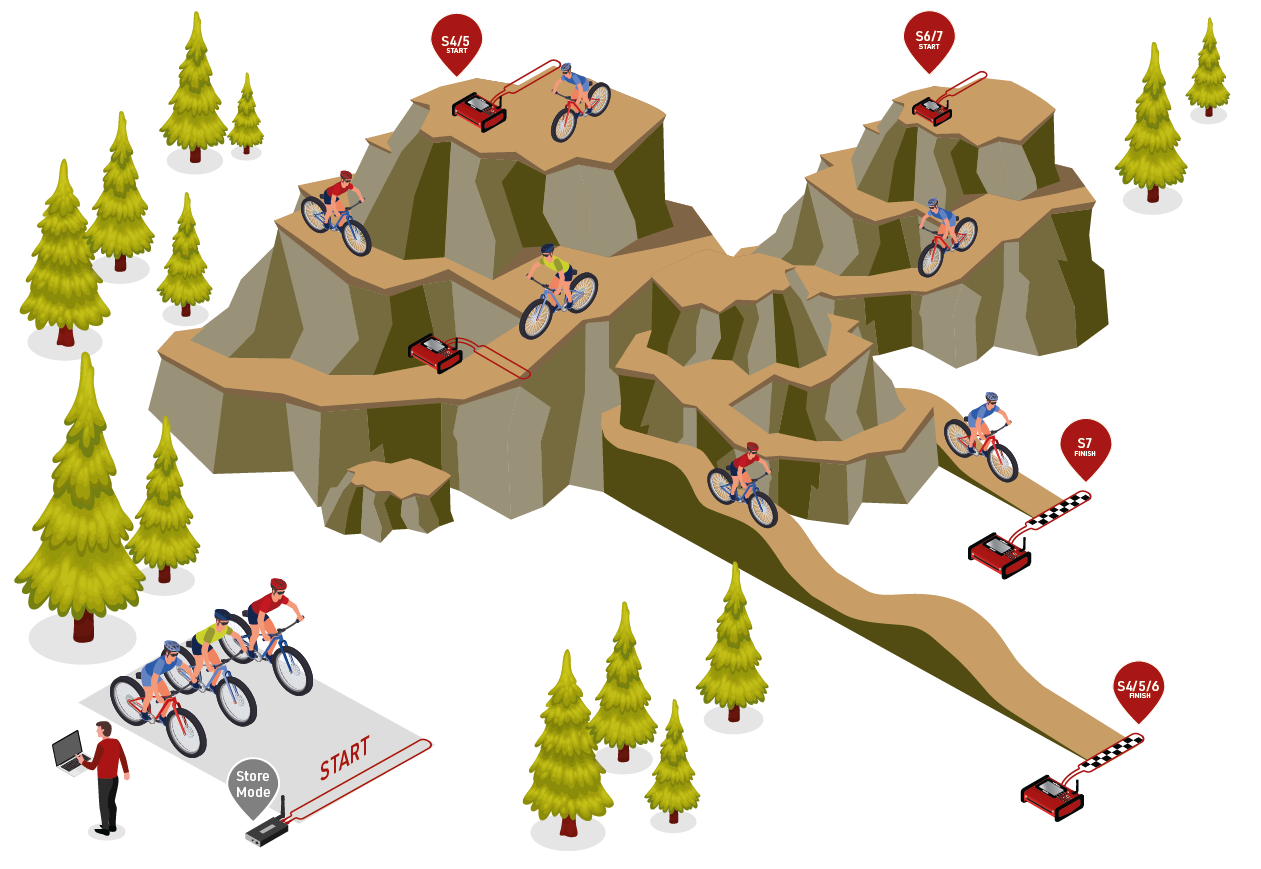
Semi-Permanent Events
This chapter is currently only available in German. The English version will follow soon.
Calculos/Resultados por puntos
Hay varias formas de calcular puntos en carreras que pueden usarse como parte de una serie, puntuaciones de equipo u otros requisitos especiales. A continuación se muestran algunas de las formas más comunes de calcular puntos en RACE RESULT 12.
Tenga en cuenta que estos ejemplos solo muestran los cálculos que se pueden usar; puede que sea necesario aplicar filtros adicionales (usando funciones If() o Switch()) para asignar puntos solo a los participantes que hayan terminado o que tengan una clasificación>0, ya que pueden De lo contrario, aún devolverá un valor positivo.
Puntaje = Rank
El método más sencillo es cuando los puntos son iguales al rango.
Por ejemplo, el 1.º lugar obtiene 1 punto, el 100.º lugar obtiene 100 puntos.
Para asignar puntos de esta manera, simplemente llame al campo Clasificación correspondiente directamente en un resultado; es posible que desee crear una clasificación especial para esto que filtre solo a los atletas elegibles.

Points = Rango Ivertido
Comúnmente también se asignan puntos según la cantidad de atletas que terminaron una carrera.
Por ejemplo, 367 hombres terminan, el primer hombre obtiene 367 puntos y el 367° hombre obtiene 1 punto.
Para asignar puntos de esta manera escribimos un breve cálculo en un resultado usando los campos MaxRank y Rank.
([MaxRankX]+1)-[RankX]
El +1 es necesario para equilibrar la ecuación, ya que de lo contrario los puntos siempre serían 1 menos, el primer lugar obtendría MaxRankX-1 y el último lugar obtendría 0 puntos.

Puntos en intervalo fijo
Se pueden asignar puntos para que el primer lugar reciba un valor determinado y cada rango posterior se reduzca en un valor fijo. Esto se puede hacer con un simple cálculo. En este ejemplo, el primer lugar según la clasificación de Género obtiene 1000 puntos, y cada clasificación posterior recibe 10 puntos menos (2º = 990, 3º = 980, 4º = 970...).
1000-(([GenderRank]-1)*10)
El valor inicial se define como 1000 y, en este caso, debemos restar 1 del rango para asegurarnos de que la asignación se correlacione correctamente con nuestra deducción de 10.

Tabla de puntos Simple
En algunas carreras, los puntos pueden asignarse especialmente a los X primeros clasificados, y todos los demás finalistas reciben un valor nominal de puntos. Esto se hace con otro cálculo, pero esta vez también usando nuestra función Choose() que devuelve un valor según su clasificación.
En este ejemplo, el 1.º lugar según la clasificación de Género obtiene 15 puntos, el 2.º = 13, el 3.º = 11, el 4.º = 9, el 5.º = 7 y todos los demás finalistas obtienen 5 puntos.
Switch([GenderRank]<=5;Choose([GenderRank];15;13;11;9;7);[GenderRank]>0;5)
Nuestra función Switch() primero verifica si tienen un GenderRank menor o igual a 5, si es verdadero, luego asigna los puntos correspondientes usando la función Choose(), luego verificamos si su GenderRank es mayor que 0 y, si es verdadero, asigna 5 puntos.
Tabla de puntos compleja
En el caso de que los puntos no se puedan calcular o asignar con un cálculo simple, puede crear una tabla de puntos en Resultados para asignar puntos en consecuencia. Para hacer esto debemos seleccionar el ícono de la mano para abrir la ventana de cálculo y seleccionar Tabla.
Cada tabla puede tener hasta 4 índices, estos son los valores que el cálculo busca en la tabla para asignar los puntos, por ejemplo Rango y Género. Tenga en cuenta que, dado que los índices deben ser numéricos, es necesario convertir aquí nuestro género en un número.
Este ejemplo asigna puntos según GenderRank (Índice 1) y Género (Índice 2, hombre = 1 / mujer = 2), los puntos asignados se reducen aleatoriamente.

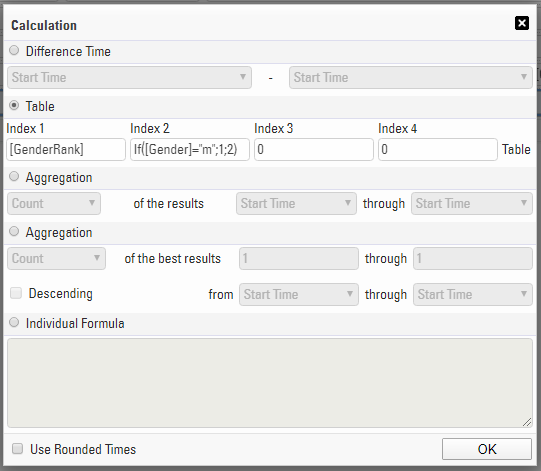
Primero se asignan los índices a los que se debe hacer referencia, al hacer clic en Tabla aparece la tabla de índice donde puede asignar los valores de índice y el valor de puntos que se deben devolver. Esto se puede importar desde un archivo Excel estándar.
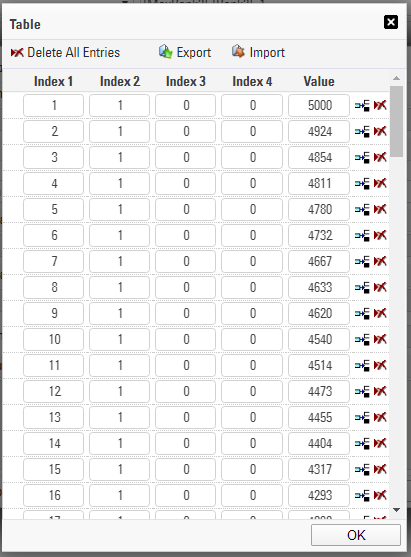
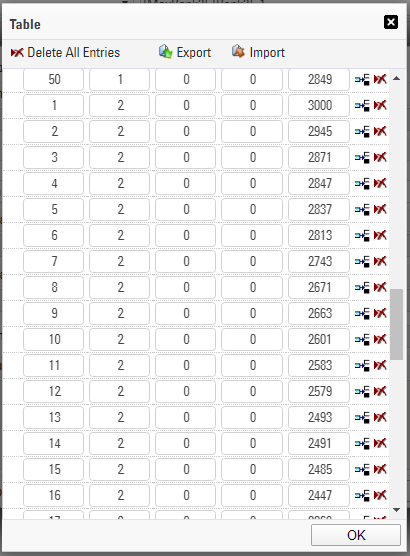
Podemos ver que cuando el Índice 1 = 1 y el Índice 2 = 1 (GenderRank = 1 y Género = Masculino) entonces se asignan 5000 puntos, hasta el Índice 1 = 50 se obtienen 2849 puntos. Pasando al Índice 2 = 2, luego GenderRank = 1 obtiene 3000 puntos y así sucesivamente.
Link to Finisher Video
It is possible to link your results page or details list to a finisher video showing each participant crossing the line, this example links to YouTube however the same principals may be applied to other hosting sites or even static photo sites.
Videos can be shot on any standard video camera, GoPros are a popular choice due to their versatility. Once the race is finished, it's a good idea to crop the video down, you'll want a bit of time (around 15 seconds or more depending on your finish setup) before the first finisher crosses the line.
The link for each participant contains three parts; the base URL, the VideoCode (a unique identifier for each video) and the playback controls which determine at what point the video should start playing from, when it should end and whether it should automatically play once loaded.
e.g. https://www.youtube-nocookie.com/embed/hZCHKy0ESPU?start=0&end=14&autoplay=1
links to Video hZCHKy0ESPU, starts automatically playing at 0 seconds and will automatically stop at 14 seconds.
(Our knowledge base uses 'www.youtube-nocookie.com' by default, which you use is up to you as both work the same)
In order to form this URL we first need to calculate the time difference between each participant and the first person to cross the finish line (based purely on finish order / time of day).
To do this it is useful to first call the Finish Time of Day in to a unique result, either using [SplitName.TOD.Decimal] or you may need to use Tx+T0.

We also need to Rank all participants according to this Finish time of day, this is done with a specific rank which has no grouping and sorts according to our result or split.

With these we can now calculate the gap time for each participant, there are a number of ways this can be calculated but using the GapTimeTop() Function is most simple. In this case we use GapTimeTop(1;4;0;"s") since the first participant should have a gap of 0 and the gap should be in seconds.
We also want to know the time in the video at which the first finisher crosses the line, or when their video should end, this is simply entered as a value in seconds.
These values are used to calculate the end time for each participant, so the video stops once they have finished.

We can now form the URL, this is done using 2 User-Defined fields so that the template can be copied across and have just the VideoCode updated rather than the full URL.

VideoLink: "https://www.youtube-nocookie.com/embed/" & [VideoCode] & "?start=" & Val([VideoOffset]-14) & "&end=" & [VideoOffset] & "&autoplay=1"
Note that the start must never be negative otherwise the video will fail to play automatically.
Now our VideoLink is calculated we can link this in an output list, this example has the video linked as part of the details window but it can be linked to any output or even under the Links in my.raceresult.com Certificates/Details
It's nice to use an image as a link rather than show the full URL, so in your output first insert an image, we use a png of the YouTube logo which has a transparent background.

Bring up the additional field details by clicking the grey arrows to the right side and in the HTML Link as Expression field enter our User-Defined Field [VideoLink].

The image will now be a clickable link in the output list whichw will take you directly to the finisher video for the corresponding participant.
Release Notes
race|result 10
| race|result 10.0.6.134 (2011-08-31) | |
| - | SMS Sender: new transfer protocol for faster sending (thanks @Aaron Clarke) |
| - | Online Registration: optional text for after registration period (thanks @Jan Andersson) |
| - | Transponder Module: problem Ultra fixed (thanks @Aaron Clarke, Andreas Bär) |
| race|result 10.0.6.133 (2011-07-11) | |
| - | Transponder Module: connections keep connection numbers after closing connections (thanks @Jan Andersson) |
| - | Transponder Module: new connection type "RFID Ultra" (thanks @Andrew Peterson) |
| - | Rundenmodus: new fields LTTeamMinLap und LTTeamMaxLap (thanks @Andreas Bär) |
| race|result 10.0.6.129 (2011-06-08) | |
| - | Improvements in the Output Window |
| - | Transponder Module: issue with option "Ignore Times Before" fixed (thanks @Andreas Seeli) |
| - | SES Import: new option not to add participants (thanks @Armin Bär) |
| - | IOC Code for Serbia added (thanks @Mario Persch) |
| - | Issue with Online Forwarding after changing event password fixed (thanks @Wolfgang Kiefer) |
| - | Issue with Live Backup fixed (thanks @Guido Jansen, Dirk Schafmeister) |
| race|result 10.0.6.123 (2011-05-05) | |
| - | Transponder Module: new setting "Do not create new participants" (thanks @Andreas Bär) |
| - | Max. field length for entry fee setting "Multiply with" extended (thanks @Reinhard Standke) |
| - | Max. field length for age group names extended (thanks @Reinhard Standke) |
| race|result 10.0.6.116 (2011-04-10) | |
| - | Manual Timing: supports "TimeMachine" device (thanks @Chris Oroshiba) |
| race|result 10.0.6.114 (2011-03-31) | |
| - | New event type "Women's Run" with different header picture on Your-Sports.com (thanks @Hanno Maier and Torsten Beeth) |
| - | Issue with basic settings of online registration fixed (thanks @Hanno Maier) |
| race|result 10.0.6.113 (2011-03-22) | |
| - | Main Window: GUI bug in result table definition fixed (thanks @Clemens Herz) |
| - | Announcer: can show data dependant images now (thanks @Clemens Herz) |
| - | List: can show [ContestStart] in list/page header/footer now (thanks @Horst Stuhlweissenburg) |
| - | Transponder Module: shows additional status information for AMB P3 connections now (thanks @Hanno Maier) |
| - | Transponder Module: shows disconnected connections in red now (thanks @Hanno Maier) |
| - | Some issues concerning Google Chrome fixed (thanks @Jenna Ginsberg) |
race|result 11.0
| race|result 11.0.0.210 (2014-03-31) | |
| - | Minor bugs fixed |
| race|result 11.0.0.207 (2014-03-14) | |
| - | Main Window->Adapt Data redesigned |
| - | New Option: Ignore Bib Number Ranges |
| - | New fields Position1, Position2, .. for numbering on lists within groups |
| - | Team scores with lap mode: minimum lap time |
| - | Team scores with lap mode: ignroe times before/after |
| race|result 11.0.0.204 (2014-03-04) | |
| - | Minor bugs fixed |
| race|result 11.0.0.202 (2014-01-29) | |
| - | New web-based Designer |
| - | Transponder Module with new Simple Mode |
| - | Support of Time Zones |
| race|result 11.0.0.195 (2013-12-23) | |
| - | Participants Window->Results: Export times |
| - | Excel Import: import age |
| - | Transponder Module: Supporting RRS chip codes |
| - | Minor bugs fixed |
| race|result 11.0.0.194 (2013-12-04) | |
| - | Minor bugs fixed |
| race|result 11.0.0.192 (2013-10-29) | |
| - | Minor bugs fixed |
| race|result 11.0.0.191 (2013-10-11) | |
| - | Issue with checkin/out on hebrew computers fixed |
| race|result 11.0.0.187 (2013-10-01) | |
| - | race|result Webserver optimized |
| - | Minor bugs fixed |
| race|result 11.0.0.140 (2013-07-15) | |
| - | race|result Webserver optimized |
| - | Minor improvements, minor bugs fixed |
| race|result 11.0.0.121 (2013-05-11) | |
| - | Minor bugs fixed |
| race|result 11.0.0.114 (2013-04-25) | |
| - | race|result Webserver optimized |
| - | Minor bugs fixed |
| race|result 11.0.0.98 (2013-04-09) | |
| - | Some new functions in the Designer |
| - | Minor bugs fixed |
| race|result 11.0.0.97 (2013-03-26) | |
| - | Issues with SMS Sender fixed |
| race|result 11.0.0.93 (2013-03-22) | |
| - | Some minor issues fixed |
| race|result 11.0.0.90 (2013-03-08) | |
| - | Some issues with new CameraServer fixed |
| race|result 11.0.0.89 (2013-02-27) | |
| - | Online registration: refinements |
| - | Transponder Module: bug in wave starts fixed |
| race|result 11.0.0.88 (2013-08-02) | |
| - | New program "Camera Server" for race|result Camera |
| - | Transponder Module can show the finish line photo from the Camera Server |
| - | New fucntions: isUCICode, isNumeric, isAlpha |
| - | Online registration: many new special settings |
| race|result 11.0.0.86 (2013-01-14) | |
| - | my.raceresult.com: certificates can now be linked on participants lists |
| - | Choose between program languages in top right corner |
| - | Edit groups: rename, cover picture, etc. |
| - | Q&A in dock window on right side |
| - | Online registration: configuration pages redesigend |
| - | Online registration: new element <HTML Line> |
| - | Online registration: new special functions: password etnry, select value, propose values, email addresse |
| - | New access rights control: several users can now get access to an event file |
| race|result 11.0.0.85 (2013-01-03) | |
| - | GUI layout adapted according zu race|result CI |
| - | Chat/Help/Info area revised |
| - | Fields "NationFlag" and "CountryFlag" added |
| - | Field "BasicFee" added (basic entry fee without optional fees) |
| - | SES import: selection of contest extended to 1-100 |
| - | Manual Timing: optimization for ALGE devices |
| - | Online registration -> Form Fields -> Validation Rules |
| - | New GUI for publishing lists on my.raceresult.com |
| - | Transponder Module: Option "Ignore Times After" added |
| - | Transponder Module: new tab "Overview Contests" |
| - | my.raceresult.com: event groups introduced |
| race|result 11.0.0.79 (2012-12-12) | |
| - | Transpondel Module: GUI redesigned |
| - | Presenter: slide mode "Manual Scrolling/Sliding" for result terminals with touch screen |
| - | my.raceresult.com: you can publish any kind of links on the personal result page (will be shown below the certificates) |
| - | Online Registration: additional options for fields: color, background, format |
| race|result 11.0.0.77 (2012-11-28) | |
| - | Output Window: list of contestes fixed |
| - | Confirmation email of online registration: can now have attachments |
| race|result 11.0.0.76 (2012-11-21) | |
| - | Output Window: you can bring all lists by one click to alphabetic order |
| - | Output Window: you can define colors for the page head, page footer, column heads and grouping heads |
| - | Output Window: you can define the background color of grouping heads |
| - | Participants Window: automatic upper case for city entries |
| - | When file is being checked out, active users will be "kicked out" |
| - | Designer: ruler added |
| - | Designer: Cut, Copy, Paste added to menue |
| - | Designer: Undo of last operation |
| - | Designer: Elements in the background can be scaled |
| - | Designer: Rename/page settings redone |
| - | Offline mode: no facebook, no Google maps |
| race|result 11.0.0.73 (2012-11-01) | |
| - | Terminal: can show a preview of the certificate |
| race|result 11.0.0.71 (2012-10-18) | |
| - | Minor bugs fixed |
| race|result 11.0.0.62 (2012-10-09) | |
| - | Minor bugs fixed |
| race|result 11.0.0.61 (2012-08-31) | |
| - | Minor bugs fixed |
| race|result 11.0.0.58 (2012-08-02) | |
| - | Minor bugs fixed |
| race|result 11.0.0.52 (2012-07-03) | |
| - | Connection issues via port 1023 in American mobile connection fixed by using alternative port 10023 |
| race|result 11.0.0.51 (2012-06-29) | |
| - | Minor bugs fixed |
| race|result 11.0.0.50 (2012-06-05) | |
| - | Minor bugs fixed |
| race|result 11.0.0.49 (2012-04-30) | |
| - | Participants Window: edit participants in the list view |
| - | Main Window->Age Groups: many new function |
| - | Main WIndow->Event Settings: regional settings added |
| race|result 11.0.0.46 (2012-03-12) | |
| - | Clicking a record in a list in the Output Window opens the record in the Participants Window |
| - | Participants: optional entry by age (thanks @Mark Bockmann, Alain Ferry) |
| - | New functions in new support |
| - | Problem with online forwarding fixed |
| - | Confirmation mails on my.raceresult.com can contain HTML tags |
| race|result 11.0.0.45 (2012-03-05) | |
| - | New support center integrated into race|result 11 |
| race|result 11.0.0.44 (2012-02-29) | |
| - | Transponder Module: many new features |
| - | Participants Window: new list view |
| race|result 11.0.0.42 (2012-02-12) | |
| - | Wave start times introduced (thanks @many) |
| - | New time editing function in participants window (thanks @Andi Seeli) |
| - | AM/PM time formats added (thanks @Mark Bockmann) |
| - | Settings->Archives: all additional fields can be selected/deselected (thanks @Andreas Bär) |
| - | Participants Window: mandatory fields can be defined (thanks @Andreas Bär) |
| race|result 11.0.0.40 (2012-01-05) | |
| - | Minor bugs fixed |
| race|result 11.0.0.39 (2011-12-12) | |
| - | rebranding |
| RunManager 11.0.0.31 (2011-11-07) | |
| - | Some minor bugs in RM11 fixed |
| RunManager 11.0.0.22 (2011-10-21) | |
| - | New GUI |
race|result 11.1
race|result 11.2
race|result 11.3
race|result 11.4
RACE RESULT 12.0
RACE RESULT 12.1
RACE RESULT 12.2
RACE RESULT 12.3
RACE RESULT 12.4
RACE RESULT 12.5
News
2020-04-09: RACE RESULT Online Training
We recently launched our RACE RESULT Online Training, hosted every Friday, giving you the chance to improve your knowledge and skills. Read more about it here.
2020-04-12: Happy Easter!

2020-04-27: New "Additional Fields"
Today we released RACE RESULT version 12.1.2 with a groundbreaking new feature. Additional Fields will now replace ATFs, AYNs and AYNTFs, letting you define an unlimited number of additional data fields. All existing fields will be converted automatically to the new structure and can still be called in the same way as before.
2020-05-23: Online Registration Backend Update
On Monday, May 25, we will launch an update to our online registration backend. We do not expect any outages or downtimes. In case you find something not working, please let us know immediately on support@raceresult.com.
2020-05-27: Customizable Confirmation Page
We have recently added support for a customizable confirmation page after the Online Registration. You can now call fields to display such as the bib number of the participant. Please note, for Group Registrations it will only show data for the first participant (GroupRegPos = 1).
2020-09-10: Decoder GPS Module
As we see the return of events after a longer than usual break you may need to take some extra time to sync the GPS time of your decoders. Over such a long break the GPS module may have lost all data or the satellite data is no longer accurate and will need to fully resynchronize which may take longer than usual. If you use the GPS time, we suggest putting the decoder outside, under clear skies for at least one hour before you need it, ideally at least the day before the event.
2021-01-18: Virtual Timers Conference
Around the world - around the clock. This is the motto of our Virtual Timers Conference on February 26. Learn and discover more about RACE RESULT and exchange with colleagues.
Click here to find more information on the conference and register free of charge.
2021-01-22: Event Groups
We have restructured the event groups for events on my.raceresult.com. You will now find event groups in the start page of RACE RESULT 12. When in an event, just click the RACE RESULT 12 icon. In the left navigation bar, you will find Event Groups in the left hand menu.
2021-02-11: RACE RESULT 12.2
If parties were allowed, our software department would be celebrating now:
The Sports Event Server (SES) has been completely reprogrammed in the past few months and is now officially online! The SES is the compute engine that does all data processing in the background of all RACE RESULT events. The new server runs 10 times faster than the old one. Loading large / complex lists should work much faster.
At the same time, RACE RESULT 12.2 was officially published and is available for download now.
2021-03-30: New "powered by" Logo in embed
We have changed the style of the "powered by RACE RESULT" logo for the website integration of RACE RESULT 12 events. The logo now changes its color depending on the background. This also applies to all previous embeddings.
2021-04-04: Happy Easter!

2021-04-15: Online Training 2021
As part of the RACE RESULT Academy, we started a new series on free live webinars. The sessions cover different functions and features in RACE RESULT 12. We offer English webinars twice to cover all different time zones! A detailed schedule and the registration can be found here: https://my.raceresult.com/167431/.
2021-05-11: my.raceresult.com relaunch
We relaunched my.raceresult.com to improve the user experience for athletes and the service for timers. Major update are the new groups categories Race Organizers, Clubs, Series, Timers, Themes. Please check if your existing event groups are sorted correctly and improve them by uploading additional information and header pictures/logos.
More information can be found in this Knowledge Base article.
2021-06-07: New Decoder Firmware
With decoder firmware version 2.58 we are removing the option for TCP + HTTP upload and defaulting to TCP upload only.
If for any reason you use any connection method which relies solely on the HTTP upload (Transponder module, Connector or Deprecated Storage APIs) you will need to switch the decoder upload target to HTTP. Please note there should be no need to use any of these modules, the Timing tab within RACE RESULT 12 is always the best choice.
For full details see the firmware release notes: https://www.raceresult.com/fw/support/kb.php?id=23806-Version-258
2021-07-05: RACE RESULT Kiosks
The all new Checkin Kiosks provide a flexible solution for dynamic bib assignment and so much more! You'll find them under the Tools menu inside RACE RESULT 12.
Find out more about how they work and the flexibility they offer in the Knowledge Base
2021-10-18: Important software update
With version 12.3.17 we released an important update to RACE RESULT 12 which is required when timing online. You will need to run the RACE RESULT Webserver from this version (or newer) in order to connect to local systems in the Timing Tab. This replaces the Local Adapter although, for the time being, this will still be used for connecting to tools and when timing offline.
2021-11-30: Bye bye Instant Push
From December 1, 2021 Instant Push will be deprecated and no longer available. Instant Push used to allow you automated sending E-Mails, SMS or WebService calls triggered by raw data. This functionality has now been moved to the Exporters. Learn more about it here.
2023-01-21: New Online Training!
Have you seen the most recent update to our Academy page? Check out our new Online Training and take a look at the dates of our upcoming 2023 Training/Networking Sessions:
2023-03-04: New Presenter
This week we have launched the new tool Presenter which will replace the tools "Show Last Chip Read" and "Present Results" shortly. The new presenter contains the functionality of those tools but at the same time offers many more different display options and lets you customize the screen in various ways.
Learn more about it in our Knowledge Base.
2023-03-09: Chip Check moves to Presenter
After launching the new tool Presenter last week we continue developing. The tool Chip Check will also move to Presenter soon. The functionality remains the same, but as with Show Last Chip Reads and Present Results, the new Presenter offers various display options and lets you use all those tools much more flexible, and most importantly, without providing a login to RACE RESULT 12. All Presenters can be accessed by a fixed URL.
2023-07-07: New Default Language Field
As we are adding new functionality in to RACE RESULT 12 a new default field has been added to the database - Language. This is primarily used for E-mail / SMS Templates, which can now be multi-lingual. This does however mean that existing Additional Fields / User-Defined Fields using this name may not work as expected as the new field will take higher priority.
2023-07-24: Coming Soon - New Online Registration
On 1st August 2023 we will launch a new, updated online registration platform which brings new functionality and enhancements to give your participants an event better user experience. All events generated from this date will use the new platform automatically, any events created before this date (including those with active online registration) will be unaffected.
Get a preview of the new features in our Knowledge Base.
2023-08-01: New Online Registration Tool
As of today, the new registration forms tool is live. It's essential to know that nothing changes for events already set up, including those with active online registration. There's no action required on your part in such cases.
All newly created events will benefit from the advantages of the new registration process. You can find the new tool in RACE RESULT 12 under Main Window → Event → Registration Forms. Both individual and group registration templates have already been set up.
We have thoroughly documented the new features and settings in this Knowledge Base article.
If you copy old events for the new year, a conversion program in the background will try to convert your old registration into the new format. However, this is done without guarantee!
Please check all your forms for completeness and function before publication.
2023-08-11: New Splits Calculation Algorithm
As Splits are used in more events every week, we have refined the algorithm for how Splits are calculated. In your Splits setup you can choose between Version 1 or Version 2, which is now the default for newly created events.
The new algorithm is designed to offer better handling of missed detections and is explained in the following knowledge base article
Old events will not be changed to prevent impacting any old results.
2023-09-14: Nueva ubicación de la herramienta "Diseñador"
Con la versión v12.5.7-25, la herramienta "Diseñador" se eliminó de la pestaña "Herramientas". Ahora se puede encontrar en "Output → Certificados":
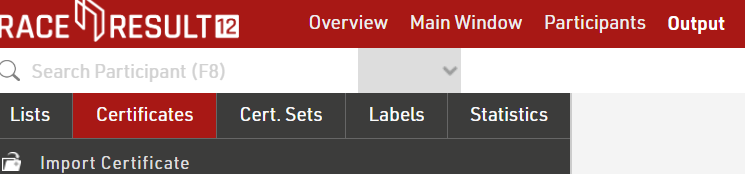
2023-09-22: Cambio de ubicación de Configuración
- La configuración "Chip reads after Finish Time Limit" que se encontraba en la pestaña "Puntos de Cronometraje" fue reubicada en la pestaña "Límite de Tiempo inicial / Tiempo de Meta"
- La configuración "Subtract start times (T0)" y "Ignore chip reads before start time (T0)" que se encontraban en la pestaña "Puntos de Cronometraje" fueron reubicadas en la pestaña "Resultados (Avanzados)"
2023-09-25: Settings moved
- Main Window -> Bib Numbers has been integrated into Main Window -> Participants Data.
2023-10-11: Access rights
With today's update we slightly change the behavior of access rights when copying an event. From now on, all access rights will be copied together the event!
If you don't want the same user accounts to access the copied event file, please remove the access rights after copying the file.
2024-01-31: New WordPress Plugin for new registration
We updated the WordPress plugin for the website integration. Especially when using the new registration, please update the plugin in your WordPress page and use the updated Shortcodes. You'll find the plugin under "my.raceresult.com > Website Integration".
Alternatively, use the regular code snippet for your website integration.
2024-02-27: DIY-API NVP de PayPal en desuso
Por razones de confiabilidad, deshabilitamos la antigua API NVP de PayPal para todos los eventos con ID superiores a 278685. La API NVP requería un nombre de usuario, contraseña y firma. En caso de que vea un error al intentar realizar el pago a través de su propia cuenta PayPal, actualice el ClientID y la SecretKey. Deberá crearlos en la configuración comercial de PayPal.
2024-11-28: Discontinuation of Old Online Registration
One and a half years after we first introduced our new registration forms, the old online registration functionality will be disabled in the first week of January 2025. What does this mean? Events with an ID smaller than 255225 where registration should remain open need to switch to the new registration forms. The easiest way to do so is to copy the event. For assistance, please refer to the Knowledge Base: Registration Forms.
If you are using the deprecated [ChangeLink] please update your templates to work with the new ChangeLink().
For users of the deprecated [PaymentLink], please create a simple self service form to use together with the ChangeLink(). We put together a guide here: Sending a Payment Link with a Self Service Form.
2024-12-30: Categories for various settings
Today, we introduced categories, similar to those used in output lists and certificate sets, to other settings such as registration forms, email templates, certificates, labels, statistics, presenters, and Checkin-Kiosks.
Caution: Moving existing templates into newly created categories will change the underlying file name, which will affect pre-existing access URLs for registration forms, presenters, and Checkin-Kiosks as well as references for statistics or custom strings in Simple APIs.
2025-01-16: Two-Factor Authentication (2FA)
Today, we have introduced 2FA for access to your customer account. For now, 2FA is optional and needs to be enabled from your customer area. You can use any Authenticator App providing a Time-based one-time password (TOTP). 2FA helps protect you against unauthorised access to your event files and the associated data.
Third-party platforms which interface directly with RACE RESULT 12 should switch to using API Keys for authentication.
2025-03-17: Major Refactoring
We performed a major refactoring under the hood of RACE RESULT 12. Consequently, if you want to check-out an event or open an offline backup copy, you are required to have RACE RESULT version 12.5.34 (or newer) installed on your local machine.
2025-04-08: Handling of [Created] and [Modified]
The internal handling of dates in RACE RESULT 12 has changed. We recommend using the date() function to query the date/time from such strings as needed.
For example, use date("yyyy-mm-dd";[Created]) to call the date of the Created timestamp or date("hh:nn:ss";[Created]) for the time of the creation.